The all in One market for watercoolers has been boring for a while now honestly. Almost every kit on the market is made by Asetek so what sets them apart is sometimes nothing and other times just a small change compared to the rest of the market. So Asus entering the market with more Asetek coolers wasn’t all that exciting at first, until I saw they added an OLED on to the pump. Now right off the bat, let me address the obvious, a screen isn’t going to change performance at all. But I was interested in being able to use it for customization and/or to show important information. Both were interesting when paired with a small form factor LAN PC build where you can’t have an extra monitor and temps can sometimes be an issue. So Asus sent over their Ryuo, one of two of their designs. This one is closer to a normal Asetek design with its round shape but today I’m going to see how it performs in our normal testing then test it out in a SFF build.
Product Name: Asus Ryuo 240mm
Review Sample Provided by: Asus
Written by: Wes Compton
Pictures by: Wes Compton
Amazon Affiliate Link: HERE
Packaging
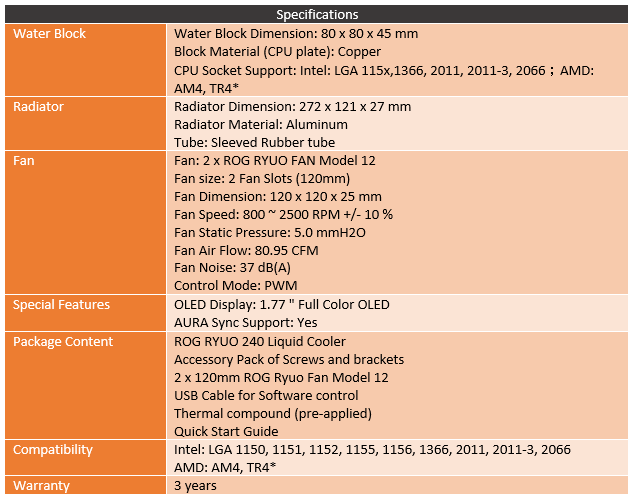
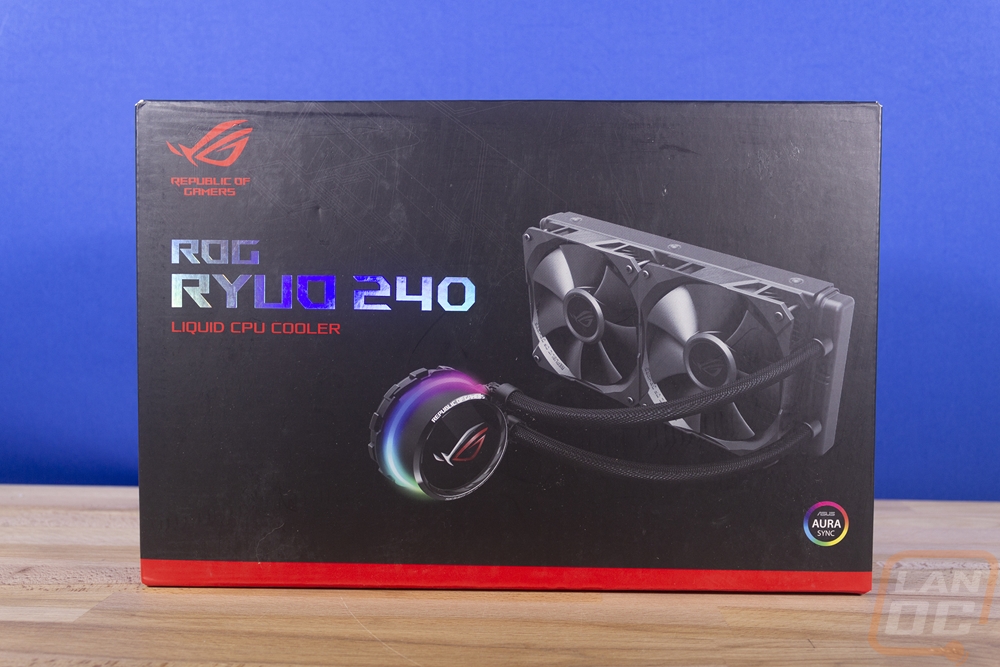
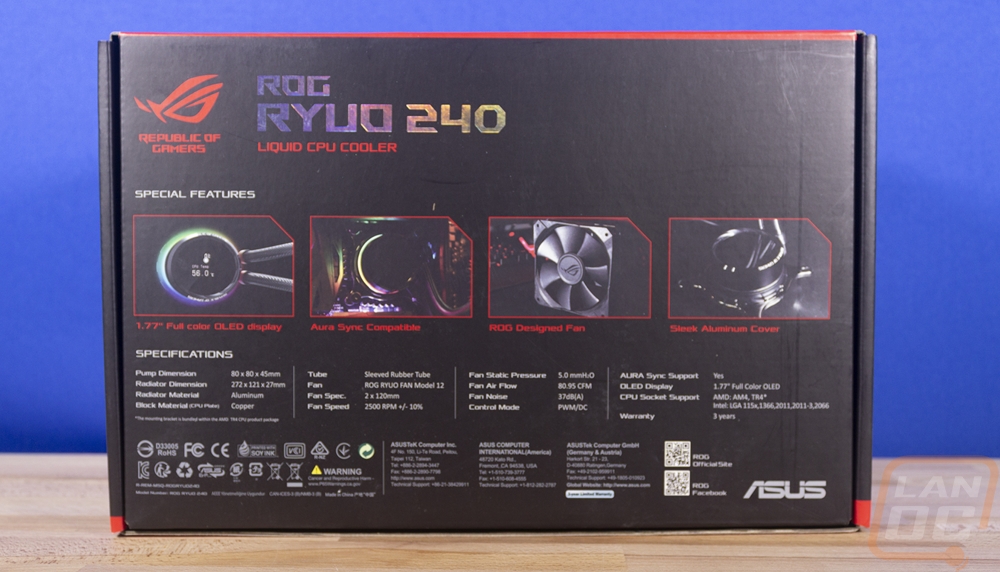
Well, the Ryuo 240 is an ROG product so the packaging wasn’t too big of a surprise. It has the same black background with red trim on the bottom as the last few ROG parts that have come into the office. I love the consistency, especially with Asus getting into almost enough parts to build a full PC so if you want to stick with an ROG build it will be easy to spot everything on the shelf. The front has a picture of the water cooling on the front along with the name in reflective letters. Around on the back, the theme is the same. Only the back has four different pictures not just one, each showing one of the Ryuo’s different features. Then below that, it has a specification listing. The main thing with that is having the dimensions available to make sure you know it will fit, that and everything is all there.
Inside when you open up the box it has the same angled ROG panel that most ROG products have with the ROG logo in the middle. Sometimes it also says welcome. The Ryuo comes in a formed cardboard tray, like all AIO kits. The pump and radiator wrap around the outside with the fans, documentation, and hardware all in the middle.
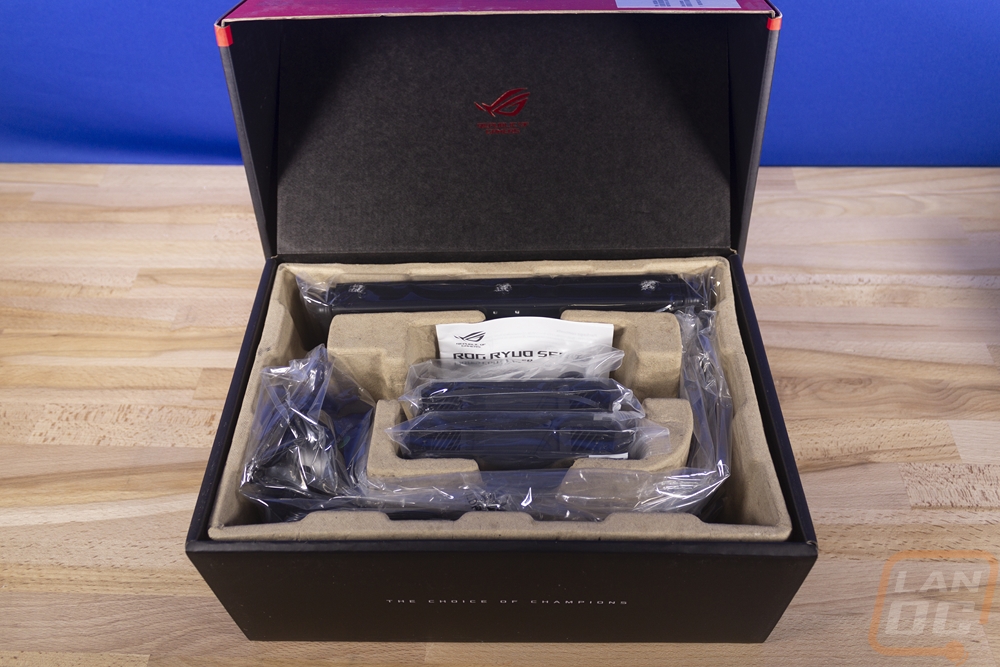
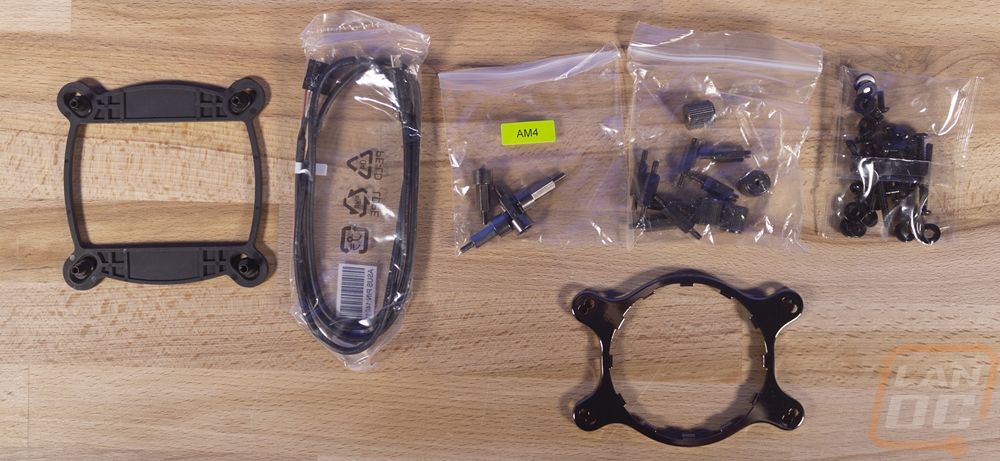
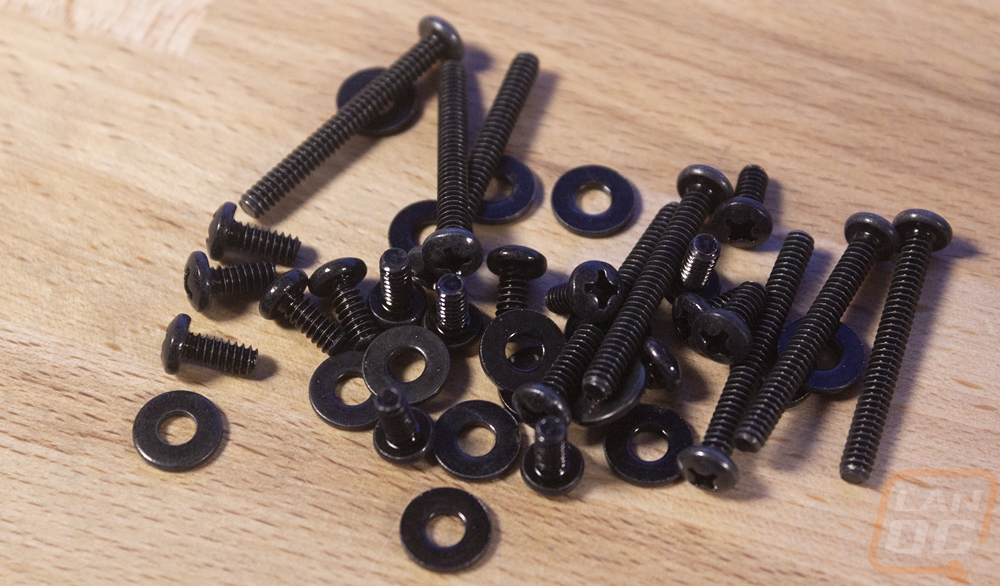
It comes with just one fold-out paper manual with installation instructions. Then for hardware, the AMD bracket comes separate along with the backplate for Intel, the Intel bracket is pre-installed. There is a USB cable then the mounting screws. The bag on the right had the radiator and fan mounting screws, this isn’t a reclosable bag which is weird. Then there is an AM4 only mounting bag and then the Intel and AM3 bag.
Photos and Fitment
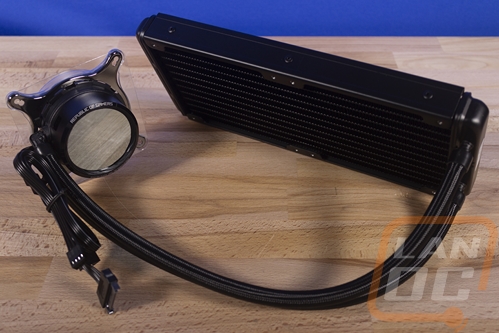
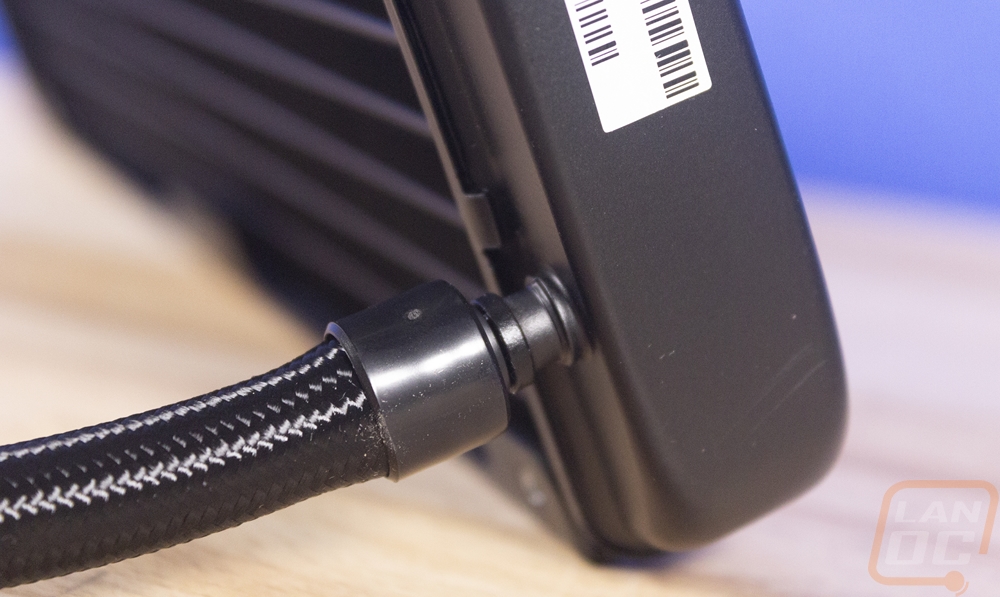
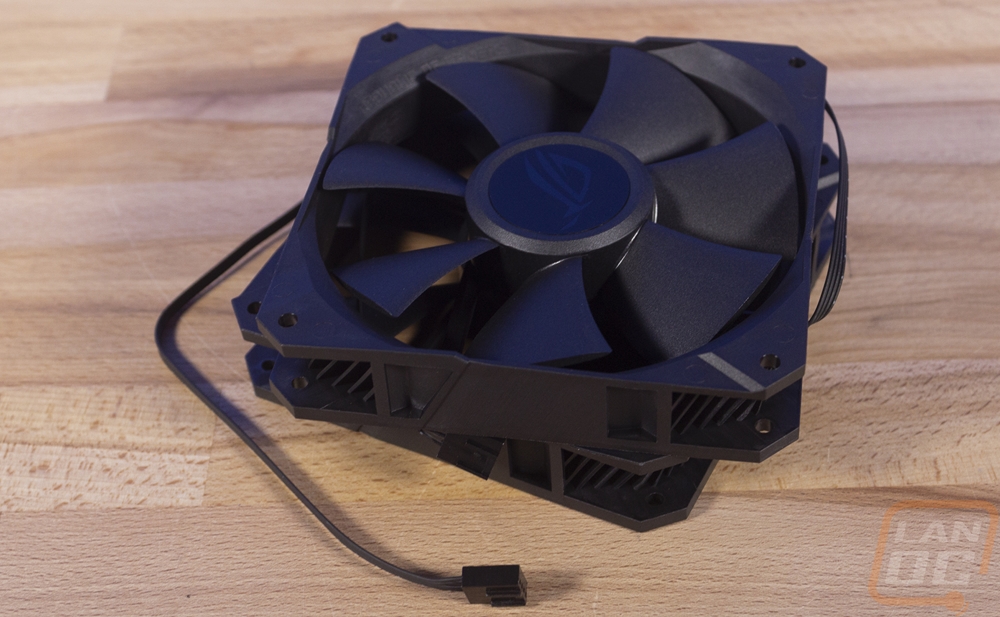
At first glance the Ryuo looks a lot like all of the other Asetek water cooling kits, this is mostly because it has the same round pump/block setup that most have. But you can see the mirror-like top of the pump that starts to set the Ryuo apart. Beyond that though the kit has sleeved hoses like some of the other premium kits but they are thinner than the Corsair AIO’s for example.
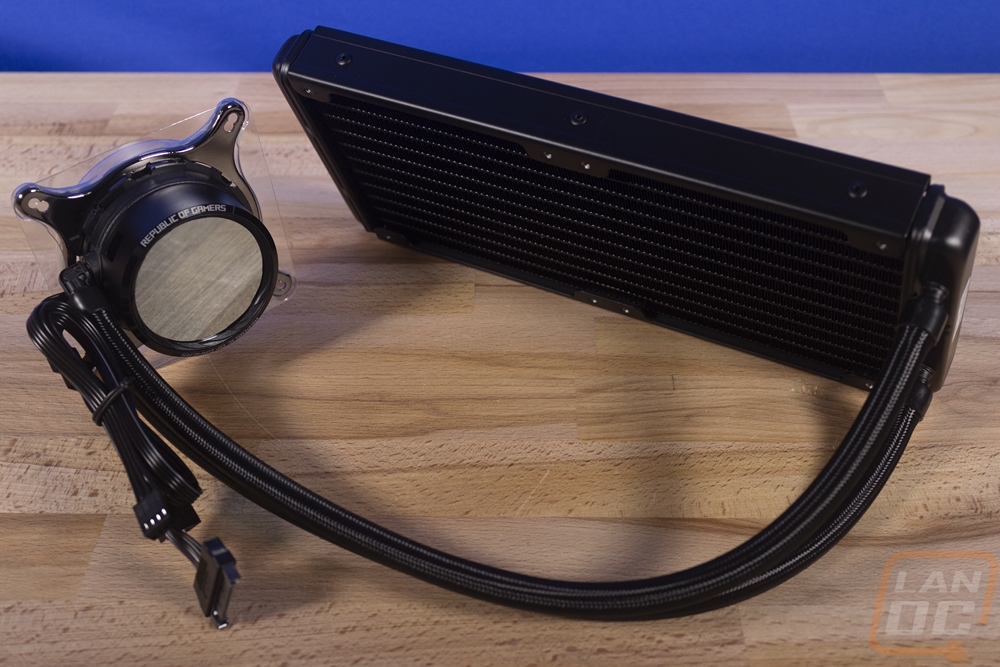
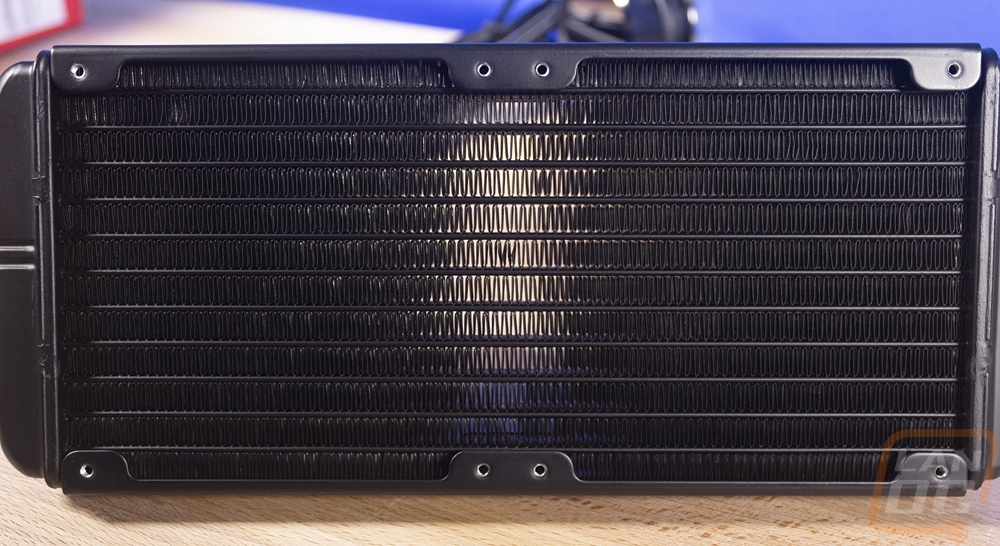
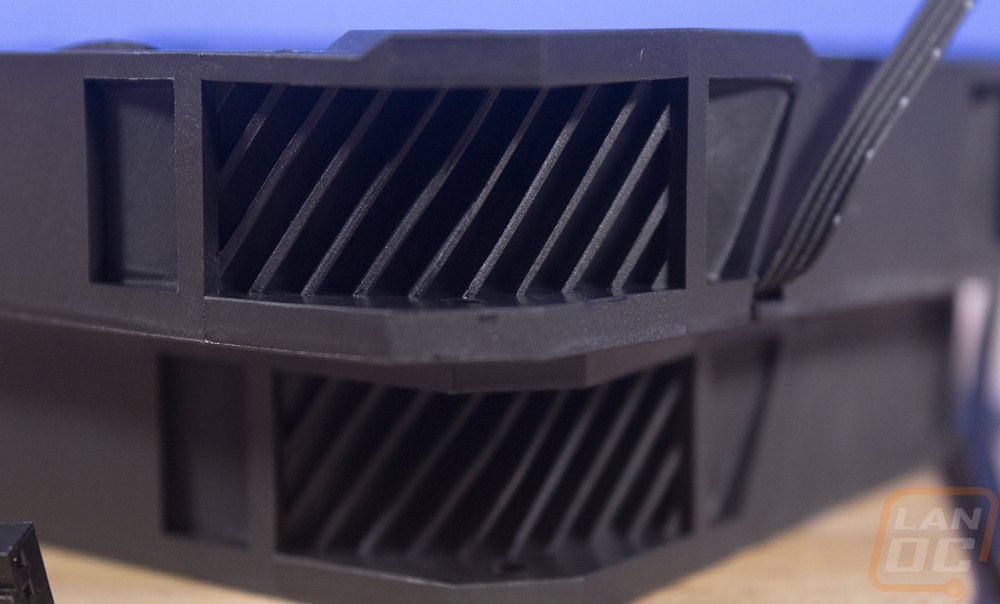
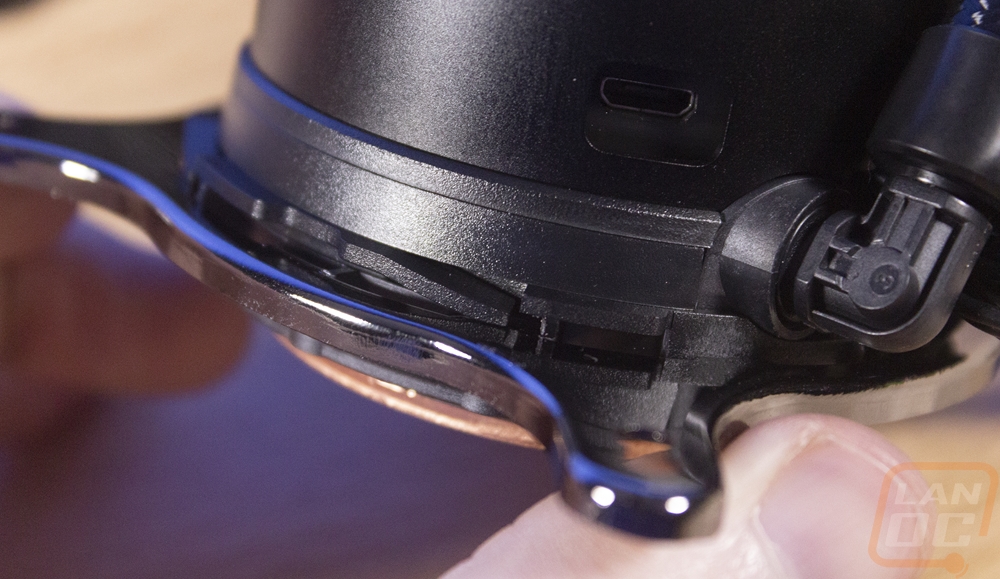
The radiator is all aluminum and is 27mm thick. That is your standard AIO radiator thickness, thinner than a custom loop but nearly the same thickness as a normal 120mm fan. The radiator fin density is on par with your average AIO as well, in other words, the Ryuo is using a similar radiator to all of the other AIO kits on the market. A closer look at the inlet and outlet on the radiator, however, was interesting. We know the tubing is sleeved over top of a normal rubber hose but where the hose meats the radiator looks oddly thin. This is mostly because of the plastic clip for the sleeving, but I do wish they would have done a better job covering it up at least.

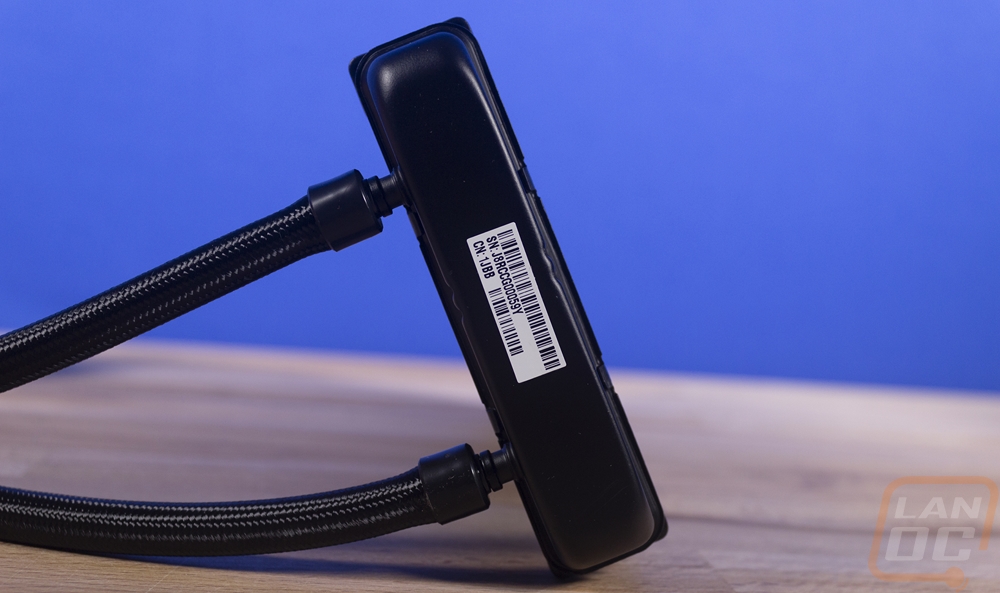
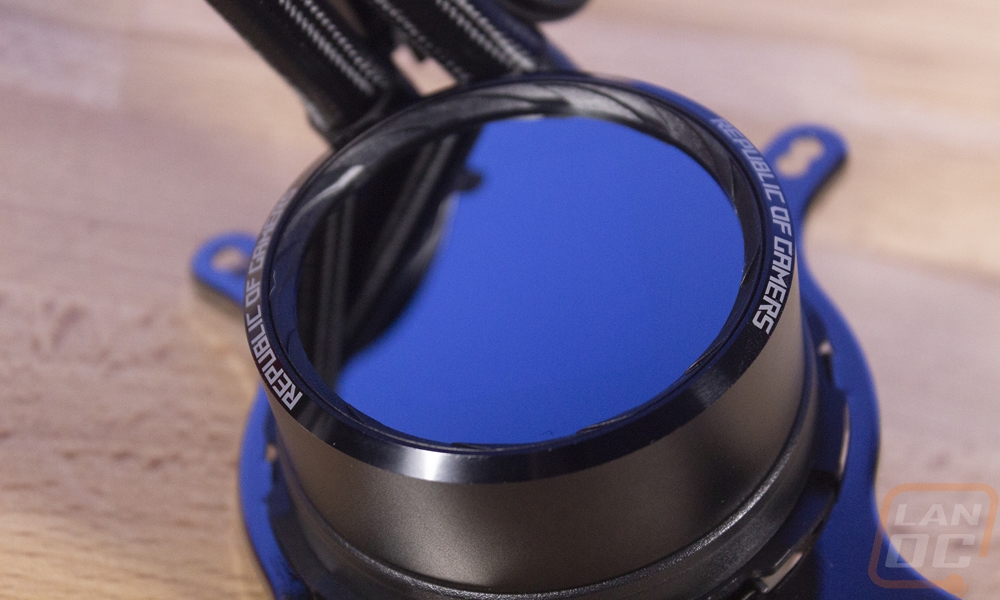
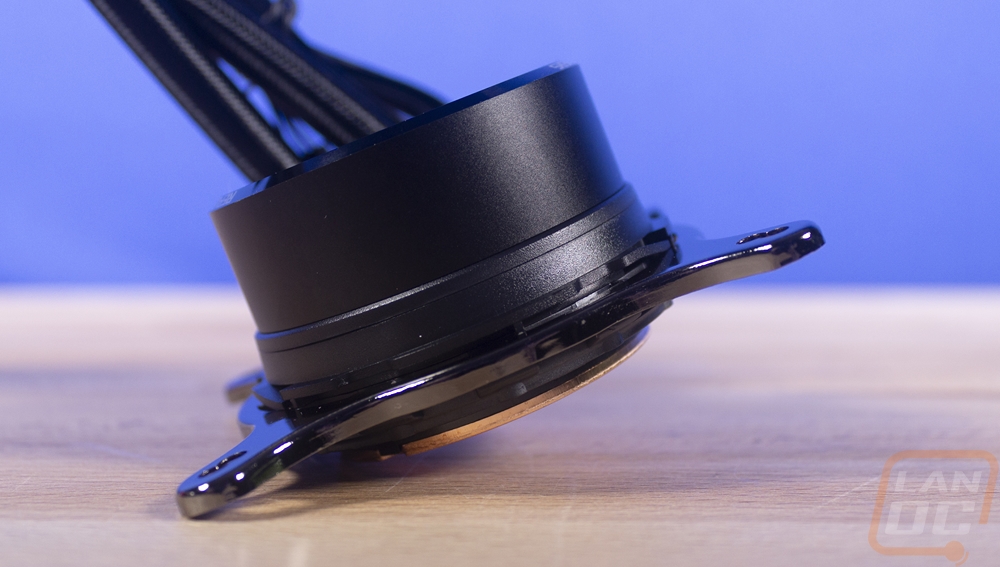
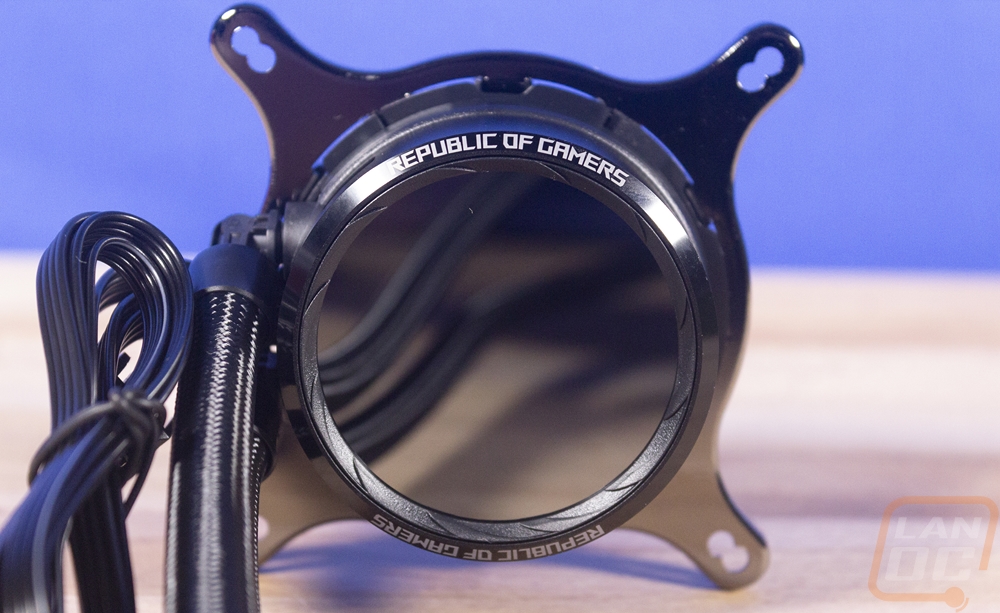
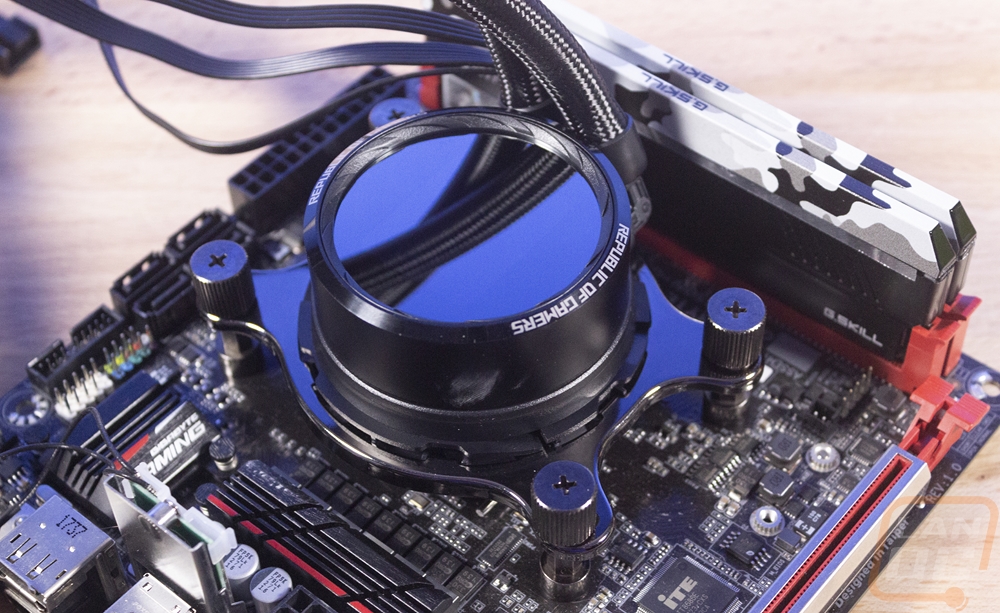
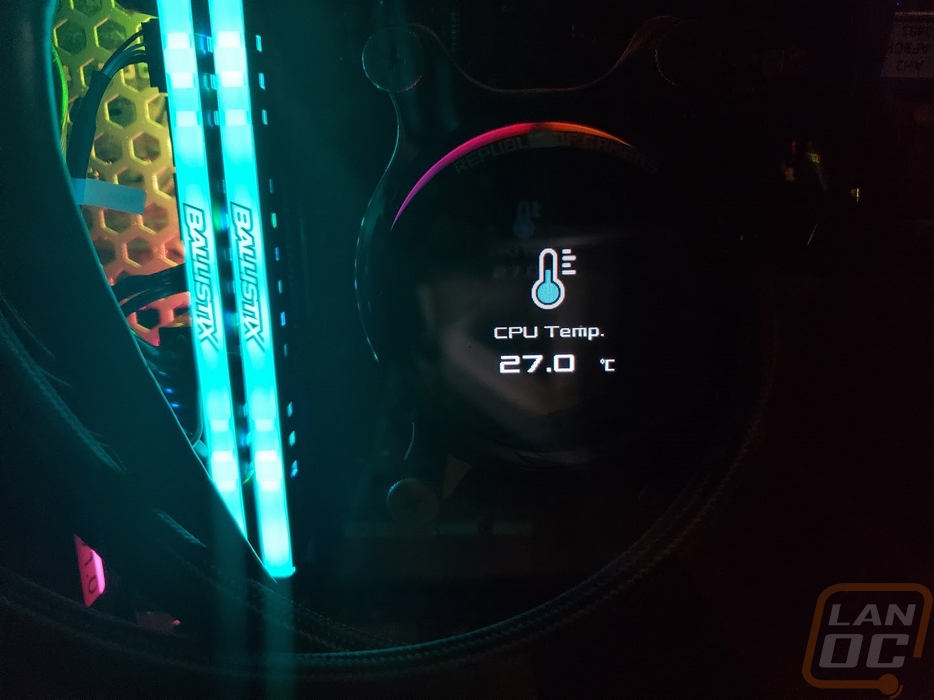
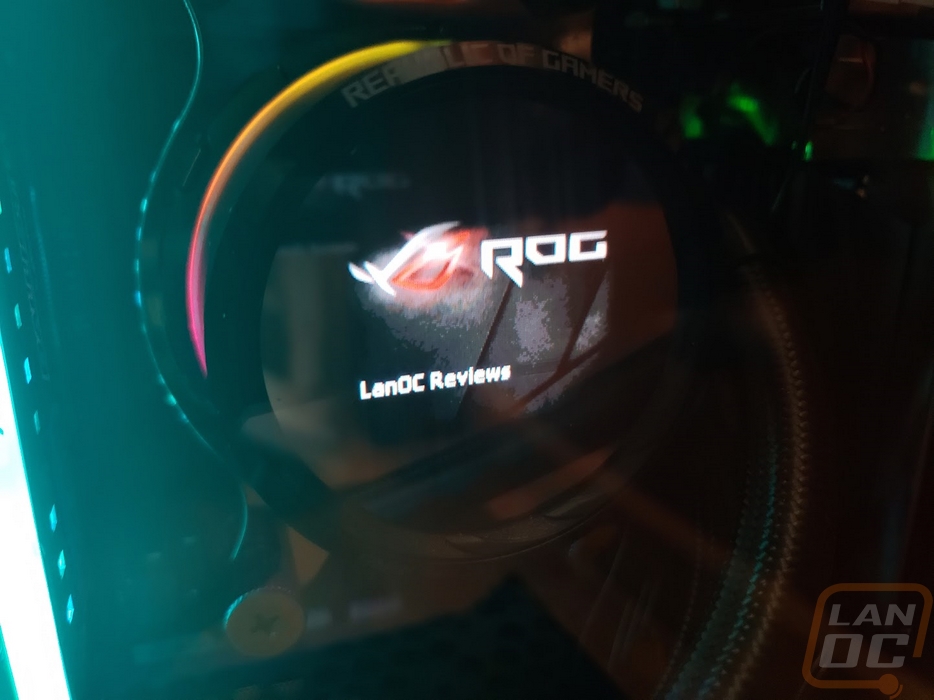
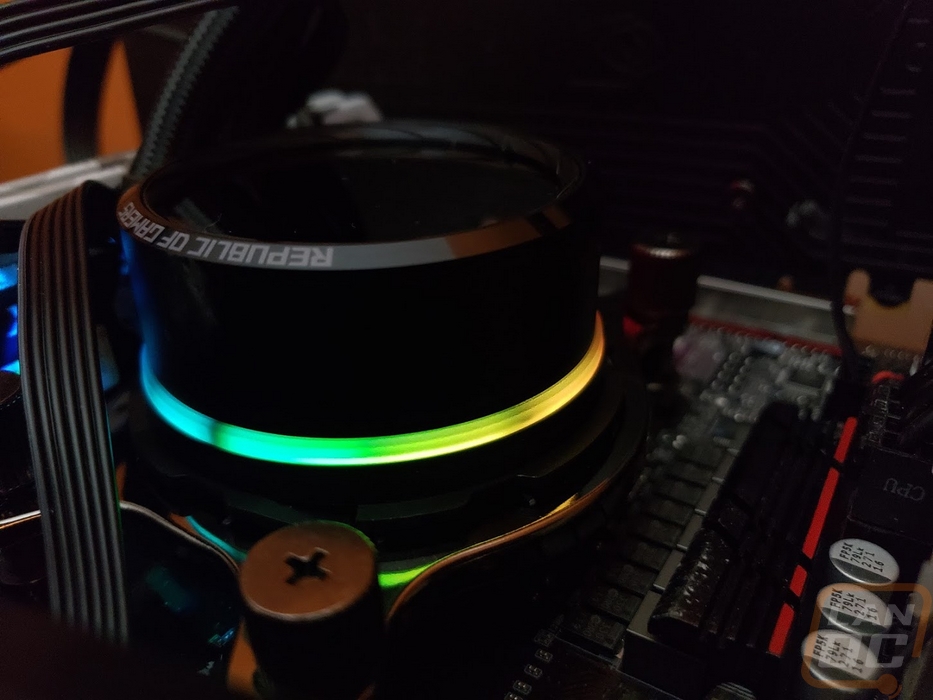
So the pump/water block combo does have that normal Asetek round shape and the same mounting bracket as other designs. But the pump itself is thicker than a lot of the other kits on the market at 45mm thick. This is partially because Asus slipped their fan controller and hardware into this area like a few other companies have done, for example, the EVGA cooler. But they also integrated a small OLED screen into the top of the pump housing. It is a 1.77-inch screen with a 5:4 aspect ratio. The screen has a resolution of 160 x 128 and is full color. It is all hidden behind a two-way mirror finish up on top. Then around the outside edge of the top of the pump, Asus also put ROG branding at the top and bottom so it is readable no matter how the pump is orientated.
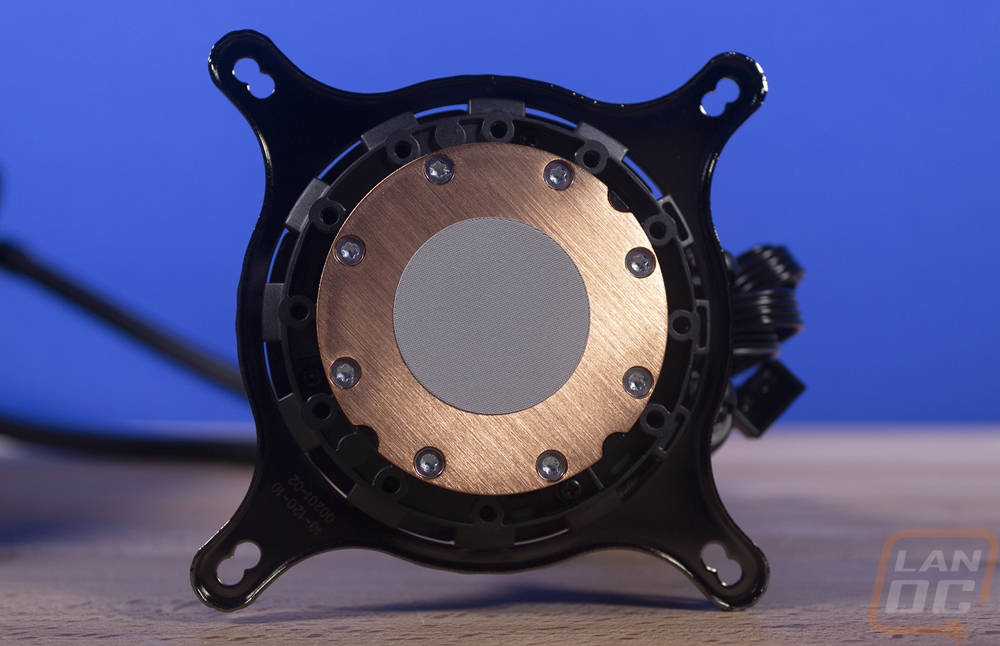
The bottom view of the surface could really be any AIO, the finish isn’t spectacular with a heavy tooling still left on it and in the middle they have pre-applied thermal paste in a circle. This will make the installation easier but the downside is because of this there is no reason to include a tube of thermal paste so if you have to remount it later you will need to have your own.
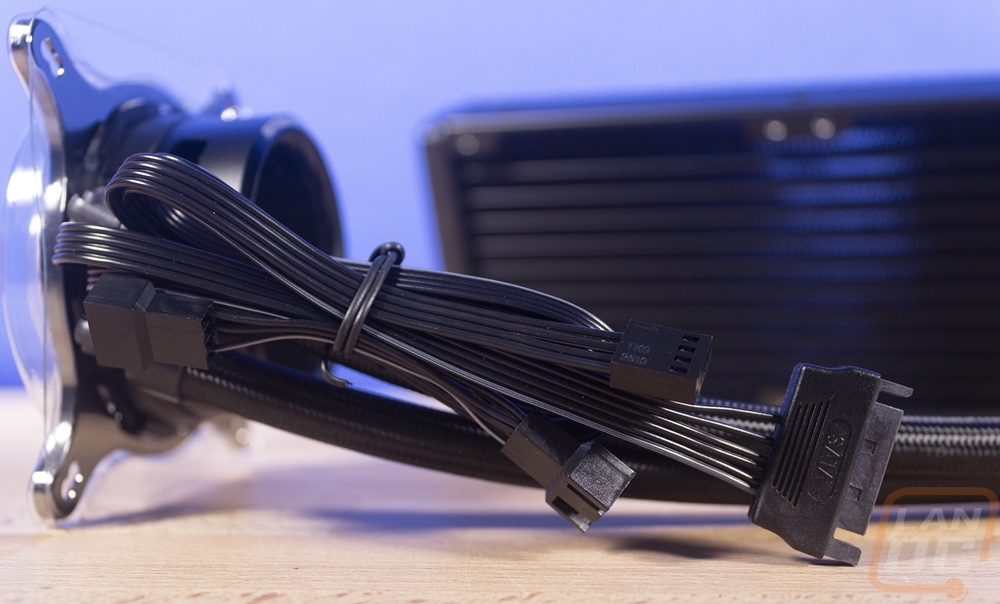
Coming off of the pump/block is all of the wiring. I think this one of the main areas Asus could have learned from a few other AIOs kits like the Fractal. Running all of these up the tubing sleeving and having all of these connections at the radiator would make a world of difference (with the exception of the signal cable). There is a SATA power connection for power for the screen. Then the two radiator fans have a single cable with two connections on it that hook up that comes off the pump. Then there is a signal cable that hooks up to your CPU or pump header on your motherboard to let it know how fast everything is running and to pick up what your motherboard fan profile wants it to do. I call it a signal cable because the SATA is already providing power for the fans. Not pictured here, but somewhat visible behind the cables there is also a USB connection that has to be plugged into the pump.
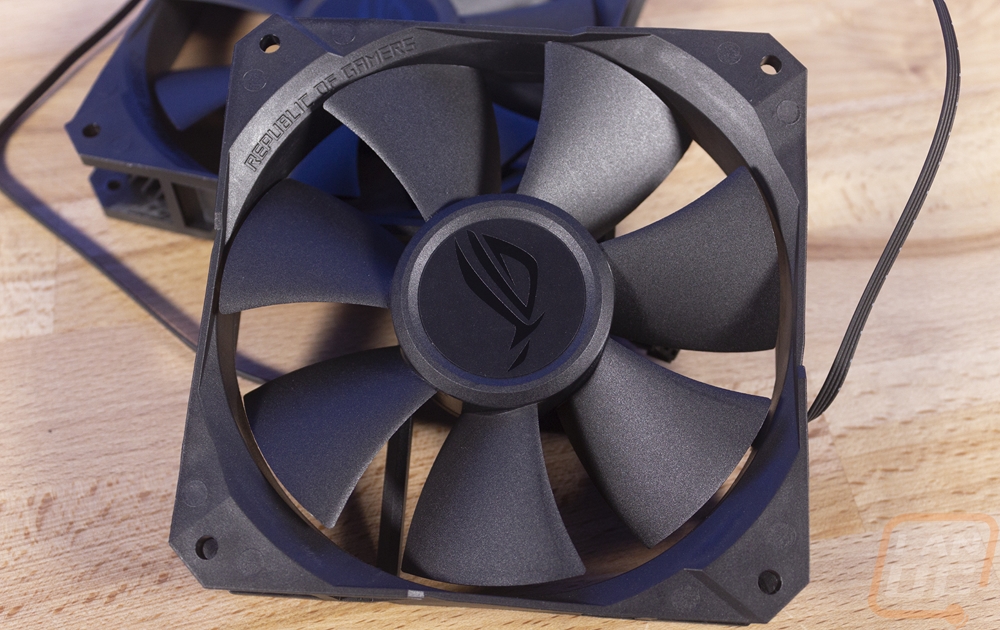
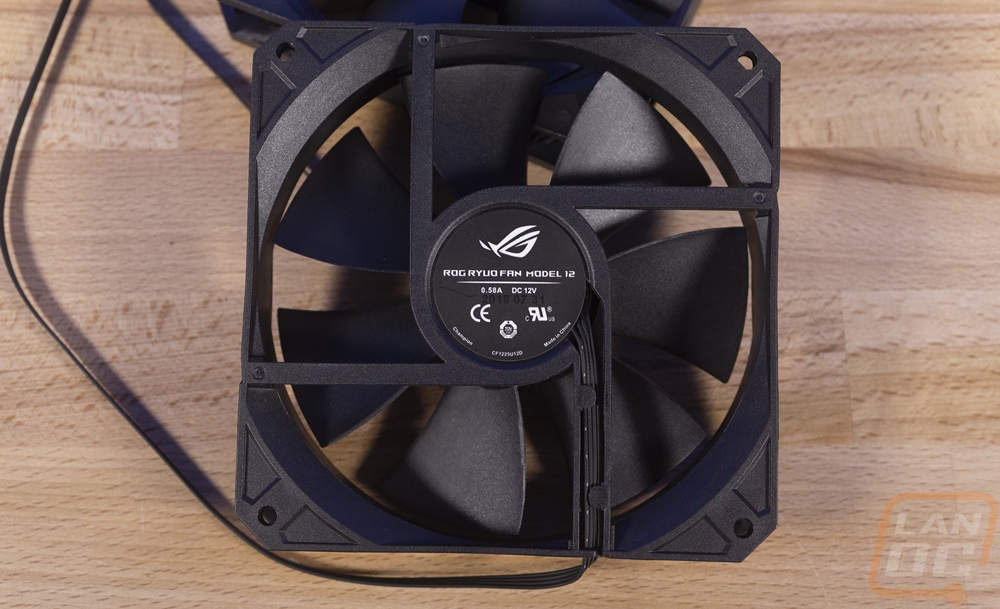
So when I heard about the Asus water cooling kits I was really excited about the Ryujin partially because they were using Noctua fans right out of the box on that one. I thought that was a great idea for a higher end AIO kit because I almost always switch my fans to Noctuas anyhow unless I have a need for RGB fans in the build. I thought Asus was going that direction rather than design their own fans but I was wrong. The Ryuo does come with Asus ROG branded fans and they have a few things that are unique about them. So as far as the stickers go, the front has the ROG logo with a black on black sticker in the middle. Then around back the sticker on the back is labeled an ROG Ryuo Fan Model 12, so these were made for this specific cooler. They are rated at .58A and made in China. One of the big things about them is in the corners behind where a screw would go I noticed they have angled supports that give a unique look. The ROG branding is embossed into the casing as well but the weird part about the fan housing is that is isn’t straight, it steps up and down in different areas with the low spot being at the middle point on each side. I don’t know if they get more air into the blades with this design or if it was just for styling. Speaking of the blades, there are 7 and they are fairly aggressive. The fans are rated to push 81 CFM and 5.0mm of H20 static pressure, so they do have the airflow and pressure needed to push through the radiator or one much thicker really.
Before testing, I did have to get the Ryuo installed. I actually did this a few times in our testing. My performance testing was done on our normal Ryzen cooling testing configuration but I did my testing of the screen in an actual system. Anyhow there were a few things I wanted to point out about the installation. For starters, the bracket that came installed was for Intel sockets so for our Ryzen setup I would have to swap the bracket out. I was dreading this because normally this requires taking out multiple tiny screws but I love the easy swap design that the Ryuo has. You just push up on the bracket and twist it and it turns and pulls off, then you push the new bracket on and turn it counter clockwise and it locks back in place. Simple and to the point!
Installing the fans to the radiator and the radiator to the case. You get both short and long screws so you can install the fans to the underside of the radiator and then the radiator to the case. You aren’t forced to use just long screws and a pull configuration or to use small screws to mount the fans and then traditional fan screws to mount to the case.
Getting the pump attached to the motherboard was simple. The Intel kit comes with its own backplate, but for the AM4 kit, you use the stock backplate. You just use these four standoffs that attach to the backplate and then hold the pump/block.
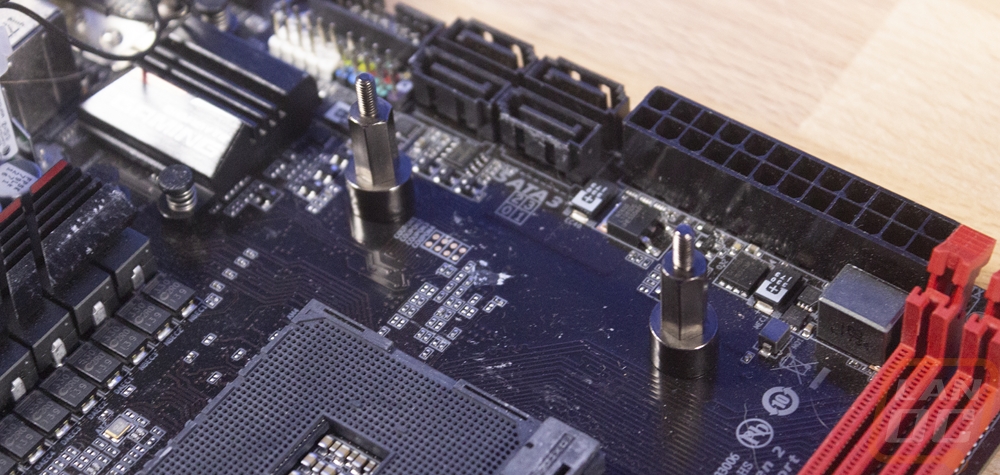
From there you just drop the pump on in the orientation that you prefer, remember to think about that before you start, then attach it with the four thumbscrew bolts. You can use a screwdriver on them or do them by hand with the knurled sides. From there you just have to get the wiring all figured out, but that can be an issue all in itself. Like I said before I felt like there were too many wires coming out of the pump and you can’t exactly hide them all. But the USB cable was by far the biggest pain. The included cable has way too long of a connection end on it so the plug actually was up against the memory. It was tight but did work, I would pre-plug the USB in if possible and I bet that connection has problems later on from the pressure pushed on it.
Testing Configurations and Procedures
Performance
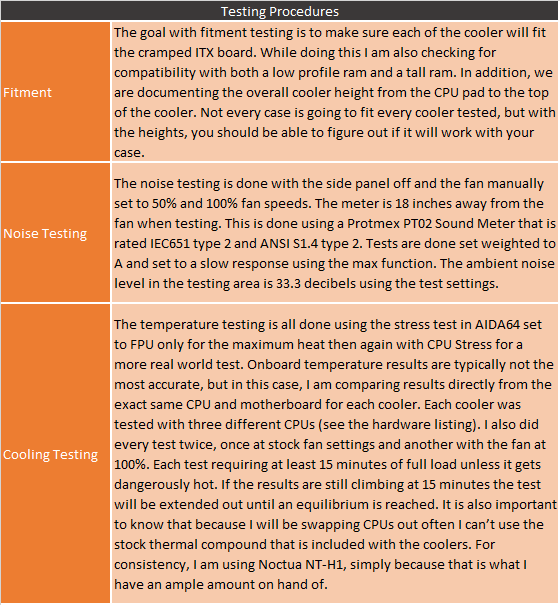
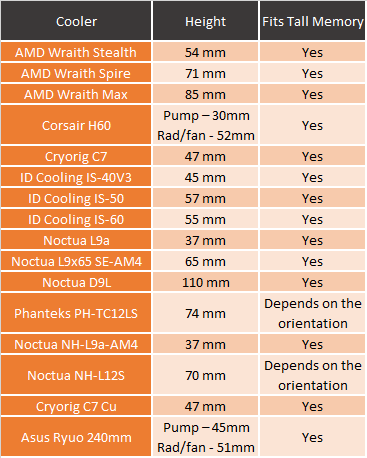
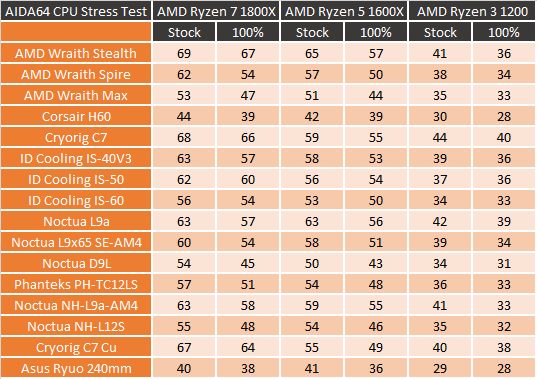
For performance testing, I hooked the Ryuo up to our normal test platform. This is an ITX X370 board and I test using three different Ryzen CPUs to get a look at performance depending on the number of cores as well as with different clock speeds. Most of the comparison coolers I have looked at in the past year have been ITX focused because I did the big roundup after the Ryzen launch as well as a few follow-ups. But some smaller builds do have room for 240mm radiators so this configuration isn’t all that out of the ordinary. In fact, that is exactly what I’m planning on using the kit in after testing, assuming it works well. So our fitment guide makes more sense with heatsinks, but here is the breakdown. You can see that compared to the only other AIO in the list the Corsair H60, the Ryuo 240 does have a much taller pump at 45mm from bottom plate to the top. Being an AIO the pump doesn’t really have any concerns with tall memory other than the USB plug sticking out of the Ryuo, but it did fit in our test configuration, tightly.
So for testing, I used AIDA64 with its stress test to put a load on each of the CPUs. I then let that run for a half hour or more if it hasn’t leveled off yet and then document the temperature. I do this same test with two different load types, the FPU load which is very aggressive and then the CPU load which is more like what you might see with normal heavy CPU usage. The FPU load is so demanding that a lot of the small form factor coolers I have tested in the past actually reached the CPUs thermal limit and it downclocked the CPU so I also track the clock speeds as well for those cases. That only applies when temps hit 75 degrees which didn’t happen with the Ryuo. I also do every CPU test twice, once with the stock fan profile and again with the fans running at 100% to see the out of the box performance and if things get crazy and you need the best possible cooling. The Ryuo did well with really only the H60 being close in all six of the FPU tests. Now the H60 is a 120mm radiator single fan configuration so I don’t know if running extremely close to that would be considered amazing, but none of the CPUs even under an extreme load had to worry about running hot. Even after the radiator was heat soaked and leveled out.
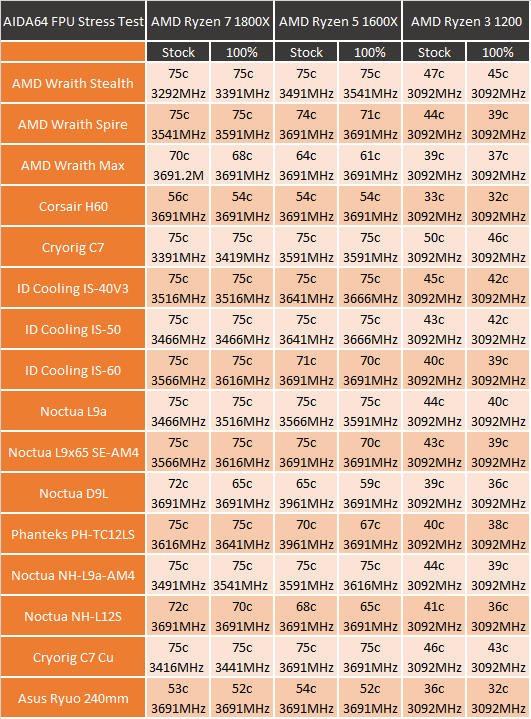
The CPU workload in AIDA64 is a lot more realistic and as you can see the temps were even better here. At this workload, there was a larger gap between fans cranked and fans on the stock fan profile of our motherboard with the two higher-end CPUs. The Ryzen 3 1200 barely even registered on the cooler at all.
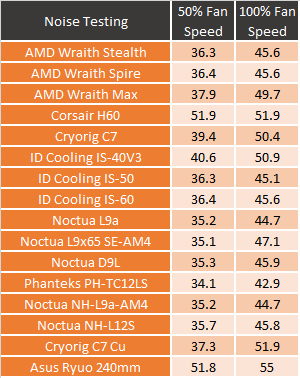
My last batch of testing was just noise focused. To me, the main reason to go with a water cooler is lower noise while under higher loads. Part of that is because they do a much better job of cooling as you could see before. That means the fans never have to really spool up. Thank god for that though right? Look at how noisy the Ryuo got when I spun those ROG branded fans up. Like the H60 the Ryuo was loud at 50% fan speed but with twice the fans at 100% it was even worse. I did spend time after my testing using the Ryou in an actual build, a SFF one at that, and it never had to crank the fans up like this. But if I did, I would no doubt be looking at replacing those fans. The pump wasn’t spectacular as well, most AIO kits have noisier pumps than full custom kits, especially when there is a little air in the lines after transporting it around or on first startup.
Software, Lighting, and OLED Screen
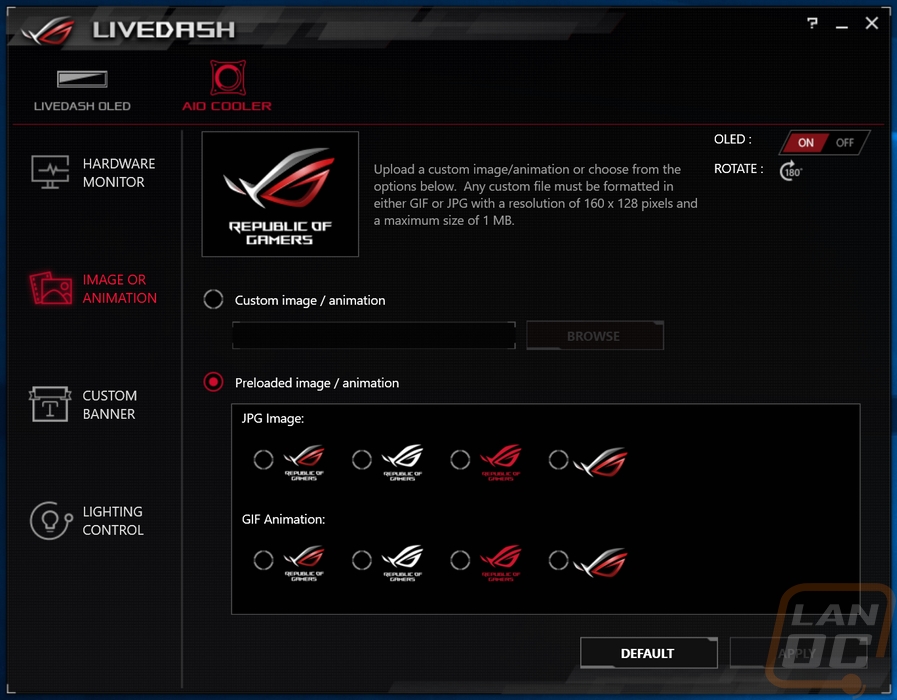
Unlike most other AIO water cooling kits, the Ryuo does have software, lighting, and the OLED screen to worry about in addition to the normal performance testing. So the screen uses a program called ROG LiveDash. Asus has used this in the past with their OLEDs on their motherboards so a few of you may have used it before. The Ryuo opens up a second tab up on top for an AIO Cooler and the other tab up top is still there even if you aren’t using a board with one. In addition to that, I’m not sure that Asus has support for this software working on boards other than Asus motherboards. I was told that support was coming for them, but I tested the screen on an Asus motherboard so I had no indication if the fix is in for that just yet. So there is a good chance at least right now that you can’t adjust the OLED screen on the Ryuo if you have another brands motherboard.
So the software has four tabs over on the left for all of the different things you can do. The first one is if you want to run a hardware monitor on the screen and this was honestly the most interesting aspect for me. You can select up to five options and it will rotate through them. As you can see there aren’t a lot of customization options for this stuff yet, I hope Asus continues to flesh this stuff out because I would love to pick different readout options. For example old ’80s style RPM dashes to show from good to bad. Also, stuff like CPU/GPU usage and other readouts could also be useful. GPU temperatures as well, I think I might be able to keep coming up ideas all day to expand this. But for now there are a few options, but everything under Watercooling didn’t work. I assume the Ryuo doesn’t have those sensors.
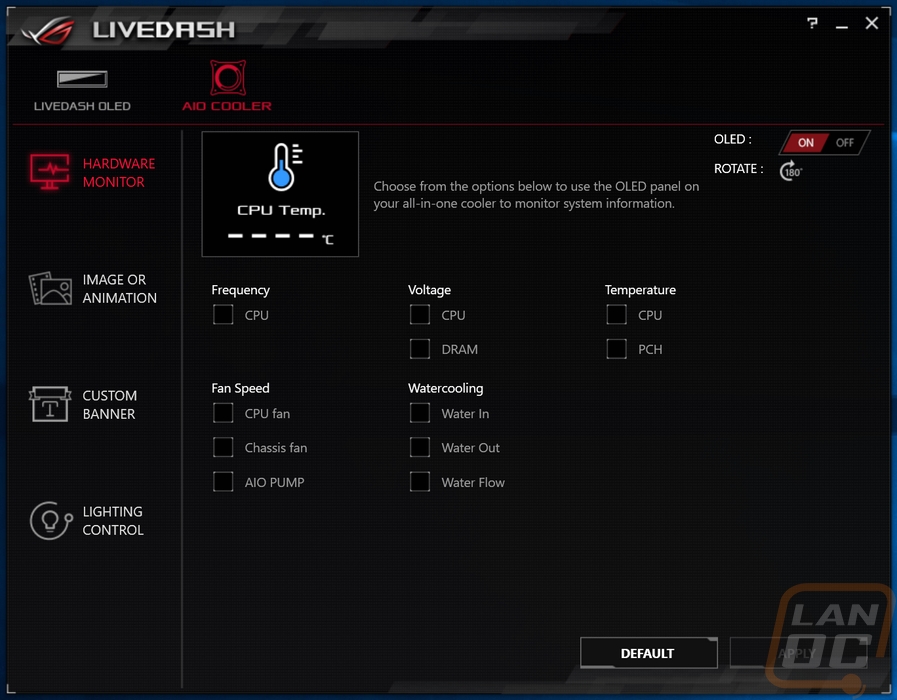
So by default, the screen runs an animated ROG logo but you have a few options if you like that to flip between different ROG logo styles or to a static image. This is also where you can upload your own custom image. Support for that is just finally getting going, reading online most people couldn’t get anything working. But I did manage after reflashing the firmware twice then designing my own LanOC logo icon. The software could be a little more useful by letting you know if it worked. Even better would be the option to save images that worked in the past and to be able to flip through them like the ROG logo options. That said, the LanOC logo looked good. But I think the best part about this is creating a logo and or name for your build and having it show inside of your case.

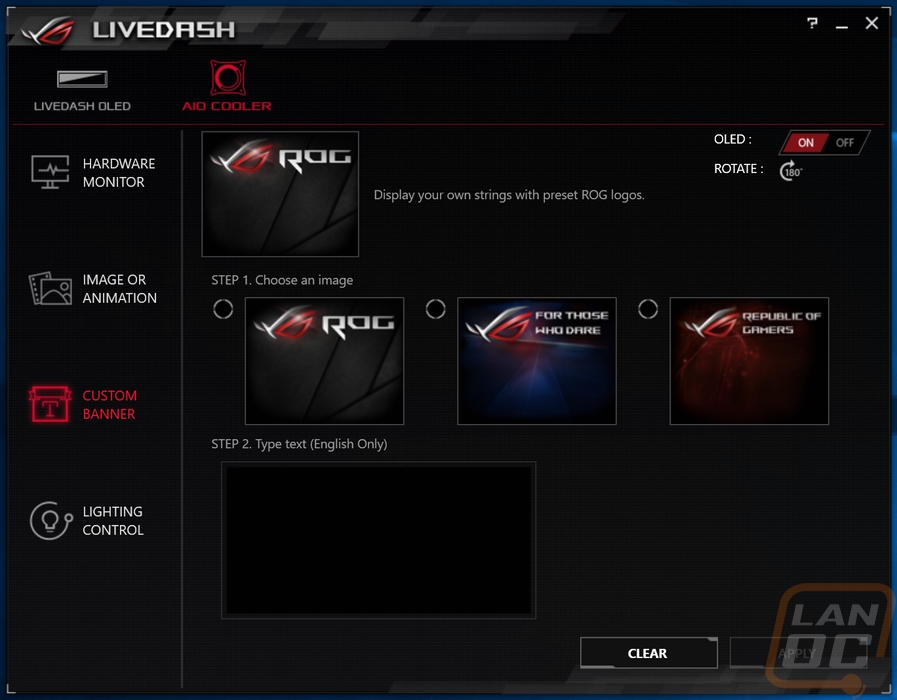
The custom banner page is if you want to put text on the screen but you don’t want to create a file for it. You can pick from three ROG backgrounds and then put text on it. This is super basic and the single font used ends up looking bad. Having a few non-ROG backgrounds or just a black background would be nice. Font and text size options as well would really make this work or going beyond that effects like scrolling text or fading in and out between words could all improve this. The base functionality is there and this could be really awesome but I can’t help but feel like this is still very early.
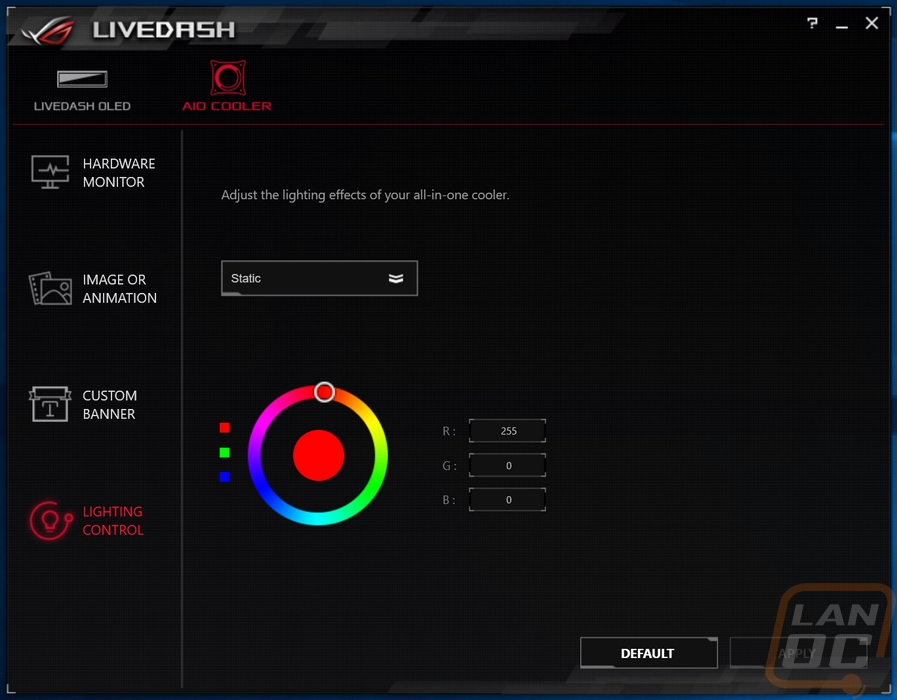
In addition to the screen, there is that RGB right around the cooler. You can pick from a list of effects for the lighting and it is addressable so you can run more than one color at a time. Actually having the option to set the color on each of those LEDs would be nice. More importantly, I couldn’t get Asus Aura to work with this, it might have just been me but I think getting it all tied into that system would be ideal.
Overall and Final Verdict
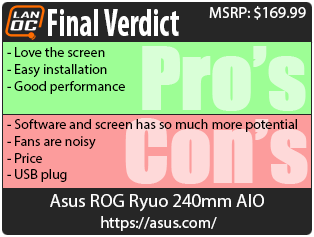
The AIO water cooling market doesn’t get nearly as much excitement with big changes as it has in the past. Like I mentioned earlier most companies use the same OEM and with that, the designs have moved closer and closer together. Asus jumped in with a few new ideas though, most went to their higher end model but the OLED screen did make it to the Ryuo. The short version of things is that I did love the screen. Most people will think it is pointless and this is true for some people. With so many cases pushing to have every surface be tempered glass, it's not a big shocker that people would also want the inside of their build to look good and to have something interesting inside to see and that is where the Ryuo comes in. The OLED screen was visible through the tempered glass on the build I tried it out in and the software did give a few different usable options like uploading your own logo or design or rotating through showing stuff like the CPU temperature. The size of the Ryuo screen is actually readable and usable compared to the small OLED screens Asus has been playing around with on a few of their high-end boards. But it is also clear that the software still needs time to mature, support for the screen with other brands boards is coming if not out by now for example. I also had a lot of things I would love to do on the screen that wasn’t possible with the current software, but hopefully, they continue to improve on that. Most other companies I wouldn’t put too much stock into waiting for that but Asus is known to continue to improve things.
Installation was easy, easier than most Asetek kits with the easy to swap mounting bracket. I wasn’t a big fan of the number of wires you have to deal with coming out of the pump though. I would love to see Asus run a few of those up to the radiator and make doing clean wiring a lot easier. Most importantly the USB port on the pump was a pain, specifically the plug was too long and it pushed up on the ram in both motherboards I used the Ryuo on.
Once installed performance was good as expected from any 240mm AIO really. The fans that Asus designed have a LOT of airflow and static pressure but hopefully, you don’t need to run them at high speeds because they did get noisy at and above 50% fan speed. Thankfully I didn’t have them running that high in real-world use.
Now the pricing of the Ryuo is going to be the biggest sticking point for most people I think. A basic 240mm AIO kit starts at $80 on sale and goes up from there. Getting one from a name brand with RGB on the pump is about $120 to $130 with a few models go up above that from Corsair with their highest end versions like the H100i RGB Platinum. So with the Ryuo 240 selling for $169.99 right now, it is right up there with the most premium models and frankly, the average person isn’t shopping in that range. Now I do think having an OLED screen on the pump does justify the price to a point, but I just don’t know if people are going to want to go up to this price point when there are other kits with nicer RGB fans selling for $20/$30 less. Now the same argument could be said for the Platinum from Corsair, its only justification is the cost of the fans and if the Ryuo had the Noctua fans that the Ryujin has I would actually consider $169 to be about right once you figure in the fan cost. Real world though I think the Ryuo will need to come down just a touch, still above those RGB AIO kits but low enough for people to consider stepping up to the OLED screen over RGB.
People who want the OLED screen will most likely still get it and if the software continues to mature I would love to use them more in my builds. But I am most looking forward to seeing where Asus goes next. The Ryuo, being mostly the same AIO that you see from other companies with the exception of the screen, has a few big flaws with one cool feature. I just don’t think most people will be able to justify it. For people looking to get the screen and who aren’t considered with the price, the Asus Ryujin might be the better option with its quieter Noctua fans and airflow around the pump for motherboard cooling.
Live Pricing: HERE
