Every time I see a TikTok or YouTube video where I see someone interviewing people using a phone as a microphone I die a little inside. There are a lot of different microphone options out there and Anker under their AnkerWork brand is jumping into the mix with their new M650 Wireless Microphone. The M650 is a pair of wireless microphones with a few mounting options paired up with a receiver that can be hooked up to your mobile phone or a DSLR or can be used remotely to store recordings. The design is focused on content creators or businesses who are recording content that want a simple way to get quality audio, today I’m going to take a closer look and see what all the M650’s have going on and how they perform.
Product Name: AnkerWork M650 Wireless Microphone
Review Sample Provided by: AnkerWork/Anker
Written by: Wes Compton
Amazon Affiliate Link: HERE
|
Specifications |
|
|
Acoustic Principle |
VoiceShield™ Noise Cancellation Technology |
|
Wireless Connectivity |
TrueLink™ Technology with LC3plus Codec / 2 TX in 1 RX Combo |
|
Wireless Range |
656.2 ft / 200 m |
|
Operating Time |
Up to 6 hours (single charge) / Up to 15 hours (with charging case) |
|
App |
AnkerWork Software |
|
Transmitter (TX) |
|
|
Microphone |
Omnidirectional |
|
Onboard Recording |
7 hours |
|
Replacement Cover |
×2 |
|
Analog Input |
3.5 mm TRS (lavalier microphone input) |
|
Operating Time |
Up to 6 hours / Up to 15 hours with Charging Case |
|
Battery |
350mA |
|
Wearable Design |
Back Clip / Built-in Magnet |
|
Weight |
1.1 oz (30 g) |
|
Dimensions |
1.8×1.8×0.9" (45.5×45.3×23.6 mm) |
|
Receiver (RX) |
|
|
Touch Display |
1.47" touchscreen |
|
Battery |
350mA |
|
Operating Time |
Up to 6 hours / Up to 15 hours with Charging Case |
|
Outputs |
3.5 mm TRS for Camera / Built-in Lightning and USB-C Adapter for Phone / USB-C for Computer |
|
Weight |
1.3 oz / 37 g |
|
Dimensions |
1.7×1.4×1.2" / 43.2×35×30.4 mm |
|
Charging Case |
|
|
Battery |
2600 mAh |
|
Weight |
6.5 oz / 184 g |
|
Dimensions |
5.3×2.1×1.9" / 135.3×54.2×48.3 mm |
|
Other |
|
|
What's In the Box |
M650 Wireless Microphone Replaceable TX Cover ×2 Windscreen ×2 AUX Cable USB-C Cable Lightning Adapter USB-C Adapter Travel Case |
|
Warranty |
18 Months |
Packaging and Accessories
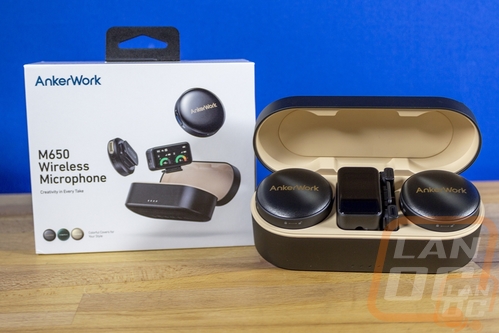
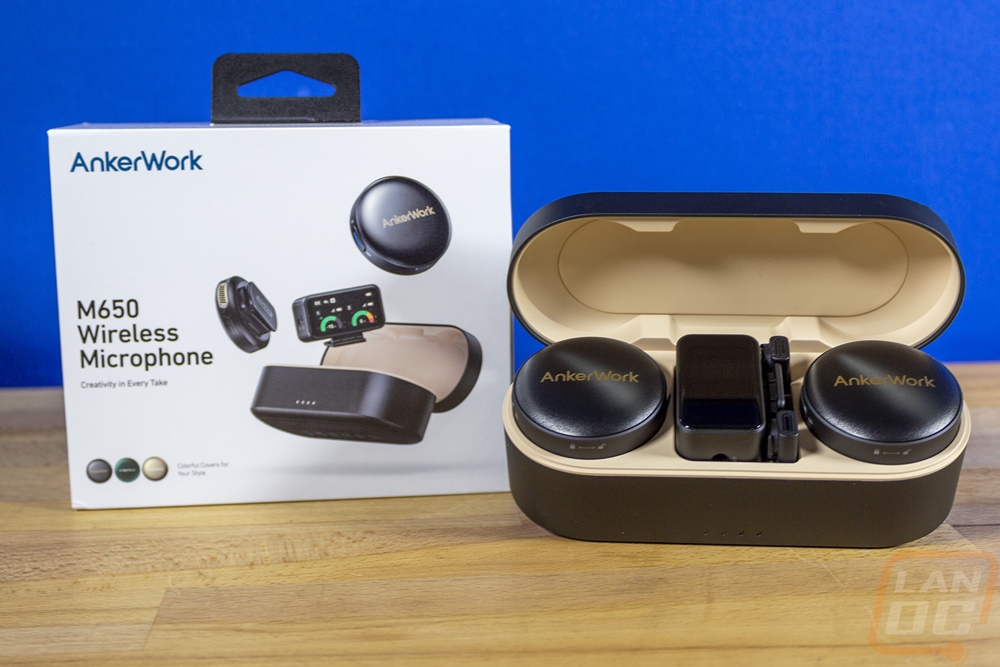
The box for the AnkerWork M650 Wireless Microphone comes in a compact white box with a thick heavy duty cardboard material. It has a full bright white background and the AnkerWork brand logo in blue in the top left corner. This is different from the AnkerWork B600 Video Bar that I previously covered which had a black background. Unlike the Anker and eufy products that I have covered which almost hide the model name, AnkerWork has the model name in a large font right in the middle with a picture of the microphones and receiver pulled out of the case across the rest of the box. You also can see small circles in the bottom corner that show the extra color covers that come with the M650. The back of the box has line drawings showing pictures of each item inside the box along with quantities. They also highlight a few of the features with each repeated across multiple languages.


Once you take the plastic off the box the bottom edge will then flip up and open up. The first thing you can see is the charging/carrying case with the AnkerWork logo right on top which sits in the middle with a plastic protective wrapped around it. There are two boxes with the accessories and the underside of the cover has line drawings showing how you can use the transmitters as well as the receiver. There is also a QR code that opens up the full manual as well.
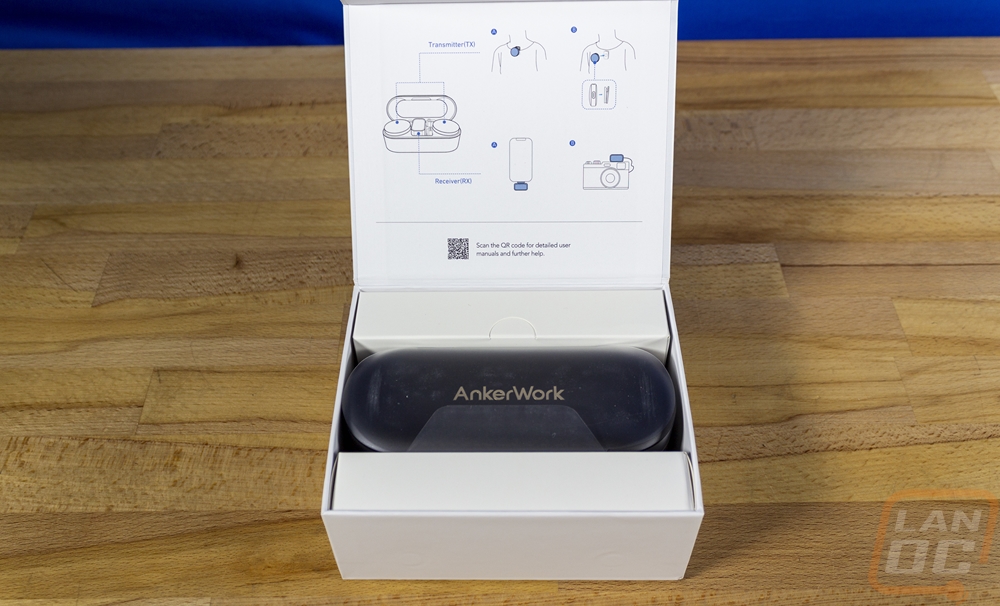
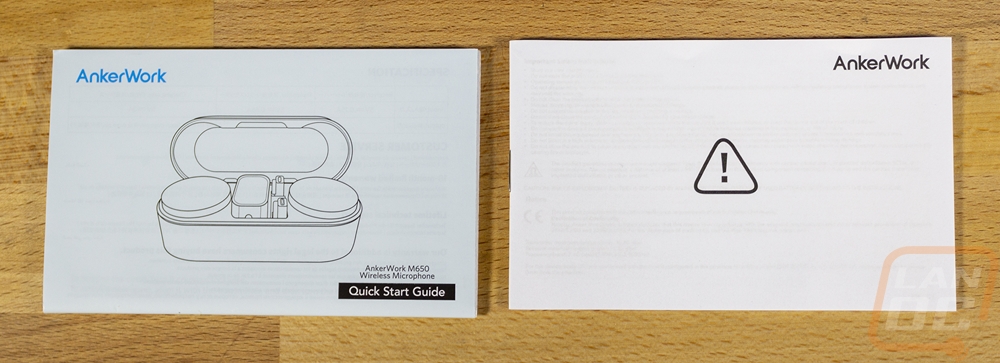
For documentation, you get a quick start guide and then the legal paperwork with all of the standard warnings.
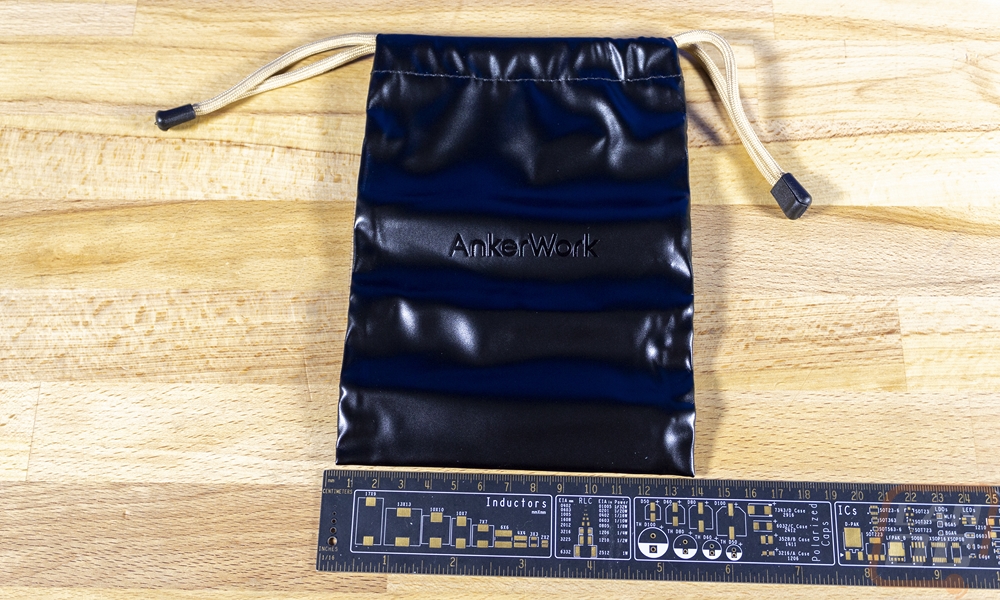
Of the two boxes, one has the included carrying case inside. Then the other box has everything else packed in it. The carrying case has the AnkerWork branding on it and is made out of a glossy very fake leather material. It has drawstrings at the top to pull it closed as well. I like the idea of the carrying bag but I hate the material they used, just about any standard cloth would have been nicer and wouldn’t look as cheap as what this does. That said given all of the accessories and the M650 itself the bag is nice to have to pack it all away.
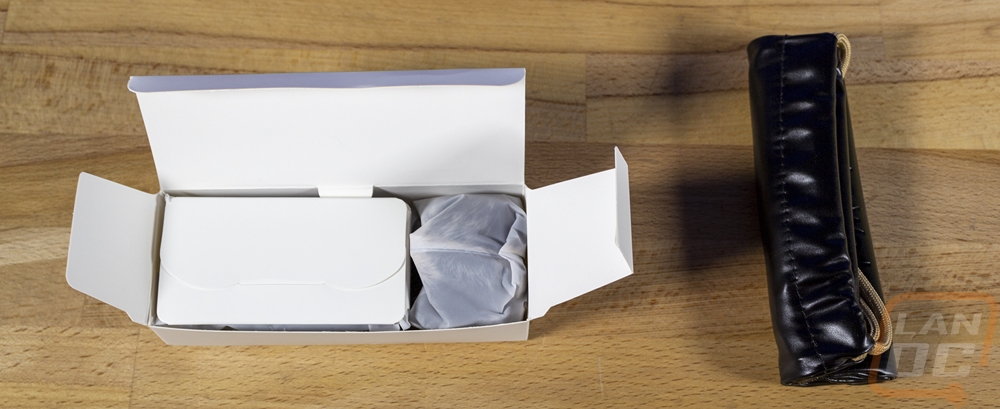
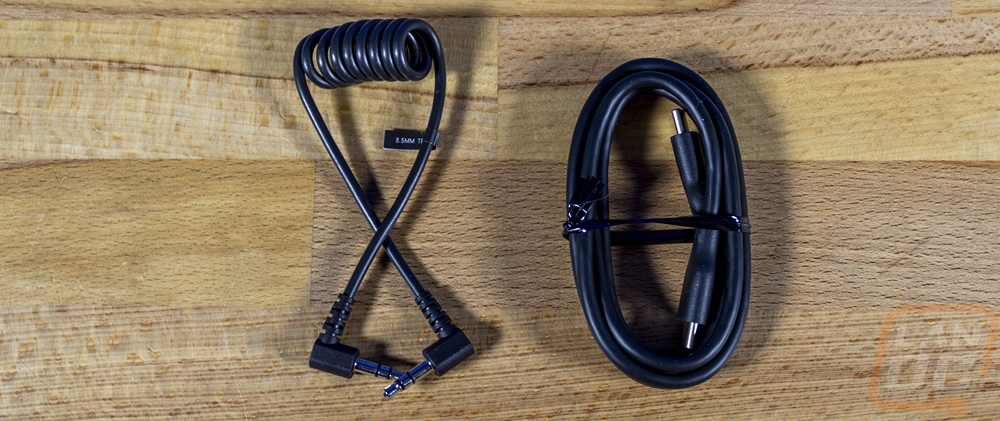
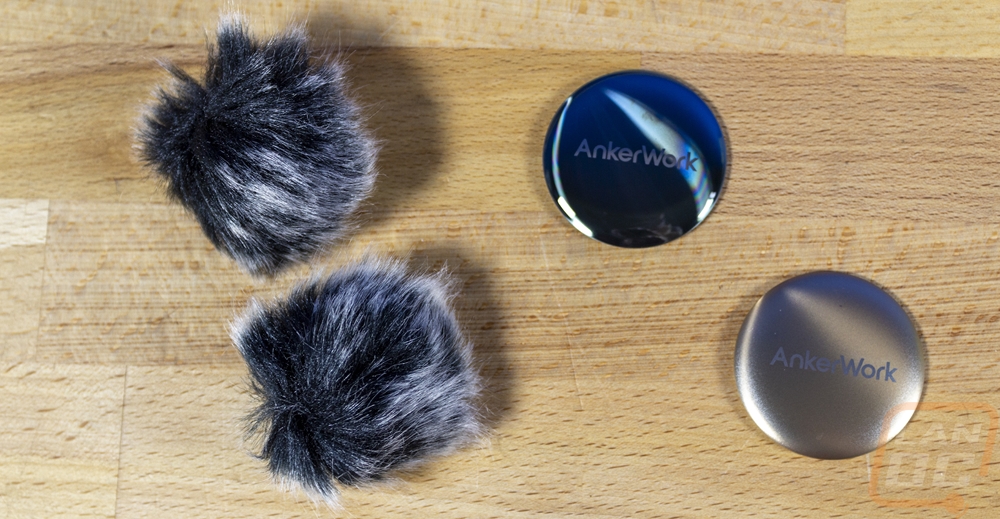
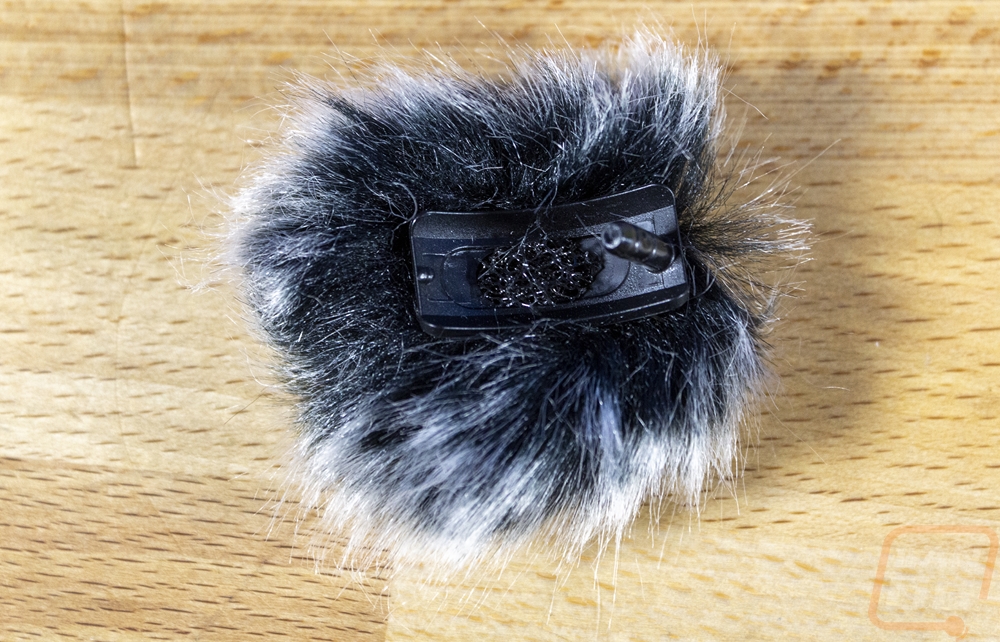
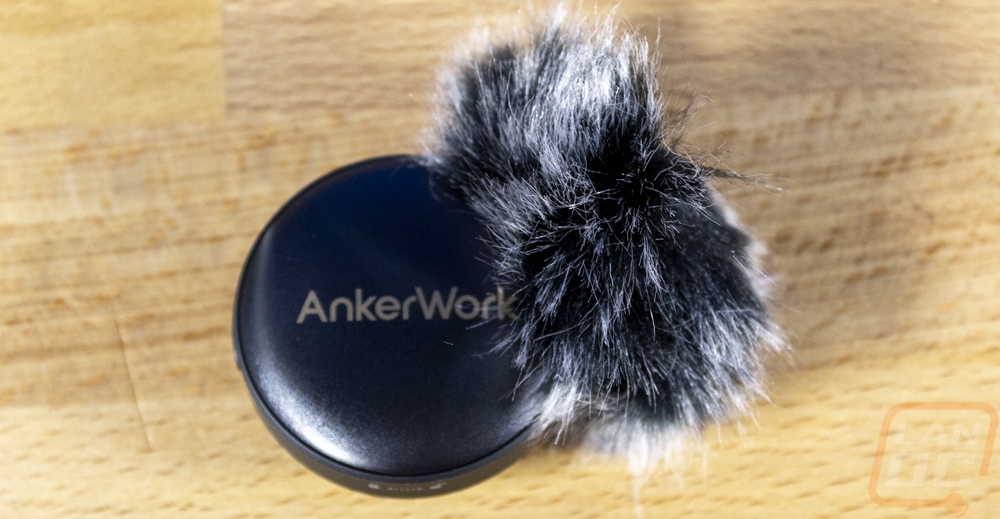
The second accessory box has two sets of cables inside which take up most of the room in the box. You get a USB cable which is Type-C to Type-C and then a standard microphone jack with 3.5 mm plugs on both ends. That cord has a spiral to it which keeps it a little more compact while still giving you some slack. Then there are two replacement covers for the transmitters, one is green with a glossy candy-like finish and the other has a champagne color to it. Then you also get two fur windscreens. The windscreens are simple with the fur glued to a small plastic clip that has a 3.5 mm jack plug and fits the round shape of the transmitter.
Photos and Features
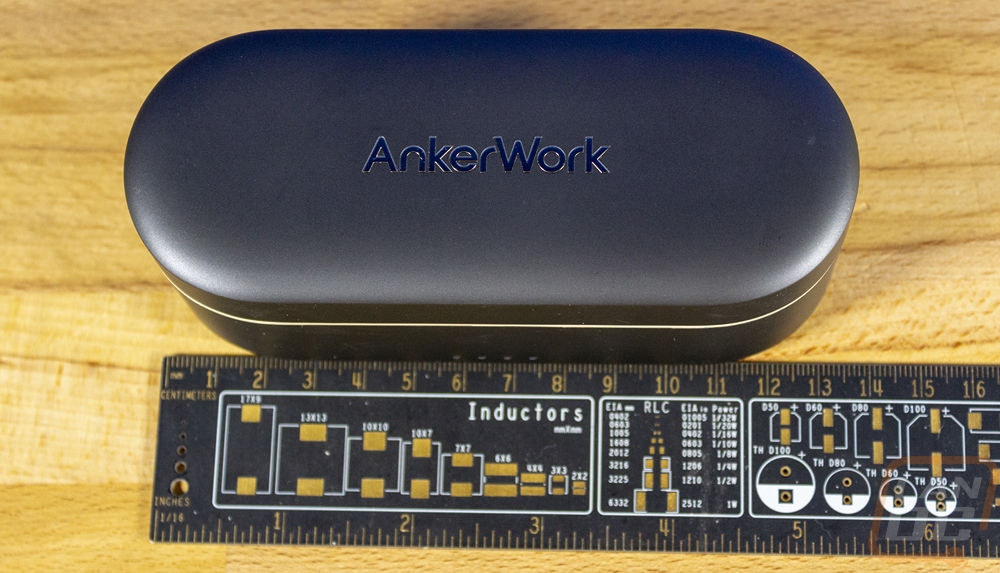
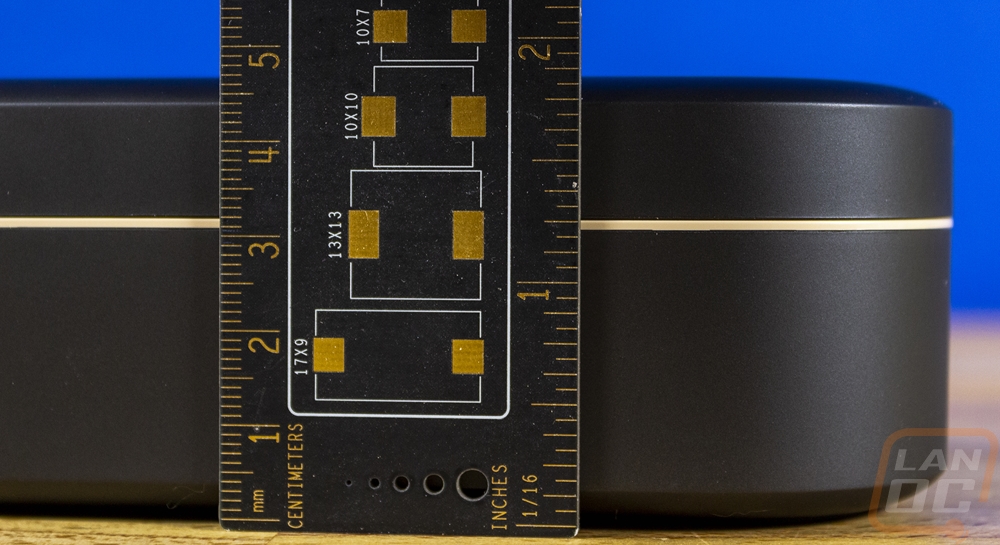
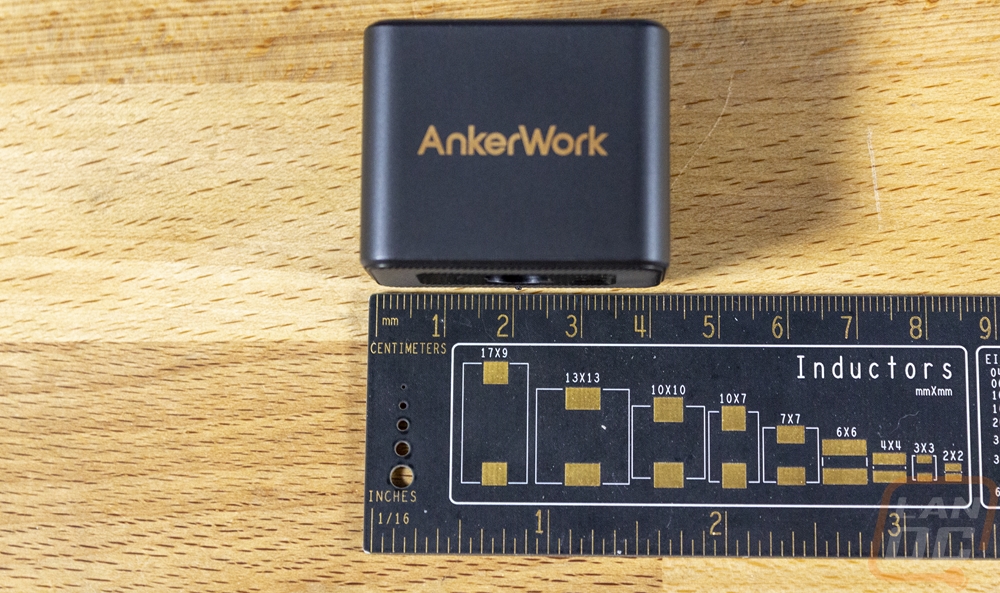
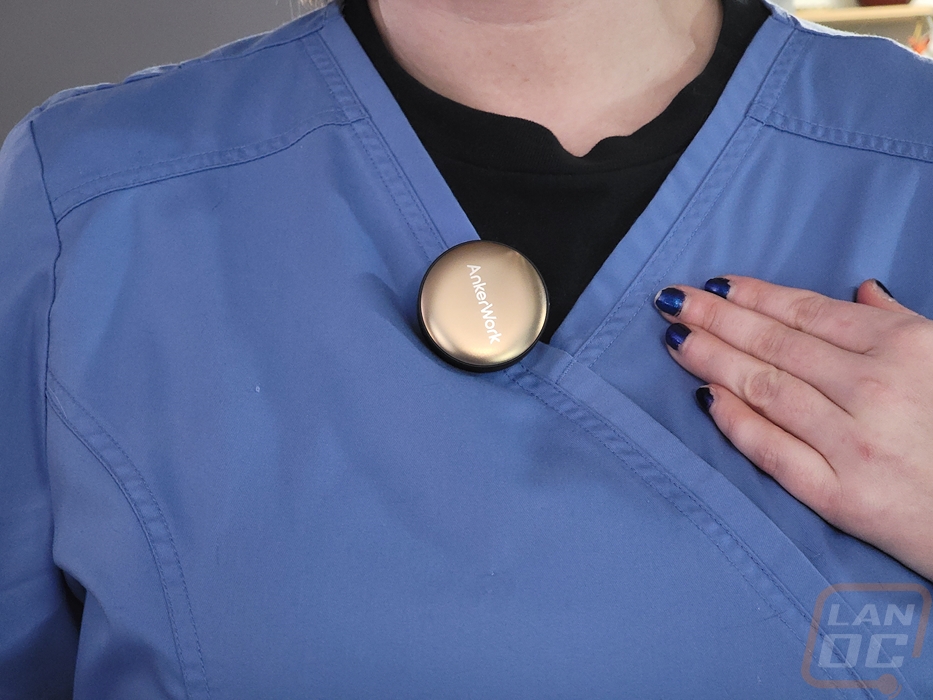
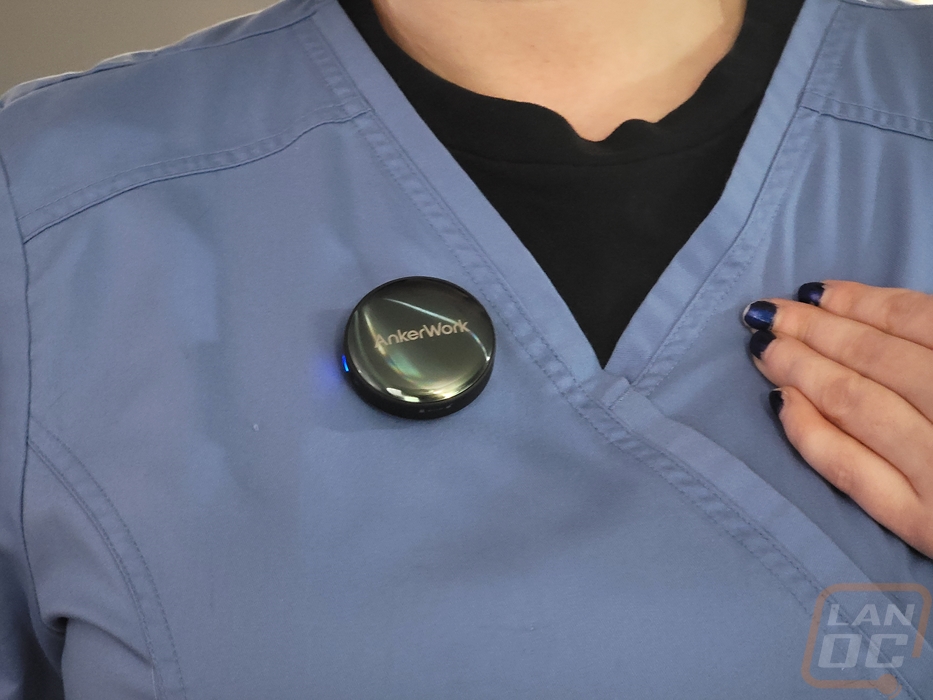
The AnkerWork calls the M650 a wireless microphone, but the reality is it is really wireless microphones or maybe a wireless microphone system. The M650 isn’t just one component, it is the combination of four main components. The first of which is the carrying case which like most modern wireless earbuds also doubles as the charger for the three other components. The case is 5.3 inches wide, 2.3 inches front to back, and 1.9 inches tall. It weighs 6.5 oz without anything else inside but with everything it put together, it has some heft to it. The outside is black for the black M650 and the white version has a matching white case. It has a gold trim ring around it between the lid and the base as well as the back hinge also being gold. Then up on top, it has the AnkerWork logo in gold as well.
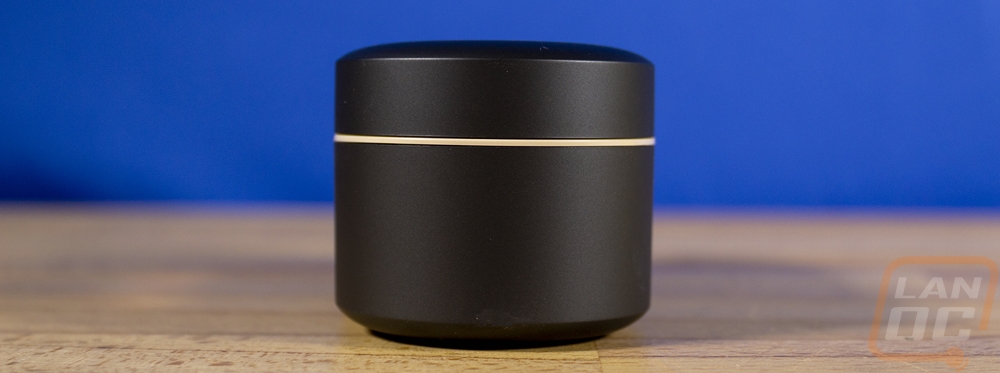
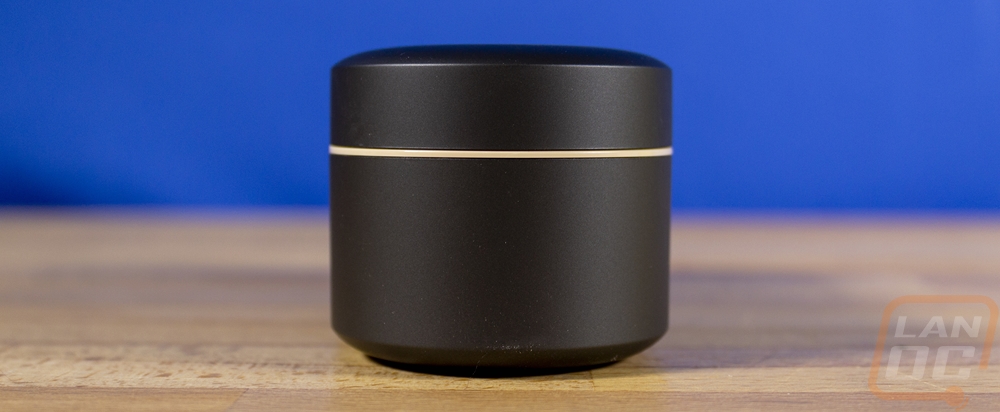
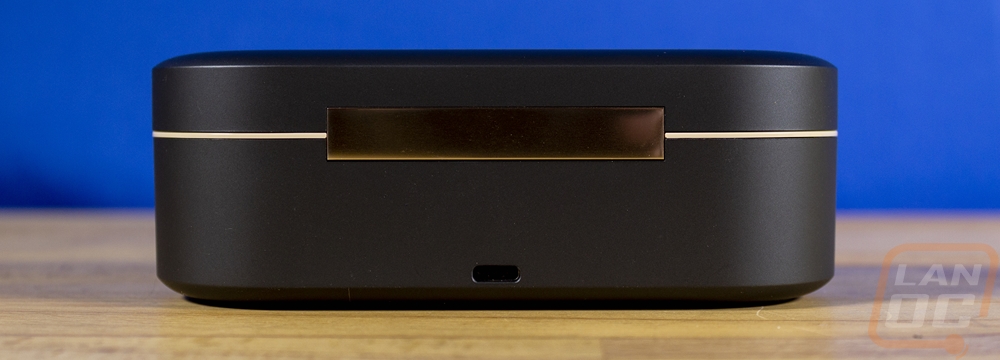
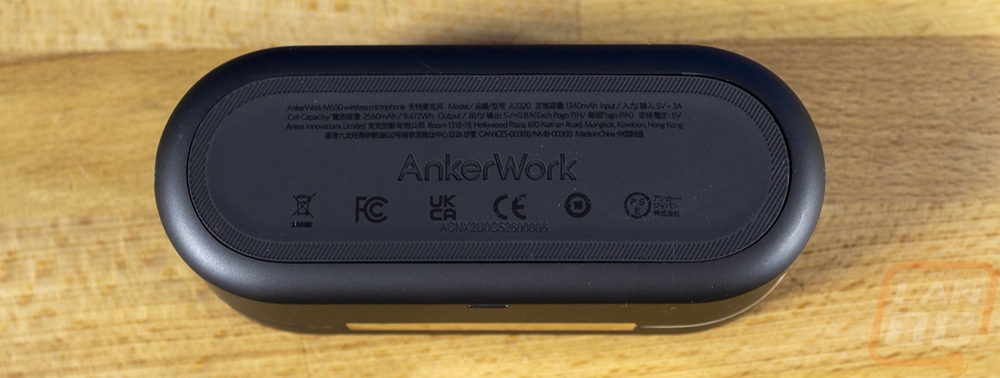
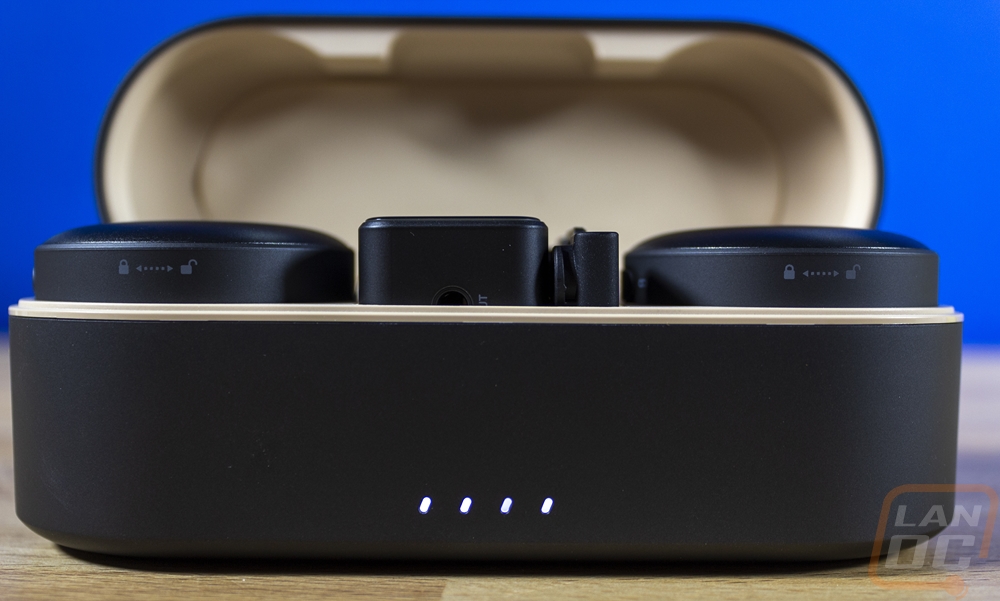
The front of the case, again much like a lot of earbuds has four pinhole LEDs that show the battery status of the built-in 2600 mAh battery. This battery can charge the M650 even when not plugged in to keep everything topped off. Then at the back, the charging port is in the center and is a standard USB Type-C connection. The bottom of the case has rubber over almost all of it with a grooved finish around the outside edge which is where it contacts the surface to keep it from moving around. The AnkerWork logo is carved in the center as well as your serial number. Then all of the certification logos and information is all printed on the bottom in black as well.

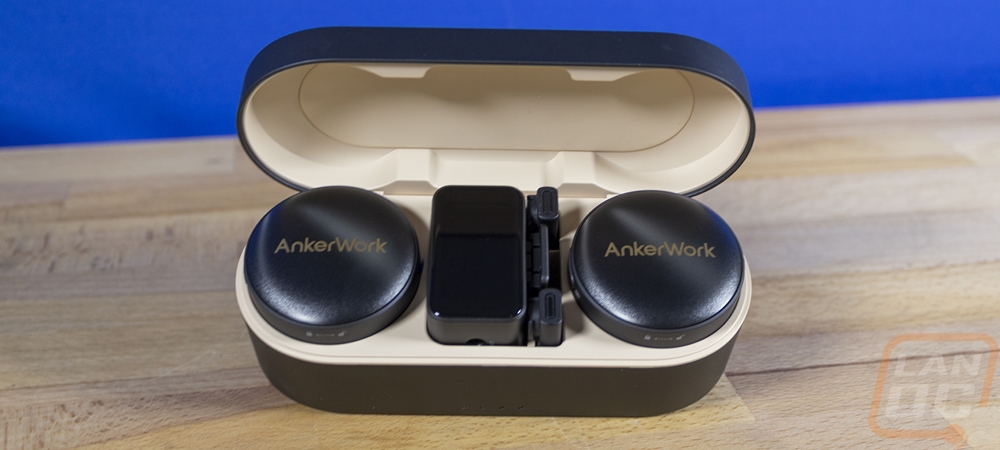
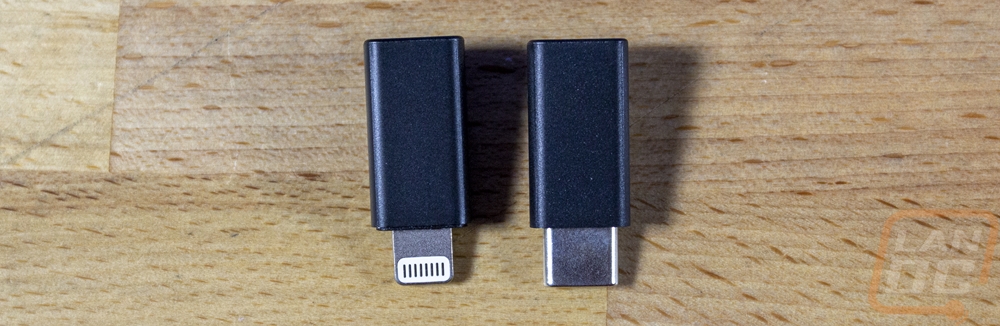
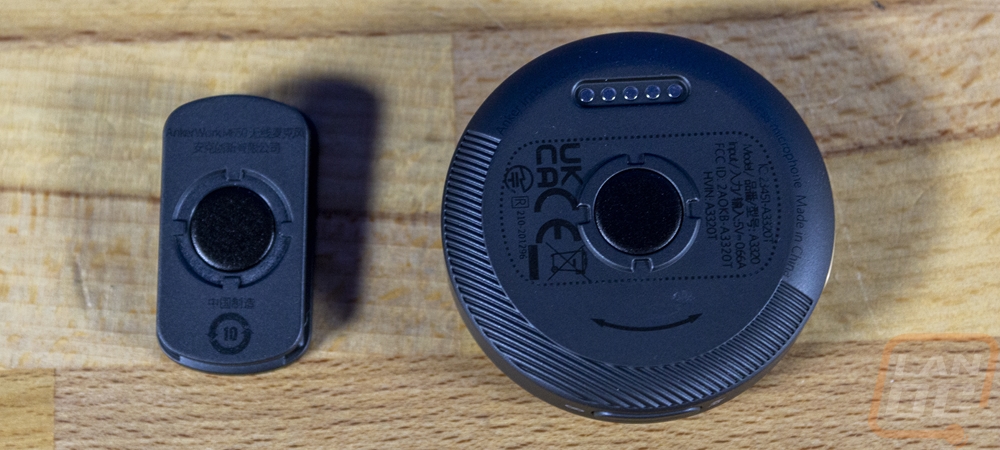
The lid on the case is held closed with a magnet and when you open it up the pinhole LEDs light up and give you the battery status. Inside there are two microphone transmitters that sit on the outsides and in the center is the receiver. Each has a perfectly shaped cutout to fit it in place and a magnet to hold it down tight as well. The magnet keeps things tight so that the contact pins which each of the three devices has can charge each device. Along with the receiver in the middle, two smaller holes fit the USB and lightning adapters.
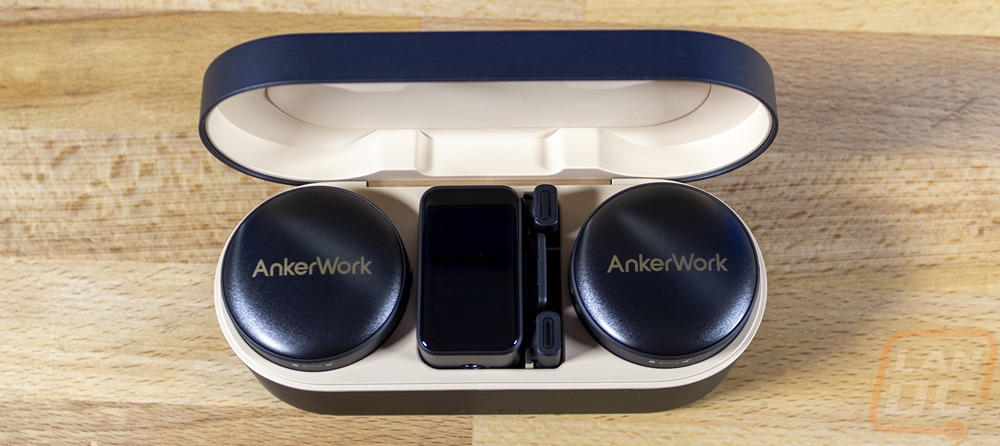
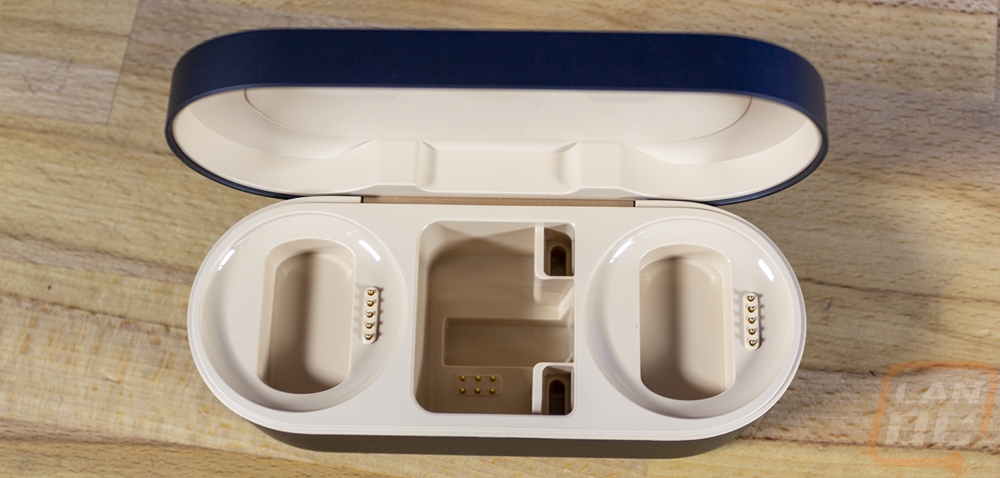
The USB and lightning adapters are compact and have the same design other than the connection at the end. Both have a 7-pin twist-on connection on the side which is how they attach to the receiver. They only fit on the receiver one way so you can’t mess it up and they barely stick out past the clip on the back once installed.

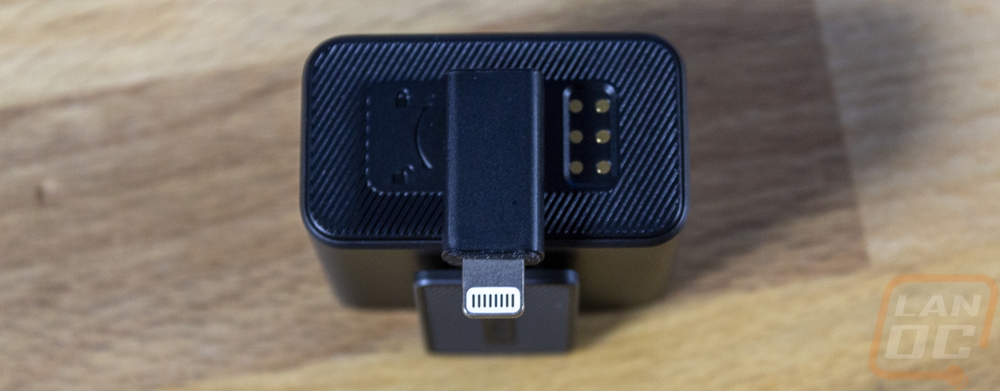
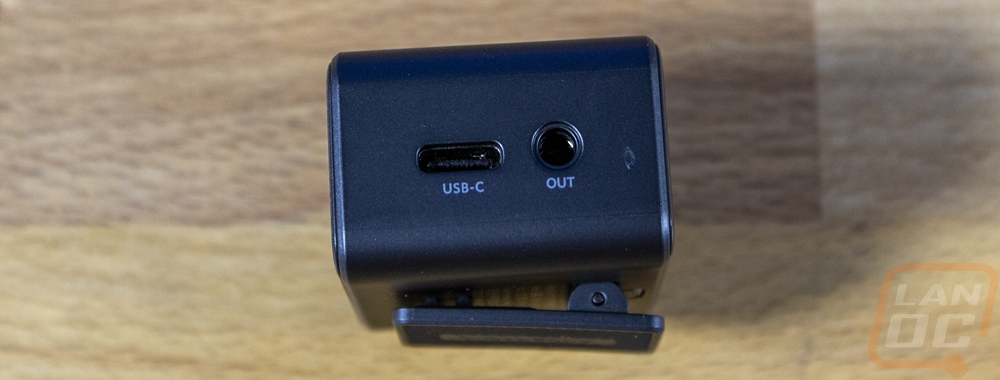
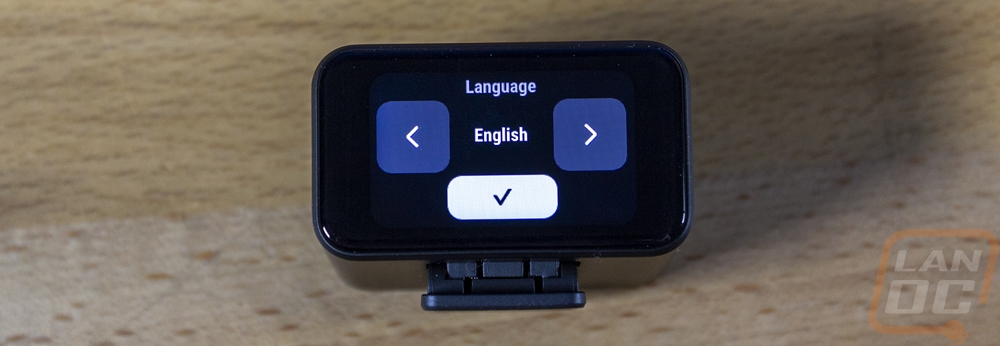
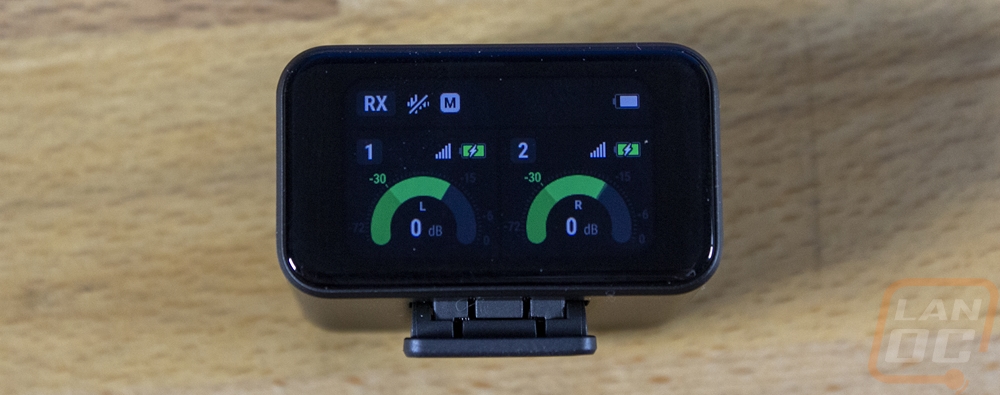
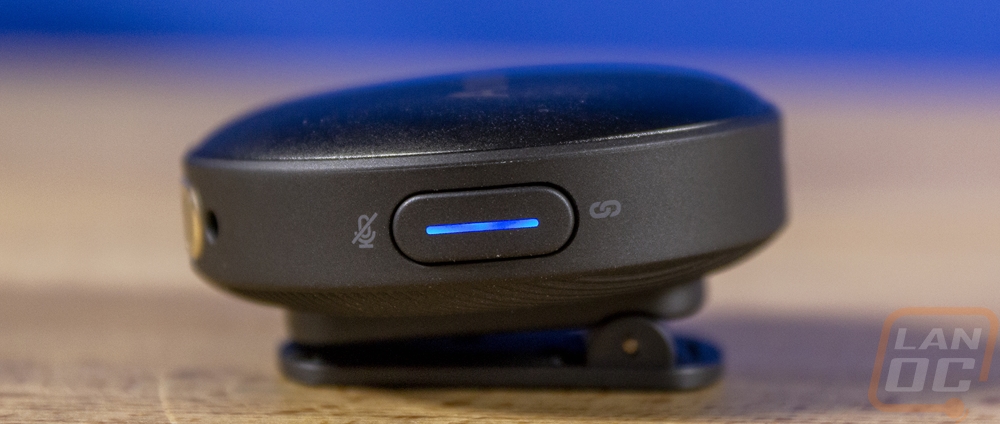
The receiver for the M650 is a squared-off design with a clip on the side. It is 1.7 inch wide, 1.4 inch tall, and 1.2 inch thick and for the black model has a black plastic housing with AnkerWork printed on the front side in gold like the case. It weighs 1.3 oz which is almost nothing and has a battery capacity of 350 mAh, this gives it up to 6 hours of operating time with the charge on board and 15 total when using the charging case’s battery. Up top, it has a 1.47-inch touch screen which shows the current status of its connection with both transmitters, battery life, and being a touch screen you have a few things you can do as well which I will show later. The clip on the back is attached to the receiver which I wouldn’t normally have to specify but Anker does get crafty with that on the transmitters. Even then the clip is the same size as a camera hot shoe and can be attached to the hot shoe if you are using it with a DSLR. Then on one side, it has a button and the other side has a 3.5 mm TRS plug and a USB plug. That can be used combined with the included cable to hook up to a PC or phone. Then on the bottom, as previously mentioned there is a twist lock setup with 7 pins for the two phone adapters. The


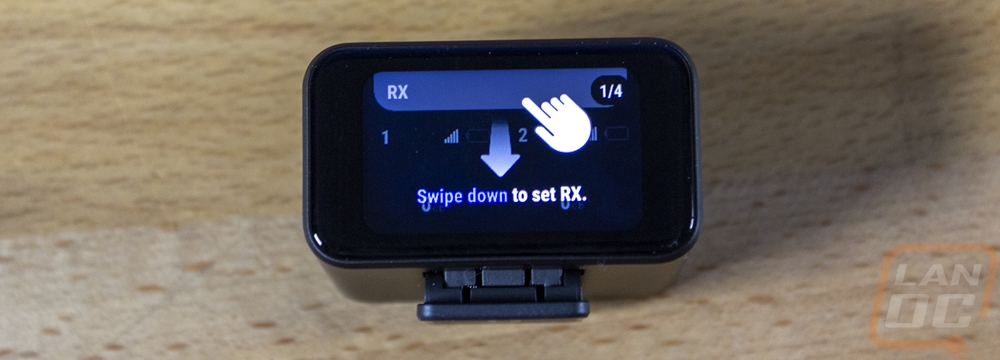
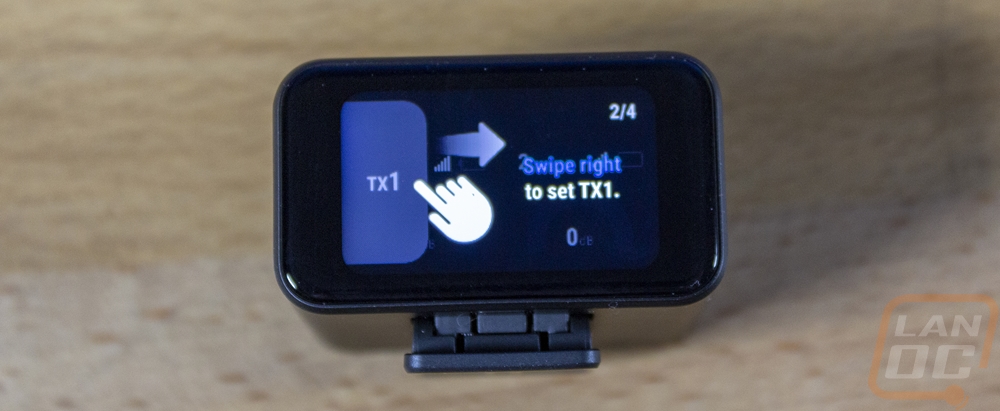
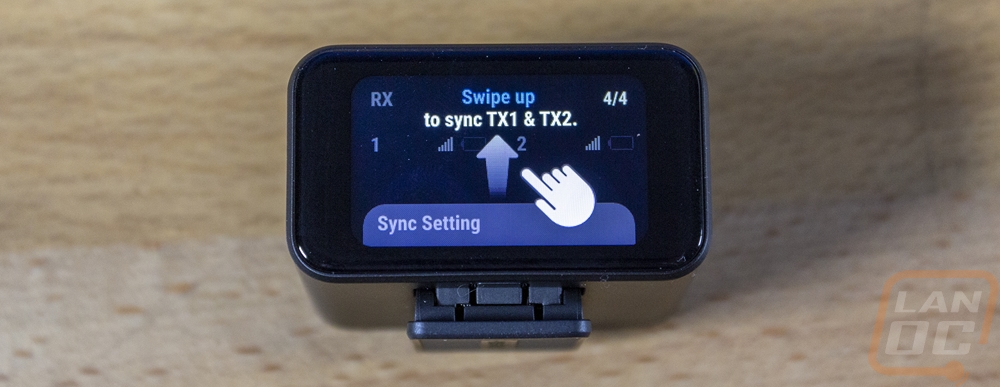
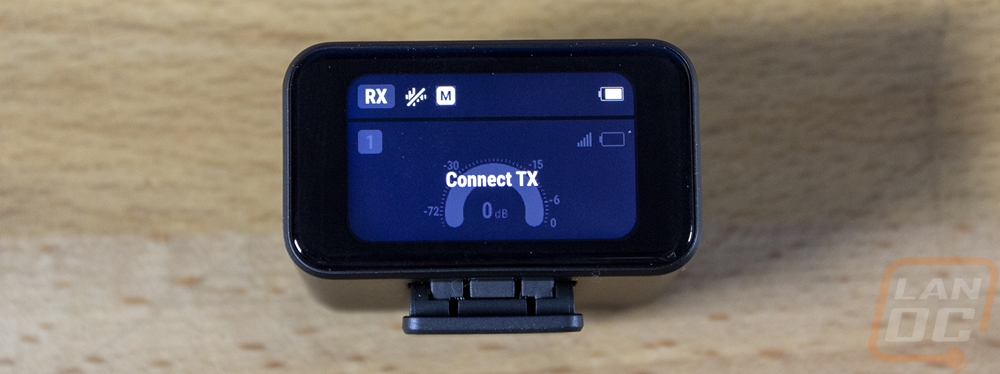
When you initially set up the M650 the receiver's display does confirm your language. Then after that, it will run you through everything you can do with the display. Being a small display it is kept simple. But in short, you can swipe from the top down, bottom up, or left and right and each will open up a different function. Swiping down is where you can set the receiver noise reduction or set stereo or mono. Swiping right gives you control of transmitter one and left transmitter two. Each has a mute button, a record button, and a gain control. You can also see the storage capacity and the number of files which each has a total of 452 minutes. Then swiping up has sync settings which has record and mute for both transmitters at the same time. Then the home page shows you the current audio output levels of each transmitter, their wireless signal, battery level, and other status like mute.
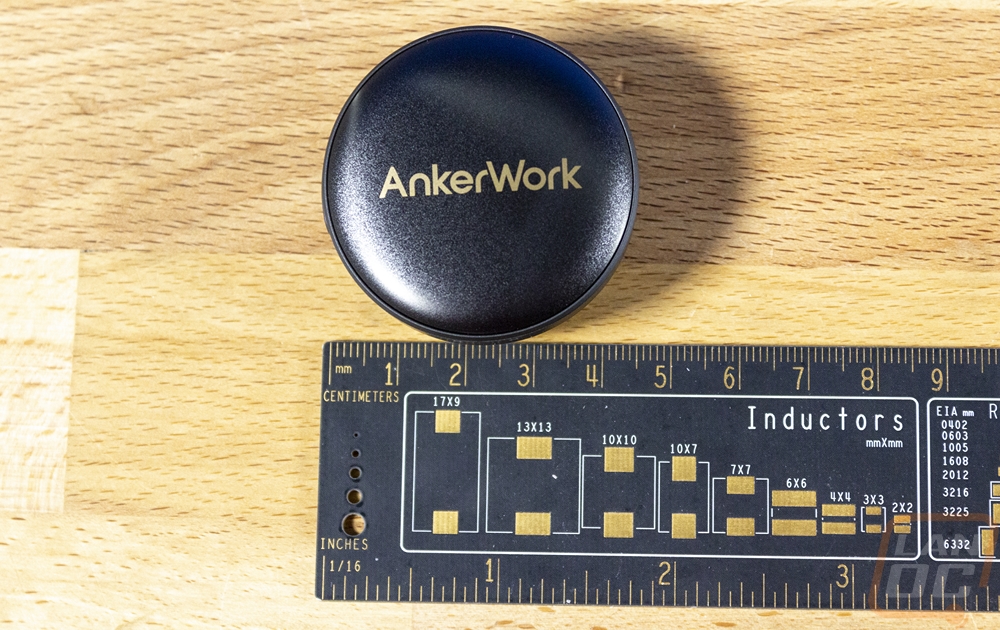
For the transmitters, the M650 has two. Both are 1.8-inch wide and .9-inch thick and come in black or white which our sample is the black model. They have the AnkerWork branding on the front in gold. Each is 1.1 oz as well. It has a built-in battery of course which has a capacity of 350 mAh. Like the receiver, this gives it a battery life of 6 hours and 15 total when using the charging case's built-in battery. The idea of course is that both transmitters and the receiver all have the same battery life.
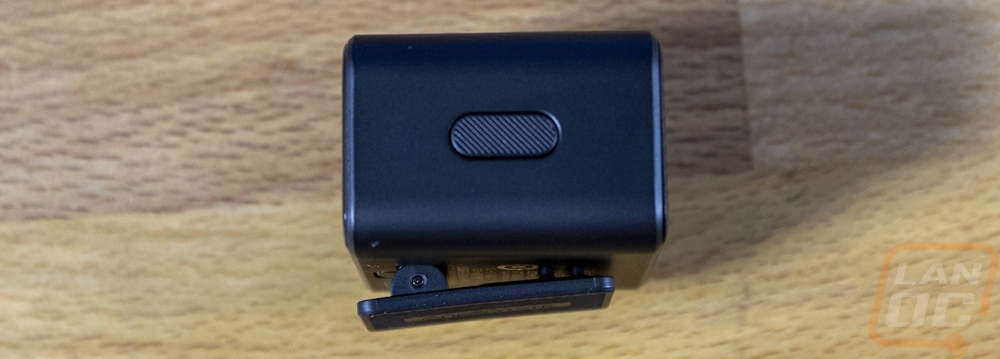
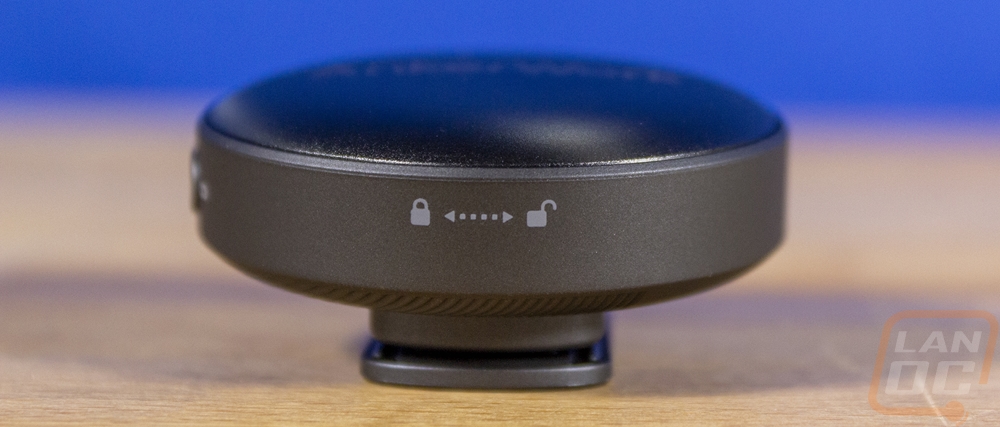
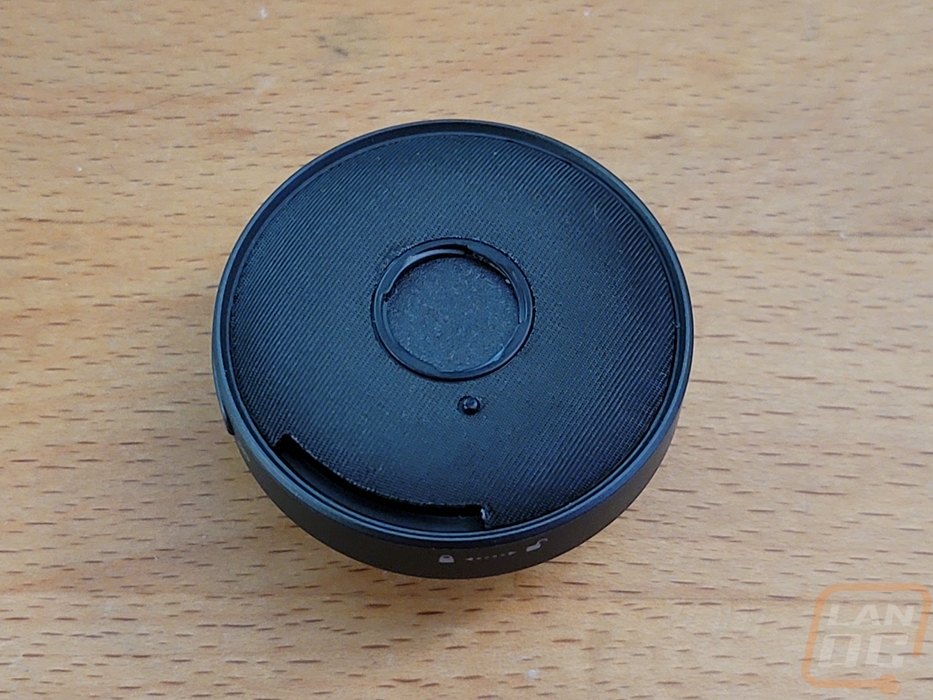
The design comes with a clip attached to make it easy to clip to you or anything else but the clip is held on with an extremely strong magnet. The clip can be removed and you can stick the transmitter to anything metal or using the clip as a backer, you can use the magnet to attach it to anything thinner like clothing. The clip has a keyed design to it that will lock in place in one of four directions but Anker does make it clear with a dotted line where you should keep the clip when it comes to storage so it won’t cover the 5 charging pins on the bottom. The clip also covers up all of the certification logos and information which is printed on the bottom as well.
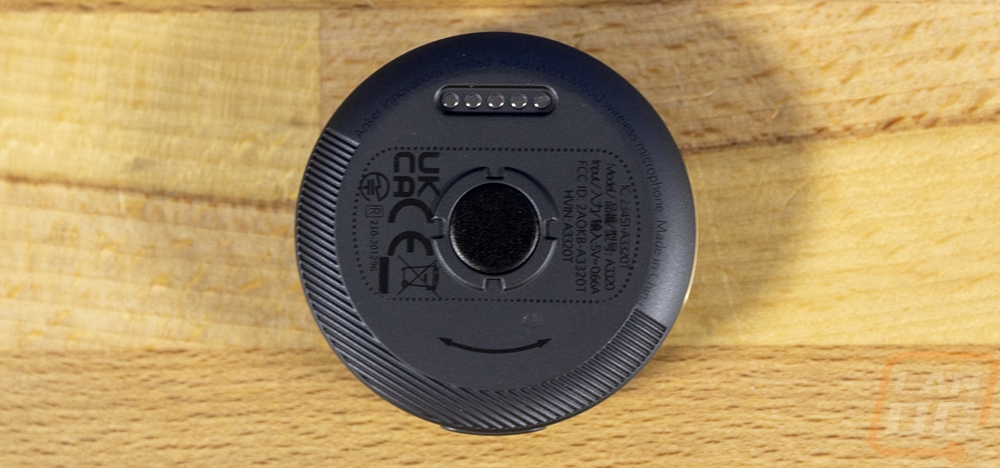
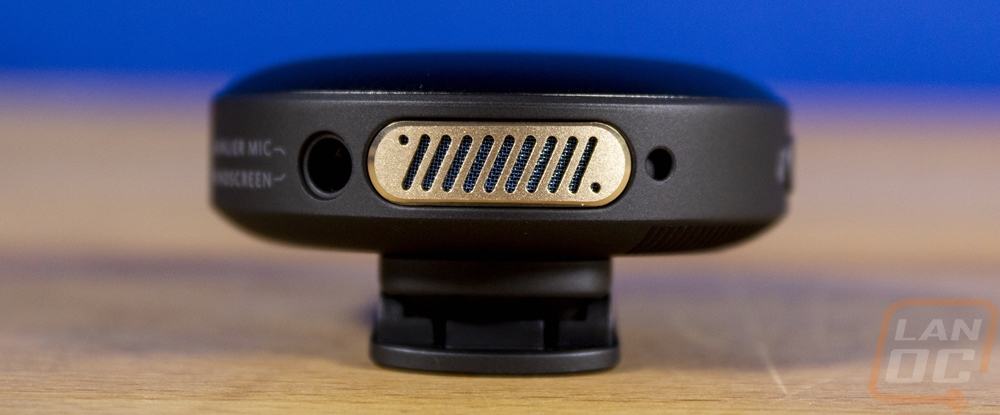
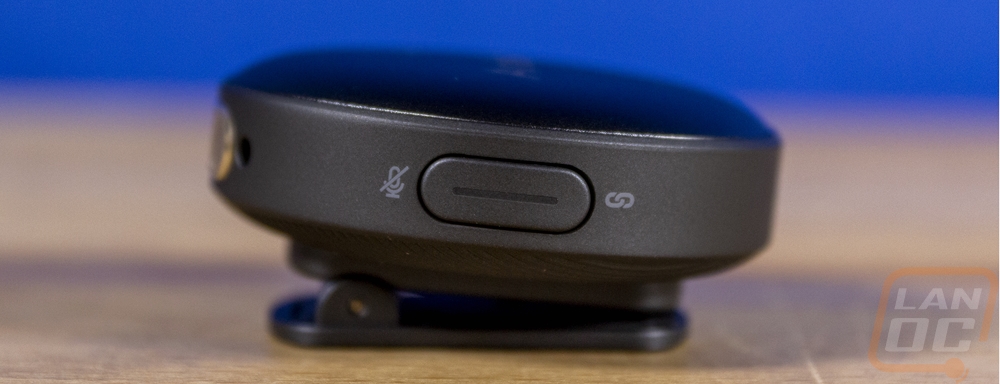
The microphone input has a metal cover plate with slots cut in it and is on the edge of the transmitter. This is an omnidirectional microphone and it does have noise canceling which they call VoiceShield that you can turn on. The overall range away from the receiver is 652.2 feet or 200 meters. They use what they call TrueLink tech for the wireless which uses an LC3plus codec. Anker doesn’t list the bit rate but the LC3plus codec is listed as having a bit rate between 125 and 250 kbps per channel and bitrate adaptation up to 500 kbps per channel. Next to the microphone opening on the left, there is a 3.5 mm TRS jack which you can use your own microphone with like a lavalier microphone. That same hole is also used with the included fur windscreens. Then on the side, there is also a button that gives the user the ability to mute themselves and not just have to rely on the receiver. The button is also used for wireless syncing and has a slot in it that has an LED behind it as a status LED as well.
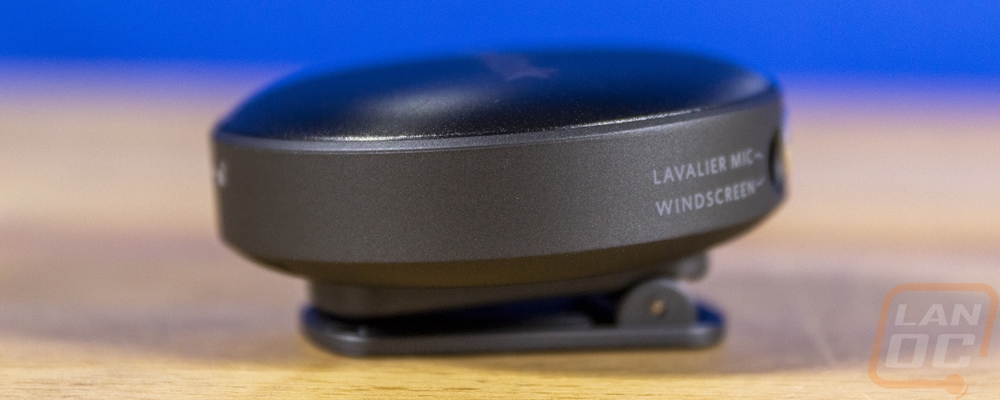
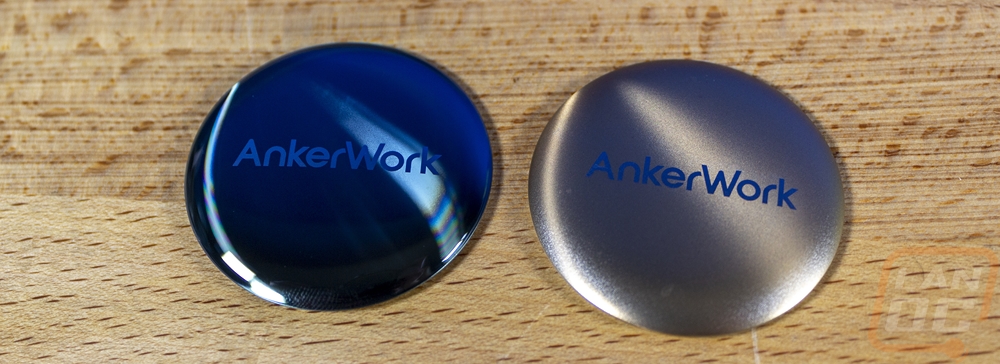
The standard black cover is removable which is indicated on the side with the lock and unlock twist. You can turn it and remove the cover and use one of the two included replacements. If nothing else doing this to one transmitter is nice so you can keep track of which is which, but you do get both the candy green and a gold cover. The white M650 on the other hand has purple and blue which I think are better options. I also included a picture of the fur windscreen when installed as well which gives the transmitter a cool tail.
Software and Performance
While the M650 Wireless Microphone is designed where you can if you want run it independently recording where you can access your recordings later. It does still have software for Windows or MacOS. I should however point out that I was initially confused on the software side of things, the M650 website mentions support on PC/Mac, iPhone, and Android and even links to the AnkerWork app download page which has links to both phone apps but the phone apps at least right now don’t support the M650. This is also a reminder to read of the instructions, I missed some information when I read them which had me spending far too much time confused. Let me be clear though, as far as software goes, the M650 works with the PC/Mac software. The M650 does work with your phone, but only as a direct microphone not for the AnkwerWork software or to access recordings on the M650.
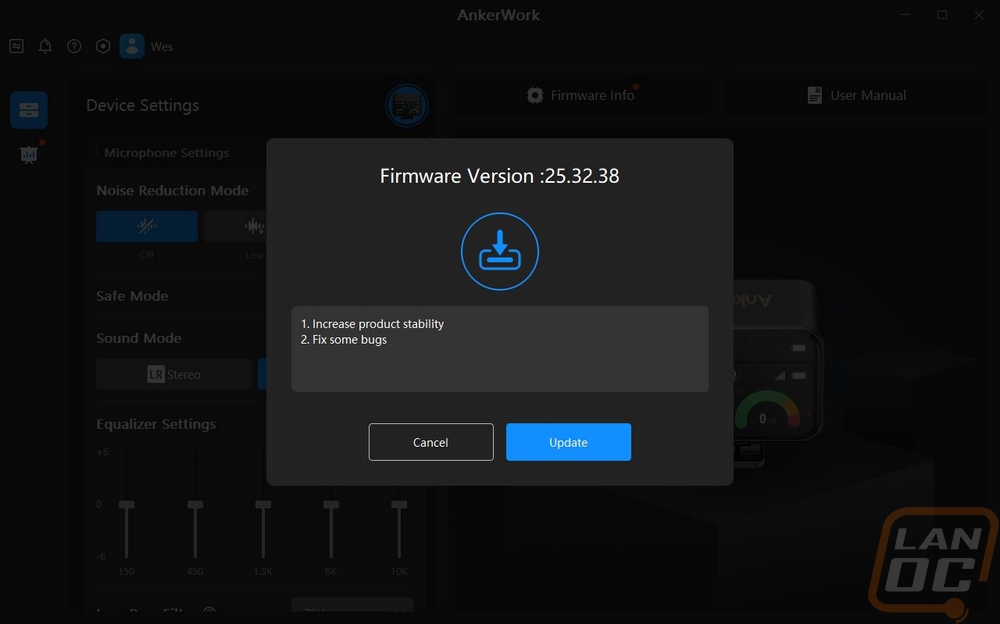
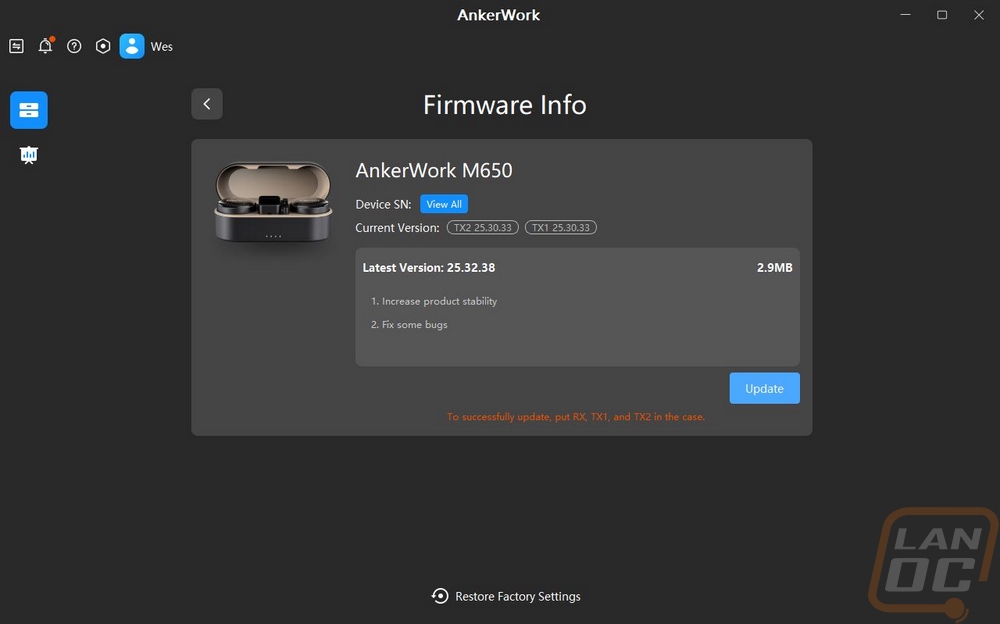
With that out of the way let's take a look at the AnkerWork PC software and run through what you can do with it. The program works with other AnkerWork products like the B600 and if you have more than one installed you will get a landing page where you can pick which product you want to work with. Plugging the M650 receiver in via USB which by the way you can use the type-c adapter or the included type-c to type-c cable, both connections will work. Once plugged in the software does check for firmware updates which ours did need an update. It had the “fixed some bugs” in the updates which Anker uses as a catch all a lot that I’m not a big fan of.
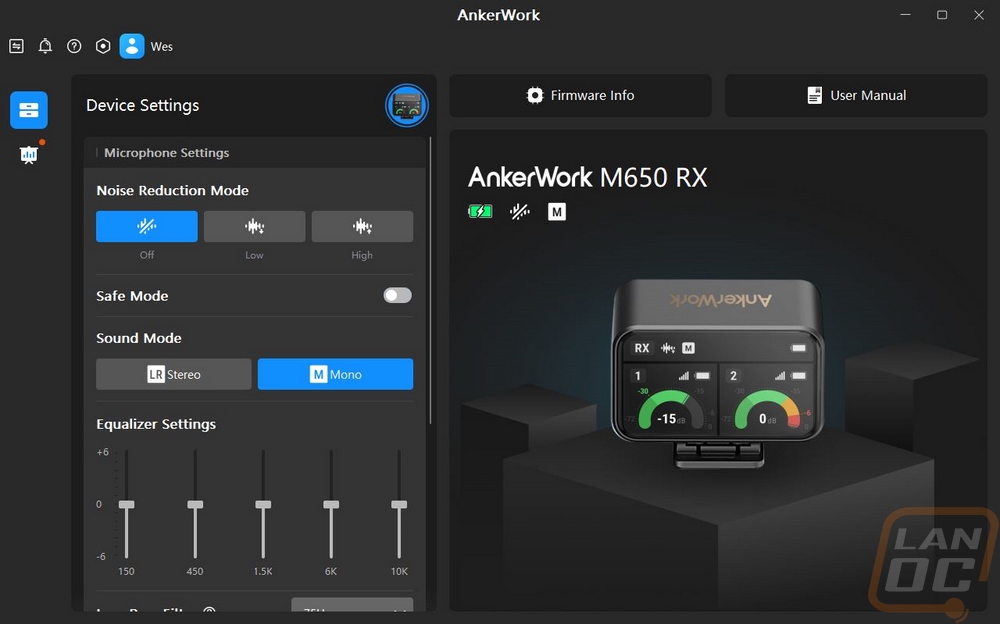
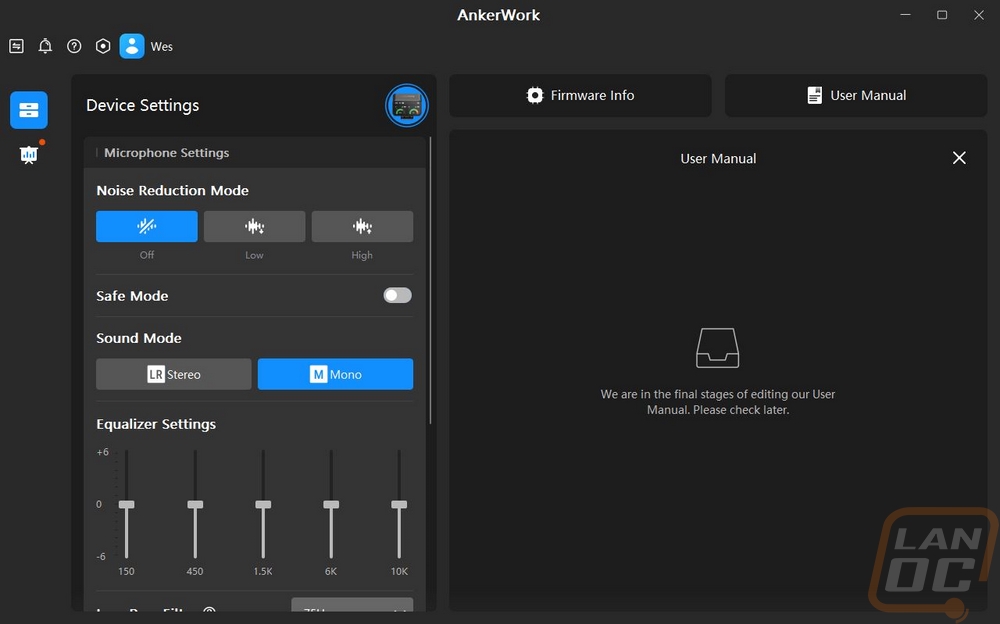
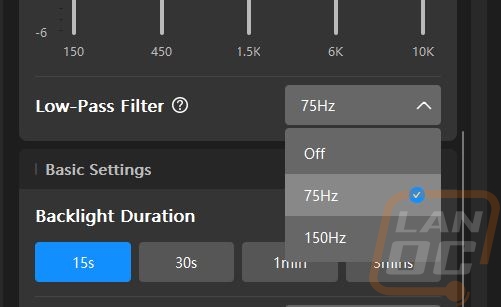
The receiver page has a large picture on the right side that shows the current battery status, mono or stereo mode, and if you have noise reduction on or off. The right side also has buttons up top where you can check the firmware status and also open up the user manual. I love the easy access to the manual, that is a nice touch. When I initially took software pictures it was so early that they didn’t have the manual uploaded yet but that has now been fixed. On the left, right up top, you can pick the noise reduction mode setting between off, low, and high. Below that the safe mode option is there, this is a really cool feature that will record a backup track at -6dB, meaning if you end up having audio too loud or distorted at points you can edit in the lower gain version for those moments. Safe mode doesn’t work when hooked up through the lightning adapter though. Below that you can pick from stereo or mono recording modes. Then you have a five-way equalizer, this is the main setting for the receiver that you can’t do using its screen. With that, you do also have a low pass filter which you can turn off, or set to 75Hz or 150Hz. The other software-specific setting is the backlight duration for the receiver's screen and you can also change the language down at the bottom.

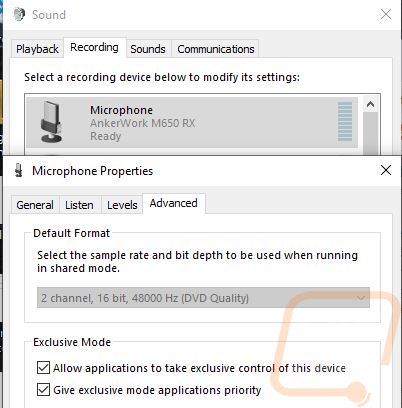
While having the receiver hooked up to your PC you can also use both of the transmitters as a microphone like any normal USB microphone. It connects with two channels at 16-bit and 48000 Hz. This is just one of a few ways you can use the M650 and for live streaming or doing a zoom/skype call or presentation, this could get you wireless freedom far away from your camera with good audio quality for two different people at once.
This is the part that I was lost on initially until I took a much closer look at the instructions. I had no idea how to get access to recordings saved on the M650 and I assumed that hooking up the receiver was how you would do that. As it turns out, to get to the recordings you need to hook the charging case up with the transmitters inside. Sadly this doesn’t also connect to the receiver even if it is inside of the case which seems to be a missed opportunity. When hooked up, like with the receiver the AnkerWork software does check for firmware updates for both transmitters and ours did need an update to “fix some bugs”
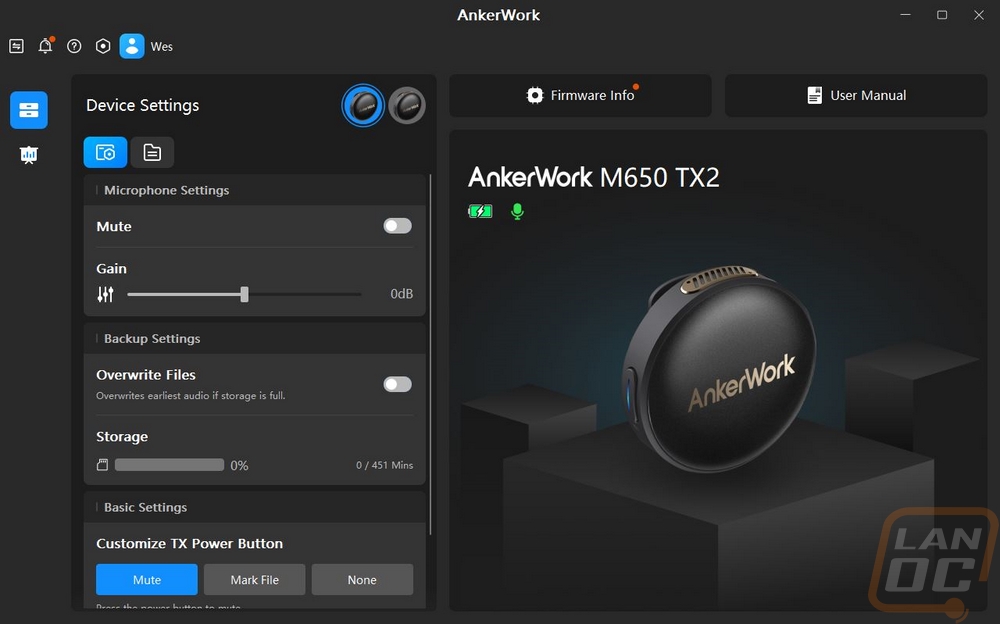
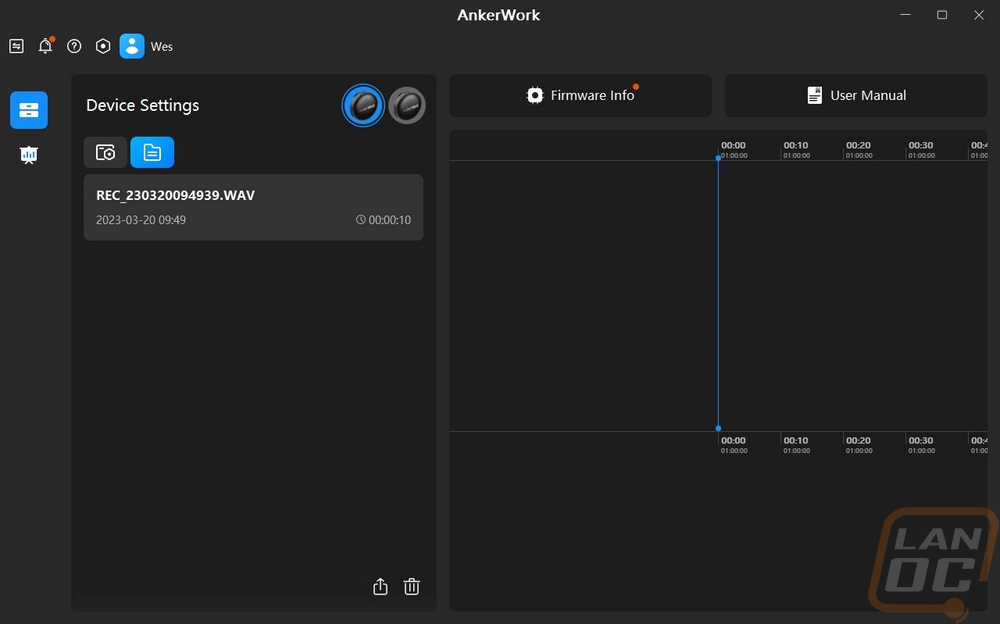
The software layout is similar to what we saw with the receiver only this time up top you can see both of the transmitters which you can click on and switch back and forth between them. I do wish you could change the names so it could be easier to know which is which but they are labeled TX1 and TX 2. The first two settings can also be done using the receiver screen with mute and gain options. Below that you can see the storage level and also set if you want it to overwrite files once you fill the storage up. Then down at the bottom, you can change how the side button works which by default is mute. You can also have it mark a file. Up at the top is a small folder icon this will open up the file list where you can download or delete files. Clicking on the file also opens it up on the right and starts playing the file. In addition to using the software, even just plugging the case into your PC and having the transmitters inside also allows you to access them in file explorer which allows you to open, copy, delete, and move which will be easier than using the software.
With the software out of the way and we already touched on how the receiver screen and menus work. The only thing left is to break down how the M650 Wireless Microphone performs. For performance, there are a couple of areas of importance. Being wireless the wireless range and also battery life both play roles. We then have the functionality of the design for things like how the microphone attaches, the windscreen performance, and how the receiver works with multiple devices. Then there is the microphone performance and storage.
For the wireless performance, the M650 runs on a 2.4 GHz frequency which is one of the heaviest used frequencies so I was a little concerned about how well it would work in my house. Not just because I have a LOT of smart devices that only work at 2.4 GHz but also because in our house we have old dense walls that wireless doesn’t work well on causing us to run 3 different access points to get coverage. To test things out I put the microphone on the far end of the house and went through the house checking the receiver. What I found was that the M650 did lose connection but not until I was on the farthest end of the house which was a lot farther than I expected it to go. In an ideal situation, AnkerWork says that it can reach 200 meters or 660 feet. When recording to the transmitter you have unlimited range and I did test this. Returning the transmitter to the case will stop the recording but it recorded when I had the receiver turned off. Sadly because there isn’t an option to start the recording you do need the receiver on to do that. I wish the software would give the option to use the side button to start and stop recording for that use case, but I do understand that it could lead to recording when you don’t intend on it or turning it off and missing something important. For battery life, I haven’t run down the batteries enough to get my own numbers so we just have the listed numbers to go off of. But they have the M650 listed with a total battery life of 6 hours of operating time and 15 when you can recharge using the case. Both transmitters and the receiver are all matched with the same battery life which makes things simple. I was also happy that everything uses USB Type-C with the charger and receiver both having it, also for charging I saw up to 12 watts of charging speed but at times between 3-4.
As far as functionality goes, I’m a big fan of the clip design on both the transmitter and the receiver. They put a lot of time into both. For the transmitters, you have that basic clip that can be clipped to the edge of your clothing. But you also have the magnet where you can remove the clip altogether and attach the microphone down lower or to anything metal as well. Then for the receiver, it doesn’t have the magnet design but its clip is designed to also fit the hot shoe on a camera. So you can clip it to yourself or put it in a picket if you aren’t monitoring it. But if you are using it paired with a DSLR you can monitor everything with the screen right above the camera screen. This works if recording to the M650 and also if you use the included 3.5 mm to 3.5 mm cable to plug in from the M650 to the input on your camera. The M650 isn’t just limited to that as well. Using a USB cable you can plug it into your PC or Mac and use the microphones to stream audio right to the PC or with the included short thunderbolt and type-c connections you can also hook it directly to your iPhone or Android device. With that, you can record audio using your own software or use it as the audio source when recording video. The included fur windscreens are a nice addition as well. I’m glad they didn’t rely on the nasty stick-on designs that you can find or hope that someone would make an aftermarket windscreen. They are easy to attach but they do mean that you can't use the included 3.5 mm jack if you wanted to listen in. As for their performance, I did include some footage of them in use in the video below using a fan. They cut out a lot of the wind noise even with that direct wind but nothing is going to be perfect.
For the microphone testing, I did our standard mic test which compares the audio pickup to a whole variety of other previously tested microphones. I did this with the gain set to zero and with the transmitter magnetically clipped to my shirt. While I was doing that I did also test the noise reduction at all three settings and did a video wind testing of the windscreen as well. The windscreen, I already mentioned but it did surprisingly well with it being right in front of the fan. As far as the audio performance, I was happy with it. It was a little quiet compared to some of the microphones we have tested but that can be adjusted in post or with the built-in gain. I also found that the audio level was higher when recording directly as you can see with the windscreen test. The noise reduction did well cutting out the keyboard noise mostly and the mouse clicks entirely which with these being omnidirectional may come in handy to cut out some background noise. I should also note that the built-in storage which is 451 minutes each is an hour and a half over the 6-hour battery life. If you are aiming to get the full 15 hours you will need to pull files off of the microphones when you go to charge them up in the case. But you don’t have to worry about a fully cleared off storage space filling up before the battery dies.
Overall and Final Verdict
There aren’t a lack of options when it comes to wired or wireless microphones but it is interesting to see Anker join into the mix under their AnkerWork brand with the M650 Wireless Microphone. You actually get a full system, not just a microphone with two wireless transmitters, the receiver, and the base which you use for getting the files and recharging. The M650 follows similar designs including from DJI with their DJI Mic. Going in I thought I had an idea of what the M650 is all about but I was surprised at the flexibility that Anker has built into the design. For connection options alone you can run the M650 independently recording on the transmitters themselves, you can connect it to your Mac or PC and use both microphones to stream directly to the computer, you can hook the receiver up to Android and iPhone and use the wireless mics to record videos or record audio, and you can also hook the receiver up to ANY 3.5 mm microphone jack including to your DSLR to stream the audio that way. In fact, they even have the clip on the receiver setup to be able to slide into the hot shoe. The transmitters have their own unique clips as well which can clip like normal or be pulled off to use with the strong built-in magnet to stick on anything or clip to your clothes using the clip itself as the backer.
For performance, the microphones worked well and you have on the fly adjustability to turn up gain or turn it down, background noise reduction, and there is even a safe mode that will record two copies of the audio with one -6 dB lower that you can use to replace any moments which peak to high. The software also has a small equalizer to tune things, but you do have to do that ahead of time not on the fly. The wireless range was great and I found that if you are recording to the M650 itself the range doesn’t matter at all because it does record to memory on each transmitter. Then for battery life, you get 6 hours on each device and 9 more hours if you recharge from the battery in the case similar to how a lot of earbuds work. So as long as you get some charging time in the case you can go a full day but the total recording capacity is limited to around 7 and a half hours so you will need to stop and pull the files. More importantly, you can only do that when hooked up to a PC right now which defeats the point of having that extra battery life. I also found it a little confusing to get the files at all, until I figured out that you have to plug the case in. Beyond that, the only other issue I has was with the color options for the included covers but only for the black model. The white model has two unique colors but I wasn’t digging the champagne and dark green.
For pricing, the M650 Wireless Microphone has an MSRP of $249.99 which isn’t cheap compared to a few of the no-name brands on Amazon. But when we compare it with the DJI Mic it is $100 less making it a much better value. Overall with the flexibility the M650 offers this is a great pickup for anyone who is filming for social media or an influencer or anyone who wants to have a compact wireless setup that they can travel with. One thing is for sure, it would be great to see a few more of these clipped on people for interviews rather than people on TikTok shoving their phone in people's faces as a microphone. I can also see someone getting creative with the swappable covers to tie it more into their brand with colors or a logo if you are looking to take things up another notch.

Live Pricing: HERE


