Software and Performance
Before getting into performance testing, as always I do like to check out the software side of things. Even if a device performs well, if it is a nightmare to set up and support I am going to go with something easier. The Zyxel NWA220AX-6E has a similar setup to what I have seen on multiple EnGenius access points with a cloud-based phone app and web interface and the NWA220AX-6E does also have a local web interface as well. Let’s check out all three of those first starting with the app because that is what I used to set things up.
First up you do need to create your network location or site name, this can be important if you are running more than one location on the same account. At the same time, you set up your country and time zone. Then from there, you can start to add in any devices which in this case would be the Zyxel NWA220AX-6E access point. For this, you can use your phone's camera and scan the QR code on the bottom or you can manually enter the information. This is also where you pick out your license type and this was really confusing Zyxel has a whole list of different license types that pop up, and each does have a drop-down list of what it offers. Then once the Zyxel NWA220AX-6E is powered up it will connect to the internet and the device will be registered, you also have the option to do firmware updates at that time.


Once the Zyxel NWA220AX-6E is added you then get moved to the dashboard page which is what you will find anytime you open the app. This shows how many devices and clients you have online and any offline devices as well. For the clients, it shows wired and wireless, and below that it also shows the data used by any clients in the last 24 hours. Down at the bottom, the Nebula app has icons for each of its pages.

The middle icon is the devices page this will list out all of the Zyxel devices on your account and splits them up by device type. You also have a location map which can show you the location of each of your network sites and the number of devices there. Clicking on a device, in our case, the Zyxel NWA220AX-6E opens up another page. This has the Mac address up top which I have covered up to keep things safe. You can see if the access point is online and up to date then it graphs out the usage over the last 24 hours in both download and upload. Below that there is a tool list which has a connection test, locator LED flashing, and a reboot button. They also list out the BandFLex setting for the Zyxel NWA220AX-6E, firmware version, and serial number/LAN IP/Public IP.


Each device can have a photo added which is really helpful on big jobsites and you can set the location on a map which again for some locations can help show where that exact device is located. For the Zyxel NWA220AX-6E specifically, there is also the BandFlex setting and this is an option that you aren’t going to see on many access points. The Zyxel NWA220AX-6E can handle 5GHz and 6GHz wireless frequencies but it isn’t designed to run both at the same time. With that, you will need to pick which you want to run. I will talk more about where that puts the Zyxel NWA220AX-6E in the market later on.
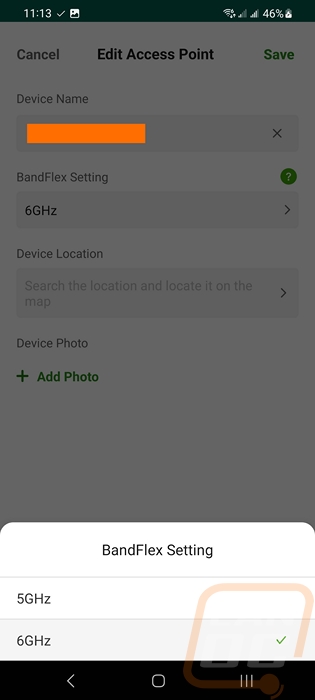
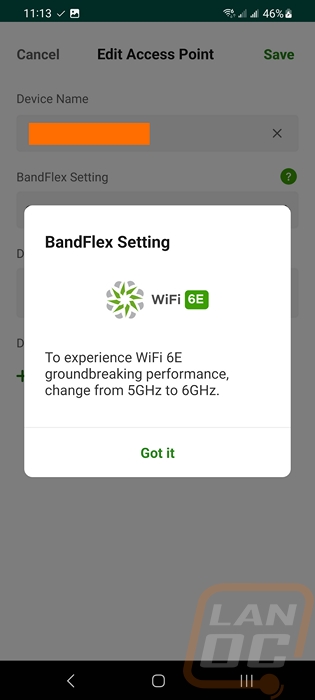
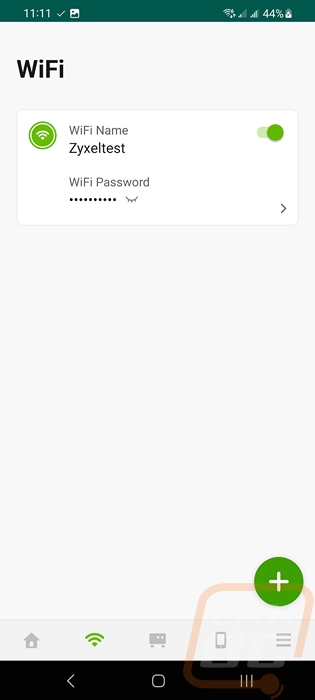
The wireless icon down at the bottom is where you can see your current SSIDs and where you can change or add more. The big green plus sign is where you add a new one and with each SSID already made you can click on it to open up and change things or there is a switch to turn it off quickly. Creating a new SSID on the Zyxel NWA220AX-6E takes the SSID name, your security setting, and a password.

The phone-looking icon opens up a list of clients from the last 24 hours and then next to that the three lines is the settings menu. Here you can open up your license settings, add administrators for your network, and change both site and organization settings.

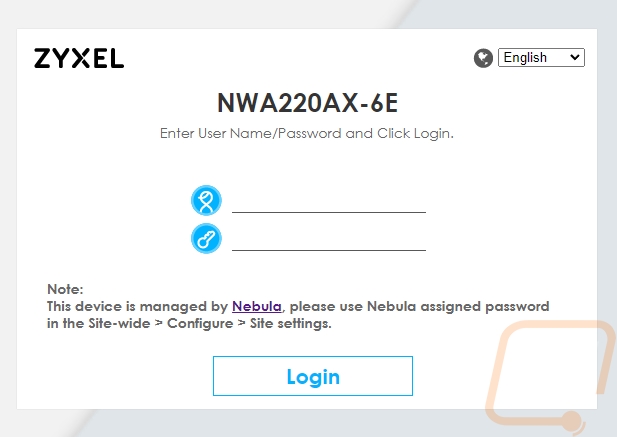
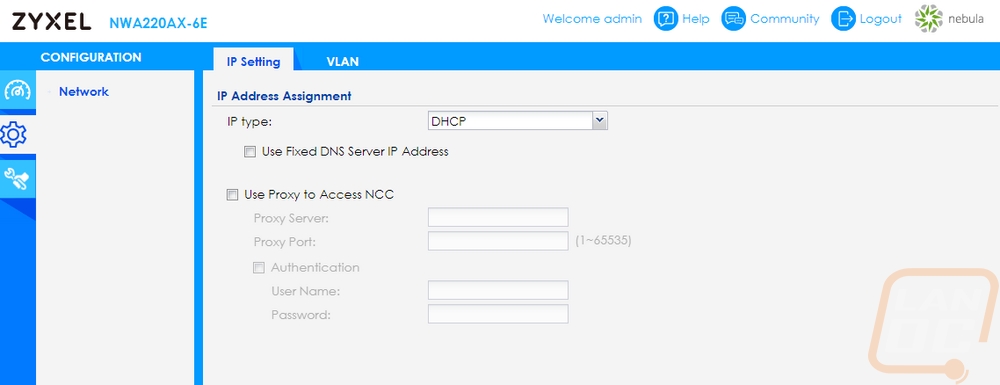
With the three different software control possibilities, next up is using the direct web interface for the Zyxel NWA220AX-6E. To access this you need to have its IP address and load that up. Some cloud-compatible devices don’t support this at all, others have limited settings available, and some have more options than you can get into on the cloud. I did log in to the Zyxel NWA220AX-6E after I had already set up the cloud connection and I don’t know if that will change any of the settings available but it does mean you need to use the login information that is set up in the Nebula software. Once logged in the landing page shows the cloud connection status over on the right showing the Zyxel NWA220AX-6E is online, connected to Nebula, and is registered. This page also shows the MAC address and serial number as well as what channels your wireless is on and the current transmit power. The settings page has IP and VLAN settings. By default, the Zyxel NWA220AX-6E is set to DHCP but you can set up a static IP here as well as setup proxy access. The last page has a few maintenance options. You can run shell scripts there and remote capture or run diagnostics if you are having issues. You also have access to the logs here as well. Beyond that any actual wireless or radio settings are not on the web interface, you will have to use Nebula to get to those.


While the Nebula app is useful for adding devices and handling things on the go, the web interface was bare bones. So the majority of your time is going to be using the cloud-based Nebula interface to control the Zyxel NWA220AX-6E. Using the same login that we created on the app once you log in to the Nebula control center the main landing page tries to pack in as much information as possible. In the picture below this was right after the initial setup so the graphs haven’t filled in but right up top, you have the status of all Zyxel devices all broken down by device. For access points, it shows we have one online and currently zero load. Then below that you have access points ranked by usage which on a complete job site this would show if you have a device being overloaded and SSIDs are listed by usage as well. Wireless clients are listed by usage, OS, and manufacturer. The entire landing page is customizable, you can move all of the widgets around and add a few more. There are a bunch by default that are specific to other devices like a Zyxel firewall or switch. Then over on the left are icons for the nebula control panel menu with the top icon that looks like a speedometer being the dashboard landing page.

The second icon down is the topology page. This is going to show the network topology as far as can be seen from Zyxel devices which in our case shows the NWA220AX-6E and then any devices connected to it wirelessly. Each icon includes the device's MAC address and shows the device status with a green, orange, or red dot. It also shows what switch the NWA220AX-6E is connected to as well. It isn’t seen in the picture below but wireless devices will get a red dashed line and the green lines are for wired devices.

The next menu option opens up a larger menu, this is the device menu. From here you can open up pages for each device type to see all of your Zyxel devices listed. For this review, the NWA220AX-6E access point is the only thing that matters so I only opened up that page. The access point page will list out all of your devices, I was surprised that this listing is wider than the nebula control center allows and you have the scroll bar at the bottom. Each device has its name, IP, model, MAC, configuration status, and more listed. Clicking on the device then opens up a full status page. That page includes a map showing the location if you have configured that and a photo if you upload a photo of its location. Then on the left, you can see things like channel utilization, power mode, the firmware version, and what channels the radios are running on. Down at the bottom, there are live tools that graph out the traffic for the last 24 hours and you can use diagnostic settings like ping, traceroute, a reboot button, and locator LED. You can also remote SSH in by setting what port you want SSH to use. Below that is another usage graph, only this one can do 2 hours, 1 day, 7 days, and 30 days with 7 and 30-day options only being for specific licenses. This graph shows channel utilization, upload and download, and 2.4 GHz and the 5 or 6 GHz traffic so you can go back and look at everything if there is an issue.


The next page is the map and floor plan page. This is important if you have multiple devices, especially across a larger building or location. You can lay out your floor plan and place the devices at their installed locations to help with future diagnostics. By default, the devices will be geo-located off of their IP which I guess for my location put me in a lake.

The icon on the menu that looks like a phone and a laptop drawing is the client's menu. This has three pages to it but the first page is the only one available to anyone not using a premium license. That page lists all of the devices connected to Zyxel devices and for wireless shows the connection status, the MAC address, IP address, and the MAC of the access point it is connected. You can click on a device and open up a page with more information including an event log for that device, topology, and the traffic graphs broken down by 2 hours, 24 hours, 7 days, and 30 days. You can also ping that device direction with a graph for that. The WiFi Aid page will list out any wireless, DHCP, or DNS failures and you can configure alerts to let you know if you reach a specific number of errors to give you advanced notice of an issue before the user lets you know. Then there is a connection log for the clients which lists out when devices connect and disconnect and a whole list of other notifications with some being specific to WiFi Aid or devices like a Zyxel firewall for DHCP issues.


Speaking of the licensing options, you do have the option to run a trial on any of the license packs. Things do get confusing though. Some of the competitors like EnGenius which I’ve covered in the past have just one license, their “Pro” plan. Zyxel has different options, most of these are specific to other devices with the Pro Pack being what you would want to use with the NWA220AX-6E or other access points.

The menu icon that looks like a graph is the monitor menu and you have pages broken down by device. For access points the main one would be the event log which you can see below. That lists out any activity. They have a page that shows wireless health which is graphed out by radio frequency and there is a summary report page a swell that breaks down usage by 1, 7, or 30 days.

Then down near the bottom of the box with the sliders in it is the configuration menu. This is where we can finally get to setting things up. The first option in the configuration menu is WiFi SSID settings. This is where you can create or change your SSIDs. Zyxel has an advanced mode switch which can keep things simple or open up other options. On the simple page you just name your SSID, pick the security type, and set up a password. The advanced menu opens up options like a programable SSID, tagging SSIDs to work only on specific access points, guest network, rate limiting, and locking an SSID to a specific radio band.


While the SSID setup page has an advanced mode, it was still very limited. Most of the real advanced user stuff is all on the SSID advanced settings page. Here you can dive into different sign-in methods like using a click to continue captive portal page and vouchers like when you see a wifi password on your receipt. You have more security options and also local bridged mode, NAT mode, and tunnel mode. You can also rate limit users on their download and upload here which is a nice feature that lets you give more or less bandwidth depending on the SSID you are using. This is also where you can set an SSID to be on a specific VLAN.

They have a page dedicated to configuring your captive portal if you set up your SSID to utilize that. You can upload a company logo and include a message. You can also change the success message and change how the portal handles completion. Up top, they have an option to change the page theme, but there is just the one default theme currently available.

There is then the SSID availability page, this is where you can set an SSID to be hidden and to set up a schedule as to when it runs at all. You can create a schedule template and apply it to multiple SSIDs or set one specific to any SSID. For businesses, this can be a great way to help protect your network by turning SSIDs off outside of business hours.

All of the radio settings are together on one page which is under the access point configuration menu. Right a the top they have you pick your country, this helps make sure the access point is running on the correct frequencies for that country, and with this being a 6GHz compatible AP they give you a list of countries that allow it. From there you can select the type of deployment you are using the NWA220AX-6E. You have single AP, Low Density for 2-5 APs, moderate density for 6-9 APs, and high density for more than 10 APs. Each setting will change the radio settings. Specifically, as you go up through the density it drops down the output power and lowers the channel width to help avoid interference in those situations. It also changes the DFS settings and the channel deployment settings. Down near the bottom of the page Zyxel also has WLAN rate control settings, for a single AP they are set across the board but as you go up in density those also tighten up as well, on 5GHz and especially on 2.4GHz.


There is a traffic shaping page where you can add rules to specific VLANs. The security service page is specific to a few of the paid license packs. The first setting available on there is application visibility and optimization which can throttle bandwidth by application. The threat protection setting is a DNS threat and IP reputation filter that will help black phishing and botnets. This does have an option where the user will get a warning but can click past it. You can also set found issues to forward to a specific notification page as well. They have a list of categories that you can pick from and you also have white lists for on-network users and specific DNS threats if you run into something specific that you trust but is tagged. This can be configured to be on or off depending on the SSID. You also get full logs as well. Sadly this isn’t an option available on the NWA220AX-6E, I did include a picture of the Zyxel APs that do support the feature.


The last access point specific page is the AP and port settings page. This is where you can turn the lights on and off on the access point. You also have load balancing options where you can set maximum client counts and a smart classroom mode for e-learning situations. You can also configure how the AP handles an extra LAN port which the NWA220AX-6E does have one. This can turn it off or you can limit it to just one VLAN.

Down below the configuration menu on the left side, there are a few other menus available on the nebula control center. The first one with a key opens up the licenses and inventory page. This is where you can keep track of all of your licensing and with Zyxel depending on what hardware you are running they have a whole list of different license options which I touched on earlier. There is then a full list of pages under the organization wide management menu. Some of these are pro license specific like the change log and firmware management. You can change your org information as well here and a lot more.


While the NWA220AX-6E has a 4x4 radio and antenna configuration, that does lead to one issue when testing that we have run into with covering other access points as well. There really aren’t any 4x4 wireless devices on the market so our testing and the overall use are limited most of the time to 2x2. That is fine though, that helps keep headroom left on the access point so more than one person can hit it hard if needed. For our testing, I benchmarked using openspeedtest from a Samsung S21 Ultra to a server on the network. The NWA220AX-6E was connected to a 2.5G network connection, as was the server. I also tested the EnGenius ECW336 and two outdoor EnGenius APs as well. For the ECW336 and the NWA220AX-6E, I tested with 5GHz and 6 GHz connections. For the NWA220AX-6E this is important because of its flexband configuration where you can only get 5 or 6 GHz at once. The difference between 5GHz and 6GHz is night and day and with the NWA220AX-6E you can see it outperform the ECW336 slightly. That said the NWA220AX-6E performed well in both radio frequencies.
|
|
Down |
Up |
Jitter |
Ping |
Connection Speed |
|
EnGenius ECW260 |
831.5 Mbps |
643.5 Mbps |
0.2 ms |
4 ms |
1020 Mbps |
|
EnGenius ECW270 |
979.7 Mbps |
1055.1 Mbps |
0.1 ms |
2 ms |
1020 Mbps |
|
EnGenius ECW336 5 GHz |
930.6 Mbps |
881.7 Mbps |
0.7 ms |
8 ms |
1100 Mbps |
|
EnGenius ECW336 6 GHz |
1549.3 Mbps |
1640.9 Mbps |
1.0 ms |
5 ms |
2300 Mbps |
|
Zyxel NWA220AX-6E 5 GHz |
990.41 Mbps |
894.69 Mbps |
1.3 ms |
7.6 ms |
1100 Mbps |
|
Zyxel NWA220AX-6E 6 GHz |
1731.9 Mbps |
1645.6 Mbps |
0.5 ms |
7 ms |
2400 Mbps |
In addition to my other testing, I like to get a look at how access points are handling heat. For this, the NWA220AX-6E had been running for a full day but with a very light user load, or just myself. Loading up the access point is going to push things a lot further, this would be a baseline of what it will run day to day. In the top view, we can see more of the heat is up towards the front but we can also see that the plastic housing does utilize a framing structure that is visible here because it is holding more heat. Most of the heat though is on the back side of the NWA220AX-6E. Zyxel has designed the back with the ventilation holes so that makes sense but keep in mind when installed this will also be the side up against a ceiling. We can see that the ground screw on the back does connect right to the PCB because it is hot as well but on the back, the hottest spot is 52.3c with the rest in the mid 40’s.


