
By now, a lot of you most likely have figured out that I have a bit of a thing for various keyboards and mice. I’ve even been known to make sure the backlighting on my keyboard matches with my mouse and with my PC build as well. Oddly enough, through all of my keyboards the only time I have ever really customized a keyboard was when I had the chance to review a custom keyboard from Max Keyboard. The fact that I haven’t dug deeper into this is curious because generally I have a hard time leaving things alone, especially my cars and my computers. It’s not that I hadn’t seen the photos of everyone’s keyboards on r/mechanicalkeyboards and GeekHack, I just never did it myself due to not knowing enough and frankly not having the time. Well after reviewing the new Novatouch from Cooler Master, I decided to take advantage of the Cherry MX stems and dive a little deeper into keyboard customization and finally show everyone what it is all about. I reached out to a whole list of companies who make a variety of products to help you take your new mechanical keyboard and turn it into something completely unique, today I’m going to talk a little about what I found!
Products Supplied by:
Written by: Wes
Pictures by: Wes
The great thing about customizing something is that you can take something that a lot of people have and you can make it your own. In some cases what you like might be similar or the same thing that others with similar interests have done as well. A good example of this is seeing a sweet keyboard on Reddit or online somewhere and loving it so much that you go out and do the same thing to yours. Maybe you are feeling a little more creative and you put together your own design, or maybe you take someone else’s design and change it to fit your style a little more. Customizing your keyboard really means something different for each person. Hell, it’s very possible that you didn’t even know that you could customize your keyboard. So today I’m going to go through a few ways you can customize. Some of the things I’m going to touch on today might not be your style, but keep in mind the idea here is to show a few options. You should take these ideas and do your own thing. Speaking of, if you do end up doing anything to your keyboard or if you have in the past, post up pictures in the comments. I know I would love to see them!
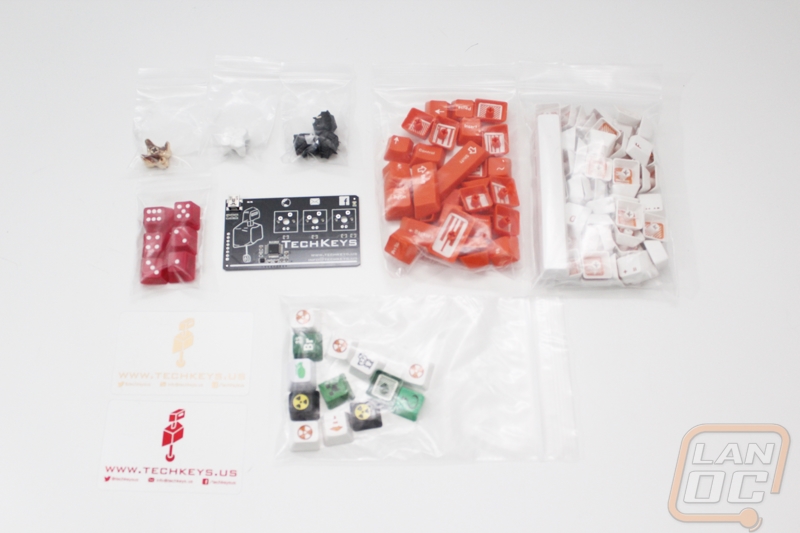
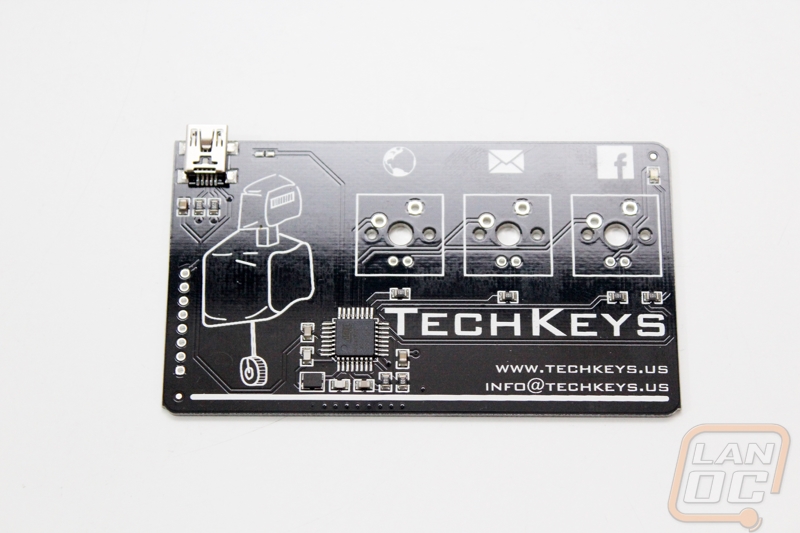
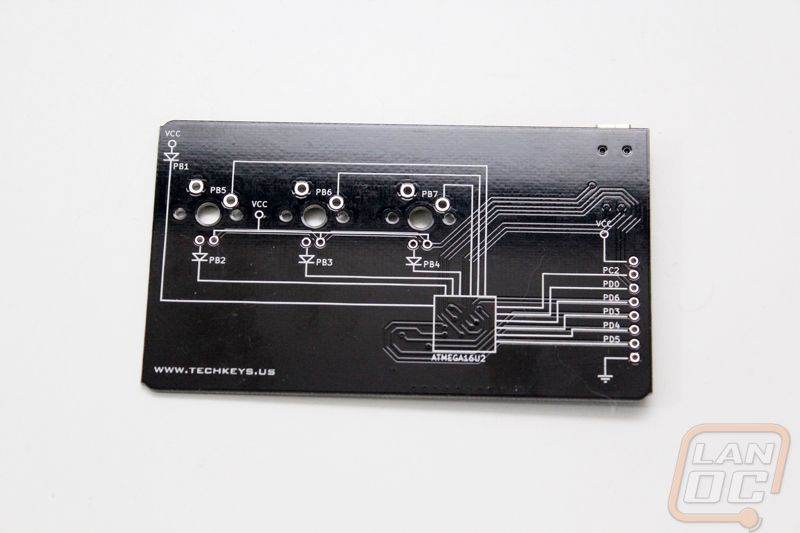
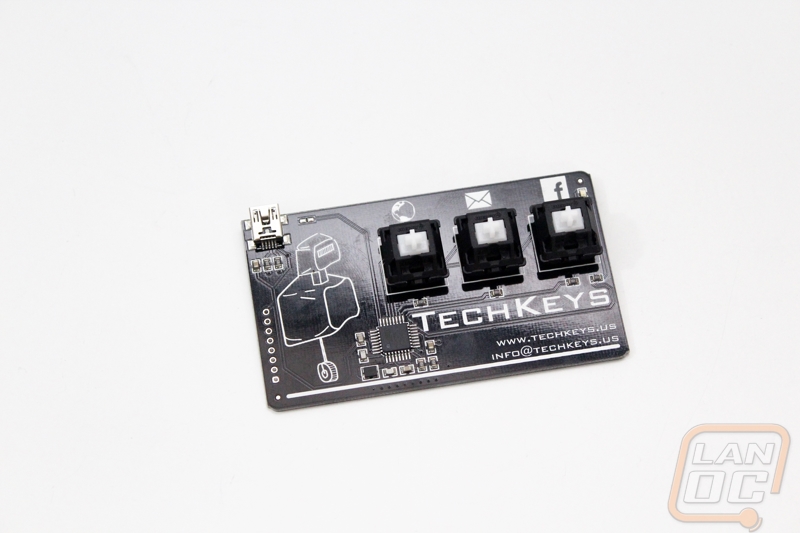
Techkeys has the coolest business card I have ever seen. Even more impressive is the card is actually completely functional. They even included three keys for me to install on the card. Once installed, when you plug the card the buttons will email Techkeys, open their website, and open their Facebook page.
Keycap Education
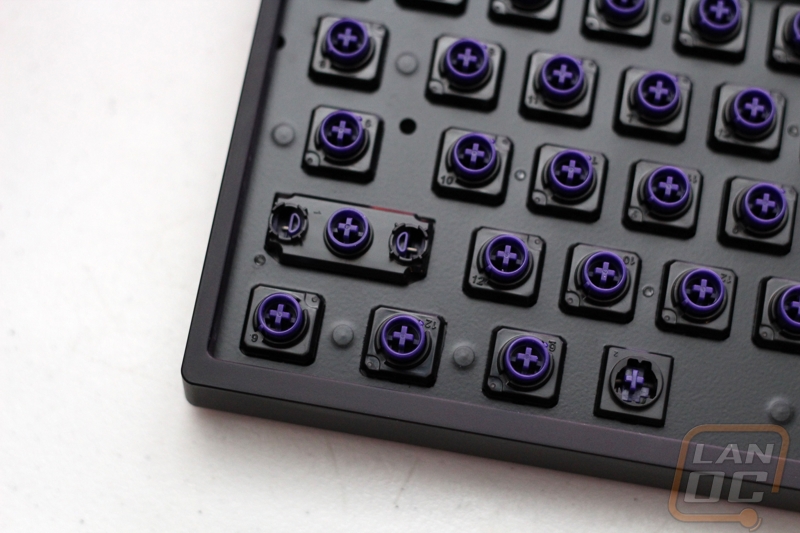
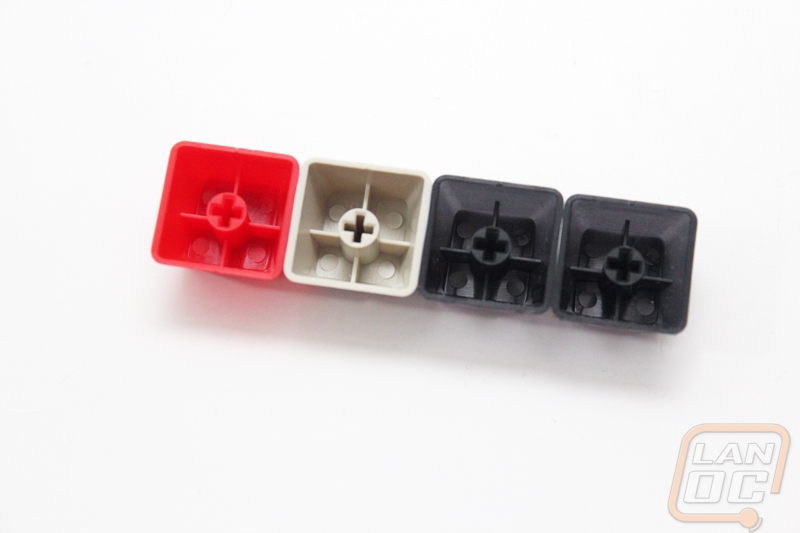
One of the easiest ways to completely change the look or performance of your keyboard is to replace all or most of its keycaps with a new keycap set. Depending on what keyboard you have this can be easy or a little complicated. For starters you need to know what kind of key switches you are running. The most popular keyswitch for customizing are Cherry MX keyswitches, thankfully most with mechanical keyboards will be running this switch. You can also customize your Topre keyboard as well but options are extremely limited, this is why Cooler Master designed their Novatouch keyboard with Topre capacitive keyswitches with Chery MX stems.
Beyond the keyswitch you also need to make sure you are running a standard key layout. Having a TKL or tenkeyless isn’t really any different than having a number pad for this situation, what you have to watch for is a longer or shorter spacebar, a taller enter key, or smaller or larger function keys. A tall enter key means you have an ISO layout where a standard layout is an ANSI. Having an ISO keyboard isn’t the end of the world they do make keysets for that design as well, although they are a little harder to find at times due to the layout being less prevalent.
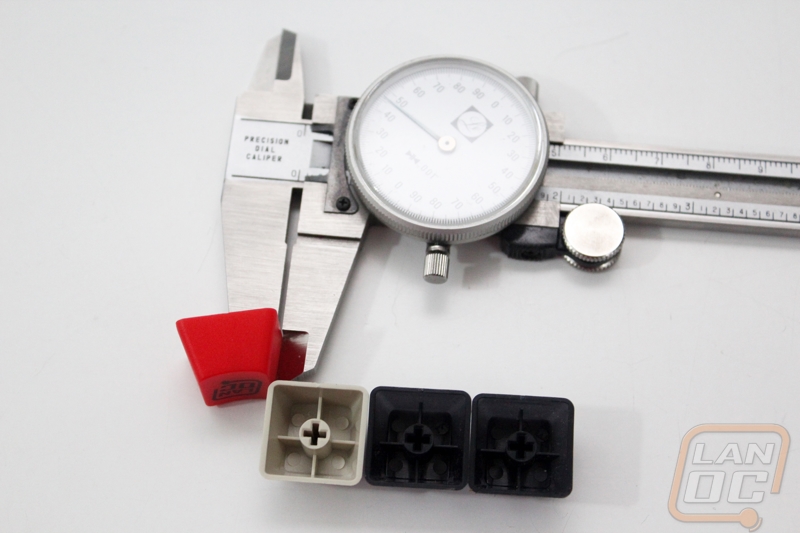
Now that you know what layout you have, next should decide what key material that you would like your new keycaps to be made of. When I talked earlier I mentioned that swapping keycaps can change both the aesthetics and the performance of your keyboard, the material of your keycaps is what effects performance. There are three main options ABS, PBT, and POM. PWM (Polyoxymethyleneor) isn’t really used these days so our focus will be on ABS (Acrylonitrile Butadiene Styrene) and PBT (Polybutylene Terephtalate). ABS is what you see on most keyboards, it is a little softer that PBT and that means the texture wears faster but it also is less likely to break. PBT is harder but more brittle; it also has a rougher texture that also holds up better over time. PBT is typically preferred but more costly. There are sometimes other materials used like metals that are used in custom keycaps as well, they few and far between though.
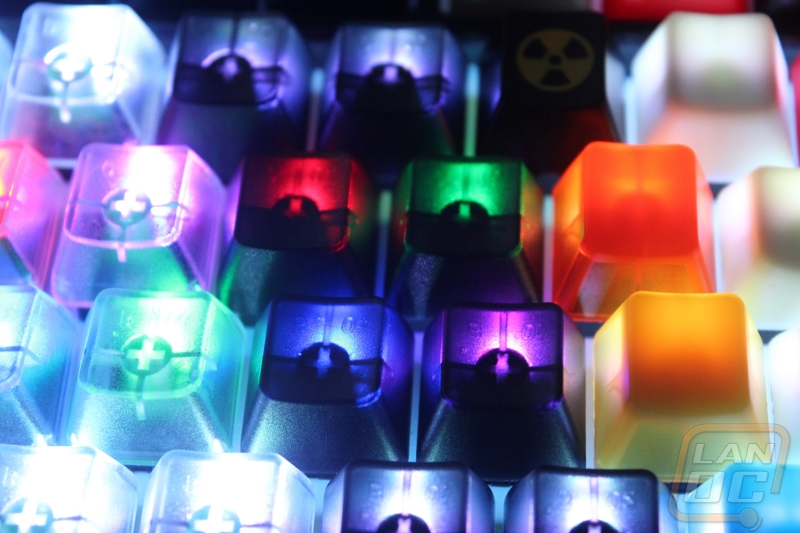
Do you have backlighting? Well if you do your options are going to be more limited. Most keycaps designed for backlighting are molded in a transparent ABS, painted, and then etched with your legends. There are a few doubleshot backlit keycap sets available but in a lot of cases they will have a striped effect due to the doubleshot process.
So what is doubleshot? Well this is when they manufacture the keycap using two different plastic colors and mold in the letter on the keycap (the legend). Doubleshot keycaps will never have the legend wear off from use. Other options for legends are dyesub, pad printing, laser etching with infilling and UV printing. Pad printing is a cheap and easy option that is very popular, it doesn’t hold up as well though. Dyesub holds up well and allows you to print in multiple colors but is expensive. Laser etching and laser etching with infill is used a lot as well, it holds up very well but shows dirt quickly. Lastly UV Printing is common with custom and novelty keycaps because it is a cheaper way to make low production quantities. In most cases, double shot keycaps are the best option.
UV Printed
Laser Etched
Doubleshot
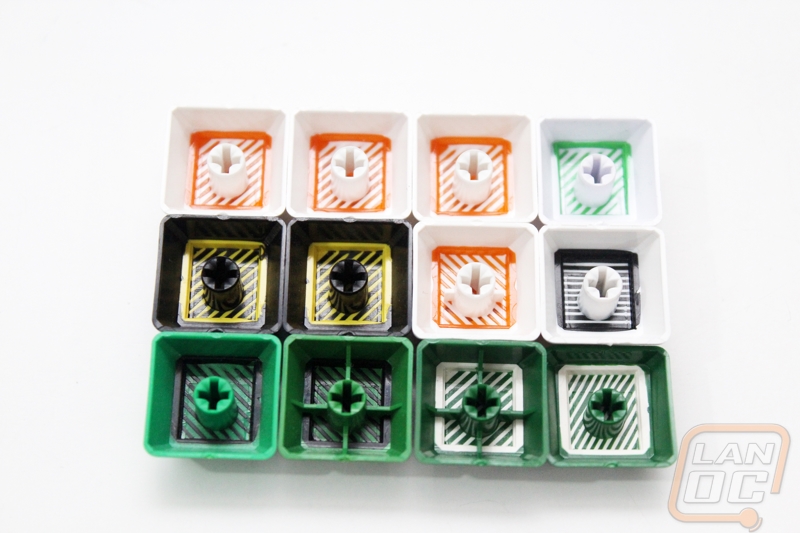
It might seem crazy but there are still other things to consider with keycaps. Different keycaps have different side profiles and there are also two different shapes for the top of the key. The two top options are Cylindrical and Spherical. Cylindrical is what you would normally see, but right now there is a trend to use older looking keycaps with a Spherical top shape. Side profiles range even more but most fall into a sculptured profile and a flat profile. Different venders and manufactures have their own profiles. A lot follow the Filco/OEM profile, but today we will also take a look at a Cherry profile and Signature Plastics (Pimpmykeyboard) DCS and DSA. Cherry is shorter than the Filco/OEM profile but with a similar profile. DCS is very close to the Cherry profile but with a different angle on the bottom two rows. DCS also specifies that the keycaps have a cylindrical top as well. DSA has a cylindrical top and a flat profile.
DCS
DSA
Keysets
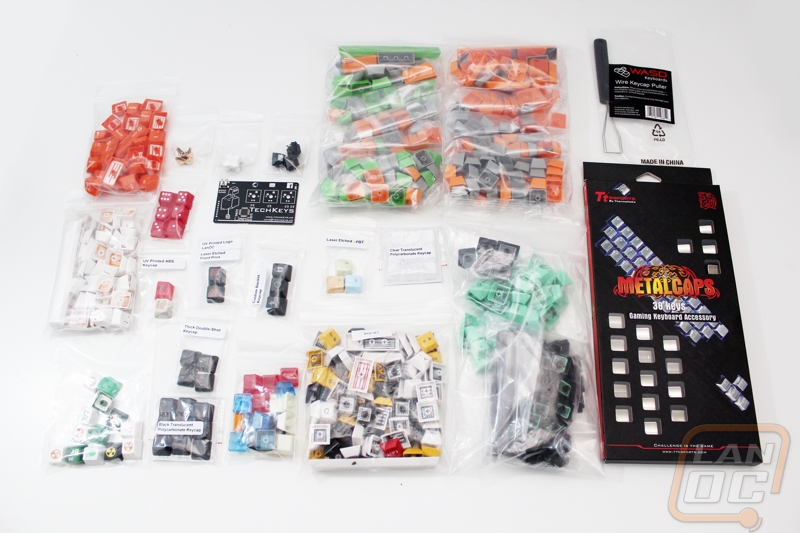
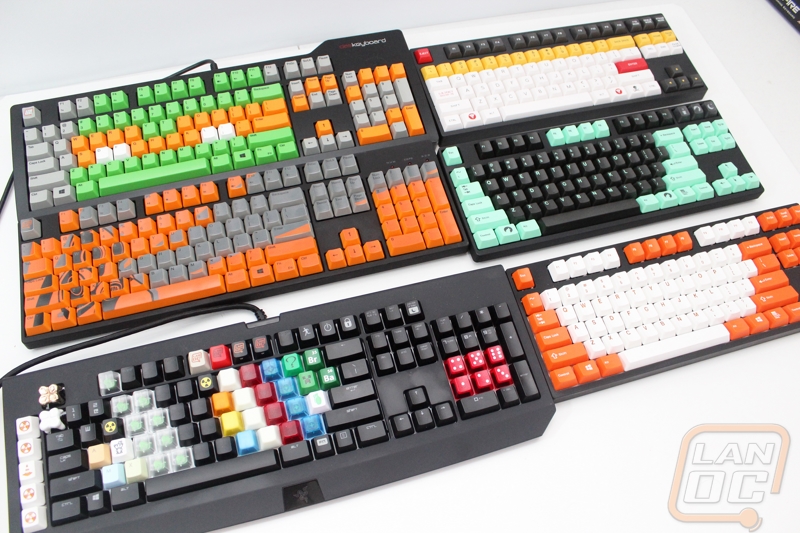
Now that you are completely bored to death with information on keycaps lets finally get our hands dirty and check out a few different options. As you may have noticed at the start of this article, we had a whole list of different companies get involved with this article. For keycap sets Techkey, Pimpmykeyboard, and Thermaltake all sent keysets for a total of four different sets (two from Pimpmykeyboard). Each of the four sets is unique in its own way both aesthetically and also when it comes to the different profiles and build materials that I talked about in the last section.
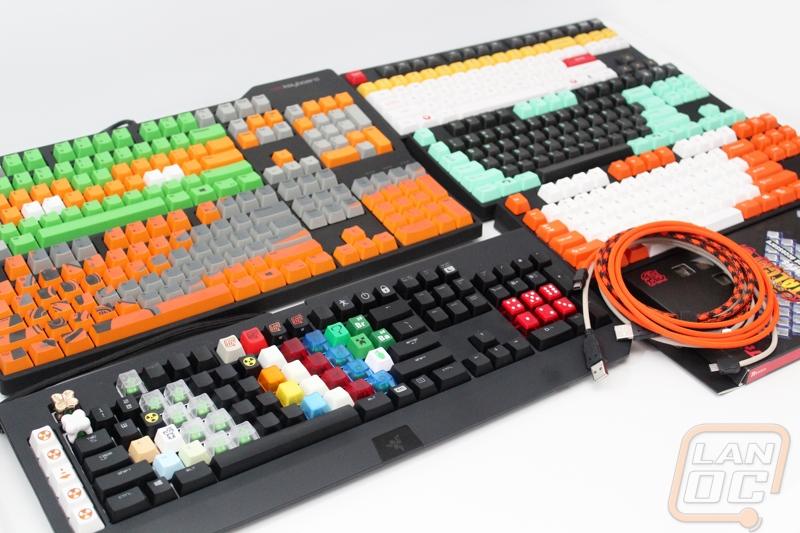
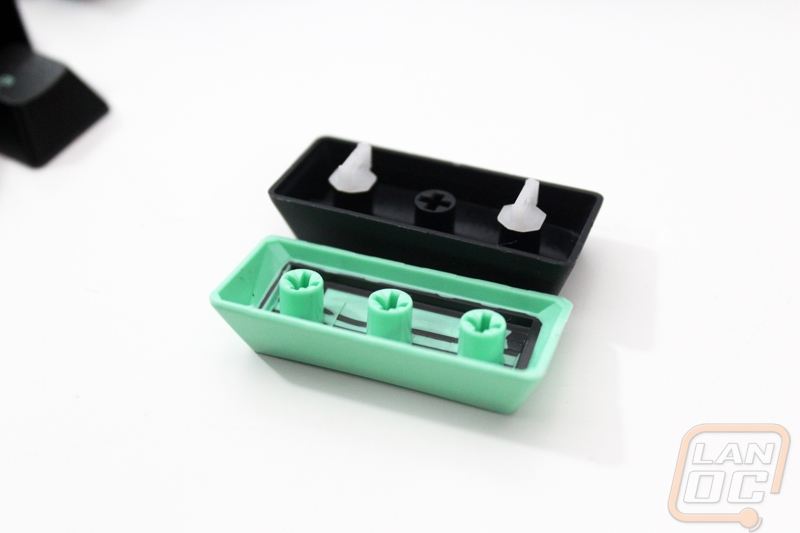
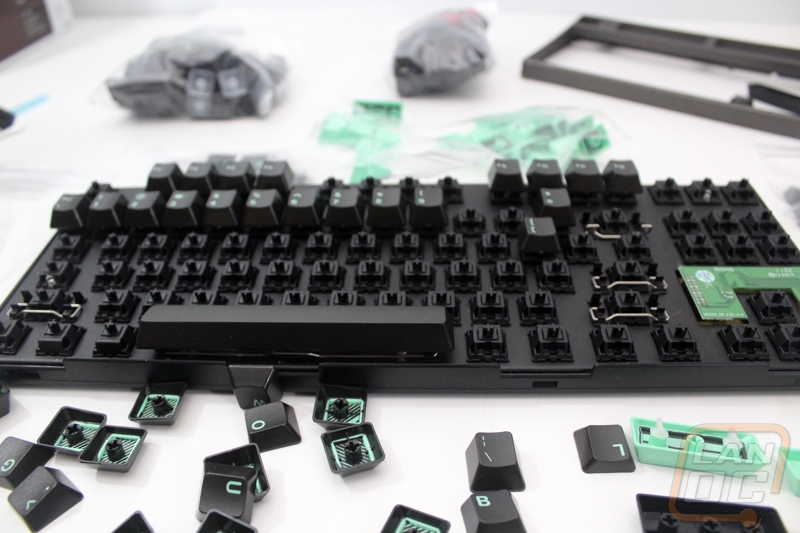
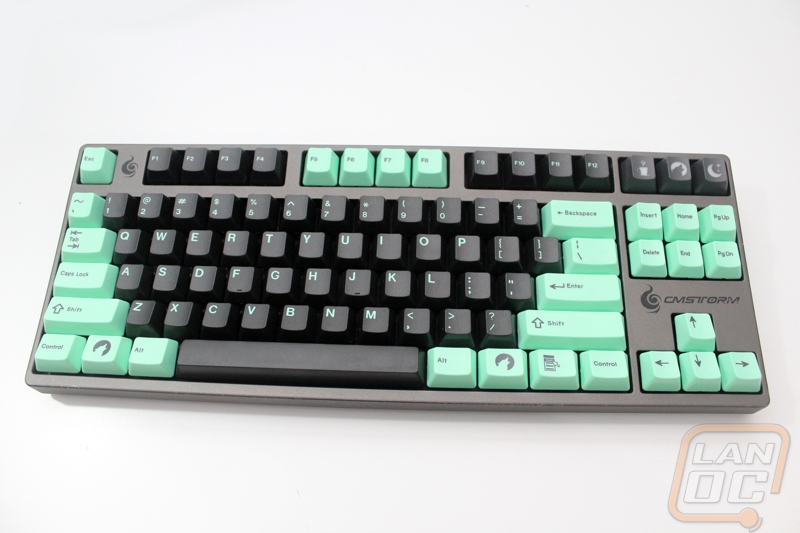
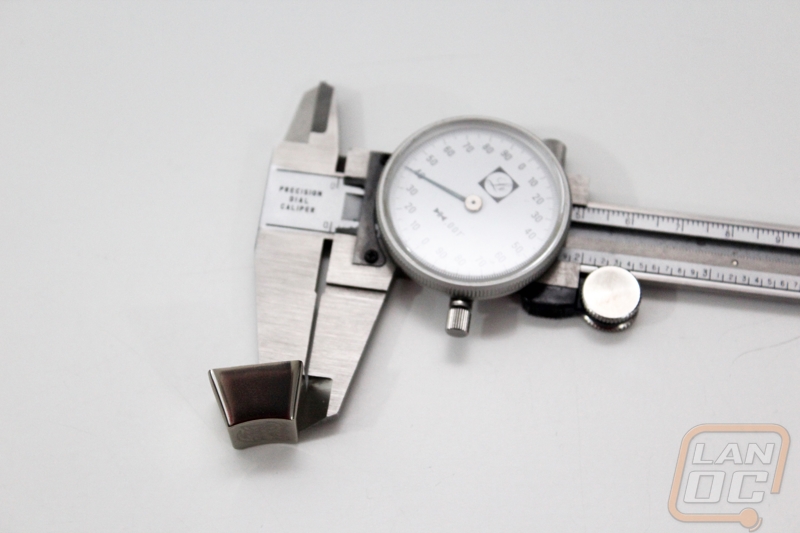
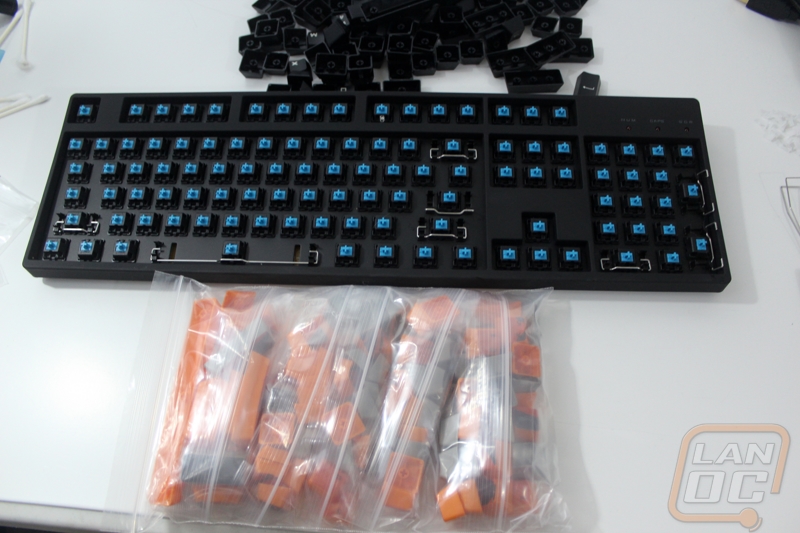
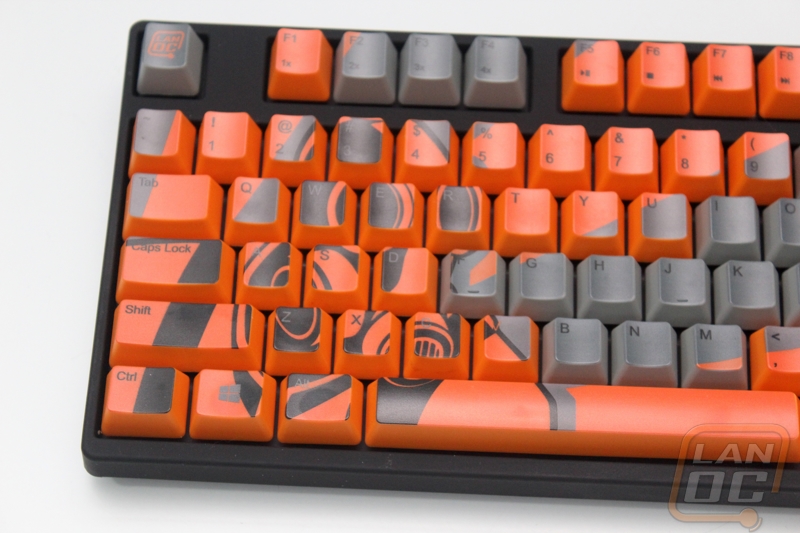
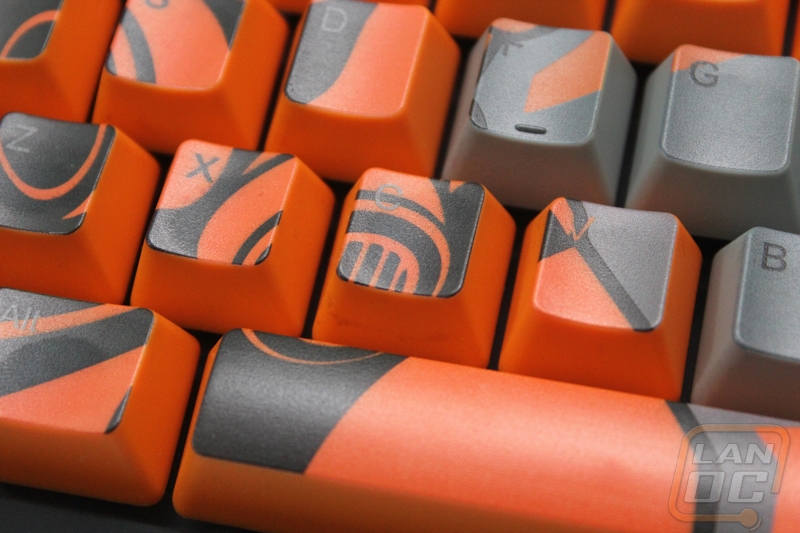
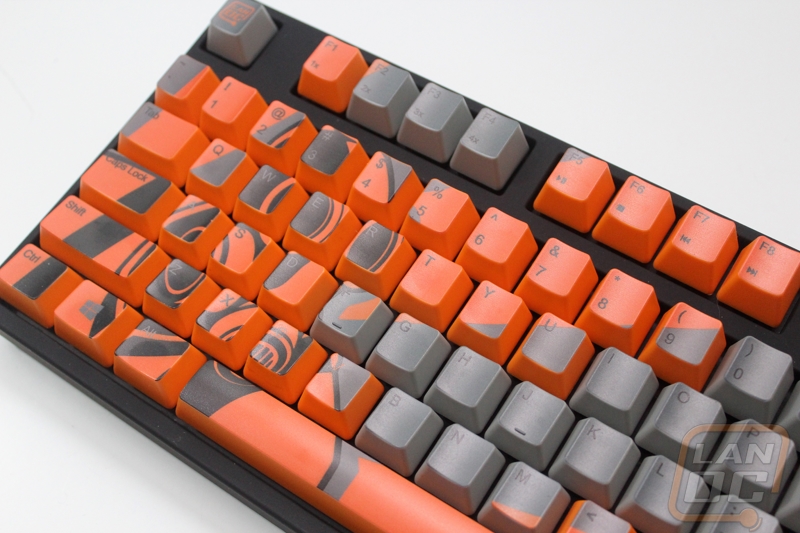
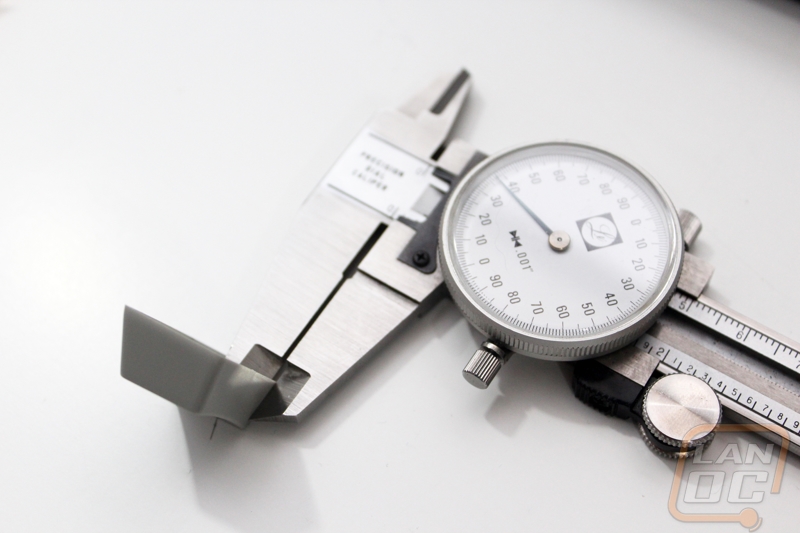
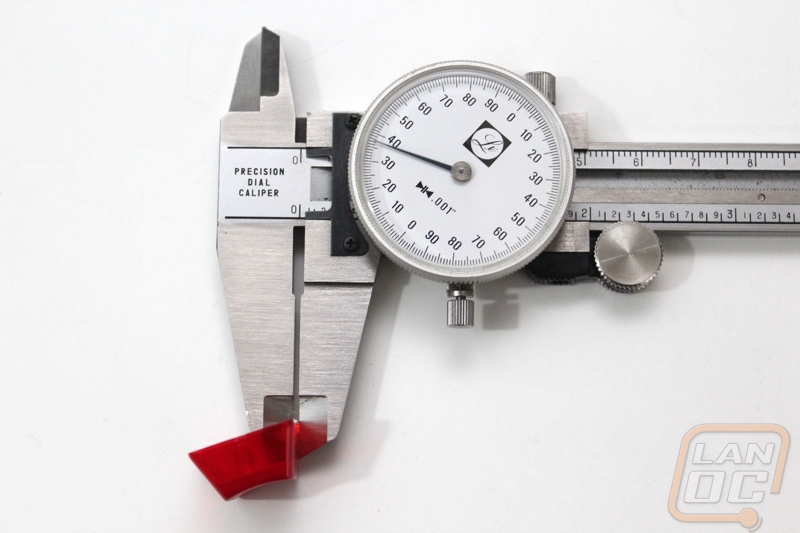
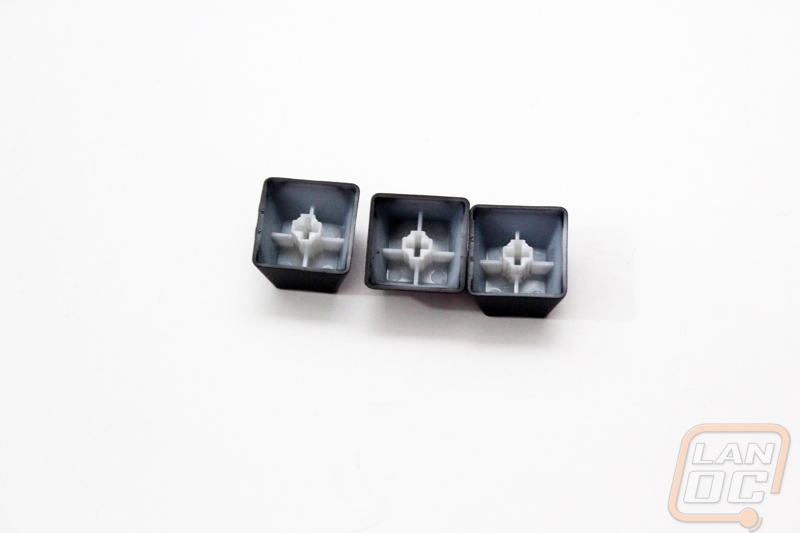
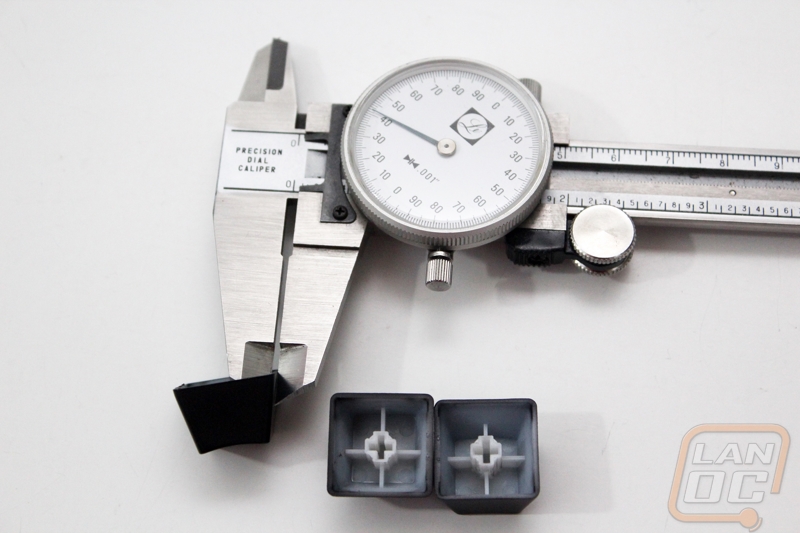
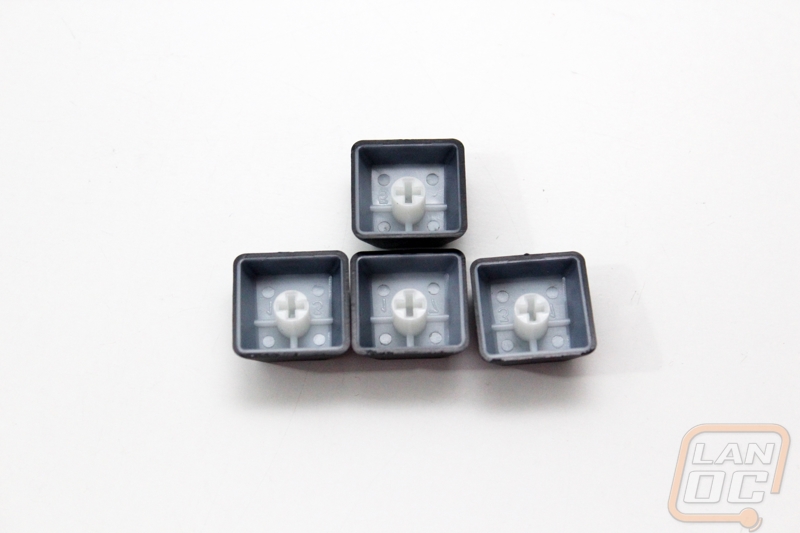
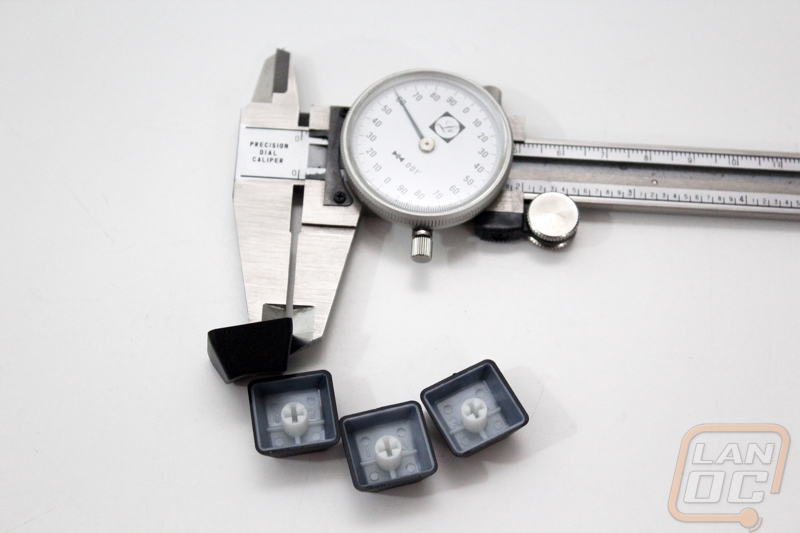
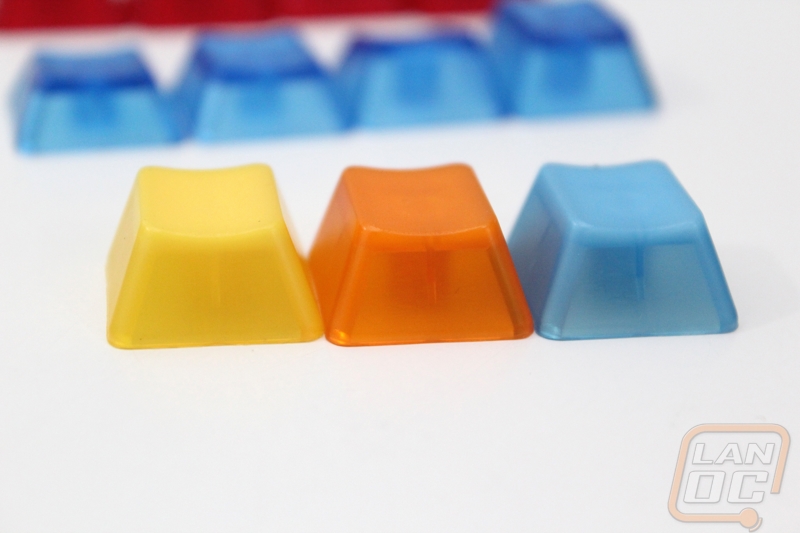
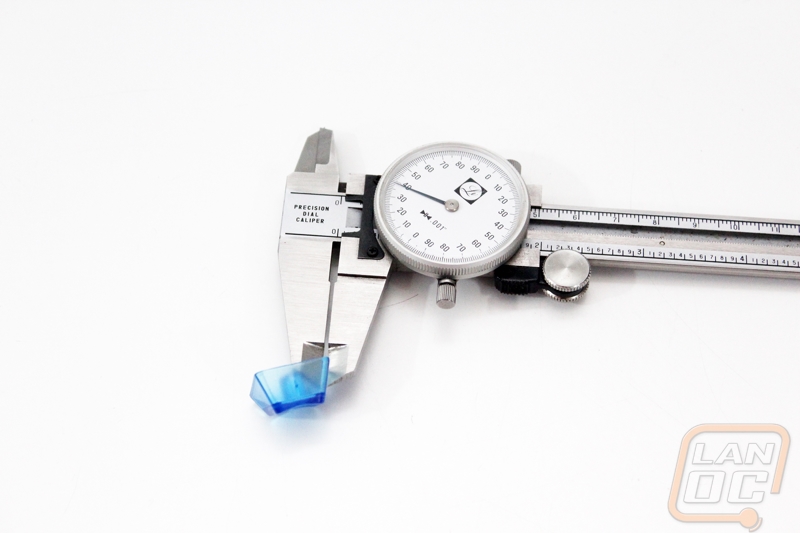
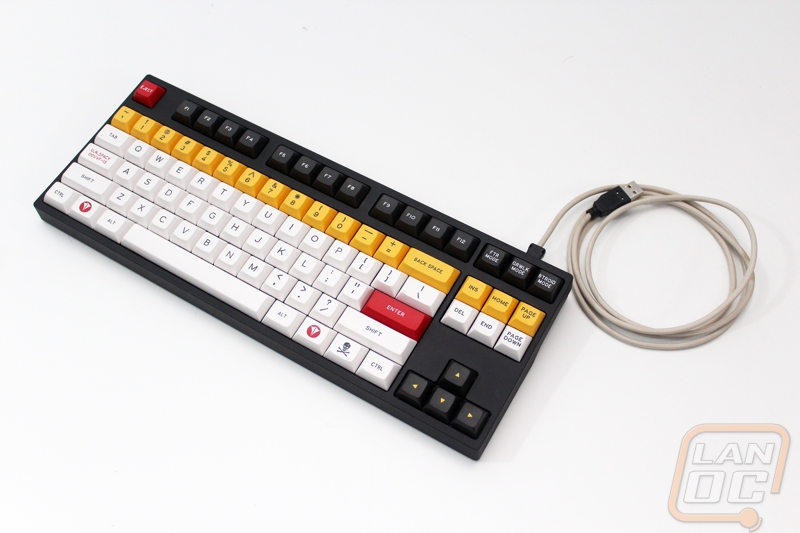
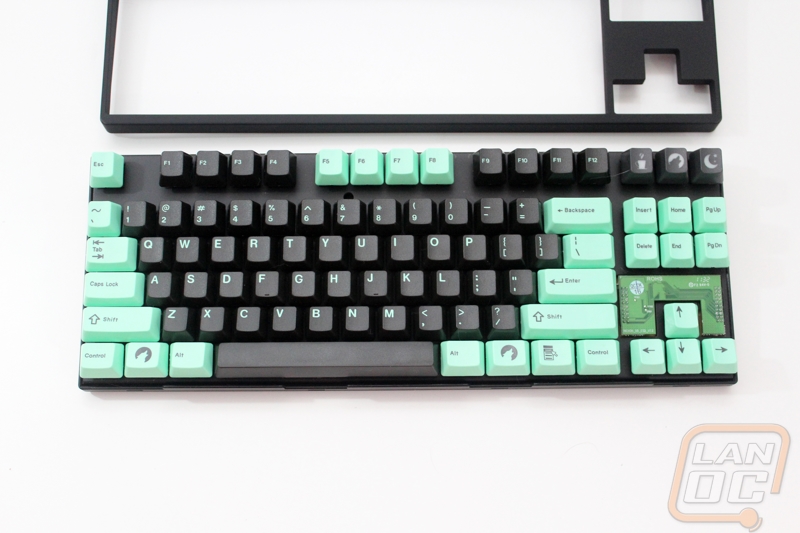
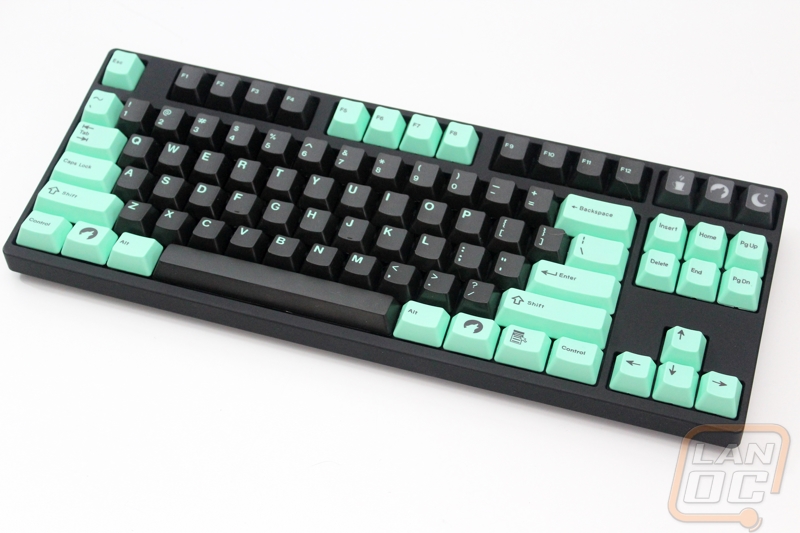
To start things off PimpMyKeyboard sent over their Skull Squadron set. I decided to use the set with the Novatouch. The Skull Squadron keyset is a DSA keyset so we know that it will have a flat profile when viewed from the side and the tops of the keycaps have a spherical top shape. Looking at the keycaps also shows up that they a doubleshot, we can see this from the two different colors visible on the back of the keys. While measuring the set I noted that most of the keycaps are .44mm thick but the spacebar was noticeably thicker at .67mm. Installing the set on the Novatouch was extremely easy because the Novatouch uses a Cherry stabilizer, that means I didn’t have to fit with those metal bars on the wider keys like the spacebar. The Skull Squadron did also come with a few extra keys, the F and J keys had a special thinner design to help position your hands when typing but they included standard keys as well.

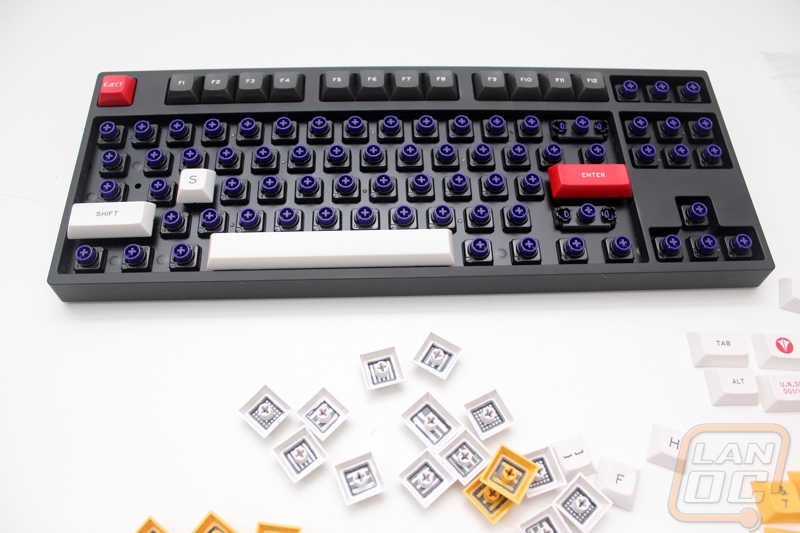
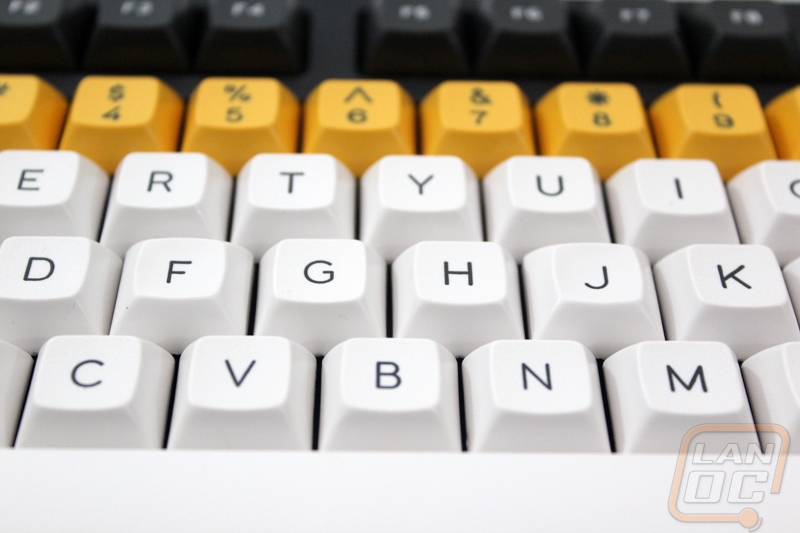
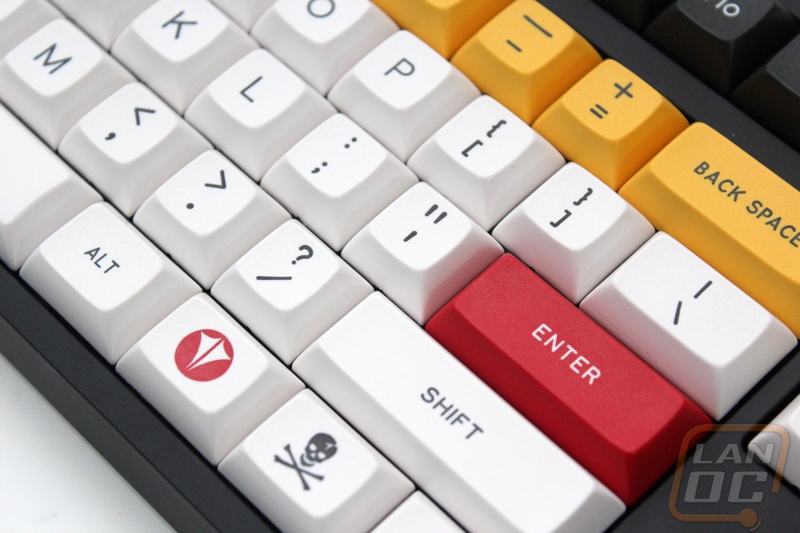
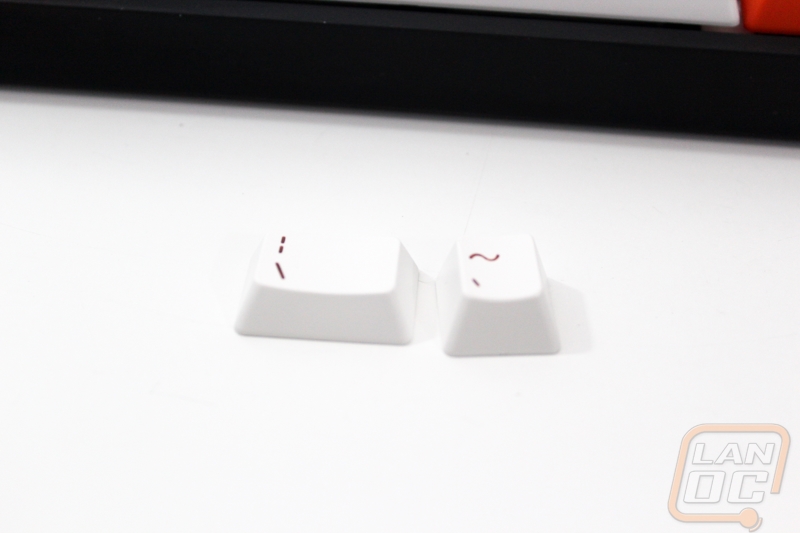
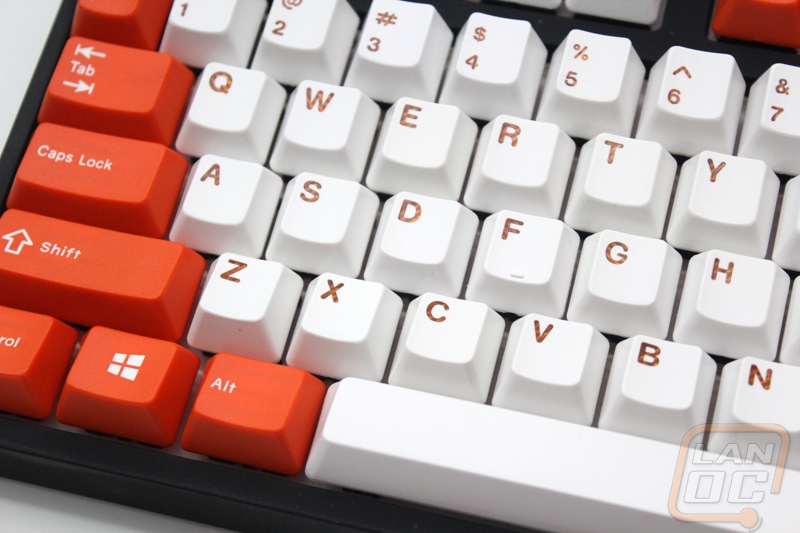
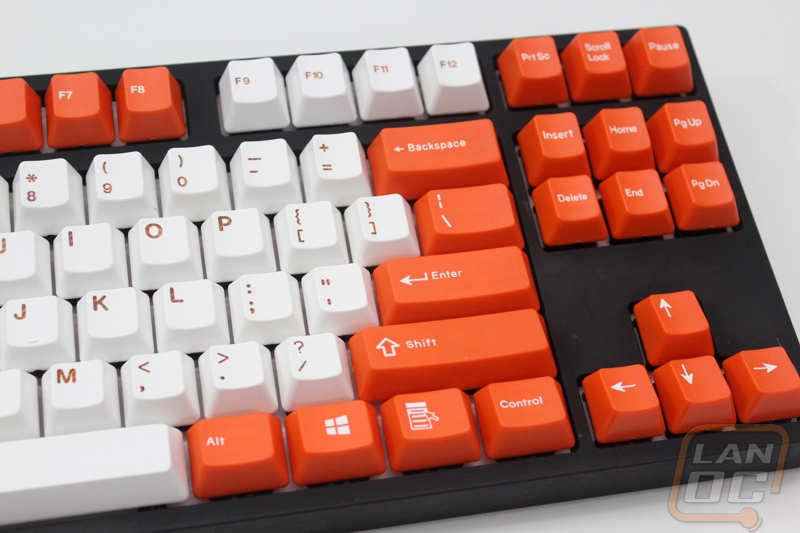
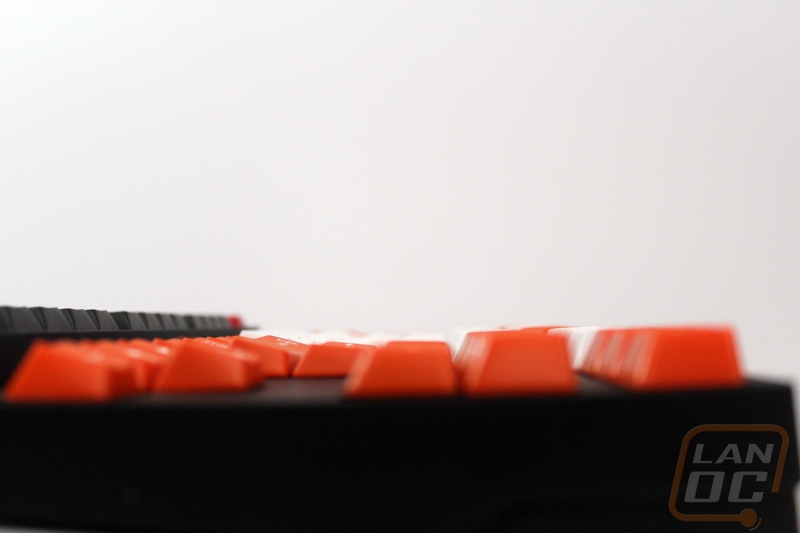
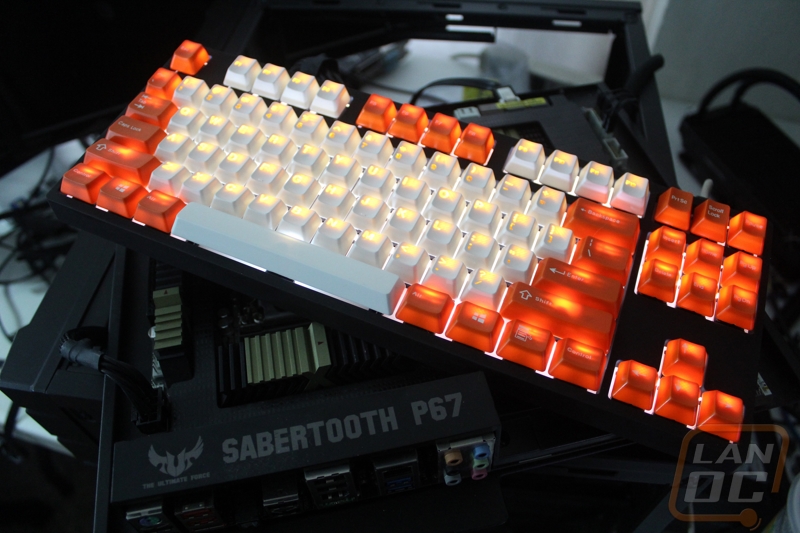
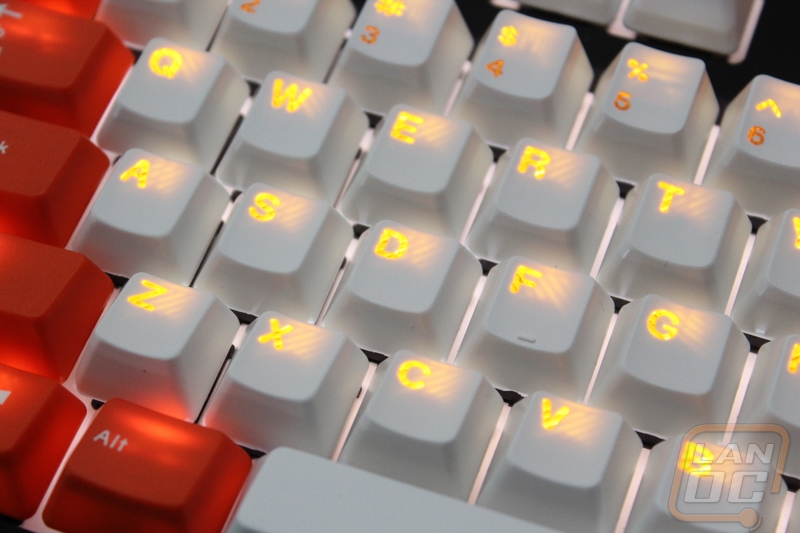
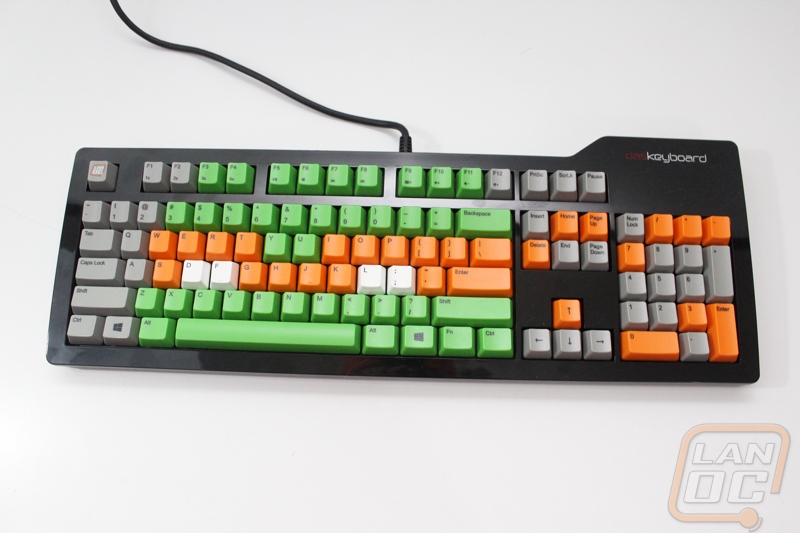
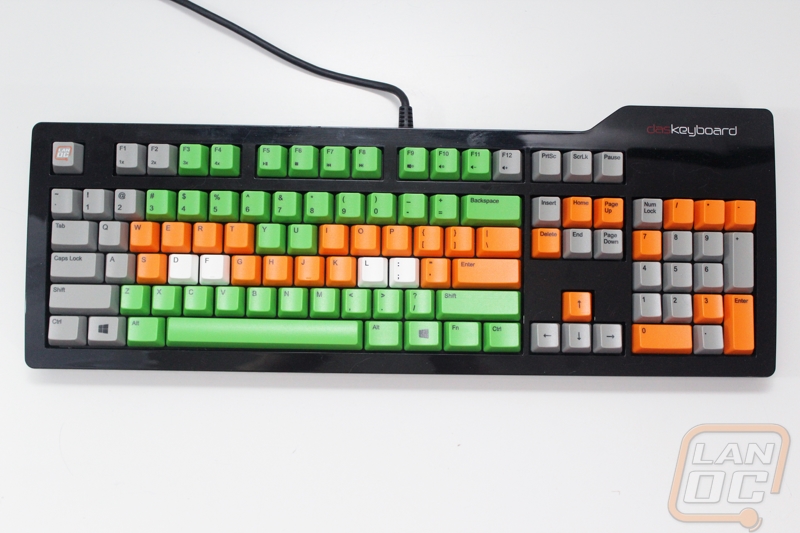
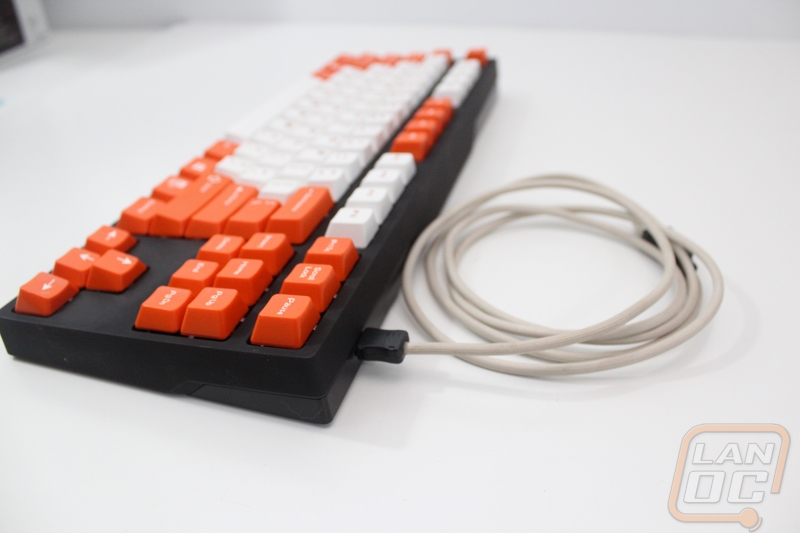
Next, I moved on to Cherry Replica Set sent over by Techkeys. Techkeys is a keyboard enthusiast who designs and sells various novelty keycaps and sometimes gets involved with keycap set group buys. Many keycap sets are only available during their group buy and then never again, Techkeys will sometimes pick up a few extra sets to make sure people can get the chance later on. They currently have eight different sets listed on their website but of those, only four still have the base sets available. The Cherry Replica Set photographed below is an ABS keycap set that has a DCS profile with orange and white keys. The Orange keys have white lettering but the white keys have a cool translucent poly legend. To really do this set justice I installed them on the Cooler Master Quickfire Rapid-I, the white backlighting will really show off the orange translucent lettering. Just like with the Novatouch, the installation went very smoothly with the Cherry stabilizers. They do include two extra keys with this set as well, this time they are two keys that are technically not function keys, so they give you the option to do them in orange or white. I stuck with orange, but it’s nice to have the option.
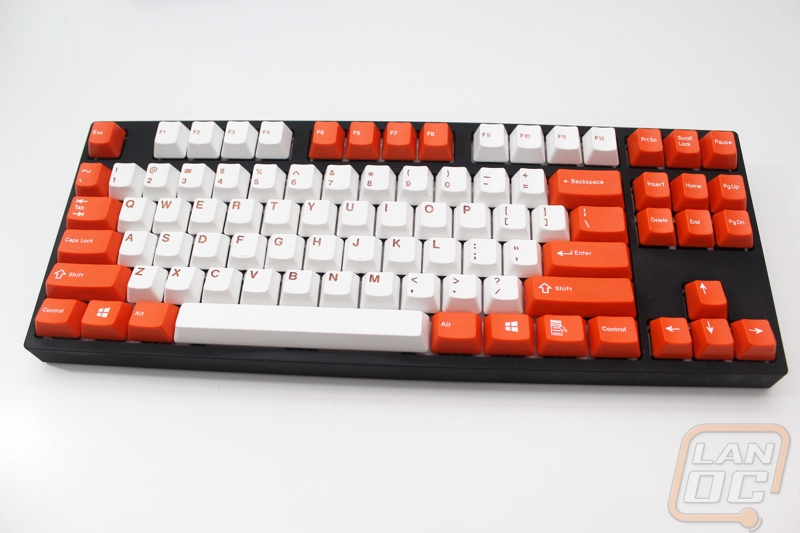
Maybe it’s my love for orange, but when the backlighting it turned on I am completely blown away with how good this keyset looks. Add to that the various lighting effects that you can do with the Rapid-I and it is a head turner for sure!
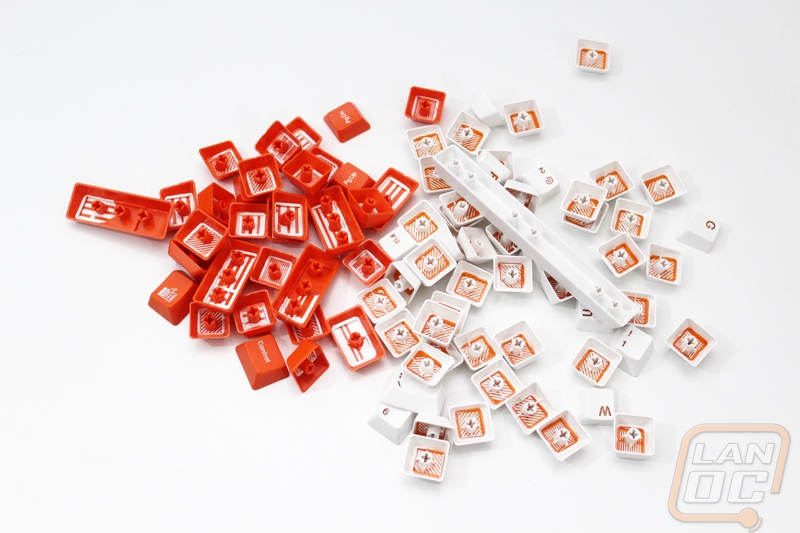
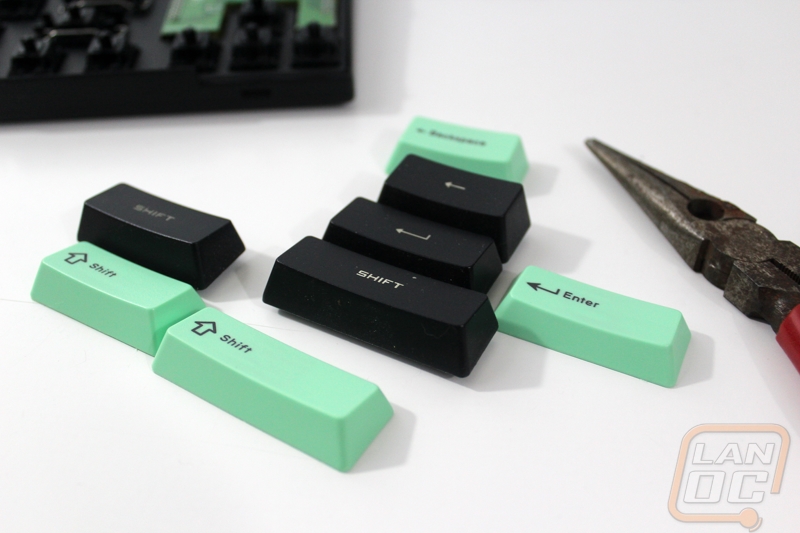
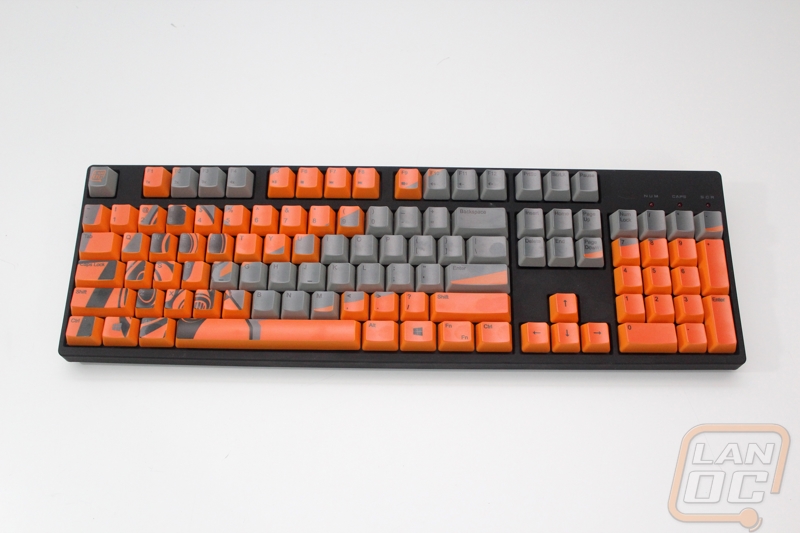
For the second keyset that PimpMyKeyboard sent over they sent over the Midnight Alpha keyset. This kit is a little unique because it is the only custom keycap set that is available on for sale outside of their group buy listing. You can check it out HERE. The Midnight Alpha keyset is another DCS profile set that also had Cherry replica legends. This means the F5-F8 keys are also color matched to the modifier keys. They use a turquoise for the legends on what they are calling a dark blue keycap but it looks black to me. They also have additional keys that follow the same midnight theme but with glow in the dark legends on them as well, I used those to replace the print screen and scroll lock buttons. Installing this keyset was a little more of a challenge because the older Quickfire Rapid uses a Filco style stabilizer. That means I had to fight with the metal clips and then move the small plastic stabilizers from the old keycaps to the new keycaps. When doing that I noticed that they were too loose in the Midnight Alpha keyset so I had to put a small piece of tape on each one before installing it to tighten up the fit.

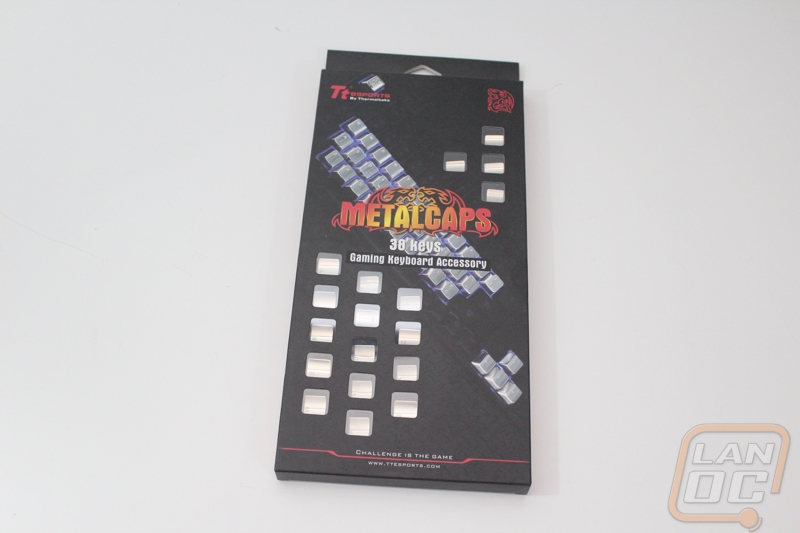
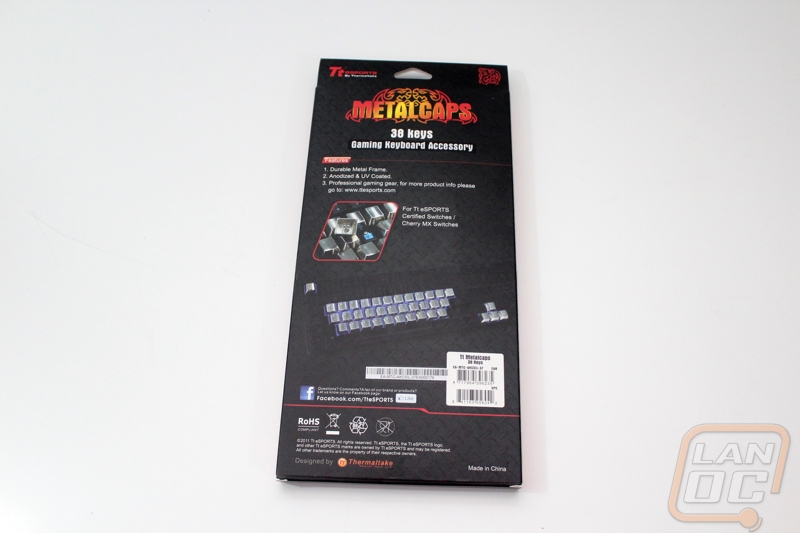
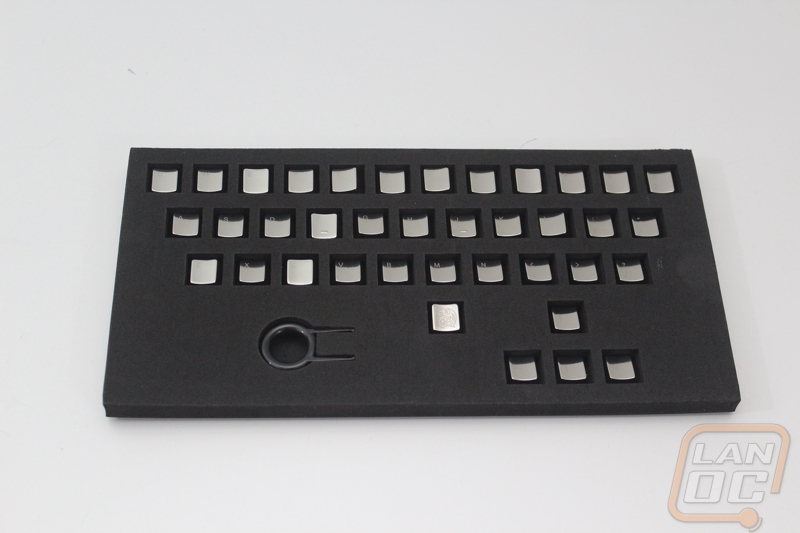
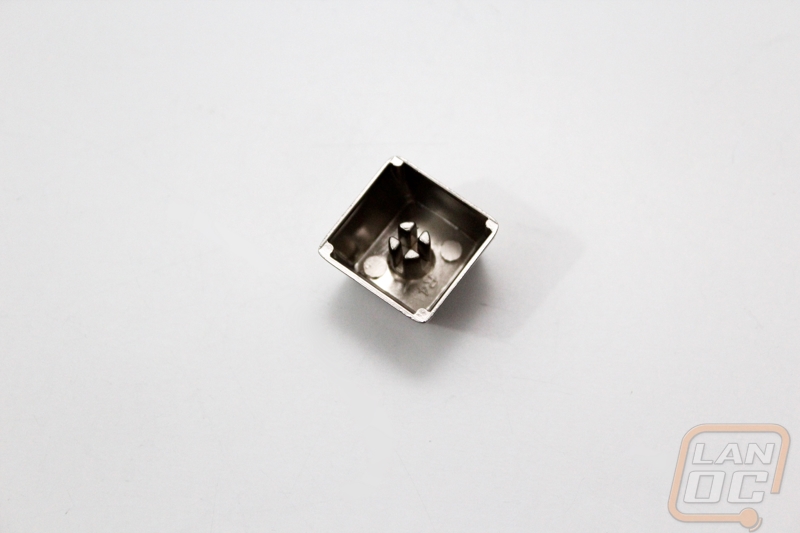
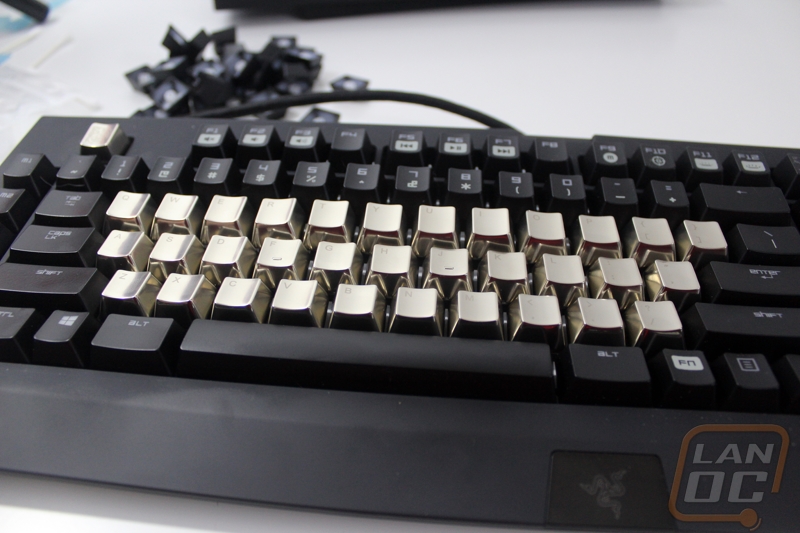
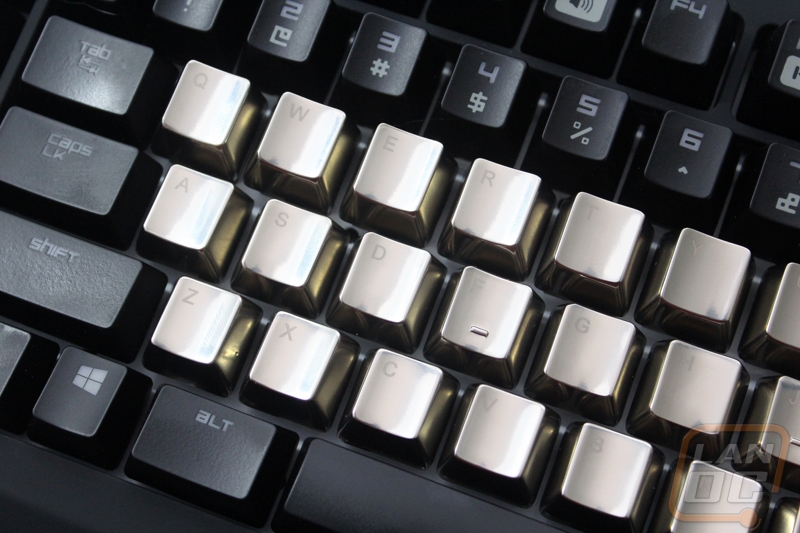
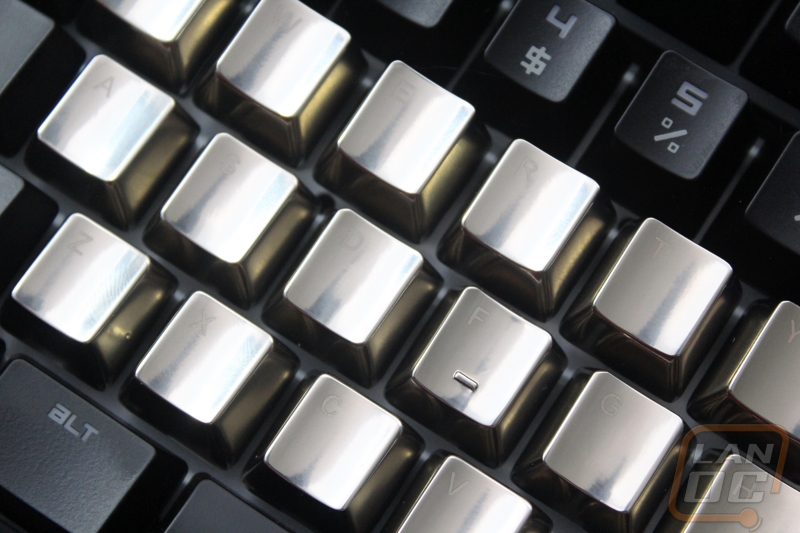
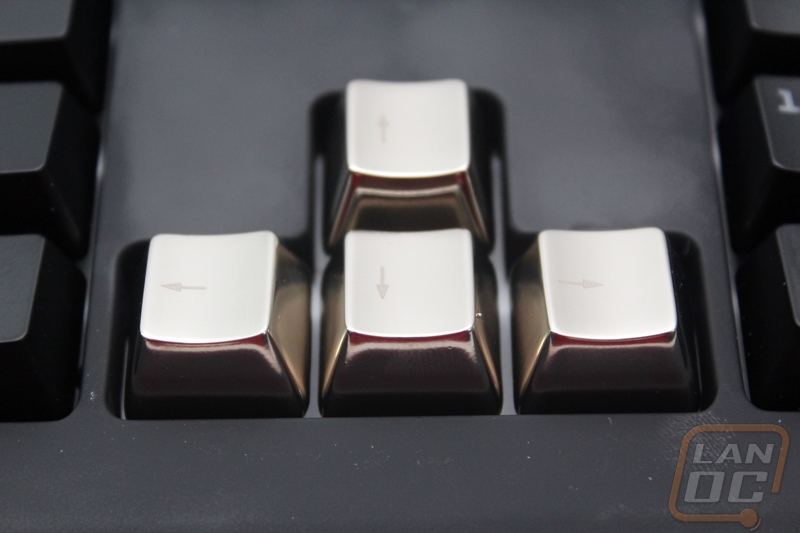
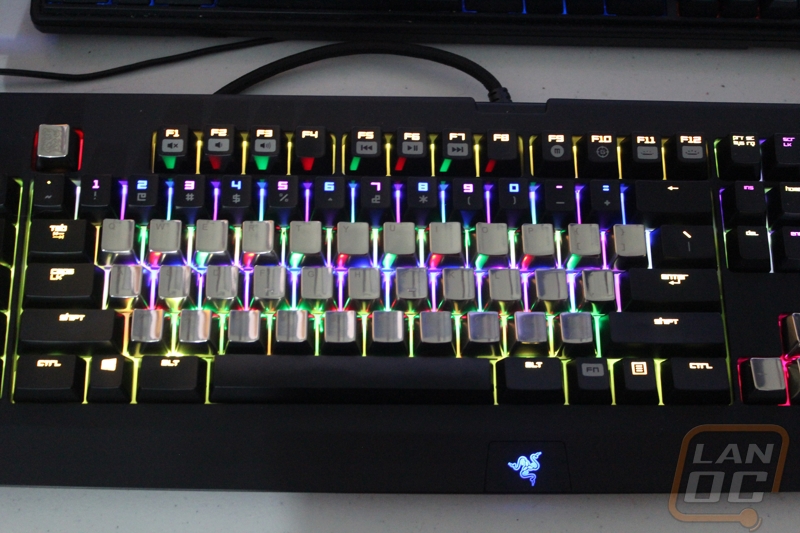
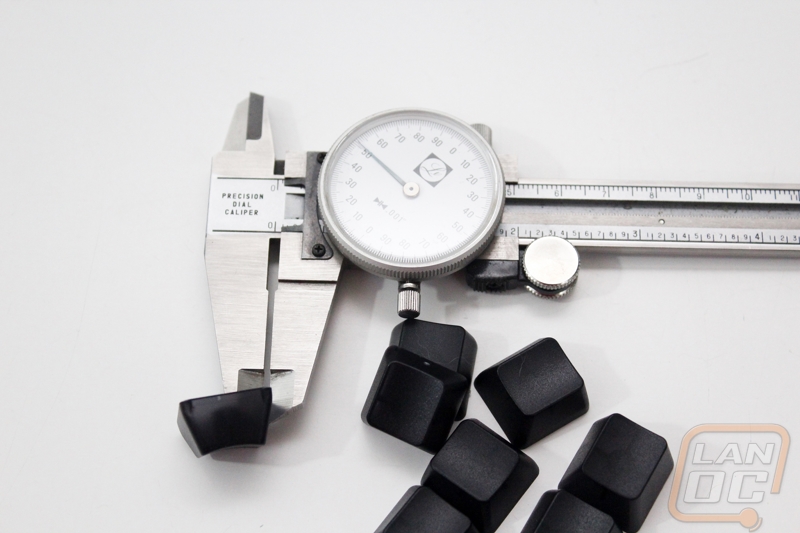
The last keycap set is something completely different than the previous three. Really it falls somewhere in between a full keycap set and the novelty keys because it is a set of letters but no function keys. This is the 38 key Metalcaps set from Thermaltake. It’s interesting that Thermaltake is really the first mainstream name with a keycap set out. When I got these keycaps in I was honestly expecting a set of plastic keycaps with a chrome or zinc coating on them. Once I got them out of the box I was a little shocked to find out that these really are an all metal keycap. You get all of your standard letters and then the direction pad. I would be nice to see a full set including function keys, it would be especially cool if they did that and the function keys were darker in color for a little contrast. Anyhow, by this time I was starting to run out of loose keyboards in the office, I thought I might actually have to get a few out of the warehouse (psshh like you thought I would run out of keyboards). I have the new Razer Chroma on hand testing, so it was enlisted. Let me first say that installing the Metalcaps is a little nerve racking. You see with the plastic keycaps I don’t feel like I could break something, but installing these I really had to make sure I was applying pressure evenly.
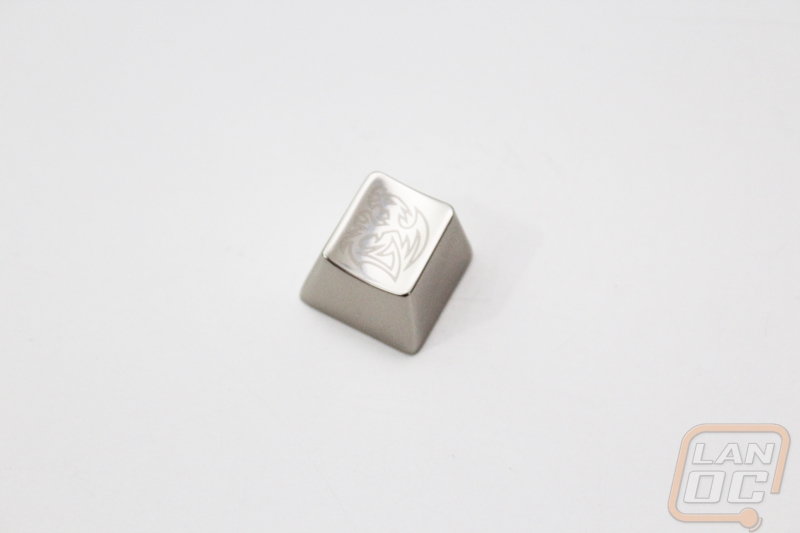
Once installed, this was the most interesting keycap to test as well. When typing on them, the heavier keycaps really changed how the keyswitches felt. I had to put a little less pressure on them and they also felt very solid. Being metal they had a cold feeling too them. The etched legends were a little hard to see, I would almost prefer them to be printed on than this. When I lit up the lighting on the Chroma I was blown away. Being a metal cap I didn’t expect the light to do very much, but the full RGB keyboard was complemented by the reflective keycaps as you can see blow. Thermaltake sells a few variations on this keyset. You can get MOBA and FPS sets as well as just the direction pad or the set that I tested.

Customize your own Keysets
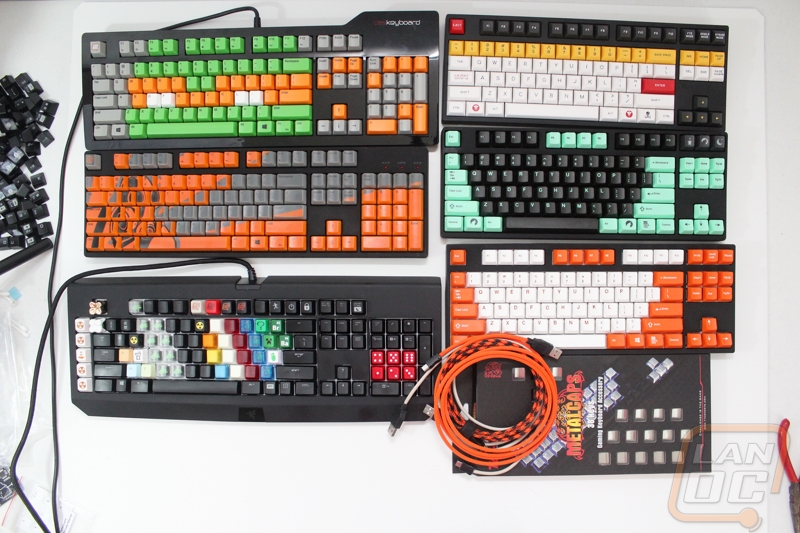
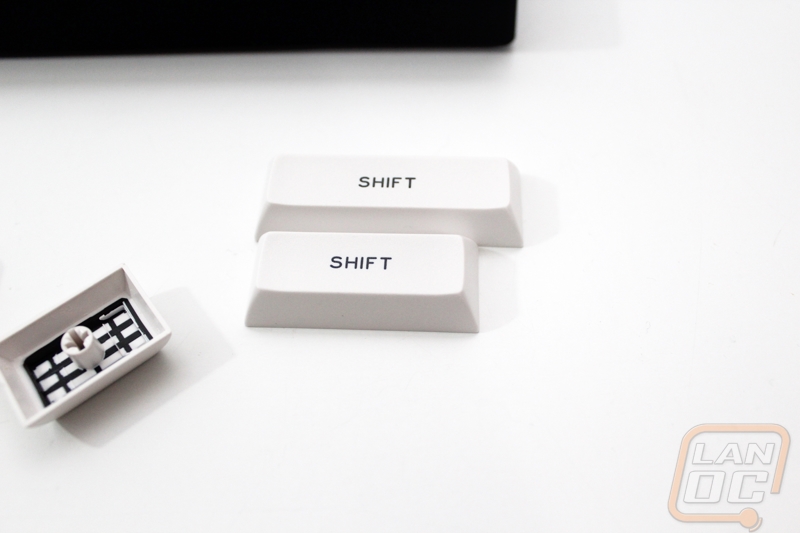
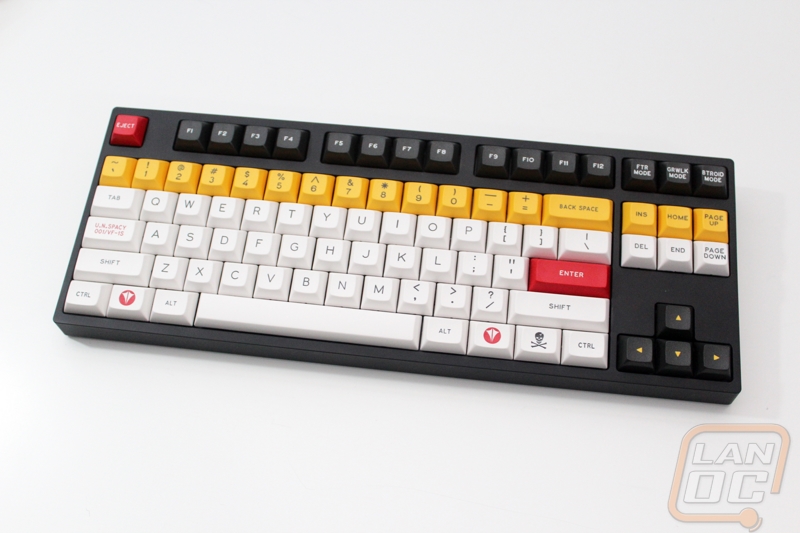
If you are looking to do something completely one of a kind you are most likely going to be looking at custom printed keycaps. While there are a few options out there, without a doubt the company that makes it easiest to design a complete keyset is WASD Keyboards. While they are known for their keyboards, if you dig around their website you will find that you can buy a full custom keyset. Frankly on their website the product images don’t really express just how crazy you can go with it. Lucky for us they hooked us up with two keysets. I went through the same process as you would when ordering on their website and put together two different sets, one is a completely custom printed set and the second has a few custom media key options for me but is otherwise just a design using different keycap colors. The goal was to showcase different directions that you can go through WASD Keyboards.
For both of my keysets I put together custom function keys because I had originally planned on using the sets on the Cooler Master Novatouch and the Quickfire Rapid. Cooler Master has their media function keys in the F keys where WASD Keyboards has their media keys on and around the home and end buttons. If you don’t plan on including media functions on your custom keyset you should be able to do everything directly on the tool they include on the website.
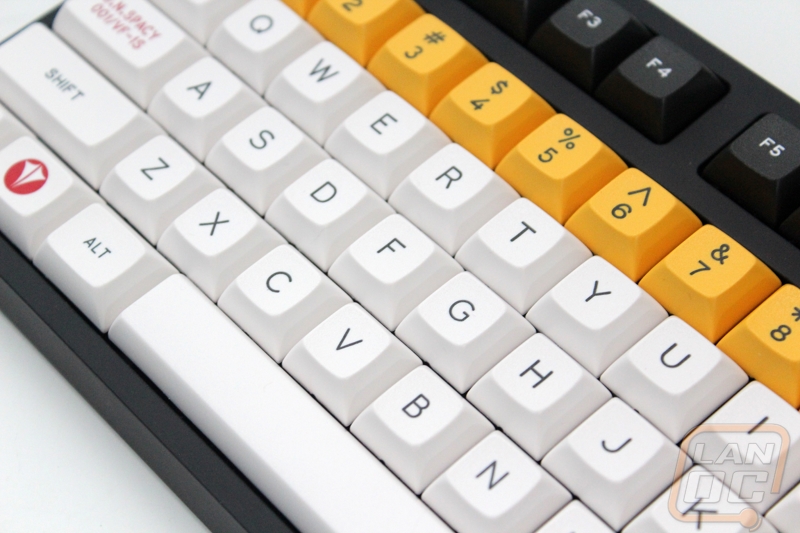
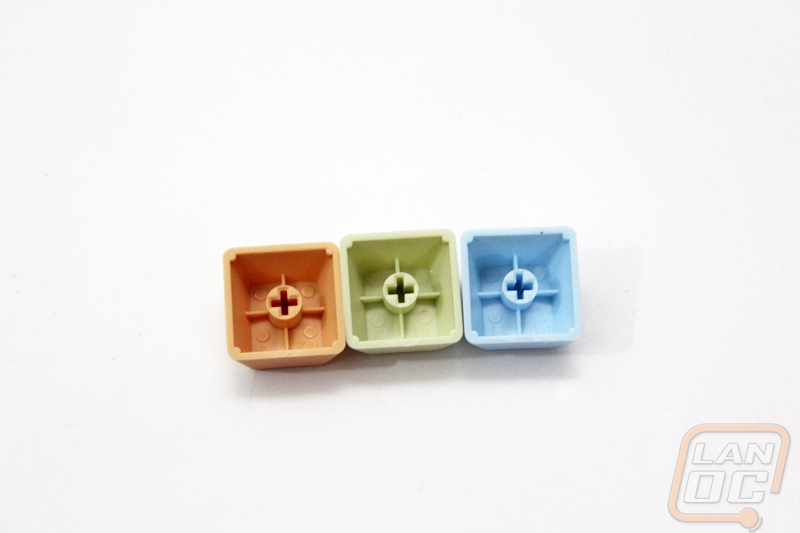
Using their online tool you can select from a list of different keyboard languages and layouts. In addition to that you can select from different function key styles from a modern look, using all symbols, or even an all blank look. They also give you an option to select what icon you have on the windows key, not only do you get multiple windows options but you can also pick other operating systems as well. From there, if you aren’t doing a custom printed keyboard you can manually color each key using one of the 11 different color options that they offer. I decided to try to turn my keyboard into a ninja turtle, Michelangelo to be specific. You can really let your creativity go wild when doing this. If you are out of ideas they have a few photos over on their website and on their Facebook page.
When it comes to doing a full custom UV printed keyset things are going to be a little harder. WASD Keyboard has put together instructions on their website walking you through doing the design using Inkscape, a free editing program. My experience with Inkscape has been limited to using it to create vector images when cutting stickers, so when I got started on making a custom set I was almost as lost as someone completely new to the software would be. Their instructions were easy to follow and I was able to put together a design. It took a few different designs before I found something that would work at all, the spacing between keys will make it hard to see some photos. I originally tried using the LanOC Reviews logo, but it didn’t work out.
I settled on a picture of the pyro from TF2 that I sometimes use as my desktop background. Looking back I maybe should have continued to try other designs that might be a little easier to see but for the purpose of this coverage, it fits the bill. I should point out that rather than trying to do a full image like I did, you could do a design that puts a single design on each key as well. For example, like how both keyboards here have the LanOC logo on the escape key.
I think the designs speak for themselves but we should also take a look at the overall quality of the custom keys from WASD Keyboards. I also wanted to touch on the pricing as well. For starters, the printing on both sets are spot on, this is something I was concerned with on the fully printed keycaps especially. We are dealing with UV printing so if you use this keyset all the time you will eventually start to see wear on them. But this is the only way you can do full custom printing. I can really see this coming in handy with case mods, you could print your keycaps to match the PC. Even just having them do standard legends, the only way to do a multi-color keycap layout would be to buy full sets in each keycap color. You might be able to keep the costs down if you only do two colors, but anything beyond that will really rack up the costs. In the end the $50 price tag on these keysets is practically a steal.
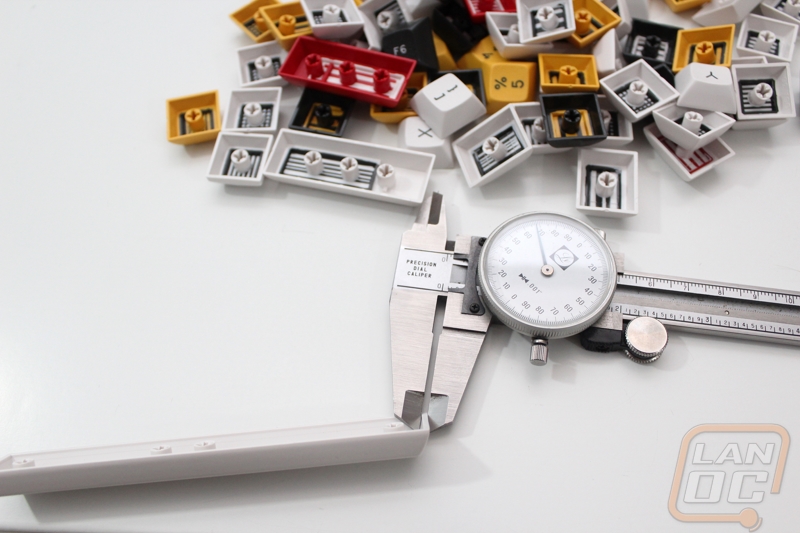
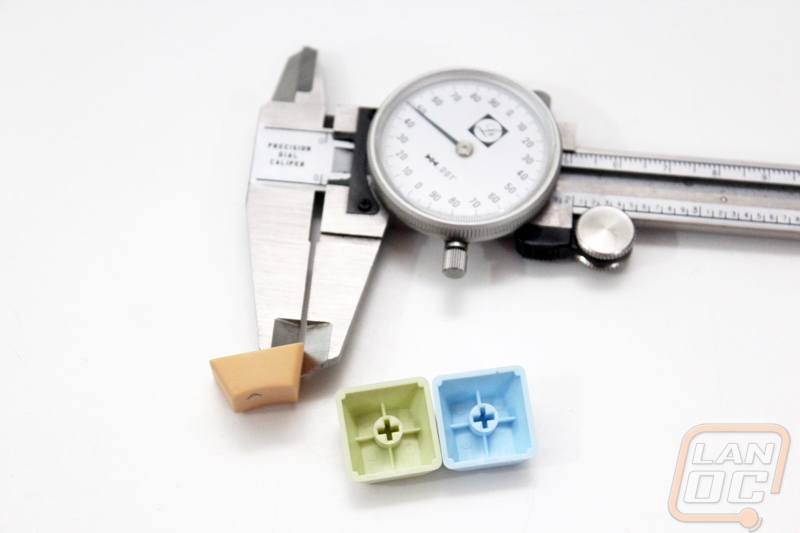
They aren’t perfect though. A lot of people will be unhappy that WASD Keyboard using ABS for their keycaps. For me what I noticed more than anything was that the keycaps were without a doubt thinner than the other keycap sets. To be specific the keycaps measured out to .38mm. A few of the novelty keycaps came in around the same thickness but the keycap sets in the previous section were around .44mm. It’s not a HUGE difference, but when using them they do sound louder and feel a little cheaper. It’s not far off from what a lot of manufactures use on their retail keyboards though, but I wanted to make sure I pointed it out.
Novelty Keys
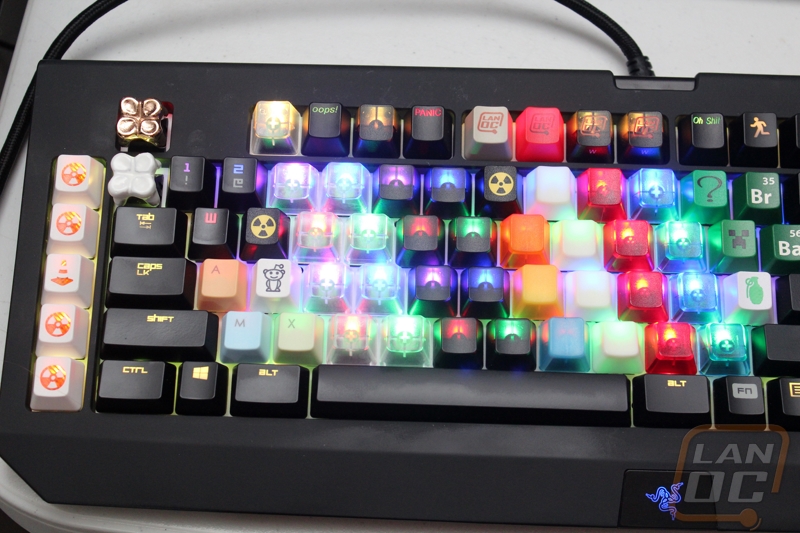
Novelty keys are a nice option if you are looking to keep things simple just as much as they are great as a way to add to your already custom keysets. They are by far the easiest to find and there are more companies selling various novelty keycaps than I could ever count. Of the six companies that we are working with on this article, three of them were nice enough to send over a variety of novelty keycaps. They sent so many in fact that the only way I can cover them all without it getting to confusing is to look at what each company sent over one at a time. Then after that I put them all together on a keyboard to see how well they would work with backlighting, while doing that I also had the chance to toy with using various backlight colors with some of the keycaps using the Razer Blackwidow Chroma.
Techkeys
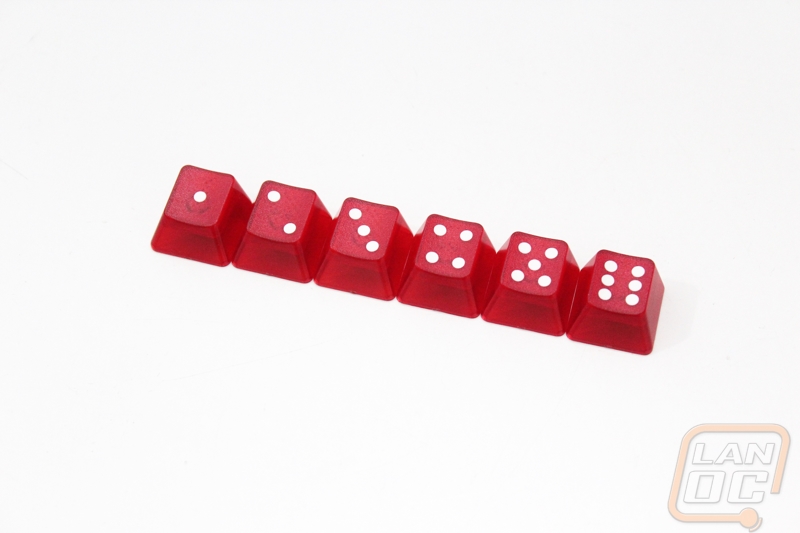
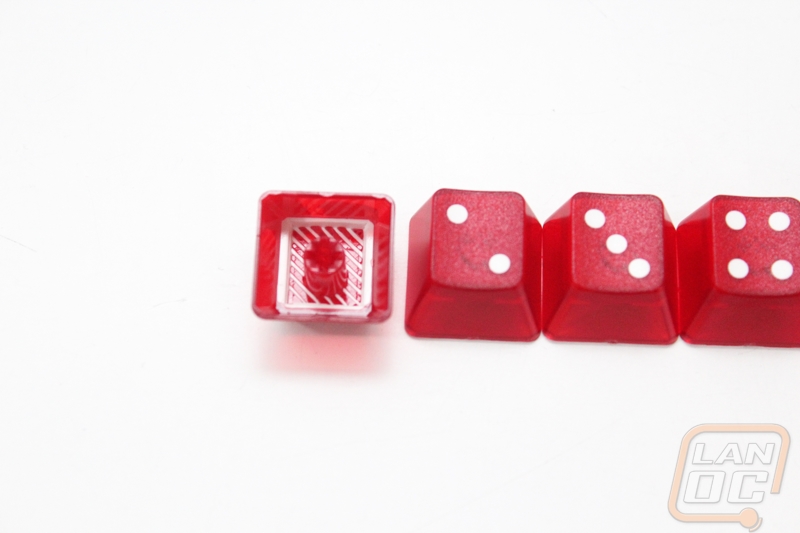
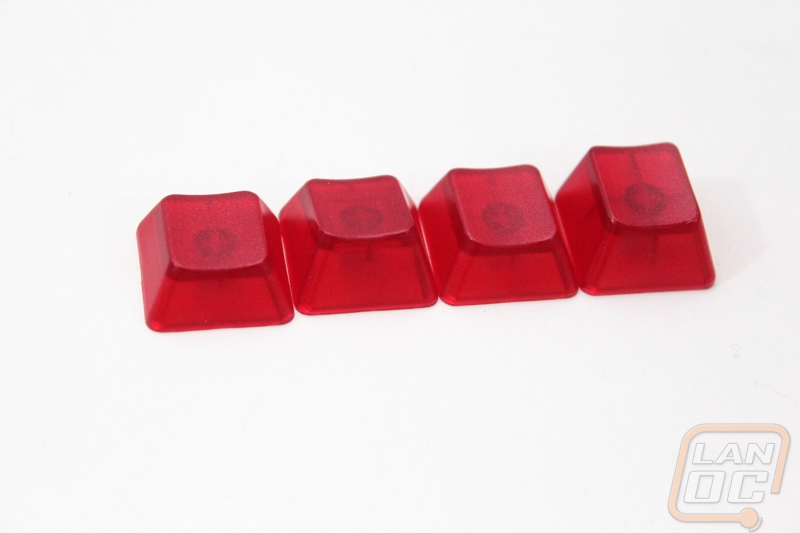
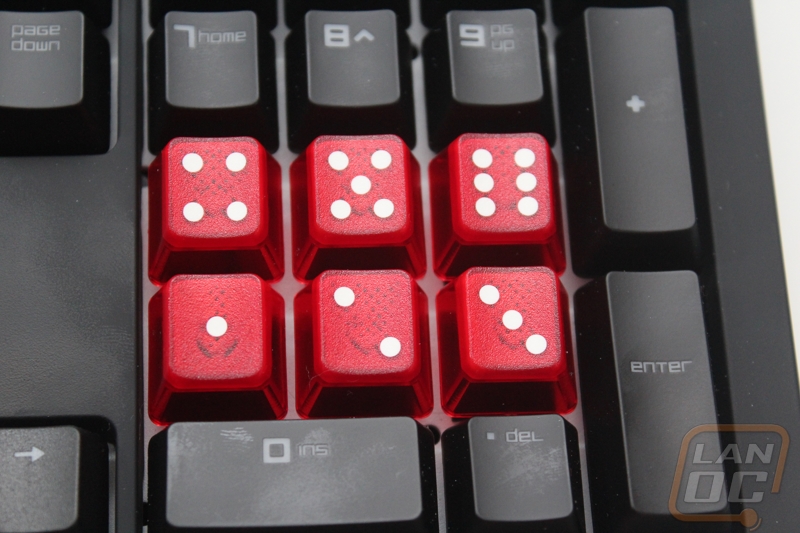
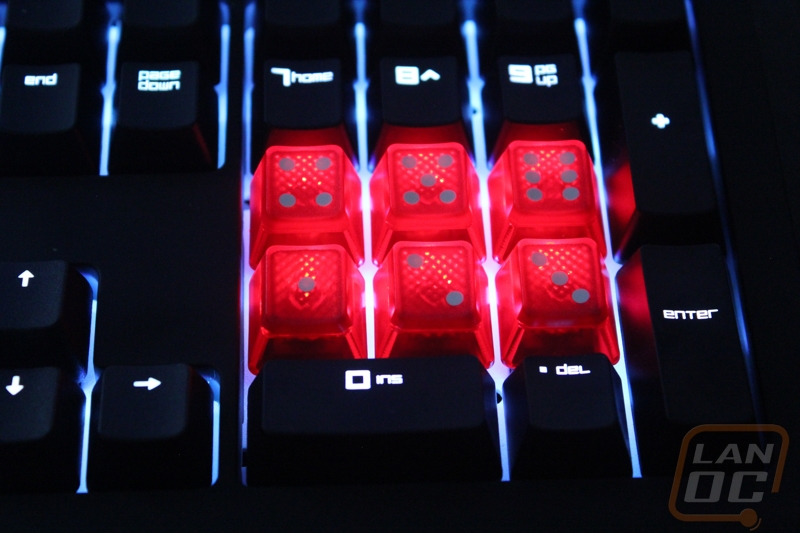
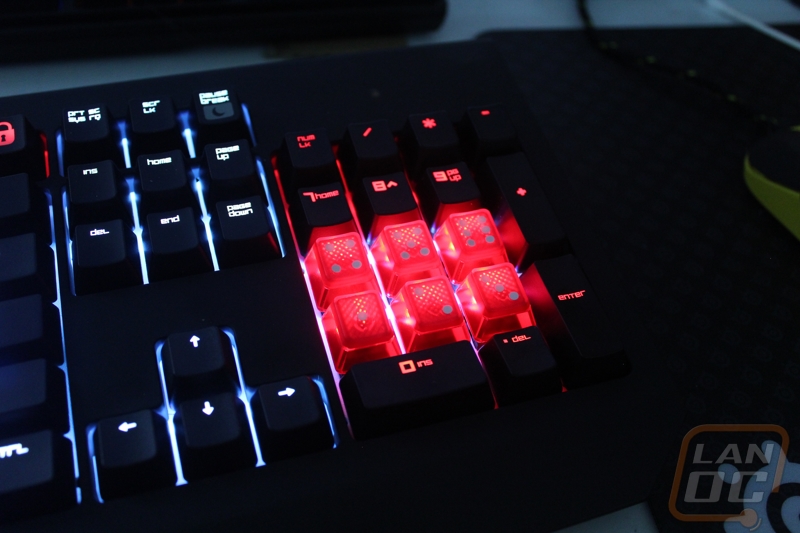
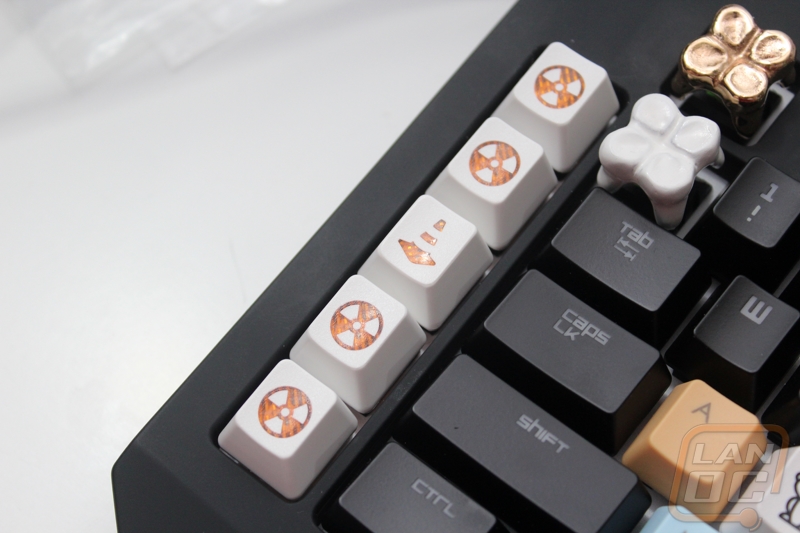
In addition to the white and orange Replica Cherry keyset that Techkeys sent over, they also sent over an impressive 20 other keys. Six of those keys are a set of transparent dice, two are artisan keycaps, and the other twelve are more of a traditional novelty keycap. To start things off, let’s take a peek at the vegas dice keycap set. This set is designed to be used in the top row of your keyboard. You can replace your F keys or use these keycaps for the 1-6 number row keys. All six of the keycaps are doubleshot with a transparent red and a solid white, the double shot process should make for an interesting stripe pattern on the key when it is lit up.
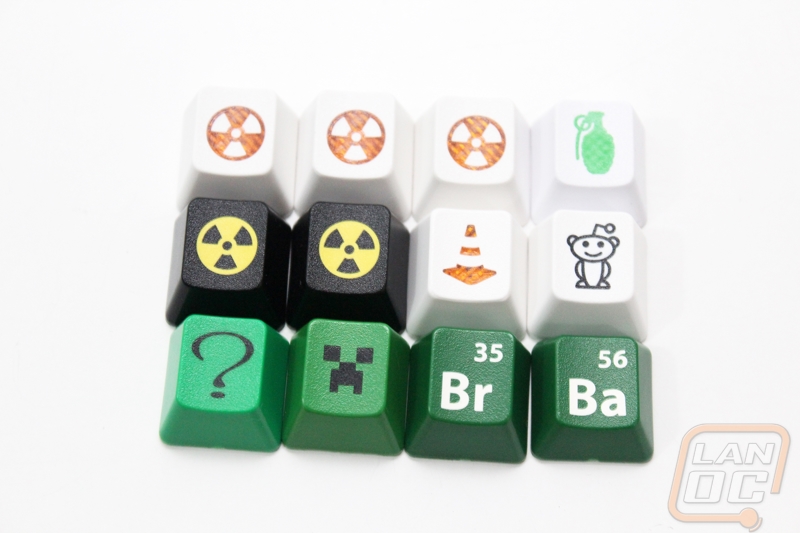
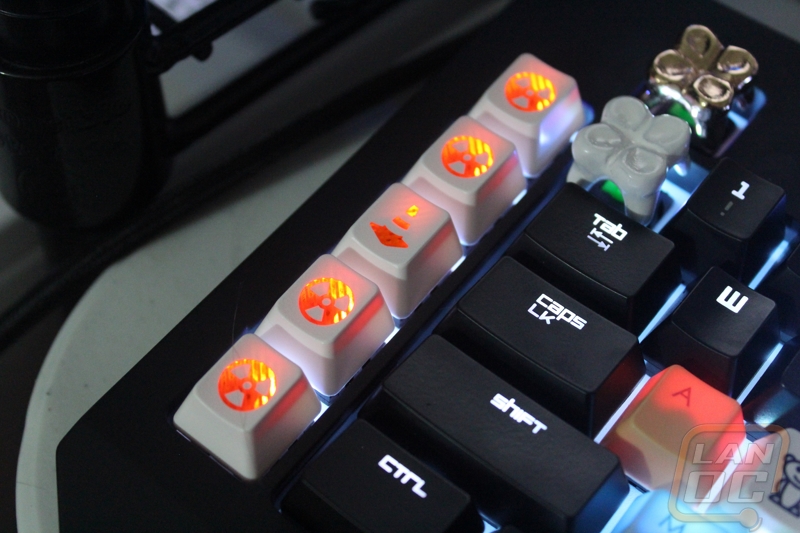
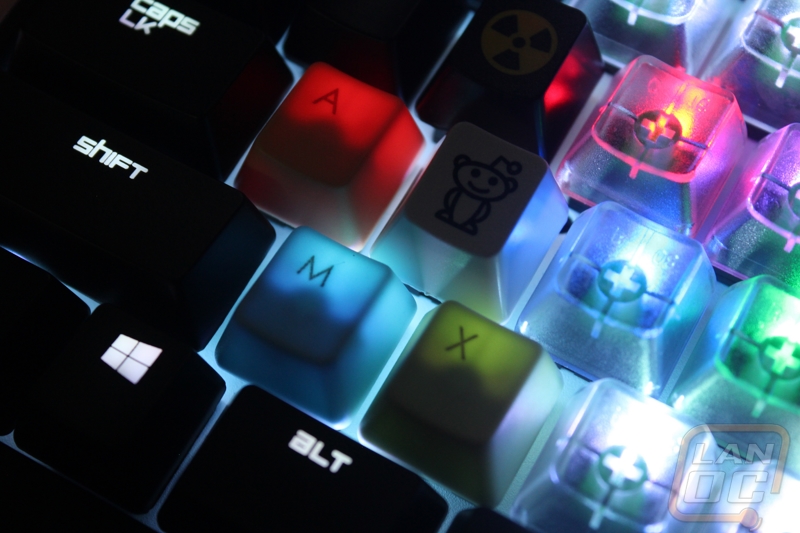
For the mix of novelty keycaps Techkeys sent over five of their Nuke keycaps (three with translucent orange and two with black and yellow), one Road Cone, a Creeper keycap, a Riddler keycap, a PBT Grenade keycap, a Reddit keycap, and Breaking Bad keycaps. It is a nice variety of keycaps that shows a little bit of what they can do. The four white with orange transparent keycaps are a perfect match for the orange replica Cherry set, I didn’t waste too much time getting them onto the Rapid-I with that keyset. The grenade keycap is great if you play FPS games, you could easily bing your grenade button to whatever key you are using that on. The last five keycaps are all different ways you can show off your interests or represent a group. If you are a big fan of Reddit or any other website, you can show your support. I hope that in the future we can have a LanOC keycap for everyone to show their support. The Breaking Bad, Riddler, and Creeper keycaps are just examples of showing off your interests. While Techkeys didn’t send any, I especially like the selection of gaming keycaps that they have. They have Zelda hearts, Mario, Luigi, and Wario keycaps. Hell you can even show your political affiliation if you want as well.

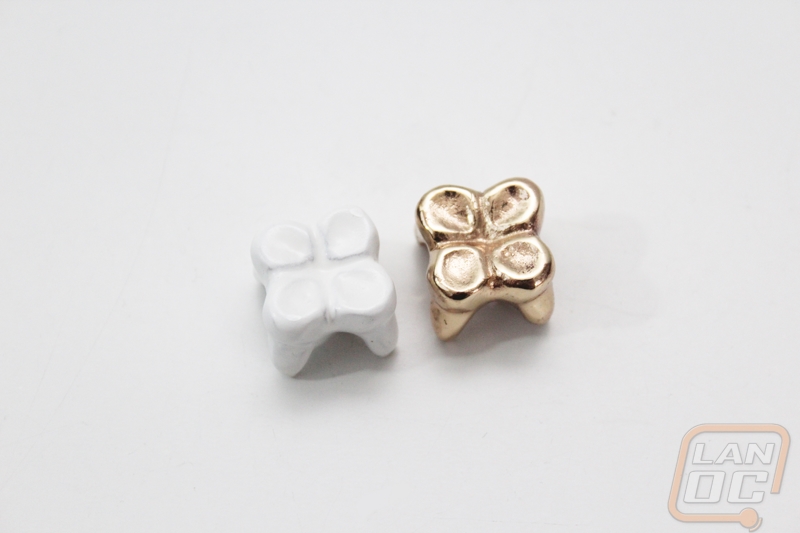
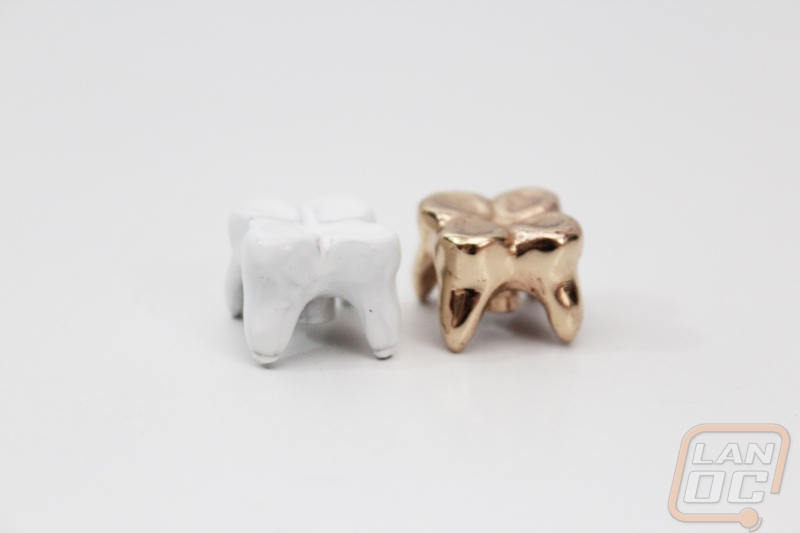
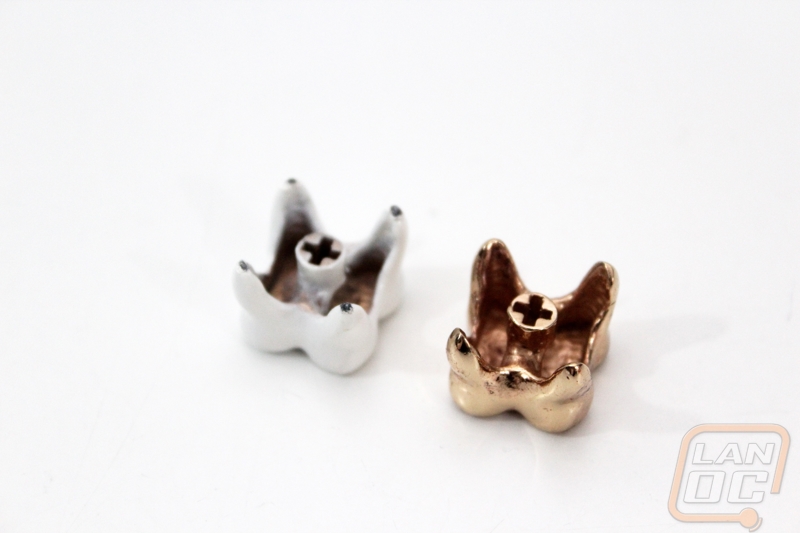
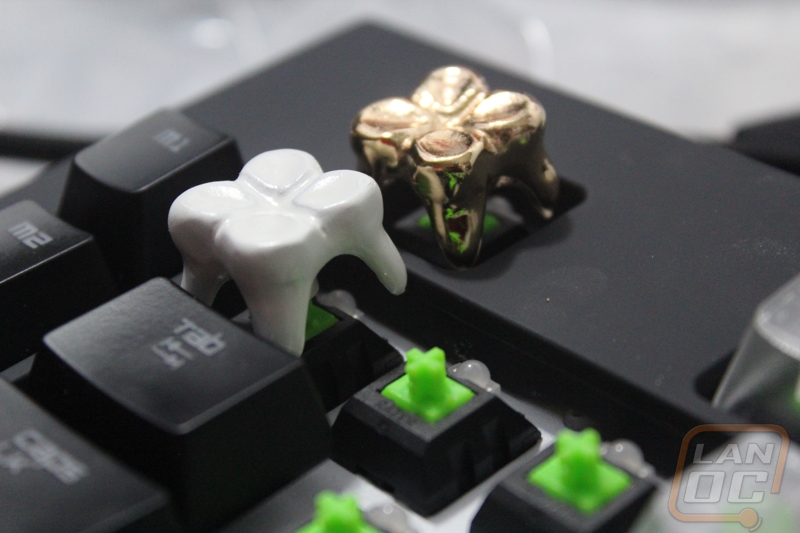
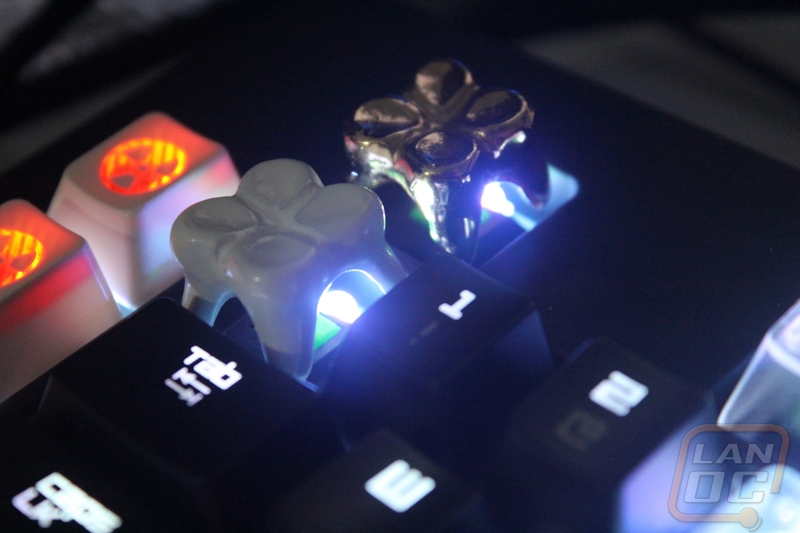
Beyond standard novelty keycaps, you can really go crazy if you want. There is a whole subsection of keycaps called artisan keycaps. Different people hand make keycaps using different materials and in some groups they are traded and collected. Techkeys doesn’t have a huge selection, but they did have a few. They actually sent over two. Keep in mind some of these keycaps can sometimes be VERY expensive, they are works of art that are handmade. A good example of this is the six shooter keycaps that Techkeys sells. I would never ask for something so expensive from them, especially considering all of the other support they provided with this article but they did send over two of their Molar keycaps, one in white and the other in gold. While I will fully admit that the molar design isn’t really for me, I was very impressed that someone could even recreate a molar into a functional keycap. The weight of each of the keys was very heavy due to them being made out of metal. I think the market for this specific design is most likely small but I can completely see how artisan keycaps could be shown off online and to enthusiast friends just like someone might show off a new painting.
Max Keyboard
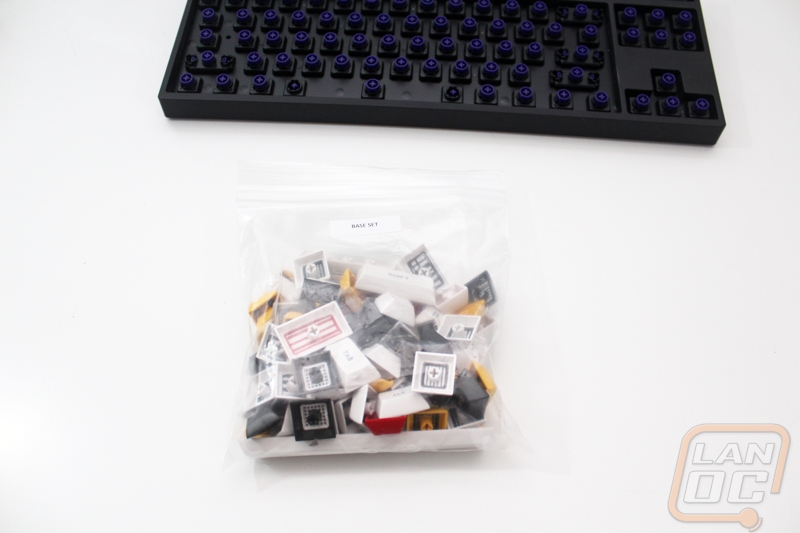
Max Keyboard actually sent over a whole selection of keycaps but as it turns out some of them are actually previews of upcoming products. I went ahead and included those in here because they didn’t really fit in the other sections. They were even nice enough to print up labels or each of the small baggies to help identify each of the keycaps as well.
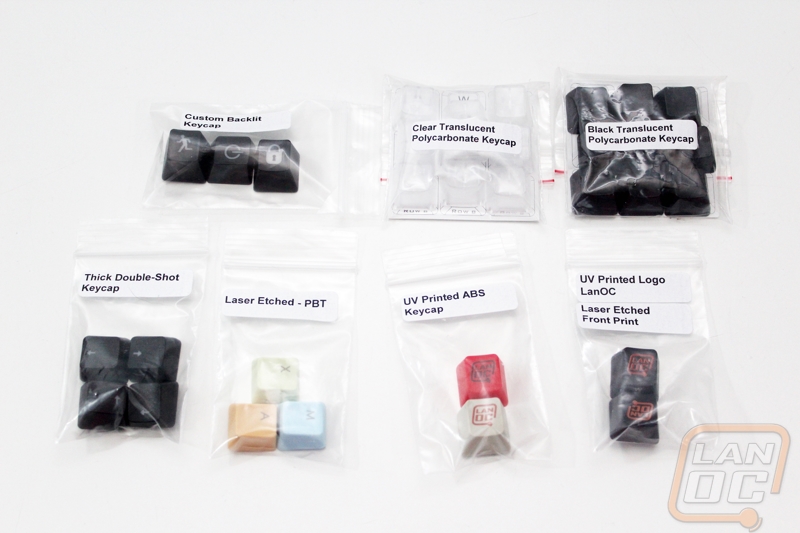
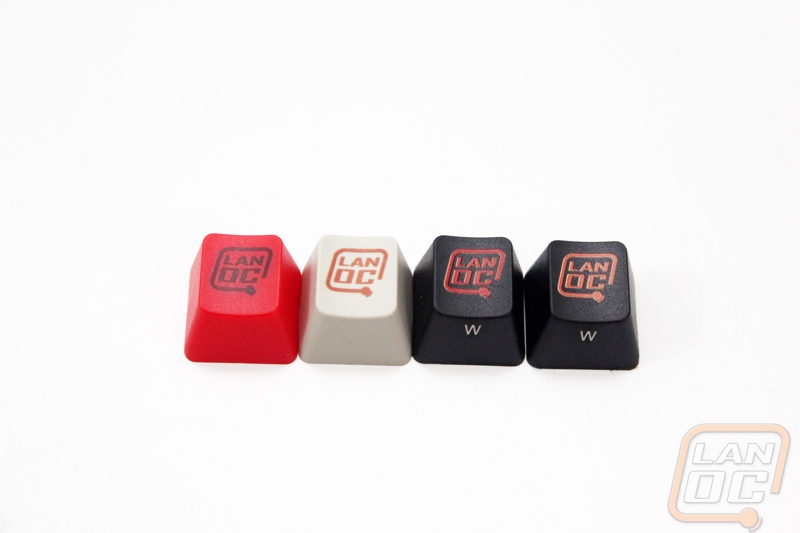
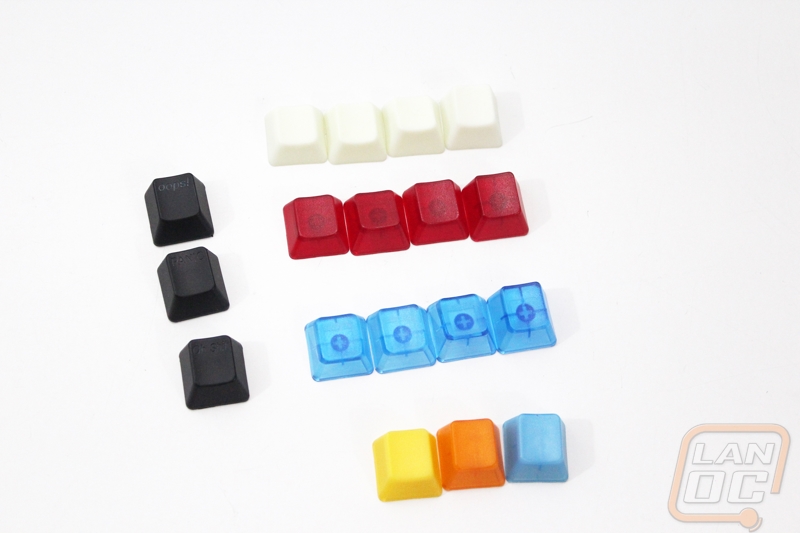
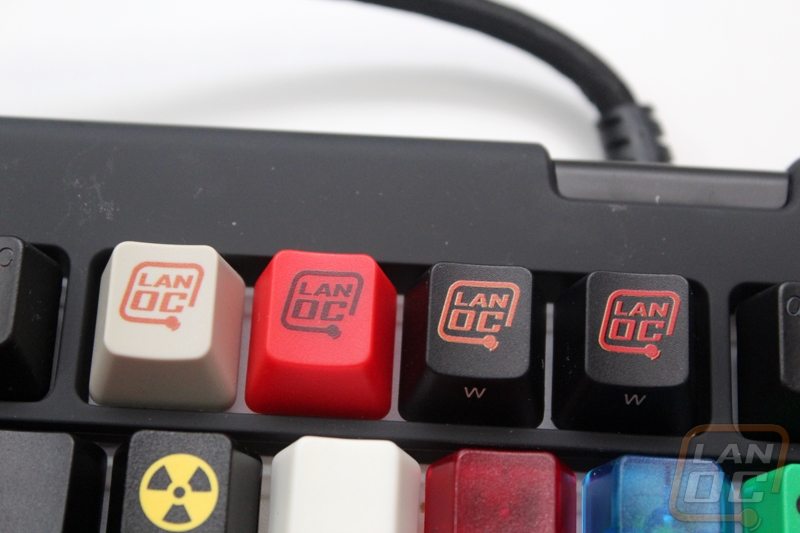
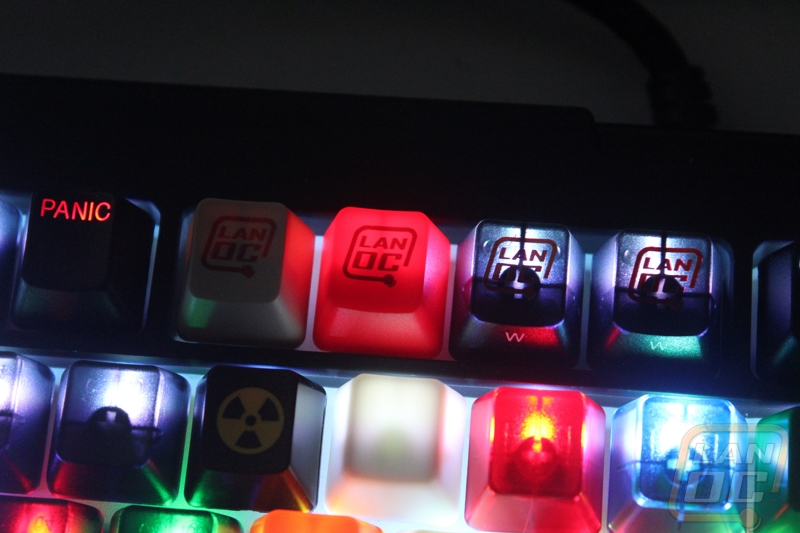
To start things off, let’s take a look at the four different LanOC keycaps that they made and sent over. All four are UV printed but the two dark keys are transparent with laser-etched lettering on the front. This is especially interesting because you could have a custom design on a keycap and still be able to identify the actual key. I was especially impressed that these keys were .46mm thick, this is thicker than the other custom keycaps that I took a look at in previous section. Currently custom keycaps aren’t available on their website but I’m told that their custom keycap service will be available soon. Be sure to keep an eye on their website and their Facebook for information.
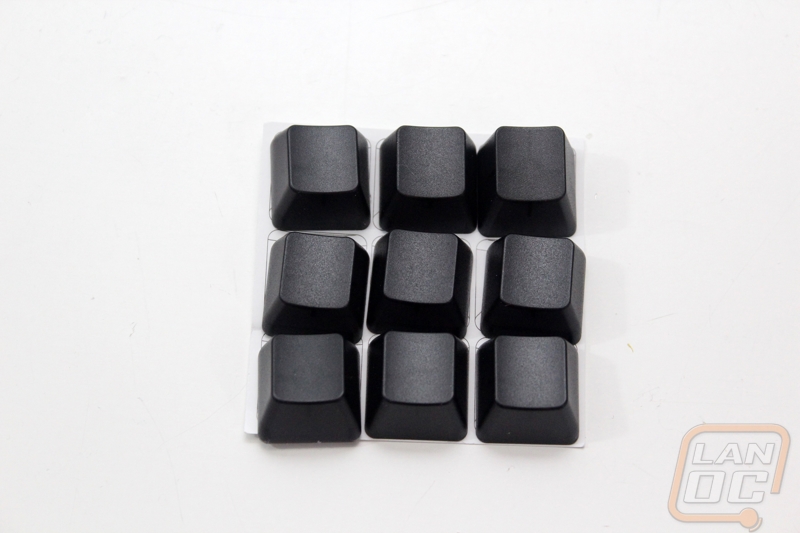
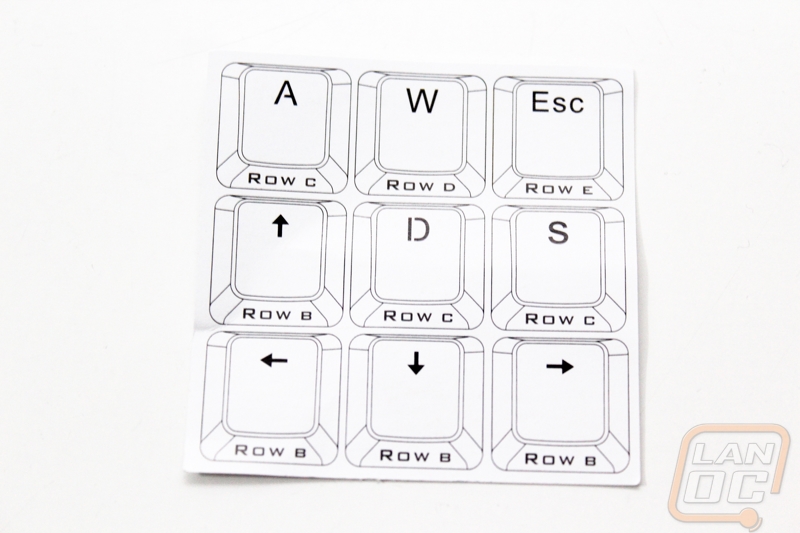
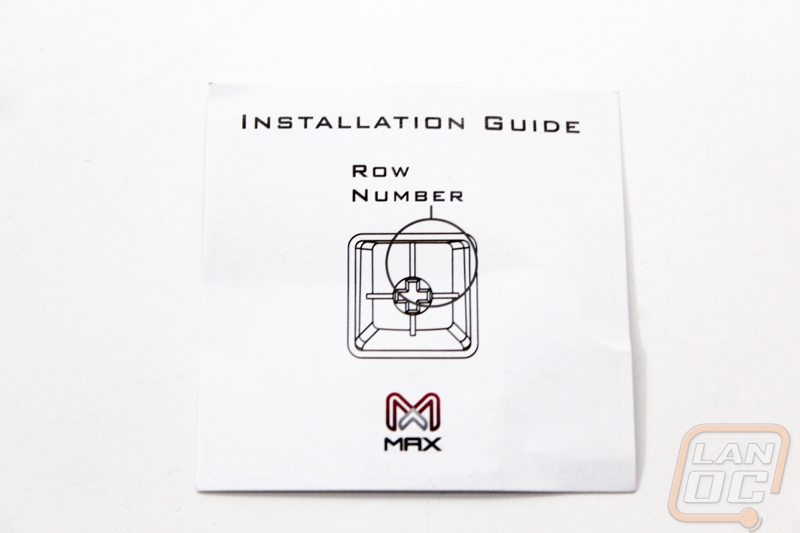
The black and clear translucent keycap sets that Max Keyboard sent over are both available on their website now. You get nine keys, they replace your escape, direction keys, and WASD. When combined with backlighting we should be able to do some really cool things with these keycaps. You aren’t limited to those uses btw, it just means that you get four row b keycaps, three row c, one row d, and one row e. The small paper included with each helps show you what each key does, but if you get mixed up you can look on the underside. The row names are molded in as well. Each of the sets are cheap to pick up and a simple way to customize your backlit keyboard!
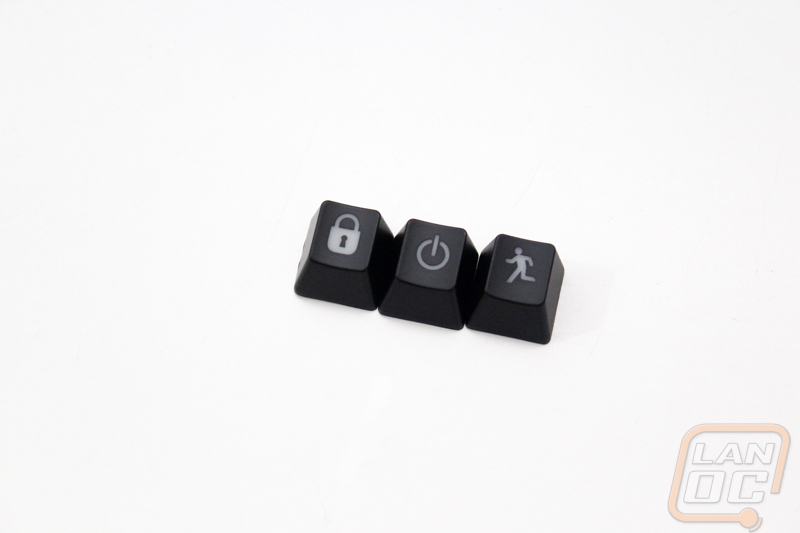
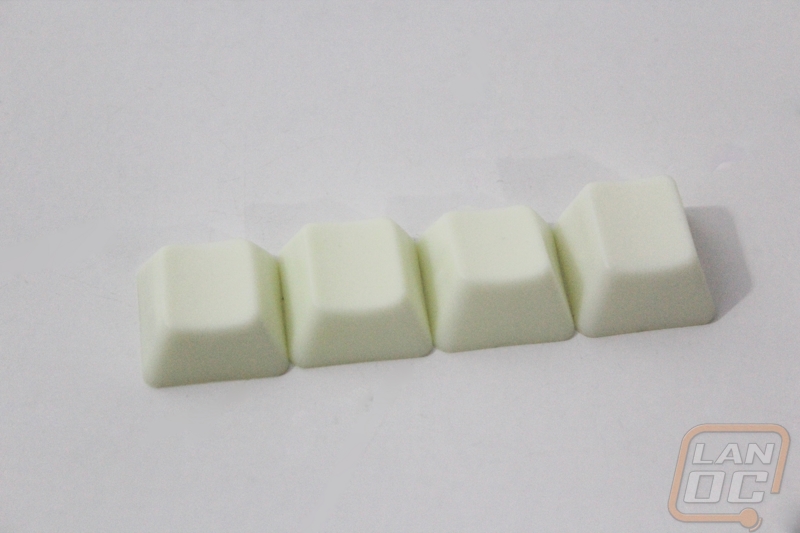
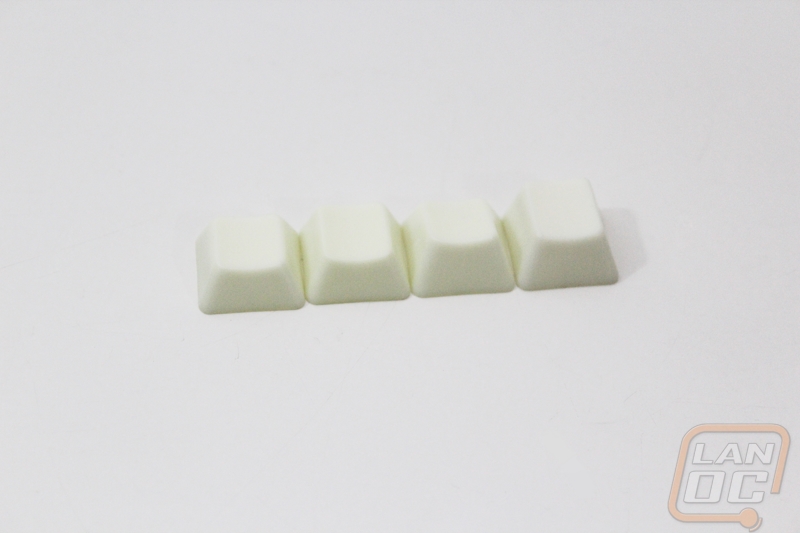
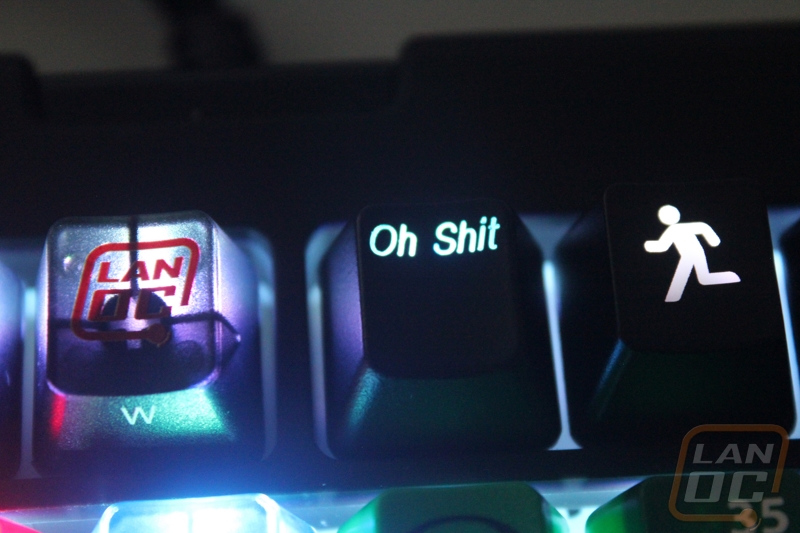
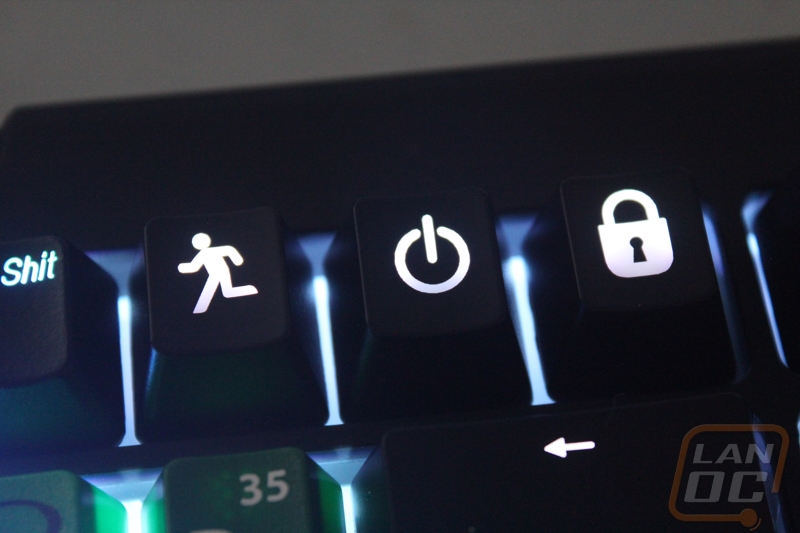
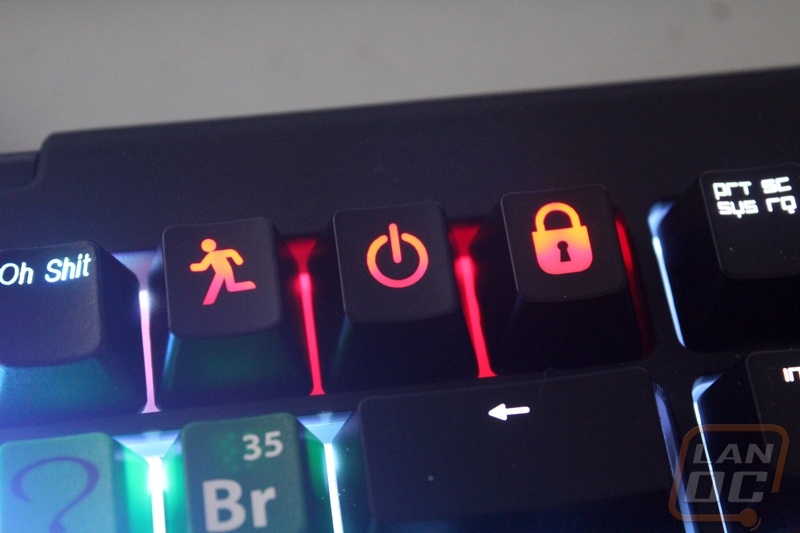
Max Keyboard also sent over a couple examples of their standard novelty keycaps. These also support backlighting. They have a wide variety of designs available but they sent over a power button, lock, and a running person. They are ABS keycaps molded in a transparent white with a painted finish. The design is etched out of that paint. This is the same construction of most backlit keycaps, including the keycaps that Max Keyboard uses on their keyboards. Be sure to check out the full selection of novelty keycaps on their website, there are a lot of other designs that might just catch your eye. I love that on their website, when you mouse over the image it shows what it looks like lit up.
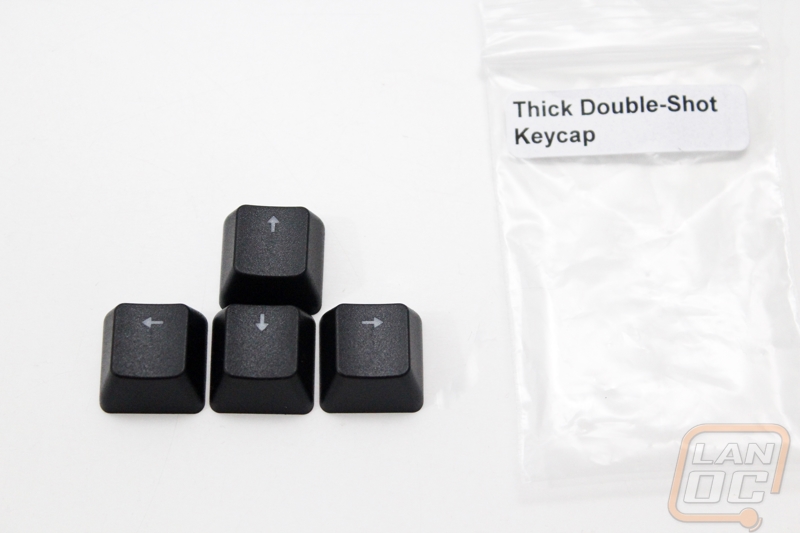
The Tick Double-Shot keycaps that they sent over are another preview of a future product. Of everything they sent, this might just be my favorite. That says a lot considering the custom LanOC keycaps. They measure at an impressive .60mm thick and the double shot design is different than all of the other doubleshot keycaps I have taken a look at today. They managed to not have to have the stripes so the backlighting should be very consistent. Being doubleshot over painted means there is more texture to the keys. They are ABS but should still hold up much better than a standard backlit keycap. Max Keyboard is planning on selling this as a complete set when they launch it in early 2015. I might have to pick up a set to replace the keys on my Max Keyboard Nighthawk, it sees use on my main PC every day and the current keycaps are looking a little tired. I love how much better these feel to type on.
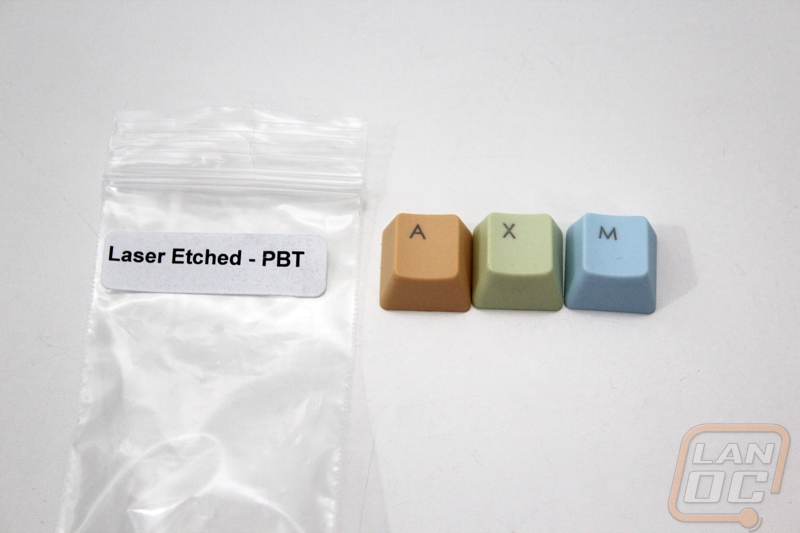
Lastly Max Keyboard is getting ready to introduce PBT keycaps as well. They sent over a couple that have been laser etched. I’m told they are going to support UV printing on the front of the keycap or you can get laser etching on the front or the top. They are planning on starting things off by releasing a set but they might do individual keys later on as well. I do not have any information on what color sets they are planning on selling but with them releasing these before the end of the year we will be finding out very soon!
PimpMyKkeyboard
While a good portion of what PimpMyKeyboard is about putting together the group buys for custom keycap sets like what we took a look at earlier. They do have a regular key shop as well with a few keysets, novelty keys and a few translucent keycaps as well. They sent over a mix of keys to check out to give us an idea of what they are about.
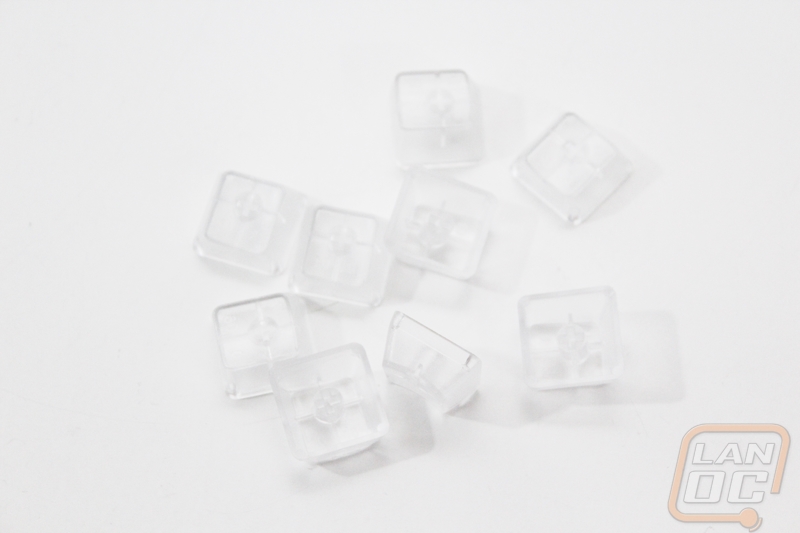
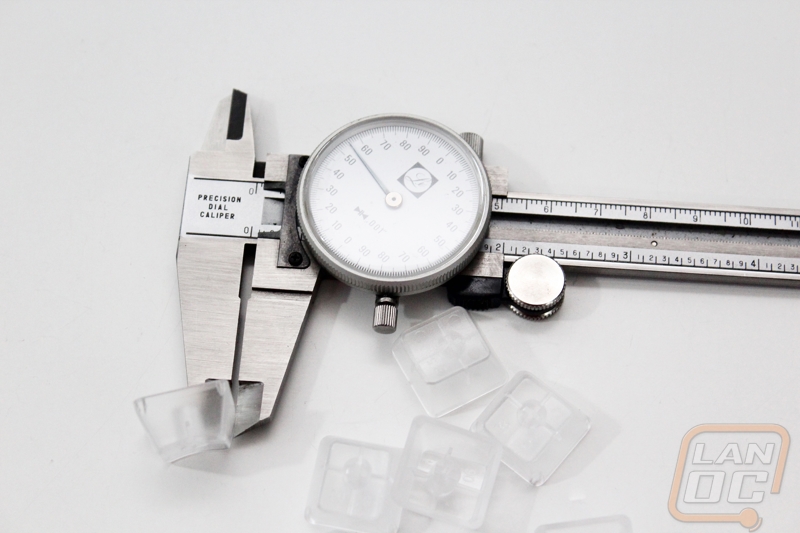
PimpMyKeyboard sells full transparent keycap sets as well as individual keycaps should you need them. They have them available in 5 colors currently as individual keys and for sets you can get clear, red, and blue. They also have three different color options available with a frosted top. The frosted top is nice if you have backlighting and are looking for everything to glow but you don’t really want to be able to see the keyswitch.

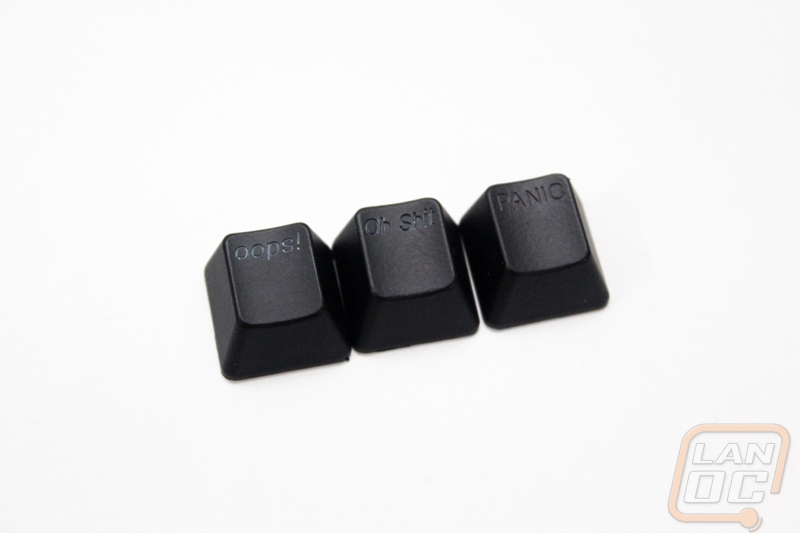
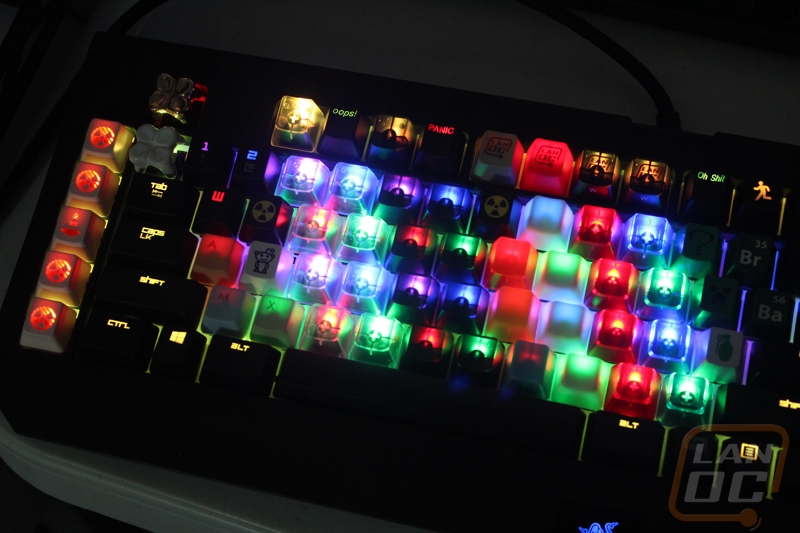
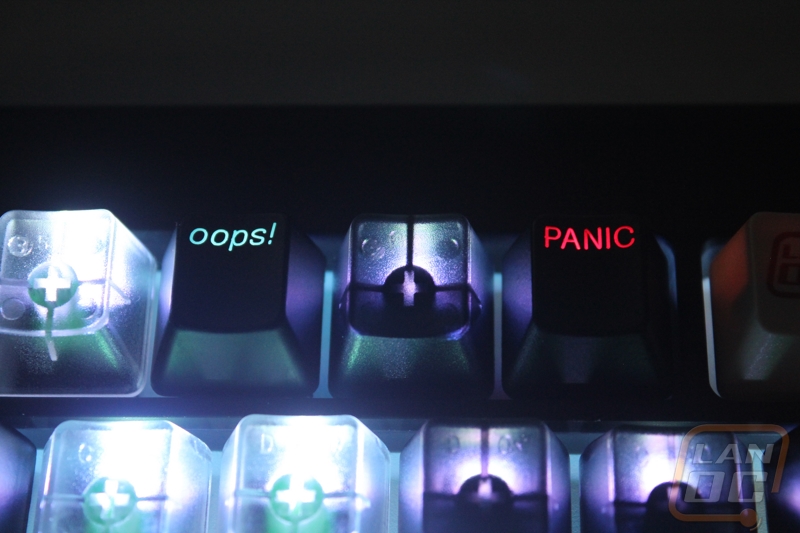
For novelty keycaps PimpMyKeyboard has a few keycaps with funny comments or pictures like “Beer Break”, “Oops”, and “Panic”. They also have a few novelty keycaps with translucent lettering for your backlit keyboards. With the popularity of backlighting it’s always great to see options for them. They sent over oops!, Oh Shit, and PANIC keycaps. They tinted the lettering right out of the hole, so if you have white backlighting you can expect these to light up in blue and red for the panic button.

PimpMyKeyboards even sells glow in the dark keycaps. While they just sent a few keys, on their website you can actually buy as many as you would like of each row. They even give you the option for the caps to be ABS or PBT with the price being the same between both. If you don’t have backlighting but are looking for something a little different this could be an option. The keys glow really well with the lights off but I had a hard time trying to get a good photo of them glowing.
Installed and all lit up
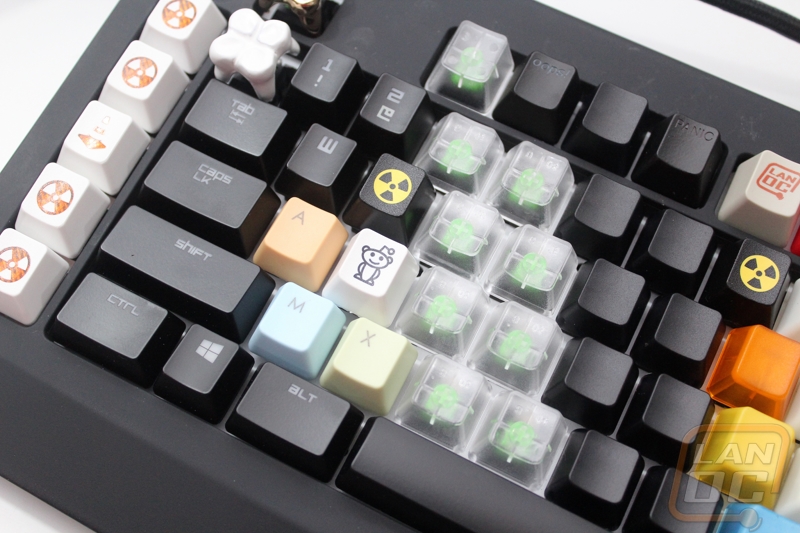
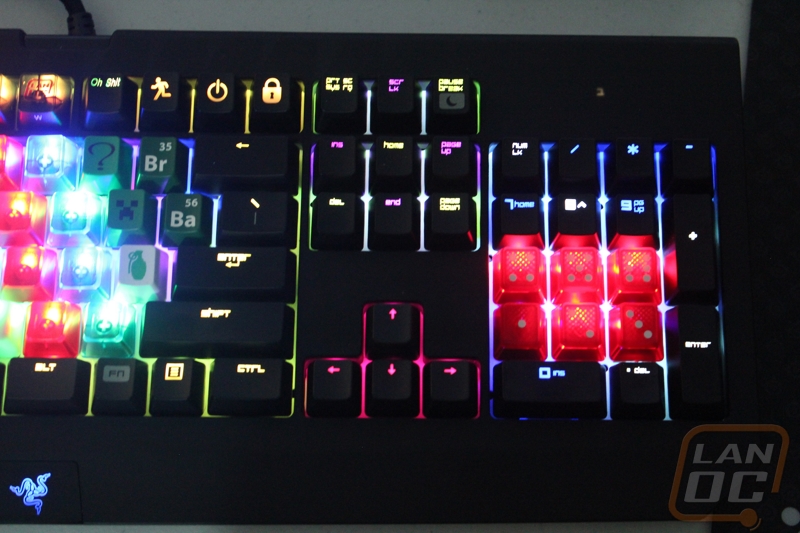
The mixture of novelty and sample keycaps really don’t make for a complete set in any way shape or form. Rather than swap them out individually I put them all onto our Razer Blackwidow Chroma so I could spend a little more time testing and toying with how they look with various backlight colors. This does mean that a lot of the keys aren’t in the exact location that they should be on the keyboard, so keep that in mind when looking at the photos below. I tried to keep matching sets together to make them easier to photograph, but in a lot of case that means they ended all over. There are also caps designed for different key profiles as well.
To get things started, I was really excited to see how well the Artisan keycaps from Techkeys would look and perform. The interesting keycap shape does mean that if you look close from the side you can see the key switch. I don’t think this is that big of a deal but something to keep in mind. When I added backlighting to the mix I really like that those same gaps help light up the key, obviously without that the metal isn’t going to let any light through.
The Vegas Dice keycaps from Techkeys ended up over on the number pad when they really should be in the top row of your keyboard. Even so they look great even without any backlighting. When I turned the backlighting on all six keys really light up, just like the Vegas strip or a slot machine. All I need now are the sound effects that the slots make. Changing the back lighting to red didn’t change the look, going to blue turned them a little purple for a different look all together.
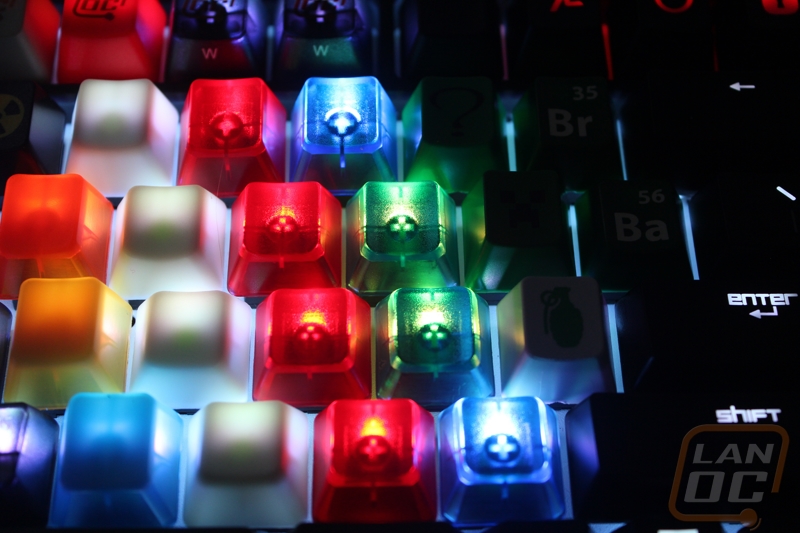
The transparent orange novelty keycaps from Techkeys looked great with white back lighting as well. So much so that after doing this testing they went directly onto my Quickfire Rapid-I to go with the Replica Cherry keycap set. Some might find the stripes weird, but I think they look better than what solid orange would look. I do wish the stripes would run the same direction though.
The white and black transparent keycaps from Max Keyboard especially caught my eye. They looked good with white back lighting but really stood out when I put other colors of back lighting. Both sets are available in completely keycap sets with and without lettering. They would be a perfect addition to a new RGB keyboard.
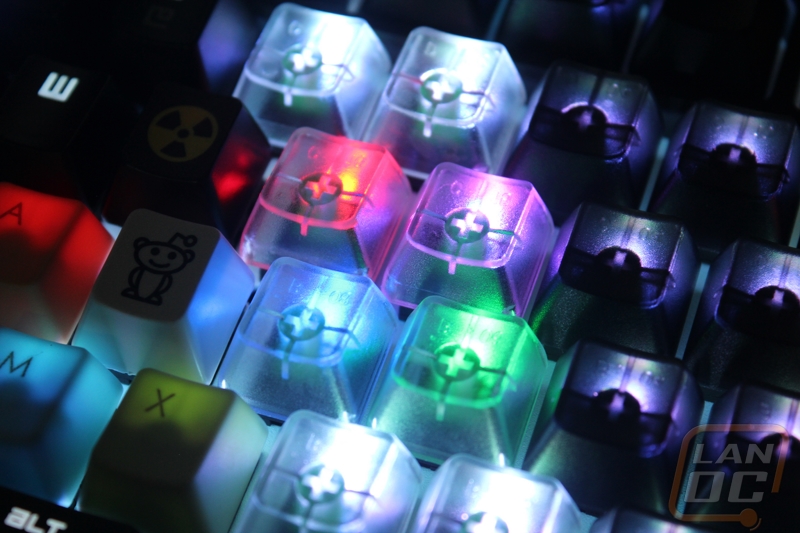
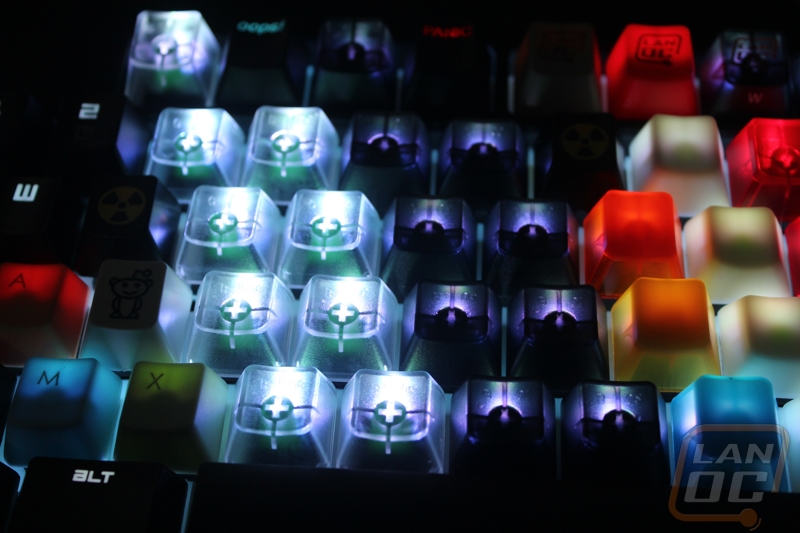
PimpMyKeyboard sent over the two sample sets of the blue and red transparent keycaps as well as the glow in the dark set. How did they look? Well I found it especially interesting. The transparents look great with white backlighting to let them glow in their natural colors, but I found it even more interesting to toy with various colors on them. Using yellow on the blues made the blues look green and blue on the reds look purple, as you would expect. This got me thinking that it would look cool to use this idea to give your keyboard a completely different look in the dark than it has during the day. You could do a red theme that glows purple or if you get especially creative you could alternate led colors to really give it a unique look.

So how did the PBT keycaps from Max Keyboard react to the backlighting? Actually, they look great. You can see the laser etched legends perfectly and they glow just enough. I think a whole keyboard with these would look great with white backlighting to give them a little glow.
Two of the LanOC keycaps that Max Keyboard sent over aren’t designed to be transparent but I still tossed them on the Chroma to see if the light would still show through. The red key did glow but the white didn’t. The two transparent keys look great with the backlighting as well!
The Creeper, Riddler, and Breaking bad keys may not support backlighting but they still add a nice touch to a keyboard.

The Novelty keys from PimpMyKeyboard with their red and blue transparent plastics look great with white backlighting. Some backlight colors won’t work well with this setup though, red will filter out blue for example.
What about the backlit keys from Max Keyboard? The novelties look great on the Blackwidow Chroma. The keys look great with any color backlighting, especially red on the power button. The double shot direction keys also worked well.
Spicing up the USB cable
While a good portion of our coverage here is about different options you have with keycaps to make your mechanical keyboard your own there are still other options. One of the biggest is also the easiest thing you can swap out on a lot of keyboards. What I’m talking about of course is the USB cable. Keyboards designed for enthusiasts have had removable cords for a long time but only a few of the more gaming focused keyboards have the option, so before you get too excited about doing this you need to make sure your keyboard actually has a removable cord. Having a hard wired cord doesn’t necessarily prevent you from still doing this, it just makes doing it a hell of a lot harder. Lucky for me out of the 6 different keyboards that I’m working with today, four of them have the option. Oddly enough all four are Cooler Master keyboards, but you can also find the option on Filco’s, Duckys, Happy Hacking Keyboards, and a while list of others.
Once you figure out if you have a removable cord (it’s really easy to figure out btw, does your cord unplug :p), next you need to figure out what connections you will need on each end of the cord. Of the four keyboards with a removable cord in my testing, I had three different connections. Two had a Micro-B, one had a Mini-B, and another had a standard A plug. All four had a standard A style plug on the end that plugs into your PC as well. If you have Filco or a Realforce there is a chance you might also need a connection that is proprietary to each of those brands as well. Once you are armed with all of that information, now it is finally time to figure out who you want to buy a cable from. For those of you with a Micro connection you might be able to find a few non custom options made for charging cell phones, but for the most part the main retailers are small companies that custom make the cables specifically for you.
For my testing, Mimic Cables was kind enough to sign up and send over a few of their cords. They let me pick from their selection of braiding, connection types, and cord lengths to put together three cables. You aren’t limited to just keyboard cords, while you are ordering you can also get a cord for your cellphone (include iPhones), PS/2, headphone, and Amp/Dac cables. There is no way I can cover even the full selection of sleeving options even but to give you an idea of the variety you have 150 options. Just assuming that one end of the cord will have a Standard USB connection, that makes for 900 different variations of the cords. That doesn’t even take into account different cord lengths or having them braid or coil your cord. Talk about options!
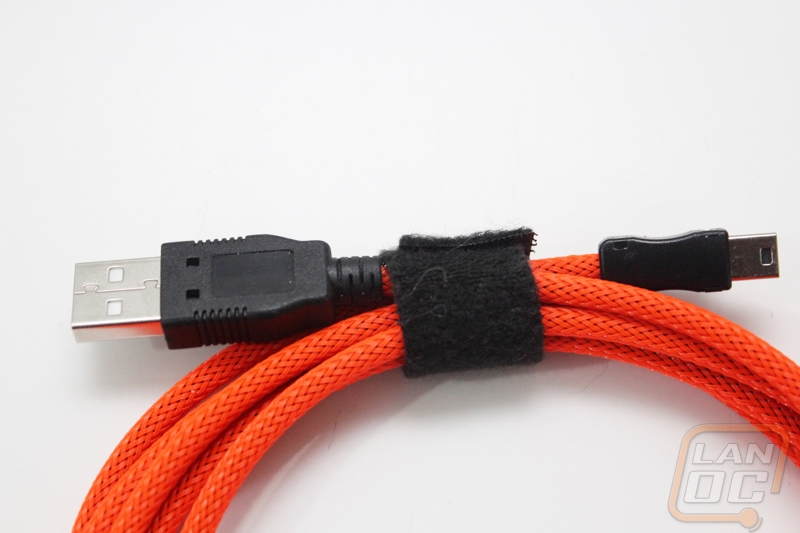
So what cords did we go with? Well funny story there! When working with Mimic Cables, I wasn’t completely sure what options we would have coming in from a few companies still but I had already designed the custom keycap sets from WASD Keyboards and I had the Cherry Replica set from Techkeys so I knew for sure I would be using a little orange, plus frankly this is LanOC we love orange here. So I ordered a black and orange paracord model as well as an orange MDPC cord. For the last one I knew that my wife’s LAN keyboard would most likely not be orange but I didn’t know what it would be so I went with the Silver Silica option to check out their premium cord sleeving and to keep it neutral. Well when order I made a small mistake that I often do, even when writing. I mixed up the connection types, I needed two Micro USB cables and one Mini because my two keyboards the Novatouch and the Quickfire Rapid-I both have a Micro connection. So in the end I ended up with two amazing orange cables that will only work on our black and mint keyboard and two Micro keyboards with just one micro cord. All isn’t lost though, I think I’m just going to turn lemons into lemonade and order a creamsicle paracord cable that will go perfectly with the Orange Cherry Replica keycap set on the Quickfire Rapid-I.
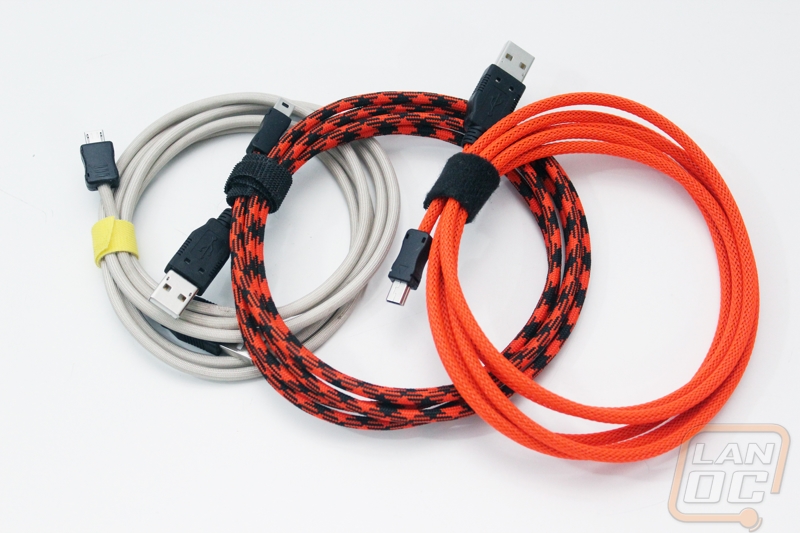
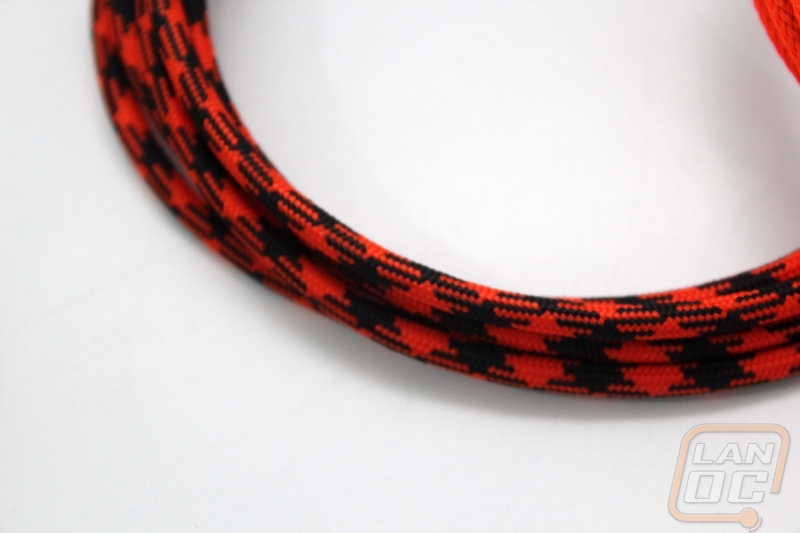
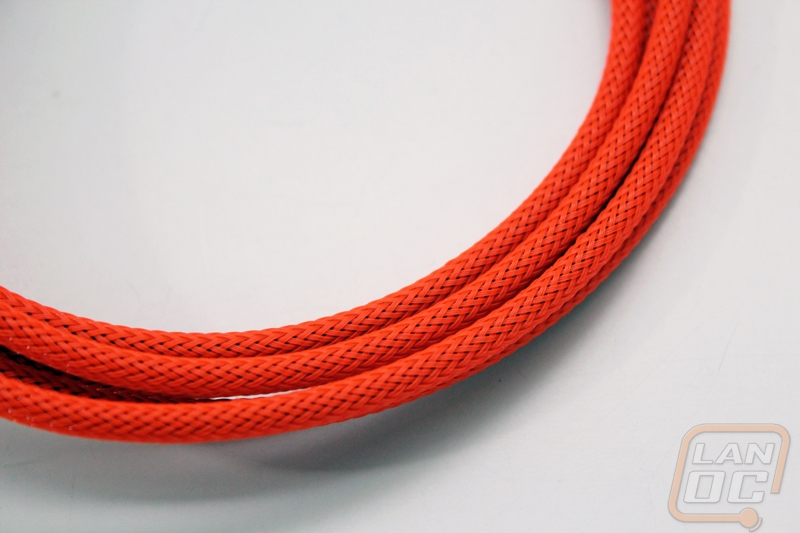
So how do the cables look? Well, all three look great. I especially like the paracord and the MDPC cords. The paracord is a little softer and is made of nylon with a tight weave pattern where the MDPC is rougher to the touch and is a looser woven plastic. The Silver Silica is also soft and feels a lot like the paracord to the touch. I prefer the paracord and MDPC sleeving simply because the Silver Silica does add a lot to the price. All three cords had the same black plastic connectors. The Mini and Micro USB connectors are slightly thicker than a premade cord. This did cause the connection on the original Cooler Master Quickfire Rapid to push out a little more than I would like. This isn’t a huge shock though, even the original connection was almost too large as well. I wouldn’t really hold that against Mimic Cables as much as I would just keep it in mind if you are looking to pick up a cable for your Quickfire Rapid.

How do they look with the keyboards? Check them out!
Mimic Cables also sent over links to a few Flickr albums where they have posted up other cables they have made. You can also see examples of their braiding and coiled cables in there. Keep in mind when ordering your cable that you need to order it with enough lead time for them to get it finished. These are custom cables, they make each one specifically for you.
Customizing your keyboards case
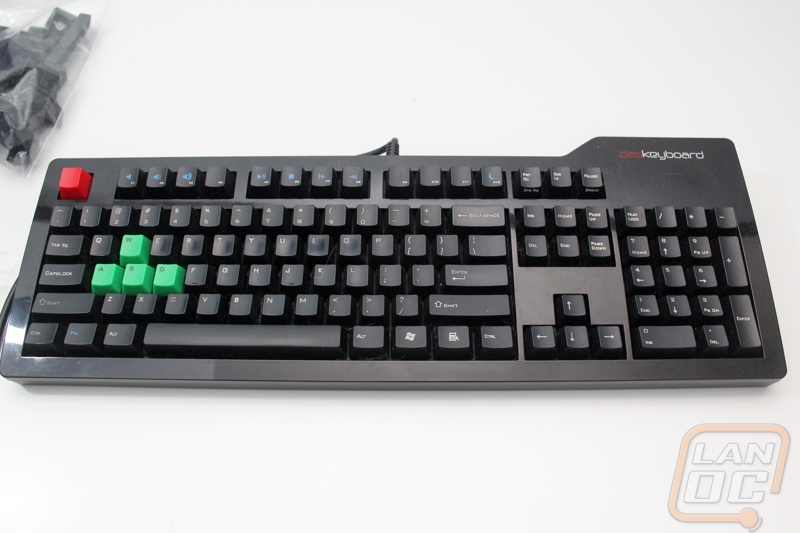
So you want to customize your keyboard but you don’t have it in your budget to throw down for a full keyset and a new USB cable. On the other hand, maybe your keyboard is looking a little beat up and you are just looking to freshen it up a little. Well a popular option is to pull your keyboard apart and repaint the case. If that is a little too permanent, you could also just use PlastiKote. PlastiKote gives you a nice matt finish in a wide variety of colors but if you mess up or change your mind later you can just peal the coating off. In my case, I put that badass Pimpmykeyboard Midnight Alpha keyset on my Wife’s Quickfire Rapid but the old rubberized finish on it was looking a little sad. See the photo below
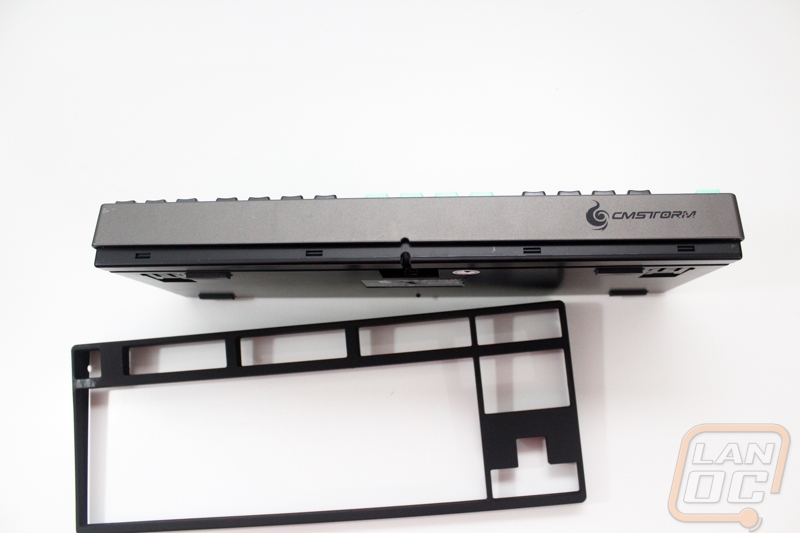
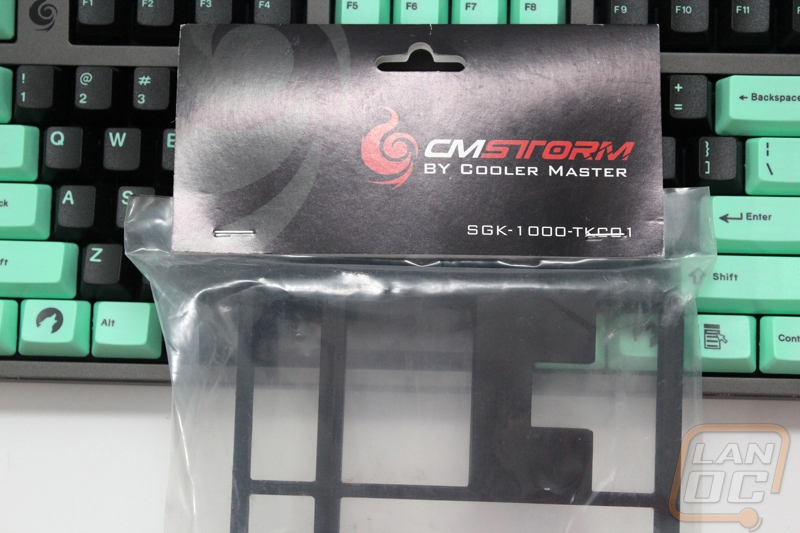
I tossed around the idea of pulling it apart to repaint it but when I decided that I wanted to recolor it black, I went for another option all together. Rather than repainting the case, I remember that Cooler Master sells replacement top panels right on their website. You can get the same grey color that the older Quickfire Rapids had or you can get the black color that they went to later. Both versions lost some of the branding that our original Quickfire Rapid had, giving it a cleaner look. Lucky for us, Carter a friend of mine over at Cooler Master, happened to have one sitting in his car! They sent it over and before long I was digging into the Quickfire Rapid to swap out the top panels.
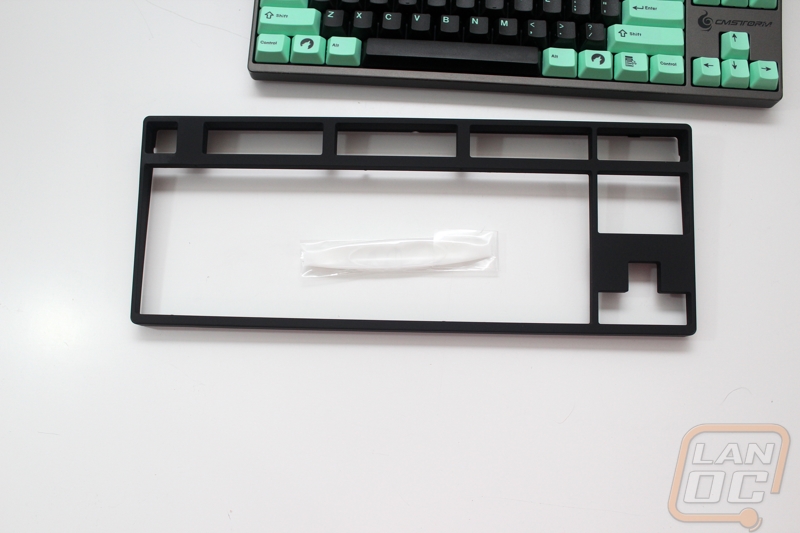
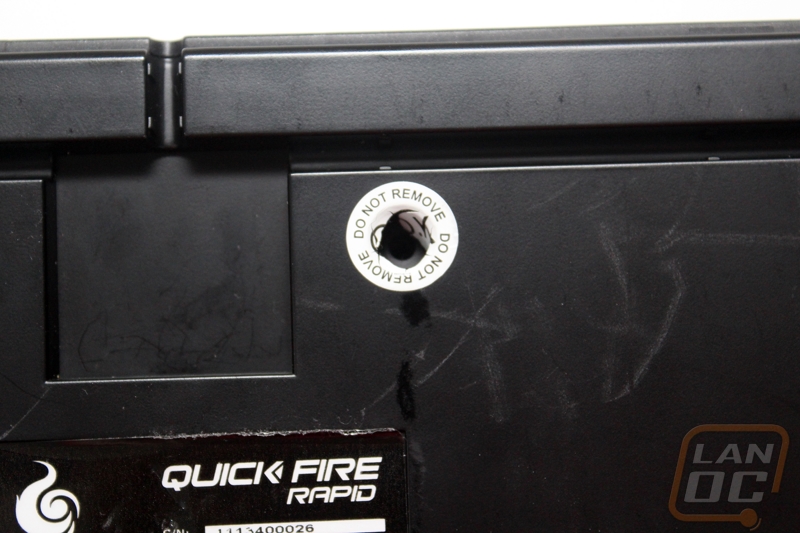
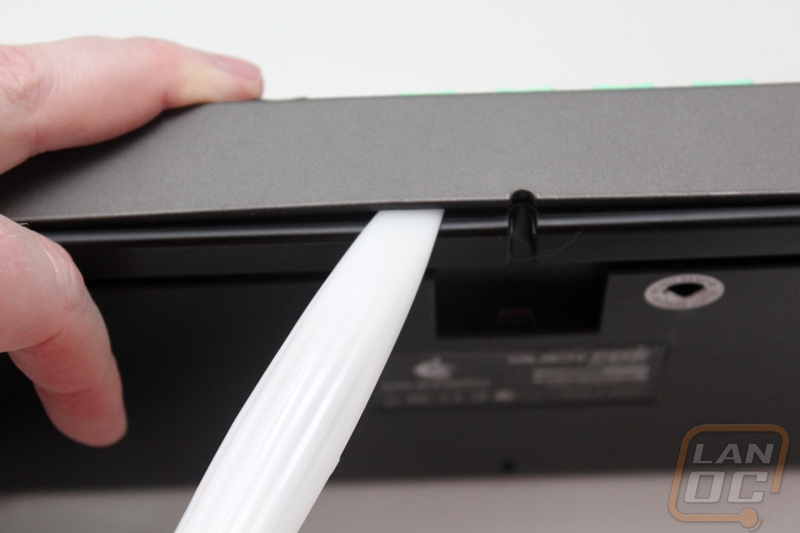
The top panel comes with a white shim to help you pop it off but before you can do that, you have to remove the single screw holding the top panel on. As you can see below, I busted a hole in the warranty sticker that asks me not to remove the sticker, hey I didn’t remove it :p. Once you remove the screw that locks the top panel down, you have to take the white shim and work it into the edge of the top panel. Once it pops loose in the first area, it doesn’t take too much to work around the rest of the keyboard. I was very impressed with how quickly I pulled the panel off. Putting the new panel back on went even quicker, you slide it on until it locks into place all around the edges then you put the screw back in.

The replacement top panel turned our old and LAN worn Quickfire Rapid into a new keyboard. When combined with the Midnight Alpha keyset from Pimpmykeyboard the keyboard looks amazing. I am keeping the old top panel around though. Should I decide to swap her keys to something else I plan on giving the old top panel a new coat of paint in a fitting color. If she has any say in it I would guess it will be something bright and eye-catching!

I should also point out that Cooler Master’s replacement top panels are actually half off right now on their website. If you are planning on a project like this in the future, now might not be a bad time to pick one up. Hell even if you are painting your keyboard, getting one it to paint while you use your keyboard day to day might not be a bad idea as well. Here is a link http://www.cmstore-usa.com/quickfire-rapid-replacement-top-panel/
