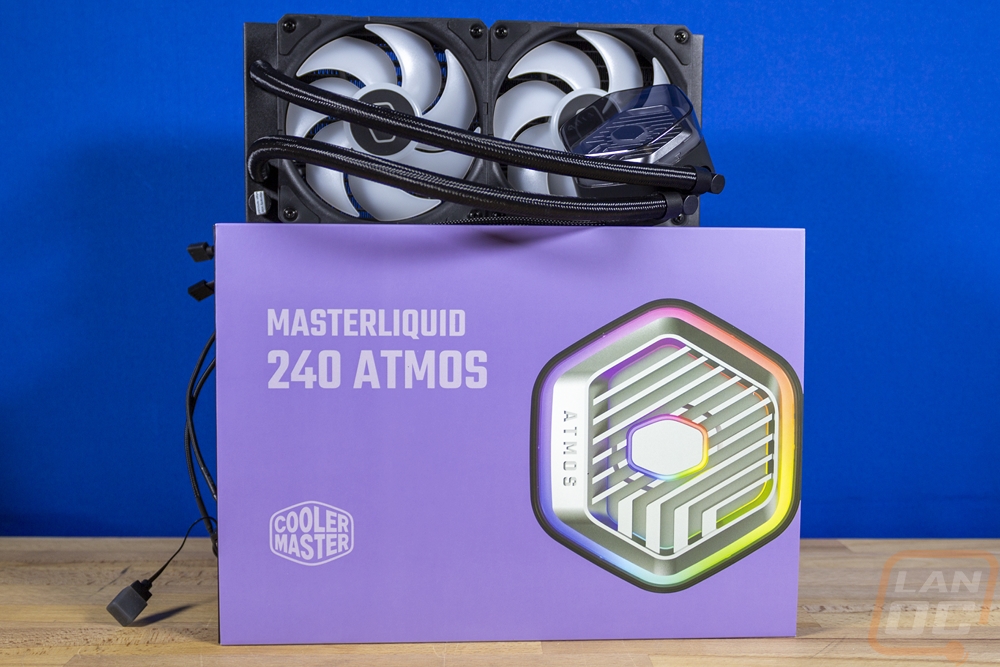
Cooler Master is one of only a few companies that has been designing their own all-in-one cooler designs, even going as far as having a very public lawsuit with Asetek. Because of that though they have a wide selection of cooler designs and are always evolving. The latest in their cooler designs is the MasterLiquid Atmos line of coolers which has a unique hexagon-shaped pump housing and even a pump top that can be customized with 3D printed designs. Today I’m going to check out the MasterLiquid 240 Atmos and see what it is all about and check out its performance. Is it your next water cooler? Let’s find out.
Product Name: Cooler Master MasterLiquid 240 Atmos
Review Sample Provided by: Cooler Master
Written by: Wes Compton
Amazon Affiliate Link: HERE
|
Specifications |
|
|
Product Name |
MasterLiquid 240 Atmos |
|
Product Number |
MLX-D24M-A25PZ-R1 |
|
Exterior Color |
Black |
|
CPU Socket |
Intel Intel® LGA 1700 / 1200 / 1151 / 1150 / 1155 / 1156 / socket
AMD AMD® AM5 / AM4 socket |
|
Radiator |
|
|
Radiator Material |
Aluminum |
|
Radiator Dimensions |
277 x 119.6 x 27.2 mm(10.9 x 4.7 x 1.1 inch) |
|
Pump |
|
|
Pump Dimensions |
84.9 x 81 x 53.15 mm(3.3 x 3.2 x 2.1 inch) |
|
Pump MTTF |
> 210,000 hours |
|
Pump Noise Level (Max) |
25 dB(A) |
|
Pump Connector |
4-Pin |
|
Pump Rated Voltage |
12 VDC |
|
Pump Power Consumption |
3.84 W |
|
Fan |
|
|
Fan Dimensions |
120 x 120 x 25 mm(4.7 x 4.7 x 1 inch) |
|
Fan Quantity |
2 |
|
Fan LED Type |
ARGB |
|
Fan Speed (RPM) |
690 ~2500 ± 10% |
|
Fan Airflow (Max) |
120m3/h (70.7 CFM) |
|
Fan Noise Level (Max) |
27.2 dB(A) |
|
Fan Pressure (Max) |
3.61 (mmH2O) |
|
Fan Bearing |
Loop dynamic bearing |
|
Fan MTTF |
>160,000 hours |
|
Fan Power Connector |
4-Pin PWM |
|
Fan Rated Voltage |
12 VDC |
|
Fan Rated Current |
0.2 A |
|
Fan Safety Current |
0.3 A |
|
Warranty |
|
|
Warranty |
5 years |
Packaging and Accessories
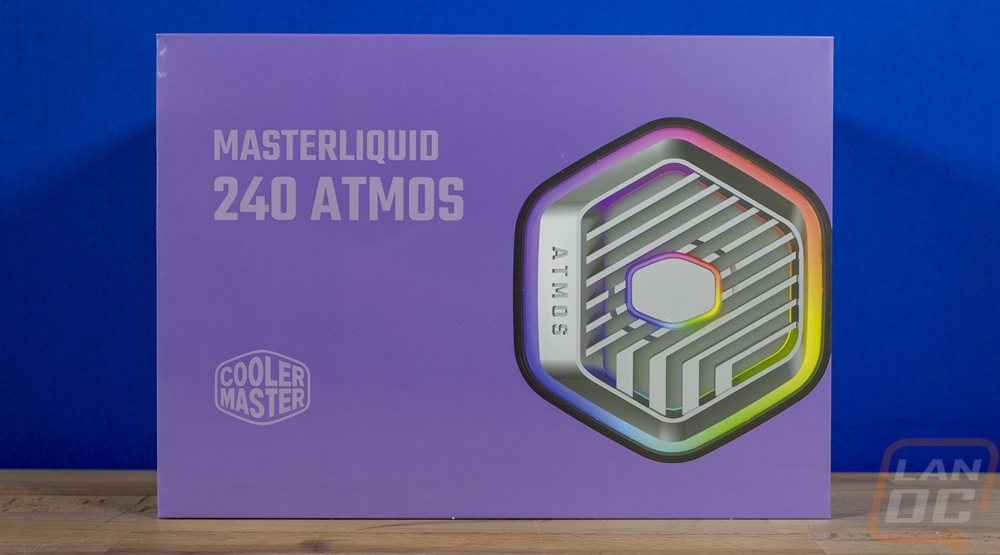
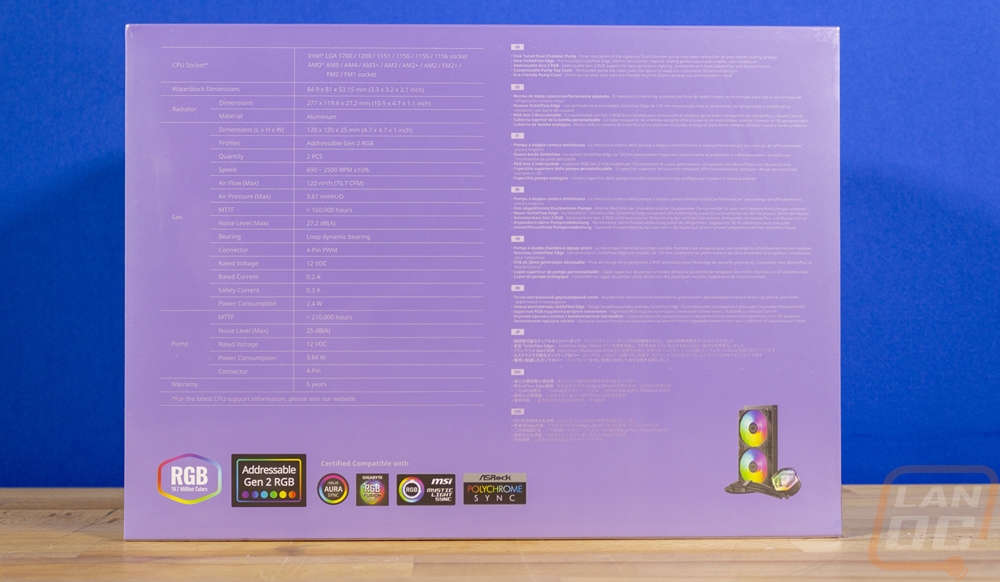
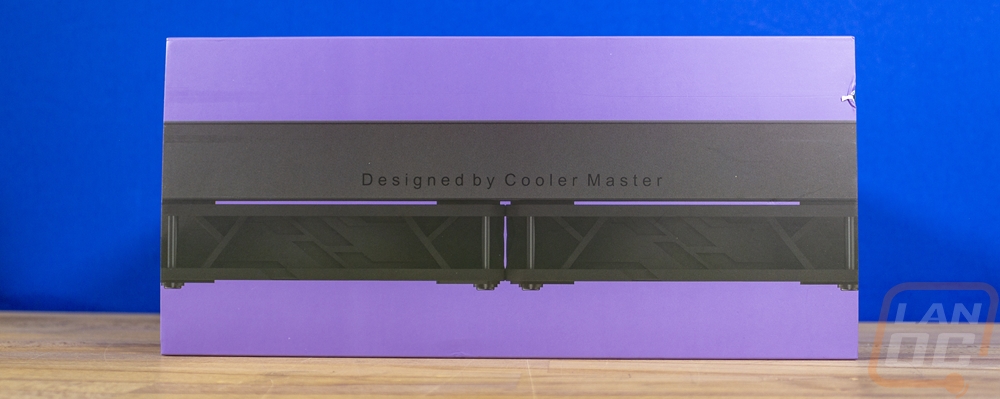
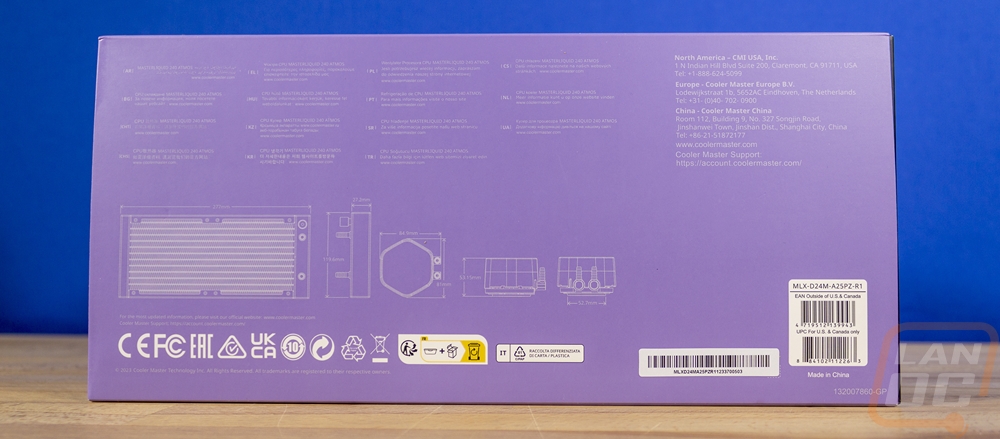
The box for the Cooler Master MasterLiquid 240 Atmos is a surprising departure from what I have seen any other AIO water cooling kits have in the past. Most have a thin outside printed cover and a brown box inside. Cooler Master has upgraded things for the Atmos however, there is an outside printed cover but it slides over top of a heavy-duty black box with the Cooler Master logo on top. The outer cover has a purple background which isn’t a surprise from Cooler Master but the purple shade here is more of a violet which is a little different. The front of the box is simple and to the point. It has the MasterLiquid 240 Atmos branding in a large font, the Cooler Master logo, and a picture of the top of the pump which has the Atmos branding on it and the RGB lighting turned on. Around on the back, the box has a full specification listing and they have also listed out key features with a short description. Those are repeated across 9 different languages. There is a tiny picture of the cooler with the fans lit up and along the bottom, they do have icons showing this is a Cooler Master addressable Gen 2 RGB product and icons that show support for lighting control from the main motherboard RGB software. The side view of the box has a picture that shows the side of the radiator and the fans with “Designed by Cooler Master” on it. The other side has line drawings of the cooler from every angle with all of the dimensions.
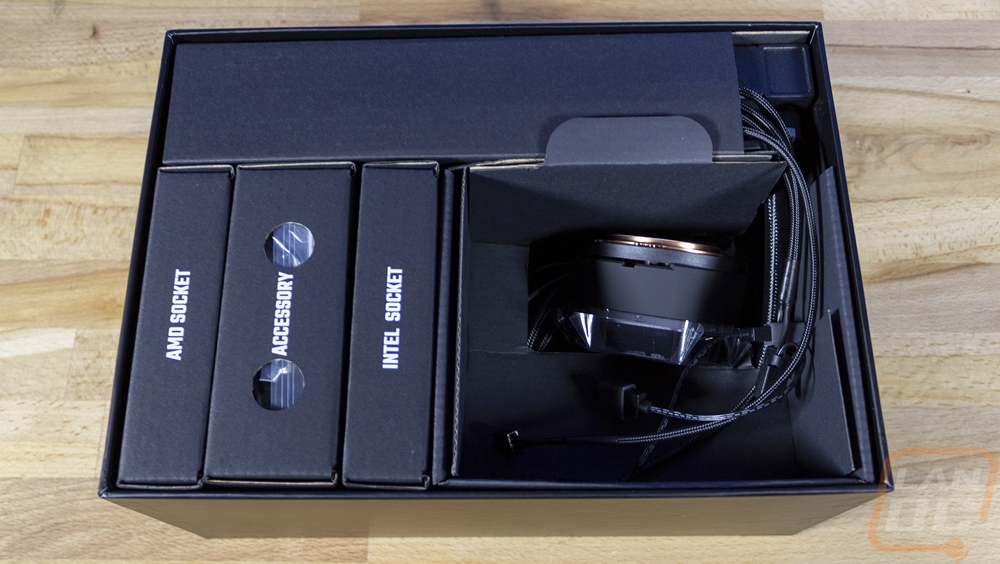
To open the black box up, you lift the top half of the box off. Inside other AIO coolers have a recycled cardboard formed tray to hold everything. The Atmos has three boxes that are labeled letting you know what is inside with one for AMD CPU compatible parts, one for Intel CPUs, and the main accessory box. The radiator comes with the fans already installed, it then has a black cardboard wrap around it to keep things safe and the pump itself sits in its own little compartment.
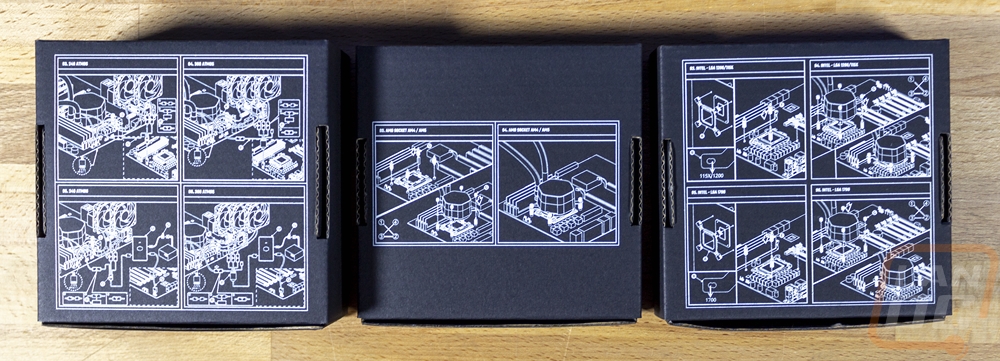
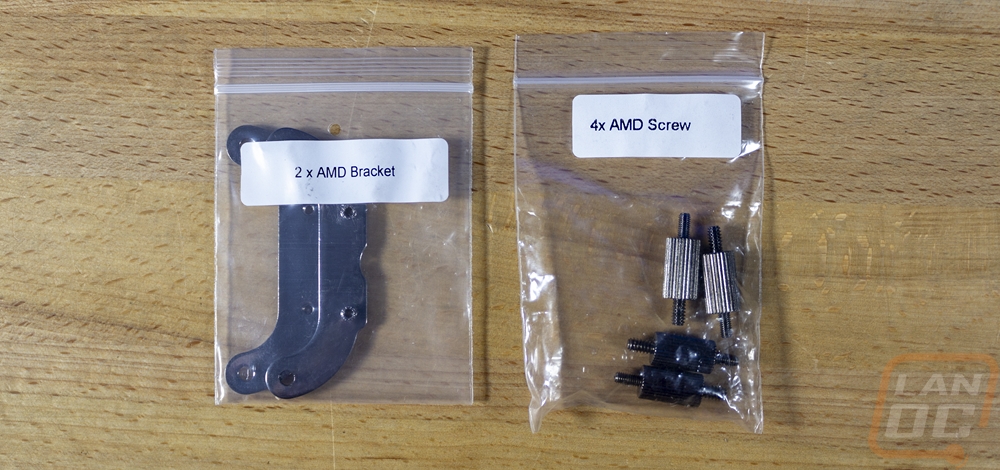
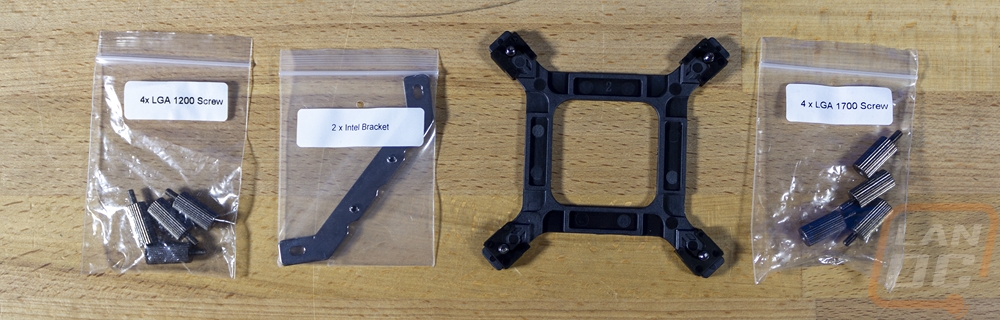
Each of the accessory boxes has installation instructions printed on the bottom and on the top a line drawing of everything inside of the box as well as the start of those instructions. This is unique and a nice way of getting the important information visible and one less reason to dig into a manual. The AMD box has two small baggies, one with the metal AMD brackets and the other with the four standoffs. The iNtel box has more with two metal brackets and a plastic backplate. They have already installed the standoffs in the backplate, something that in the past you would have to do. Then you have standoffs for LGA 1200 and LGA 1700 sockets, all are bagged up and each is labeled making them easy to find.

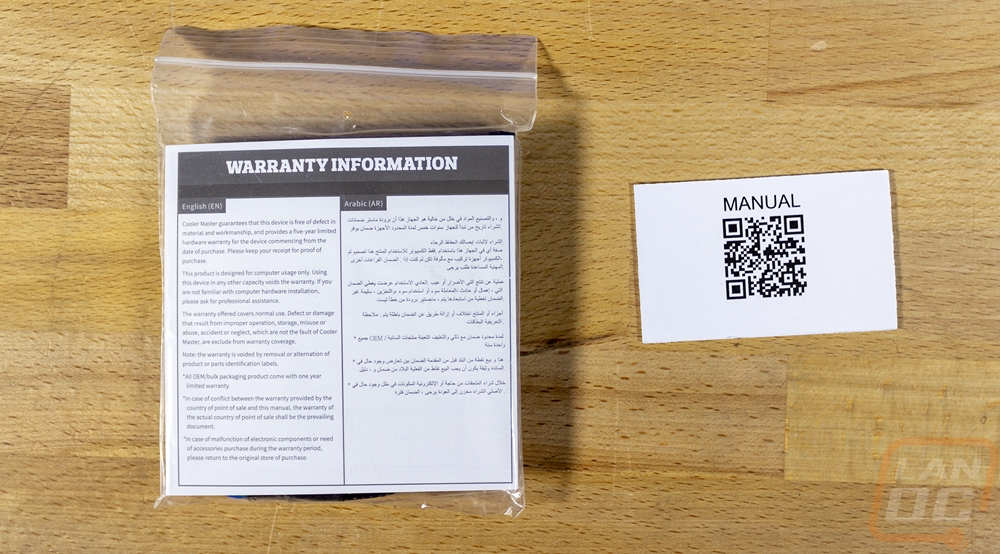
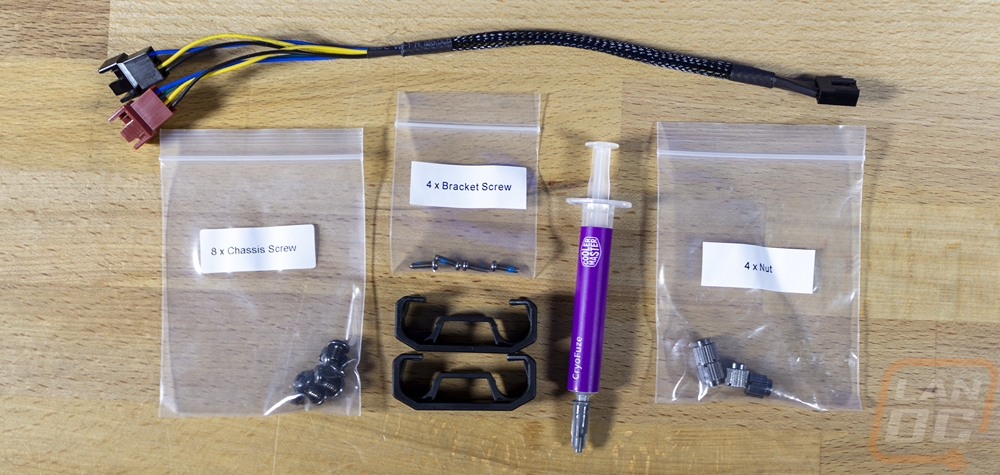
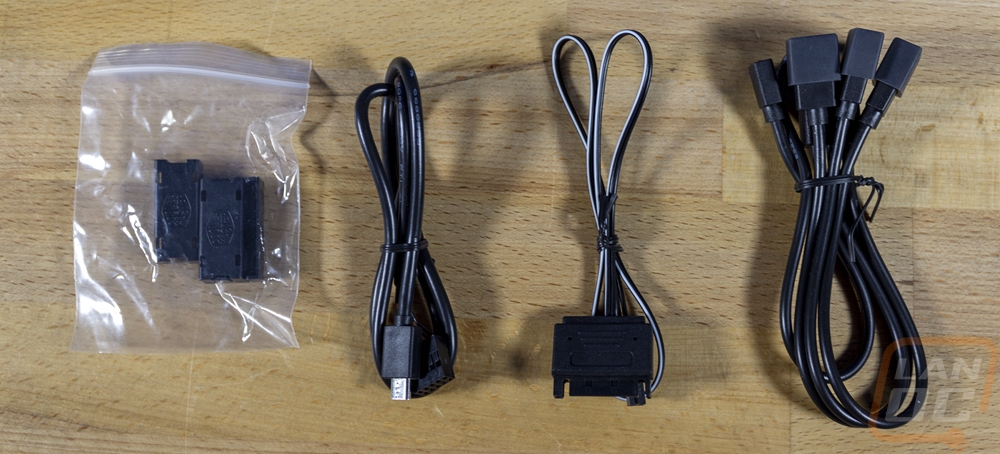
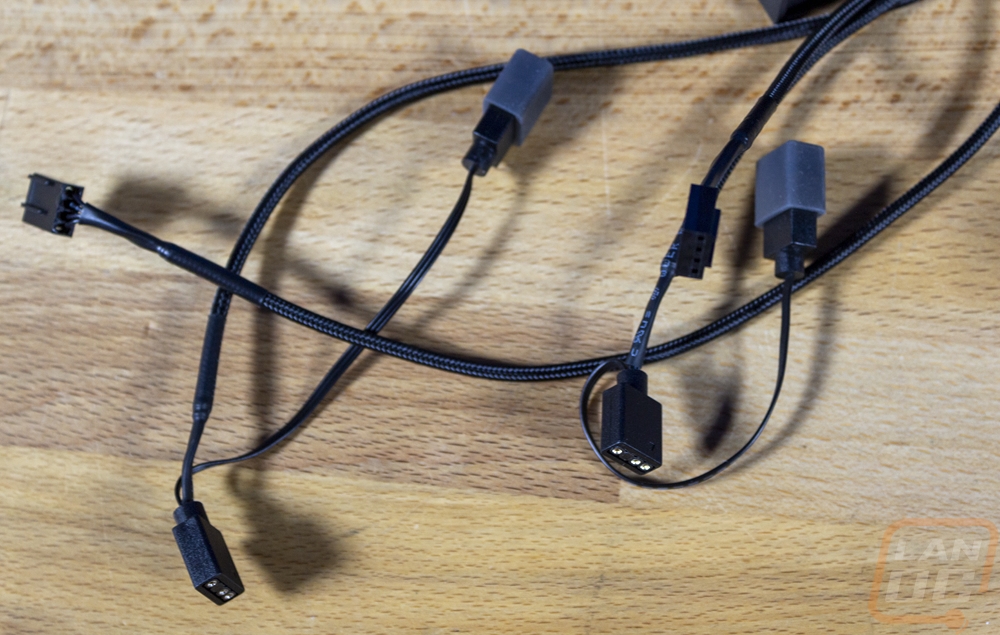
The main accessories box has a bag with the documentation inside along with a few other things. You also get a thick card that has a QR code that links to the installation manual. That bag has a fan and pump 4-pin PWM splitter, bags with chassis screws, bracket screws, and nuts for installation which are all labeled. You have two plastic clips that can keep the water lines the same distance apart and a full tube of thermal paste as well.
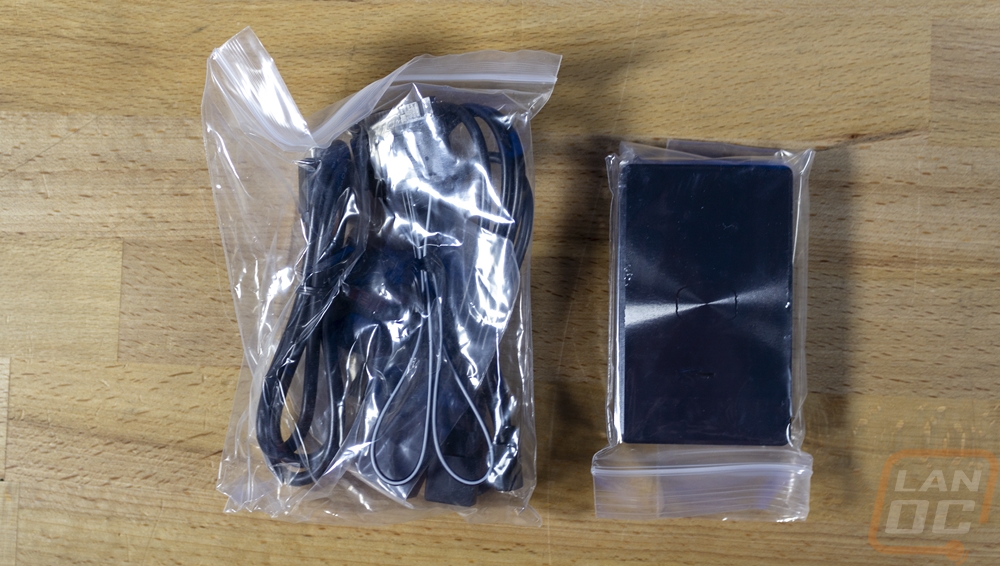
Also in the accessories box, you have the RGB controller which comes bagged along with a large bag of wiring for it. The controller has a machined aluminum-looking top that is actually black plastic. It has the outline of the Cooler Master logo up top and a machined ring that gives the entire top a nice texture. On the sides, one side has a micro-USB plug and a small plug for the power cable. The other side has three RGB channels with the addressable 3-pin plug design that everything uses, so you can use the controller with Cooler Master products and anything else RGB as well. Then the bottom of the controller has rubber feet on the bottom, surprisingly I didn’t see any mounting holes or double-sided tape, that is because the controller has magnets inside, if you have an aluminum or plastic case you will need to get double-sided tape but that should make installation easy in most cases. For the wring, the controller has three sets of cables and a bag with plastic clips. The plastic clips lock the RGB connections together preventing them from pulling apart later. The first cable is a USB header to the Micro-USB connection. The second is SATA power to the small two-pin power connection on the controller. Then the last one is an RGB splitter that lets you hook up the pump and two fans all to one RGB connection on the controller. Leaving the other two connections for future use or anything else you have in your PC.

Photos and Features
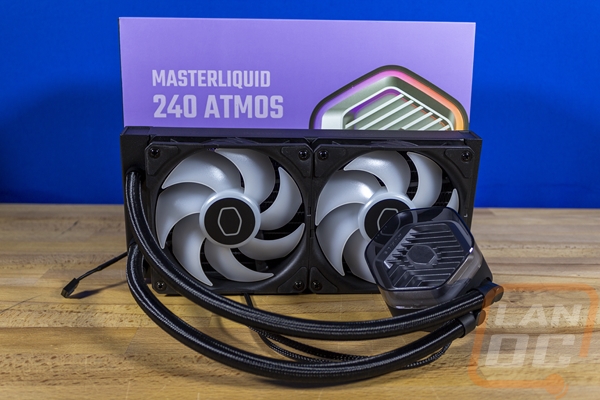
Like with the packaging for the Cooler Master MasterLiquid 240 Atmos, it is very clear that Cooler Master is aiming for the Atmos to be a more premium all-in-one cooler. One noticeable area is with details like having the fans already installed. Installing the fans isn’t that difficult to do, but it normally does take up a good portion of the installation time when setting up a new cooler. The Atmos comes in a 240 and a 360 model which means it is available with dual and triple 120 mm fans. For the fans, Cooler Master has gone with their Sickleflow ARGB fans. They have standard 120 x 120mm dimensions as well as a thickness of 25 mm. They have a standard looking black housing with black rubber vibration mounts on each corner to dampen vibrations both on the mounting screw contact surface and against the radiator. Then they have a 7-blade white translucent blade in the center with black center stickers that just have the outline of the Cooler Master logo. The Sickleflow ARGB fans have their addressable lighting in the center housing that radiates out into the blades as they spin to give a nice blended effect. They can run at up to 2500 RPM and can push up to 70.7 CFM with a max pressure of 3.61 mmH2O which is solid for a radiator fan. They have loop dynamic bearings and are rated at over 160,000 hours of line.
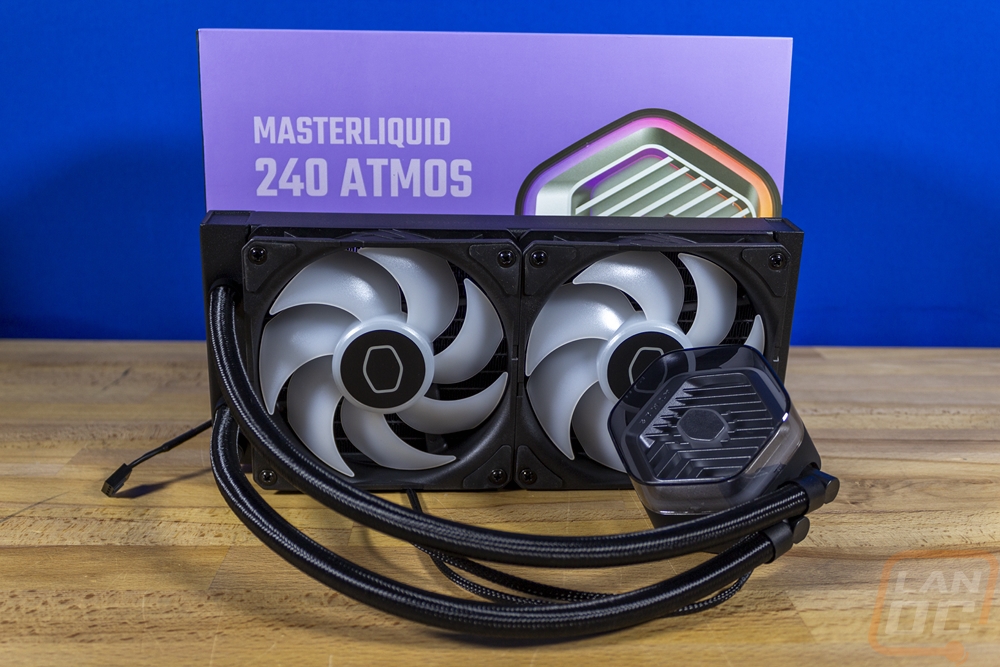
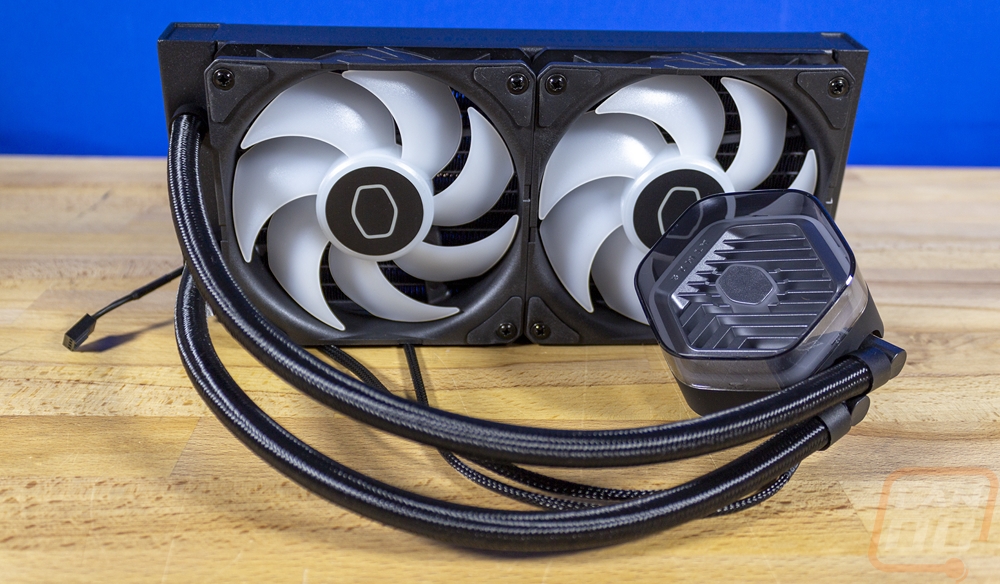
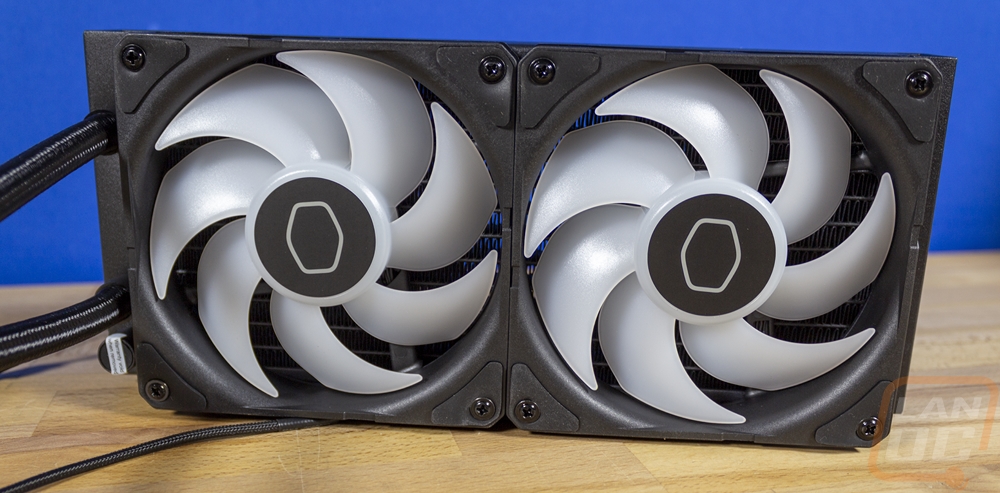
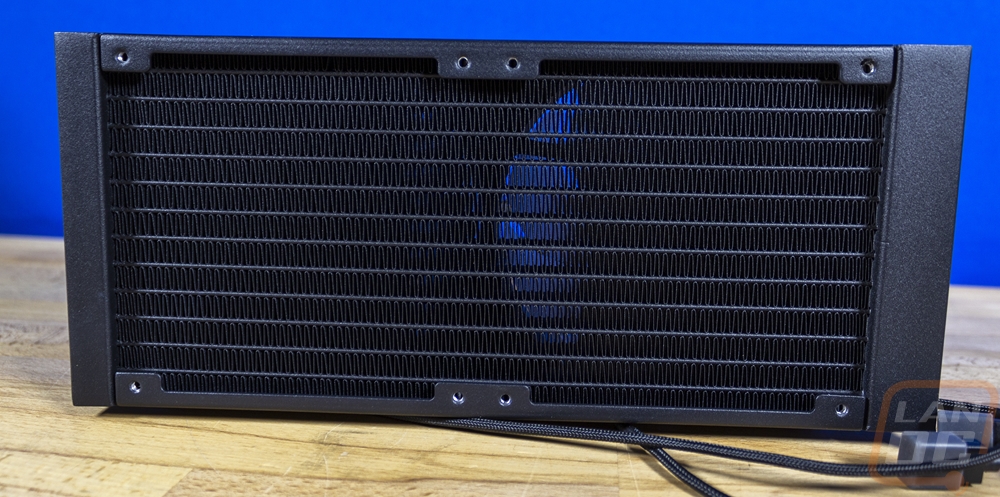
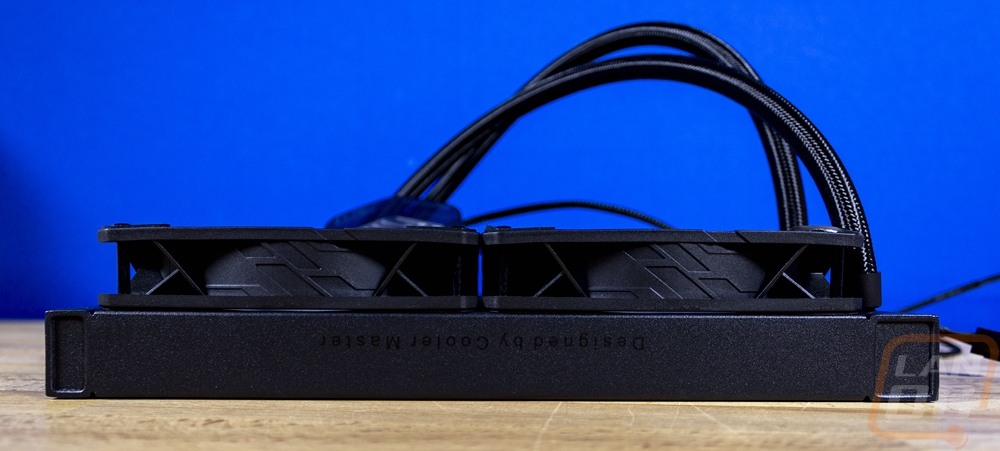
The radiator design for the 240 Atmos has boxed endcaps that give the cooler a more modern look. I was also surprised with the finish which has more texture than your standard AIO radiator. They didn’t change the dimensions at all, it is 277 mm long, 119.6 mm wide, and 27.2 mm thick which is just .2 past the standard AIO radiator thickness. I would bet that the extra .2mm comes from the upgraded textured finish. It is all aluminum and has a standard fin density as well. The side view does let us just barely see text that is printed on the sides. It is printed in black on the black finish and it says “Designed by Cooler Master” on it. The main end of the radiator has two water lines going into it and a capped third hole where they fill everything. The lines have black plastic caps on the ends and a black sleeving over the entire rubber line.
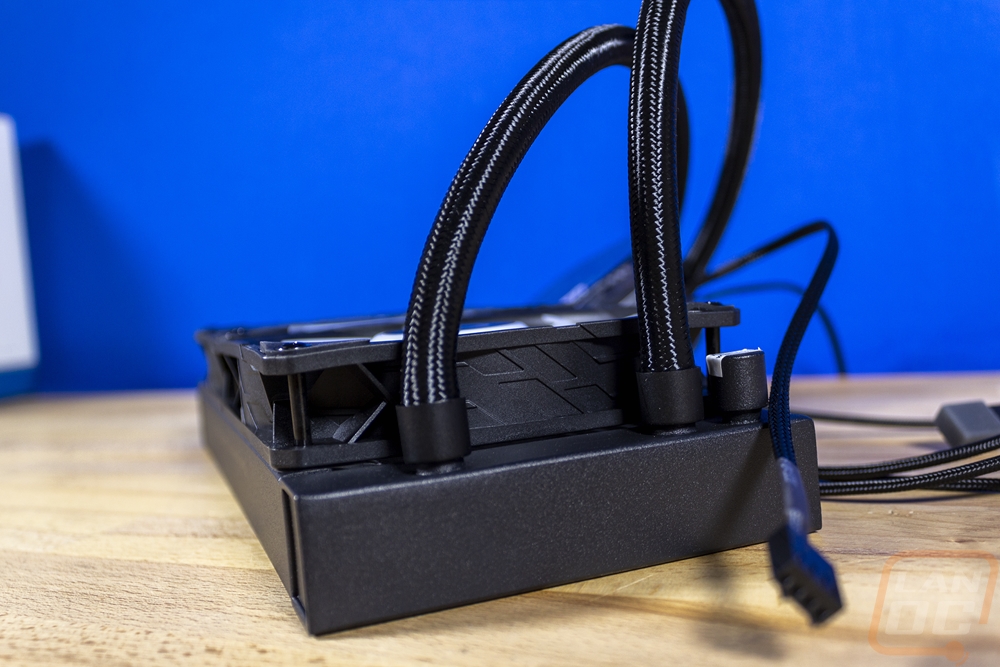
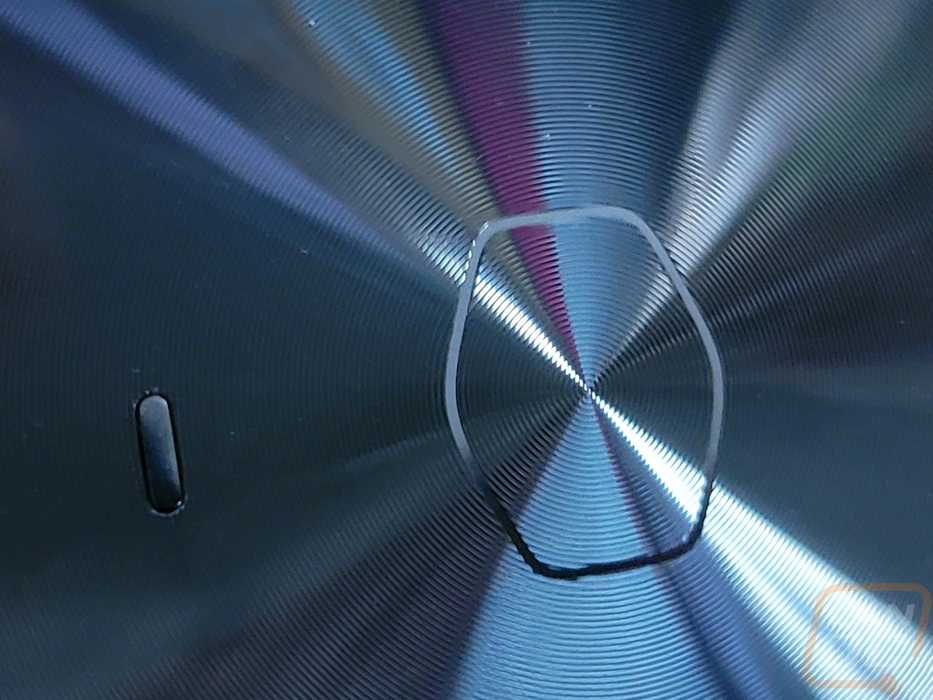
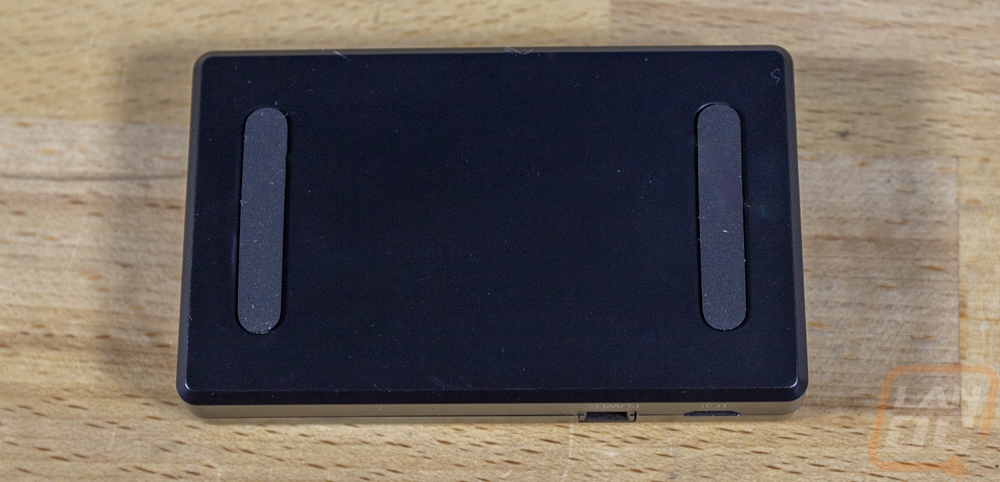
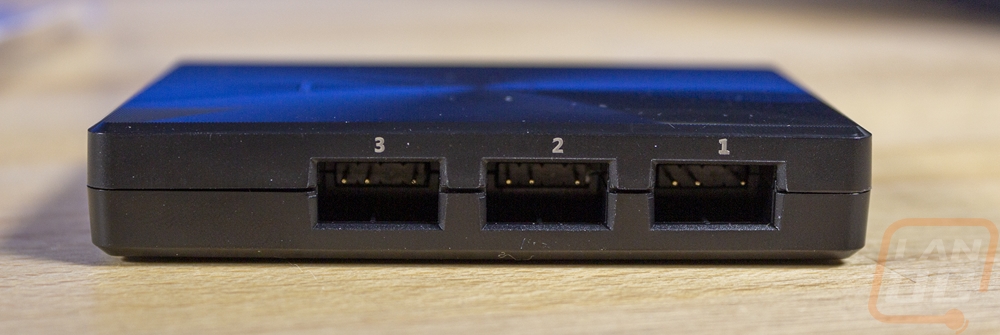
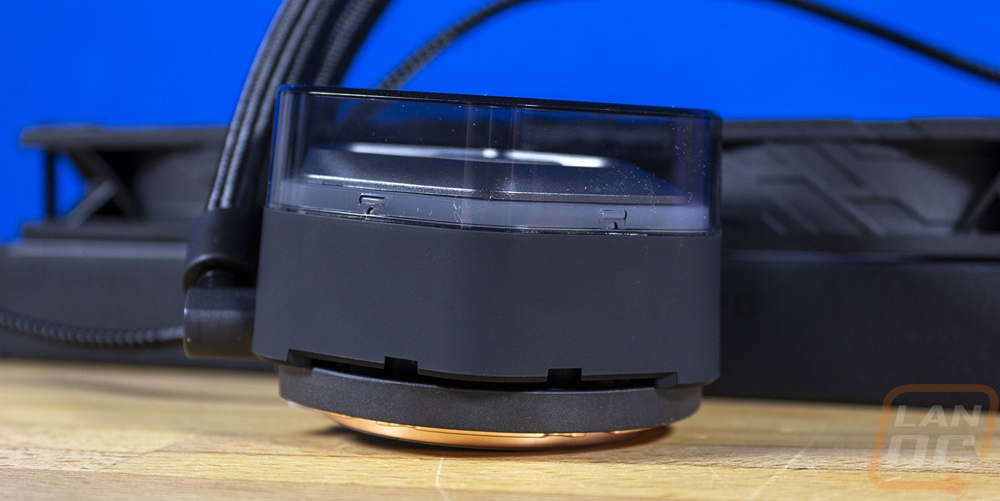
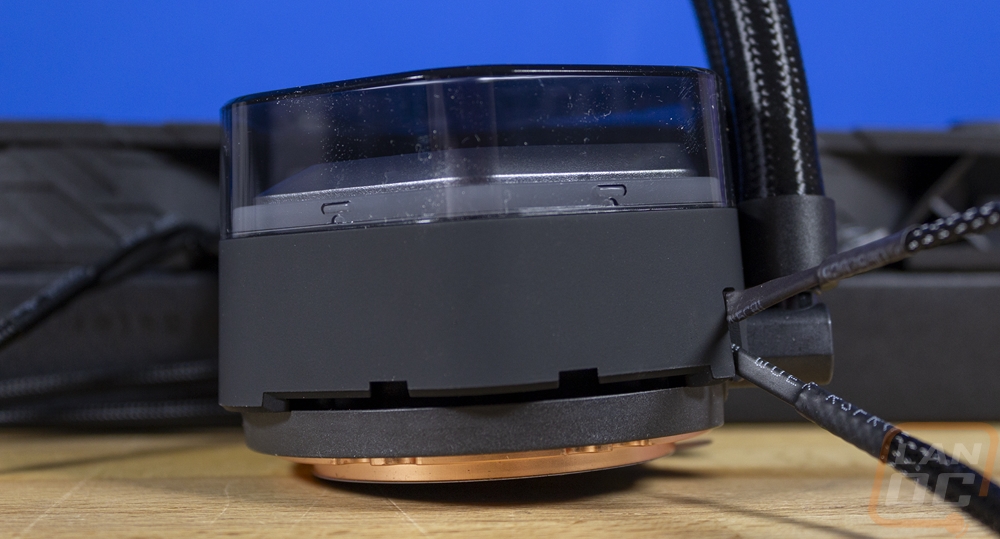
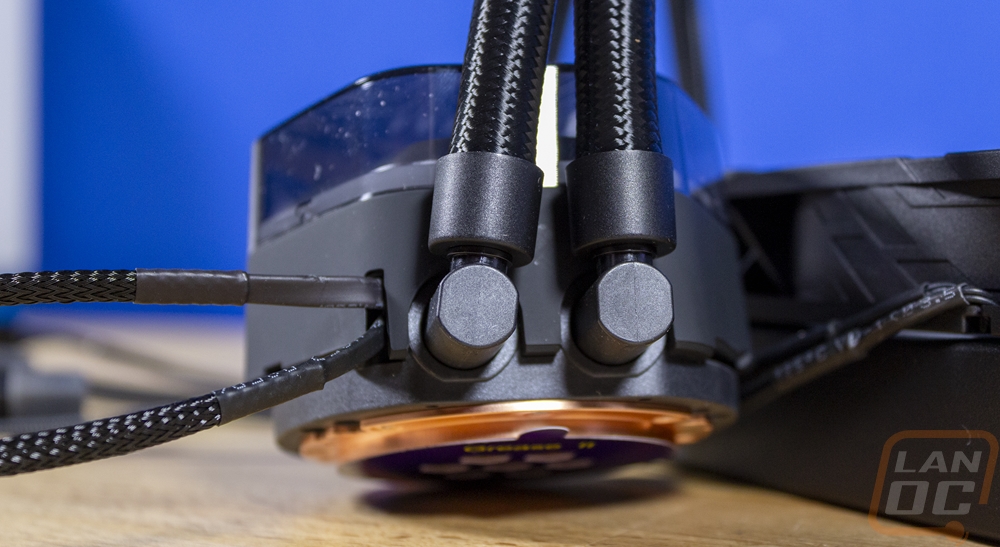
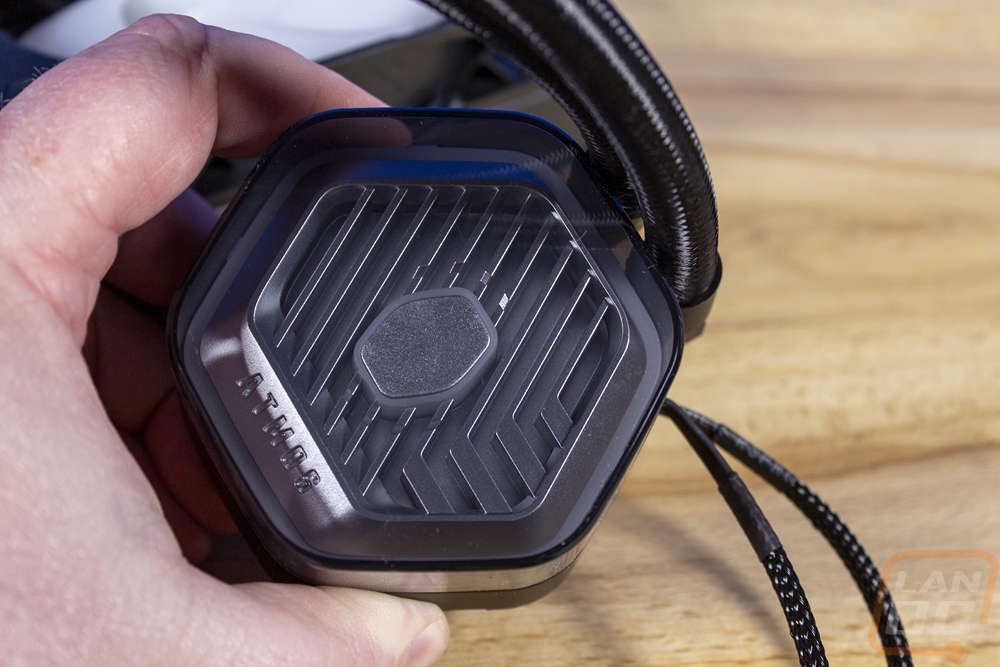
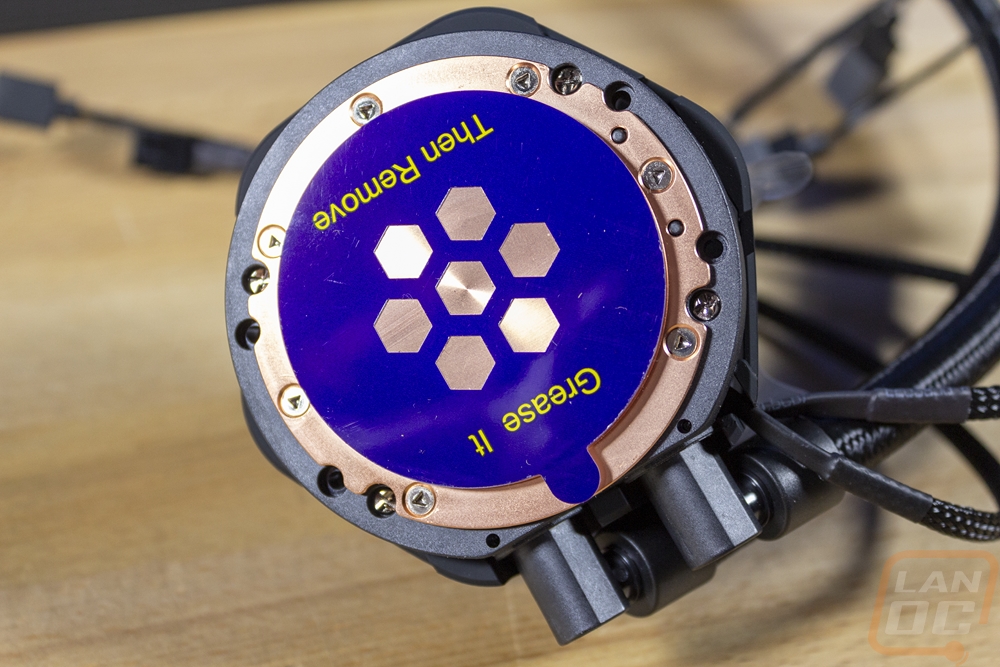
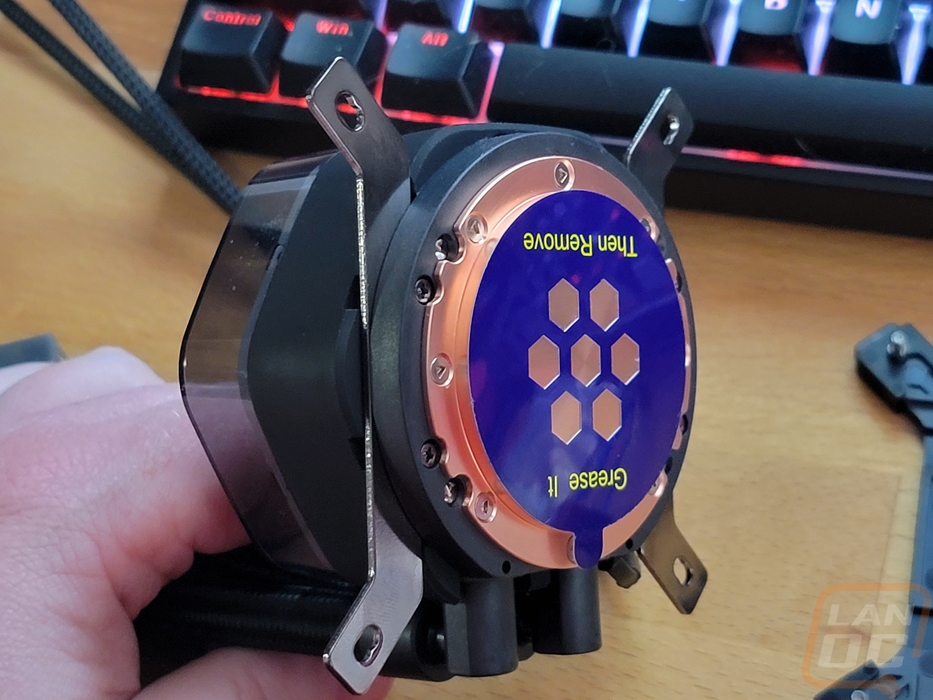
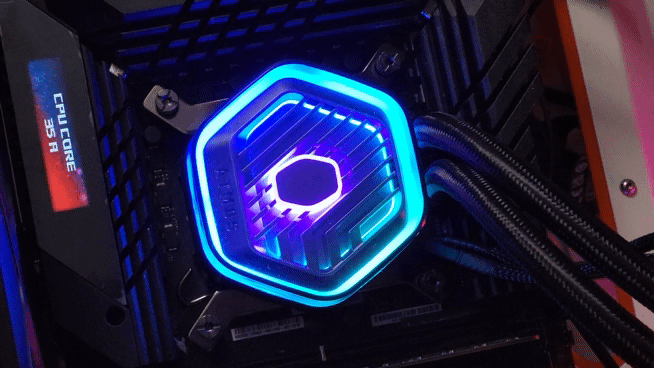
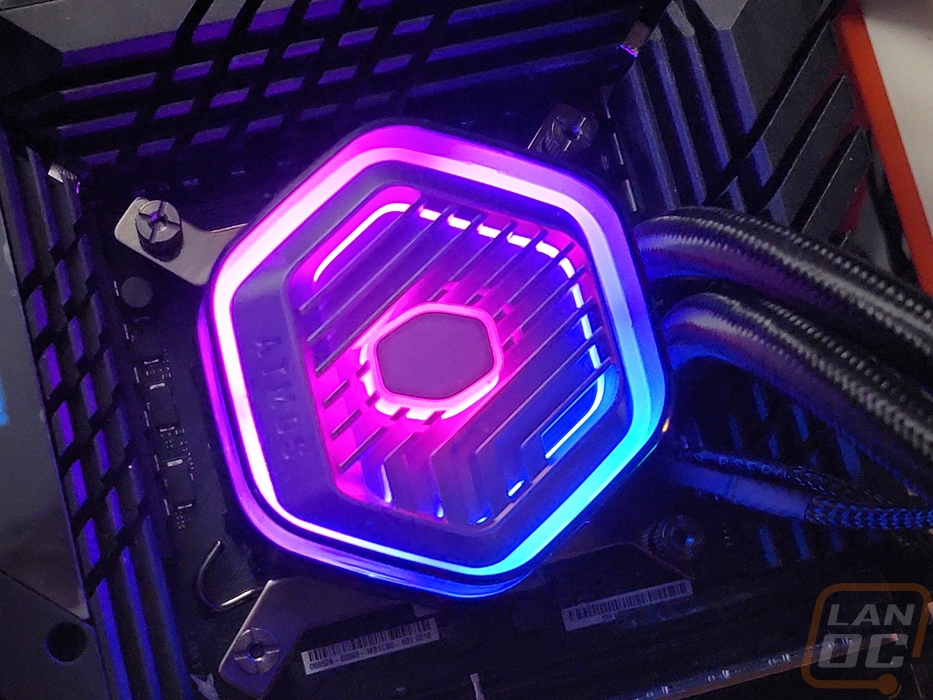
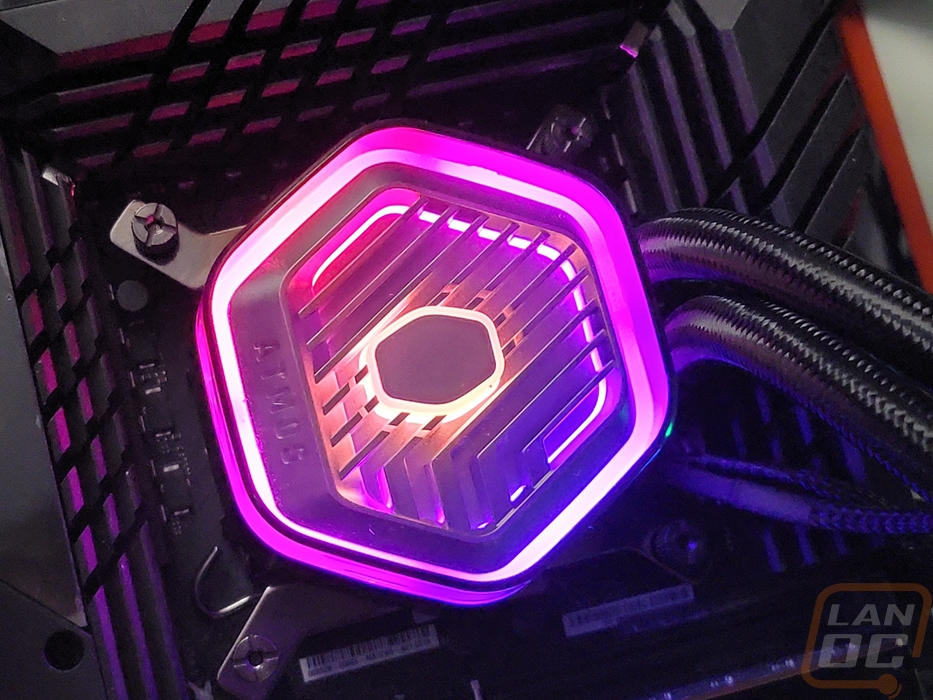
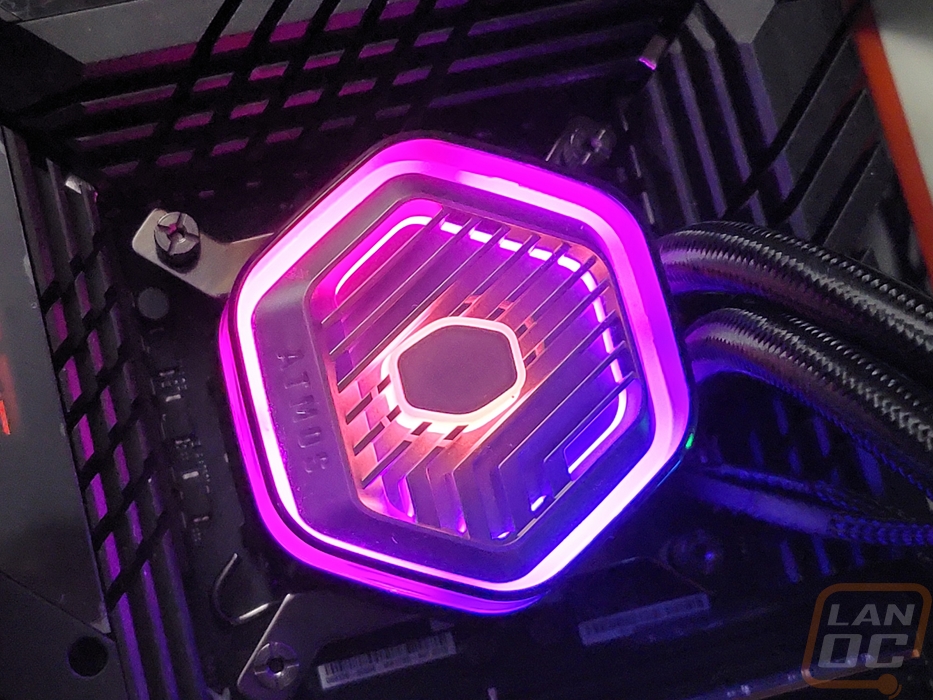
Cooler Master has always had a nice variety of unique pump/water block designs but I think the 240 Atmos has the best looking of them all. Where most are round and some are squared off, the 240 Atmos has a 6-sided hexagon shape. If they went a little wider they could pull off the Cooler Master logo shape. The assembly is 53 mm tall but the pump section itself is surprisingly compact. The extra space is filled with the top 1/3 of the pump having a tinted plastic cap over top. Inside of that, you can see a grooved design which has the Cooler Master logo outline in the middle with translucent white plastic around it so it can light up with RGB lighting. The top design has the Atmos branding on it as well. Both the water lines and both of the sleeved cables all run into one side of the pump then under it all, we can see a traditional round design at the base with the copper contact surface. With the fans pre-installed I expected to see the thermal paste also pre-applied which is common these days but Cooler Master didn’t do that. They did include a sticker with 7 hexagon cutouts on it that you can use to get the perfect application with the included paste. The contact surface has a visibly machined surface and while smooth isn’t the mirror finish you might find on higher-end custom water cooling components. The bottom view also shows the four mounting holes, two on each side for the included mounting brackets depending on which CPU you are running. The hexagon-shaped plastic housing has a flat black finish below the translucent top cover and from the side, you can see a ring around the top of translucent plastic for the aRGB lighting up under everything.


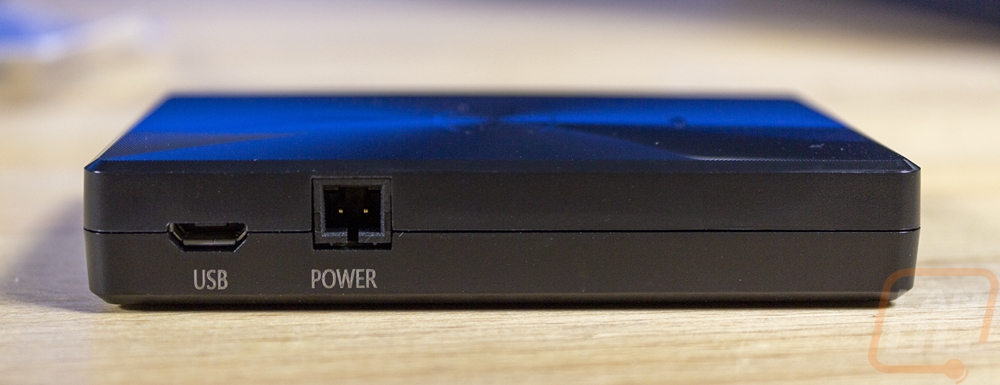
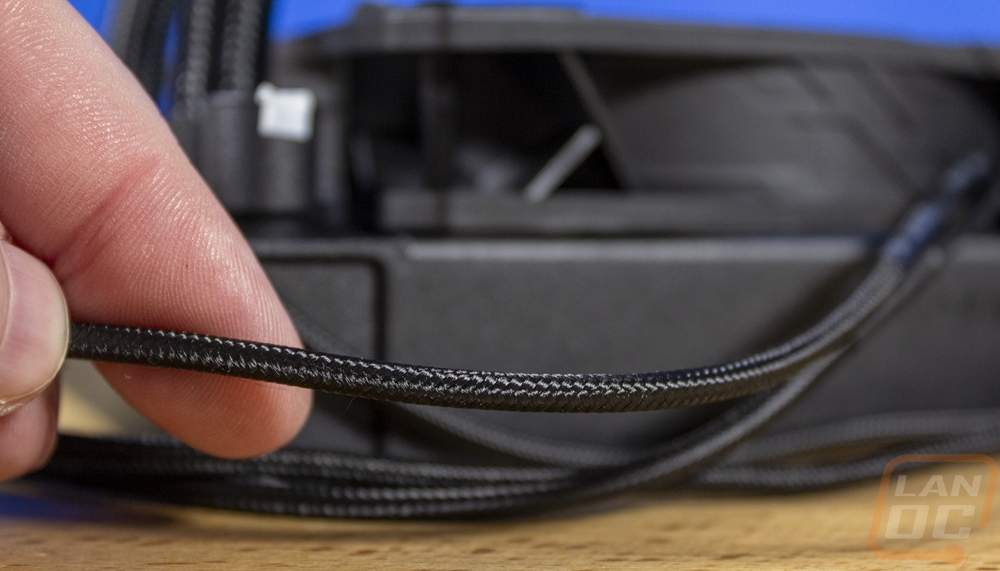
The Atmos sadly doesn’t have daisy-chained fans so you will have to deal with the wiring when you set everything up. The sleeving for everything however is surprisingly compact with a tight black sleeving over everything. Each fan has an addressable RGB cable which has a daisy chain plug at the end so you can connect them together, each fan also has a four-pin PWM fan header. The same goes for the pump as well which has both. All of the lighting connections can be hooked up to the included RGB controller or directly to your motherboard's aRGB header if you have one.
Test Bench
|
Testing Hardware |
Live Pricing |
|
|
Case |
Primochill Wetbench |
|
|
Motherboard |
Asus ROG Maximus Z790 Extreme |
|
|
CPUs |
Intel i9-13900K PL1=PL2: 253, τ: 56 / 307A |
|
|
Ram |
Crucial 2x16GB 5600 MHz Kit |
|
|
Power Supply |
Be Quiet! Dark Power Pro 1600W |
|
|
Thermal Paste |
Noctua NT-H2 |
|
|
SSD |
Sabrent Rocket Q4 2TB |
|
|
OS |
Windows 11 Pro |
|
Noise Testing, Fitment, and Lighting
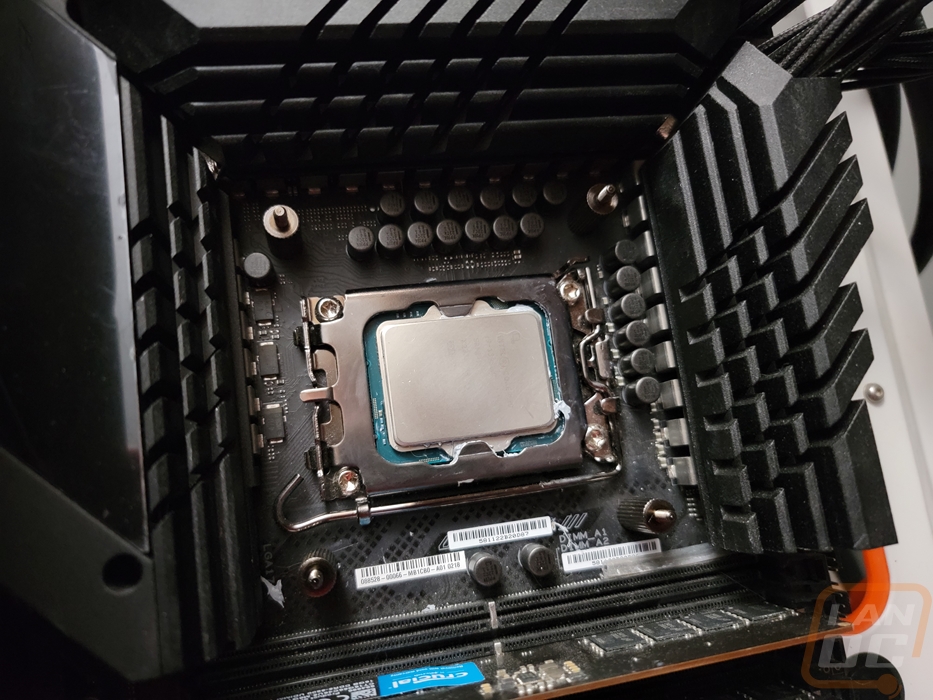
With the 240 Atmos coming with its fans pre-installed the installation and setup of the cooler was already ahead of the game. You do still need to get all of your CPU mounting brackets set up, however. This includes installing the two brackets onto the pump itself. Then for the CPU socket itself, you have the backplate and the large standoffs that screw into it. A lot of the coolers I have taken a look at recently cut out a step here and everything goes together all at once but I prefer this setup where you can install the bracket on the motherboard even before you install the motherboard in your case if you want and if you remove the cooler later it all stays In place. From there you need to mount the radiator into your case with the included screws and put thermal paste on the pump. Then it drops in on top of your CPU and is held in place with four nuts.
For wiring, you have three PWM fan plugs, two for the fans and one for the pump which can be tied in together with the included adapter or plugged right into your motherboard. TH aRGB lighting then has three connections as well but they can all be linked together leaving just the one plug. For that, you have the included RGB controller which can also control other RGB products in the future or running the lighting off of your motherboard's aRGB header.
As far as fitment goes the 240 Atmos has a standard thickness for its radiator and the dual or triple 120mm fan setup depending on model should work with just about any case. The water block/pump height was more compact than almost any other cooler I have tested recently and that includes the extra height that the translucent plastic cap on top adds so it shouldn’t be a problem in any cases.
|
AIO Cooler |
Fan Configuration |
Radiator Thickness |
Water block height |
|
Corsair H100i Elite LCD Display |
2x 120mm |
27mm |
57mm |
|
Enermax Aquafusion Adv 240 White |
2x 120mm |
27mm |
54.5 mm |
|
Enermax Aquafusion Adv 360 Black |
3x 120mm |
27mm |
54.5 mm |
|
Corsair H100I Capellix XT |
2x 120mm |
27mm |
49 mm |
|
Lian Li Galahad II Trinity SL-INF 360 |
3x 120mm |
27mm |
67mm |
|
Lian Li Galahad II Trinity Performance 360 |
3x 120mm |
32mm |
67mm |
|
Enermax LIQMAXFLO 360 |
3x 120mm |
38mm |
70mm |
|
Cooler Master MasterLiquid 240 Atmos |
2x 120mm |
27.2mm |
53mm |
With the 240 Atmos setup and up and running, my first round of tests were with the decibel meter. For this, I have it set up 18 inches away from the open-air test bench. I tested the fans and pump with the speed set to 50% and 100% to get a look at the overall noise levels that it is capable of. Then the last test was when the system had been running under load with AIDA64’s Stress Test CPU workload for a half hour or more. This gives us a look at the noise levels you can expect from the 240 Atmos overall in normal use. What I found was that the dual fan cooler was middle of the pack for noise levels in the 50% and 100% fan speed tests with it at 33.2 dB at 50% and 43.1 dB at 100% fan speed. There were a few larger triple fan coolers that ran quieter even. Under load, it did well though at 32.9 dB with the LIQMAXFLO 360 running a little quieter but overall this was the second quietest cooler tested.
|
Noise Testing |
50% Fan Speed |
100% Fan Speed |
Under Load |
|
Corsair H100i Elite LCD Display |
35.9 |
46 |
45.9 |
|
Enermax ETS-F40-FS ARGB |
32.1 |
37.2 |
37.2 |
|
Enermax Aquafusion Adv 240 White |
38.6 |
50.5 |
42.1 |
|
Enermax Aquafusion Adv 360 Black |
39.8 |
52.4 |
45.1 |
|
Corsair H100I Capellix XT |
33.4 |
46.1 |
40.8 |
|
Enermax Aquafusion Adv 360 Black Retest |
39.8 |
52.4 |
41.8 |
|
Lian Li Galahad II Trinity SL-INF 360 |
32.5 |
41.1 |
34.4 |
|
Lian Li Galahad II Trinity Performance 360 |
39.5 |
56.8 |
40.8 |
|
Enermax LIQMAXFLO 360 |
32.4 |
41.8 |
31.4 |
|
Cooler Master MasterLiquid 240 Atmos |
33.2 |
43.1 |
32.9 |
I also took the opportunity to check out the lighting on the 240 Atmos. This consists of the lighting on its two Sickleflow ARGB fans and on the top of the pump assembly which has lighting around and behind the hexagon-shaped design which is all visible through the tinted translucent cover on top. For the two fans, there weren’t any big surprises, this isn’t the first time we have seen the Sickleflow fans. All of the lighting comes out of the middle of the fan and radiators out through the white translucent fan blades and stops with the black fan housing. This design blends the lighting together really well when you have the fans running as you can see below.
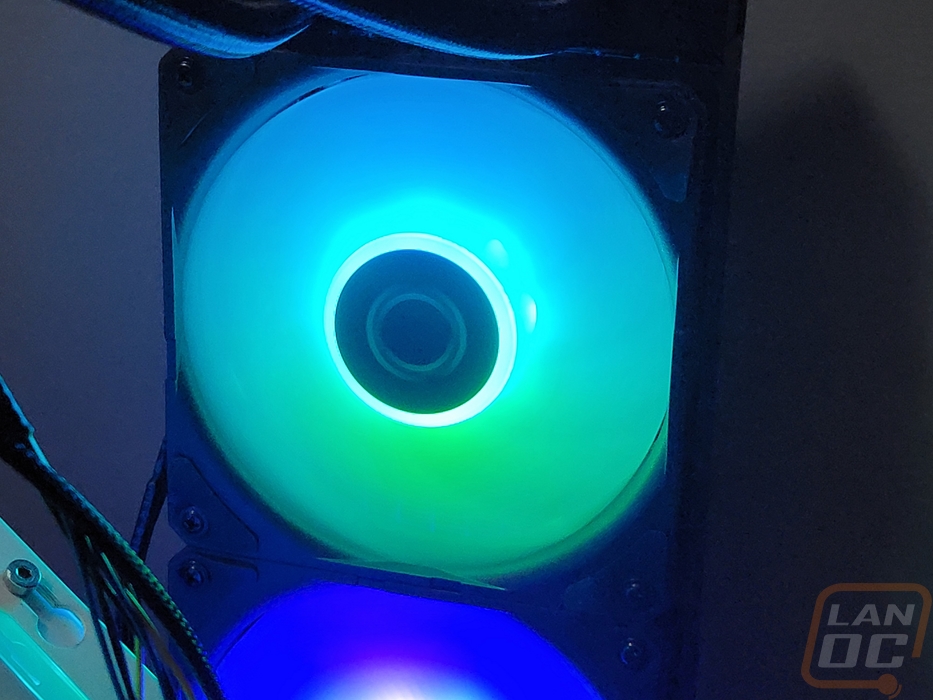
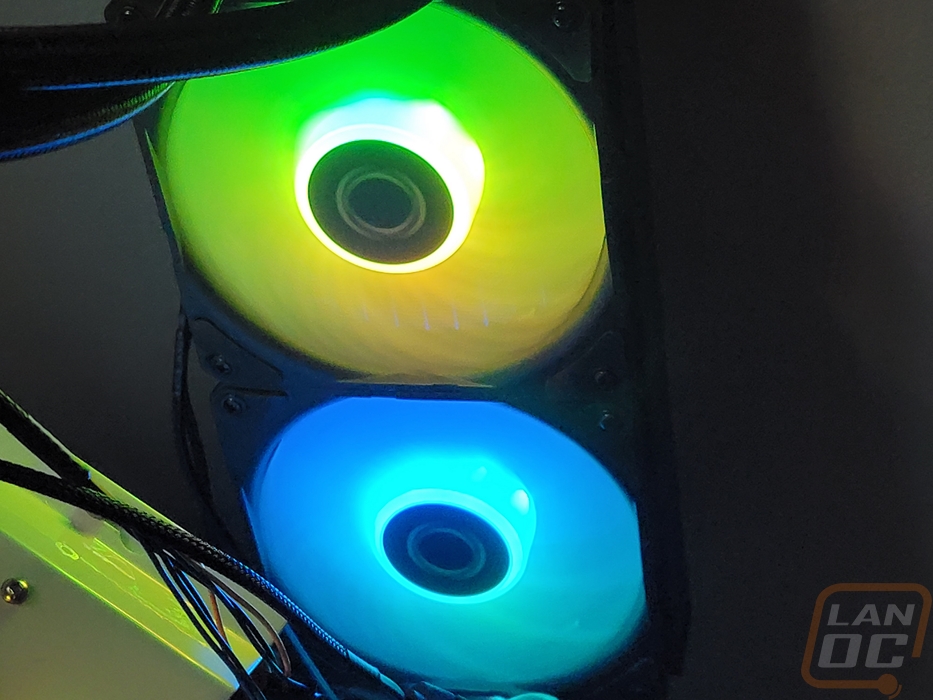
The top of the pump was my main focus. The silver finish on the carved out shape inside of the top of the pump made it hard to see what would be lit up and what wouldn’t be. We knew that the Cooler Master logo outline in the middle was lit up and the outside edge was visible from the sides of the pump. But beyond that nothing else was visible. That outside ring is visible from the top view as well and it also glows off of the translucent cover over everything. There is also an inner ring of lighting that runs parallel on four of the six sides. The glowing Cooler Master logo then radiates out across the groves on the cover. All together the design looks great when lit up and the addressable RGBs help with this a lot as well with inner and outer lights.
Cooling Performance
For the main performance testing, I ran the MasterLiquid 240 Atmos on our Intel test bench in the same configuration as our noise testing. This was an open-air configuration, so case performance doesn’t change cooler performance. Our Intel i9-13900K CPU was running with both the PL1 and PL2 set to 253 watts which is the CPUs wattage rating. This just locks things down and prevents auto overclocking. The τ was set to 56 seconds and total amperage was set to 307. The goal here was to lock the CPU down to one fixed power rating so we could compare from cooler to cooler. I have tested a range of coolers on this same setup. To put things under load I used AIDA64’s Stress Test and for the first tests I ran the FPU workload which is a lot more demanding, this replicates what I have seen when doing rendering. I tested with the stock fan profile on our motherboard and again at 100% fan speed. The 240 Atmos came in at 64c with the stock fan profile and 61c at 100% fan speed. This was surprisingly close to some of the triple fan AIO coolers that have been previously tested and better than the LIQMAXFLO did with the stock fan profile.
|
AIDA64 FPU Stress Test |
Stock Fan Profile |
100% Fan Speed |
|
Corsair H100i Elite LCD Display |
68c |
67c |
|
Enermax ETS-F40-FS ARGB |
89c |
89c |
|
Enermax Aquafusion Adv 240 White |
64c |
63c |
|
Enermax Aquafusion Adv 360 Black |
70c |
70c |
|
Corsair H100I Capellix XT |
65c |
62c |
|
Enermax Aquafusion Adv 360 Black Retest |
62c |
60c |
|
Lian Li Galahad II Trinity SL-INF 360 |
62c |
60c |
|
Lian Li Galahad II Trinity Performance 360 |
59c |
58c |
|
Enermax LIQMAXFLO 360 |
65c |
61c |
|
Cooler Master MasterLiquid 240 Atmos |
64c |
61c |
Using the same FPU workload I went back in and uncapped the amps and wattage on the CPU and tested again with the fans at 100%. With any cooler, we would see the CPU temperatures maxed out. For this test, I was just looking at the CPU wattage and I waited until things leveled off before recording the number. The 240 Atmos came in at 300 watts, just one below one 360 AIO and better than a few of the other 240mm AIO coolers tested, making it the best performing 240 AIO of everything tested.
|
AIDA64 FPU Stress Test With PL2 uncapped and 100% Fan Speed |
CPU Wattage |
|
Corsair H100i Elite LCD Display |
271 |
|
Enermax ETS-F40-FS ARGB |
208 |
|
Enermax Aquafusion Adv 240 White |
297 |
|
Enermax Aquafusion Adv 360 Black |
262 |
|
Corsair H100I Capellix XT |
297 |
|
Enermax Aquafusion Adv 360 Black Retest |
301 |
|
Lian Li Galahad II Trinity SL-INF 360 |
307 |
|
Lian Li Galahad II Trinity Performance 360 |
323 |
|
Enermax LIQMAXFLO 360 |
301 |
|
Cooler Master MasterLiquid 240 Atmos |
300 |
The last round of tests changed things up by switching the workload in AIDA64 Stress Test. This time the CPU workload does better at showing what you would see when gaming or doing normal tests with the PCU at 100% workload. The 240 Atmos ran cooler here with it at 57c on the stock fan profile and 53c with the fans cranked up to 10)%. There is a clear line between the 240mm and 360 mm coolers here but the 240 Atmos did outperform all of the other 240 mm AIO coolers and comes close to some of the 360 mm AIO coolers as well.
|
AIDA64 CPU Stress Test |
Stock Fan Profile |
100% Fan Speed |
|
Corsair H100i Elite LCD Display |
63c |
61c |
|
Enermax ETS-F40-FS ARGB |
88c |
88c |
|
Enermax Aquafusion Adv 240 White |
60c |
57c |
|
Enermax Aquafusion Adv 360 Black |
65c |
64c |
|
Enermax Aquafusion Adv 360 Black Retest |
55c |
51c |
|
Enermax Aquafusion Adv 360 Black Retest |
55c |
51c |
|
Lian Li Galahad II Trinity SL-INF 360 |
55c |
52c |
|
Lian Li Galahad II Trinity Performance 360 |
53c |
48c |
|
Enermax LIQMAXFLO 360 |
58c |
52c |
|
Cooler Master MasterLiquid 240 Atmos |
57c |
53c |
Overall and Final Verdict
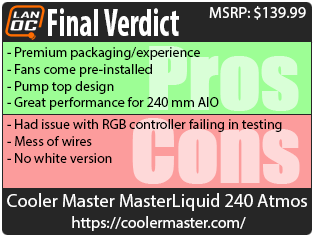
I came in with the MasterLiquid 240 Atmos expecting a new unique lighting design and maybe a small pump update and the Atmos does have that but Cooler Master has a different focus with this cooler. They were aiming to give a premium product and a premium experience and they did manage to do that. Starting with the box itself and the unboxing experience the Atmos doesn’t feel like other AIO coolers, everything is labeled and organized and the fans even come pre-installed which helps cut out some of your installation time. The new pump design looks great and the lighting on top looks good. Even with the translucent cover on top, I was surprised to find that the Atmos was still more compact than any of the other coolers I have tested recently. They have upgraded the wiring sleeving which is nice, but cutting down the number of wires that you need to hook up with daisy-chained fans and potentially hiding the pump wires in with the pump sleeving would be a good next step in the future. As it is, like with most RGB fans and AIO coolers, you end up with a mess of wires. Performance wise though the 240 Atmos outperformed any of the other 240mm AIO coolers tested and did well in the noise testing as well.
The Atmos coolers come with Cooler Masters RGB controller but I did have an issue with our controller dying in testing. Thankfully all of the lighting can be hooked up right into your motherboard's RGB header and controlled there if needed. A controller-less option could be a nice way to lower the pricing on the Atmos as well without losing any other premium features. The controller does just handle the lighting, a lot of the higher-end coolers now have controllers that handle the fans and the lighting, with the Atmos line aiming to be in that market which is an area where it could improve as well. I would also love to see a white version as well
Our MasterLiquid 240 Atmos has an MSRP of $139.99 and the larger 360mm triple fan design is a little higher at $159.99. That is more than any of the other coolers tested other than the Corsair H100i Elite LCD Display with its LCD display. AIO coolers that come with their own RGB controllers do run more and Cooler Master has done a good job trying to add more value with some of its more premium features. In the end, I would love to see an Atmos cooler without the controller to keep a cheaper option available as well. But the Atmos is a great option if you are in the market for a cooler with a controller.

Live Pricing: HERE


