This year marks 10 years now that I have been running the same PFSense-based router, I moved to it after seeing how well PFSense performed for our LAN events and after having issues with the basic router that I was previously using. In that time it has been solid but 10 years on the same hardware has had me questioning if I should change things up at all but it hasn’t been a priority at all. I did however recently notice that PF Sense hasn’t had an update for their community edition going all the way back to January of 2022, combine that with the fact that EnGenius recently introduced their new gateways and I thought this couldn’t be a better time to branch out and try out other options. So today I’m going to take a look at the EnGenius ESG510 to see what it is all about.
Product Name: EnGenius ESG510 Security Gateway
Review Sample Provided by: EnGenius
Written by: Wes Compton
Amazon Affiliate Link: HERE
|
Specifications |
|
|
CPU Processor |
Quad-Core |
|
Operating Frequency |
1.6GHz |
|
Memory |
4GB |
|
Storage |
8GB Network Ports (Copper Ports) 4 x 10/100/1000/2500 BASE-T, RJ-45 Ethernet ports |
|
Console Port |
1 x 10/100/1000, RJ-45 Ethernet port |
|
PoE+ Capable Port |
1 (802.3af/at) LAN (P1) |
|
Mounting Method |
Wall mount |
|
USB Interface |
1 x USB 3.0 |
|
Security Chip |
TPM |
|
Performance & Capacity |
|
|
Firewall (SPI Throughput) |
4 Gbps |
|
VPN Throughput |
970 Mbps |
|
Max. TCP Concurrent Sessions |
1,000,000 |
|
Max. Concurrent VPN Tunnels |
200 |
|
Max. VLAN |
96 |
|
Firewall |
|
|
Firewall Features |
Stateful Packet Inspection Policy Rules Port Forwarding 1:1 NAT Allow Inbound Services |
|
VPN |
|
|
Site-to-Site VPN |
Mesh VPN/Hub-and-Spoke |
|
Encryption |
DES, 3DES, AES (256-bit) |
|
Authentication |
MD5, SHA1, SHA2 (512-bit) |
|
Key Management |
IKEv1 (x-auth, mode-config) IKEv2 (EAP, configuration payload) |
|
VPN Features |
Site-to-Site VPN Client VPN Policy-based VPN IPSec NAT traversal (NAT-T) Dead Peer Detection (DPD) Auto-VPN Connection Auto NAT traversal |
|
Networking |
|
|
Operation Mode |
Routed/Passthrough |
|
Multiple WANS |
Dual (WAN 1 & WAN/P3) |
|
Bandwidth Limit |
Per Interface/Per Client |
|
Traffic Load Balancing |
WAN load balancing with WRR |
|
Networking Features |
Static Route Multiple WANs USB Cellular User Authentication PPPoE VLAN Tagging Captive Portal Custom Splash Page Dynamic Routing Bandwidth Limit Traffic Load Balancing DHCP client/server/relay Dynamic DNS support |
|
Environmental & Physical |
|
|
Power |
54V/1.2A |
|
Operating Temperature |
0°C to 40°C |
|
Humidity (non-condensing) |
5 to 95% non-condensing |
|
Package Contents |
Power adapter Power cord RJ-45 Console Cable Wall Mount Kit Quick Installation Guide |
|
Dimensions & Weights |
|
|
Weight |
2.14 lbs. (.97 kg) |
|
Dimensions |
Width: 8.27” (210 mm) Length: 7.07” (179.5 mm) Height: 1.38” (35 mm) |
|
Compliance & Warranty |
|
|
Regulatory Compliance |
FCC Part 15 (Class B) IC CE EMC (Class B) RCM BSMI |
|
Certifications |
CE FCC IC |
|
Warranty |
2 years |
Photos and Features
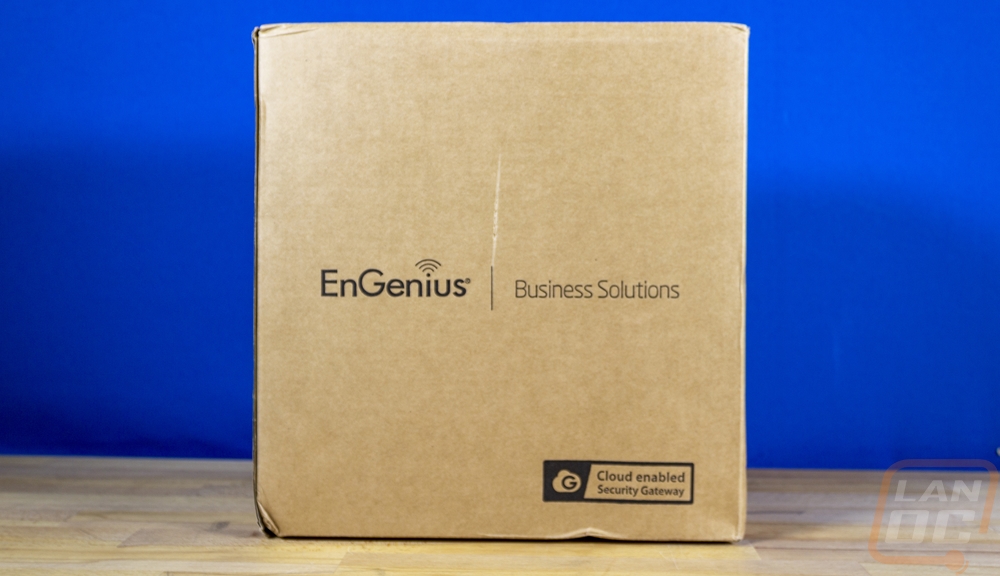
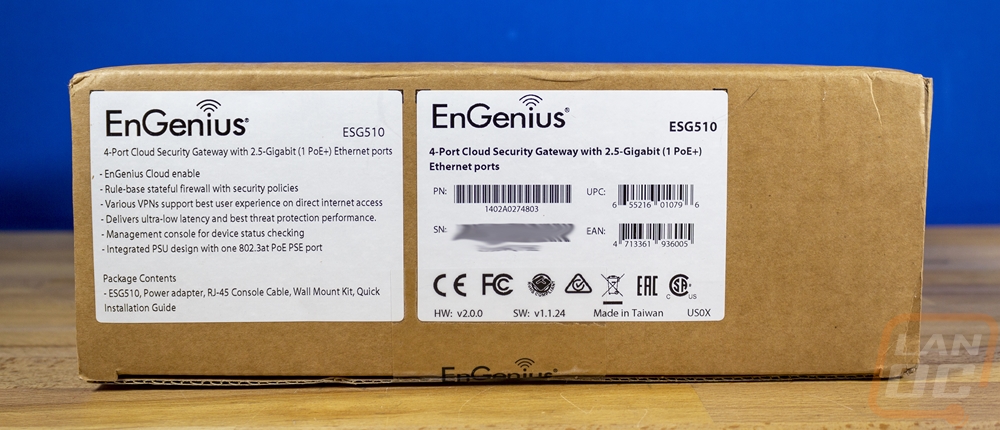
Like with all of the EnGenius enterprise-focused products, the ESG510 comes in a relatively universal brown box and the front has the EnGenius Business Solutions logo and down at the bottom, it lets you know it is a Cloud-enabled security gateway. The model name or information isn’t on the front at all but on one of the edges, they do have two stickers. Both stickers let you know that this is the ESG510 and they have the full model description. One has the certification logos along with barcodes for the part number, serial number, UPC, and EAN. The other has a list of what you will find in the box and a few of its key features.
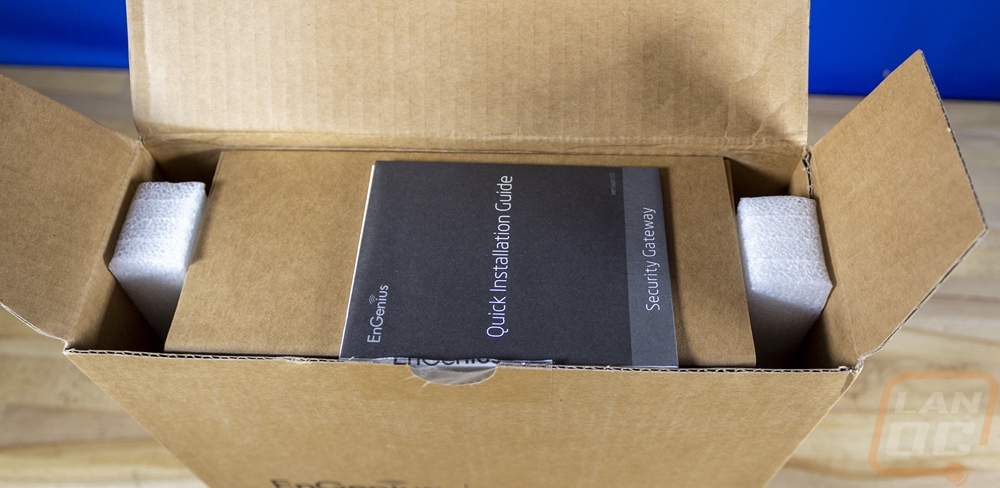
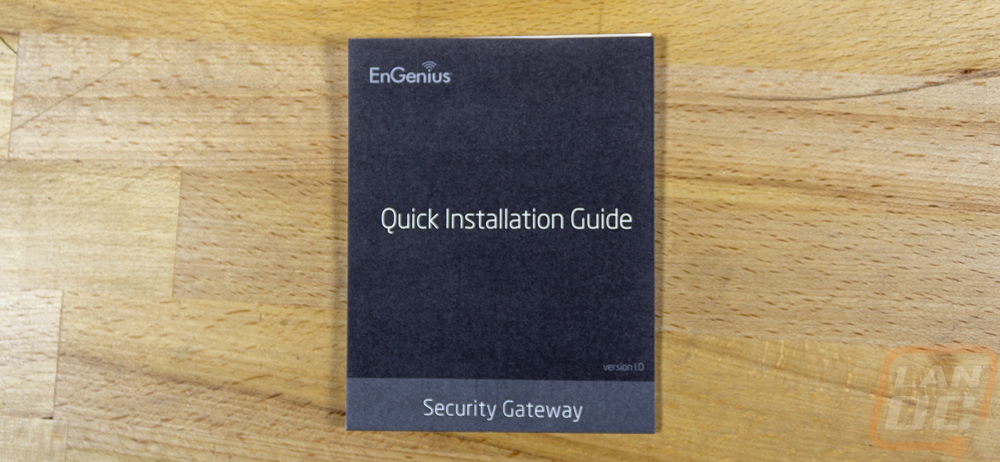
When you open the box, right up on top you have the quick installation guide which is specific to their Security Gateways. Under that is a brown box with the accessories. Then the ESG510 itself comes wrapped in a soft plastic and has nice foam on both ends to keep it well protected.

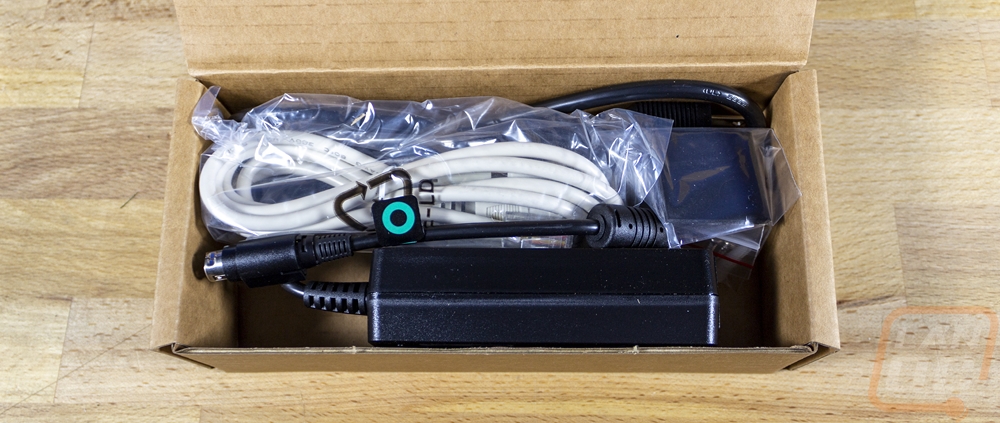
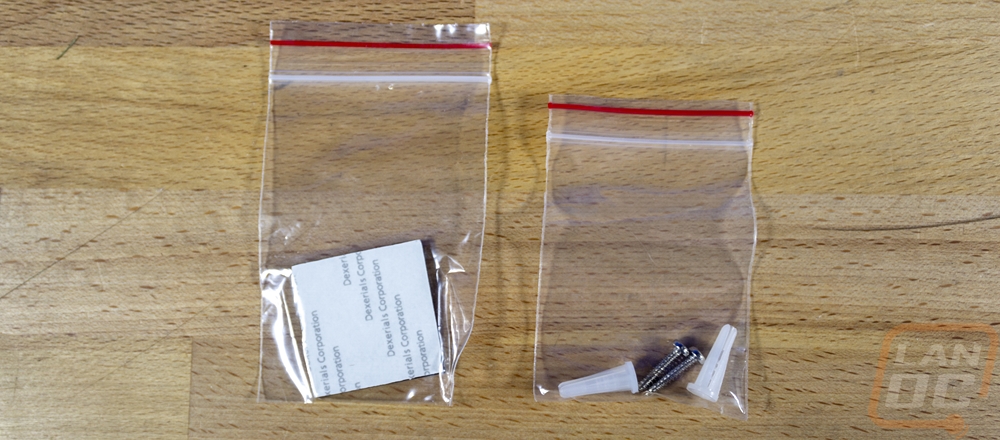
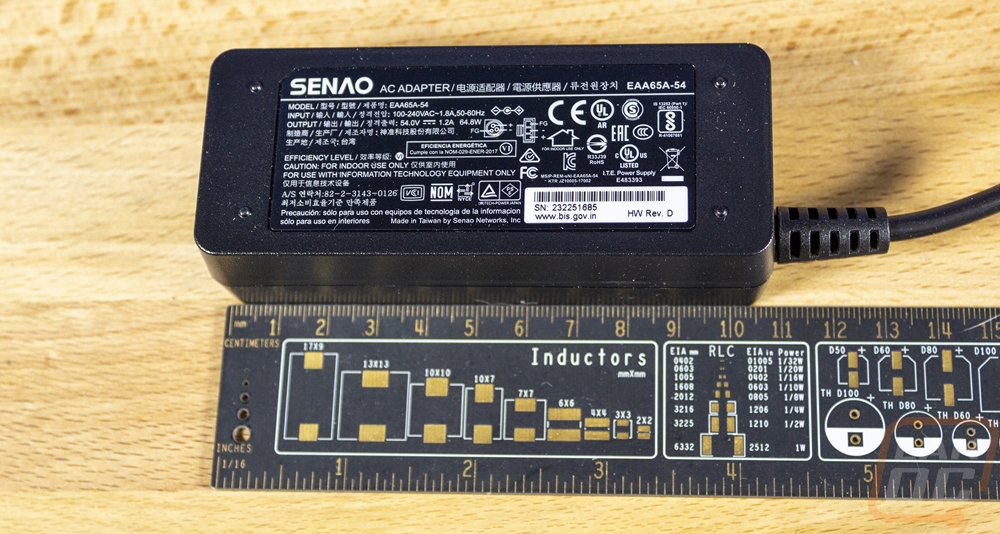
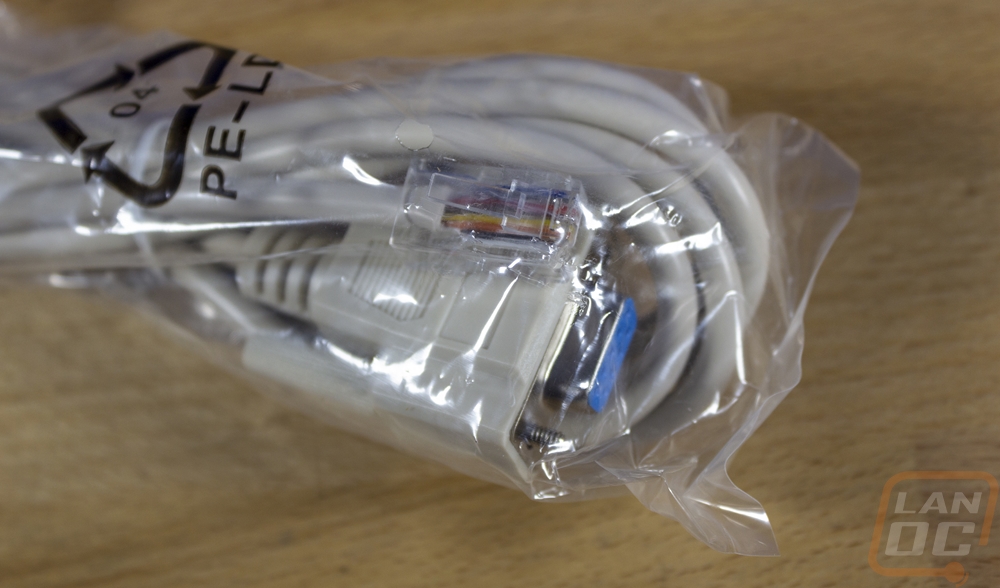
Everything needed to get the ESG510 up and running comes inside the brown accessory box. You have two small baggies, one has two mounting screws and drywall inserts and the other has a set of four rubber feet. The white cable is a serial to RJ45 console cable, similar to what all of the EnGenius switches also come with. Then you have the power supply which has a unique three-pin round DIN connection. The power supply is in line, not a power wart, and has a replaceable C13 cable for the AC side so that EnGenius can include the correct cable depending on the country you buy it in. The power supply itself is 105mm long or just past 4 inches long. It can input 100-240 volts and it outputs 54 volts at 1.2A for 64.8 watts.


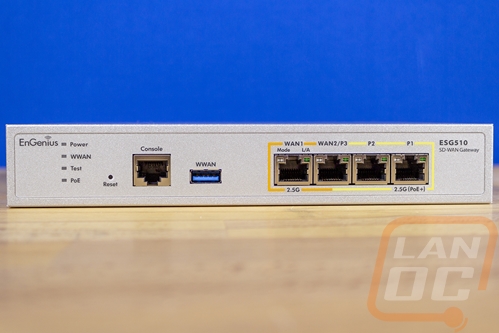
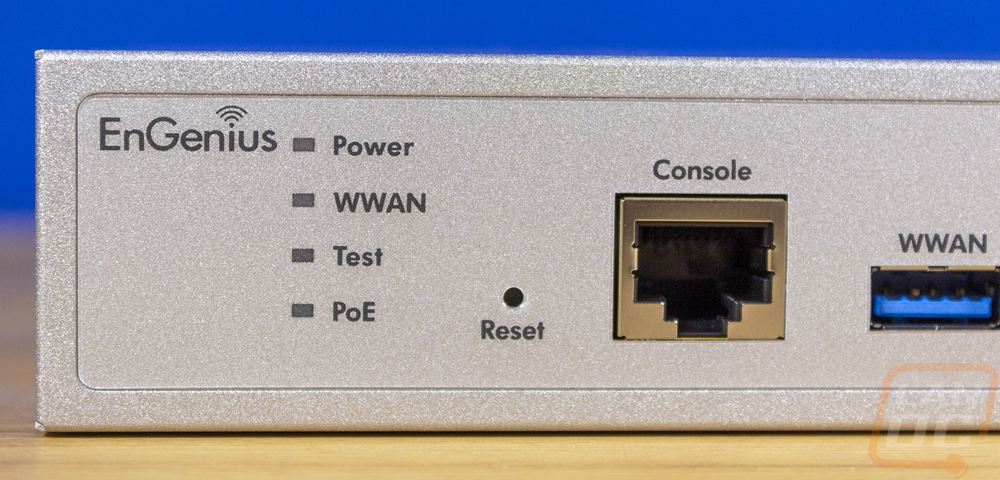
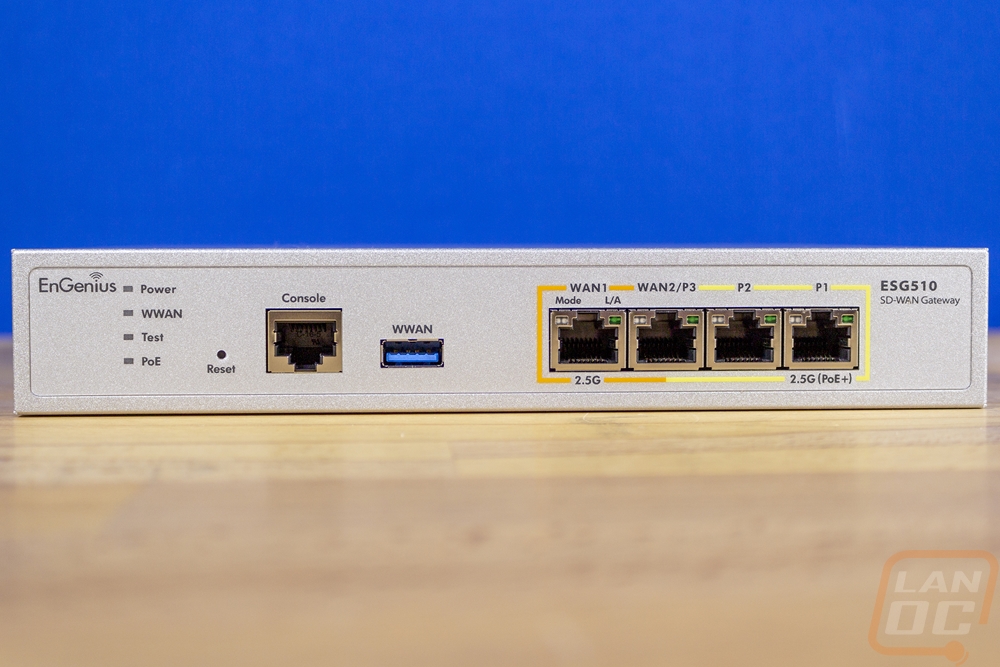
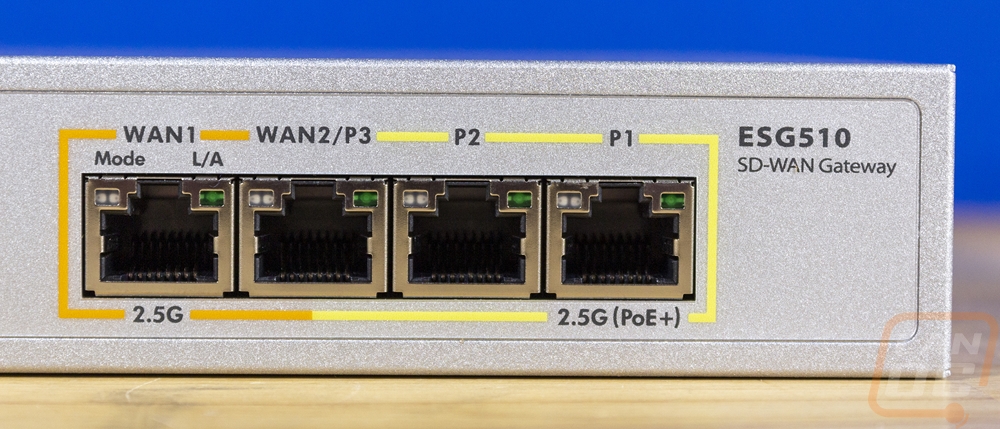
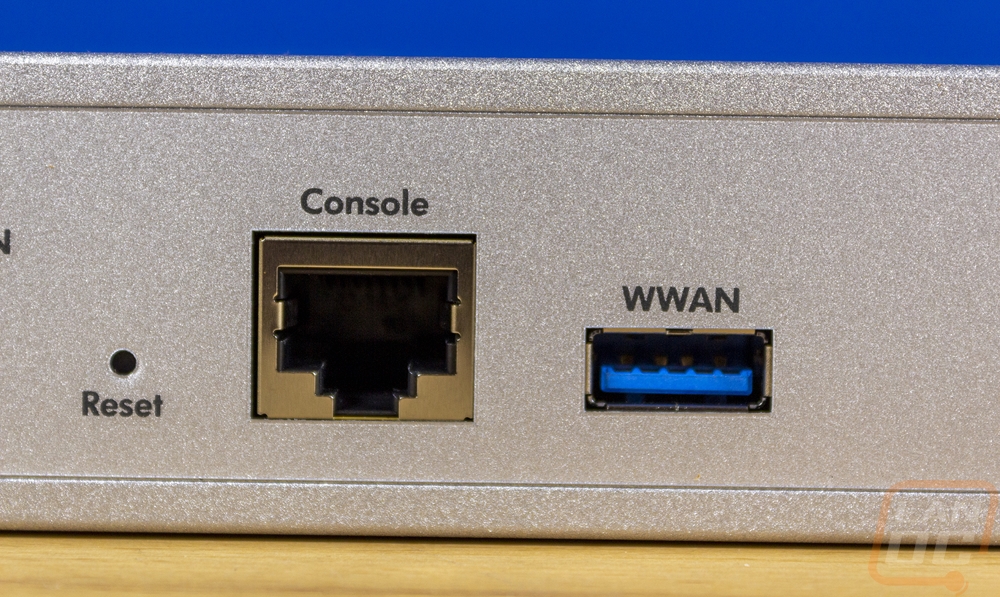
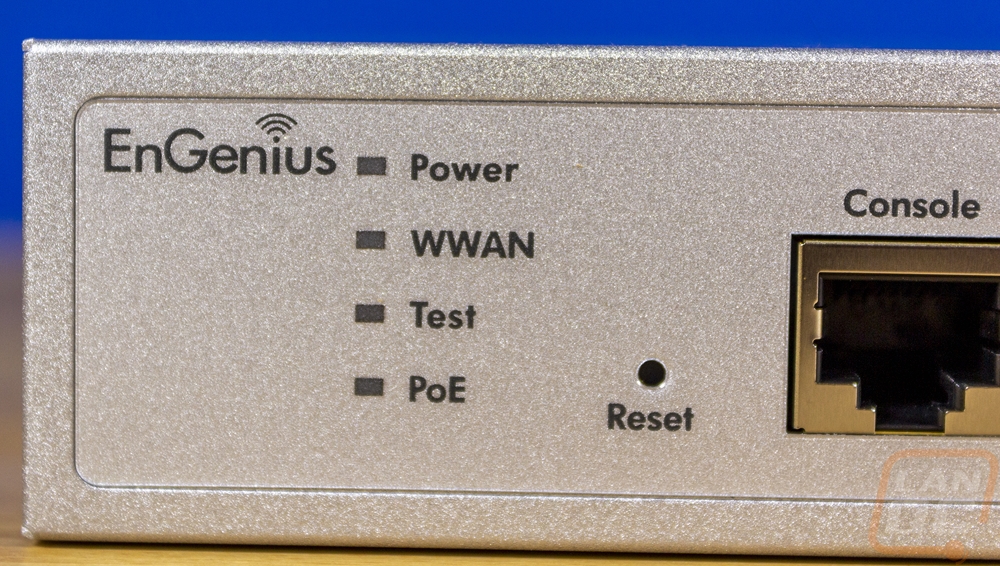
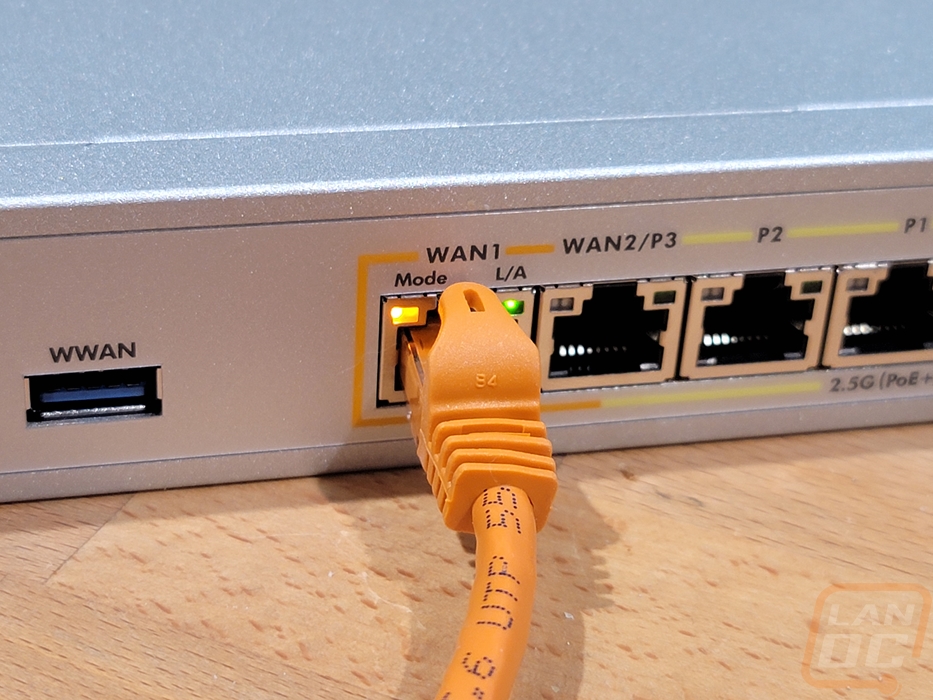
Unlike the EnGenius switches which have a dark grey finish, the ESG510 has a silver finish. The overall size of the ESG510 is 8.27 inches or 210 mm wide, 7.07 inches or 179.5 mm wide, and it is 1.38 inches or 35mm thick. This makes it less than 1U in total thickness and closer in size to the ECS1008P that I previously took a look at. The front does start off similar to the 1U switches however with the EnGenius logo on the far left and a stack of status LEDs next to that. It has a power indicator up top. Below that is the WWAN status which is to let you know the status if you are using a collier modem which the ESG510 supports. Next is the Test LED which replaces the diagnostic LED. Then down at the bottom, a PoE indicator LED will let you know when the PoE+ port has PoE active. There is a pinhole reset button and then the RJ45 console connection. The USB 3.0 port is to hook your cellular modem up too. Then on the far right, you have four RJ45 jacks and the model name down at the end. Of the four ethernet connections all of them are 2.5G connections which allows for support for internet connections faster than 1 Gigabit. The far left plug is the main Wan1 connection and the outputs or LAN side start their numbering from the far right. They did this because the WAN2 or P3 port can be used as a WAN or LAN connection as needed. The connection on the end supports PoE+. All four of the RJ45 jacks have the standard two status LEDs so you can see activity as well as the connection speed.
Both sides of the ESG510 have the same split ventilation on them. Sadly neither side has the mounting screws for rack mount ears. Then at the back of the ESG510, there is just one thing, the three-pin DIN connection over on the left for the included 54-volt power supply.


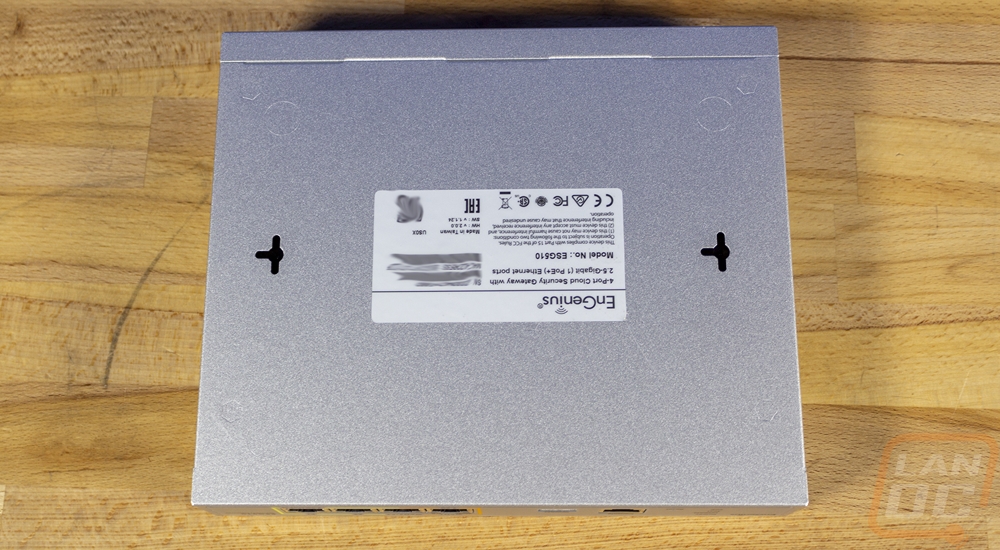
Neither the top or bottom of the EnGenius ESG510 have too much going on. The top has nothing at all other than the steel housing. The bottom on the other hand does have a few things. You can see the small rings etched into the housing meant to show you where you can stick on the included rubber feet if you are sitting the ESG510 on a shelf. In the center, it has a sticker with the usual certification logos. The sticker also has the model information as well as the ESG510’s MAC and Serial numbers. There is also a QR code you use to link the ESG510 to your EnGenius Cloud account if you are using the app. Then there are two T-shaped mounting holes on the bottom as well. These are for wall mounting the ESG510, with it not having rack mounting tabs wall or shelf mounting are your two options.

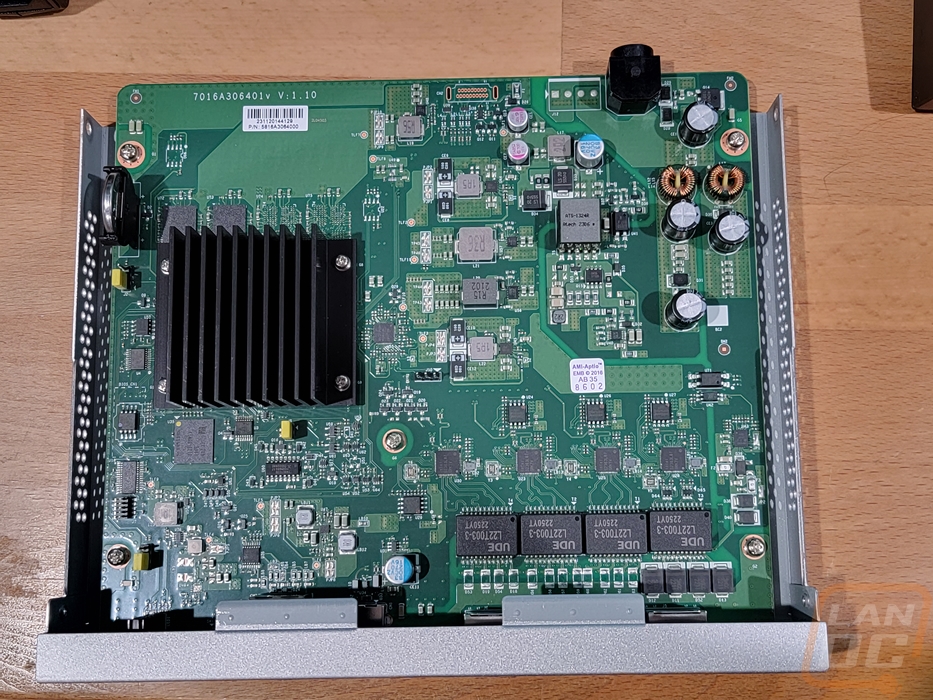
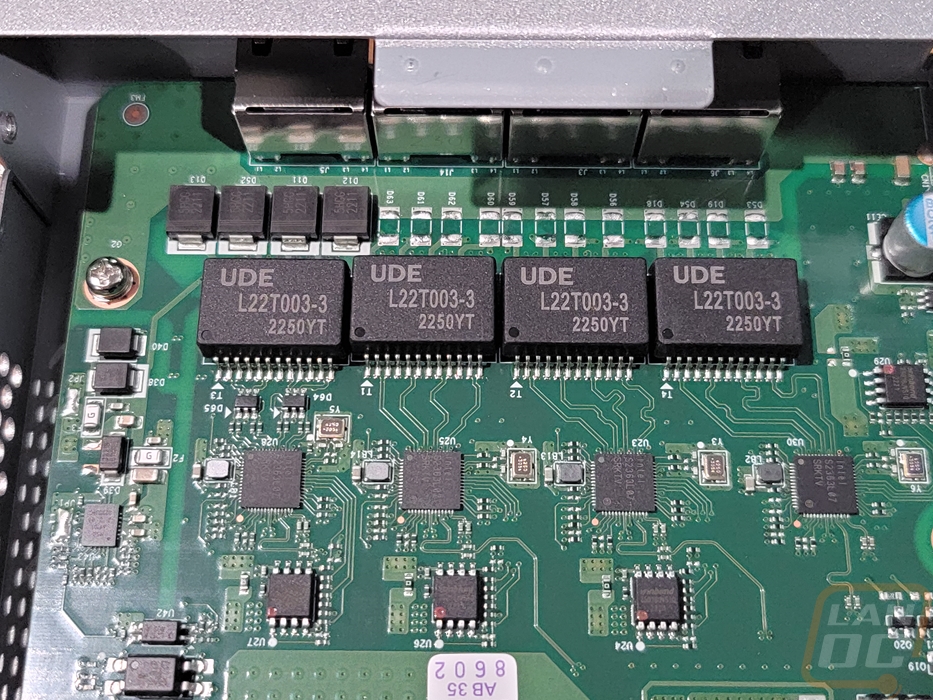
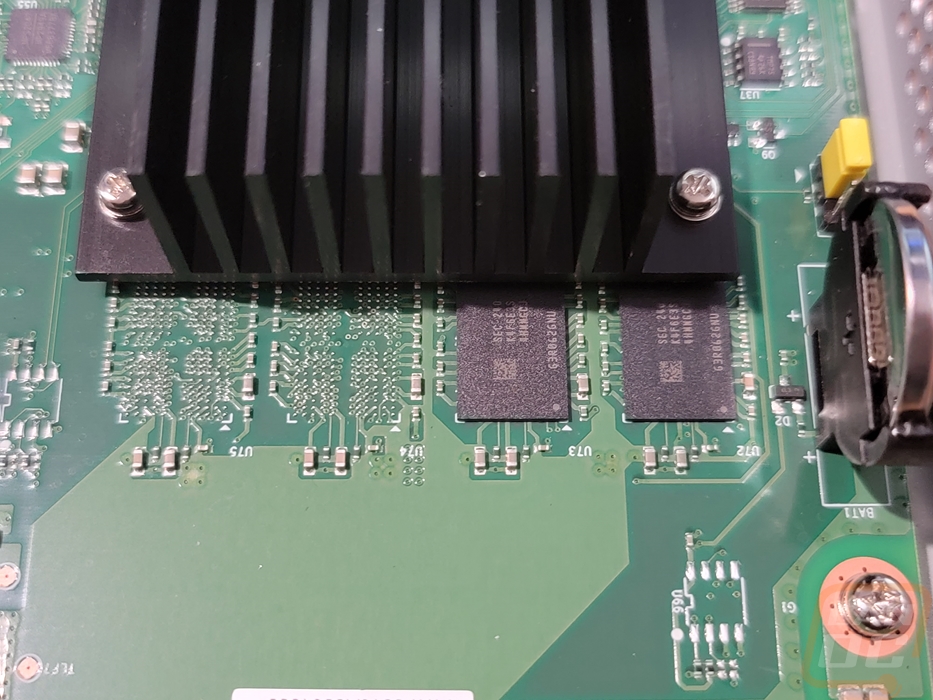
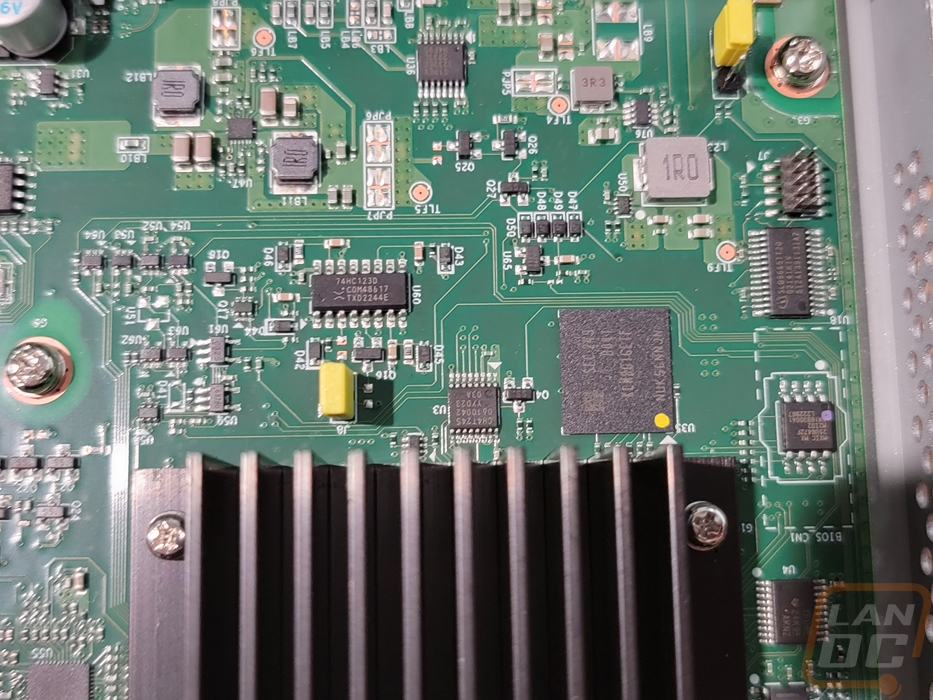
Because I was curious about what is going on inside of the ESG510 I did open it up. This was easy with the Philips head screws on both sides, the top cover and back of the case slides back and then comes right off. Inside there are no fans and the PCB takes up the entire housing which surprised me. I thought for sure the PCB would end in between the two mounting holes on the back to prevent any damage. On the left, there is one black anodized aluminum heatsink but I was surprised it is orientated where any airflow that goes from the vents on the sides doesn’t blow through the fins. That sits on top of the ESG510’s Intel ATOM E3940 X236F668 Quad-Core CPU which runs at 1.6GHz which should be powerful enough to handle things. Just above that there are two 4 GB KLM8G1GETF eMMC storage memory giving it 8GB in total and it has 4GB of ram. Then sitting behind the four 2.5G network ports you can see four large L22T003-2 filters and just below that smaller Intel S2353L34 controller chips for each port. The PCB does have provisions for twice as much eMMC which they use on the ESG610. A majority of the PCB is dedicated to handling power which you can see filling in the space to the right of the CPU and above the network connection circuitry.
Software and Performance
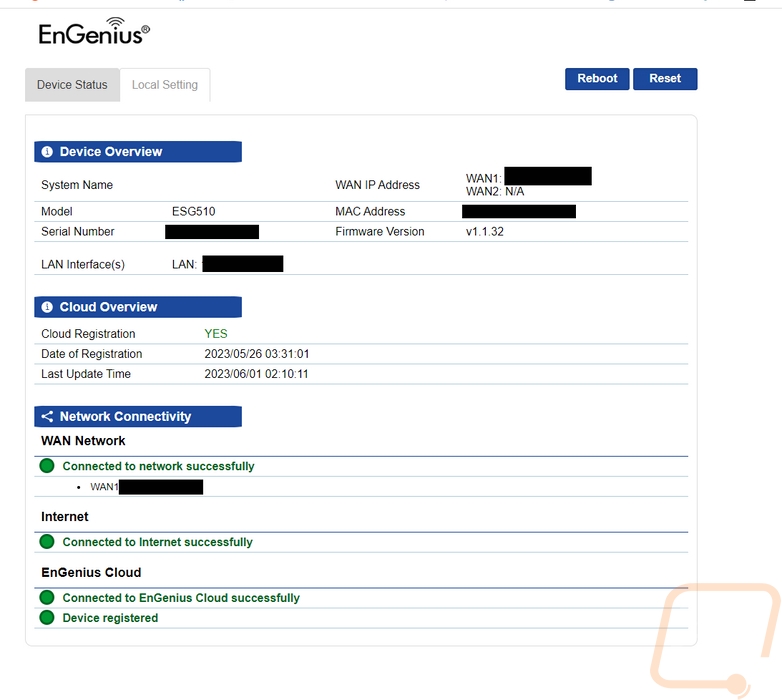
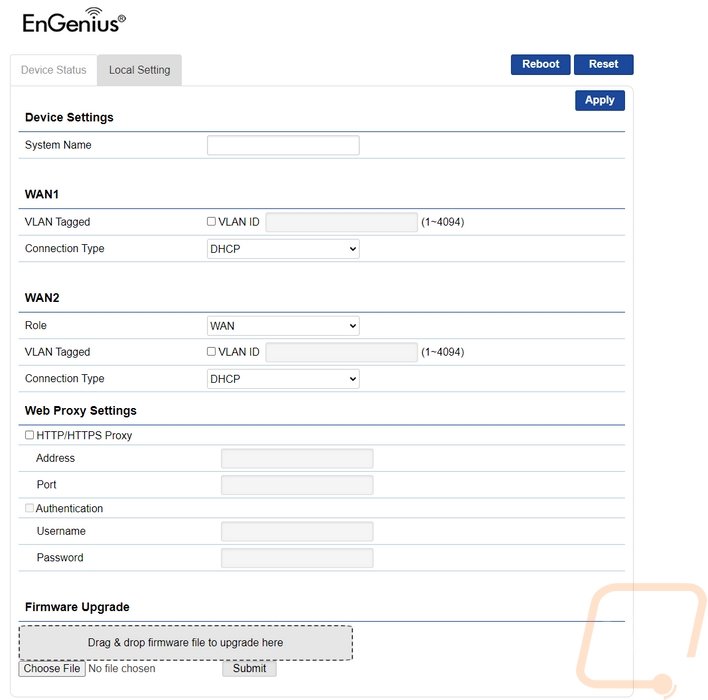
The ESG510 is another great example of a product where the physical hardware, while important, is only as good as the software side of things. That is because the ESG510 physically is a basic computer with a four-port 2.5G switch attached without its software. Like with a lot of the EnGenius Cloud-supported devices, the ESG510 does have its own web interface on top of the EnGenius Cloud web interface so before diving into the Cloud let's check that out first. Some of the web interfaces can function on their own but I was surprised to find that the interface for the ESG510 is about as simple as they come. It has just two pages. The main landing page shows the device information up top including the model number, serial number, firmware version, MAC address, and WAN1/WAN2/LAN IP addresses. It checks the cloud connection and shows that as well as tests connections to the internet and your WAN connection. The only thing you can do on this page is reboot or reset the ESG510 with the buttons up top. The second page on the other hand has a few options. Up to you can rename the ESG510 and below that you have WAN and then WAN2 connection settings where you can tie them to a specific VLAN and set up your static connection or in our case have it set to DHCP. The WAN2 option has an additional option where you can pick what you have the connection set as, this lets you switch it between a second WAN connection or an additional LAN connection. Then below that you can set up web proxy settings. Down at the bottom, you can also do a manual firmware update which is nice to see on the chance that the cloud auto firmware updates break something.
While I don’t have any pictures here, the EnGenius Cloud software is accessible through their app or the web interface. My pictures below are all through the web interface, but it is similar to the app. I personally prefer using the web interface in most situations, the exception to that is when adding a new device like the ESG510 to your network. In addition to hooking it up, you use the apps to add a device feature which uses your phone's camera and will scan the QR code on the ESG510. You then just have to tell it what network you want the device to be on and give it a name if needed and you are up and running. It will call out and download the latest settings which you can set up ahead of time and download its firmware update and that’s it.
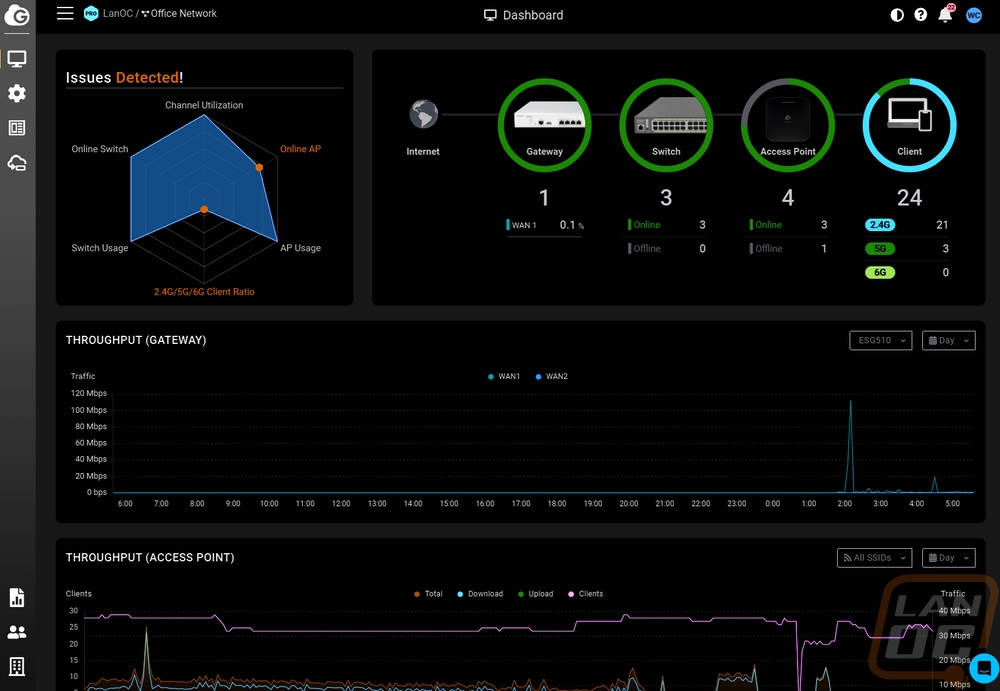
The landing page is the dashboard and up top you have a graph showing you if you have any issues like devices not being online or in our case also too many devices using 2.4GHz vs 5GHz on our wireless network because of the number of IoT devices that only use 2.4 GHz. Next to that, you have a quick go-to section that shows how many devices you have linked as well as the total client count. This shows the WAN traffic for the ESG510 and breaks down how many wireless devices are connected at each frequency. Once you add the ESG510 the dashboard does change compared to how it looked with having switches and access points attached. You still have the throughput graph for your access points that show the number of clients, upload, and download speeds over the day. But now there is a second graph, this time for gateway traffic that will show the traffic on your WAN1 and WAN2 if you are using a second.
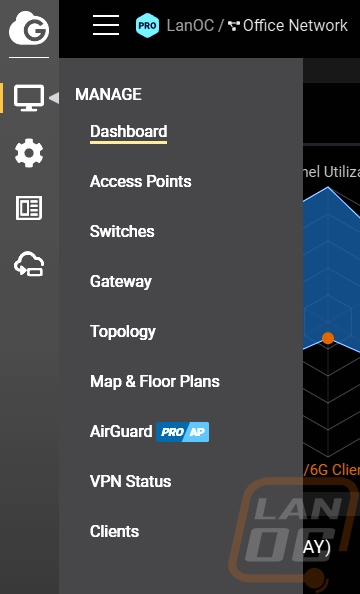
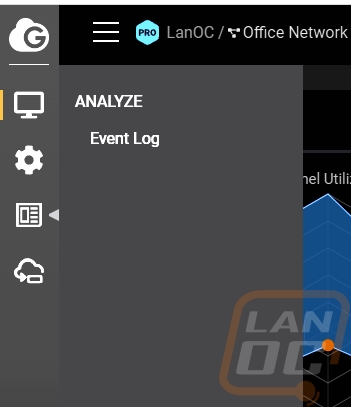
On the left, there are multiple menu options and when you mouse over them a longer full menu opens up. You have the manage menu up top and configure below that. These are the two main menus. Then there is analyze which just has the event log access on it. The manage menu has just one option for your Gateways, the configure page on the other hand opens up and gives you access to four different pages. We will check out each page, but you have Interfaces, Site-to-Site VPN, Client VPN, and Firewall.
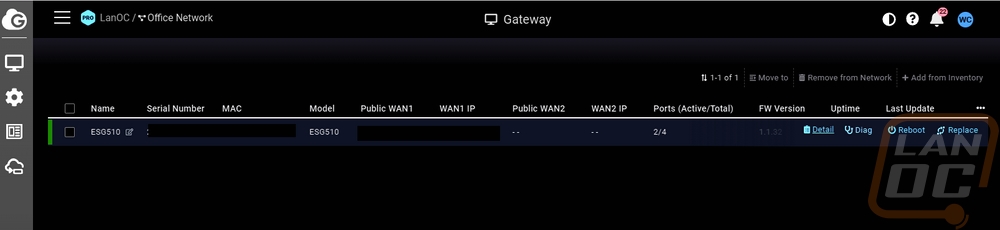
The manage menu page for Gateways opens up a page similar to what we have seen for switches and access points as well. It will list off all of the Gateways you have attached to this network and in this case, we have just the one ESG510. The list shows the serial number, your MAC address, model number, Public and private WAN IPs for both WAN1 and WAN2, ports active, firmware version, uptime, and last update. Mousing over it opens up a few links. You can reboot, or replace. You have access to the detail page and also the diag page.
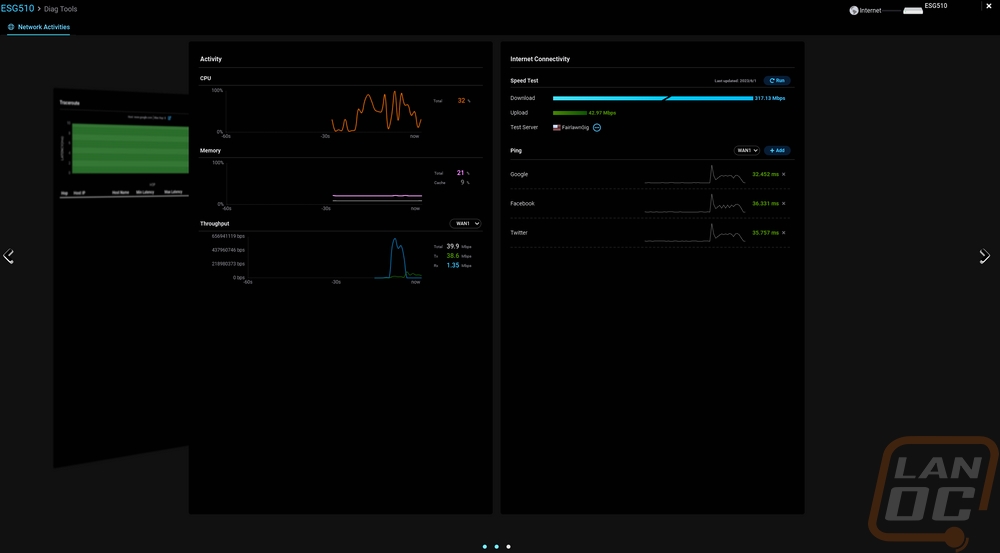
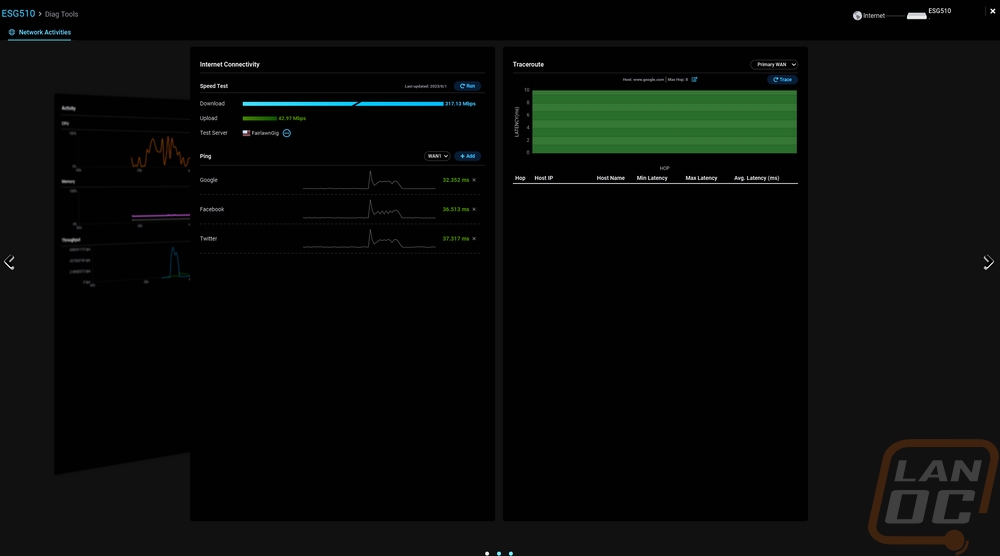
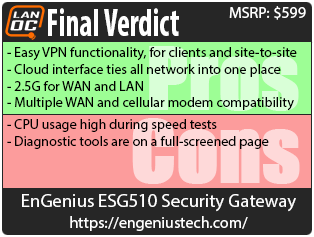
This is the diag tools page and this opens up to a full screen which can be annoying sometimes. You have three tools that you can flip through. One is a traceroute tool that will list everything out and also graph the pings to help show where issues are. You have the internet connectivity tool that has a speed test and a list of pings to popular websites. Those pings also graph out as you keep the window open and you can add more of your own ping destinations if needed. There is also the option to switch the WAN to other WANs if you have them set up. Then there is also the activity page. This just graphs out the CPU usage, memory, and throughput while you have this page open.
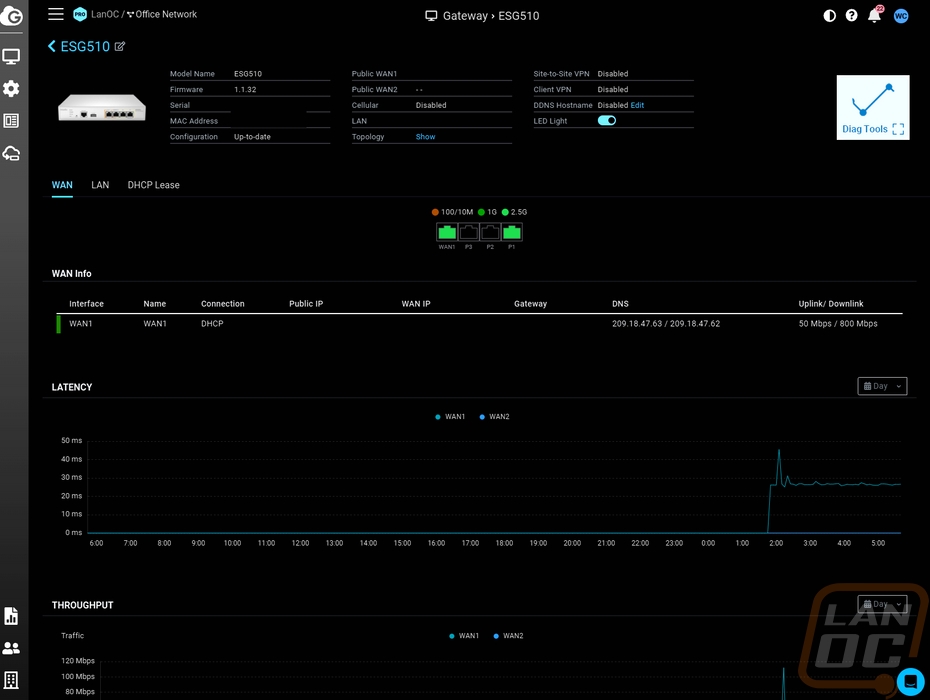
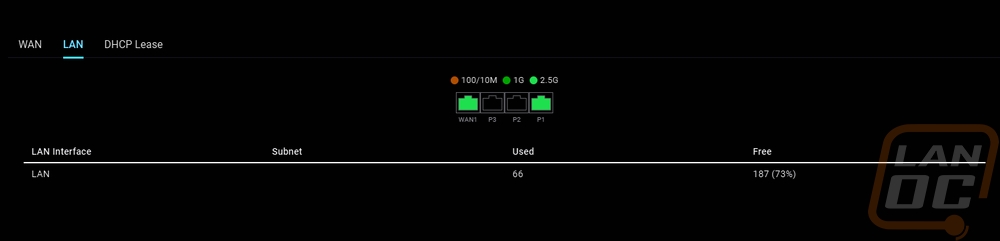
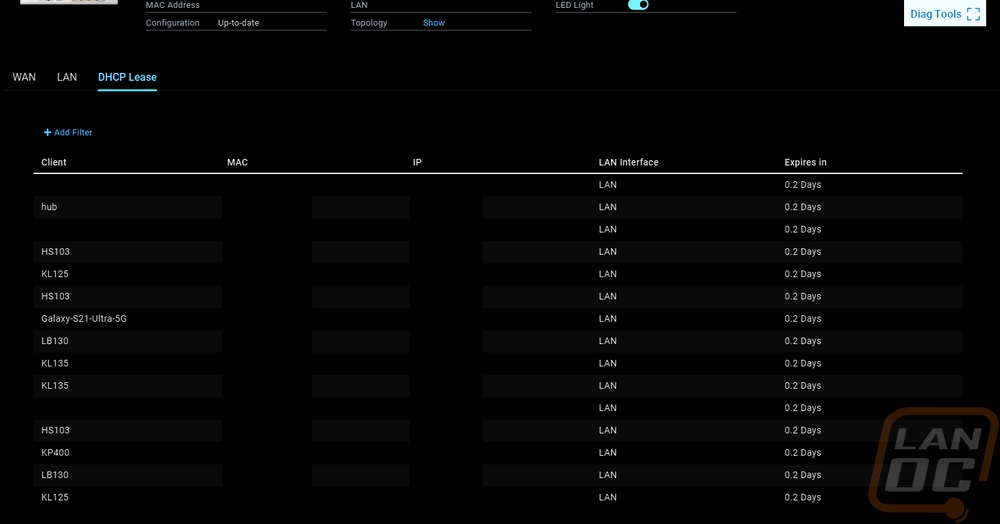
The details page opens up and up top starts with a lot of the same information that was on the Gateway listing page up top. You also have a few important settings shown up like the VPN and DDNS settings that it will show if you have turned on. Then there is a picture of the four 2.5G RJ45 jacks on the ESG510, this shows the status of each port. We can see that the WAN is hooked up and the P1 LAN jack is being used which are both connected at 2.5G. The WAN page shows the WAN info listed for all of your WAN connections then below that you have graphs for latency and throughput throughout the day. The latency is especially helpful when you think you have internet issues from time to time, you can look back here and spot them. The LAN sub-page has the same status as all of the ports then below that it lists out your LAN connections and each shows how many IPs are used on DHCP for that LAN. The third page is the DHCP Lease list which I have a lot blocked out here for privacy reasons. But this lists out the client name, MAC address, IP, interface, and how long until the lease expires.
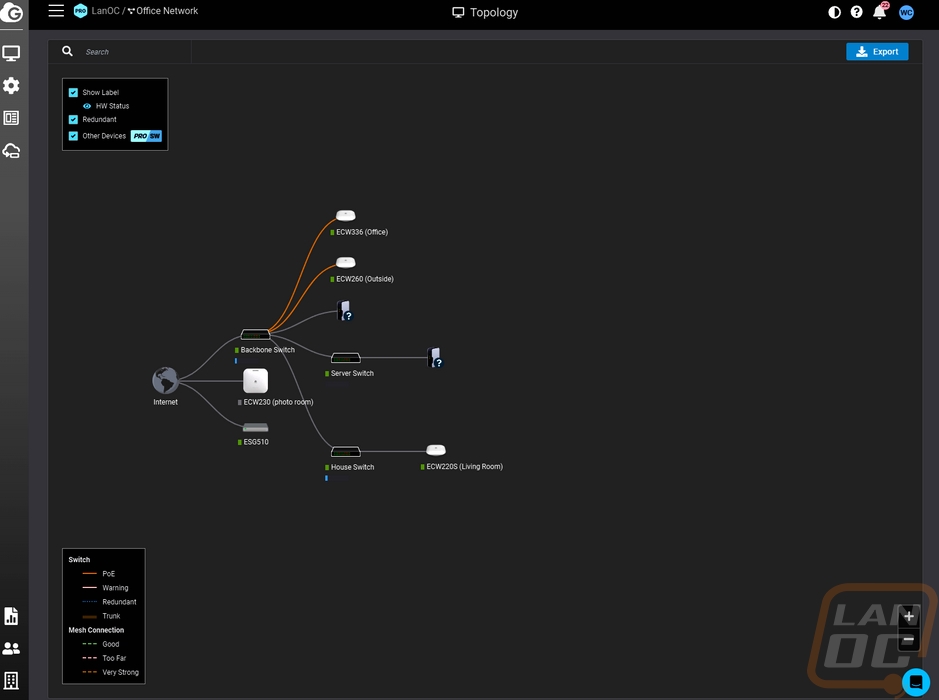
The detail page also has a link to your network Topology which is also in the main menu on the far left. I’m a big fan of this feature but as I mentioned in my coverage of the ECS1552P switch I would love if this did a better job of mapping out some of the other devices. Even with the Pro subscription where it has the option to show other devices most of the devices showing on our network are the EnGenius devices. Even just using some of the available information from the switches and access points which can list out the devices connected it could expand out and show more of what is on your network. Or have the option to manually add them.
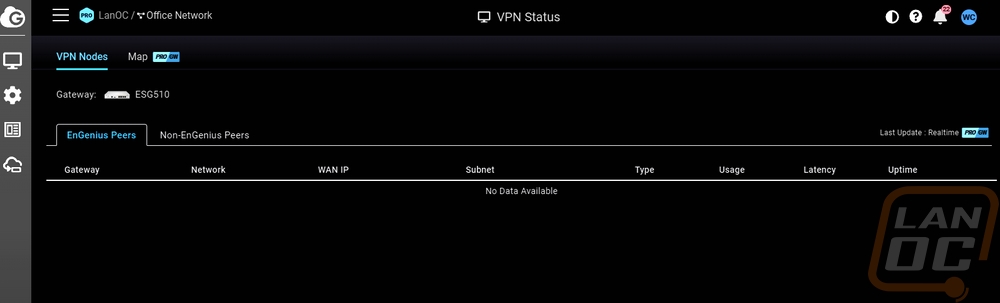
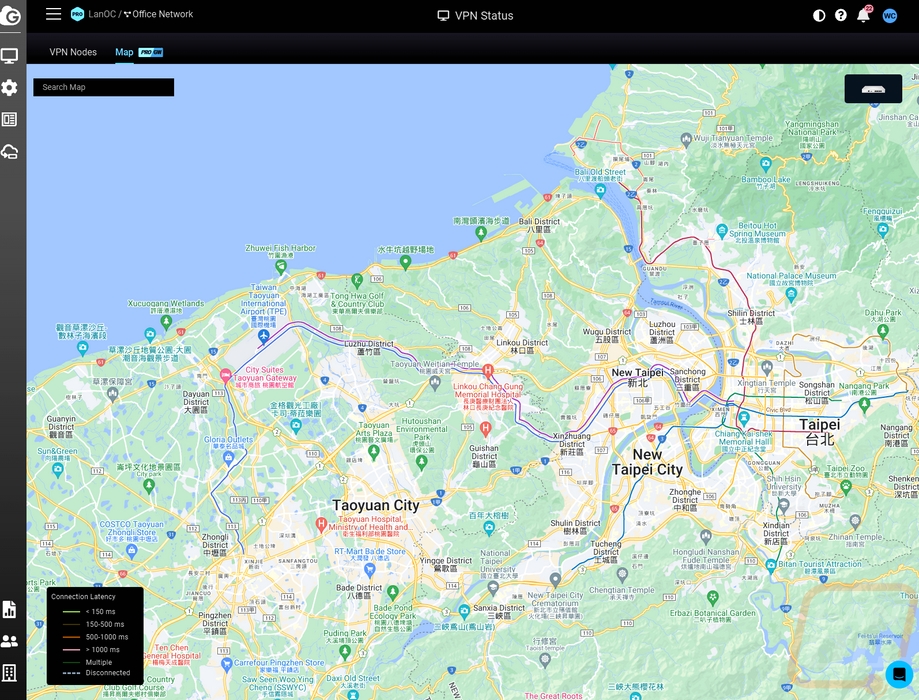
Still in the Manage menu, there is a page to check on your VPN Status. With the ESG510 this opens up and they break down the listed VPN connections between EnGenius Peers and Non-EnGenius Peers. Each will show the gateway, network, WAN IP and subnet, the type of VPN connection, usage, latency, and uptime. Pro subscription users also have a second page here that opens up a map. This will put lines between you and all of the connected devices to get a rough idea of where all of your connections are coming from. The lines are different colors depending on their latency as well.
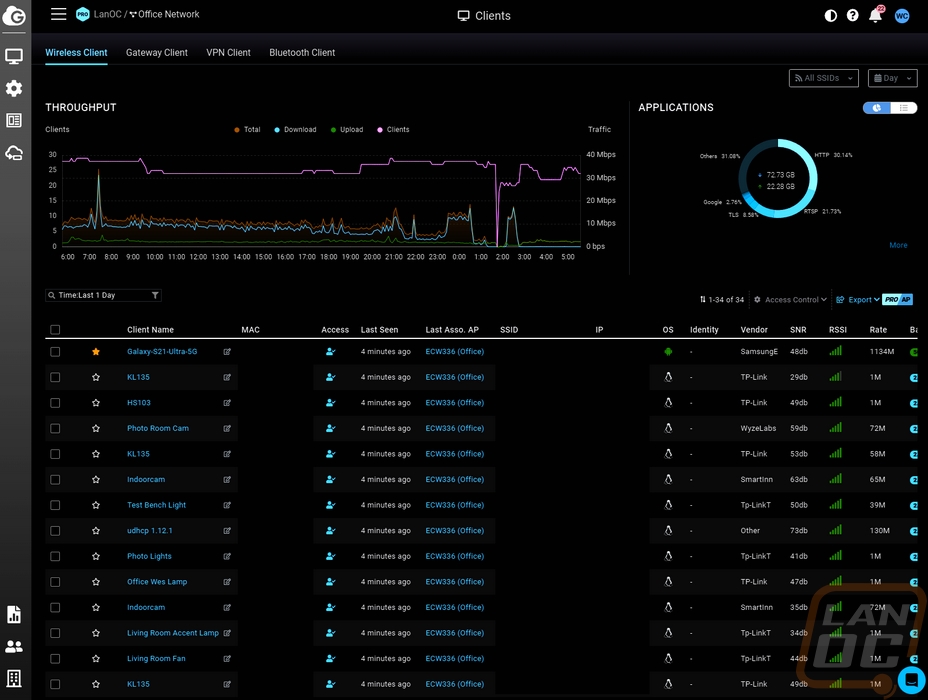
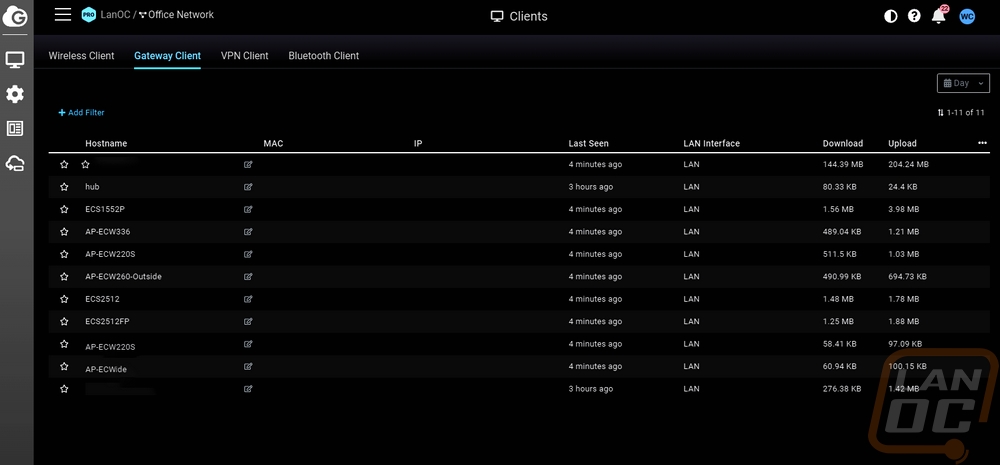
Previously the clients listing page on EnGenius Cloud just had the devices connected to our access points but with the addition of the ESG510 on the network Gateway and VPN Client pages were also added. The wireless page has a throughput graph and a breakdown of the applications being used and the gateway page doesn’t show anything like that. But you do at least get a list of hostnames, MAC addresses, IPs, when they were last seen, what LAN interface they are on, and upload and download usage. This still doesn’t list a majority of the devices on the network, in fact when I check this now it shows no clients at all for today and most that are picked up are the other EnGenius devices.
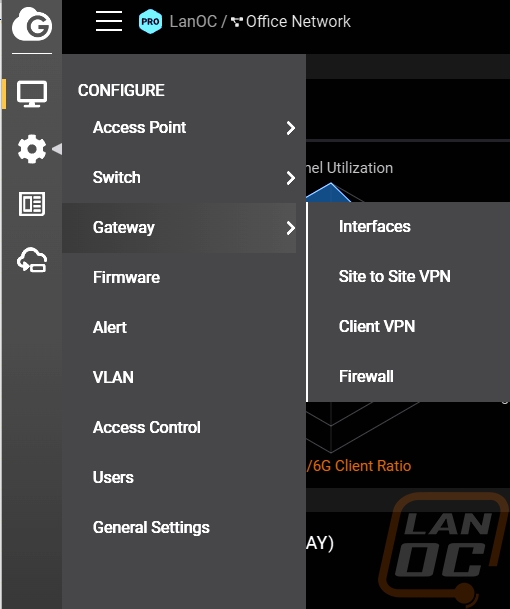
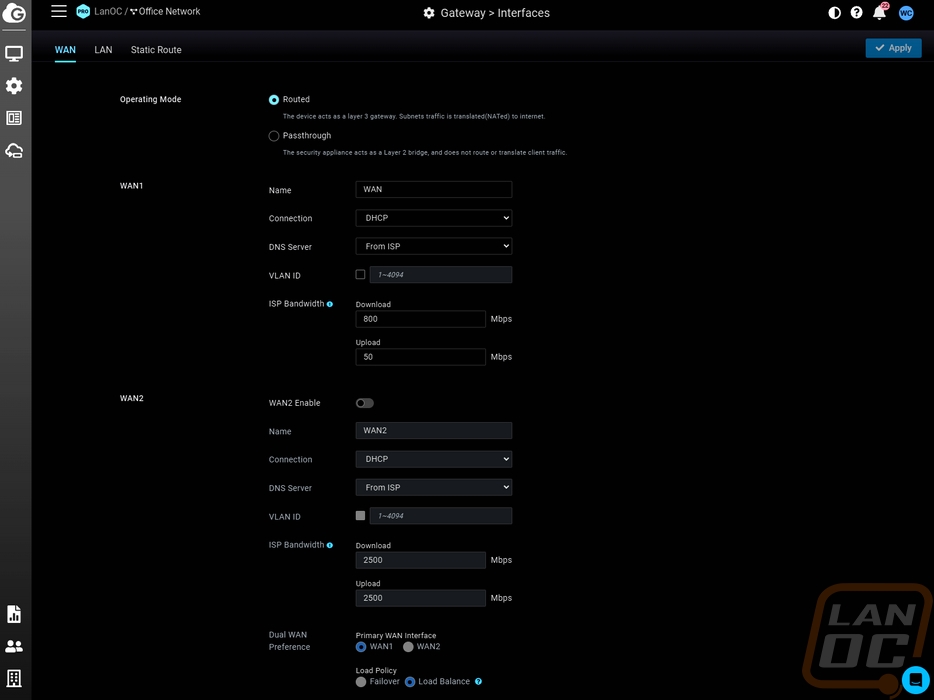
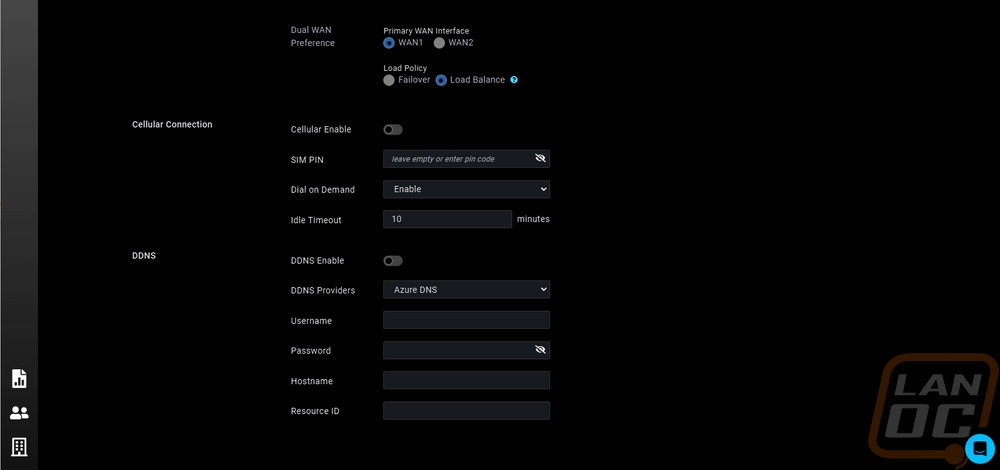
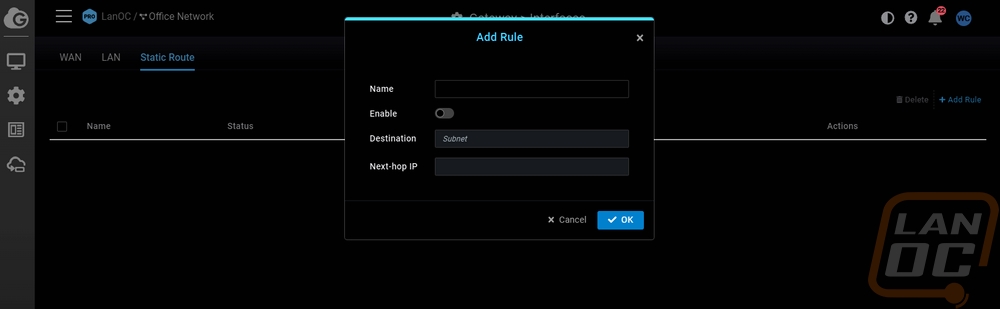
Moving over to the Configure menu which has four different pages starting with the Interfaces page. This has pages for the WAN interfaces as well as the LAN interfaces and a third for Static Routes. The WAN page up top lets you decide if the ESG510 will be running as a Layer 3 gateway or a Layer 2 bridge. In other words, will be a router or passing that through to another router. Then from there you can rename the WAN, set up the connection type to your ISP, and also pick your DNS servers. For the DNS settings, you can use the ISP, Google DNS, or you have the option to input your own. Then you can input your IPS bandwidth which helps in some of the other interfaces that show what percentage of bandwidth you are currently using as well as with load balancing. You can also specify a WAN to a specific VLAN as well. These settings are available for both the WAN and WAN2, the WAN2 also has the option to turn that off and to switch between load balancing and failover on how the ESG510 handles the second WAN. Then down at the bottom, you have settings for the cellular modem which the ESG510 supports, and dynamic DNS settings as well as a dropdown of the popular DDNS providers and room to input your username, password, hostname, and resource ID.
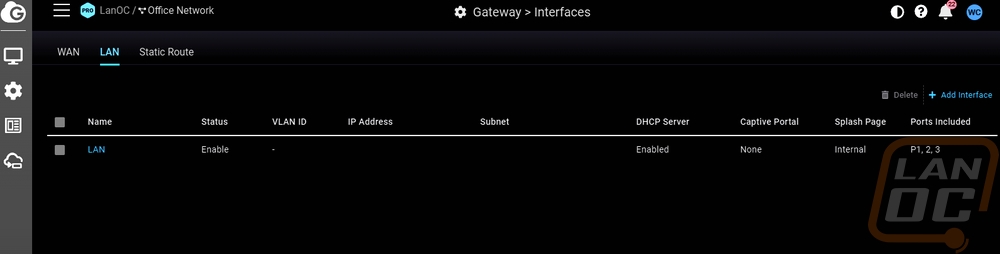
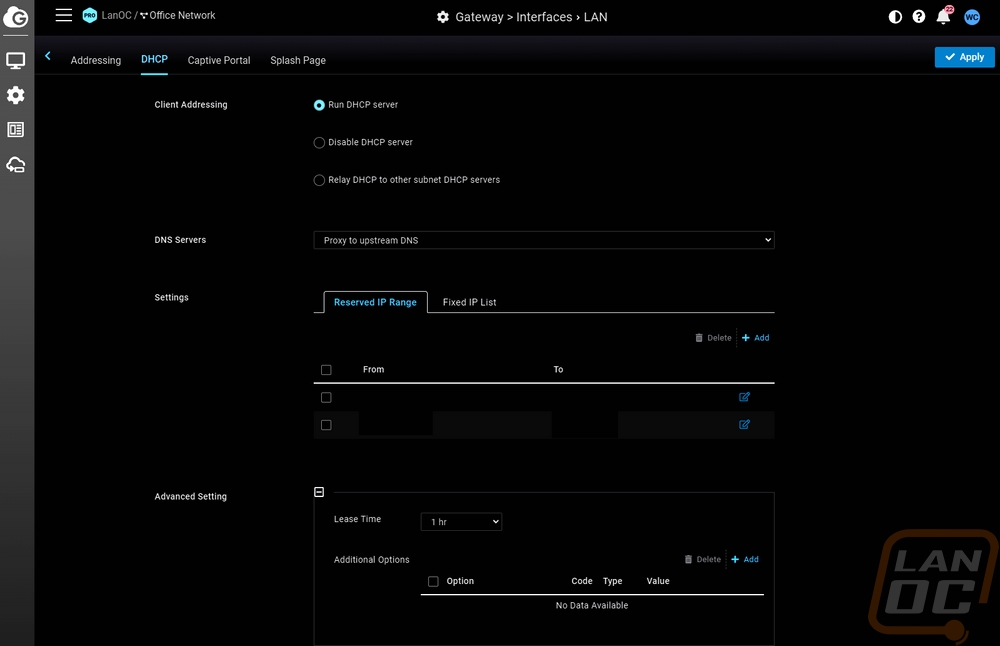
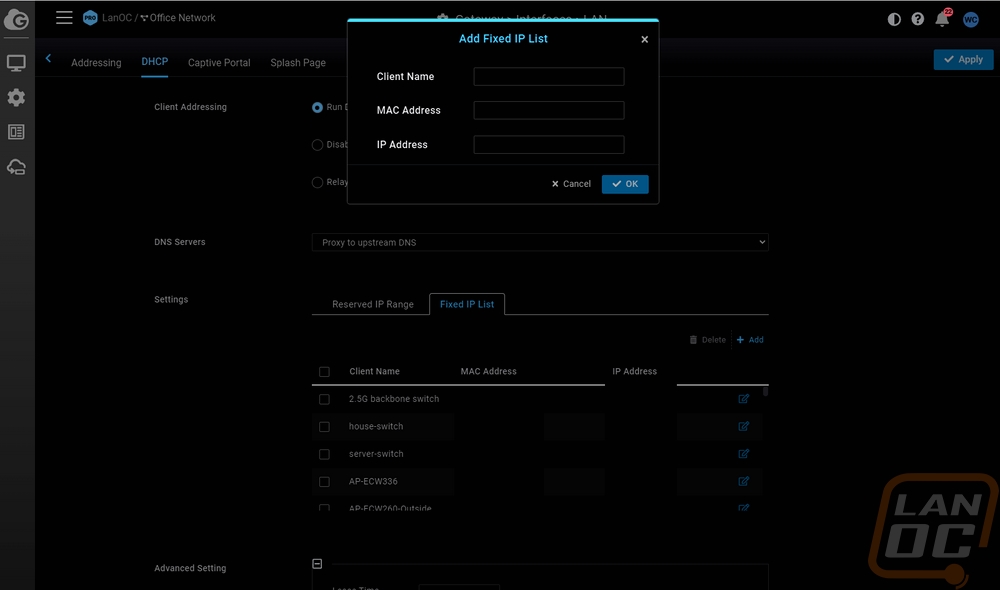
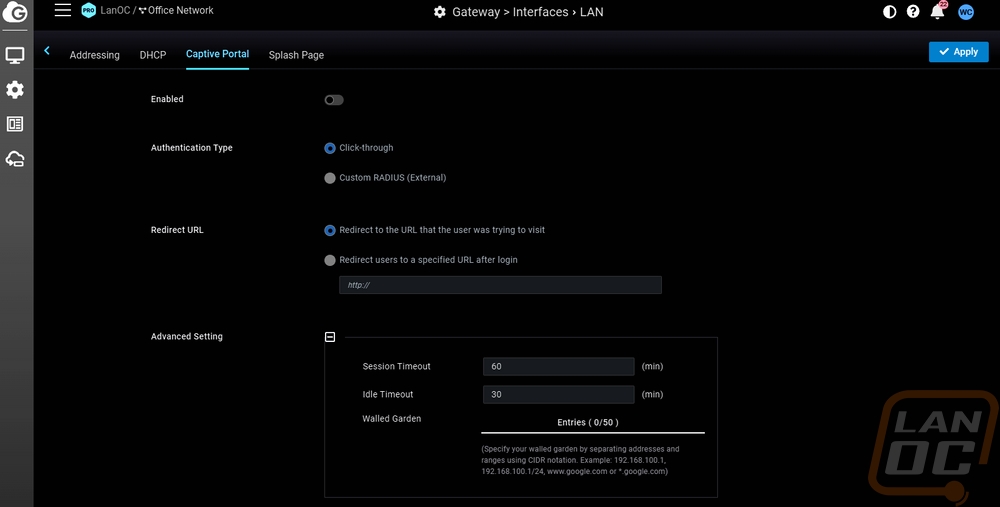
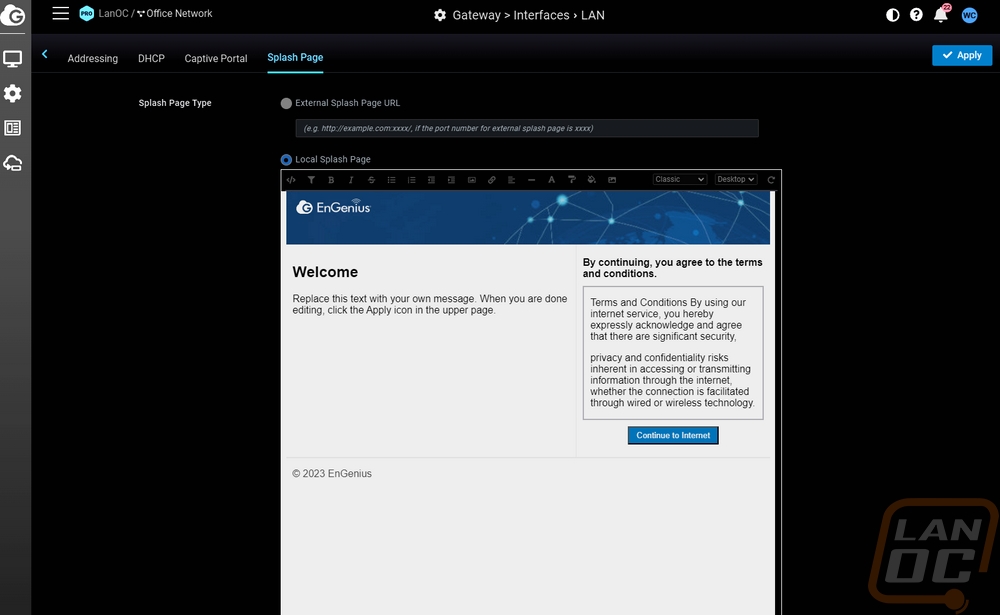
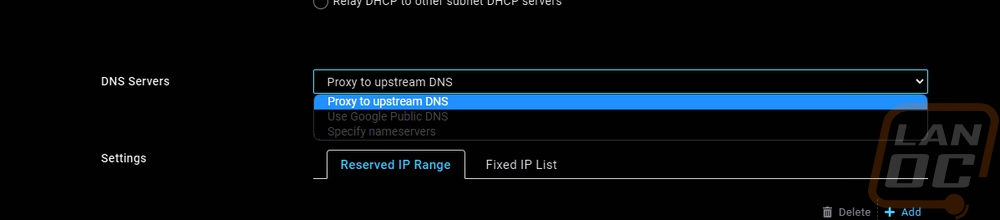
The interfaces page for your LAN will list out all of the ports you have connected to LAN which could be between 1 and 3, for our setup I have just the one. This page shows the status, VLAN id of the LAN, IP address, subnet DHCP server setting, captive portal setting, splash page setting, and what ports you have dedicated to that interface. Clicking on the LAN name then opens up a second page. This has Addressing, DHCP, Captive Portal, and the Splash Page settings pages. The addressing page is where you can rename the LAN, set up your IP address, allow VPN, and which ports you want these LAN settings to work on. The DHCP page has all of your DHCP settings all together. Up top, you can select if the ESG510 is running DHCP, completely off, or relaying DHCP to a different server. You can pick from the DNS server dropdowns with the same options we saw on the WAN page this includes using the ISP DNS, Google DNS, and inputting your own. Below that you set your reserved IP range which is where you can section off IPs that you don’t want the DCHP server to use. That area also has the Fixed IP List which is where you can input a client name, MAC address, and IP Address to always give a specific device the same IP. Then down at the bottom under advanced settings, you can change the DHCP lease times. The captive portal page lets you set up a click-through authentication or use a custom RADIUS server to authenticate before giving out IPs, which also lets you set up a redirect after login as well. The splash page works with that as well with a default welcome page and terms and conditions which you can edit for a basic splash page or you can input an external URL.

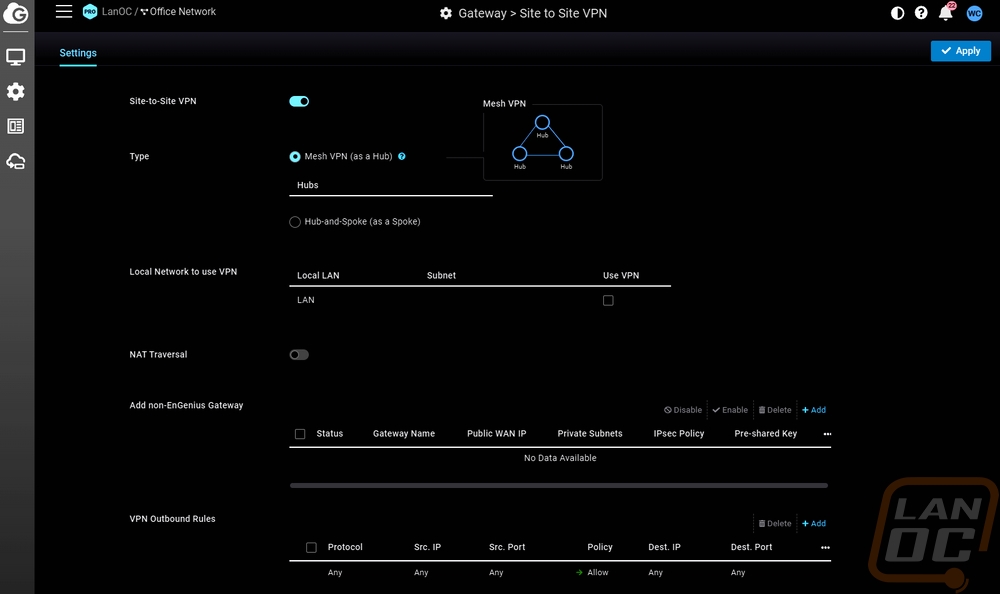
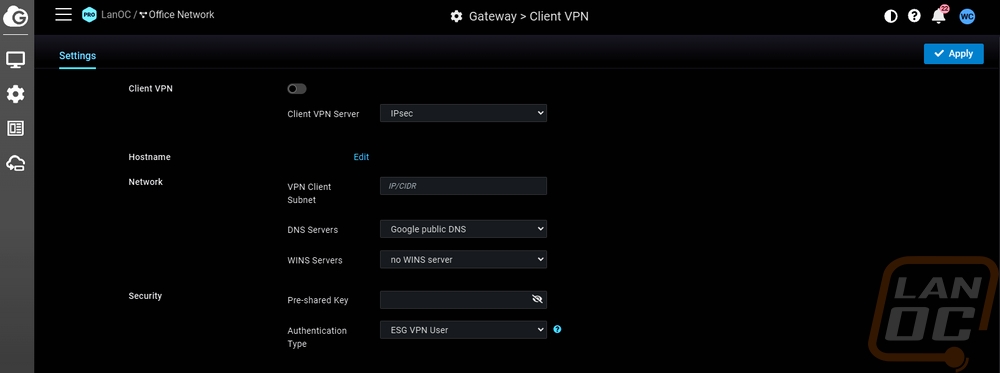
The Configure menu has two different VPN settings pages. The first is site-to-site VPN settings. This is where you can link together different offices and they have options to switch between a mesh VPN or a hub and spoke. With a mesh, EnGenius will link together the hubs where a hub and spoke configuration you specify the hub that the other offices are linking back to. You can add in a non-EnGenius gateway down at the bottom and you also have options to specify outbound rules, just like the firewall rules. The NAT Traversal setting lets you pick between automatic or manual with port forwarding but it should be noted that Automatic is a pro subscription-only feature. The second VPN page is the client VPN settings page. This is where you can set up the basis of your VPN settings to allow individual computers to VPN into the network and while there is a dropdown under client VPN Server the only option is IPsec. You can set the subnet for the VPN clients as well as the DNS servers.
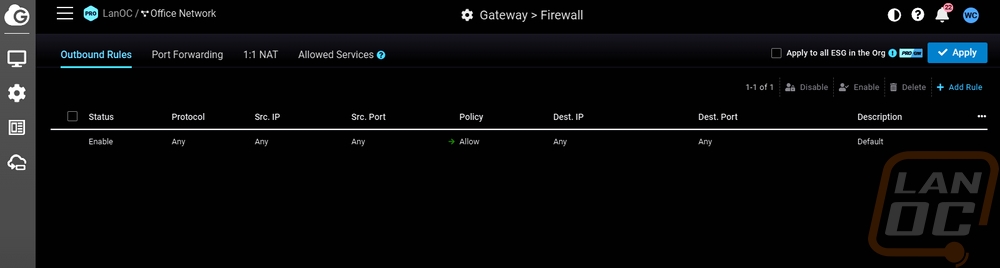
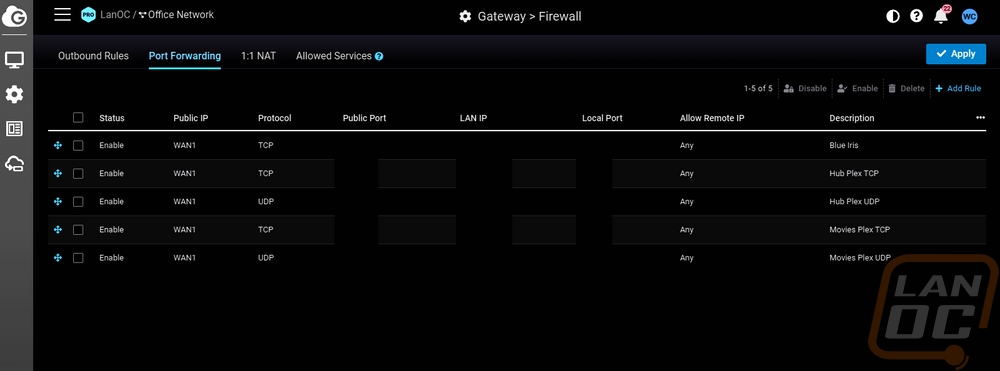
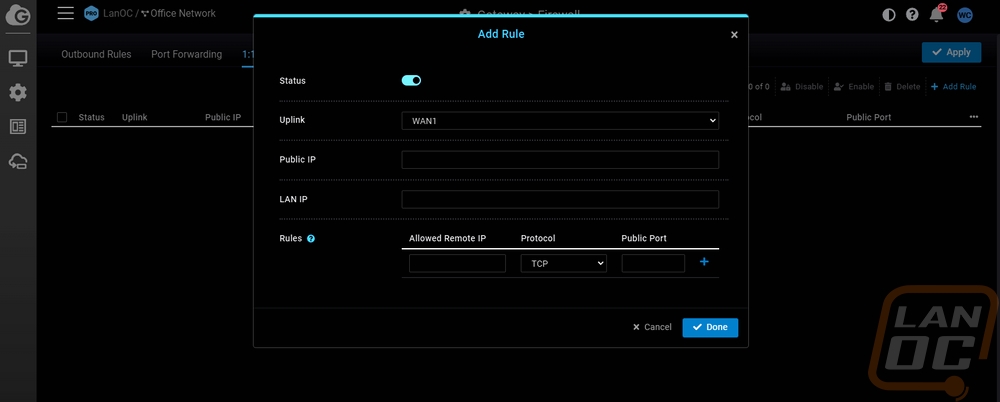
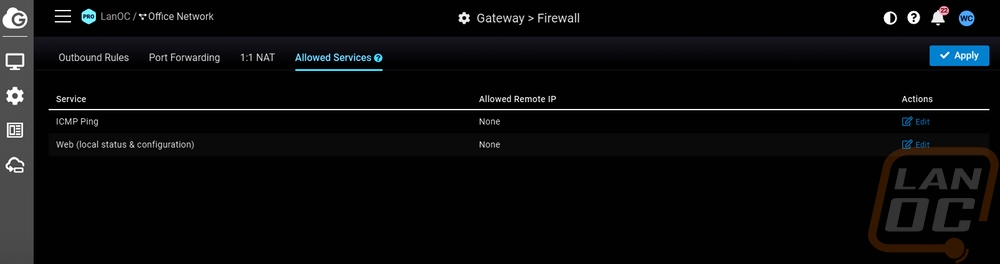
The last option in the configuration menu is a big one, it is the Firewall settings. This is broken down into four different pages with the tabs up top. You start out on the Outbound Rules page. This is where you can set up allow or deny policies to block specific IPs or Ports, by default there is an overall rule that allows anything but if you wanted you could flip that around and block everything and open things up individually if necessary. The second page most people are going to be familiar with, port forwarding. Here you can set up rules to help guide traffic in and out of your network for the software that needs it. For ours, there is port forwarding setup for a few Plex servers for example and our security camera server as well. I was surprised here that you have to make a rule for TCP and a second for UDP, there isn’t an option that covers both. The 1:1 Nat page is your demilitarized zone, this is where you can set specific IPs up to be outer facing. Then the last page is the Allowed Services page which is where you can allow specific IPs to ICMP ping and access the web service.
For performance testing, I’ve been using the ESG510 as our main gateway, and coming from PFSense there have been a few things to note. While it does offer great functionality when it comes to VPN, multiple internet connections including having a backup cellular connection, and solid firewall functionality. I do miss some functionality from PFSense, specifically the packaging/plugins which can expand functionality. I will especially miss pfBlockerNG. The ESG510 didn’t have any trouble with any of the web traffic I through at it but I did notice that when using the diag tools to track CPU usage and doing a speed test I was able to push the CPU usage up into the mid 90% range. Ram stayed down around 20% however. I didn’t experience any slowdowns when doing the speed test and I’m not really sure why it caused the CPU usage to ramp up like with web traffic. Our internet connection is 700 down and 35 up which shouldn’t really scratch the surface of what the ESG510 is capable of. DHCP was quick and had no issues beyond me inputting the wrong setting for one of the fixed IPs of our servers which didn’t show itself until later when a switch updated and cleared its ARP tables.
Overall and Final Verdict
Time is money and when it comes to products like the EnGenius ESG510 it doesn’t matter if you are paying someone to handle your IT or if handling the network is just one of many tasks that someone considers their job. If you can simplify things and cut down on the time needed to keep an eye on things it is going to save you money, time, and headaches. With the ESG510 this is accomplished in a few ways. With it integrating with EnGenius Cloud you can remotely keep an eye on things when needed if you have other supported network hardware like we have on our network then everything you need to check is all in one place. The ESG510 also helps save money and headaches by supporting multiple internet connections with its dual WANs and also supporting the addition of a cellular modem as well for a third backup. You can use multiple connections to help prevent downtime and the ESG510 can use the backup connections as a fallback or load balance to gain even more bandwidth. The third area where the ESG510 helps is with how they simplify VPN use. You can quickly set up client VPNs to individual users which with the prevalence of remote work is important and you can also set up site-to-site VPNs if you have multiple offices. On top of all of that the ESG510 supports 2.5G connectivity on its WAN and LAN ports to help handle Gigabit and higher internet connections.
This is EnGenius’s first gateway and with that, it does feel like there is still room to grow on the software side of things. I came from PFSense before the ESG510 and I’m going to miss some of the plugins that allow you to handle things like Domain Name System Blacklists. When trying to pinpoint an issue while using the ESG510 it was frustrating to use the built-in diag tools that full screen. Running multiple screens I could get around it, but I can’t imagine how frustrating it would be to have those full screen with just one monitor, and when you close them the performance graphs close and start over when you reopen it. The other issue I ran into was high CPU usage on the ESG510 when I was running speed tests. I didn’t experience any internet slowdowns, but when I’m not running load balancing and I don’t have a crazy fast internet connection I don’t understand why the CPU was going up with internet use at all. Hopefully, that is a configuration issue on my end or a bug that can be fixed in the future.
As for if I will be sticking with the ESG510 long-term? Well, I am really liking the simplicity of having everything tied into EnGenius Cloud for simplicity. I may have to set up a VM or a Pi running something like Pi-Hole to get DNSB Groups to help stay on top of keeping my network secure, however. The ESG510 has an MSRP of $599 which isn’t cheap but isn’t completely out of line with the enterprise competition. In fact, CDW has it for $446 and I saw it for $420 previously. For comparison, the SonicWall TZ470 which is about as close as you get with similar 2.5G connectivity and cellular modem support has an MSRP of $840 and is selling for $672.
Live Pricing: HERE


