Over the last few years, I have been slowly updating our home/office network. I updated our access points to get full coverage in the house and outside, rebuilt a few of our servers to handle how we use them, and also get them mounted in our server rack, and with EnGenius’ help the main backbone has been updated to get 2.5G and a few 10G connections to servers and important devices. I have even cleaned up a lot of the wiring which over the years turned into a mess. The main thing left has been the switches that handle all of the network outlets throughout the house and the second switch needed for our cameras. When I moved in I went with a used switch to cover all of our network jacks but didn’t consider that it might be better to also have it support PoE, so when our cameras expanded past just a few I had to add in the second switch just for that. Both switches are dated however, one I can’t even connect to without using Internet Explorer. So an update has been a long time coming but a costly upgrade given the number of connections I need, needing PoE, and needing SFP+ to get a faster connection between switches. Having it tied in with EnGenius Cloud would also be nice given that our backbone switch and access points are all controlled there as well. Well, EnGenius was kind enough to send over the ECS1552P Cloud 48-Port 4x10Gb 410W PoE+ Switch which fits the bill perfectly and today I’m going to check it out to see what all it has to offer as well as integrate it into our network and clean things up even farther. So let’s get to it!
Product Name: EnGenius ECS1552P Cloud 48-Port 4x10Gb 410W PoE+ Switch
Review Sample Provided by: EnGenius
Written by: Wes Compton
Amazon Affiliate Link: HERE
|
Specifications |
|
|
Port Standards |
802.3 10Base-T Ethernet 802.3u 100Base-TX Ethernet 802.3ab 1000Base-T Ethernet 802.3x Full-Duplex Flow Control |
|
Network Ports |
48 10/100/1000 Mbps Ports + 4x SFP+ Ports |
|
Switching Capacity |
176Gbps |
|
SDRAM |
512MB |
|
Flash Memory |
128MB |
|
PoE+ Capable Ports |
1-48 |
|
Total PoE Budget |
410W |
|
Power Source |
100 ~ 240VAC, 50-60Hz |
|
Physical Interface |
|
|
LED Indicators |
Power LED Fault LED PoE Max LED LAN Mode LED PoE Mode LED |
|
Ports |
Link/Activity/Speed (per Ethernet port) |
|
Software Features (L3 Features) |
|
|
Multiple IP Interface |
20 IPv6 address |
|
ARP Table |
Max. 192 ARP entries |
|
Static ARP |
Static 192 ARP entries |
|
IPv4 Static Route |
Max. 63 entries |
|
IPv6 Static Route |
Max. 21 entries |
|
Software Features (L2 Features) |
|
|
MAC Address Table |
32K |
|
Jumbo Frame |
10K |
|
Multicast Group |
Max 256 groups |
|
MLD Snooping |
MLD Snooping: v1 |
|
QoS-Number of Priority Queues Supported |
Queue 8 |
|
Trust Mode |
Cos/802.1p DSCP CoS/802.1p-DSCP |
|
Scheduling Mechanism |
Strict / WRR/ Strict + WRR |
|
Bandwidth Control |
Port-based bandwidth control (Ingress/Egress) |
|
Port Security |
Max. 256 Entries |
|
Access Control List (ACL) |
MAC Based ACL IPv4/IPv6 Based ACL ACL Binding Time base ACL |
|
Web Graphical User Interface(GUI) |
HTTP IPv4 / IPv6 |
|
SSL Certificate |
Certificate/Key Import |
|
SNMP |
SNMP v1/v2c/v3 Support |
|
RMON |
RMON 1,2,3,9 |
|
System Time |
Time Setting/Daylight saving |
|
Common L2 Features |
802.1d Spanning tree Loopback Detection Multicast Filtering IGMP Multicast Forwarding IGMP Snooping MLD Multicast Forwarding 802.1Q VLAN tagging 802.3x flow control 802.3ad Link Aggregation IPv4 DHCP Relay IPv4 DHCP Snooping IPv4 DHCP Snooping Source MAC Address Check-up ARP Inspection ARP Packet Validation (additional validation checks) Voice VLAN Port-based VLAN Protocol-Based VLAN CoS Mapping 802. 1X Radius Authentication Protocol IPv4 Settings IPv6 Settings IEEE 802. 3az Energy Efficient Ethernet (EEE) Command Line Interface (CLI) SSH Server Telnet Server TFTP Client Configuration Upgrade/Backup Simple Network Time Protocol (SNTP) SYSLOG 802.1d Spanning tree |
|
Environmental & Physical |
|
|
Temperature Range |
Operating: 32°F to 122°F (0°C to 50°C) |
|
Humidity (Non-Condensing) |
Operating: 5% - 95% |
|
Package Contents |
1x Cloud Managed Gigabit Switch 1x Quick Installation Guide 1x Power Cord 1x RJ45 Console Cable 1x Rack Mount Kit |
|
Device Dimensions & Weights |
|
|
ECS1552P Device |
Weight: 13.66 Ibs. (6.2 kg) Width: 17.32” (440 mm) Length: 10.23” (260 mm) Height: 1.73” (44 mm) |
|
Packaging |
Weight: 16.84 lbs. (7.64 kg) Width: 20.82” (529 mm) Length: 21.57” (548 mm) Height: 4.13” (105 mm) |
|
Warranty |
2 year |
|
Certifications |
CE FCC IC |
Photos and Features
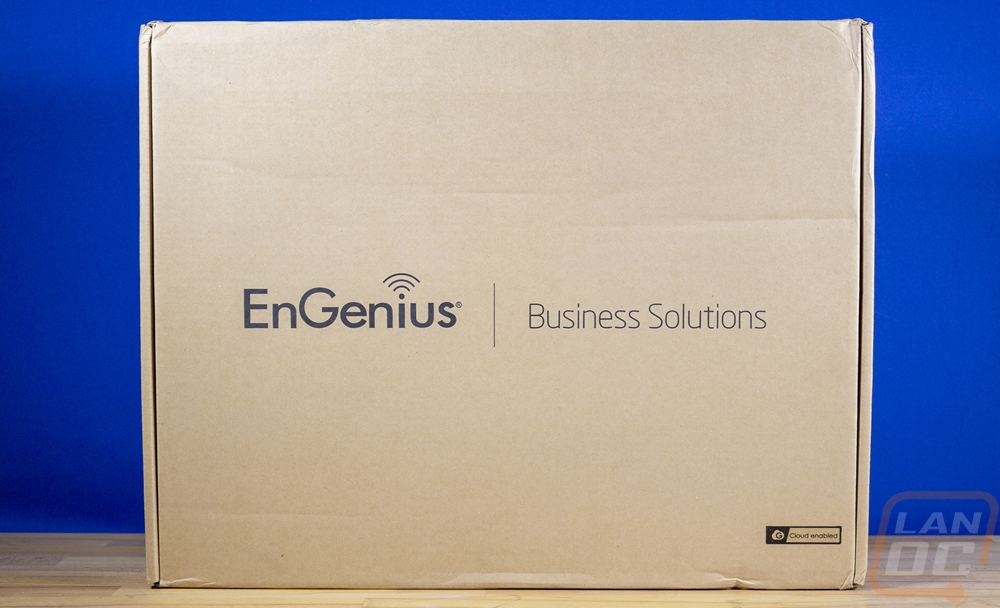
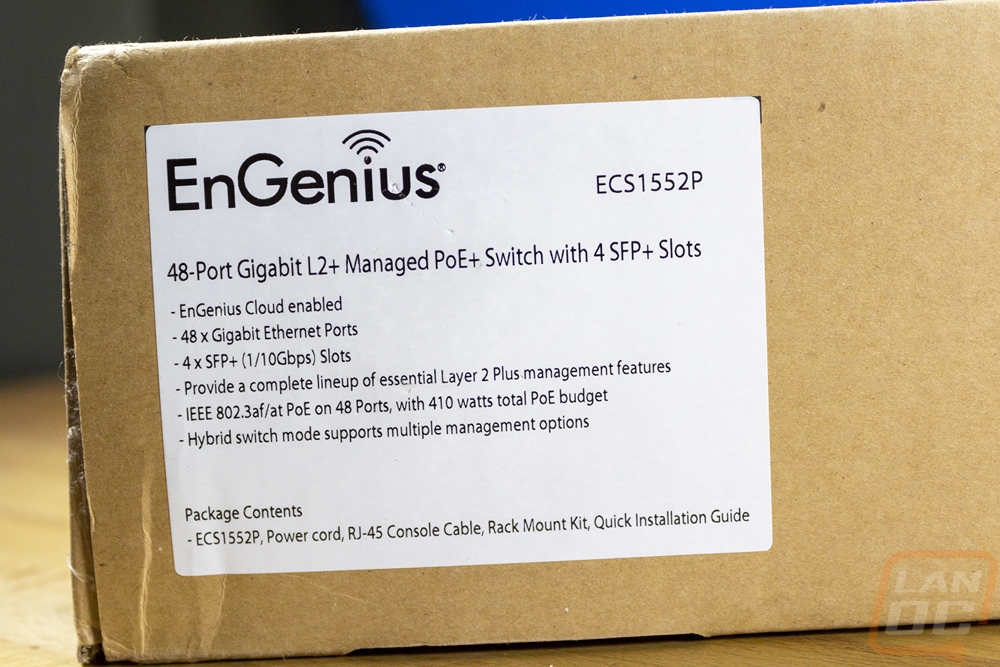
Like with EnGenius’s other products, the ECS1552P Cloud 48-Port 4x10Gb 410W PoE+ Switch comes in a brown box, only this one is larger than the other EnGenius boxes that have come in. Across the top, it has the EnGenius branding and lets you know this is one of the business solutions products. There is also a small sticker that indicates this is cloud-enabled. Beyond that there isn’t anything else printed on the box, they just have two white stickers on the box, one on the front edge and the other on the right side edge. This allows the box to be used for multiple models which makes sense. The front edge sticker has the EnGenius branding up top as well as the ECS1552P model name, below that they have the full description which better shows what model this is. This is their 48-point Gigabyte layer 2+ managed PoE+ switch with 4 SFP+ Slots. They have barcodes for the part number, UPC, EAN, and serial number as well. Down at the bottom, the sticker has the certification logos and it also lists the hardware revision number and software version number. The side sticker has the branding, model number, and model description but below that they have listed its main features. This sticker also lists what you will find in the box.

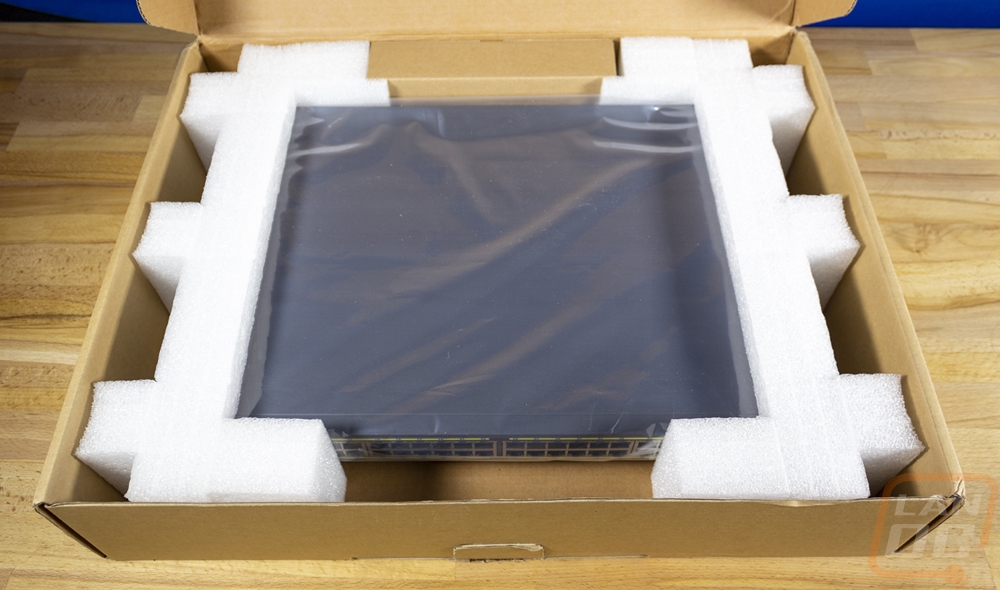
When you open the box up the ECS1552P comes wrapped in a thick plastic to keep it safe from any scuffs and then both ends have foam wrapped around them to keep the switch centered in the box and away from any potential damage. Then at the back, they do have one small brown box which has the accessories inside.
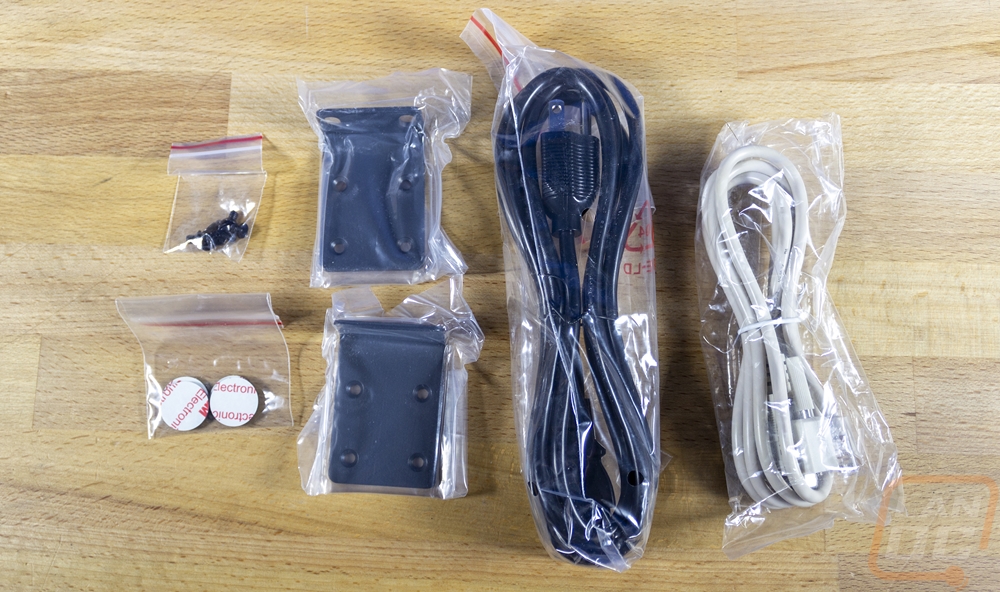
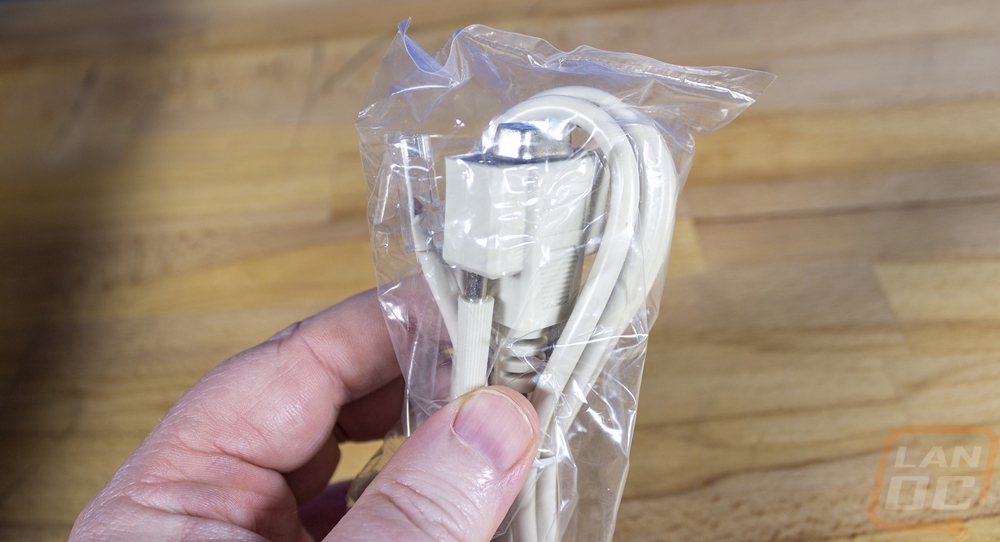
The ECS1552P is the main component, but EnGenius does include a few things alongside it. The accessories box comes with two cables inside. You have a standard NEMA 5-15P to C13 cable, which handles power for US users. Then you have a beige console cable which has a RJ-45 plug on one end and a serial connection on the other end. There are two rack ears which both come individually bagged and a small baggie with screws to mount them. Then there are four small rubber feet that you can install if you are planning on using the ECS1552P sitting on top of something. EnGenius also includes their quick installation guide which is specific to a managed switch but not specific to the ECS1552P.
The ECS1552P comes in at 17.32” or 440 mm wide, 10.23” or 260 mm deep, and 1.73” or 44 mm thick. That is your standard 1U configuration but this is larger than some of the other EnGenius switches we have had in the office. It is heavy as well at 13.66 lbs, but that is partially because it has an all-steel housing which has been powder coated a dark grey which does have a hint of blue in it but our photo area with the blue background gives the switch a little more blue in these pictures.
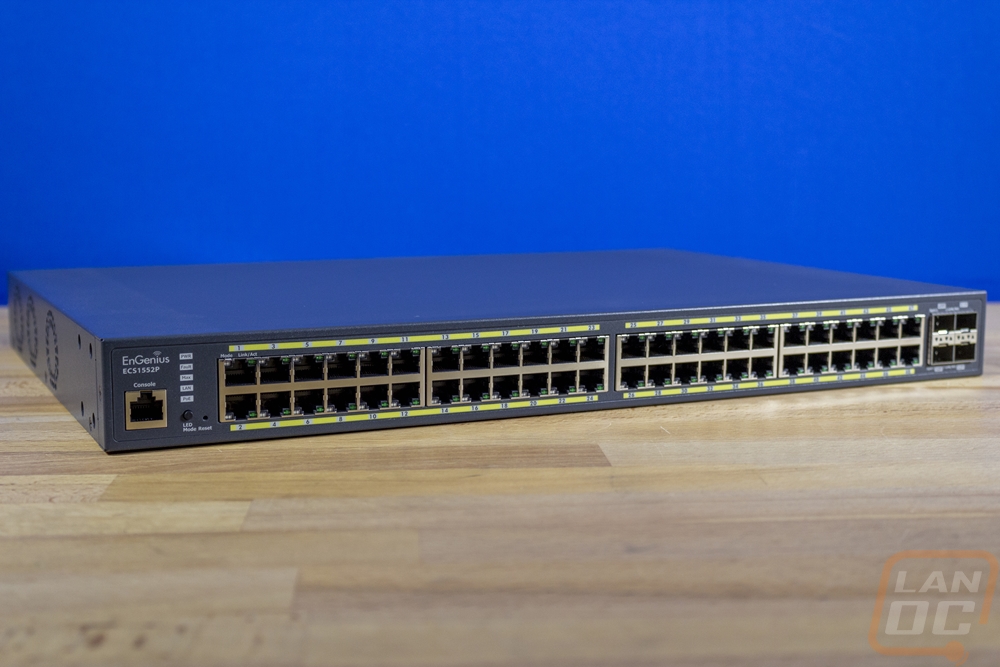
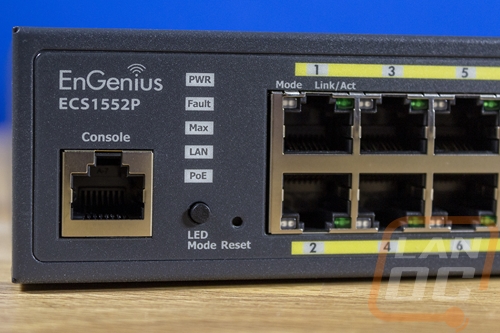
Zoomed in a little closer on the far left of the ECS1552P we can see the EnGenius branding and the model name are in the top left. Below that they have the RJ-45 Console connection for when you need to directly connect to the switch. The five white boxes next to that are backlit and are the status indicators for the switch. Up top, you have power which will light up green flashes before the system boot and is solid on when powered on, the fault indicator lights up amber when there is a fault and is off when there isn’t. The Max LED is also amber but will light up solid when the PoE power is at its max budget and will be off when there isn’t an issue. The LAN indicator can be green, amber, or off depending on the speed that you have the LAN status lights to, green will indicate they show 1000 Mbps, amber would be 100 Mbps, and off shows 10 Mbps. You use the LED mode button at the bottom to switch between these modes. Then the PoE LED lights up when you have any PoE activity. There is also a tiny pinhole reset button should you need to hard reset the ECS1552P.
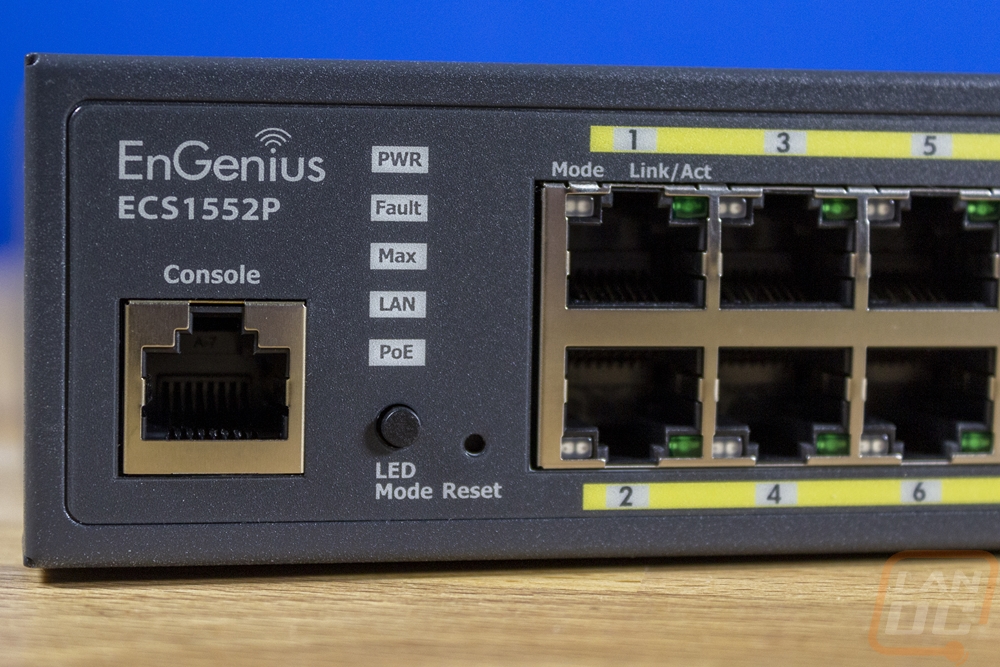
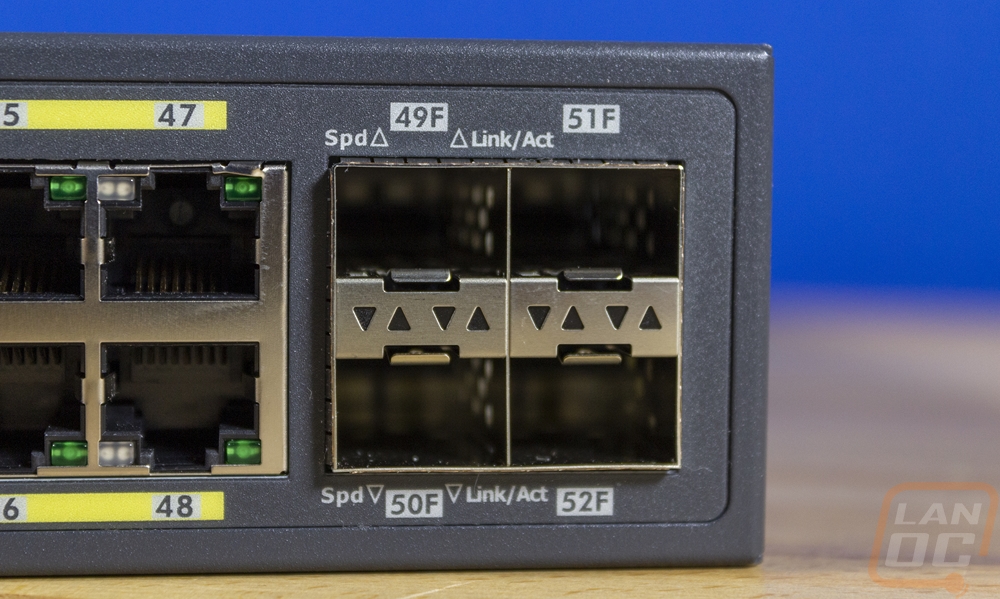
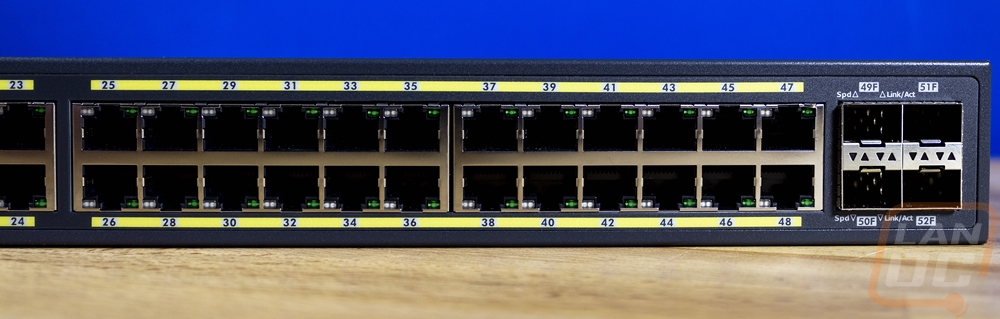
On the far right end of the ECS1552P, it has four SFP+ ports. SFP+ stands for enhanced small form-factor pluggable and they have a potential speed of up to 10 Gbit/s depending on what you have connected to it. They are a modular slot that you can use different transceivers in to link your hardware together. You can link things together with fiber or copper and there are transceivers for RJ-45 to get 10G connections which I use a few for 10G connections to specific PCs. I personally like using Passive DAC Cables which have the SFP+ connection at the end of each cable to eliminate any other potential issues when it comes to switch to switch or server to switch. But the idea here is that you have some versatility. These are numbered like the other ports on the ECS1552P but these have F at the end of each number. They also have small status LEDs which are in the middle inside of the up and down arrows. The up arrow show the connection speed and link for the top port and the down arrows show the bottom ports.
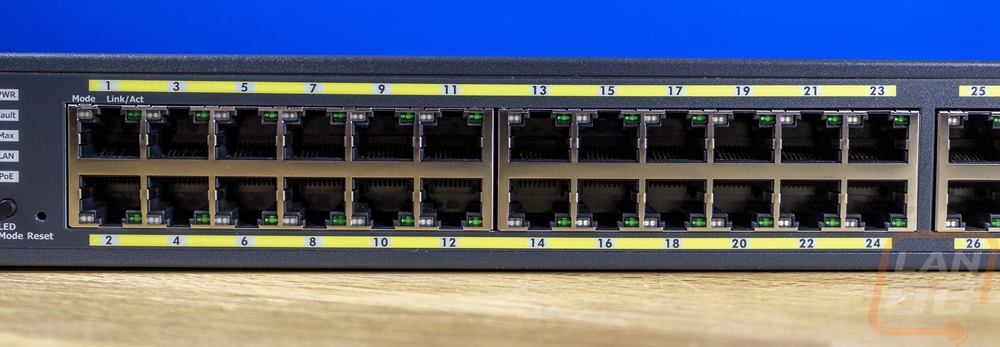
Then of course the ECS1552P has all of the RJ-45 connections through the middle across the front. The ports are split up into four sections as shown by the metal shields but those are then paired up with a gap between the middle two. Each group has 12 ports giving us a total of 48 ports. They are all labeled with the odd numbers up top and even on the bottom and the yellow bar that goes with the label is how EnGenius indicates on their switches that these are PoE ports. The ECS1552P supports PoE on all of its 48 RJ-47 jacks. Each port has its own status LEDs with the connection mode on the left and a status LED on the right. The right will flash with activity and the left will change color depending on the status of the connection. Solid on the left will show that it is a 1000 Mbps connection and the color changes to amber when PoE is being used. All of the ports can run at 10/100/1000 Base-T and for PoE, they support 802.3 at/af PoE+ with the switch as a whole supporting up to 410 watts for the total PoE budget. That is 8.5 watts per port. They also have the ECS1552FP which is the same setup but with 740 watts of PoE+ power for someone who needs more power. That still wouldn’t allow the max 30 watts of PoE+ power for all 48 ports, but most devices use a very small portion of that. For our situation where we have a mix of PoE cameras and outlets around the house, 410 watts is way more than enough. Just having it available on every port is going to be nice. The ECS1552P does also support PoE Extended Mode which you can turn on when deploying PoE devices at longer cord lengths with support up to 250 meters. The ECS1552P has a total switching capacity of 176Gbps which is more than enough to handle the 40 Gbps of the four SFP+ ports leaving 146 Gbps for the 48 ports which is 2.8 per port, so there is lots of headroom even if you are completely slamming the switch.
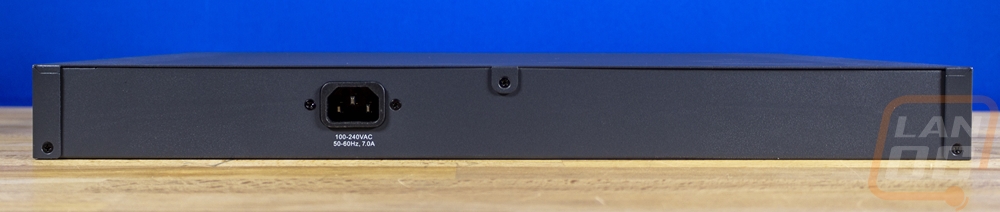
There isn’t too much going on at the back of the ECS1552P like there was at the front. The back has just one power plug which is offset to the left of the center. It has a C14 power connection which is the standard PC female plug and it supports 100 to 240 volts and 50-60 Hz at 7 amps. The rest of the back of the ECS1552P is blank with screws at both ends and one at the center top where a tab from the top is held in place.
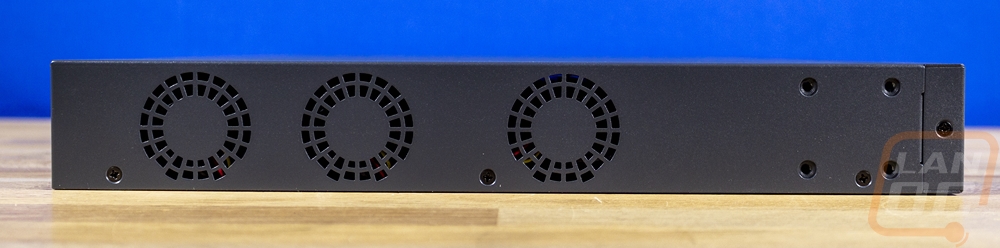
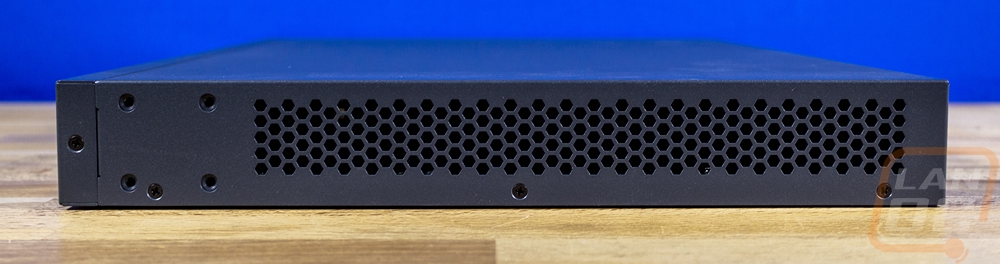
The sides of the ECS1552P, like with all rack mountable switches are where you will find all of the airflow solutions to keep things cool. The left side of the ECS1552P has three small round vents for fan intakes. This side also has the four screw holes up at the front for the rack mount ears and the housing itself has four screws on this side holding the housing on. The right side of the ECS1552P then has hexagon-shaped vent holes running the length of the switch for airflow exhausted out from the fans on the left side. This side also has four screw holes for the rack mount ears and four screws holding the ECS1552P together.
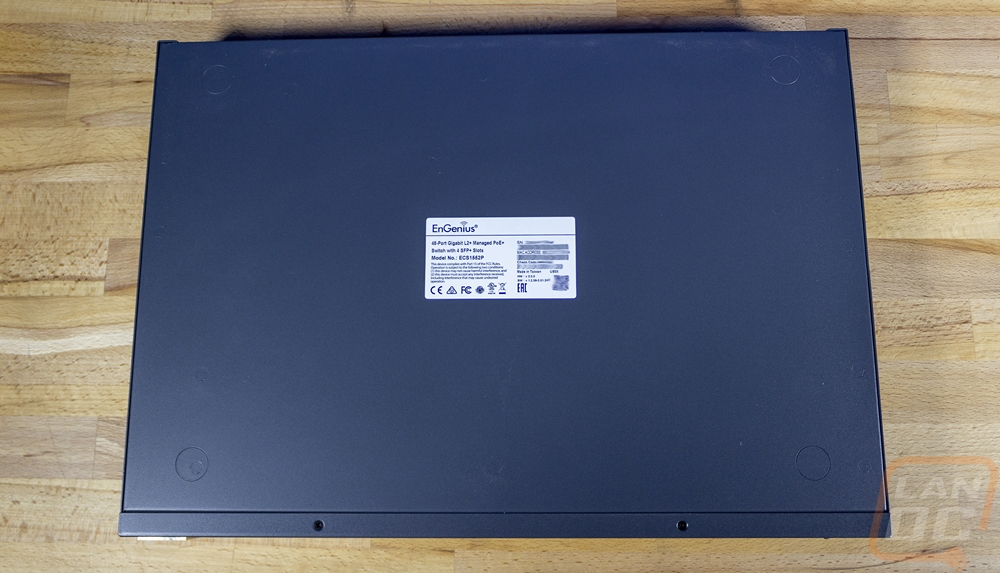
The top of the ECS1552P gives us a better look at that powder coat finish, but beyond that, there isn’t anything going on here. The bottom on the other hand has a few things going on. For starters, you can see the small circles they have on the bottom to show you where to install the included rubber feet. Then in the center, you have a white sticker. This has the model number and description once again. This also has the Mac address listed out and in a bar code as well as your serial number. You also have a small QR code, this is for attaching the ECS1552P to the EnGenius Cloud app on your phone, you can manually type it in or scan the QR code to speed things up.

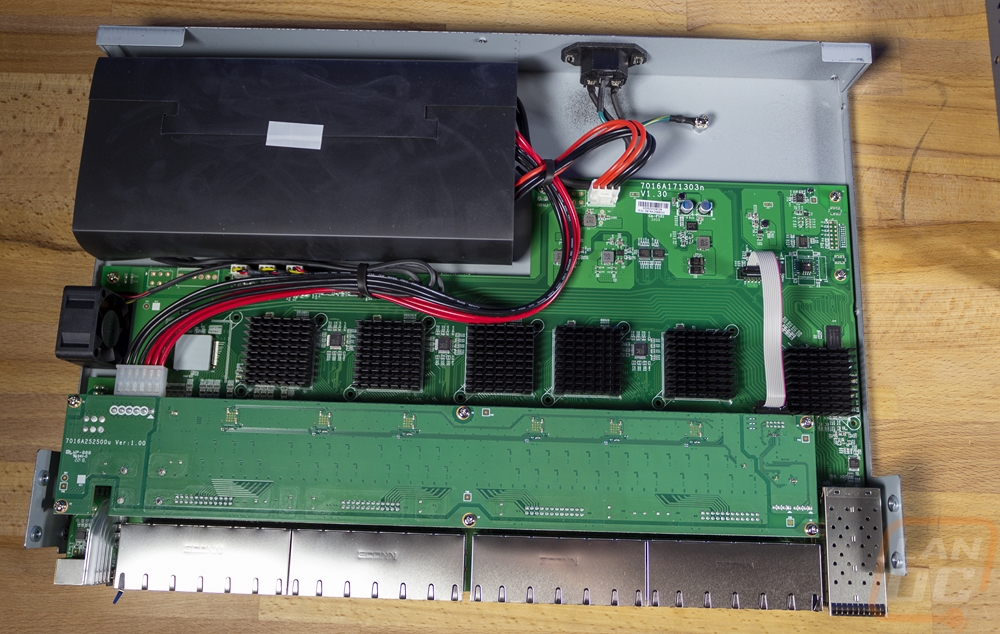
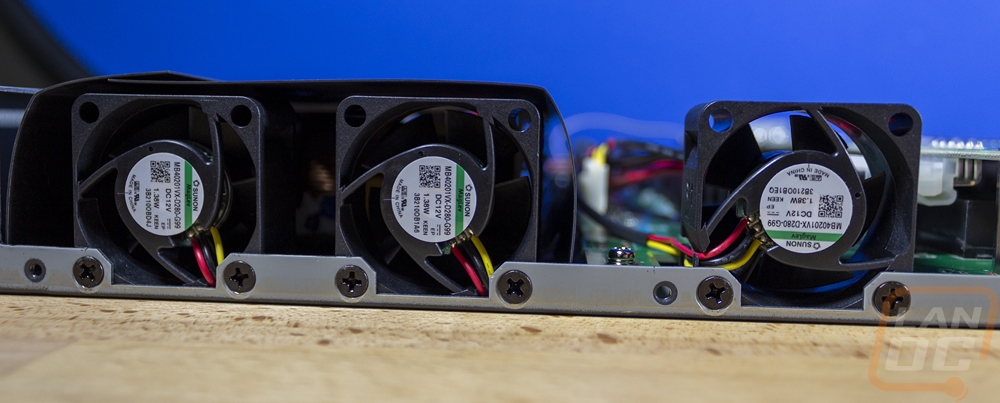
I did open the ECS1552P up as well to take a look inside. The housing is all held together with standard Phillips head screws and there aren’t any “warranty is void” stickers which at least in the US aren’t valid anyhow. So the ECS1552P is easy to get inside if you should need to do any repairs. Engeius does warranty the switch for two years so at least in that time you shouldn’t need to do anything inside. But once inside a few things are going on. Up front all of the network connections all have metal shielding around them to help cut down interference no surprises there. The stratus LEDs on the far left are actually down on the main PCB and have light bars bringing that up to the front. Then for the switch, you have a top and bottom PCB with the bottom being the main interface. They have 6 heatsinks with five lined up and one offset. All of those are in front of the first fan on the left. There is one ribbon cable connecting the two PCBs. The power supply is at the back close to the power input and it has been covered by a thin cover, this combined with the two fans at the end help funnel the airflow from those two fans across the power supply before blowing out into the rest of the housing. The power supply has one power cable that does to the main PCB at the rear and then its main power cables all run up to the secondary PCB at the front which from the look of it handles the PoE. For the fans each of the three fans are all the same Sunon-branded MagLev fans with the model number MB40201VX-D280-G99 and they are 40 x 40 x 20 mm fans. They push 10.8 CFM each and run at up to 8200 RPM with a wattage of 1.38. You can see that they are connected to the main board with 3-pin connections and this should make them easy to replace. You can even find them on Amazon with prime delivery but the price on there is twice what they are on other websites, once you include shipping though it isn’t bad. The MB40201VX-D280-G99 is listed as obsolete on Mouser though so by the time you have to worry about replacing them, you may have to find something comparable.
Once I had the ECS1552P back together I could finally install the ears for installing the switch in a rack which is how we will be using the switch. You have eight screws in total, four for each side and as you tighten them down they are self-centering so they will position the ears perfectly.

Software
The Engenius ECS1552P is what they are calling a Layer 2+ switch and with that, a good portion of its functionality is all on the software side of things. It doesn’t go to the extent that a layer 3 switch does which are in a lot of ways a router but we do need to dive into the software to get a good idea of the full experience. The ECS1552P has two different software aspects that we need to check out individually, it is part of the EnGenius Cloud and then it has its own web interface as well. So let's start off with the EnGenius Cloud which if you have been around here for a while you have most likely seen a few times as most of our network hardware is EnGenius Cloud compatible. The cloud software can be accessed through a web interface or using their app but functionally they are similar. The app does make adding new hardware easier, however, once you have an account setup you just click the add hardware button and use your phone camera to scan the QR code on the bottom of the ECS1552P to add it as a device. Then once it is powered up and plugged into your network it will automatically connect, update with your location settings, and update its firmware.
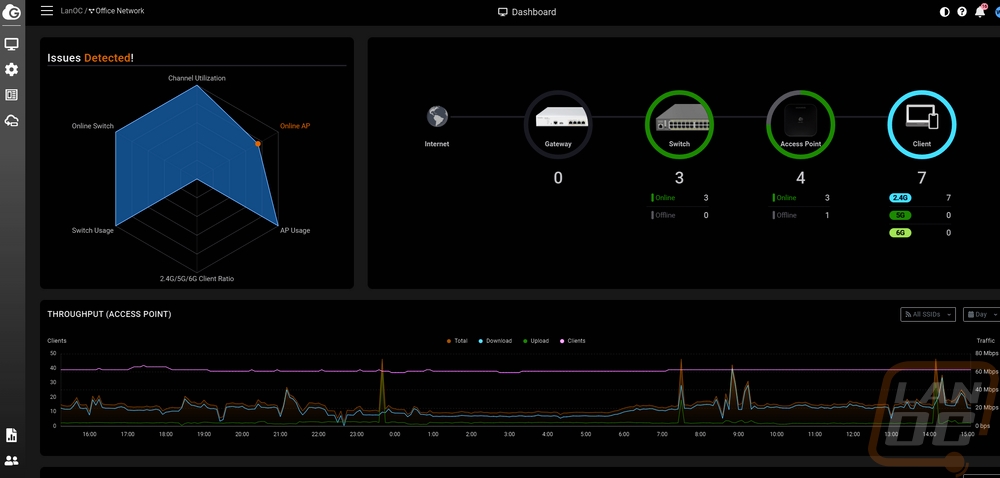
The landing page for the cloud web interface has menus on the far left and up top to let you know the status of your network. For ours, you can see that it is letting me know that one of the access points attached to the account isn’t online and our ratio of 2.4 GHz and 5 GHz clients is bad due to a lot of smart devices. I do wish I could adjust that setting or set IoT devices to be ignored by that calculation. Also up top, they break down all of your devices starting from switches, access points, then clients. Then below that you have a graph of throughput for the past day on your access points, that can be changed to a longer period of time and you can also set it to just a specific SSID to help pinpoint issues. Not in the picture, but below that graph they have pie graphs showing the top access points, top SSIDs, and top clients as well as lists for top operating systems and top applications. Sadly even though we do have cloud supported switches none of the homepage information is really related to them.
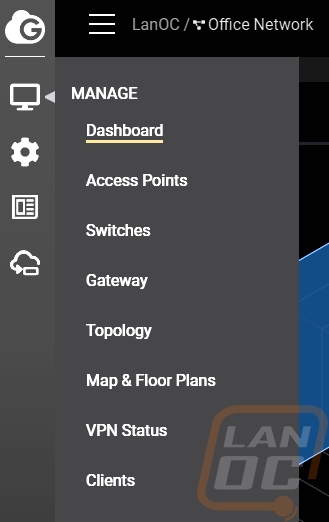
On the left, the menus drop down when you mouse over them and the two main menus are the top two. The PC-shaped icon is the manage menu which has options for APs, switches, and gateway that all will open up a page with a list of your devices of that type. You have the topology page which shows a basic topology of the devices hooked up, pro subscription users can also turn on an “other devices” option which I thought with a switch like the ECS1552P would show all of the connected devices but it does. In fact, turning that on only showed a few devices. It seems like a missed opportunity to not show the connected devices on switches and access points or maybe have the option to add things manually so you can map your entire network. The gear-shaped option is a second menu which is all for configuration. It has the same options but mousing over things like switch, gateway, and access point have more dropdowns that open up for each. These are your settings pages, for example, for an access point, you have an SSID page and radio settings. Switches have “system and protocols” and one for templates which is pro subscriber only. There are also pages like the VLAN page which tie into everything.
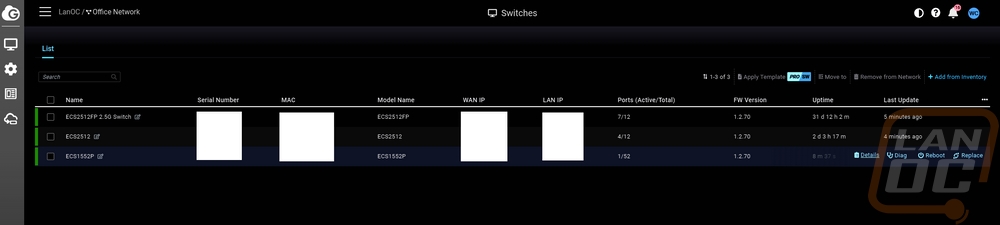
Opening up our switch list we have the ECS1552P as well as the other EnGenius Cloud supported switches that are on our network. This lists out things like the serial number, IPs, and mac addresses which for security I have blocked out. You can also see the uptime and number of ports and devices active. Mousing over a switch also opens up options. You can open up a details page, diagnostics, reboot, and replace.
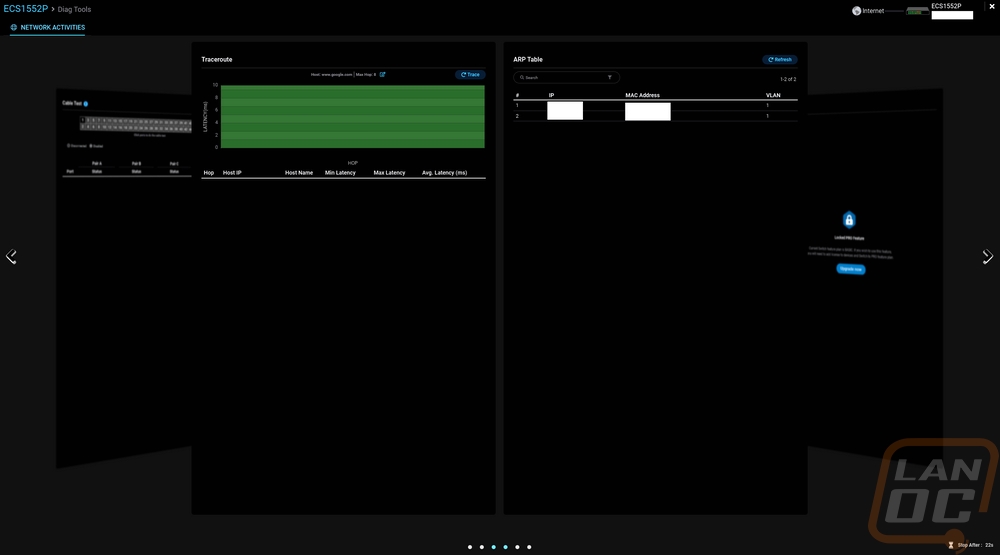
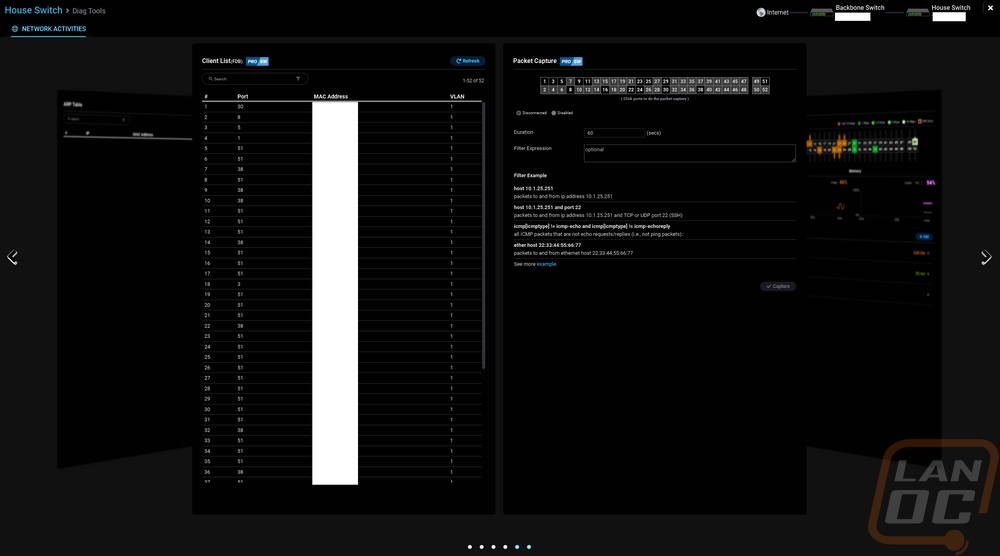
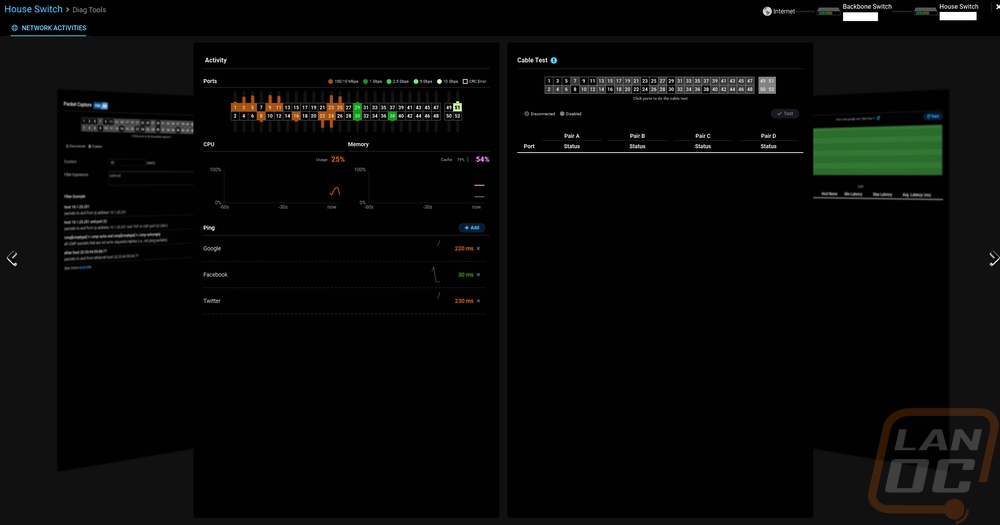
The diagnostic page opens up into a full screen page with flip through pages and is where EnGenius has hidden away a few tools for pinpointing issues. You have a page where you can run a traceroute which also graphs the results out, an ARP listing page, a client list that lists each MAC address that has connected to the switch including what port it was plugged into. The client list is a pro subscription-only feature sadly but it would be nice if your port labels were also listed here, I’ve gone through and tagged each of our ports to what outlet around the house it is plugged into knowing this info could save trouble pinpointing why you have X number of devices that have plugged into one port. Also a pro feature but they have packet capturing as well. You can run cable tests and there is also an activity page that has CPU and memory graphs, graphed out pings to different websites, and up top a picture of all of the ports with bars indicating the port activity and color showing the connection speed. This is the one tool that I think you shouldn’t have to go to the diagnostics page for as it would be great information for your Cloud landing page.
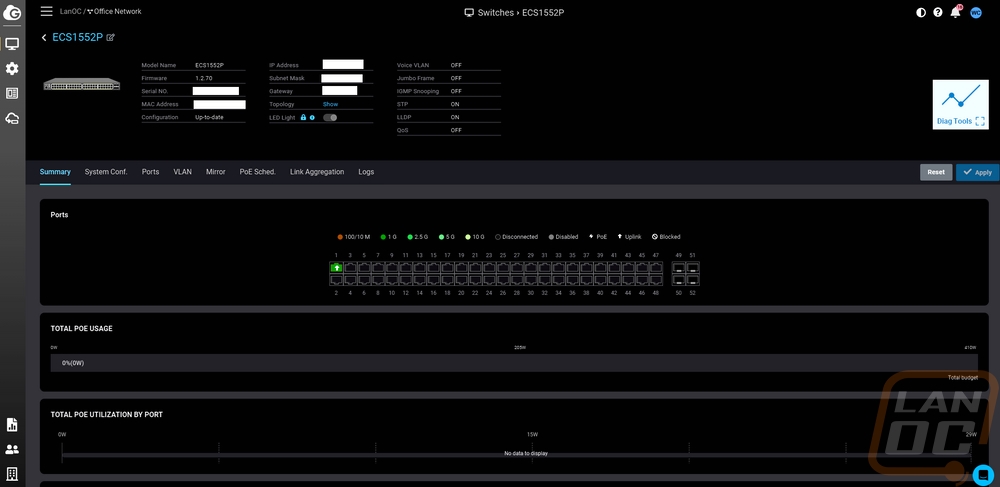
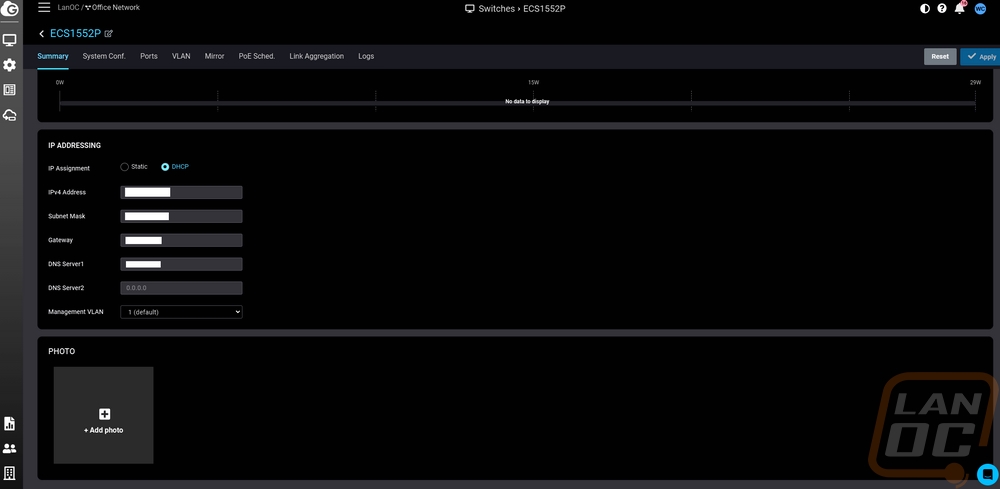
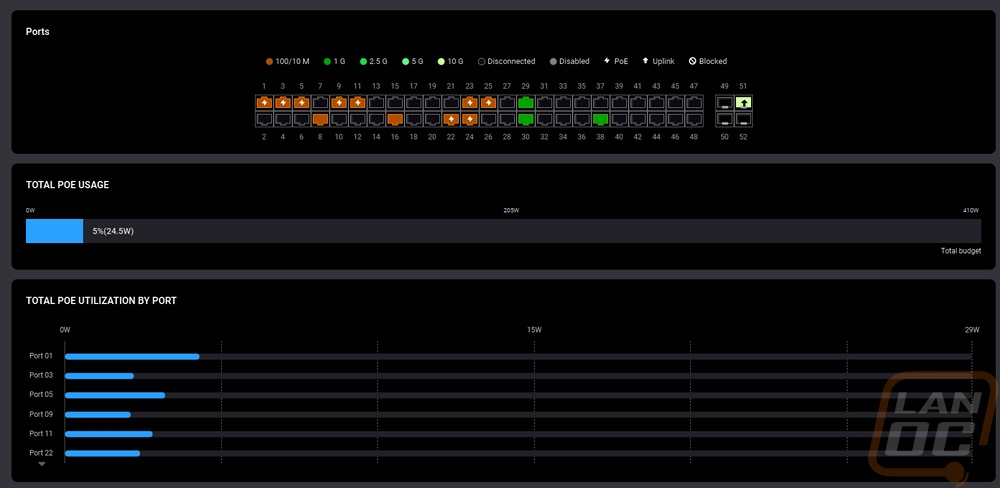
Opening up the details for the ECS1552P opens up a page which has some of the key settings and information up top including your IP address and MAC address. Then below that you have a picture of the ports showing any port with an active connection and its current connection speed. Having that port activity here would be nice as well. Below that you get a total PoE usage and a bar graph below that showing how much power each device is using and what port it is on. Below that you can change the switch to a static IP if needed and add a photo of the switch location or see photos to help find it.
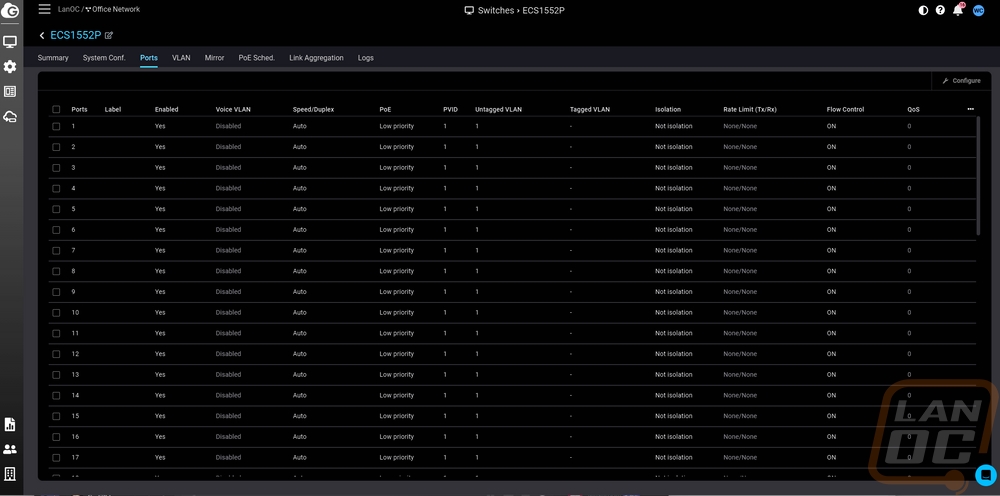
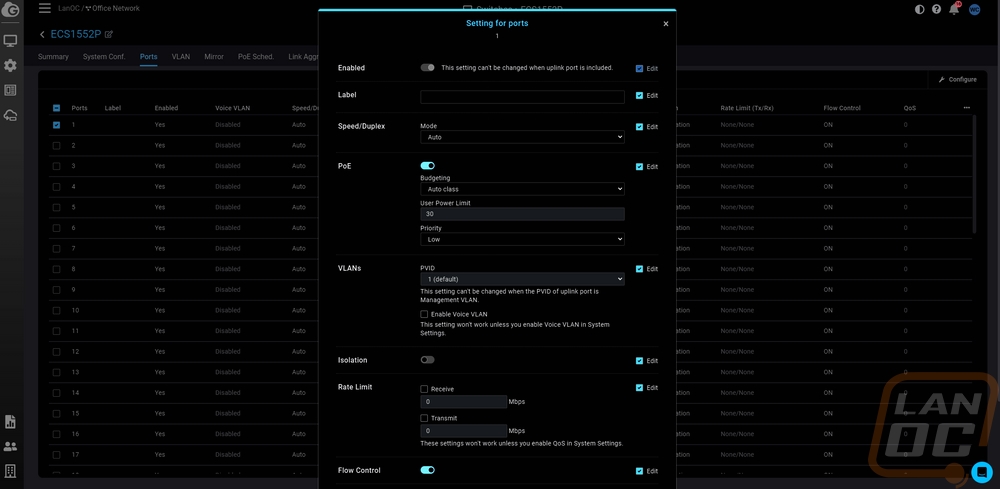
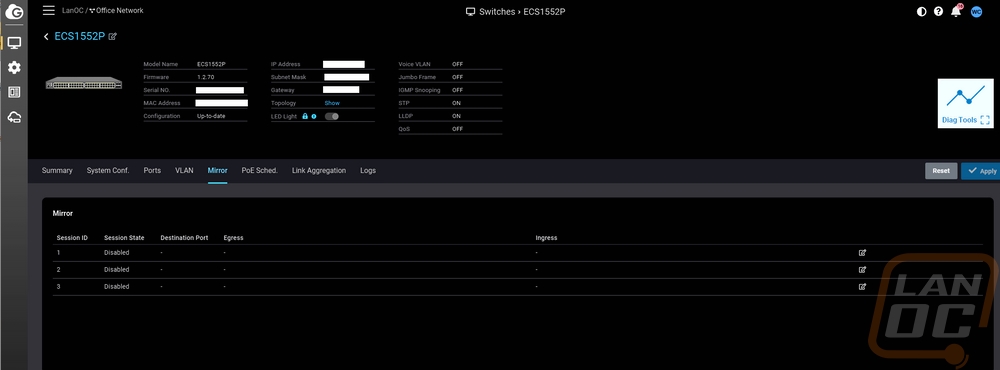
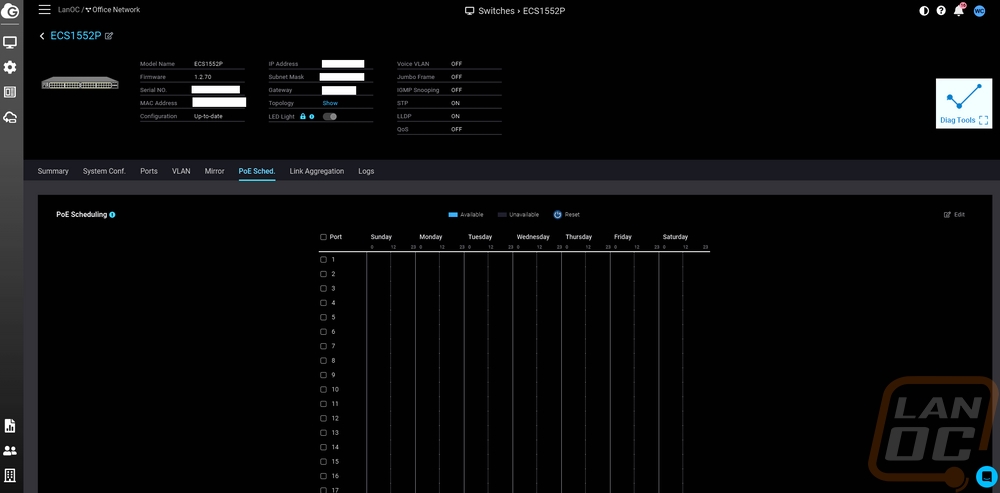
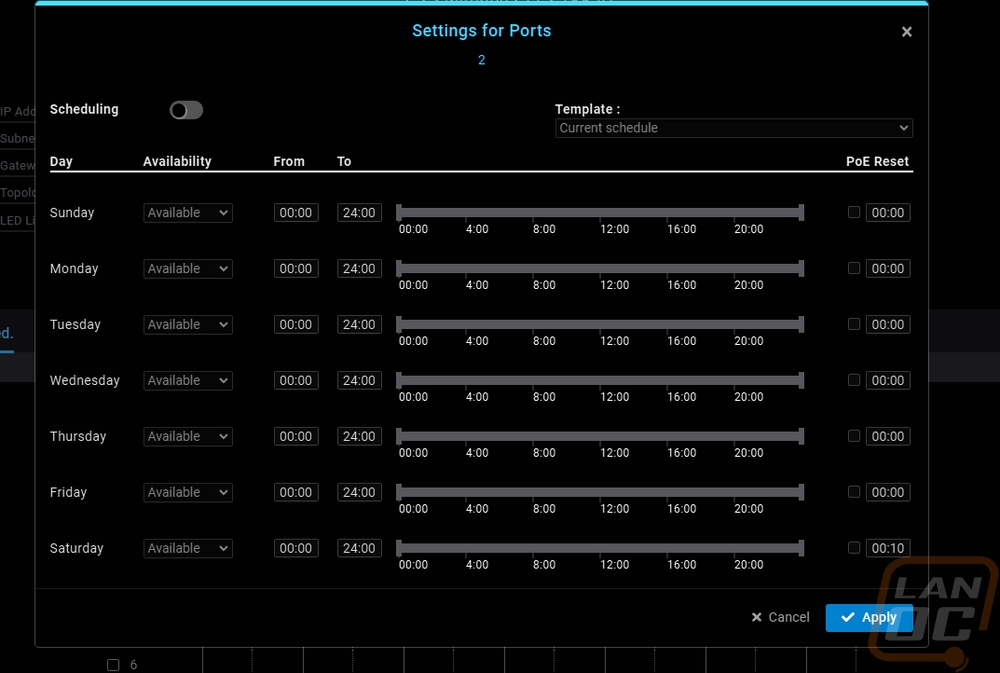
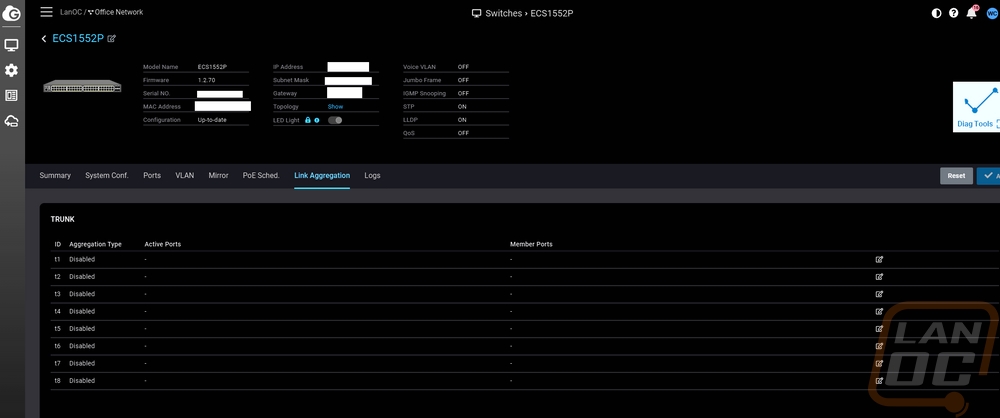
The details page has multiple tabs and the first is a system configuration tab. This isn’t the settings for your entire network, just to this specific switch so any changes here will override your network-wide settings but you can turn on QoS, IGMP, Jumbo Frames, voice VLAN, LLDP, etc. Down at the bottom, you can also turn on the web interface for the switch which you will need to turn on if you want to get into those settings which I will show in just a minute. You have a posts page which lists out every port, the main page shows settings like PoE priority, rate limits, and more. You can click on one or more ports and open up a port setting menu and change these settings to force a port to a specific speed, isolate it from the network, etc. This is also how you can label each port as well. The VLAN page just lists off the network VLANs that you have and you can add them and tag specific ports to that VLAN. The Mirror page slows you to set up Port Mirroring to copy packets from one specific port to another. The PoE scheduling page lists out all of the ports and you can schedule what time of day or days that port will be powered up. You can also set a reset time at a specific time on any or all days. This can be helpful to reset a device to keep it fresh and the scheduling can turn off devices when you are out of the office or the other way around. For example, maybe you don’t want PoE cameras on in some areas when you are there or if your access points aren’t EnGenius Cloud supported you could turn them off outside of business hours to help secure the network. The Link Aggregation page is where you can pair up specific ports for LACP or static link aggregation. Then the last page is a logs page that will list off switch firmware updates and power cycles.
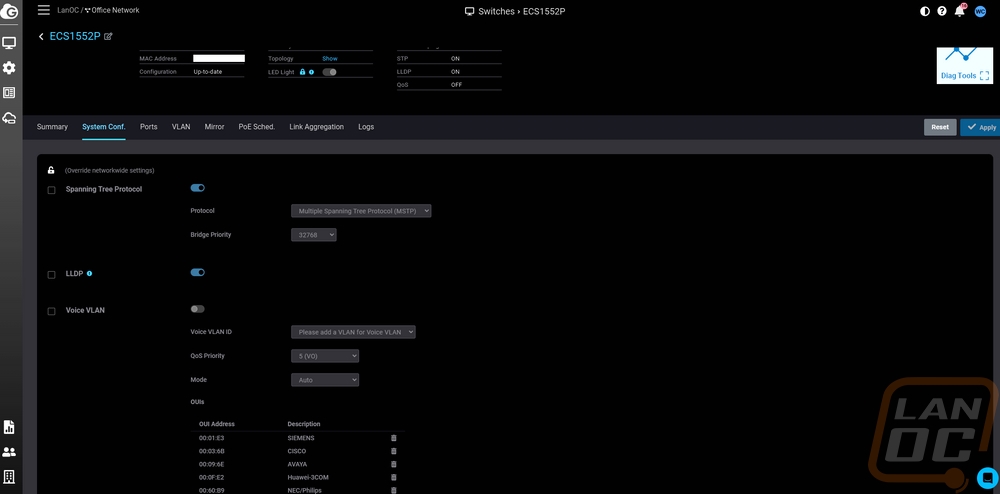
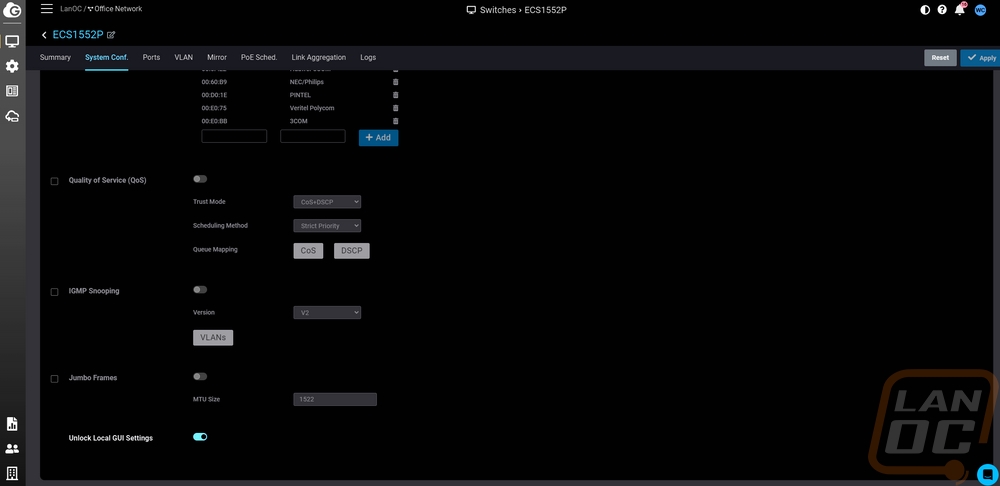
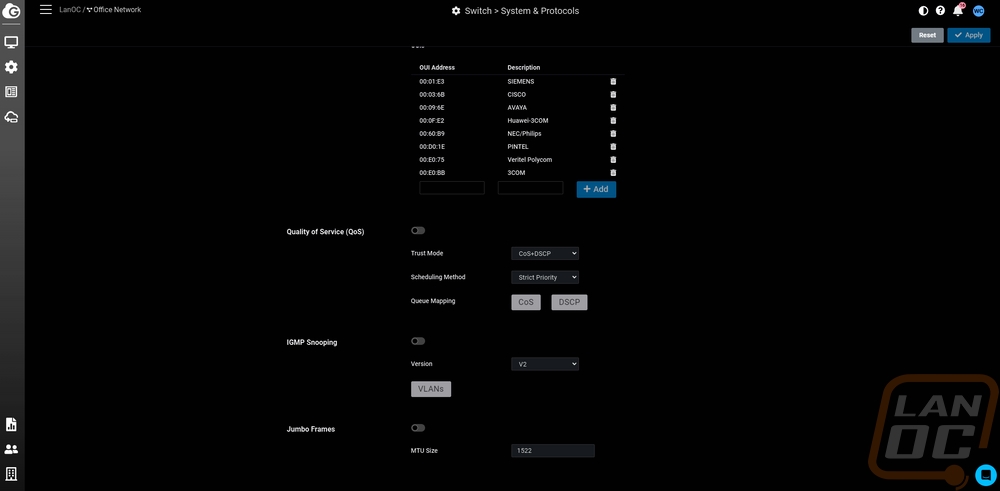
Under the configuration menu, the switch option has the system and protocols page. This is your main network settings for all switches. All of these settings are going to look familiar because these are the same settings on the switch details page. Only any changes here change the setting for ALL switches you connect to the network. You have Spanning Tree Protocol, LLDP, Voice VLAN, Quality of Service, IGMP Snooping, and Jumbo Frames settings each with a few sub-options as well.

For most people, the EnGenius Cloud interface is all you will need. But the ECS1552P does have its own web interface as well just like any other Layer 2+ switch would have. The cloud interface gets you access to some of the switch features but there are other things hidden in the web interface as well.
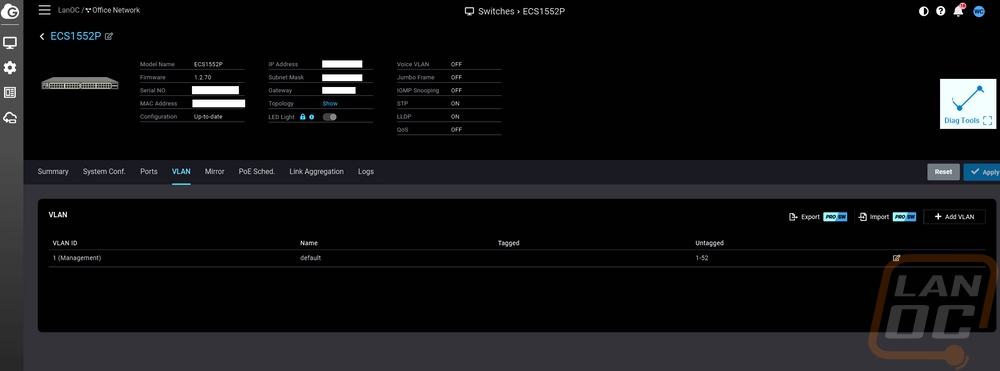
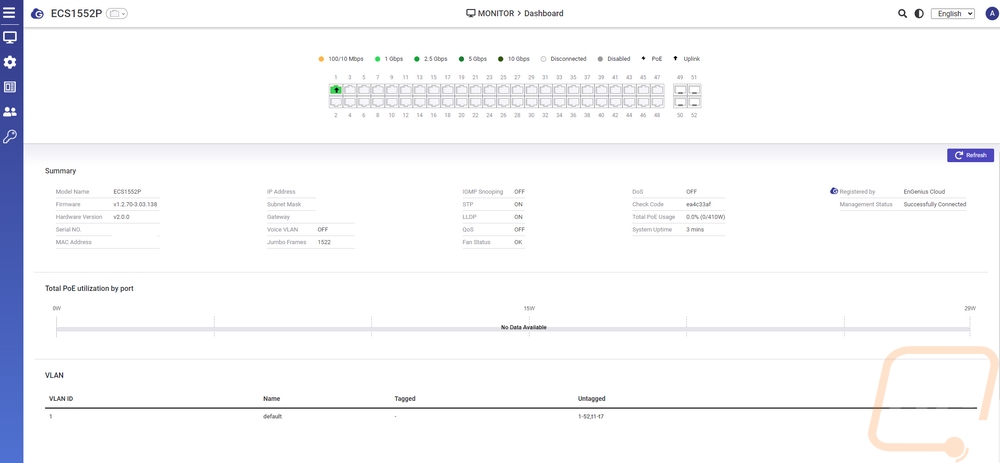
The landing page once you get signed in is the dashboard and like with the details page on the cloud interface this has a line drawing of the switch up at the top which shows the current status of each port including color coding the connection speed and showing which are using PoE and which is the uplink to the rest of the network. I took most of the software images before getting things hooked up to our network so we just have the one port hooked up here. Below that you have a list of some of the main feature settings and things like the IP address and MAC address. Below that you have a breakdown of the PoE use by the port in bar graphs and at the bottom a lit of the VLANs. On the left, the web interface looks a lot like the EnGenius Cloud with its menu icons only mousing over them opening up more options specific to the ECS1552P.
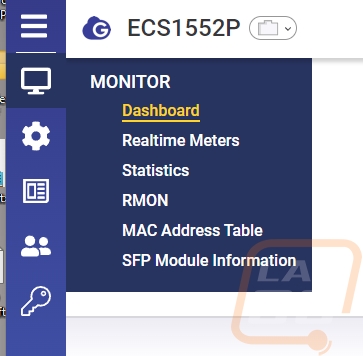
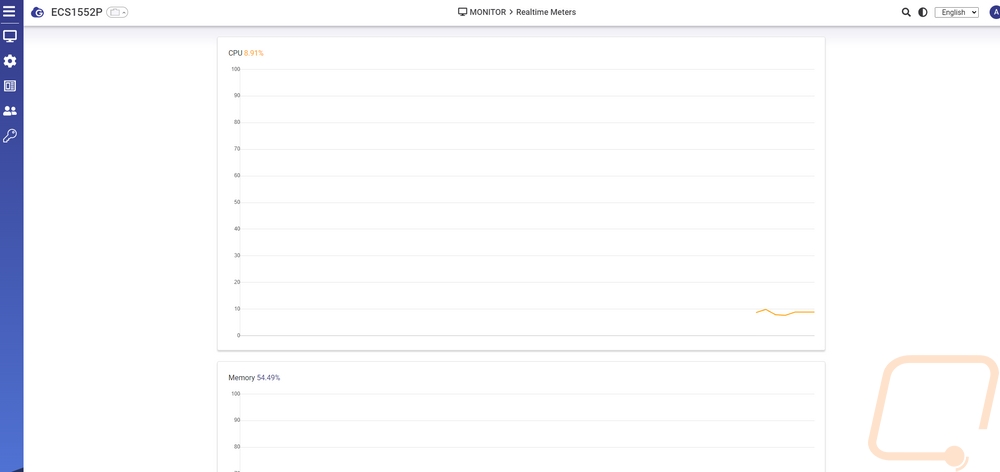
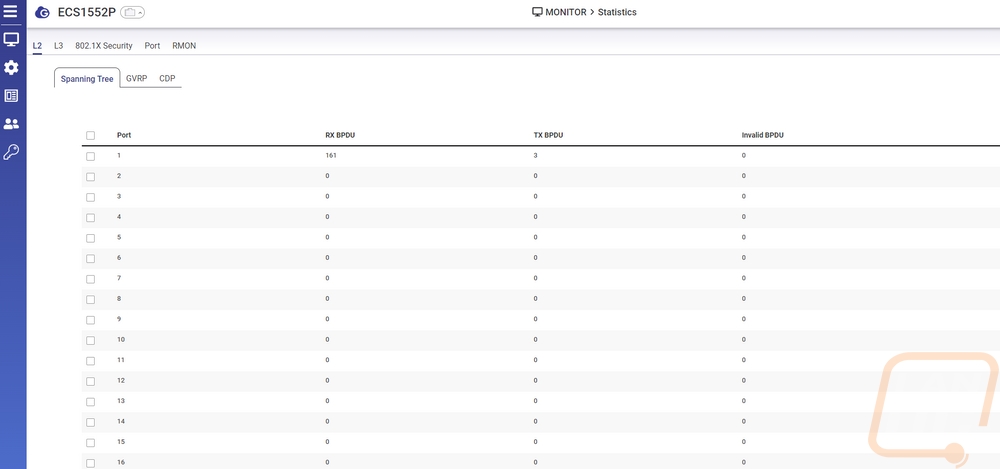
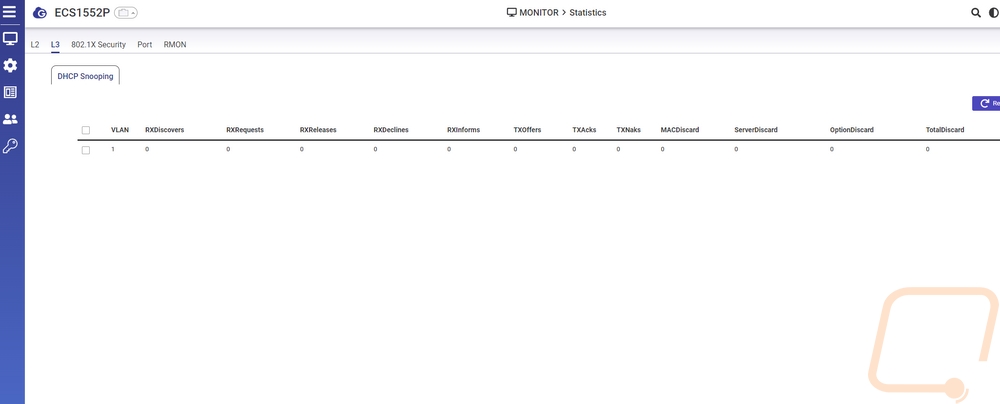
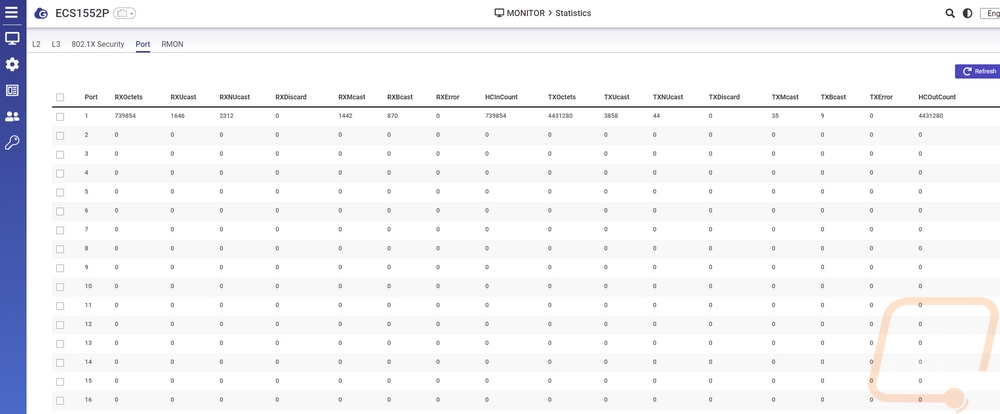
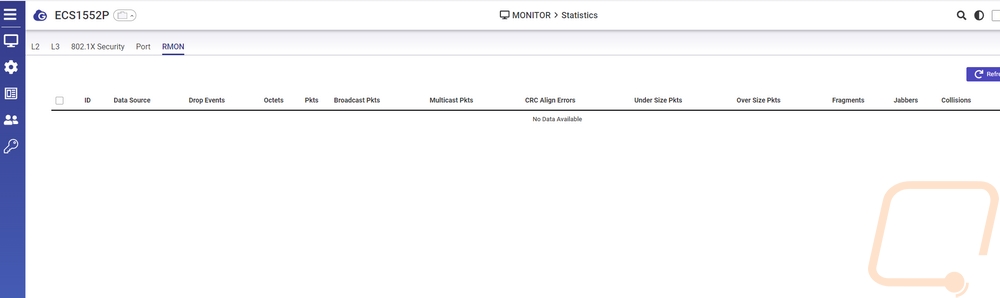
The monitor menu icon has a few options under it including a page that graphs out your real-time meters that show your PCU usage and memory usage. The statistics page breaks things down by layer 2, layer 3, 8702.1X Security, Port, and RMON. Clicking those then opens up a list by the port. For the Layer 2 info for example we can see the BPDU information broken down by transmitted, received, and invalid per port layer 3 dives into DHCP snooping. Then the port page shows the packet counts.

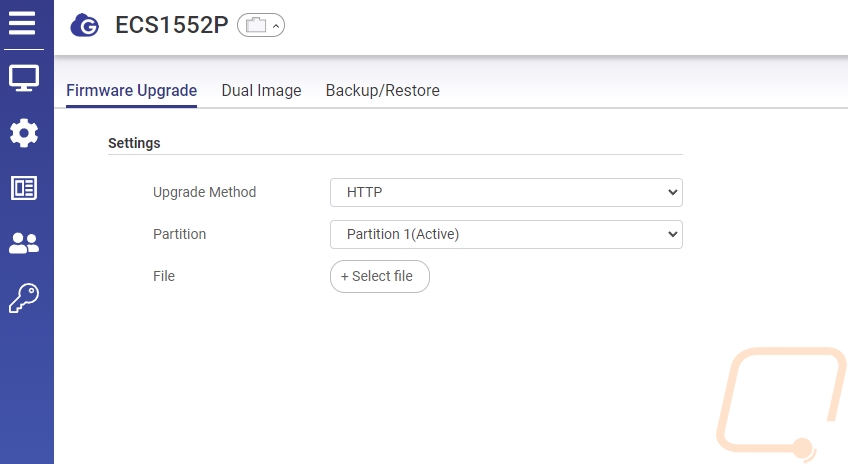
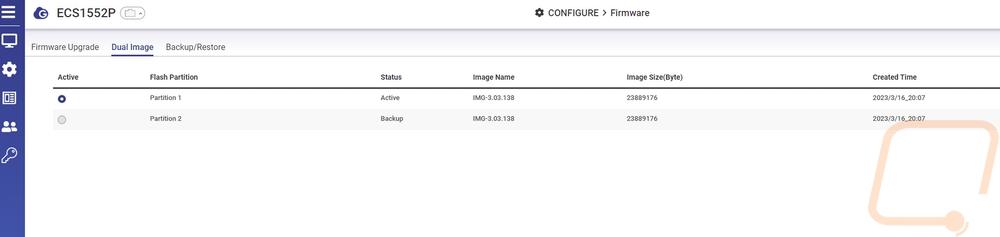
Under the configure menu option you can upgrade the firmware manually which EnGenius does have on their website and it lets us see the dual BIOS images and switch between the two if needed. You can also backup and restore system settings here.
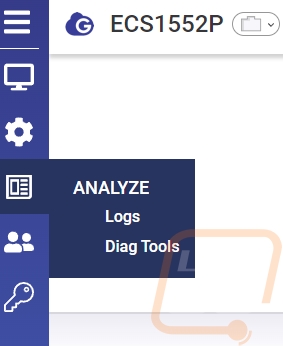
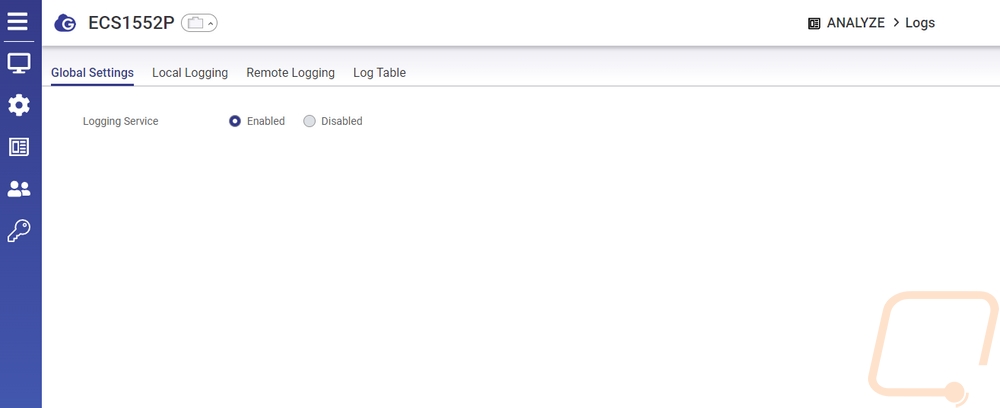
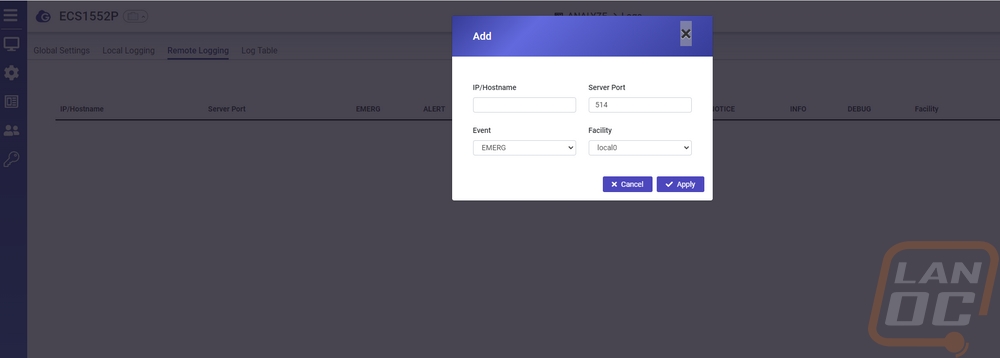
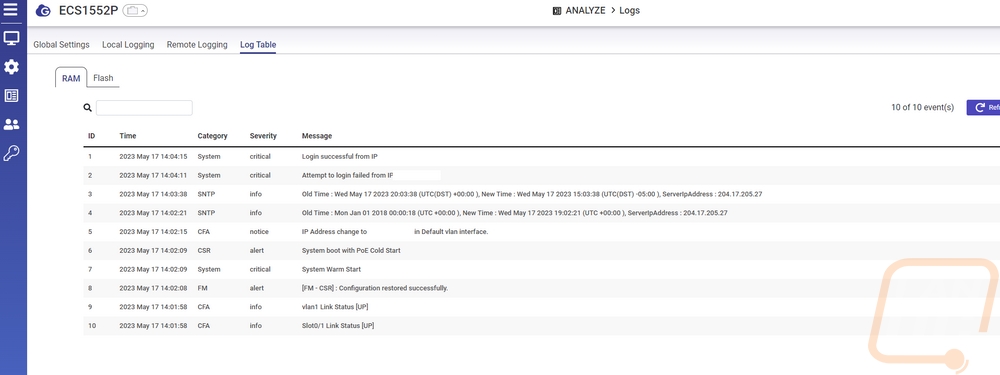
The Analyze page has a whole section dedicated to logs whereas the Cloud just has basic boot, reboot, and firmware updates shown on the logs. Here you can get into the full log table and see each login, IP address change, and more. You can turn the logging service on or off and you can also set up remote logging.

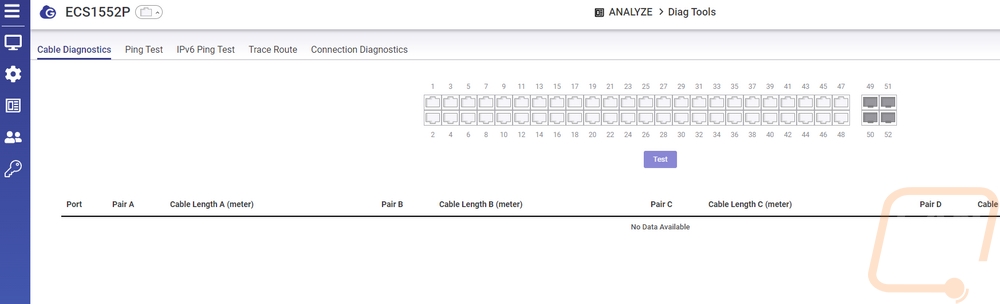
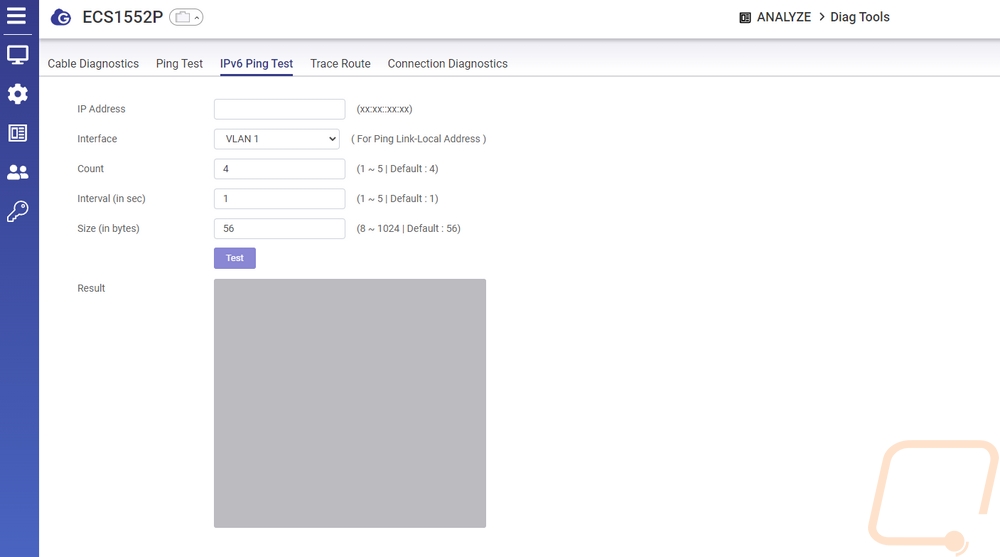
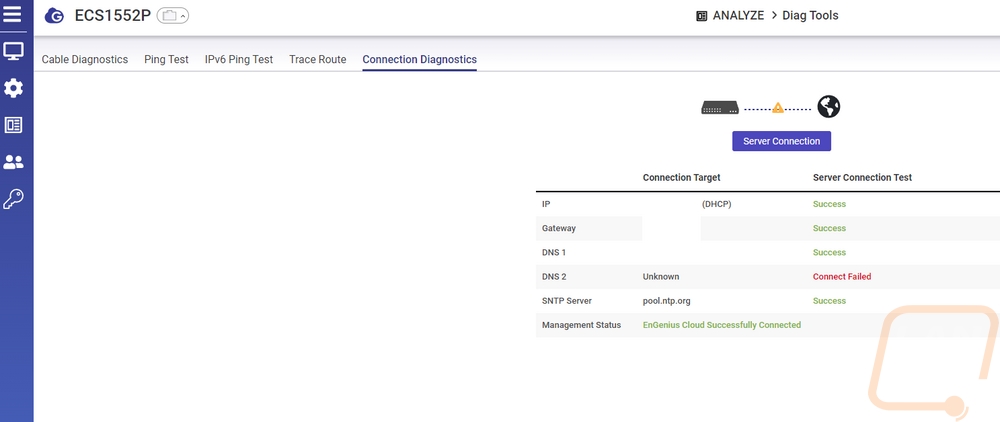
The web interface does have its own diagnostic tool section as well. They just don’t have it opening up to a full screen and each is under its own page. The cable test is there, ping test, and traceroute. There is also a basic page that just tests the connection to servers and checks the cloud service connection.


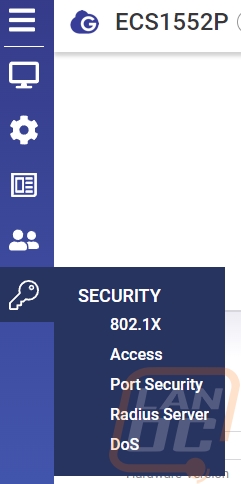
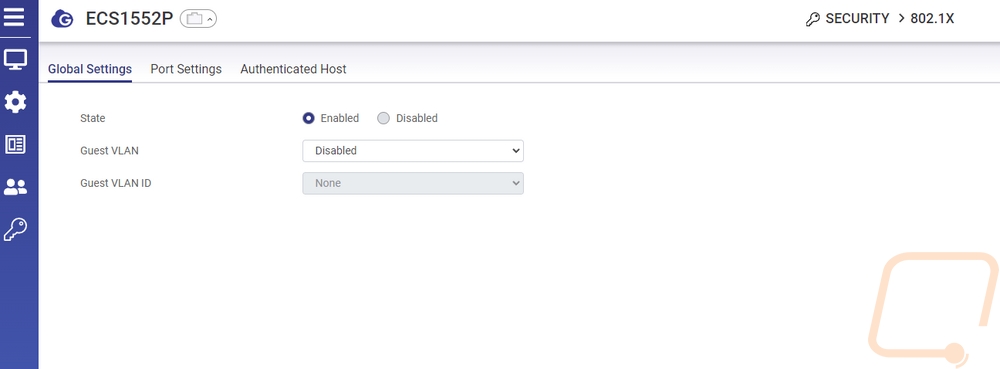
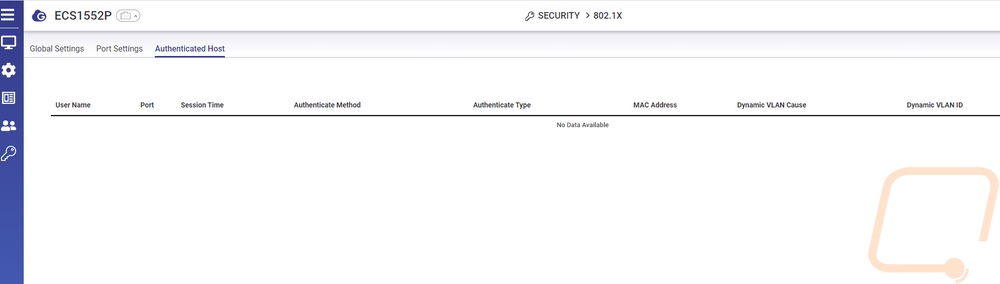
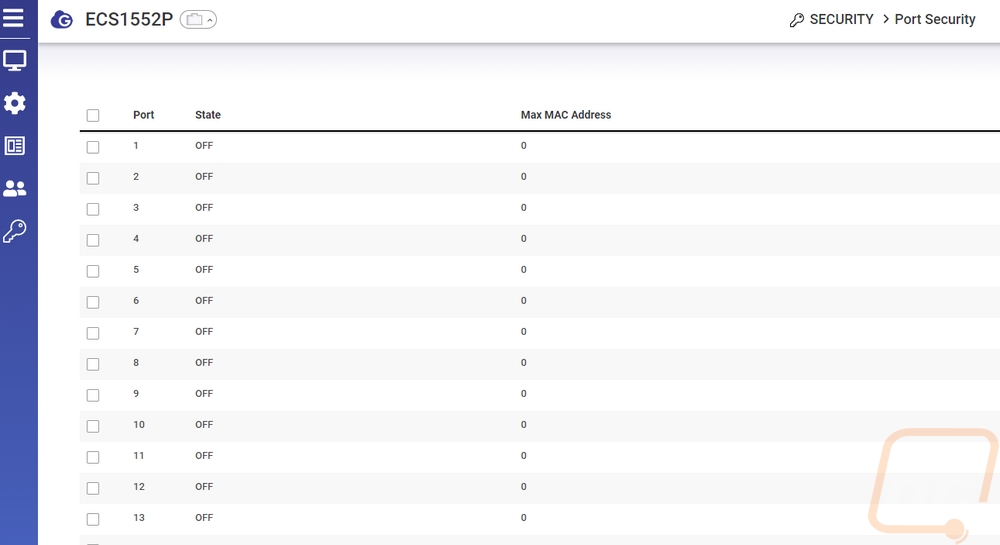
They also have a section focused on security this starts off with the option to set a guest VLAN. The port settings let you set up a quiet period, set up the reauthentication period, and even turn on MAC Authentication Bypass and use a radius server to authenticate your device's MAC address before it will allow traffic.

Performance
In my opinion, a majority of the performance of the ECS1552P is in the software experience and we have covered that. I did want to touch on a few other performance aspects, however. To start things off, with the ECS1552P having three 40mm fans I did want to check out the noise levels. This switch is designed to be rack mounted and typically noise isn’t much of a concern, but for some businesses you may have these mounted in a closet near offices. The fans on the ECS1552P boot up initially at 100% fan speed, as you would expect but they do settle down to a much more reasonable level. At 100% fan speed they were running at 54.5 db but this dropped down to 42.3 db in normal use. For reference, our ambient noise level was 33.6 db at the time of testing. I would be concerned with the noise if the fans were running at their 8000+ RPM all of the time, but the 42.3 db reading in normal use is great. I wouldn’t run the ECS1552P in the middle of a noise-sensitive area, but inside of a rack, it is going to be quieter than most of the other devices.
The 410-watt PoE capacity is well beyond what I will end up needing in our situation which leaves plenty of headroom. Between the house and the office, we run three PoE-powered access points and currently nine PoE-powered IP cameras but that number does change. Some of the access points run on our backbone switch to get a full 2.5G connection speed but the cameras are connected to the ECS1552P and I was curious what they were pulling. In total, the nine cameras were pulling just 24.5 watts with one camera edging up in the 4-5 watt range. Ironically that is an older camera with the newer cameras pulling even less. This hardly put a dent in the wattage limit on the ECS1552P. But now that we have PoE available at any port I can start considering more PoE-compatible options like IP Phones and even Raspberry Pis with a PoE hat for a few small functions around the house/office.
I did also do some standard speed tests on the ECS1552P as well but with 48 ports being Gigabit that is going to be the biggest limitation. In my tests across the Gigabit ports, I was seeing 942.5 Mbits/sec average file transfers. When using two SFP+ ports with RJ-45 copper transceivers I saw 9542 Mbits/sec average. My biggest concern and something I can’t easily test on the ECS1552P is the overall switching capacity, but with that being 176 Gbps it is beyond the capacity of the 48 Gigabit ports and the four SFP+ ports combined.
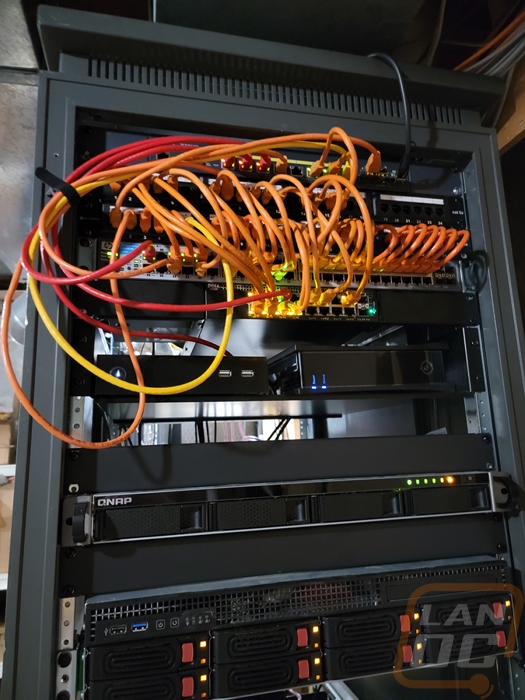
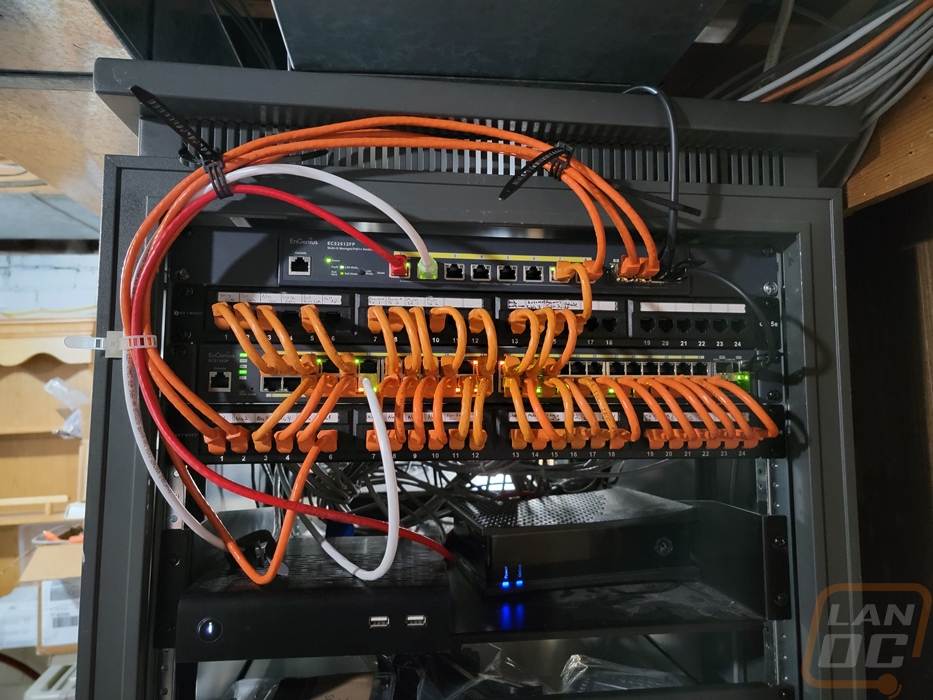
For my specific situation, the upgrade to the ECS1552P allowed me to cut out the second switch for our PoE devices, integrate ALL of our wired network into the same EnGenius Cloud software to make managing it easier, and it allowed me to tie the main house switch into the network backbone at 10Gbps speeds with the SFP+ ports where my old switches both could only connect back at Gigabit. It also helped further clean up my rack which has been a project I’ve been working towards starting during the initial Covid shutdowns. Our old setup had a few servers and NAS that were picked up before having the rack so as I have upgraded, combined, and rebuilt those systems I have moved to rack-mounted devices. But with all of that and a slow expansion of things like adding a few access points and cameras the wiring has been a mess and the old multi-switch setup didn’t help with that. As you can see below, I’ve finally been able to shorten things up and clean up the wiring between the switch and patch panels. That includes being able to move the switch in between the two patch panels for shorter and cleaner wiring as well as finally cleaning up a few of the wires that are longer as well.
Before
After
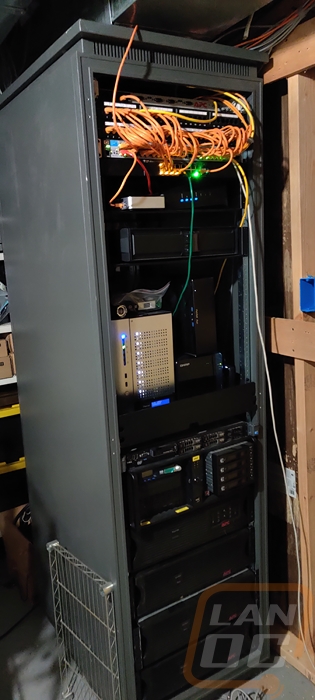
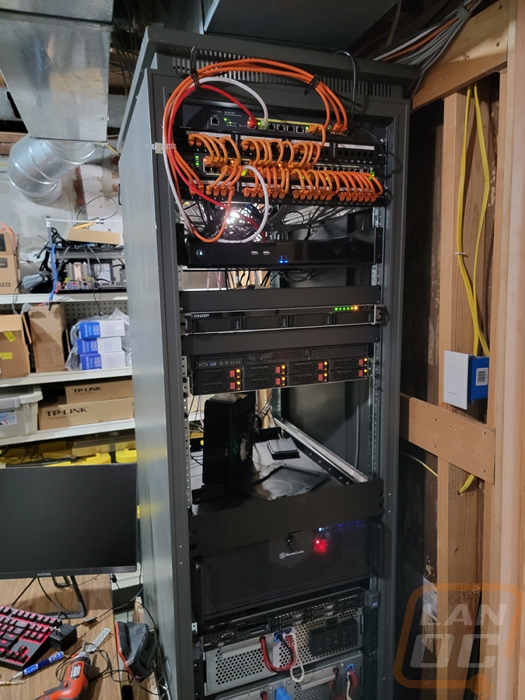
Because this has been an ongoing project for a while now including multiple project builds to replace random servers and NAS here is a before and after of the rack itself. Before we had a bunch of random NAS and our security server all sitting on a drawer. Now things are cleaner and everything is racked except the old security server that I just need to remove. Of course, our UPS’s just died and there are a few wires that need to be added to our patch panels (the white wires) so it is never finished. But with EnGenius’s help, this is a big upgrade.
Before
After
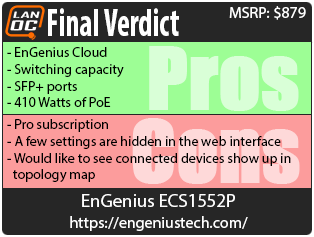
Overall and Final Verdict
In the past, we have had a few of EnGenius’s faster switches in for testing, and having 2.5G ports and faster is a lot more exciting than the ECS1552P’s 48 Gigabit ports but where they differ is the ECS1552P is a workhorse. Not every connection needs to be the fastest, even with the ECS1552P as I have it installed right now there are multiple connections that I have devices that only need a 100 Mbps connection. The ECS1552P stands out however because with all of that EnGenius has set the switch up with a solid switching capacity to fully handle things if all 52 ports (including the SFP+ ports) are all maxed out. Between that and having the four SFP+ ports to be able to tie the ECS1552P in with the rest of your network at 10G speeds helps avoid those bottlenecks and with four SFP+ ports you do have a few connections available to tie in one or two servers or important PCs in at a faster speed. In our case, most of that is handled on the backbone, but we are tied into that at 10Gbps. The ECS1552P also has PoE+ capabilities on all 48 of its ports. For our specific situation, this allowed us to cut out an extra PoE switch that was used just for cameras but it also means that in an enterprise application, you can deploy PoE powered devices like IP Phones or thin clients anywhere. This also helps with battery backups, you can keep cameras up and running through an outage with just the UPS at the switch, not a smaller UPS near each device. The 410 watts of total power is ideal for cameras, our IP Cameras all fall in the 3-5 watt range and with 410 watts the ECS1552P can handle 8.5 watts average across all 48 ports. EnGenius does have a higher wattage model that increases that to 740 watts if you need more as well.
For me, as someone who is handling our network myself while also having other responsibilities the cloud functionality that EnGenius has tied in with the ECS1552P is important for me. I have the EnGenius Cloud web interface as well as their app to be able to monitor and handle things remotely. I’m not a big fan of the pro subscription that the EnGenius Cloud has integrated, obviously, the target audience isn’t a home user at all. But even in an enterprise environment, the pricing can start to add up quickly with each device costing $40 yearly. For the switches you aren’t getting much for that, the biggest feature for me at least would be Auto Cam Lifeguard which can power cycle a camera if it detects it has locked up. At least with the S series of access points, it makes sense that the pro plan is helping support the AirGuard functionality. You do get a year of a pro license with any device so you have time to get a feel for things to see if you need the functionality. This gets a little harder to deal with because as it sits the current interface is an all or nothing situation. So if half of your switches or access points have an active license but the other half don’t you have to either turn it off or on for them all and if you have pro on for expired devices they no longer get updates and for the switches, you lose the ability to even open up the diagnostic page because 2 of the 6 functions there are Pro only. I would like it if I could turn it on or off per device.
There are a few other areas where I would love to see the cloud interface improve even though as a whole I do like it. For the switches for example there are a few functions here and there that are only on their own web interface. I would also love to see for switches and access points all of the connected devices show up on the topology map. Utilizing the cool port traffic interface in the diagnostic page that shows which ports have the most traffic could be useful on the main switch detail page.
The EnGenius ECS1552P is going to hit the pocketbook hard as well with it being priced at $879. This is an enterprise 48 port PoE switch with four SFP+ ports so that isn’t completely out of line and a quick look on CDW has the TP-Link JetStream TL-SG3452XP V1 with a similar configuration at $939.99. So I wouldn’t consider it out of line, in fact, it is well below the Ubiquiti USW-PRO-48-POE which I would consider to be a direct competitor. Overall I like what EnGenius is doing, they have been reliable and easy to work with and they have been expanding their lineup both with the EnGenius Cloud enterprise lineup and the Fit lineup for small businesses and power users which helps keep more of your functionality all in the one interface.

Live Pricing: HERE


