
Performance
To get into performance testing, the first thing we have to check out is the software that controls everything. That plays the biggest role in your overall experience and what features you will have which with a product like the Uni Fan TL LCD especially makes or breaks everything. Both fans use the Lian Li L-Connect 3 software but it does use a different revision than past fans have used. I’m hoping after launch that will be combined but I know with the LCD on their latest AIO cooler they have a different revision listed on the website so we will have to see.
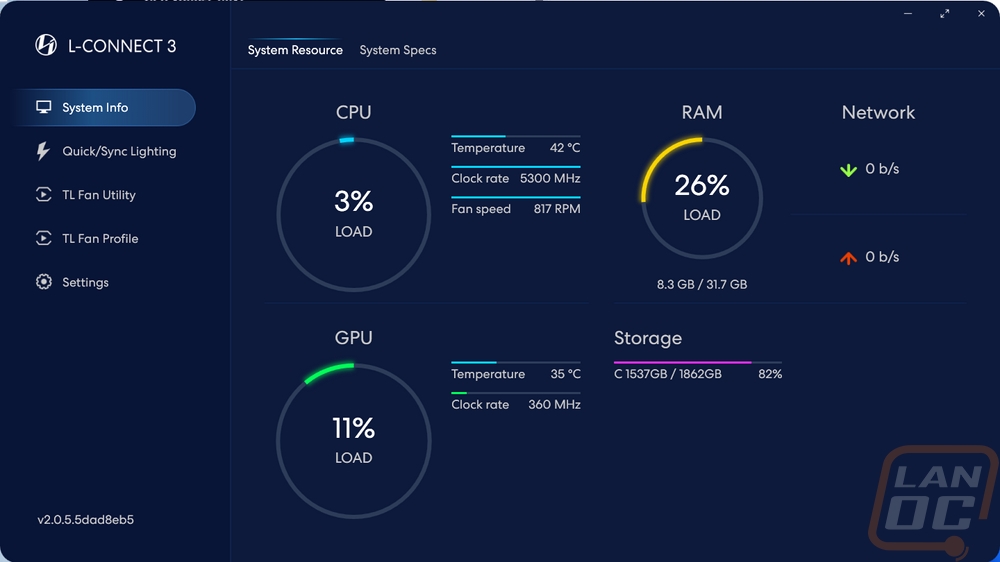
With the software installed the first page is the system resources page which has graphs showing your CPU, GPU, RAM, and Storage usage as well as temperatures, clock speeds, and fan speeds where they apply.
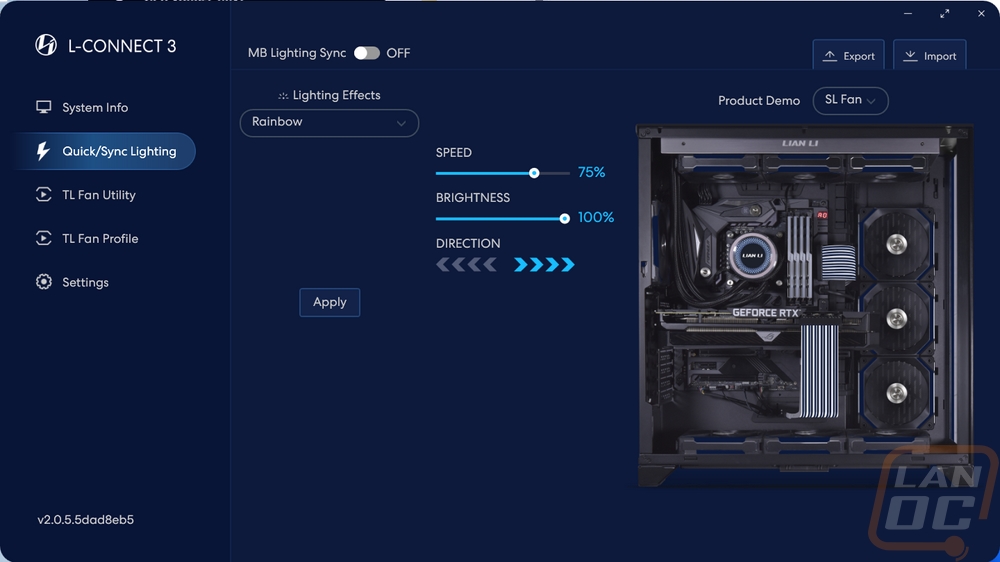
The quick sync lighting page is an overall lighting control page. This can be a little confusing but this lets you change to a few lighting effects along with their settings to adjust things like speeds, color, and direction all in one place to change all of your Lian Li controlled lighting. This is also where you can give up lighting control to your motherboard with the switch up top.
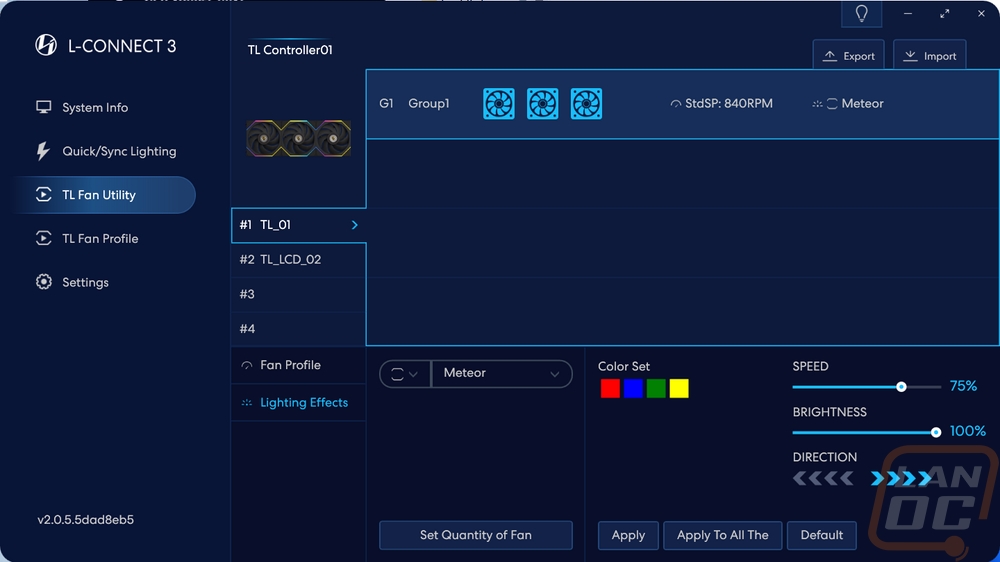
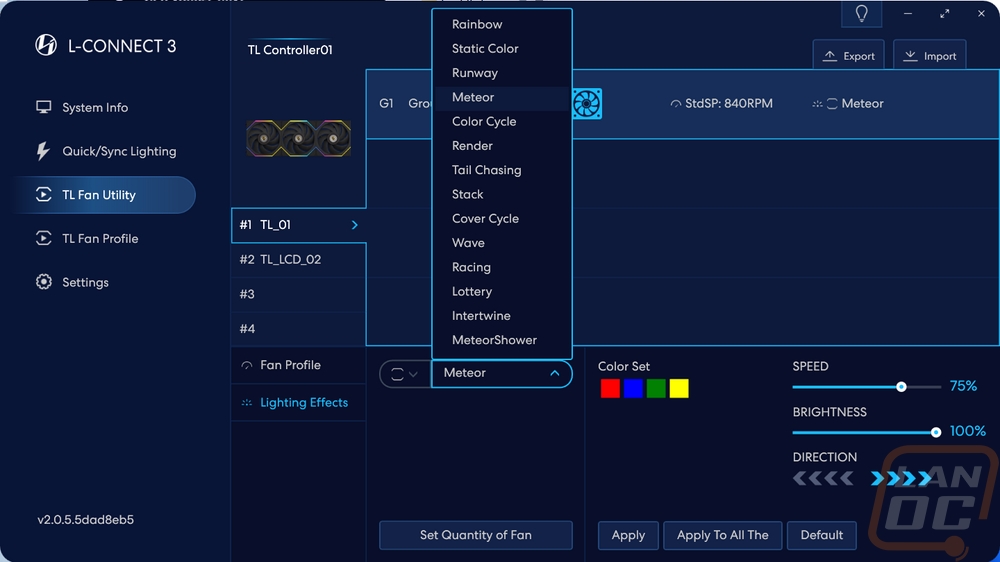
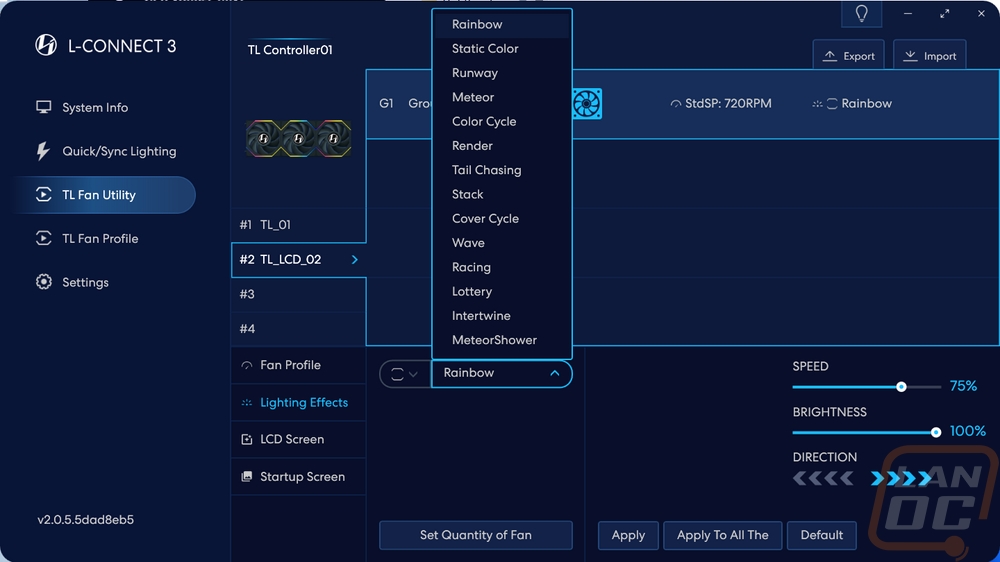
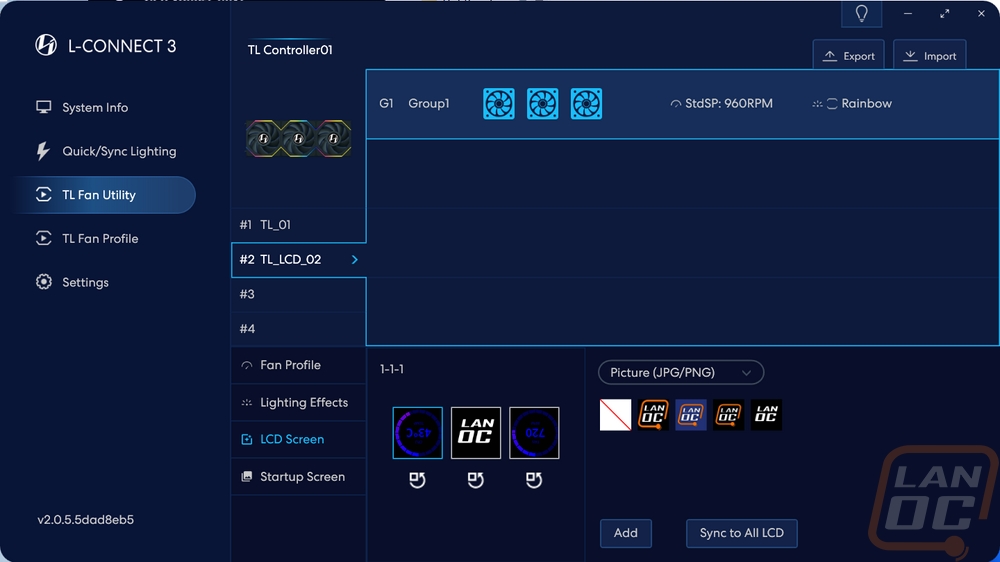
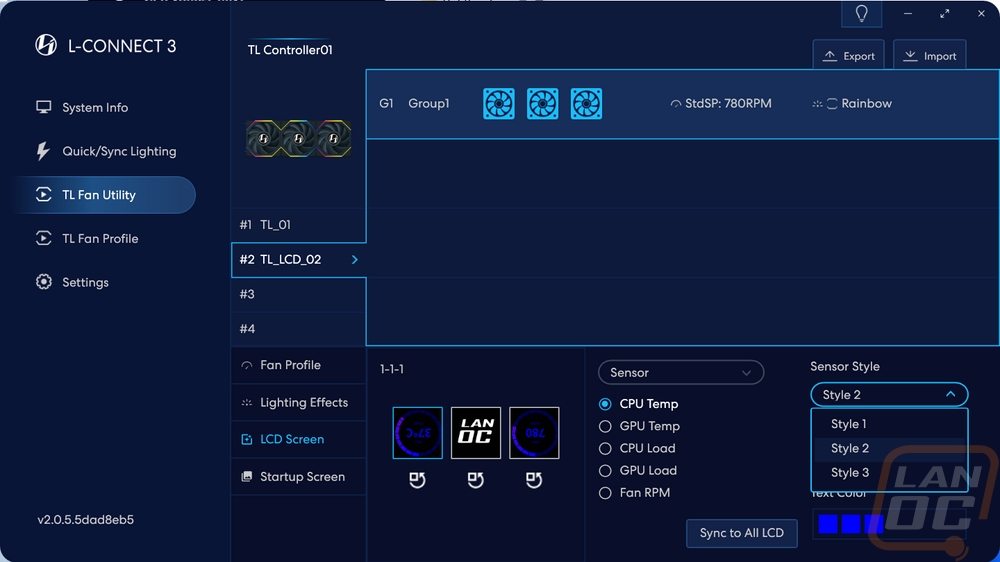
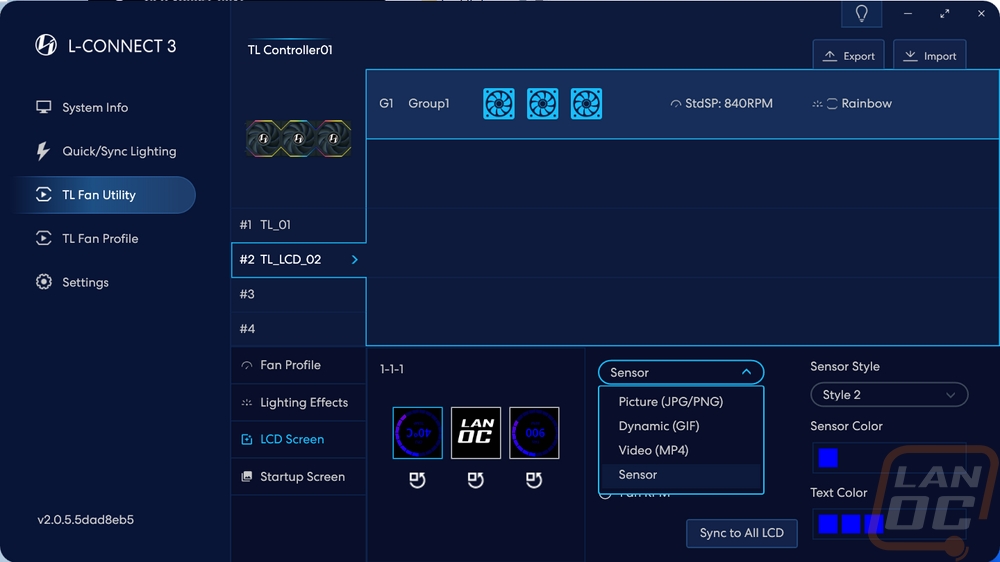
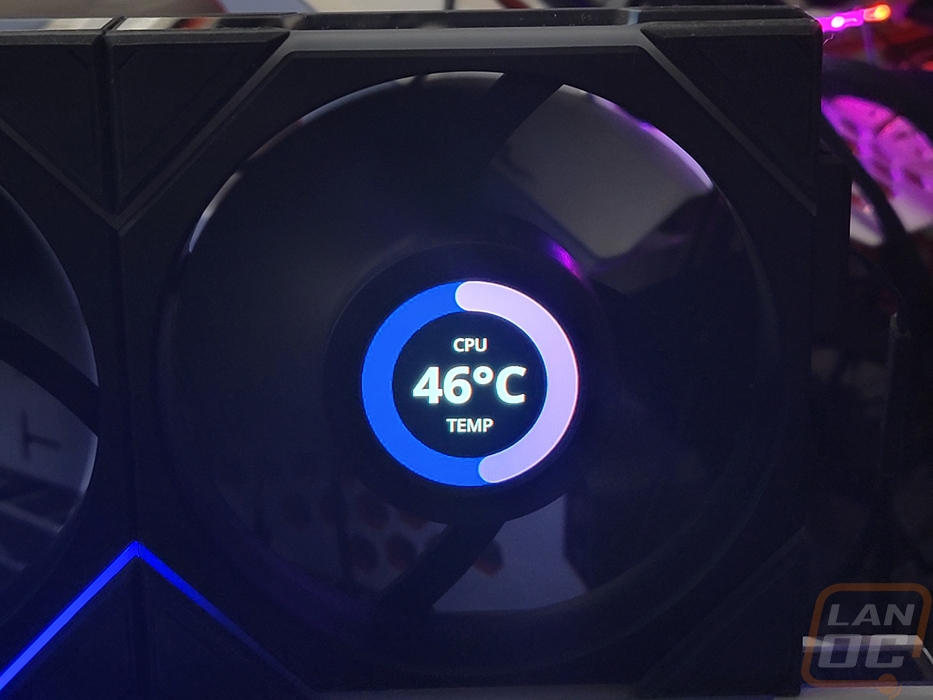
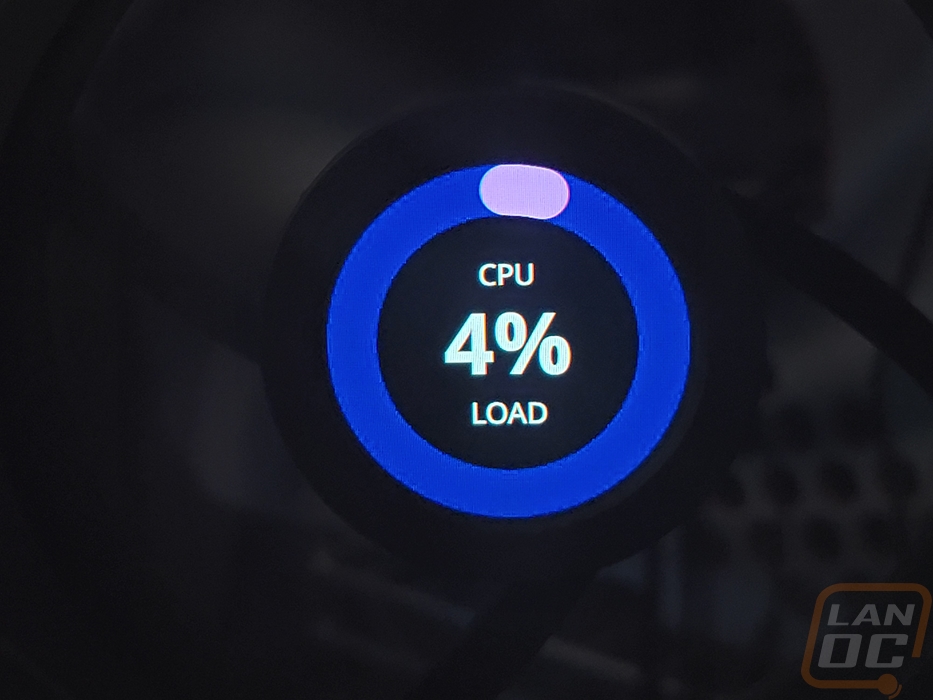
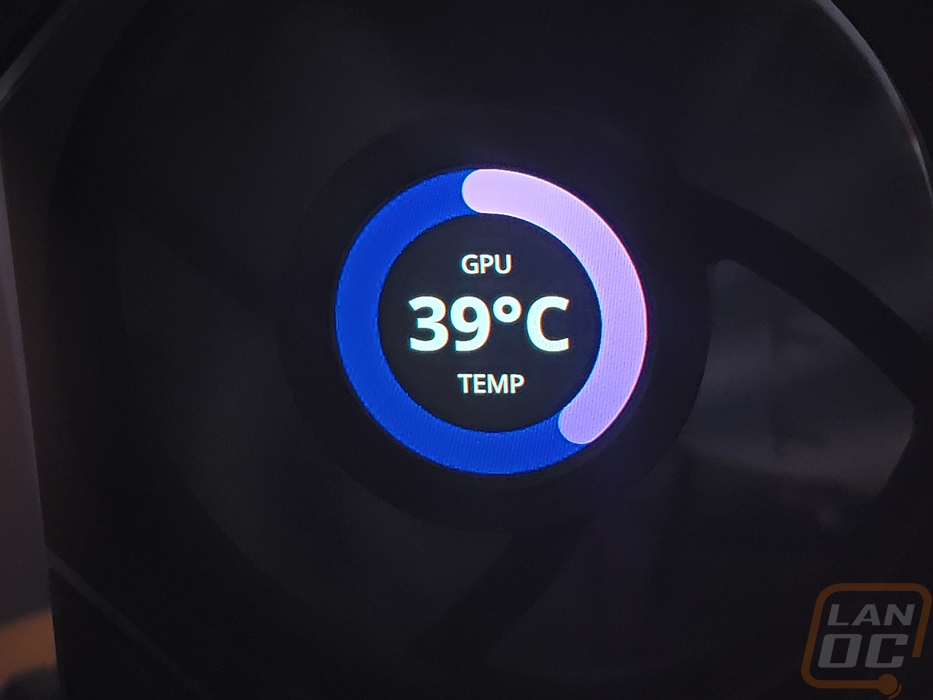
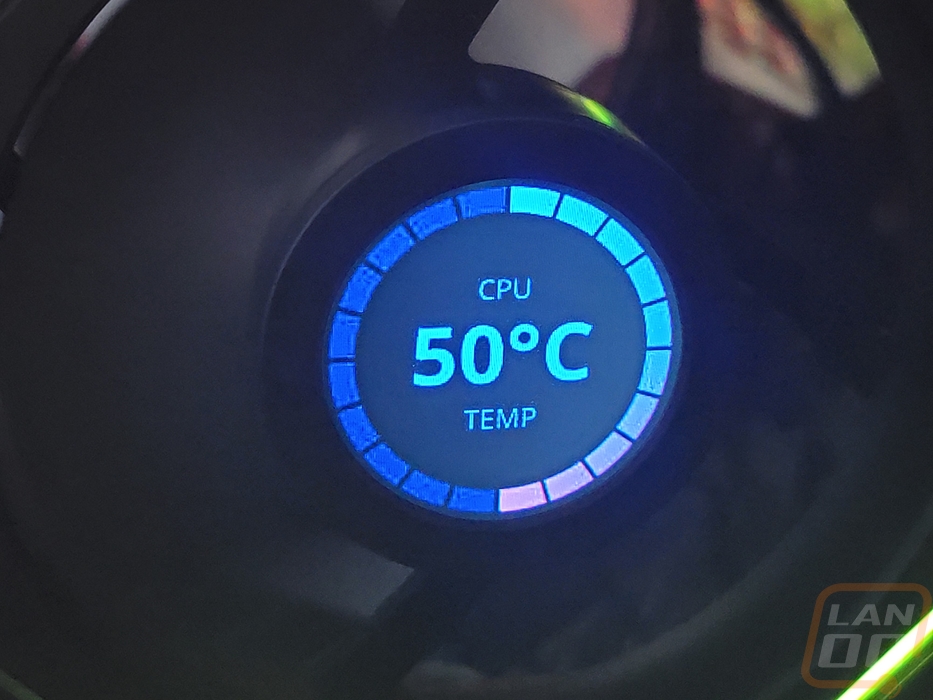
The TL Fan Utility is the first of two pages specific to controlling anything hooked up to the controller included with the triple fan pack. The first page is where you can change any of the lighting settings and also dive into controlling the LCD screen on the TL LCD models. In this case, I have both the triple TL LCD 120 fans hooked up as well as the three TL 140 fans so you can see the difference between the controls for both and how they are on two different channels. The main page here shows the number of fans on each and their current lighting and fan settings. Then down towards the bottom, there is a drop-down menu to pick from a long list of lighting effects and you can change the colors used, speeds, brightness, directions, and anything else. The same settings are available for the Uni Fan TL LCD fans as well. But those fans have two more settings pages over on the left. One for the LCD screen and another for startup. The LCD screen page shows the current effect, picture, or video being shown on each LCD in order. Below each preview, you can rotate the image to help line it up in your PC. Then to the right is a dropdown that lets you pick from pictures, dynamic or videos, and sensor readings. With the pictures and videos, you can upload your own designs. I do wish they had a variety of basic pictures at least, even the Lian Li logo that is run by default isn’t listed here. The sensor readouts let you pick from CPU or GPU temperature or load and fan RPM. You have three styles to the right to pick from but only two work right now and with those you can select the colors that it uses.
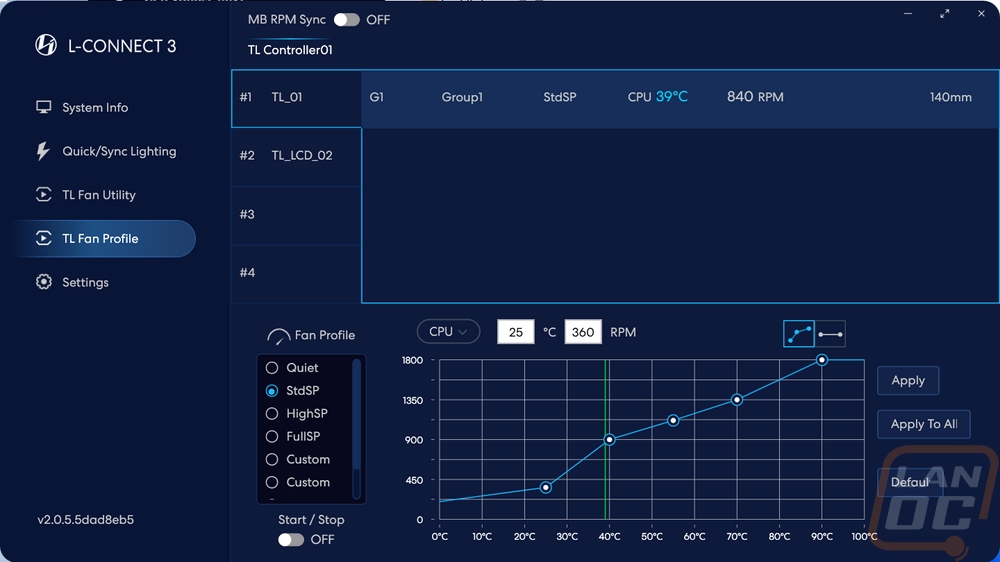
The last page is the TL Fan Profile. This is where you adjust the fan settings. You can turn on a start and stop which will turn the fans off at specific temperatures. You can pick what device the fans use to dictate temperatures which is nice. Everything uses CPU temps but if you have a good cooler your case most likely is getting more heat from your GPU. From there, you have a list of profiles on the left that you can pick including custom profiles. With custom profiles, you can set a speed all of the time or map out a full profile that best fits what you need. Then you can apply it to one set of fans or to all of the Lian Li controlled fans. Up top, you can turn on motherboard sync which will just do whatever your motherboard says to do if you would prefer to control everything from that software.
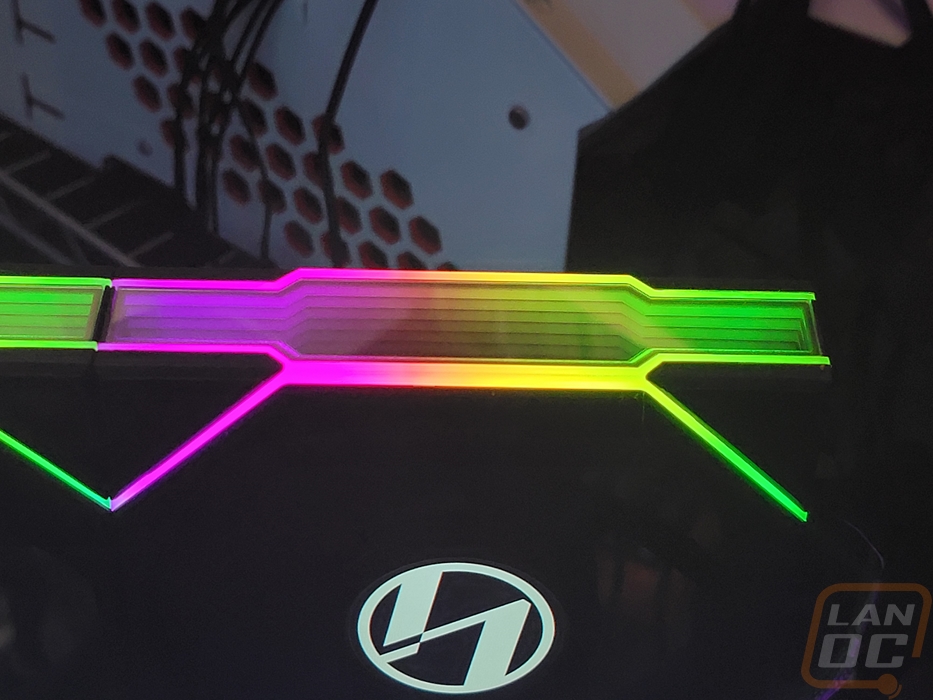
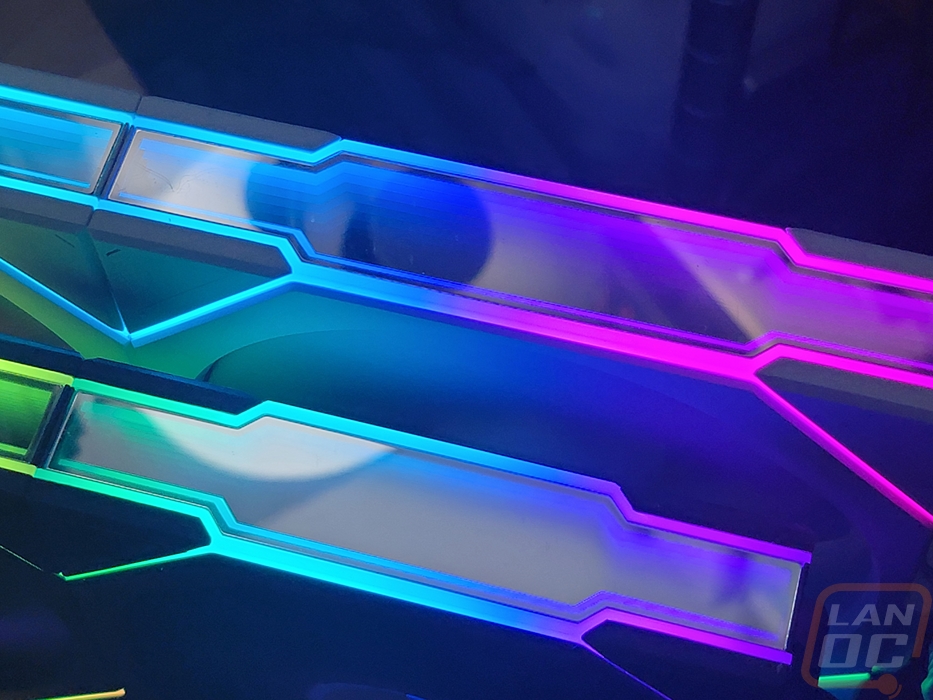
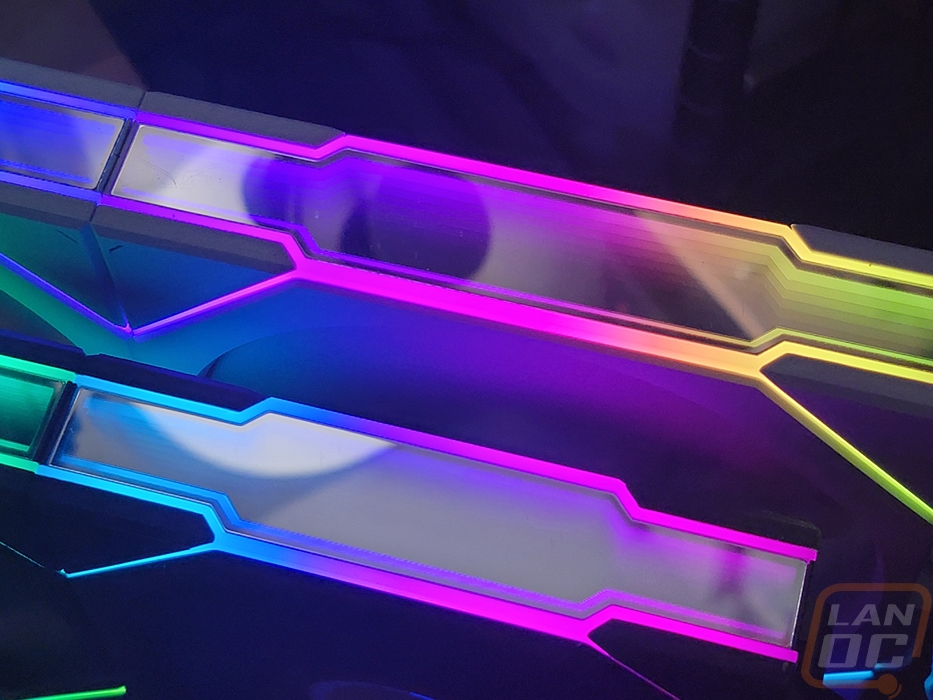
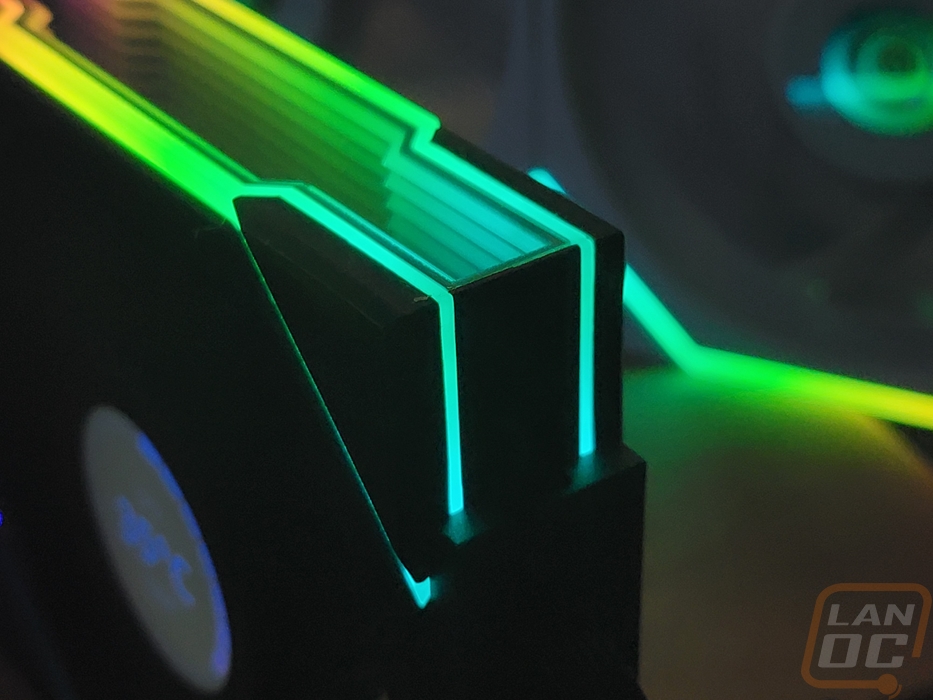
While to some people, the fan performance is the biggest priority, with the Uni Fan designs and especially here with the TL LCD model aesthetics are the biggest priority with the fan design. With that I wanted to check out the lighting and how the LCD worked before diving into any of the fan specs or performance. There are two halves to this story really. You have the addressable RGB lighting that runs across the top and bottom of the front and back of the fans along with all of our outer edges as well then you have the LCD. First up let's check out the RGB lighting and like the Uni Fan SL design the two hockey stick shapes above and below the fan look great but for the TL design, Lian Li has widened that diffuser more out to the edge of the fan which looks even better. When you have the fans linked together the effects just blend in together making the linked fans look like one device, not multiple fans next to each other. That lighting then wraps up onto the top edge as well which is the big change from the SL Infinity design. Not only do you have the infinity mirror still but around that you have diffused lighting as well which again is wider and more lighting than in the past. All of that also runs to the end which looks great and wraps around to the sides which for the linked fans will be hidden but does look good at the ends of your linked fans. The infinity mirror design gives the effect that you have more lighting as well as it goes down into the infinite.
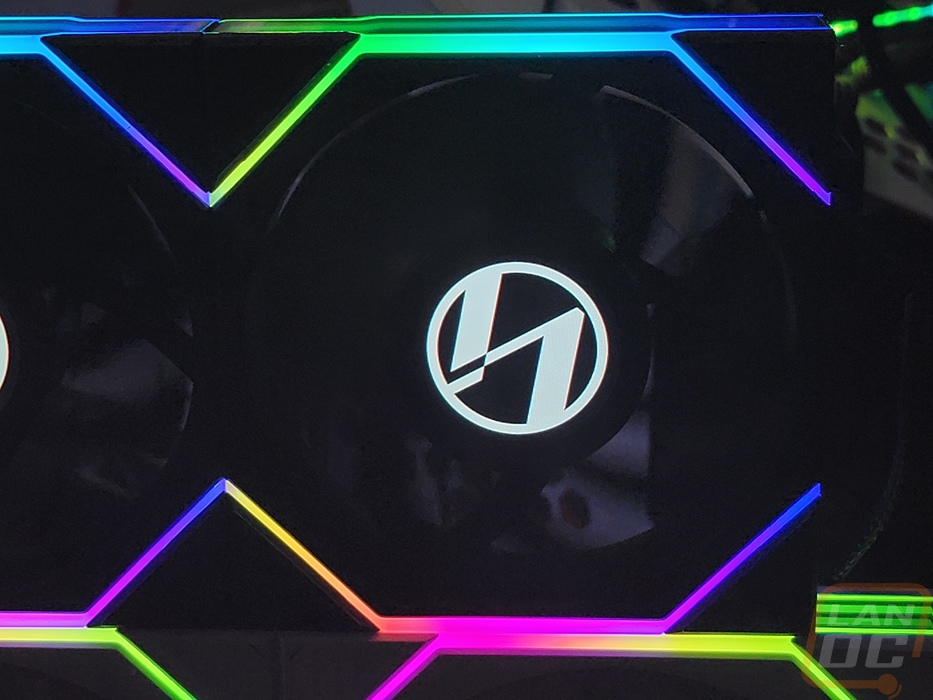
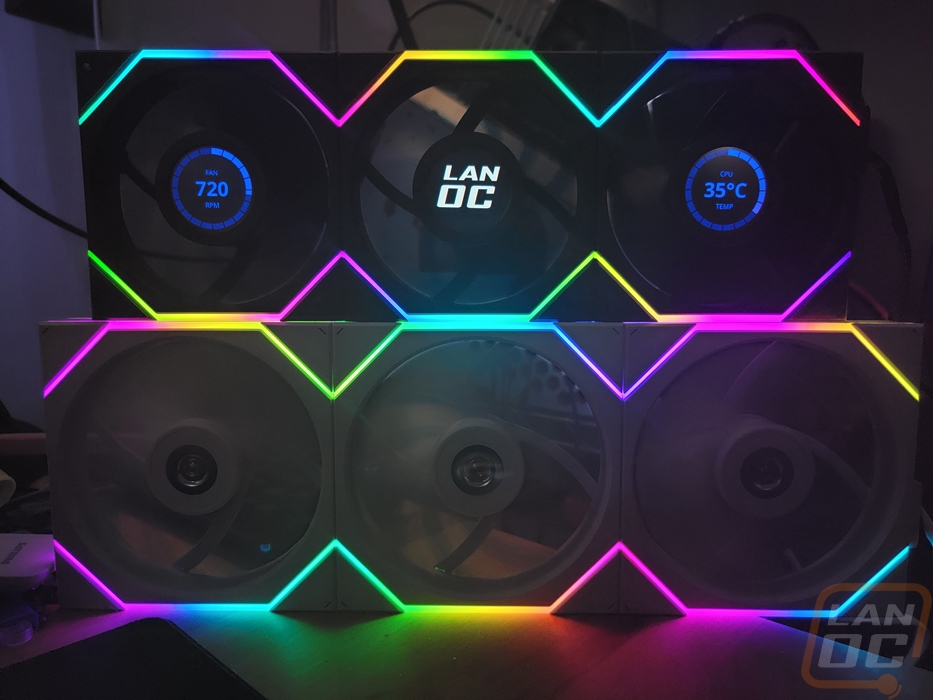
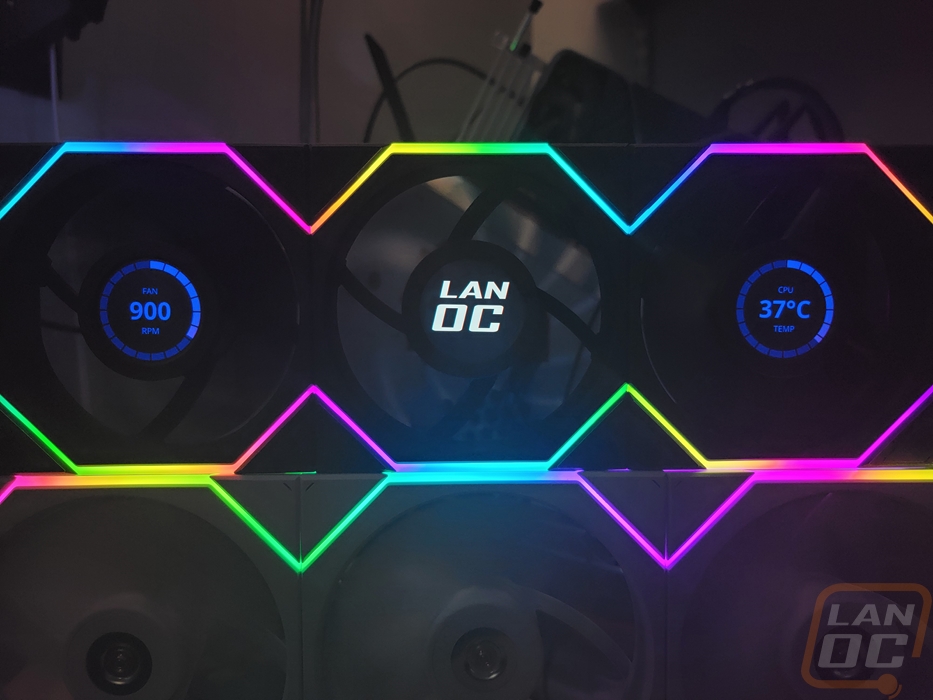
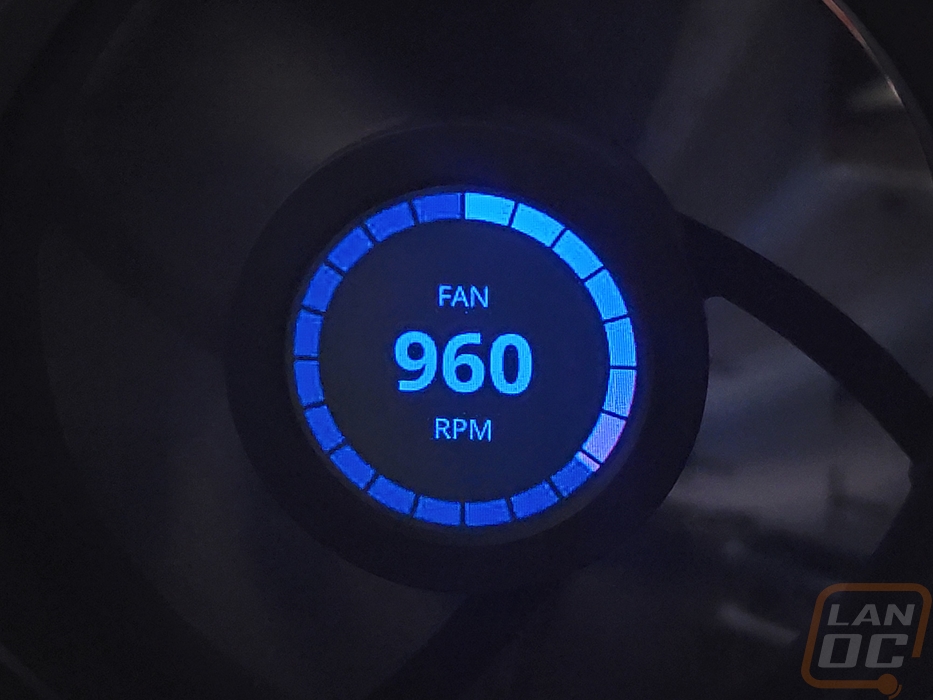
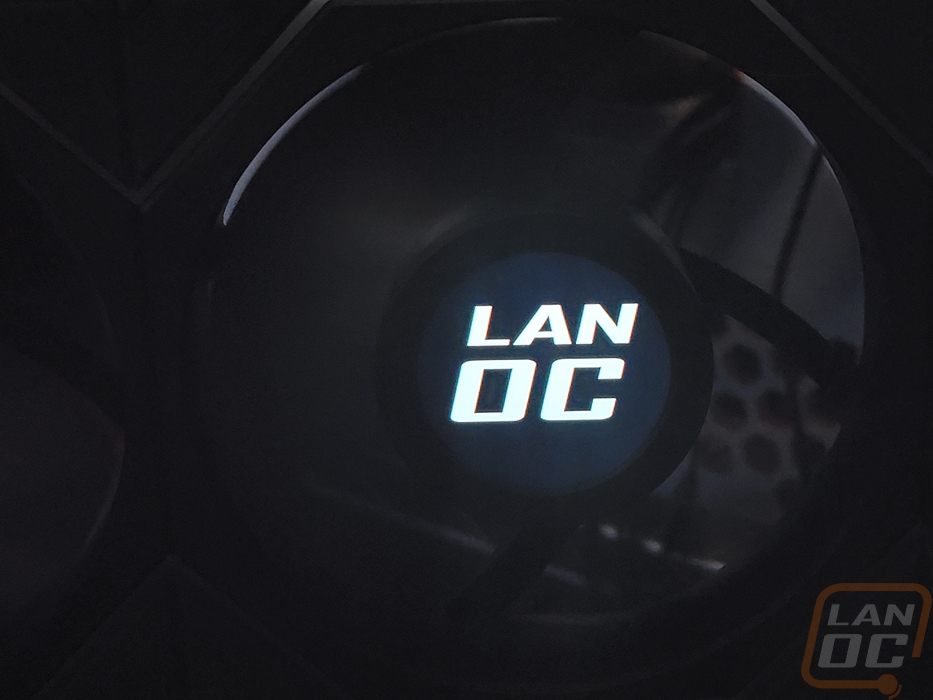
We are all here for the LCD though right? It’s funny because just a few years ago having a screen on top of the pump on an AIO cooler was crazy and even still it is great to have. But it is hard to wrap your head around a screen in the middle of a fan. You have the spinning blade behind it and the motor design itself makes it very hard to pass through the cables needed to power the display but Lian Li has all of that figured out. The 400 x 400 resolution 1.6-inch display in the middle of each fan is bright and does a good job with the blacks. When they first boot up with the Lian Li logo I can see someone just thinking these are backlit logos but once you change things out there won’t be any doubt. It did take a little time to figure out the spacing, with the resolution being a square and the display being a circle there is going to be a lot cut off from some designs and I found that you need to offset things slightly to the bottom left not be exactly centered. Once I had designs that fit the aspect ratio tossing them on the fans was easy. It will take a lot more work to get good animated designs however and like I said with the software section. I would love it if they had more designs come by default, especially animated designs. Getting the LanOC logo on there was cool though and if you theme out your PC or name it this is a great way to tie that in. Even then you still could run one or two of the sensor readouts as well. The two working designs look good but this is another area that software improvements over time can really change things. Adding even more readouts going beyond the standard PC information could be cool. Stock tickers, local weather, or even just random pictures could be options. Being able to add pictures into the background of the current sensors could be nice as well. The two displays do a good job of making things visible with the numbers in the center and the outer ring being used as a graph. Really the possibilities are endless assuming Lian Li continues to support it all and given how good of a job they have done with the Uni Fans on the software side up to now it is promising.
Of course, we can’t forget about performance and without having a full setup for airflow my testing was focused on noise levels but I did want to touch on some of the listed airflow performance numbers from Lian Li as well. With so many SKUs from the TL lineup, my focus is just on the two fans that I have on hand but know that the numbers for their reverse flow fans are different. The numbers between the LCD and non-LCD models are different as well. The TL LCD 120 has a fan speed of 350 RPM up to 1900 RPM, the non-LCD model gets a lot crazier running from 0 to 2600 RPM. The LCD 120 maxes is air pressure out at 2.9 mmH2O and has an airflow of 62 CFM and is rated at 27 dBA at full speed from Lian Li. The non-LCD model with its higher RPM can pul 3.97 mmH2O for air pressure, flows a crazy 90.1 CFM, and is 33 dBA. For the 140 mm TL fans that they sent, they can run from o to 1800 RPM. Their air pressure is 2.34 mmH2O and because of their larger size, they flow 103.9 CFM at full speed at 29 dBA.
For testing, I set the decibel meter up at 14 inches away from the fans. My testing covered 100% and 50% fan speeds as well as three of the Lian Li fan profiles. For those three profiles, I had the CPU under load with AIDA64’s stress test with the CPU workload so we could get an idea of what to expect noise level wise when under full load. I also tested with 1 fan and 3 fans for comparison and documented the listed fan RPM for each. There is some variation as the CPU temperatures did range from 58c up to 62c when testing but most were similar. Unlike with the P28 fans, I didn’t see any issues with fan speed dropping as more and more fans were running. In fact when I ran all six fans both fans showed the higher 1860 RPM even though the 140 mm fans don’t normally go that high. So how did the Uni Fan TL fans perform? Well the TL LCD 120 fans came in a lot closer to the 140mm non-LCD fans than I expected across the board but as fan speeds were turned up that gap did open up. The slightly lower RPM and less restriction on the 140 mm fans that didn’t have a screen in the way ran at 39.7 dB at full speed to 41.8 dB for the TL LCD 120 when comparing one fan to one fan. Having three fans really ramped things up with the 120 model going from 41.8 dB up to 47.5 dB and the 140 mm model going from 39.7 dB up to 45.1 dB. More than anything though my testing showed that anything other than full speed the fans were a lot quieter than expected.
|
Fan Speed Setting |
Decibels |
RPM |
|
Uni Fan TL LCD 120 – 1 Fan |
||
|
50% Fan Speed |
32.1 |
900 RPM |
|
Quiet Setting |
32.3 |
960 RPM |
|
StdSP Setting |
33.2 |
1260 RPM |
|
HighSP Setting |
35.3 |
1440 RPM |
|
FullSP Setting |
41.8 dB |
1860 RPM |
|
Uni Fan TL LCD 120 – 3 Fans |
||
|
50% Fan Speed |
32.5 |
900 RPM |
|
Quiet Setting |
32.5 |
960 RPM |
|
StdSP Setting |
36.9 |
1260 RPM |
|
HighSP Setting |
39.4 |
1500 RPM |
|
FullSP Setting |
47.5 |
1860 RPM |
|
Uni Fan TL 140 – 1 Fan |
||
|
50% Fan Speed |
32.1 |
840 RPM |
|
Quiet Setting |
32.1 |
840 RPM |
|
StdSP Setting |
32.9 |
1140 RPM |
|
HighSP Setting |
34.6 |
1380 RPM |
|
FullSP Setting |
39.7 |
1740 RPM |
|
Uni Fan TL 140 – 3 Fans |
||
|
50% Fan Speed |
32.9 |
840 RPM |
|
Quiet Setting |
32.9 |
840 RPM |
|
StdSP Setting |
34.5 |
1140 RPM |
|
HighSP Setting |
38.9 |
1320 RPM |
|
FullSP Setting |
45.1 |
1740 RPM |
Beyond all of that, there are a few other aspects of the Uni Fan TL and Uni Fan TL LCD that I should also touch on. The biggest of those is the experience with wiring and installation. I’ve spoken about it a lot with other fans but RGB fans are a wiring nightmare. Lian Li with the Uni Fans and a few other companies with their own variation on daisy chaining fans together has helped a lot with that. In the past, you had to have two long wires for each fan and then a controller that had its own wiring mess. With this setup, you could have just one wire that runs from the fans to the controller. If you have fans in more than one location you can link them together as well with the cable included with the single fans. There are a few complications though with the TL LCDs in the mix. These do pull more power and they use 12 volts for the fan and 5 volts for the display. Lian Li hasn’t provided any of their amperage numbers but it's clear given the new power plug that more power was needed than a SATA power connection could provide. I’m still not a big fan of having to use that cable though, I wish using more than one SATA plug could have been an option. They have let us know the limits on how many fans you can hook up. The one controller can handle a total of 7 TL LCD fans in total and only three can be used per plug. The standard TL fans on the other hand can run up to 10 on that same controller. You also can’t directly connect the TL and TL LCD fans together and have them work. It is possible for them to link to each other but it won’t pass the signal through and the cable designs don’t work together. You can however do what I did in our testing and run them both on the same controller.
