With all of the Sapphire cards that launched this year the one model that I didn’t get a chance to check out was their Vapor-X cards. They share a lot of the styling of their other cards but Sapphire changed up the cooling design with a vapor chamber sitting between the heatsink and the GPU and PCB to spread out the heat for better cooling. I had to see how it compares to the standard Tri-X cooling as well as the competition, so I got in touch with Sapphire and put their Vapor-X 290 to the test.
Product Name: Sapphire Vapor-X R9 290
Review Sample Provided by: Sapphire
Written by: Wes
Pictures by: Wes
|
Specifications |
|
|
Display Support |
Supports up to 3 display monitor(s) without DisplayPort 4 x Maximum Display Monitor(s) support |
|
Output |
1 x HDMI (with 3D) 1 x DisplayPort 1.2 2 x Dual-Link DVI-D |
|
GPU |
1030 MHz Core Clock 28 nm Chip 2560 x Stream Processors |
|
Video Memory |
4096 MB Size 512 -bit GDDR5 5600 MHz Effective |
|
Dimension |
305(L)X 114(W)X 47(H) mm Size. 2.5 x slot |
|
Software |
Driver CD SAPPHIRE TriXX Utility |
|
Accessory |
8-PIN to 4 PIN x2 Power Cable HDMI 1.4a high speed 1.8 meter cable(Full Retail SKU only) |
Packaging
Sapphire stuck with the same packaging design that they have gone with on all of their R series cards this year. The Vapor-X does however sport a blue theme where the Tri-X had orange. The cover has what looks to be a robot built out of video card components. Down along the bottom there is a whole line of small circles with information about the card. For example there is a 4GB circle and one them mentions AMD’s Mantle support. They also tossed on stickers showing that the Vapor-X 290 comes with a free HDMI cable and is overclocked as well. Half of the back is dedicated to explaining how Vapor-X works while the rest of the back has explanations on some of the Vapor-X 290’s other features.


Inside the card is wrapped up in a static protective bag that is also made of bubble wrap to keep it extremely safe. On top of that it sits in a piece of foam that has the shape of the card carved out. There is no way this card is going to get damaged in shipping. Up under the foam is another box. Inside you will find the Vapor-X 290’s documentation and accessories. It comes with an installation guide, information on registration and a driver disc. You also get a Sapphire mouse pad and an HDMI cable. Last but not least they also slipped in two double Molex to 8 pin adapters, just in case your power supply doesn’t have the connections needed. Of course if you don’t have any of the connections I would be more worried that it’s not going to have enough power at all.


Card Layout and Photos
At first glance the Vapor-X 290 looks a lot like the other Sapphire 290’s. This is because they all share the same Tri-X cooling. The first thing that sets the Vapor-X apart is the blue color that they went with where the other models are all in orange. There are other important differences, but you have to look a lot closer to find them. That is where this section comes in handy. Not only do we show off the card here, but also I take a closer look to see what sets the Vapor-X 290 apart.


The top edge of the Vapor-X actually has a lot going on. Starting over on the left side, the small button with the Sapphire logo on it actually switches the card to run on a UEFI BIOS. This is really only important when running Windows 8 and you hope to turn on some of the fast booting options. In the middle of the top, we can see the vapor chamber that makes this the Vapor-X card. If you look close you can also see that this is a custom PCB design, the PCB sticks out from the top a half inch along with the vapor chamber. Most of the heatsink attaches directly to the vapor chamber, helping pull the heat away from the GPU as quickly as possible. Along the top of the fan shroud Sapphire cut out their logo and backlit it, so when the Vapor-X is running the Sapphire glows. Depending on how hot the card is running it will glow blue, yellow, and red. Lastly, over on the right side the Vapor-X 290 actually requires two 8-pin power connections where a standard 290 takes an 8-pin and a 6-pin. Sapphire is obviously expecting overclockers to pull a little more power through the Vapor-X.


For video connections, Sapphire went with the standard four. You get two DVI, one HMDI, and one full sized DisplayPort. That still leaves room for a fairly large vent to help with ventilation, assuming the design blows air that direction.

As with Sapphires previous designs, they focused on packing as much cooling in as possible rather than focusing on pushing air out the back of the case like a reference card will do. This means that the top bottom and end of the Vapor-X 290 is open and blows air into your case. This isn’t a problem as long as you have a case with good airflow, like most gaming cases.


On the backside of the Vapor-X I love the decked out backplate that Sapphire went with. I would have been happy with just a blank backplate but they added a little style with blue and grey stripes. The Vapor-X logo looks upside down in some of my photos but that is because it is designed to be read when the card is installed in your case. This is a small but important touch. Down at the end you can see a small on and off switch. This is for Sapphires Intelligent Fan Control, this actually will let the Vapor-X turn off two of its fans when you aren’t gaming (anytime its temperature is under 60 degrees), this will help drop its noise level down even farther.


Our Test Rig and Procedures
|
Our Test Rig |
|
|
CPU |
|
|
Memory |
|
|
Motherboard |
|
|
Cooling |
|
|
Power Supply |
|
|
Storage |
|
|
Case |
|
|
Our Testing Procedures |
|
|
Bioshock Infinite |
Using the Adrenaline Action Benchmark Tool we run Bioshock Infinite on the “Xtreme” quality setting. This has a resolution of 1920x1080, FXAA turned on, Ultra Texture detail, 16x Aniso Texture Filtering, Ultra Dynamic Shadows, Normal Postprocessing, Light Shafts on, Ambient Occlusion set to ultra, and the Level of Detail set to Ultra as well. We also run this same test at 2560x1440 using the same settings as mentioned above. |
|
Tomb Raider |
Using the Adrenaline Action Benchmark Tool we run Tomb Raider on the “Xtreme” quality setting. This has a resolution of 1920x1080, Exclusive Fullscreen turned on, Anti-Aliasing set to 2xSSAA, Texture Quality set to Ultra, Texture Aniso set to 16x Aniso, Hair Quality set to TressFX, Shadow set to Normal, Shadow Resolution on High, Ultra SSAO, Ultra Depth of Field, High Reflection quality, Ultra LOD scale, Post Processing On, High Precision RT turned on, and Tessellation is also turned on. We also run this same test at 2560x1440 using the same settings as mentioned above. |
|
Hitman: Absolution |
Using the Adrenaline Action Benchmark Tool we run Hitman: Absolution on the “Xtreme” quality setting other than the MSAA setting is turned down from 8x to 2x. That setting puts the resolution at 1920x1080, MSAA is set to 2x, Texture Quality is set to High, Texture Aniso is set to 16x, Shadows are on Ultra, SSA is set to high, Global Illumination is turned on, Reflections are set to High, FXAA is on, Level of Detail is set to Ultra, Depth of Field is high, Tessellation is turned on, and Bloom is set to normal. We also run this same test at 2560x1440 using the same settings as mentioned above. |
|
Sleeping Dogs |
Using the Adrenaline Action Benchmark Tool we run Sleeping Dogs on the “Xtreme” quality setting. That means our resolution is set to 1920x1080, Anti-Aliasing is set to Extreme, Texture Quality is set to High-Res, Shadow Quality is High, Shadow Filter is set to high, SSAO is set to High, Motion Blur Level is set to High, and World Density is set to Extreme. We also run this same test at 2560x1440 using the same settings as mentioned above. |
|
F1 2013 |
We use the built in benchmark for F1 2013. We set our resolution to 1920x1080 and then use the “Ultra” setting. |
|
Total War: Shogun 2 |
Direct X11 Benchmark High setting 1080p |
|
Crysis 2 |
Using Adrenaline Crysis 2 benchmark. 1080p, 4x Anti-Aliasing, DX11, Laplace Edge Detection Edge AA, on the Times Square map, with hi res textures turned on. |
|
Sniper V2 Elite |
1920 x 1080 resolution, graphics detail set to ultra |
|
Dirt Showdown |
1920 x 1080 resolution, 4x MSAA multisampling, Vsync off, Shadows: ultra; Post Process: High; Night Lighting: High; Vehicle Reflections: Ultra; Ambient Occlusion: Ultra; Water: high; Objects: Ultra; Trees: Ultra; Crowd: Ultra; Ground Cover: High. |
|
Metro Last Light |
Using the included benchmark tool. The settings are set to 1920x1080, DirectX 11, quality is set to very high, Texture filtering is untouched at 4x, and motion blue is set to normal. SSAA is unselected, PhysX is unselected, Tessellation is off. We run through scene D6 three times to get an average score. |
|
Theif |
Tested using the “Very High” setting at 1920x1080 and 2560x1440 |
|
3DMark |
The same goes for the most current version of 3DMark using the Fire Strike benchmark in both normal and extreme settings |
|
Unreal Heaven Benchmark 4.0 |
Using the “Extreme” preset |
|
Unreal Heaven Benchmark 4.0 heat testing |
We run through Unreal Heaven using the “Extreme” preset for 30 minutes to test in game cooling performance. |
|
Power Usage |
Using Unreal Heaven Benchmark 4.0, we get our “load” power usage number from the peak power usage during our test. We get our numbers from a Kill-A-Watt connected to the test benches power cord. |
|
Noise Testing |
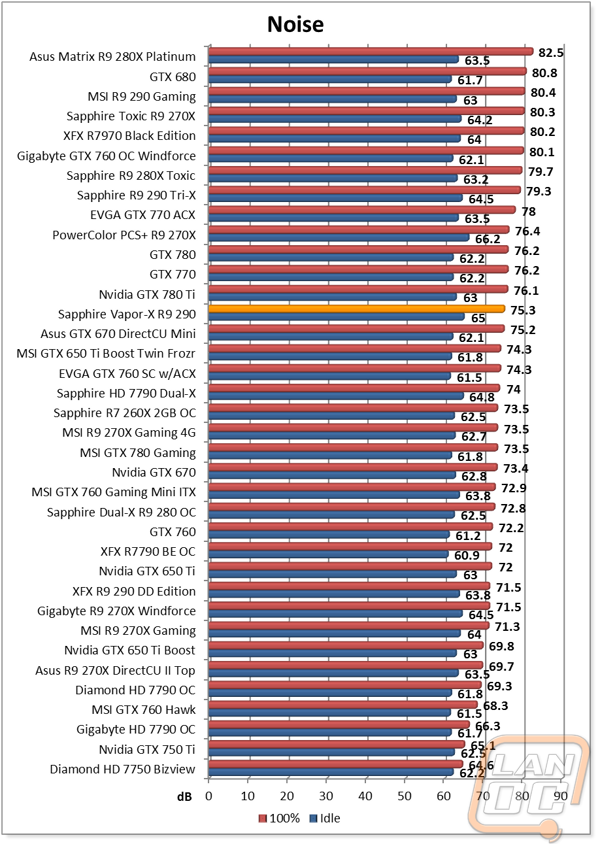
Our Noise testing is done using a decibel meter 3 inches away from the video card on the bottom/fan side of the card. We test an idle noise level and then to get an idea of how loud the card will get if it warms all the way up we also turn the fan speed up to 100% and test again. The 100% test isn’t a representation of typical in game noise levels, but it will show you how loud a card can be if you run it at its highest setting or if it gets very hot. |
Synthetic Benchmarks
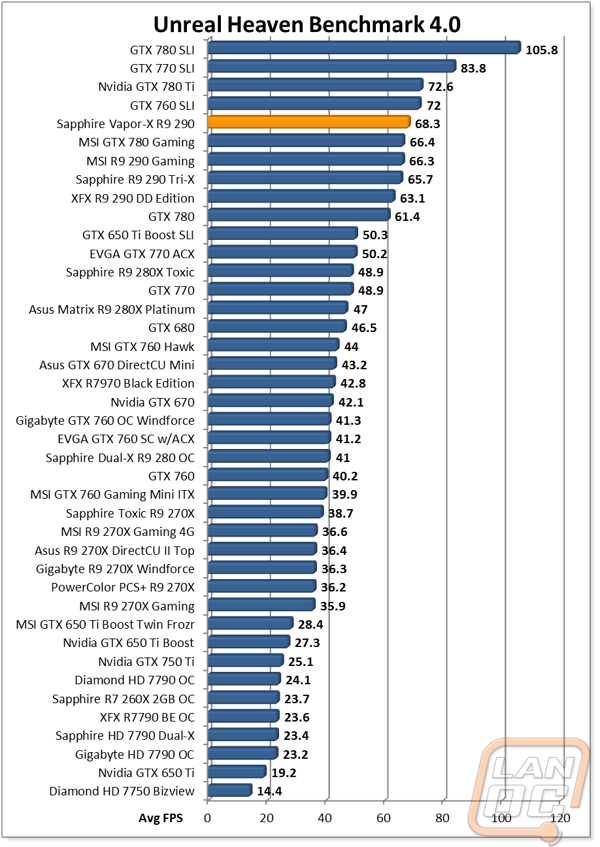
Recently I have thinned out our synthetic benchmarks slightly, dropping the older 3dmarks to focus on the most recent version. This way we can focus on in game benchmarks more while still getting the level playing field that the synthetic benchmarks give us. They may not show what you should expect in game, but they are still a good way to compare from card to card. Not surprisingly, the Vapor-X 290 was up near the top of our charts. The other R9 290’s that I have tested in the past performed very well as well. The Vapor-X did pull slightly ahead in the standard Fire Strike benchmark while the Extreme version didn’t do as well in comparison to the other 290’s. Even so, they were ALL fast, getting very close to the GTX 780 Ti. In Heaven Benchmark 4.0 only the SLI’ed cards pulled a higher average FPS.


1080p In-Game
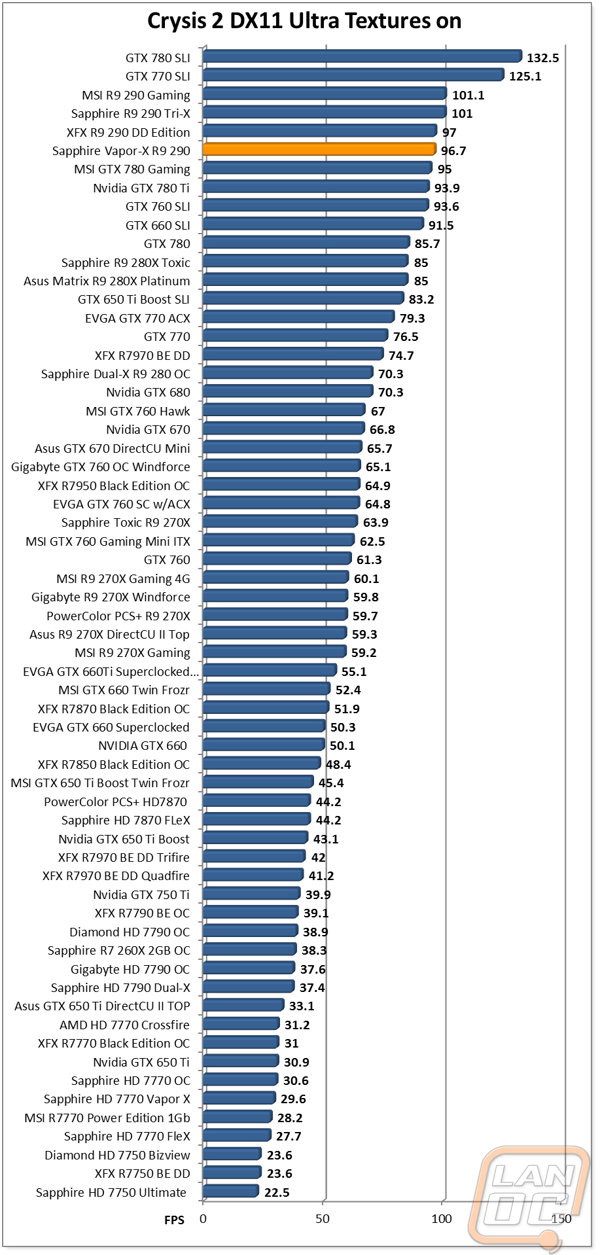
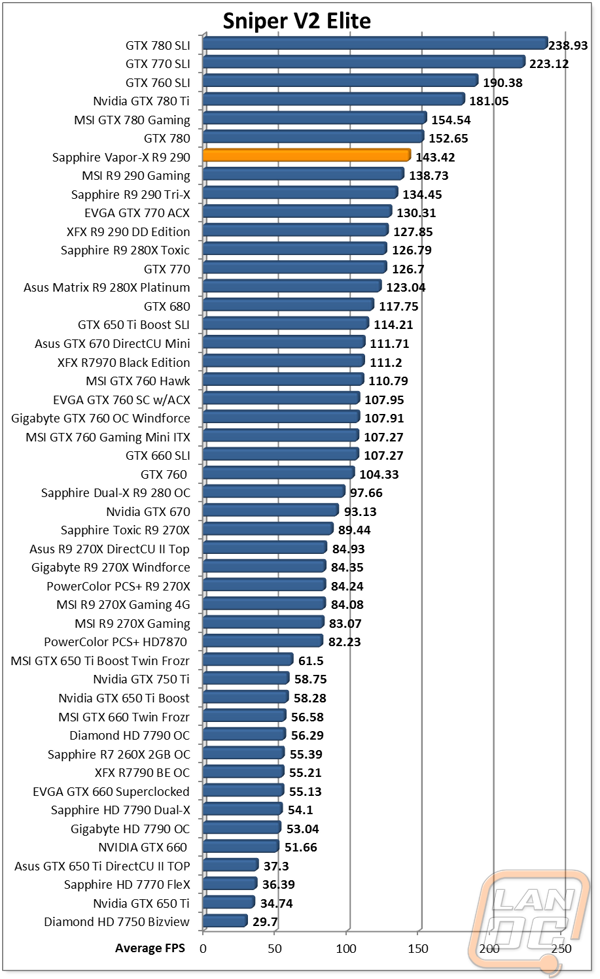
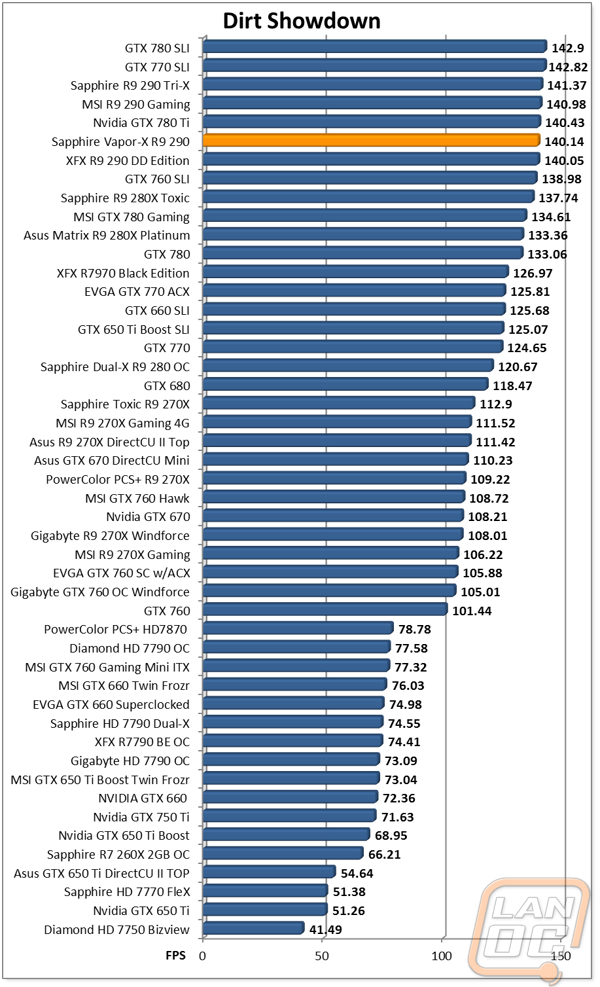
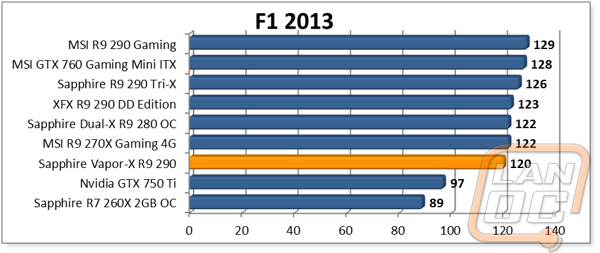
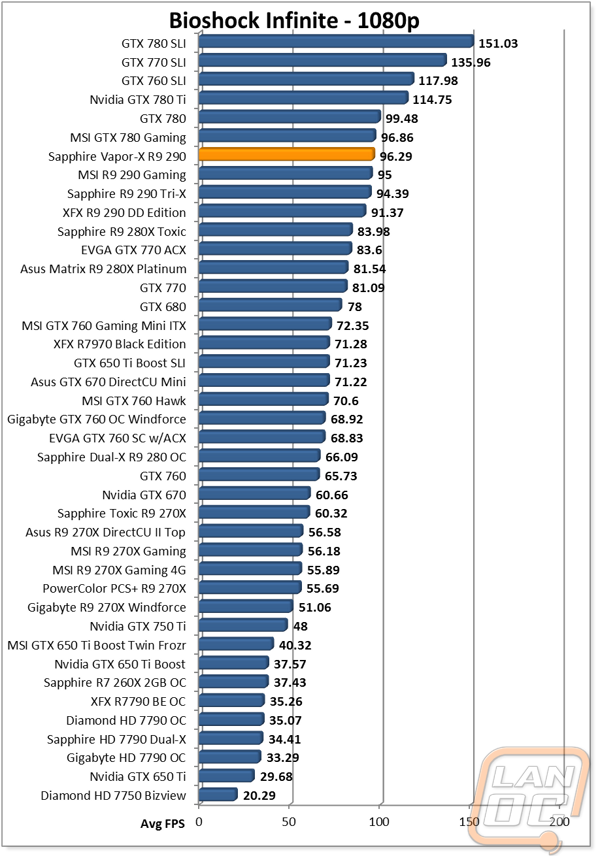
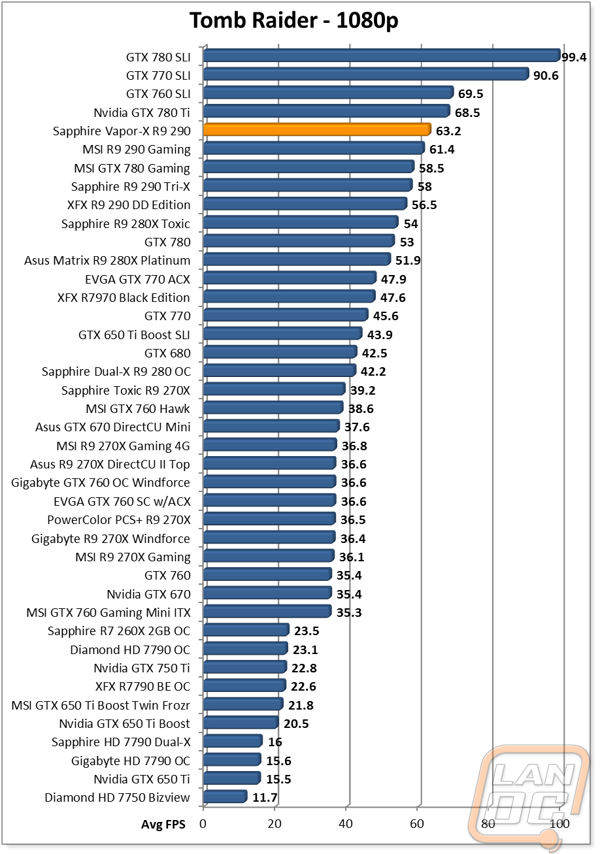
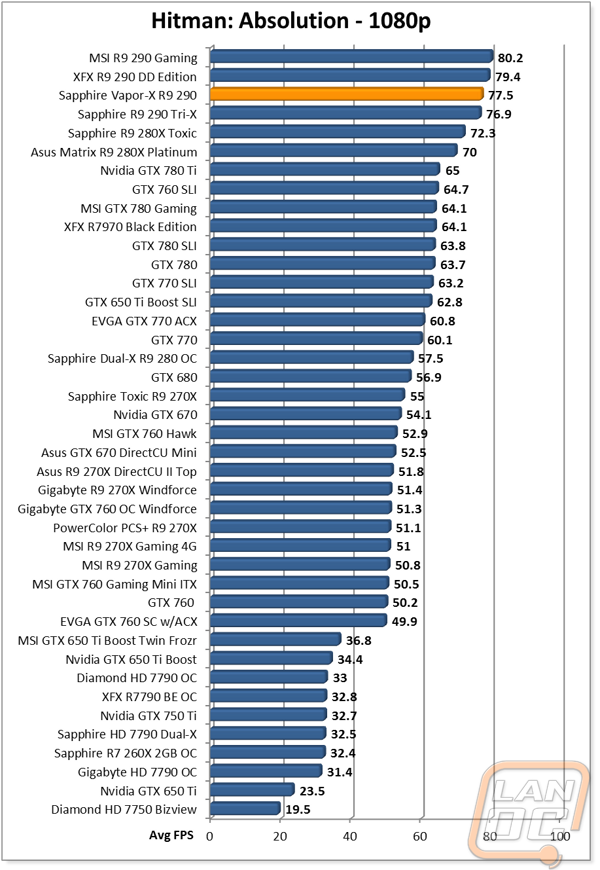
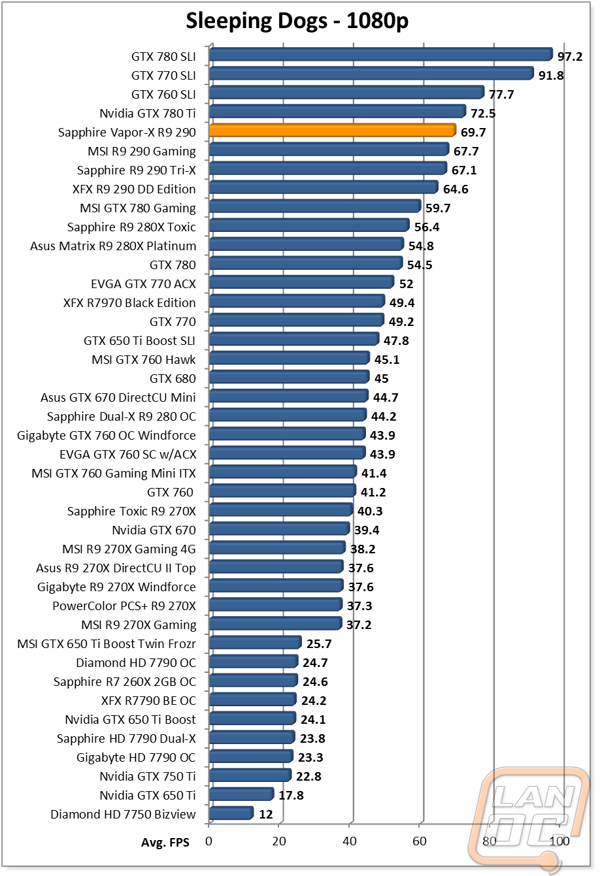
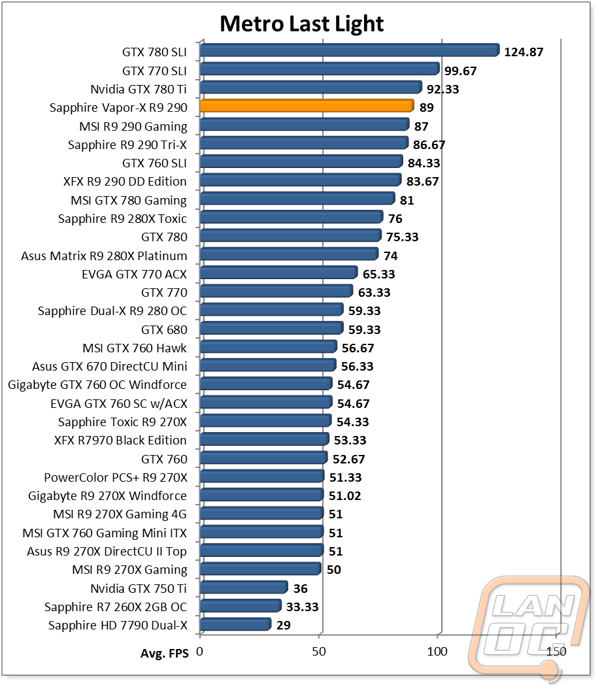
With the addition of 2560x1440 testing into our benchmark suite I have split up the in game benchmarks into two sections. I did also add a new game “Thief” but its results are in the 1440p section. Anyhow I ran the Vapor-X R9 290 through 10 different games at 1920x1080 set to their highest settings. Of those 10 games, every single game had an average FPS of up over 60 FPS, what most consider to be the performance goal. Most of the games actually game in MUCH higher than 60 FPS with them Sniper V2 Elite and Dirt Showdown both getting up into the 140’s.

1400p In-Game
Our 2560x1440 testing is still very new, so results are limited just to the Vapor-X 290. I still wanted to include them to give you an idea of what to expect performance wise if you decide to bump up your resolution. Only one of the 5 games tested still gave us over 60 fps, even with the power of the Vapor-X 290. Most, like Thief came in just under 50fps. This is still a good number, most people find anything above 30 fps playable, but you might have to sacrifice a little AA to bring the performance up over 60 if you are sensitive to that. Hopefully soon I will have filled in more of our testing to show 1440p performance a little better, keep an eye out on our future VGA reviews for new and old cards being tested.


Cooling, Noise, and Power
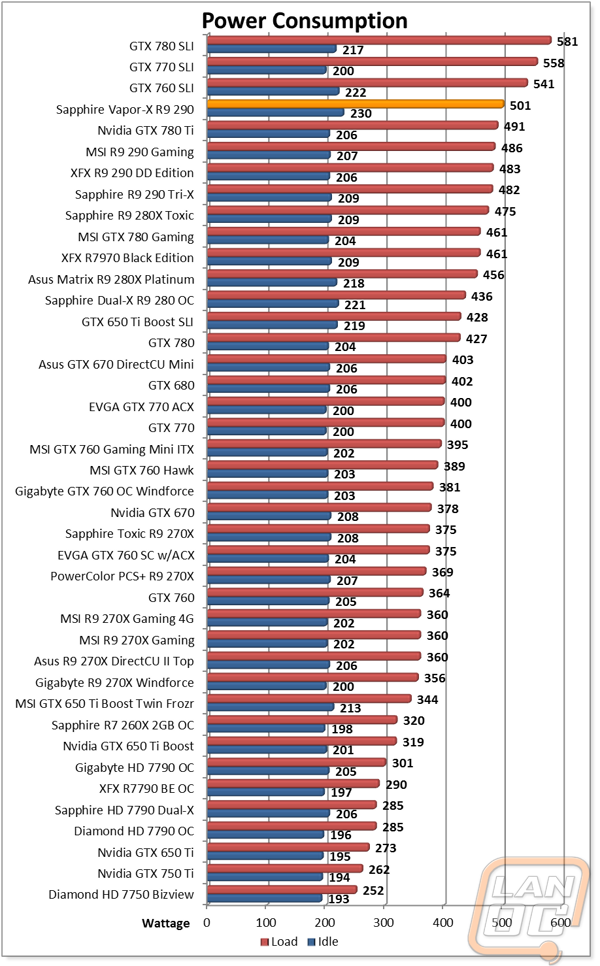
Typically, the difference between similar models in game is only a few FPS. Where manufactures can really set themselves apart is in the cooling department. Sapphire has put a big focus on that with the Vapor-X cooling for example. Because of that our cooling, noise, and power section plays a big role in our testing. I put the Vapor-X 290 through all of our tests to see how it performs compared to the other R9 290’s that I have tested previously, including the Tri-X Sapphire card. When it came to power consumption their wasn’t a single card that pulled less than the Vapor-X 290, the overclock and three fans helped push the Vapor-X R9 290 just past the GTX 780 Ti that held the title before.
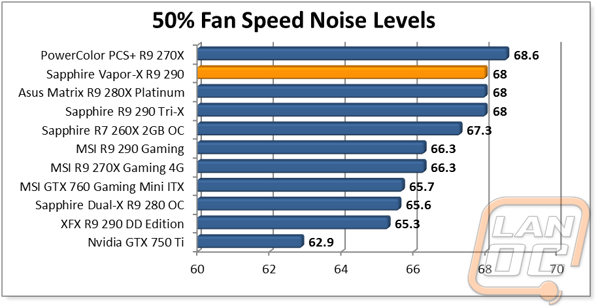
Typically triple fan designs don’t perform that well in idle noise tests so the slightly high performance at idle wasn’t a big shock to me. This is however exactly why Sapphire added the switch on the back of the PCB to turn off two of the three fans at low temperatures. With this turned off our idle noise dropped down to just over 61 decibels. Under load, the Vapor-X ran quieter than the Tri-X. This put the Vapor-X 5 decibels lower than the MSI 290 as well, a better cooling design means lower fan RPMs and less noise.
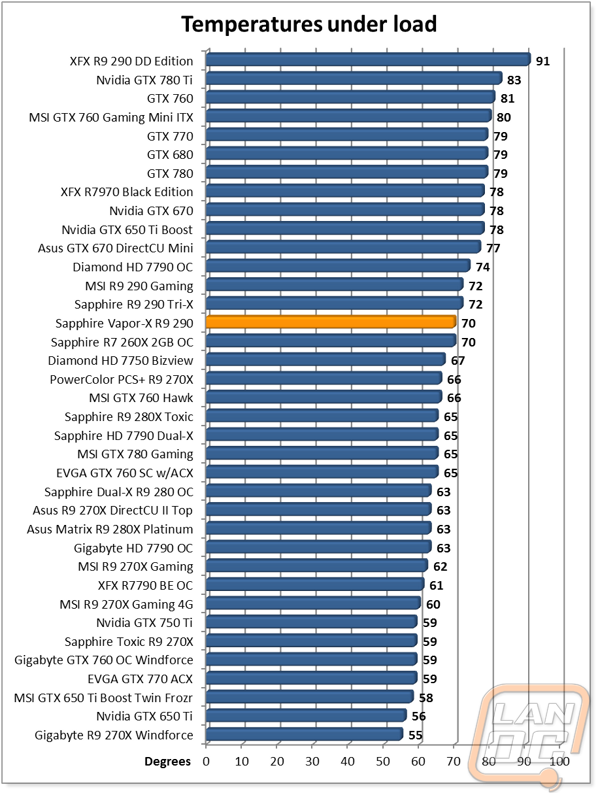
With the other R9 290’s all over the top of our temperature charts the Vapor-X R9 290 had to work hard to get down near the middle of the pack, down with some 270X’s. The end result was 70 degrees, two less than the Tri-X and MSI’s card and over 20 less than XFX’s 290. This proves that the vapor chamber design does help cool more, even with a higher overclock.
Overclocking
As usual I ran the Vapor-X R9 290 through our standard overclock testing. That means I overclocked the GPU and memory by themselves and tested them using 3dmark 11 benchmark 2 and then I put the two results together to see if the card could handle both overclocks at the same time. All the while, I document my results as I go. GPU testing went smoothly and actually gave me the same result as the MSI card I tested. The entire time the Vapor-X ran fairly cool, so it is obvious that there is a lot more power left in the card if you know how to massage it out. Memory testing hit the same 6200MHz wall that all of the other 290’s I have tested also hit. This time I was expecting it and bumped it back down slightly for a good result. Lastly, I ran the card with the GPU set to 112MHz and 6000MHz on the memory and it took it like a champ on the first try. All in all the Vapor-X 290 overclocked as expected for an R9 290, but I know there is a lot more room left in it on air.
|
GPU Clock Speed Overclocking |
|||
|
GPU Clock Speed |
Pass/Fail |
FPS Result |
Notes |
|
1030MHz |
Pass |
69.25 |
|
|
1120MHz |
Pass |
74.73 |
|
|
1150MHz |
Fail |
N/A |
Artifacts |
|
1140MHz |
Pass |
75.19 |
|
|
Memory Clock Offset Overclocking |
|||
|
Memory Clock Speed |
Pass/Fail |
FPS Result |
Notes |
|
5500MHz |
Pass |
71.98 |
|
|
6000MHz |
Pass |
72.78 |
|
|
6200MHz |
Fail |
N/A |
Black Screen |
|
GPU and Memory Overclocks Together |
|||
|
GPU Clock Speed |
Memory Clock Speed |
FPS Result |
Notes |
|
1120MHz |
6000MHz |
77.56 |
|
Overall and Final Verdict
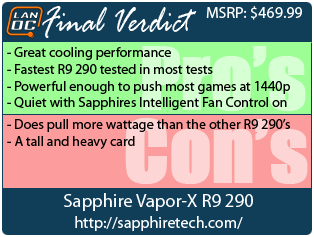
Frankly even going into this review I knew I would love the Vapor-X. All of the Sapphire Tri-X cards have performed great and Sapphire only packed in more features with the Vapor-X. The addition of the vapor chamber improved cooling even more than the standard Tri-X cooler and that allowed them to bump up the performance slightly. In testing the Vapor-X R9 290 topped most of our charts and proved that it could push all of the games tested at 1440p, although I would recommend turning down the AA to get it up to 60 fps. What I really liked was the intelligent fan control switch on the back of the card, this quieted down the fans expect when in game.
The addition of a backplate and the artwork on it was a nice bonus as well. The backplate and the vapor chamber do however make the Vapor-X a very heavy card, not to mention tall with its tall PCB. You should be fine to use it in most cases, but if your case is tight be sure to double check, while you are installing it make sure it is secure as well due to the weight. The other downside was the amount of power it pulled when under load, it wasn’t far off from the GTX 780 Ti, but it was noticeably higher than the other R9 290’s tested so keep that in mind when picking out your PSU.
All in all Sapphire managed to take an already good design and improve on it both aesthetically and performance wise. The Toxic-X isn’t the cheapest card on the market, but they do make sure you get your money’s worth if you decide to go with it.
