Over the past few years, there is one video card company that had really caught my eye with a couple unique products. PowerColor introduced the Devil 12 and has followed up with various Devil cards that have been really sharp. It’s always exciting to see a video card manufacture really step up. When PowerColor offered to send over their new R9 270X I jumped at the chance, excited to see what their PCS+ cooling is all about.
Product Name: PowerColor PCS+ R9 270X
Review Sample Provided by: PowerColor
Written by: Wes
Pictures by: Wes
|
Specifications |
|
|
Graphics Engine |
RADEON R9 270X |
|
Video Memory |
2GB GDDR5 |
|
Engine Clock |
1060MHz (up to 1100MHz with boost) |
|
Memory Clock |
1425MHz (5.7Gbps) |
|
Memory Interface |
256bit |
|
DirectX® Support |
11.1 |
|
Bus Standard |
PCIE 3.0 |
|
Standard Display Connecors |
DL-DVI-I/DL-DVI-D/HDMI/Display Port |
|
Feature Support |
|
|
OpenGL |
Support |
|
CrossFireX™ Technology |
Support |
|
ATI Stream Technology |
Support |
|
ATI Eyefinity Technology |
Support |
|
Display Support |
|
|
VGA Output |
Via Adapter |
|
DVI Output |
DL-DVI-I/DL-DVI-D |
|
DisplayPort |
On Board |
|
HDMI |
On Board |
|
HDCP Support |
Support |
|
Maximum Resolution |
|
|
VGA |
2048x1536 |
|
DVI |
2560x1600 |
|
DisplayPort |
4096x2160 |
|
HDMI |
4096x2160 |
|
Power Specs + Board Dimensions |
|
|
Board Dimensions |
240mmx111mmx38mm |
|
Minimum System Power requirement (W) |
500W |
|
Extension Power Connector |
Two 6-Pin PCI Express Power Connectors |
Packaging
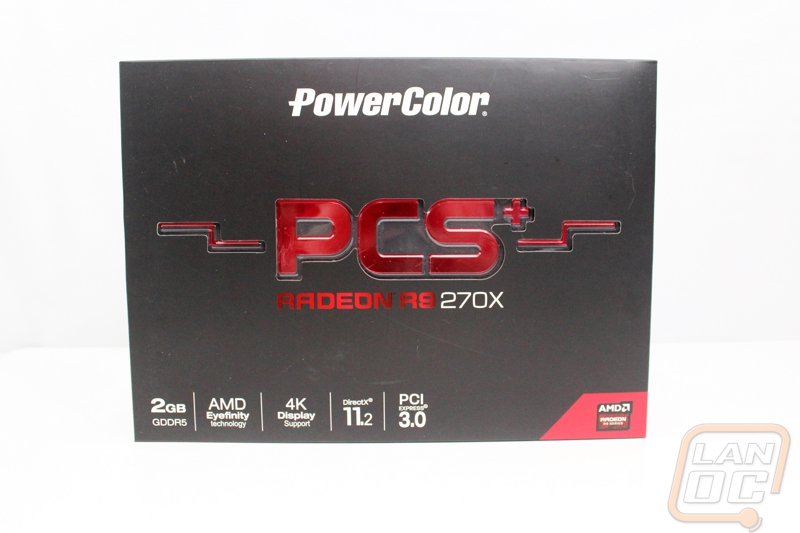
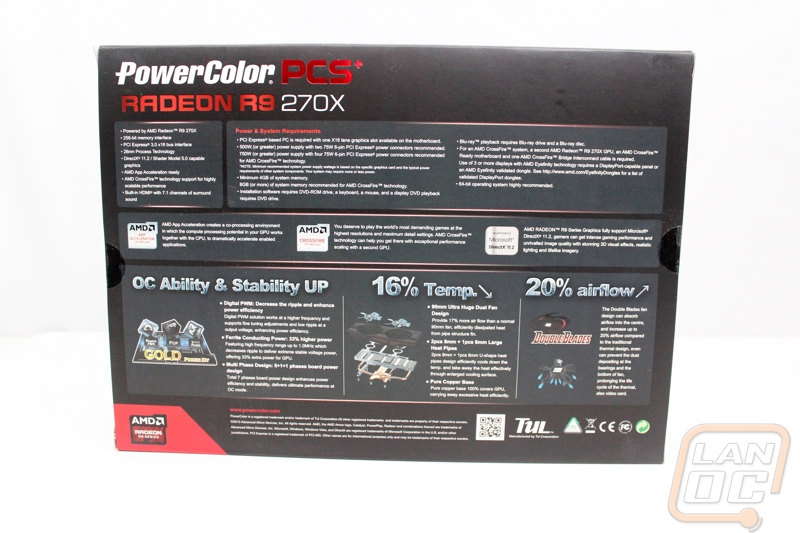
The box for the PCS+ R9 270X is all black other than the red trim around the AMD logo and the PCS+ logo. All of the red stands out on the black, but the PCS+ logo stands out even more because it is a cutout in the box with the metallic logo being inside the box itself. Around on the back you get a short list of features and a section about power and system requirements up top. Down on the bottom half you have more information on how PowerColor was able to lower temperatures, increase airflow, and increase overclocking ability and stability.
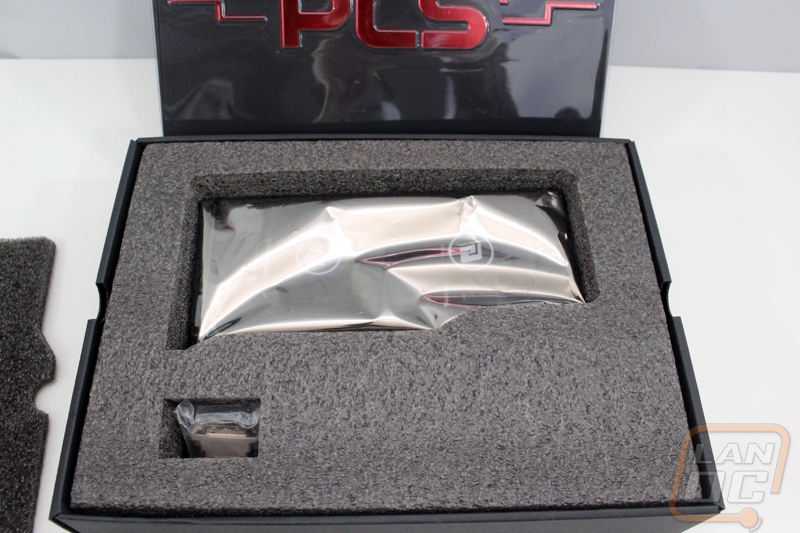
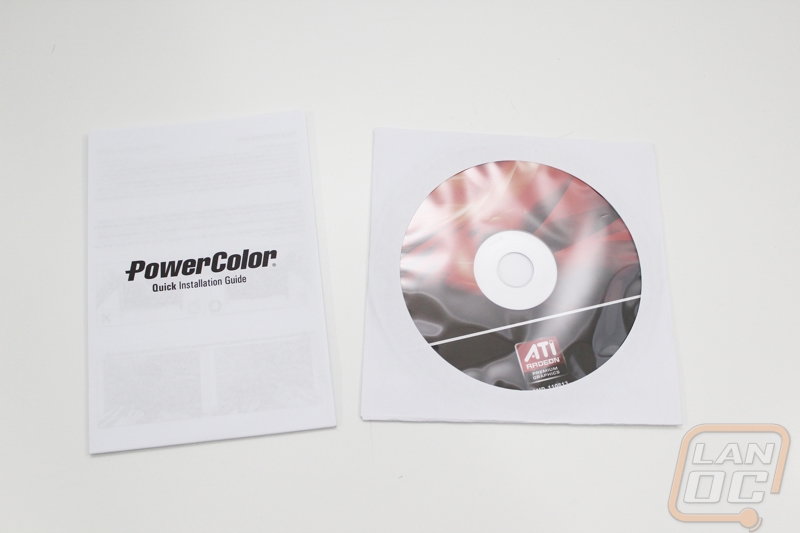
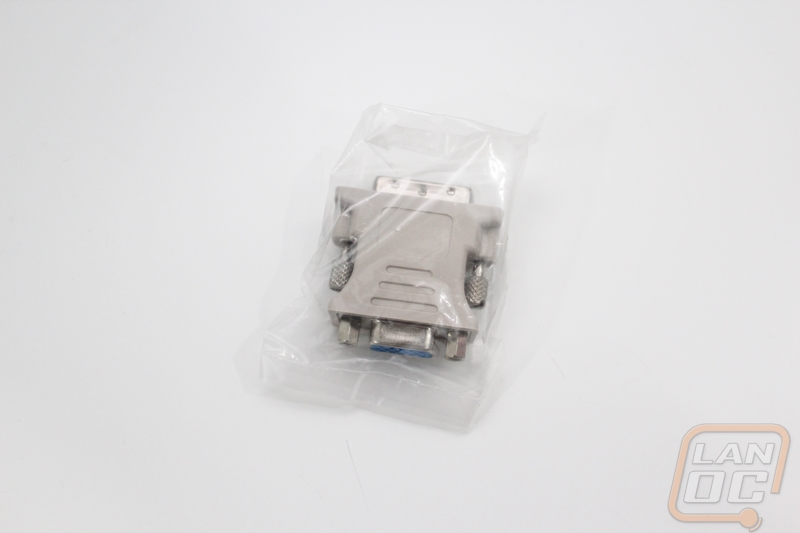
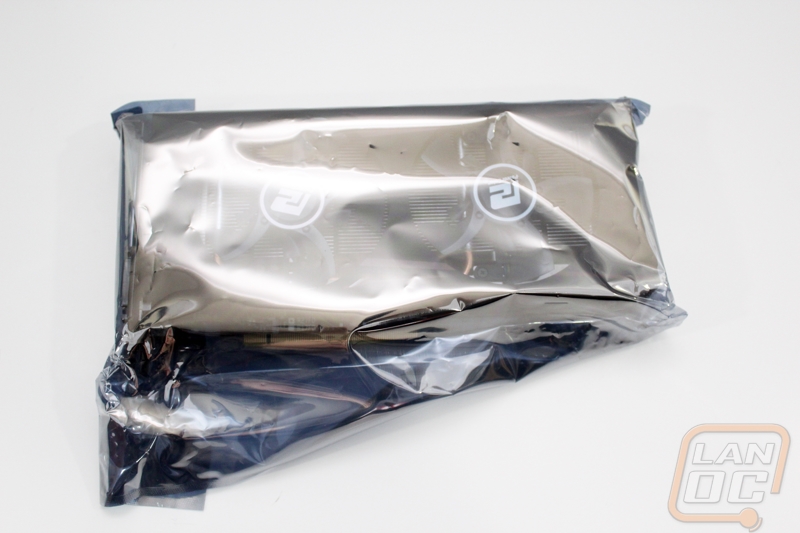
Inside, under the plastic cover with the PCS+ logo on it you will find the card deep inside of a protective foam. There is a small compartment for the DVI to VGA adapter that comes with the card and up under the card itself you will find the drive disc and a quick installation guide.
Card Layout and Photos
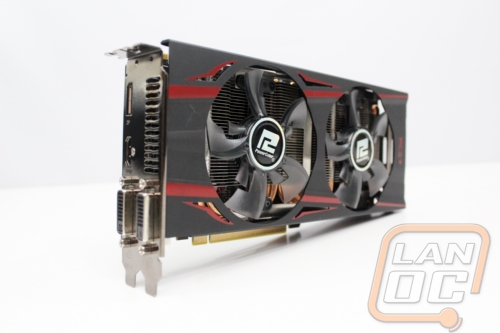
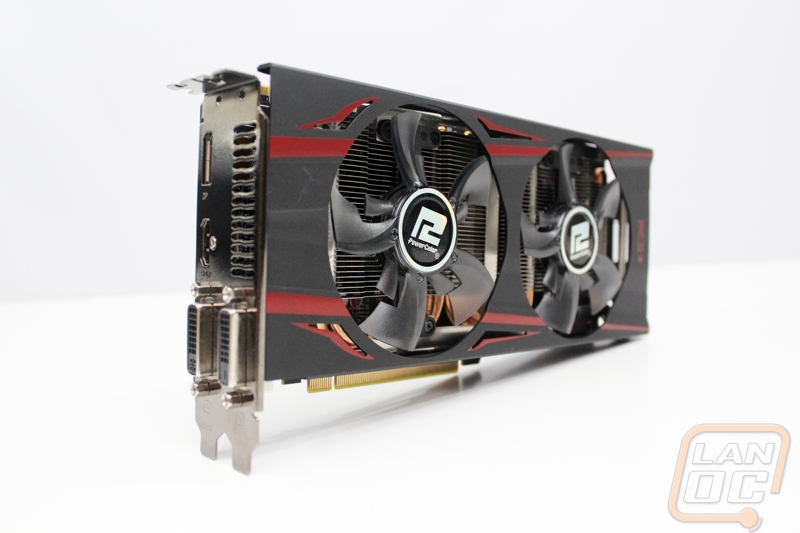
What sets the PowerColor PCS+ R9 270X apart from the other R9 270X’s on the market is the PCS+ cooling design. Without it you just have another reference card that could come from any manufacture. They went with a dual fan cooling design and really packed the two fans in, this is noticeable on the top and bottom where there just isn’t any more room to go larger. The fan shroud design is black with red stripes going across it giving it a bit of an Asus styling. This isn’t a bad thing though, the card looks great but is still subtle enough to look good in any build, even if you aren’t using red in that build. The two fans are really unique in design with five large blades on each with notches cut out of them that house five small blades. I’m really curious to see how they perform in both cooling and noise levels as this isn’t anything like what other cards use. The rest of the cooling design is similar to some cards though with multiple heatpipes pulling heat from the GPU out over the heatsink for the two fans to cool everything down.

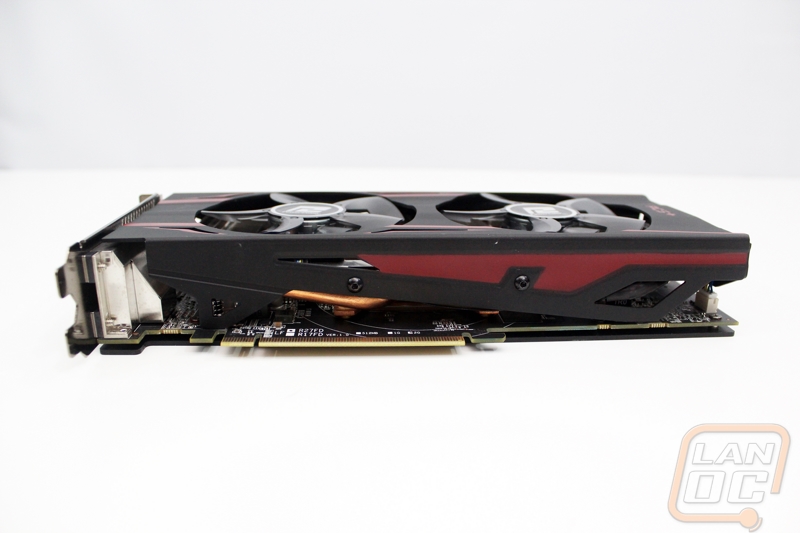
Like most video cards with upgrade coolers, the PCS+ cooling does vent into the case from the top bottom and end of the card. This is because the dual fan design pushes more air than it would be possible to push out the back of the case.


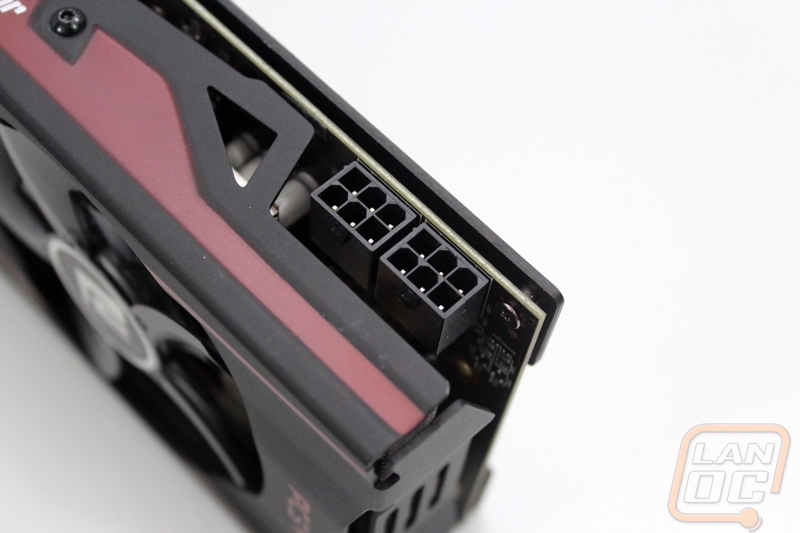
For power connections, PowerColor didn’t do anything different from the reference design. You need one four pin power as well as a six pin power connection.
Just like other R9 270X’s, this card has a single Crossfire bridge that allows you to run two in crossfire in the future if you are hoping to add more performance.

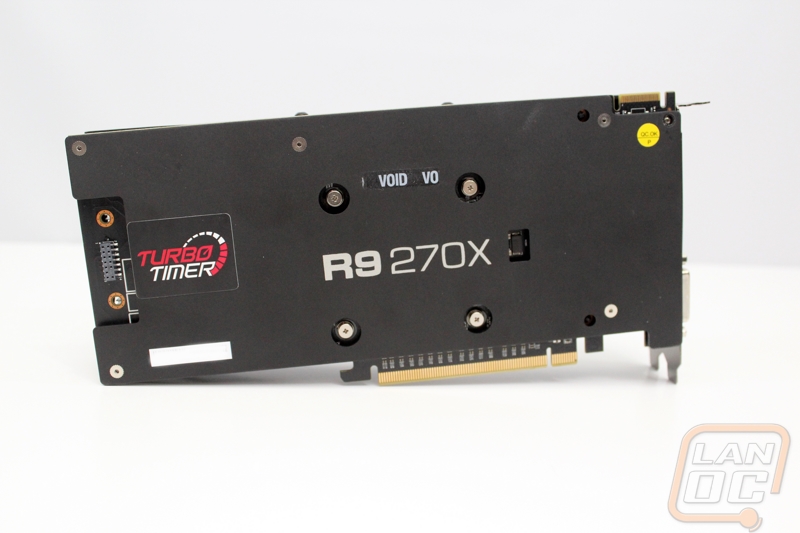
I think one of if not the best feature on the PCS+ R9 270X is the all black backplate that covers the PCB of the card. Not only will this make the card stronger and prevent any sagging, but it will also prevent you from shorting anything out on the back of the card as well. The backplate has the R9 270X logo on it, but I would have preferred it to be facing the other way so it would be visible when the card is installed. Beyond that you have a sticker for PowerColor’s Turbo Timer. Those of you who are into cars might know what a Turbo Timer is. On cars, a turbo timer keeps your car running after you shut it off to idle the turbo down to a better temperature before shutting the car off. This lengthens the life of your turbo by keeping the lubricating oil from burning up after you shut your car off. PowerColor has taken that same idea and designed a product that attaches to the back of this and other cards to run the video card fans after you turn off your PC to cool the video card down.
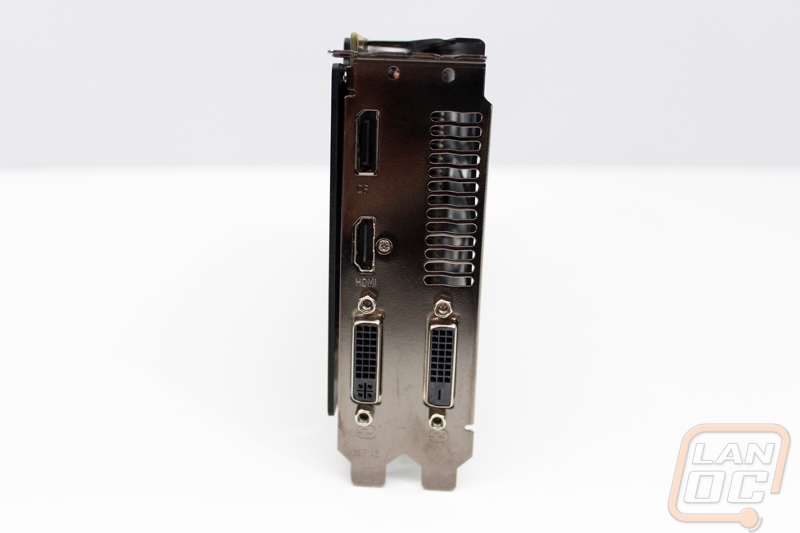
Down on the end, the PCS+ R9 270X has a standard layout of connections. You get two DVI connections along with a full sized HDMI and a full sized DisplayPort. This is what I see on just about every card right now and the reason for that is because when combined with a DVI to VGA adapter, this covers all of the possibilities.
Our Test Rig and Procedures
|
Our Test Rig |
|
|
CPU |
|
|
Memory |
|
|
Motherboard |
|
|
Cooling |
|
|
Power Supply |
|
|
Storage |
|
|
Case |
|
|
Our Testing Procedures |
|
|
Bioshock Infinite |
Using the Adrenaline Action Benchmark Tool we run Bioshock Infinite on the “Xtreme” quality setting. This has a resolution of 1920x1080, FXAA turned on, Ultra Texture detail, 16x Aniso Texture Filtering, Ultra Dynamic Shadows, Normal Postprocessing, Light Shafts on, Ambient Occlusion set to ultra, and the Level of Detail set to Ultra as well. |
|
Tomb Raider |
Using the Adrenaline Action Benchmark Tool we run Tomb Raider on the “Xtreme” quality setting. This has a resolution of 1920x1080, Exclusive Fullscreen turned on, Anti-Aliasing set to 2xSSAA, Texture Quality set to Ultra, Texture Aniso set to 16x Aniso, Hair Quality set to TressFX, Shadow set to Normal, Shadow Resolution on High, Ultra SSAO, Ultra Depth of Field, High Reflection quality, Ultra LOD scale, Post Processing On, High Precision RT turned on, and Tessellation is also turned on. |
|
Hitman: Absolution |
Using the Adrenaline Action Benchmark Tool we run Hitman: Absolution on the “Xtreme” quality setting other than the MSAA setting is turned down from 8x to 2x. That setting puts the resolution at 1920x1080, MSAA is set to 2x, Texture Quality is set to High, Texture Aniso is set to 16x, Shadows are on Ultra, SSA is set to high, Global Illumination is turned on, Reflections are set to High, FXAA is on, Level of Detail is set to Ultra, Depth of Field is high, Tessellation is turned on, and Bloom is set to normal. |
|
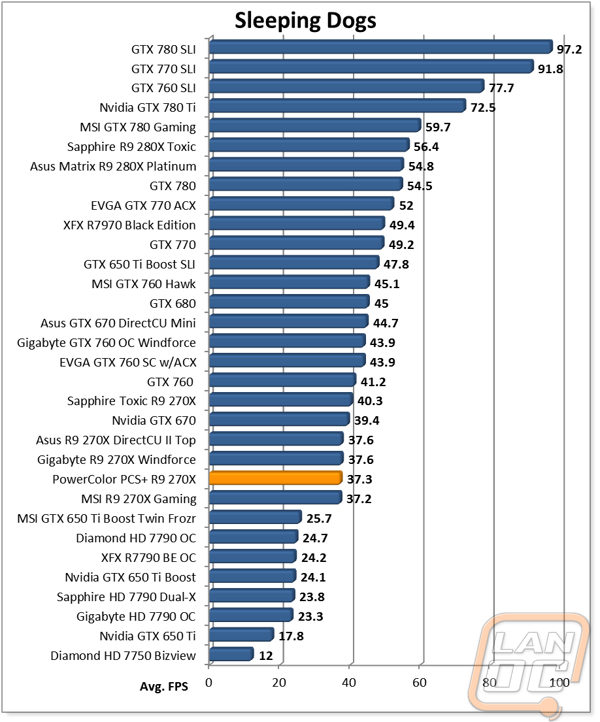
Sleeping Dogs |
Using the Adrenaline Action Benchmark Tool we run Sleeping Dogs on the “Xtreme” quality setting. That means our resolution is set to 1920x1080, Anti-Aliasing is set to Extreme, Texture Quality is set to High-Res, Shadow Quality is High, Shadow Filter is set to high, SSAO is set to High, Motion Blur Level is set to High, and World Density is set to Extreme. |
|
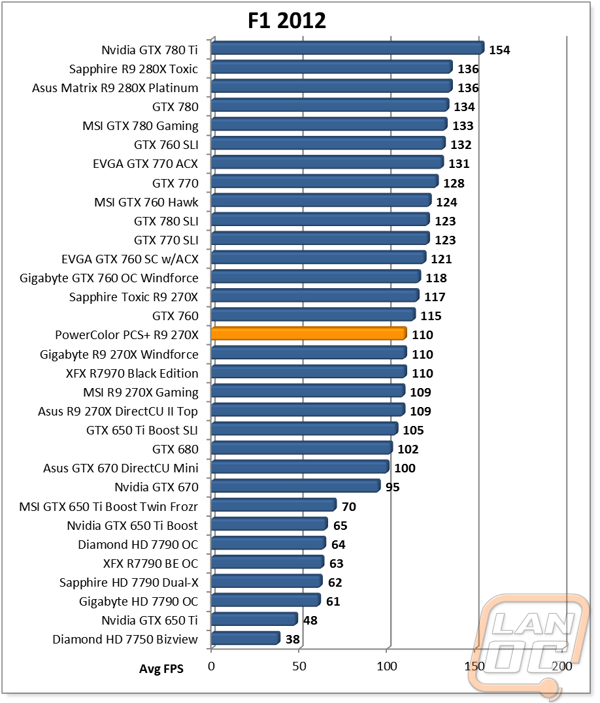
F1 2012 |
We use the built in benchmark for F1 2012. We set our resolution to 1920x1080 and then use the “Ultra” setting. |
|
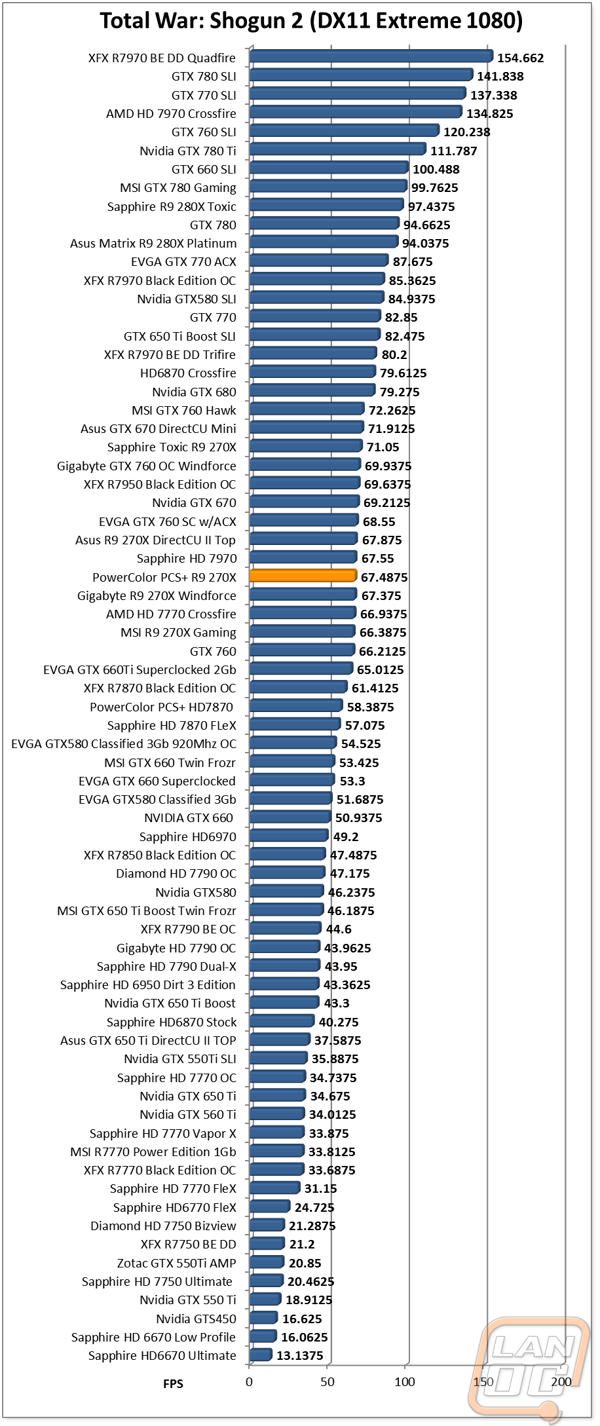
Total War: Shogun 2 |
Direct X11 Benchmark High setting |
|
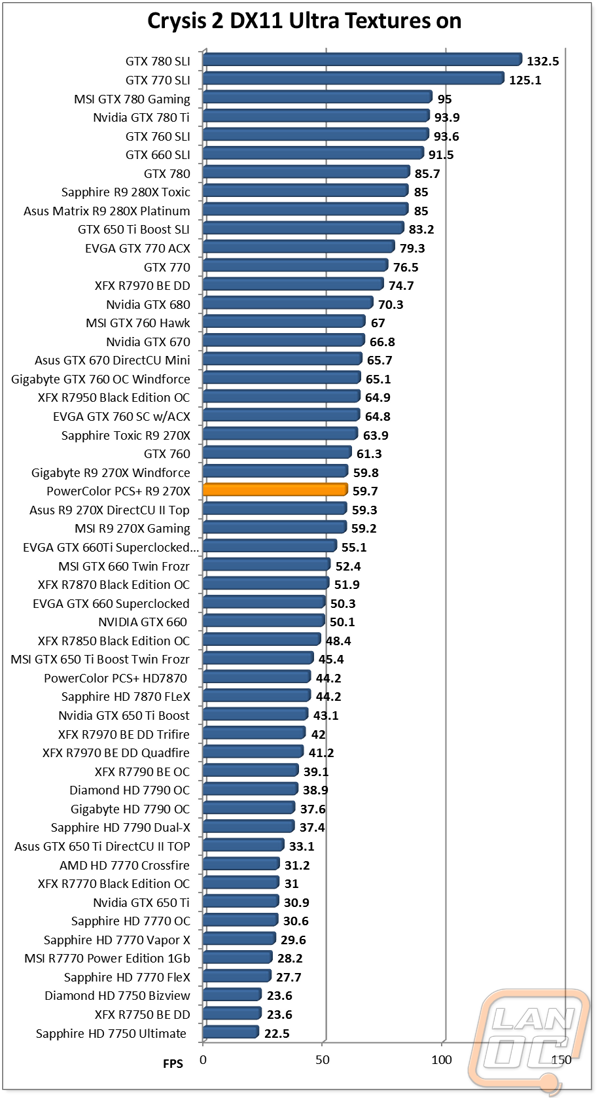
Crysis 2 |
Using Adrenaline Crysis 2 benchmark. 1080p, 4x Anti-Aliasing, DX11, Laplace Edge Detection Edge AA, on the Times Square map, with hi res textures turned on. |
|
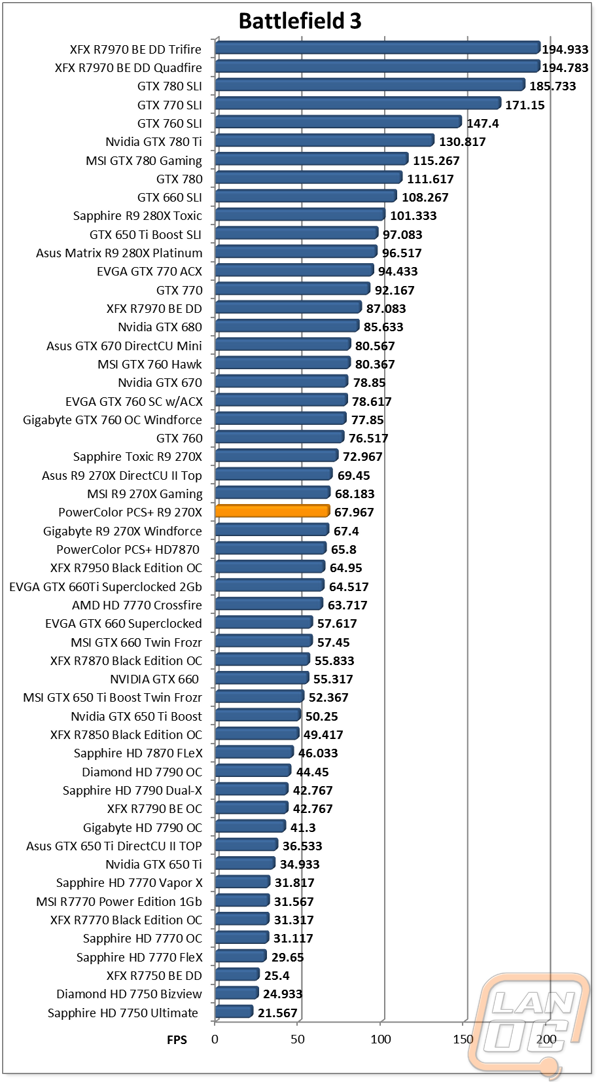
Battlefield 3 |
Using Fraps with the game set to Ultra settings with 4x MSAA Antialiasing Deferred, 16X Anisotropic Filter, at 1920x1080. |
|
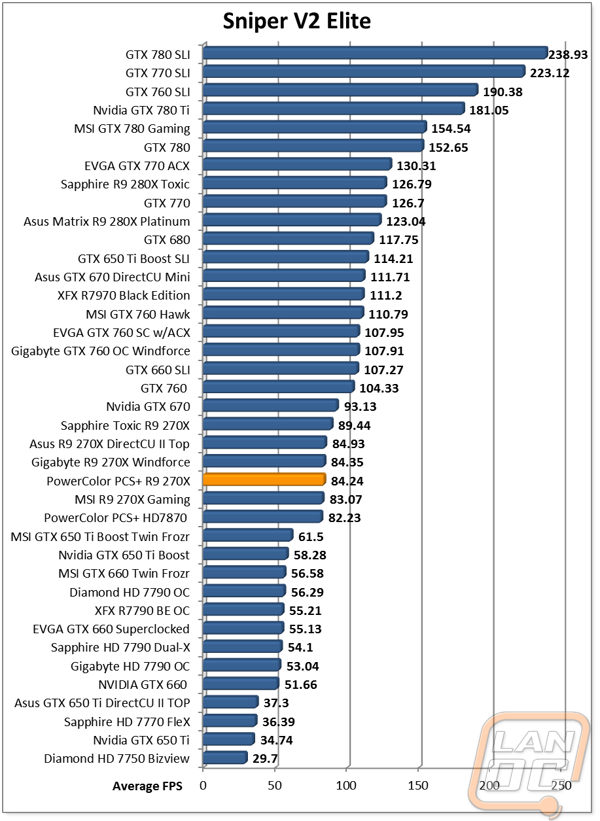
Sniper V2 Elite |
1920 x 1080 resolution, graphics detail set to ultra |
|
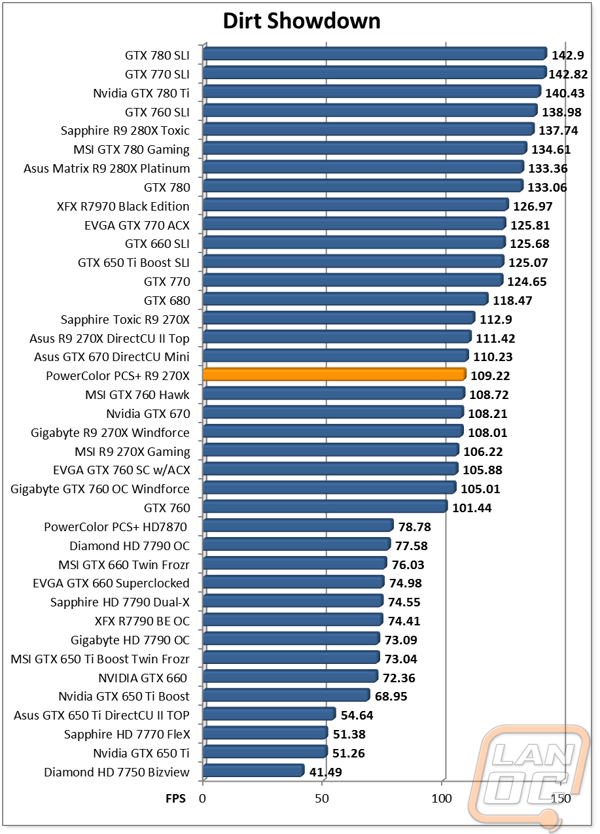
Dirt Showdown |
1920 x 1080 resolution, 4x MSAA multisampling, Vsync off, Shadows: ultra; Post Process: High; Night Lighting: High; Vehicle Reflections: Ultra; Ambient Occlusion: Ultra; Water: high; Objects: Ultra; Trees: Ultra; Crowd: Ultra; Ground Cover: High. |
|
Metro Last Light |
Using the included benchmark tool. The settings are set to 1920x1080, DirectX 11, quality is set to very high, Texture filtering is untouched at 4x, and motion blue is set to normal. SSAA is unselected, PhysX is unselected, Tessellation is off. We run through scene D6 three times to get an average score. |
|
Synthetic Benchmarks |
For video cards our synthetic benchmarks are limited to 3DMark Vantage 2011, and 3DMark 2013 (AKA 3DMark). In 3DMark Vantage 2011 we run both performance and extreme benchmarks. The same goes for the most current version of 3DMark, we run through Fire Strike on standard and extreme settings. |
|
Unreal Heaven Benchmark 4.0 |
Using the “Extreme” preset |
|
Unreal Heaven Benchmark 4.0 heat testing |
We run through Unreal Heaven at 1080p for 30 minutes to test in game heat performance and noise output of the card while under load. |
|
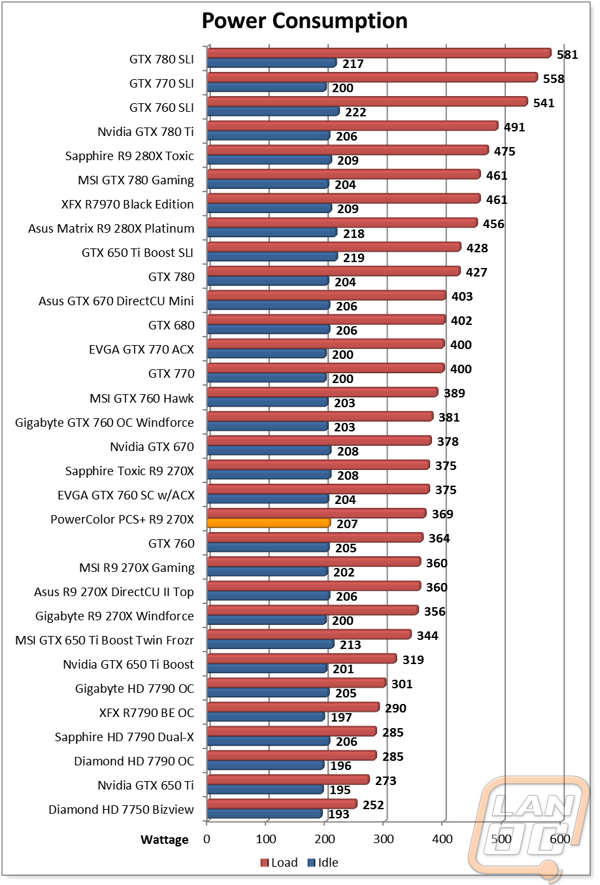
Power Usage |
Using Unreal Heaven Benchmark 4.0, we get our “load” power usage number from the peak power usage during our test. We get our numbers from a Kill-A-Watt connected to the test benches power cord. |
|
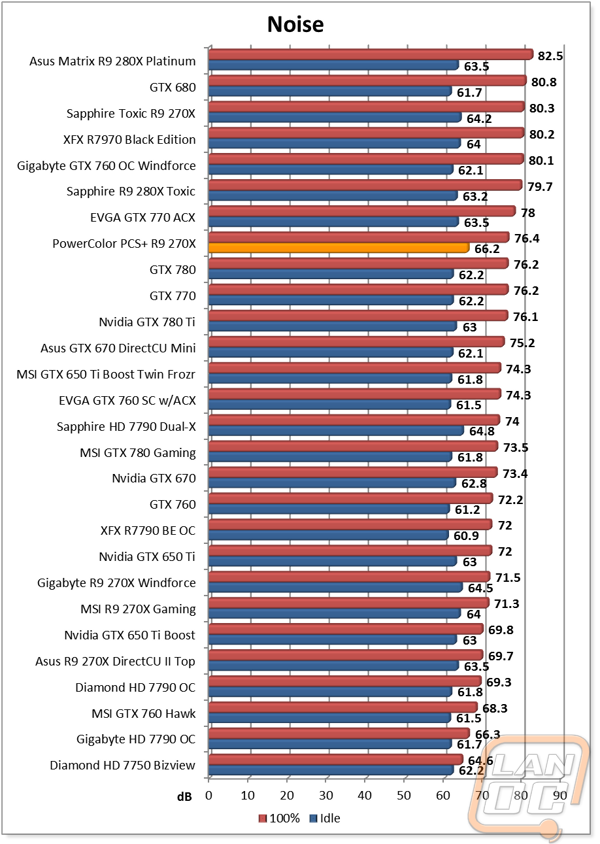
Noise Testing |
Our Noise testing is done using a decibel meter 3 inches away from the video card on the bottom/fan side of the card. We test an idle noise level and then to get an idea of how loud the card will get if it warms all the way up we also turn the fan speed up to 100% and test again. The 100% test isn’t a representation of typical in game noise levels, but it will show you how loud a card can be if you run it at its highest setting or if it gets very hot. |
Cooling, Noise, and Power
As I mentioned before, what really sets the PowerColor PCS+ R9 270X apart from other R9 270X’s is its PCS+ cooling. Because of that I was extremely excited to see how well its cooling performed in our cooling and noise testing. Before I get into that though let’s see how it performed in power testing. I ran the PCS+ R9 270X through Heaven Benchmark 4.0 and documented its peak load as well as a full idle load as well. At idle the PCS+ R9 270X fell right in between other R9 270X’s at 207 watts. The same happened with its load performance at 369 watts. You shouldn’t have to worry about what power supply you run with the PCS+ R9 270X.
For noise levels, went through our normal idle and 100% fan speed testing to find that at idle the PCS+ R9 270X was noisier than most. Under full load though it was still quieter than the Sapphire card, but still above average compared to the other cards tested. Not included in this graph currently, I also ran through the same test at 50% fan speed as well. At 50% fan speed the PCS+ R9 270X made hardly any more noise than at idle (68 decibels) meaning it should actually be reasonably quiet in day to day use.
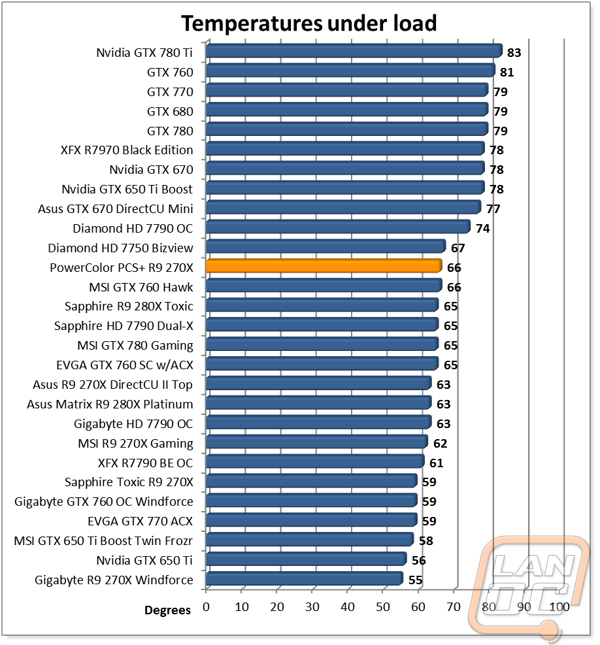
As for cooling testing, the PCS+ cooling performed much better than any of the reference designed cards we have tested. But when compared to the other R9 270X’s that I have tested in the past, it fell slightly short. I suspect that the unique fan design isn’t pushing as much air as some of the other fans. The difference is only a few degrees, so I wouldn’t hold it against the PCS+ too much. But it is still something to keep in mind when picking out your card.
Synthetic Benchmarks
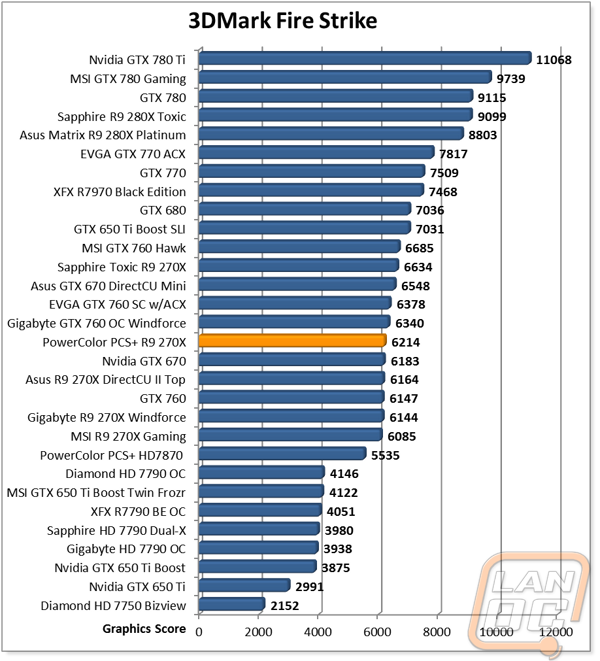
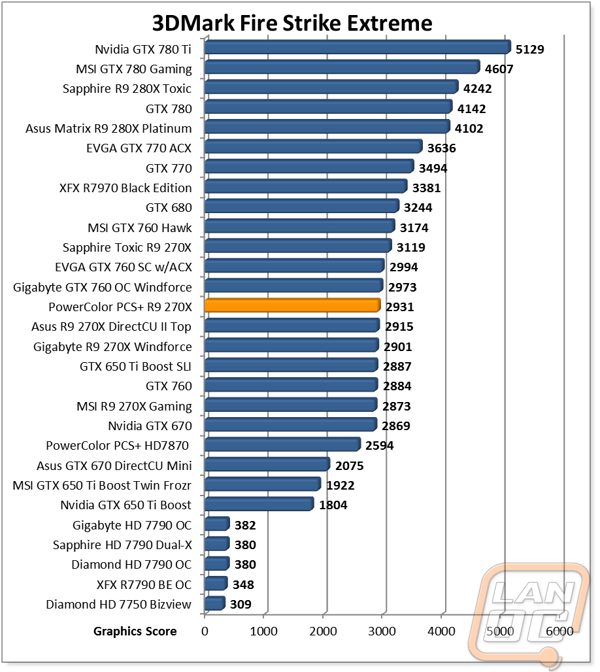
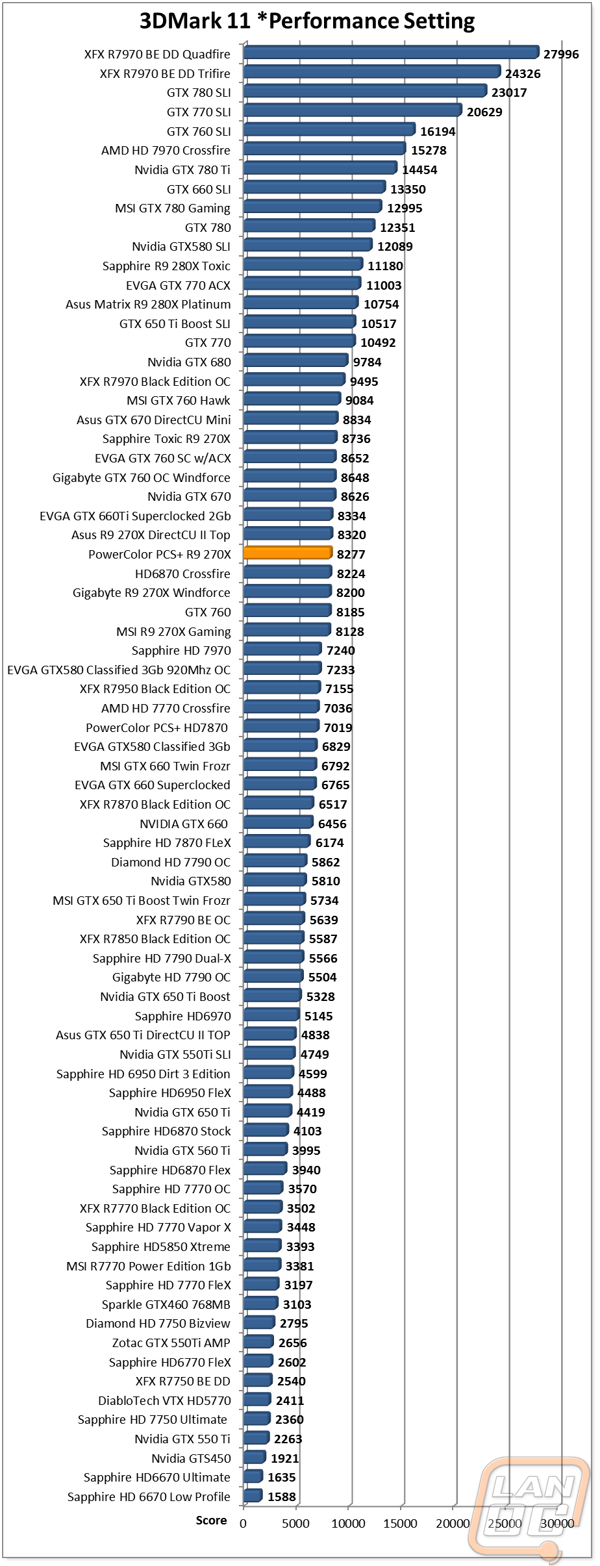
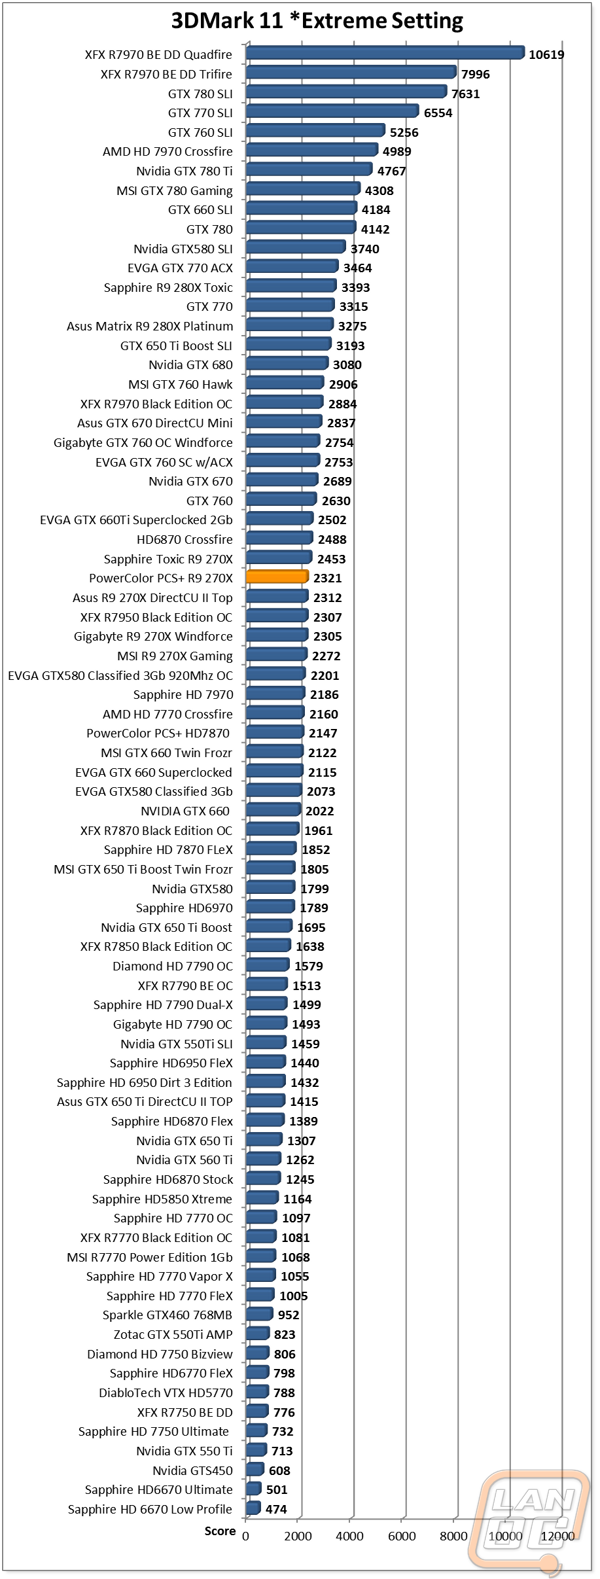
To get my first taste of how the PCS+ R9 270X performs I ran it through our synthetic benchmark test suite that includes 3DMark Fire Strike and 11 in both performance and extreme settings. Along with that we also include the Unreal Heaven Benchmark 4.0. In Fire Strike as well as 3DMark 11 the PCS+ R9 270X out performs all of the other R9 270X’s other than the highly overclocked Toxic card. The results from Heaven Benchmark 4.0 were similar but a little closer to the other 270X’s. When compared to the Nvidia cards the PCS+ R9 270X performs just short of what we saw previously from the overclocked GTX 760’s but above the stock GTX 760.

In Game Benchmarks
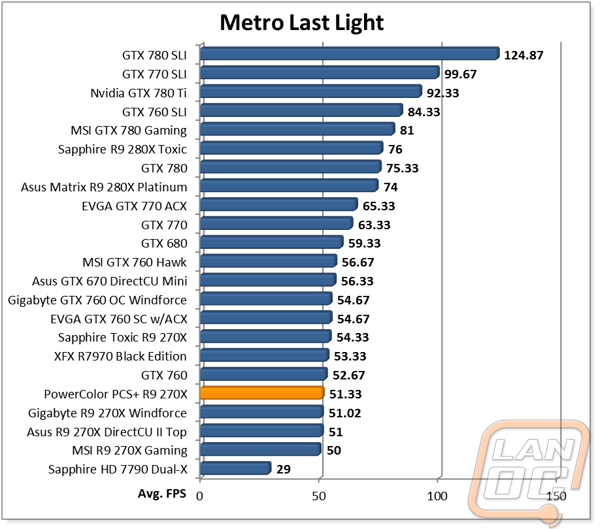
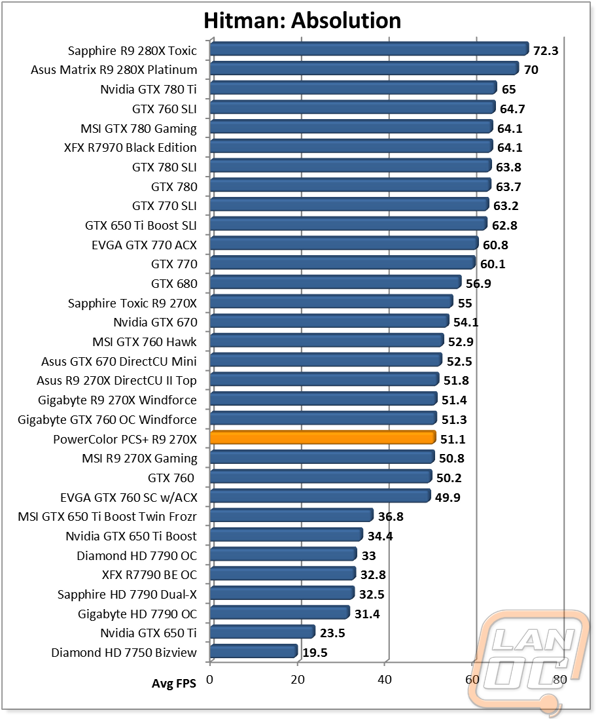
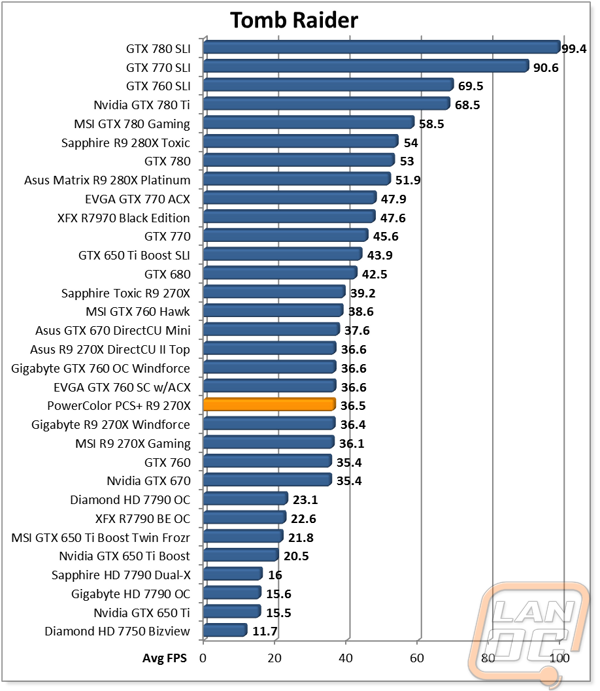
As always, the synthetic benchmarks are great and all, but it’s how the card performs in game that really makes a difference for most of us. To test the PCS+ R9 270X, I ran through our in game test suite that includes a range of game from the past few years with a focus on some of today’s biggest hits like Bioshock Infinite.
To start things off, out of the 11 games benchmarked 5 of them averaged over 60 FPS. All of the results were over 30 FPS, what most would consider a playable FPS, but obviously 60 FPS or higher is always the goal. Most of the results that came in below 60FPS were still very close, especially Crysis 2 where the PCS+ R9 270X averaged 59.7 FPS. When you look at the results when compared to the other R9 270X’s the PCS+ R9 270X comes right in the middle in most cases with only a small difference between them in most cases.

Overclocking
Once I was finished up with all of our regular testing, I had to put the PCS+ R8 270X through its paces in overclocking as well. As usual I broke the overclocking up into three parts, gpu, memory, then together. All of our overclocking is done using the AMD overclocking tool meaning you are limited to the voltage, memory, and gpu clock speed adjustments that the software allows. Starting with the GPU I ran through a couple quick overclocks at 1200MHz and 1250MHz before I ran into issues at 1300MHz. From there I started to drop my clock speeds back down and turn up the power limit on the card until I was able to get through our benchmark at 1265MHz.
On the memory side of things this wasn’t an issue. Just like the other R9 270X’s I have tested in the past, I was able to run all the way up to the 1625MHz limit that AMD put in place without any issues. Lastly I put the two together and gave it a try. The first time through it failed, but after turning the power increase back up I was able to get through it with 1265MHz on the GPU core clock and 1625MHz on the memory clock.
|
GPU Clock Speed Overclocking |
|||
|
GPU Clock Speed |
Pass/Fail |
FPS Result |
Notes |
|
1200MHz |
Pass |
44.29 |
|
|
1250MHz |
Pass |
45.75 |
|
|
1300MHz |
Fail |
N/A |
|
|
1275MHz |
Fail |
N/A |
|
|
1275MHz |
Fail |
N/A |
With power turned up |
|
1265MHz |
Pass |
46.29 |
|
|
Memory Clock Offset Overclocking |
|||
|
Memory Clock Speed |
Pass/Fail |
FPS Result |
Notes |
|
1500MHz |
Pass |
41.45 |
|
|
1550MHz |
Pass |
41.05 |
|
|
1600MHz |
Pass |
41.30 |
|
|
1625MHz |
Pass |
41.34 |
|
|
Combined GPU and Memory overclocks together |
|||
|
GPU Clock Speed |
Memory Clock Speed |
FPS Result |
Notes |
|
1265MHz |
1625MHz |
N/A |
Failed w/BlueScreen |
|
1265MHz |
1625MHz |
46.53 |
Turned up power limit |
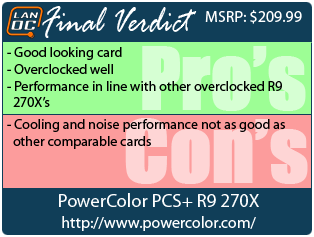
Overall and Final Verdict
Now that all of our testing is finished up, we can look back at the PCS+ R9 270X’s performance and say without a doubt that it held its own. When it came to in game and synthetic benchmarks the PCS+ performed in line with the comparably overclocked R9 270X’s that we have tested in the past. I was happy with what I was able to edge out of it when overclocking as well. The only aspect where I was hoping for a little more was in its cooling and noise performance. It performed great compared to reference cards, but the numbers where a little lower when put next to other 270X’s with aftermarket cooling. To make up for it though, I really loved the styling of the card with its black with red trim. In the end the PCS+ R9 270X is a good card that doesn’t really stand out in a very crowded market full of other R9 270X’s with aftermarket coolers. What will really be the determining factor is the price. With the card at $209.99 currently, it is cheaper the most of the other options, making it a good buy. If you have been holding onto your Christmas money for a new video card, this could be the one.