When I spoke about the AMD launch of its new R9 cards, I mentioned that most of the cards are rebadged versions of the 7000 Series cards. That doesn’t mean manufactures couldn’t go out of their way to improve on the designs themselves. Asus attempted this with their flagship R9 280X called the Matrix R9 280X Platinum. The Matrix itself brings a lot of amazing features, but the platinum edition is handpicked and equipped with a higher overclock to go with it all. Today I’m going to take a close look at the card to see what sets it apart from the rest of the R9 280X’s on the market.
Product Name: Asus ROG Matrix R9 280X Platinum
Review Sample Provided by: Asus
Written by: Wes
Pictures by: Wes
|
Specifications |
|
|
GPU |
Radeon R9 280X |
|
GPU Clock |
1100 MHz |
|
Memory Clock |
6400 MHz |
|
Memory Size |
3072MB GDDR5 |
|
Bus Type |
PCI Express 3.0 |
|
Memory Bus |
38bit |
|
Stream Processors |
2048 |
|
DirectX 11 |
Yes |
|
DVI Port |
DVI-I / DVI-D |
|
Power Connections |
2 x 8 pin |
|
DisplayPort |
Yes x4 |
|
HDMI |
HDMI 1.4a |
|
HDCP |
Yes |
|
Cooling System |
2.5 slot cooling solution with direct CU design and two 10 cm fans |
|
Backplate |
Yes |
|
Demensions |
11.2 " x 5.7 " x 2.1 " Inch |
|
Features |
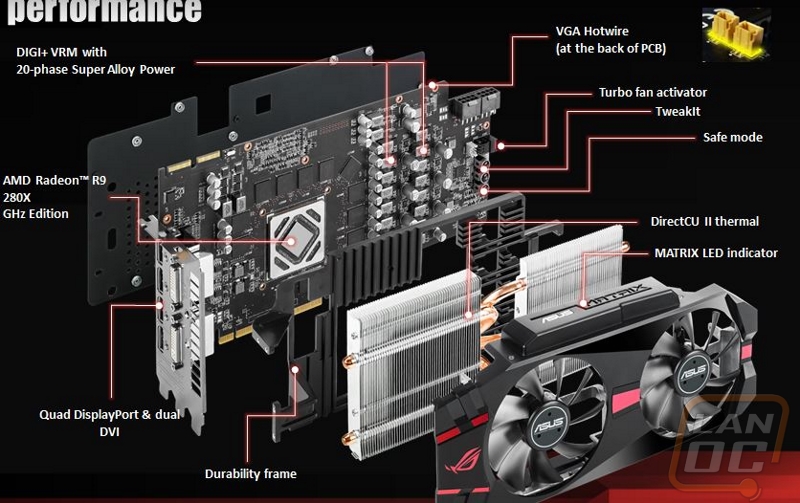
VGA Hotwire Tweakit Turbo Fan Activator Safe Mode DIGI+ VRM with 20-phase Super Alloy Power DirectCU II MATRIX LED Load Indicator GPU Tweak Software |
|
Accessories included |
1 x CrossFire cable 1 x DVI to D-Sub adaptor 1 x Power cable |
Packaging
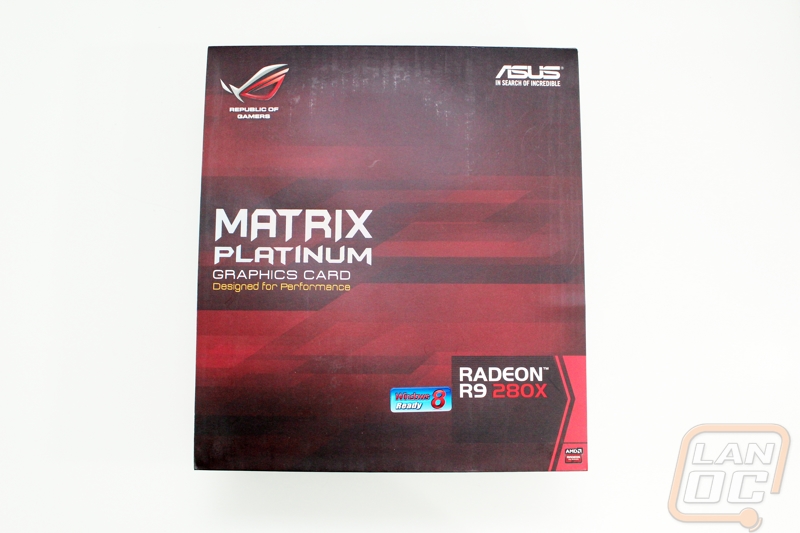
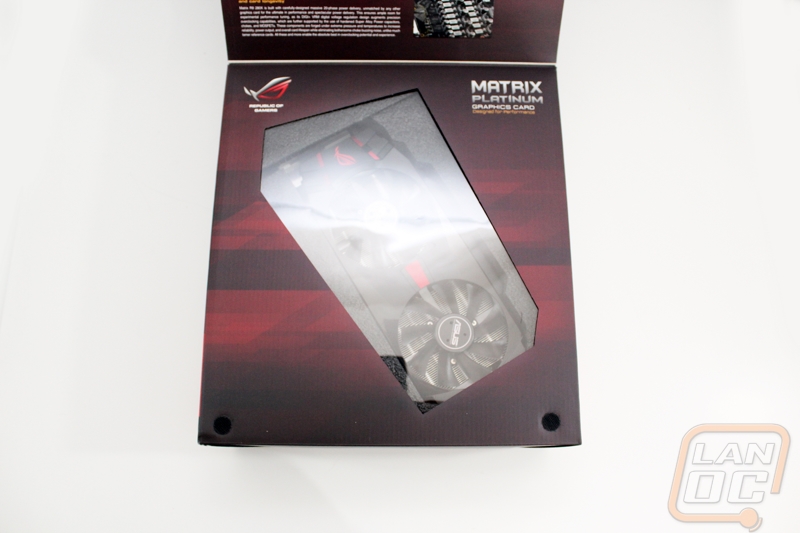
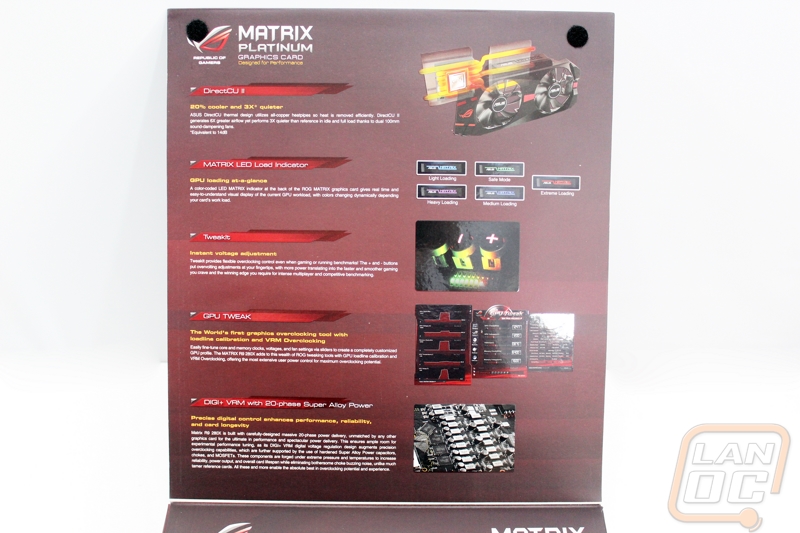
When the Matrix Platinum came in, it was obvious that this isn’t any regular card. The size of the box along is more in line with the size of a full ATX motherboard than a video card, especially when sitting next to the R9 270X box that came along side of it. Of course it continues the standard Republic of Gaming color scheme and styling with a clean look on the cover with just the model and brand information. You can open up the cover to see the card itself inside of a window and on the back of the cover Asus has include more information on what makes the card special. They have five key features listed with each one having a small description under it as well as photos on the right to help explain them all.
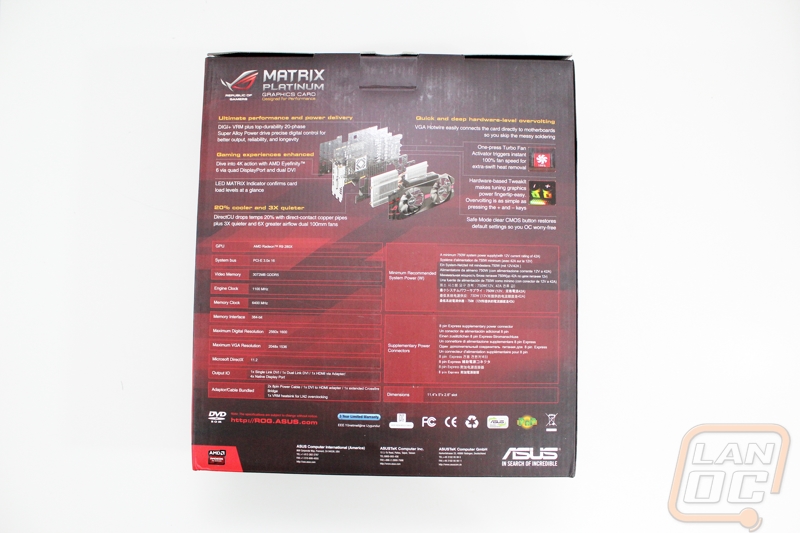
The back of the box has even more information including a complete specification listing as well as an awesome photo of the Matrix broken down by each of its layers showing a little of what it behind the cover. If nothing else I love that Asus has gone out of the way to include actual specifications and a real picture of the card, most manufactures save money by making their packaging as general as possible and miss out on these things.
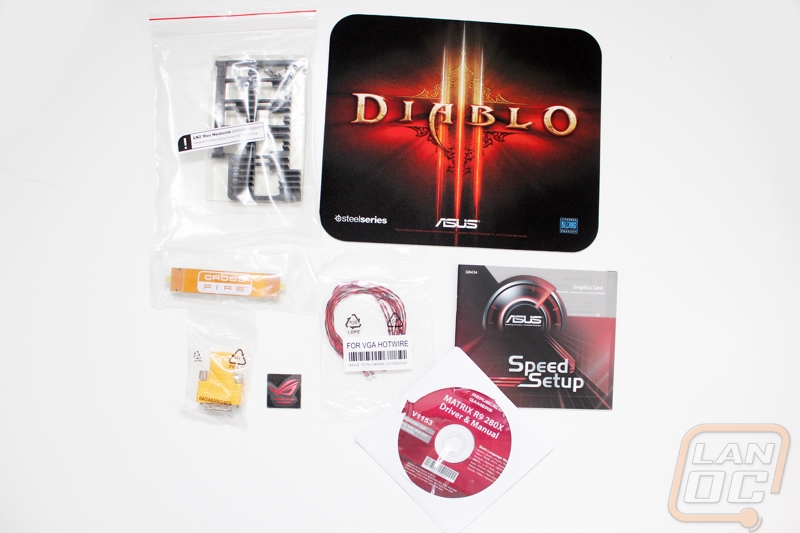
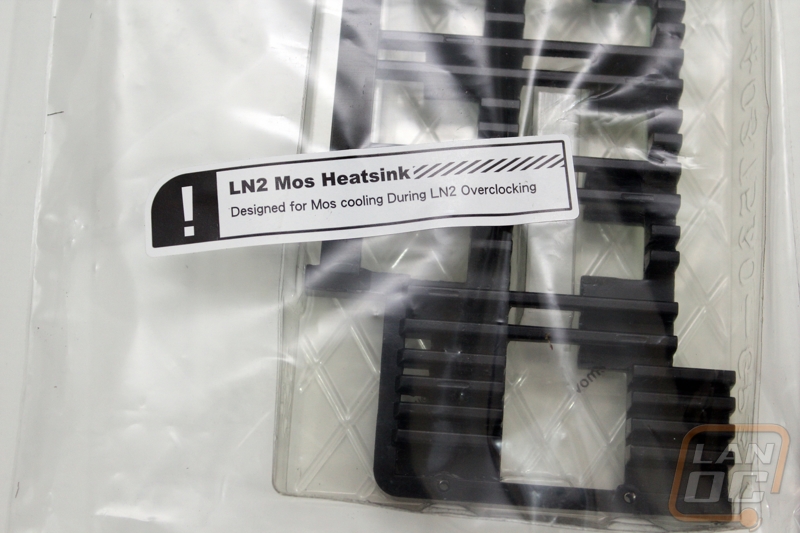
Inside the box, under the card itself that is wrapped in a foam casing, you have a box full of goodies. Inside you will get your user guide and a driver/manual disc. On top of that you have a Crossfire bridge and a DVI to HDMI adapter, both in bright colors. I would prefer to see the Crossfire Bridge in a black or red that would actually go with the card itself. You also get a ROG metal case badge and Diablo 3 mouse pad as well. It’s interesting to see that Asus didn’t hold back on the mouse pad and went with one from SteelSeries where most others would just go with the cheapest model possible, the colors on this are much brighter than what you see with the Intel Extreme mouse pads for example. The last two items you get are specifically for overclocking, you get VGA hotwire cables and a LN2 Mos Heatsink. Its interesting that they included the heatsink in the box as that is a small market, but it shows that the Matrix is focused on high end overclocking performance. This isn’t your dad R9 280X!
Card Layout and Photos
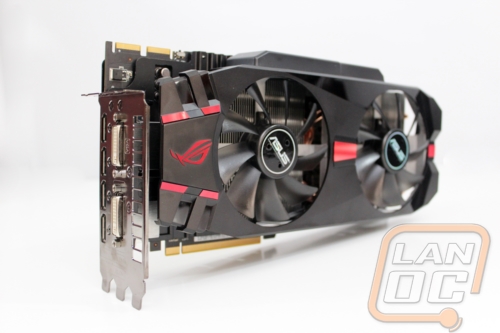
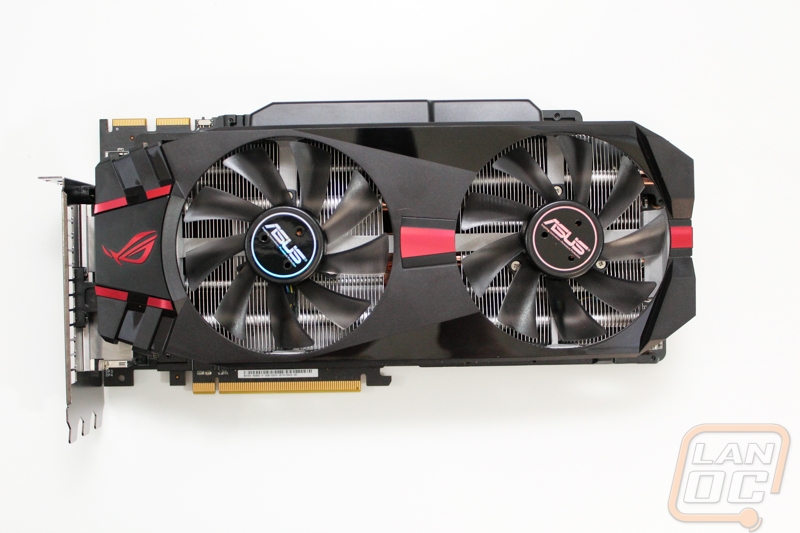
Let’s first point out the most obvious feature of the Matrix Platinum, the card does take up three PCI slots like a few of Asus’s other cards in the past. I’ve spoken with Asus a few times in the past because at first I didn’t see the logic in going this route. The main thing to keep in mind is that it is actually very rare to see people running multiple card configurations, but of the people who do most only run two cards. That is the reason Asus likes to go with a three wide configuration when they can. They know their market and know that the additional cooling capabilities as well as room for features will benefit more people than the ability to be able to run a triple card configuration. The Ironic thing is as someone who runs triple and sometimes quad cards in my main PC, I end up actually using one of the cards only for connections for my multiple monitors, negating the whole reason to run multiple cards, so I can see their justification.
With that being said, I want to point out that the Matrix Platinum looks like any other Asus card design wise, only wider. What I mean by that is it has the same black and red them that all Asus cards have and it does use a Direct CU II cooler meaning it has direct contact on the GPU and two fans. The fan shroud on the Matrix is a little more styled than normal and there is a long list of actual features on the card that set it apart, so let’s take a look around the card at them.
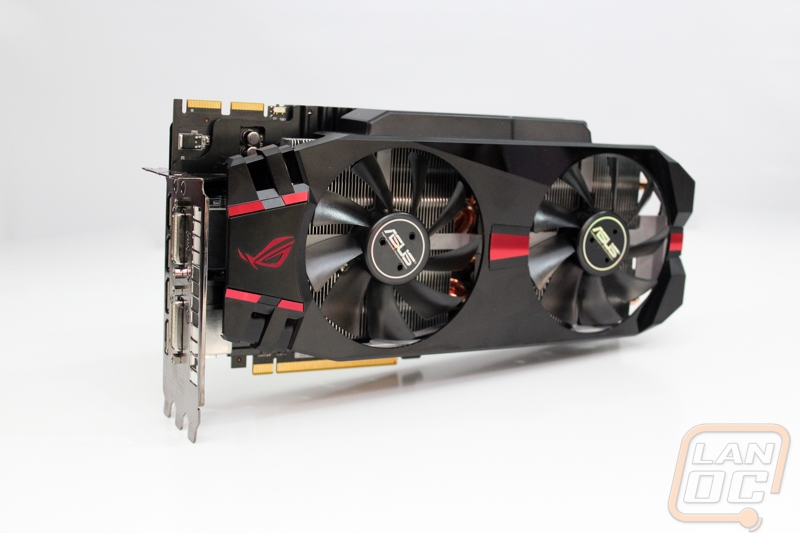
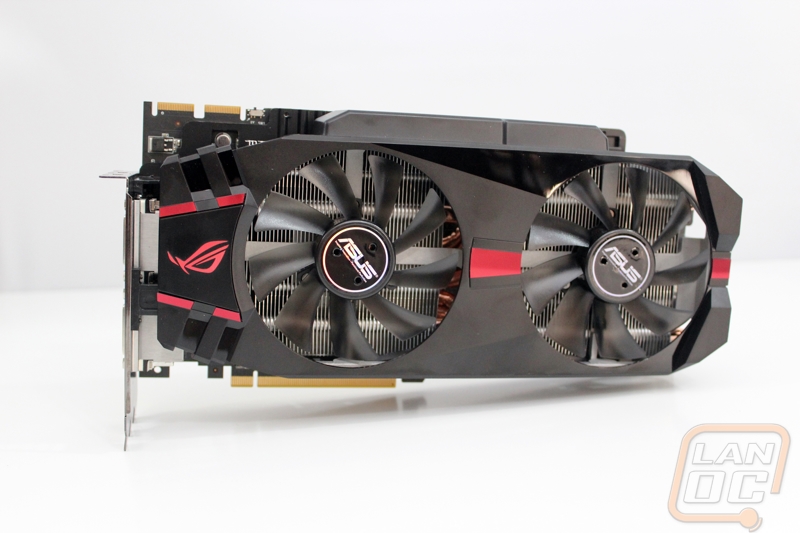
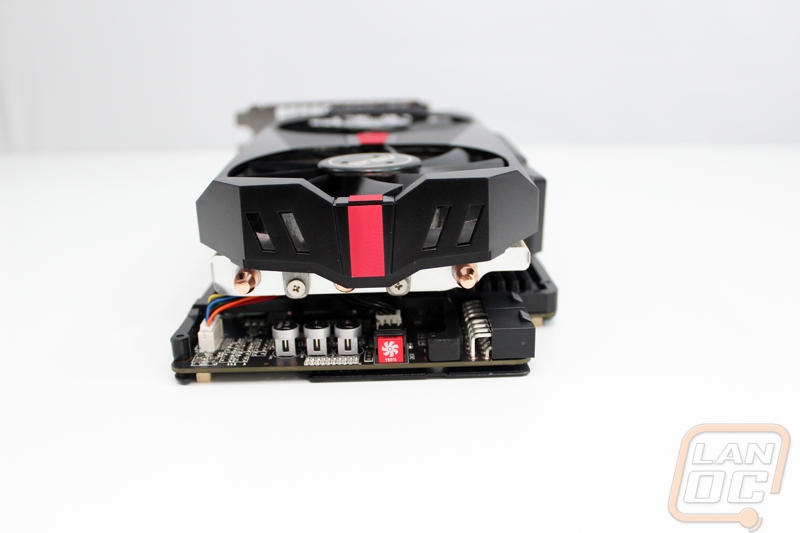
Starting with the view from under the card we have a perfect view of the Direct CU II cooling. You can see the pad that sits directly on top of the GPU as well as the heatpipes coming out of it that spread the heat all over the heatsink. The fan shroud is vented enough to still show all of this off as well as to give room for the heated air coming off the heatsinks to go somewhere. Without a doubt any heat this card creates is going to go into your case, there isn’t anything being pushed out the back of the case, even with the ventilation in the PCI slot.

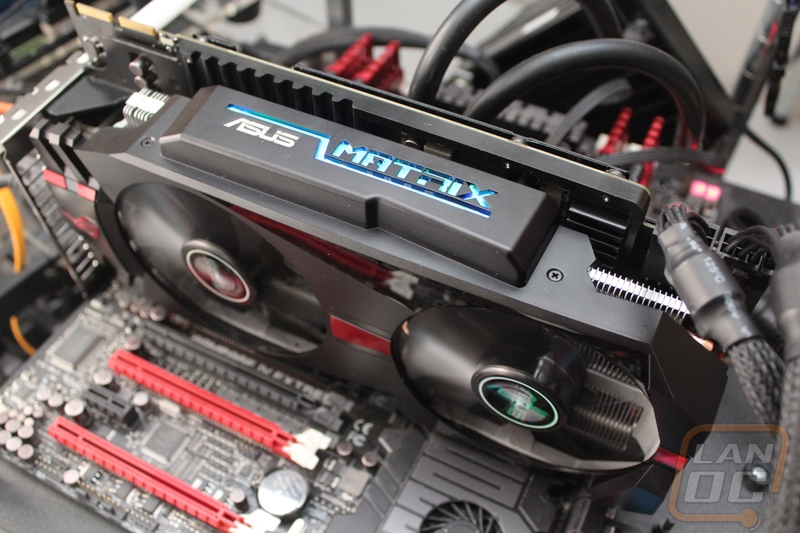
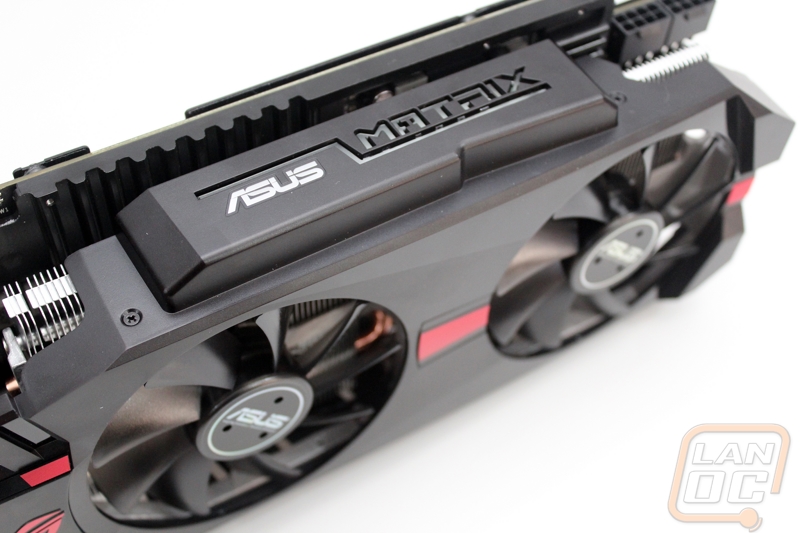
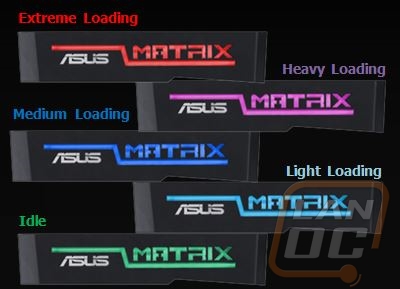
The top of the Matrix really shows off the thickness of this card. To put that space to use Asus integrated the Matrix logo into the card with backlighting. To go with that they also programed that lighting to change colors depending on the load level of the card. The lighting will range from green at idle to red under extreme load. It’s a nice touch, although people looking to match this lighting with their build will be out of luck. You can also get a peek at the large heatsink that covers most of the card to cool all of the power circuitry. Image20
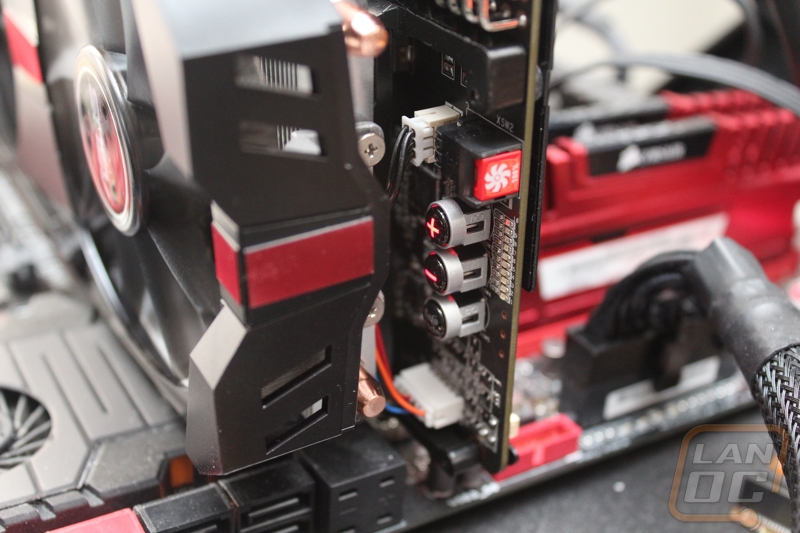
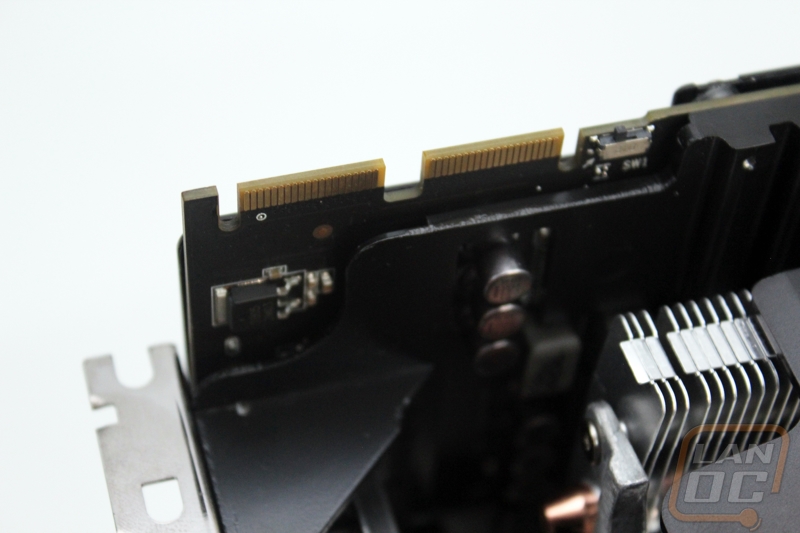
The end of the card is where a lot of the action is. Here below the power connections you have four different buttons. Yeah that’s right, there are buttons on this video card, something I normally only see on high end motherboards. Three are related to a feature Asus is calling Tweakit and the fourth is a turbo fan activator that turns the fans onto 100%. I can say without a doubt that I put the turbo fan button to use multiple times in my testing, it was perfect for overclocking. The Tweakit buttons give you real time hardware level voltage adjustments with a 1-10 LED readout that goes from green to red depending on the amount of voltage you push. There is also a “safe mode” button that takes you back to a stable video BIOS quickly.
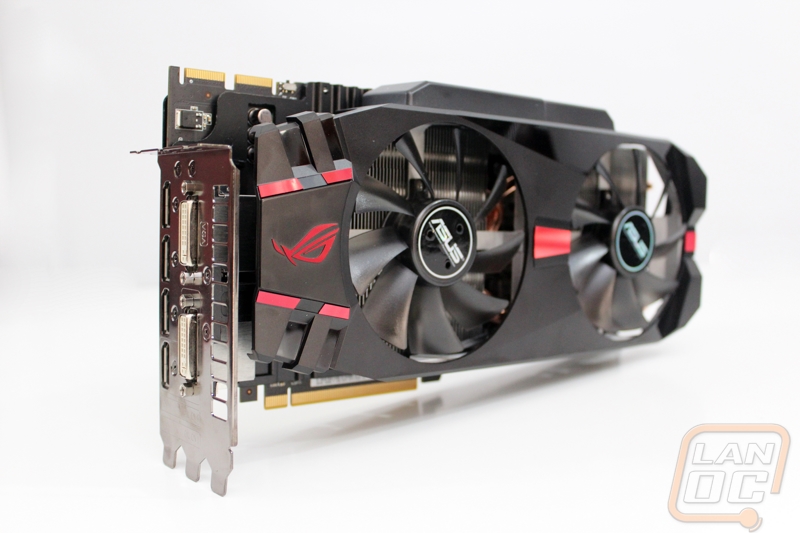
On the back of the PCB in this same area you will also find the VGA hotwire connections. This lets you plug right in to adjust hardware level voltages without having to solder anything.
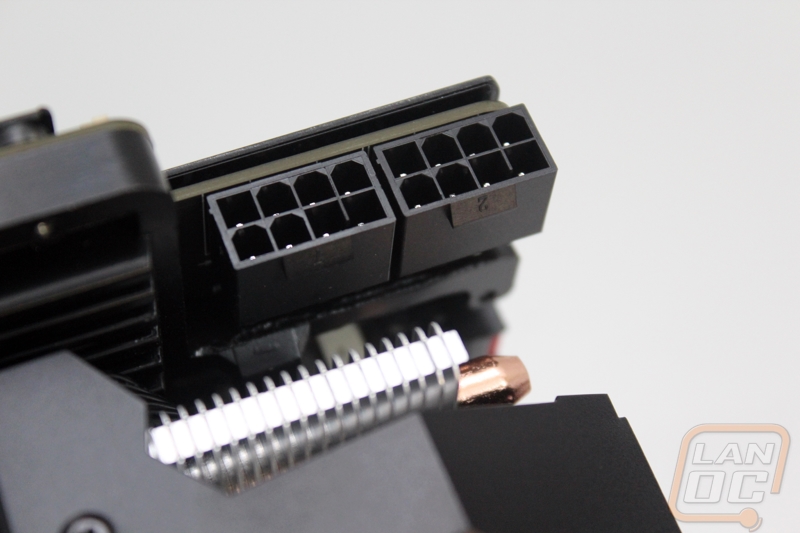
The reference R9 280X requires 1 6-pin and 1 8-pin power connection while the Matrix Platinum steps things up a little but requiring two 8-pin power connections. This is completely understandable given the base overclock and its overclock features. I also noticed that oddly enough each plug is numbers as well, with the left plug having a 1 and the right a 2.
The Matrix Platinum does have two Crossfire bridge connections should you need them, it’s unlikely you would unless you ran water cooling though due to three cards needed 9 slots. It should also be pointed out that these Crossfire connections sit up higher than on a traditional R9 280X.
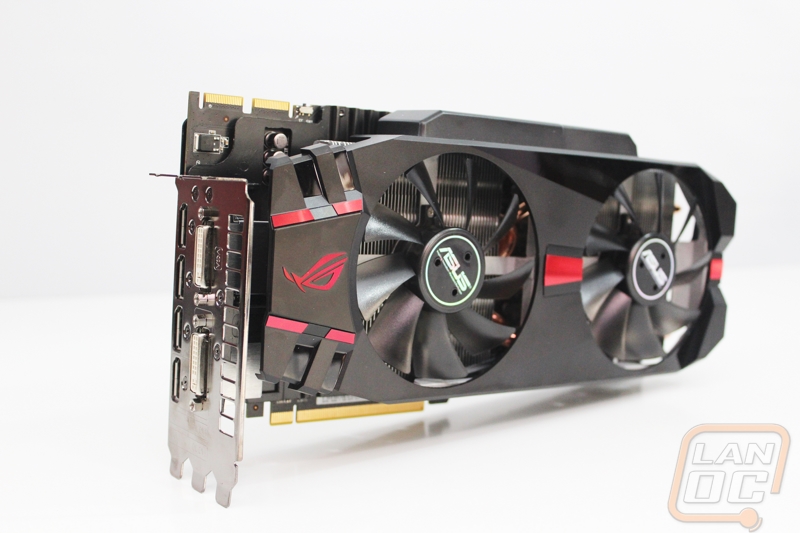
In traditional Asus style, they went over the top on the back of the card as well. The entire back is covered with a vented backplate that has the Asus and Matrix logos on it. You will notice that both logos are upside down here, meaning when the card is installed you will see them perfectly through a side panel window. Even with a backplate they still went with a black PCB as well. Something else I want to point out about the backplate and the design of their Direct CU coolers is the four silver screws that hold the entire cooler on. They make it very easy intentionally to remove your heatsink for overclocking or to clean and freshen up the thermal paste on the card. Most manufactures don’t think about things like this, so every time I work with an Asus card I am always impressed with details like this.
In this photo you can also see better than the PCB design doesn’t take a normal shape and is taller than you would expect. As mentioned before, this means you can’t Crossfire this card with a standard card, but you also have to keep it in mine when picking your case on the off chance that you go with a thin design you could run into fitment issues although this would be a rare situation.

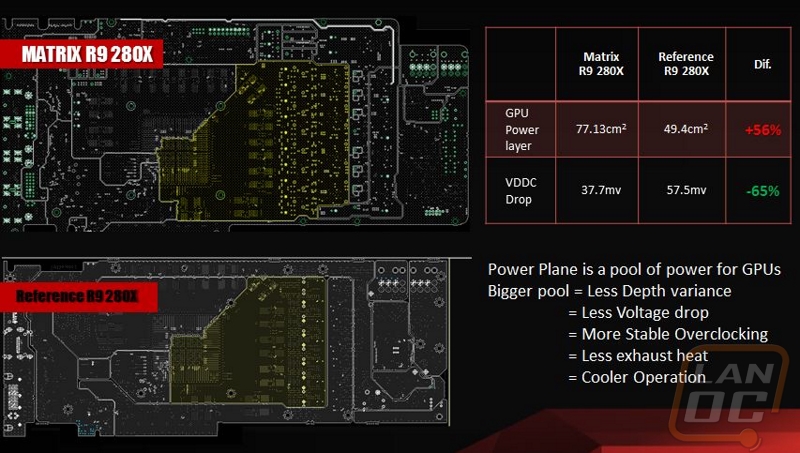
What you can’t see because it is under the backplate is the larger power plane. For reference here is the Matrix compared to a reference card. The size difference is clear as it the reason for the larger PCB that was mentioned as well. Officially you are getting a 56% increase in size and Asus claims 65% less voltage drop that will give you less heat and more stable overclocking. It’s also important to point out that on the flip side of the card Asus went with Black Metallic Caps from the Nichicon GT Series, these also help keep temperatures down and offer a 5x longer lifetime than traditional caps (10,000 hours vs 2,000 hours). These are the kind of features that make a quality card, even if they don’t always show in the performance numbers.
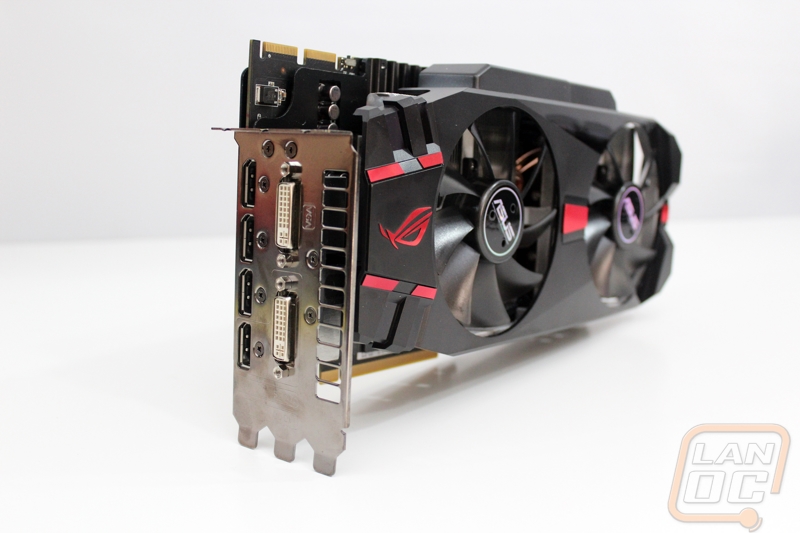
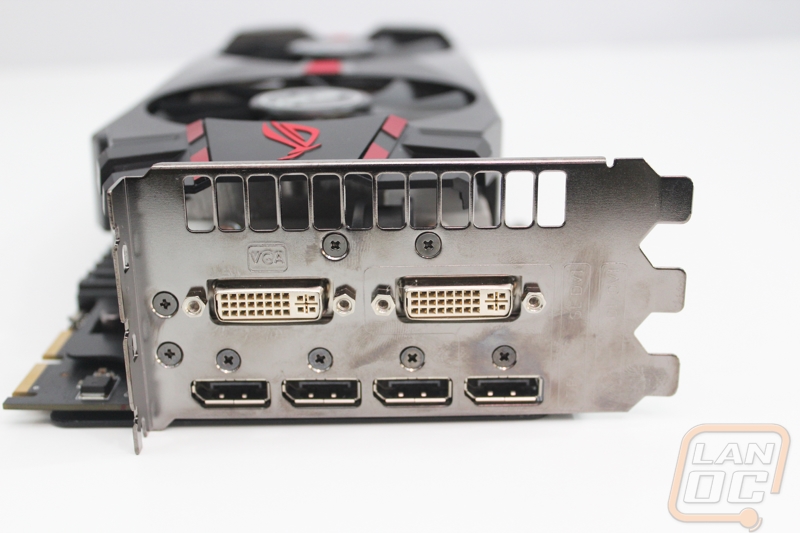
So what did Asus do differently on the end of the card with the additional space? Well the most obvious thing is the entire bottom row is packed with full sized Display Port connections. On top of those you get two DVI ports as well, but ironically no HDMI ports. They did bundle that DVI to HDMI adapter with the card though. With this configuration, with adapters or DisplayPort monitors you could run your entire 6 monitor configuration all on one card.
Our Test Rig and Procedures
|
Our Test Rig |
|
|
CPU |
|
|
Memory |
|
|
Motherboard |
|
|
Cooling |
|
|
Power Supply |
|
|
Storage |
|
|
Case |
|
|
Our Testing Procedures |
|
|
Bioshock Infinite |
Using the Adrenaline Action Benchmark Tool we run Bioshock Infinite on the “Xtreme” quality setting. This has a resolution of 1920x1080, FXAA turned on, Ultra Texture detail, 16x Aniso Texture Filtering, Ultra Dynamic Shadows, Normal Postprocessing, Light Shafts on, Ambient Occlusion set to ultra, and the Level of Detail set to Ultra as well. |
|
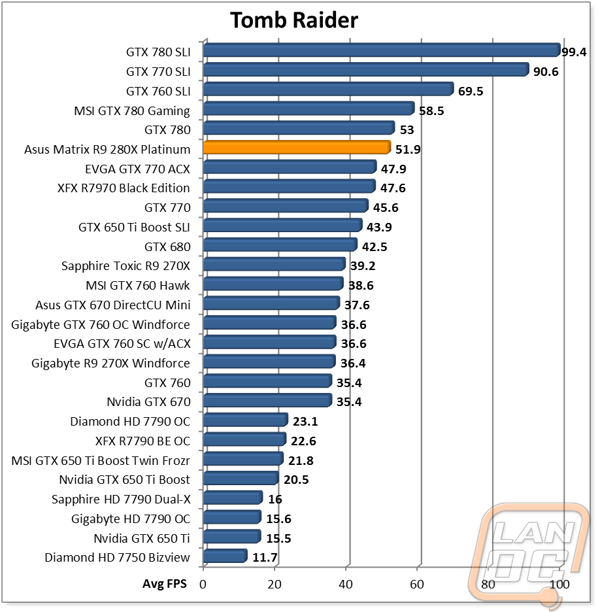
Tomb Raider |
Using the Adrenaline Action Benchmark Tool we run Tomb Raider on the “Xtreme” quality setting. This has a resolution of 1920x1080, Exclusive Fullscreen turned on, Anti-Aliasing set to 2xSSAA, Texture Quality set to Ultra, Texture Aniso set to 16x Aniso, Hair Quality set to TressFX, Shadow set to Normal, Shadow Resolution on High, Ultra SSAO, Ultra Depth of Field, High Reflection quality, Ultra LOD scale, Post Processing On, High Precision RT turned on, and Tessellation is also turned on. |
|
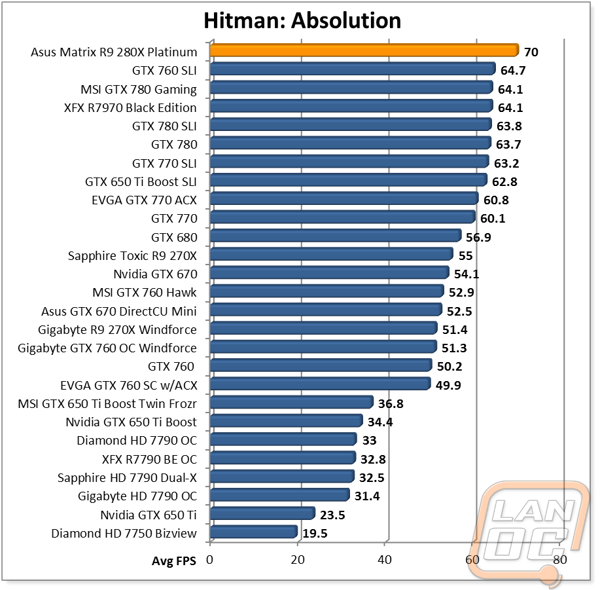
Hitman: Absolution |
Using the Adrenaline Action Benchmark Tool we run Hitman: Absolution on the “Xtreme” quality setting other than the MSAA setting is turned down from 8x to 2x. That setting puts the resolution at 1920x1080, MSAA is set to 2x, Texture Quality is set to High, Texture Aniso is set to 16x, Shadows are on Ultra, SSA is set to high, Global Illumination is turned on, Reflections are set to High, FXAA is on, Level of Detail is set to Ultra, Depth of Field is high, Tessellation is turned on, and Bloom is set to normal. |
|
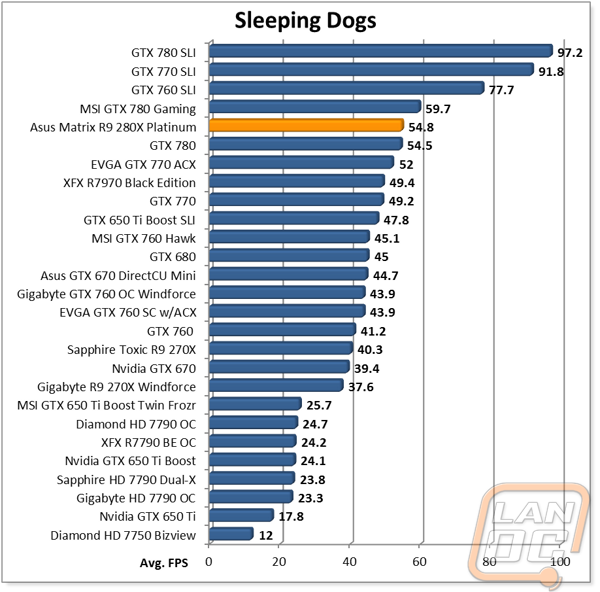
Sleeping Dogs |
Using the Adrenaline Action Benchmark Tool we run Sleeping Dogs on the “Xtreme” quality setting. That means our resolution is set to 1920x1080, Anti-Aliasing is set to Extreme, Texture Quality is set to High-Res, Shadow Quality is High, Shadow Filter is set to high, SSAO is set to High, Motion Blur Level is set to High, and World Density is set to Extreme. |
|
F1 2012 |
We use the built in benchmark for F1 2012. We set our resolution to 1920x1080 and then use the “Ultra” setting. |
|
Batman Arkham Asylum |
We used the built-in benchmark set to 1920 x 1080, Multi Sample AA 16XQ, Detail Level, Very High, Bloom: Yes, Dynamic Shadows: Yes, Motion Blur: Yes, Distortion: Yes, Fog Volumes: Yes, Spherical Harmonic Lighting: Yes, Ambient Occlusion: Yes, PhysX: Off |
|
Total War: Shogun 2 |
Direct X11 Benchmark High setting |
|
Crysis 2 |
Using Adrenaline Crysis 2 benchmark. 1080p, 4x Anti-Aliasing, DX11, Laplace Edge Detection Edge AA, on the Times Square map, with hi res textures turned on. |
|
Battlefield 3 |
Using Fraps with the game set to Ultra settings with 4x MSAA Antialiasing Deferred, 16X Anisotropic Filter, at 1920x1080. |
|
Sniper V2 Elite |
1920 x 1080 resolution, graphics detail set to ultra |
|
Dirt Showdown |
1920 x 1080 resolution, 4x MSAA multisampling, Vsync off, Shadows: ultra; Post Process: High; Night Lighting: High; Vehicle Reflections: Ultra; Ambient Occlusion: Ultra; Water: high; Objects: Ultra; Trees: Ultra; Crowd: Ultra; Ground Cover: High. |
|
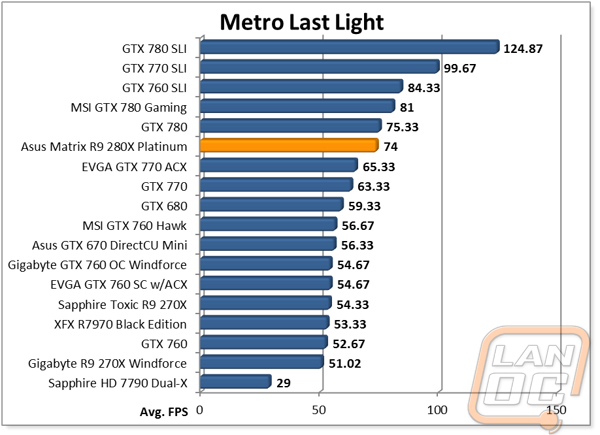
Metro Last Light |
Using the included benchmark tool. The settings are set to 1920x1080, DirectX 11, quality is set to very high, Texture filtering is untouched at 4x, and motion blue is set to normal. SSAA is unselected, PhysX is unselected, Tessellation is off. We run through scene D6 three times to get an average score. |
|
Synthetic Benchmarks |
For video cards our synthetic benchmarks are limited to 3DMark Vantage 2011, and 3DMark 2013 (AKA 3DMark). In 3DMark Vantage 2011 we run both performance and extreme benchmarks. The same goes for the most current version of 3DMark, we run through Fire Strike on standard and extreme settings. |
|
Unreal Heaven Benchmark 4.0 |
Using the “Extreme” preset |
|
Unreal Heaven Benchmark 4.0 heat testing |
We run through Unreal Heaven at 1080p for 30 minutes to test in game heat performance and noise output of the card while under load. |
|
Power Usage |
Using Unreal Heaven Benchmark 4.0, we get our “load” power usage number from the peak power usage during our test. We get our numbers from a Kill-A-Watt connected to the test benches power cord. |
|
Noise Testing |
Our Noise testing is done using a decibel meter 3 inches away from the video card on the bottom/fan side of the card. We test an idle noise level and then to get an idea of how loud the card will get if it warms all the way up we also turn the fan speed up to 100% and test again. The 100% test isn’t a representation of typical in game noise levels, but it will show you how loud a card can be if you run it at its highest setting or if it gets very hot. |
Software
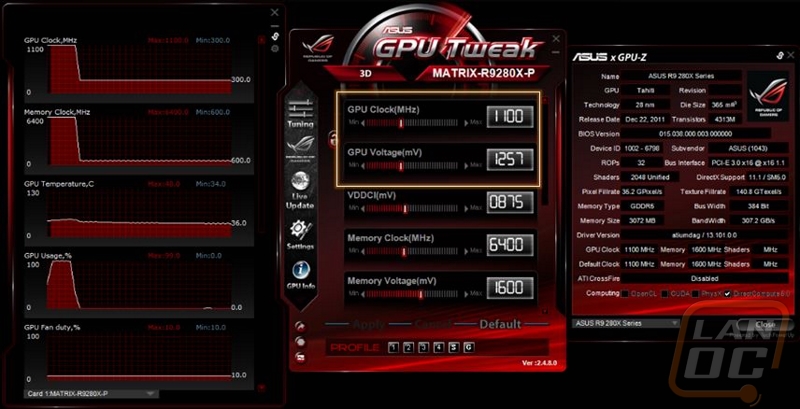
Some cards don’t come with any software at all, leaving you to only use the AMD software if you want to tune your card at all. Asus on the other hand does offer their GPU Tweak on all of their cards and in the case of a card like the Matrix with it being a ROG card you get a ROG themed skin as well. GPU Tweak has three sections to it, starting from the left you can see its graphing page that will graph out clock speeds, usage, fan speed, and temperatures. This is great because a lot of times when you are in game you won’t see the actual temperatures that you are hitting because they drop when you close or tab out. This gives you a chance to look back at your peak temperatures. In the middle you have the main page where you can adjust GPU and memory clock speeds. With the Matrix you also get GPU load line and PWM frequency control, something you don’t get on most other cards at all. This will no doubt help with overclocking the Matrix along with its voltage adjustment buttons right on the card as well. Lastly you also get a ROG themed copy of GPU-Z to get all of the details of the card you are running.
Cooling, Noise, and Power
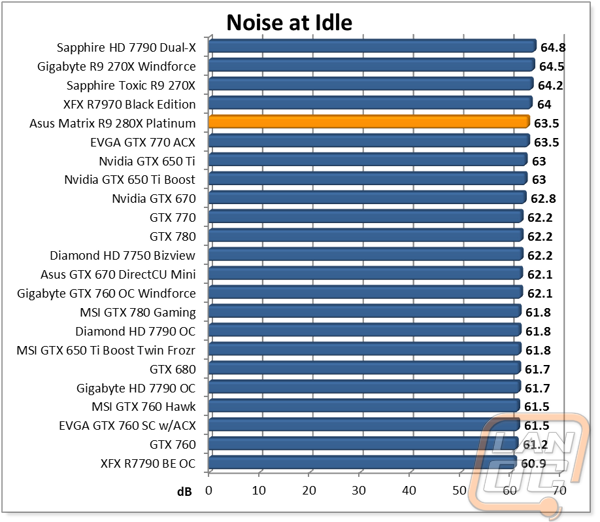
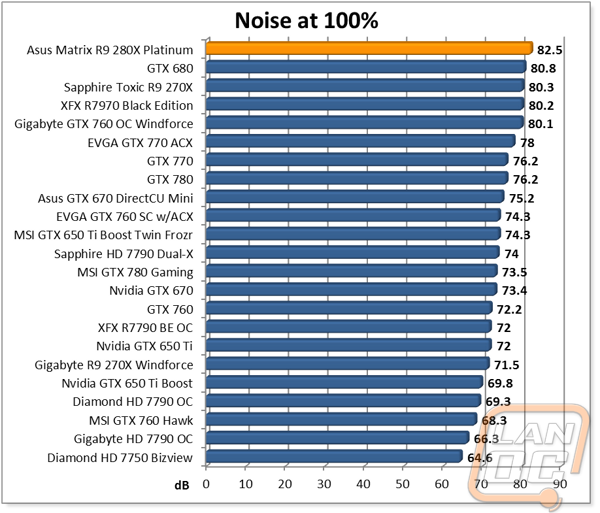
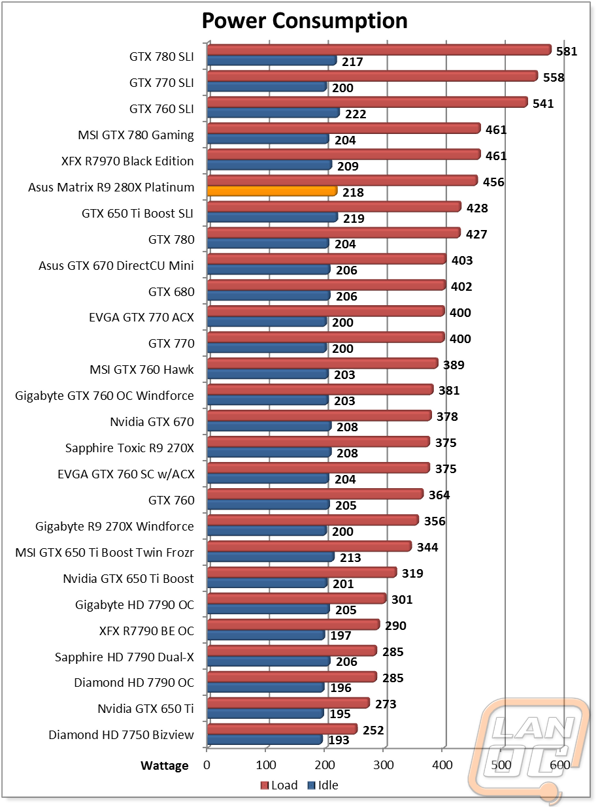
Although the R9 280X is basically the HD 7970, I was very excited to see how the Matrix Platinum performs with its triple slot cooler design and 20 phase power circuitry. Generally with a card like the Matrix Platinum, noise isn’t a high priority because of its focus on keeping things cool while overclocking. So when I saw the results from my noise testing I wasn’t all that surprised. At 100% fan speed the Matrix Platinum was at the top of our graph, beating out a few cards with three fans as well. Even at idle the Matrix Platinum was up near the top as well. I suspect if you are on the market for a card with these features, noise isn’t going to be the highest priority as well.
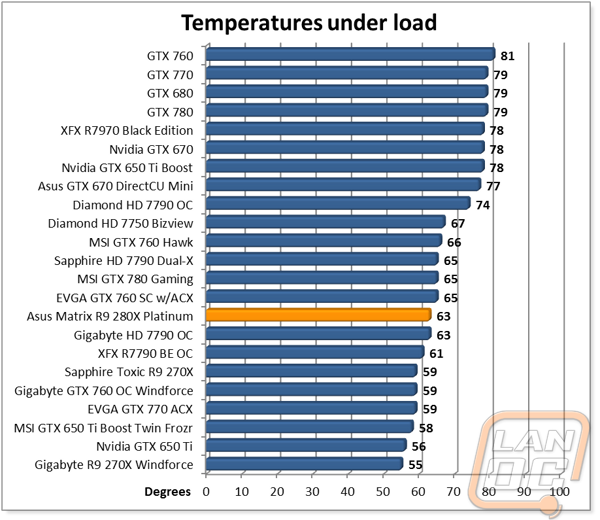
So how did the Matrix Platinum perform in the cooling testing? Well it wasn’t the coolest that we have tested, but it did fall in with a few HD 7790’s, I would say that is extremely impressive considering the performance of the card and its increased heat from the overclock that the platinum edition gets you!
For power consumption at idle the Matrix Platinum does pull more power than any other single card. Under load the Matrix Platinum actually pulled less wattage than the overclocked R7970 Black Edition under load.
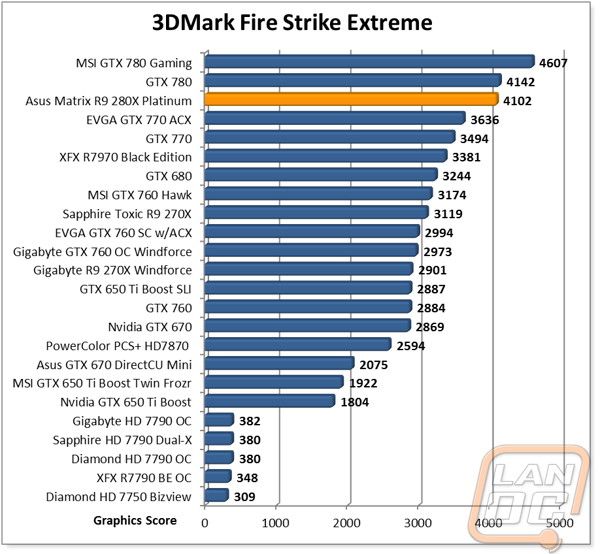
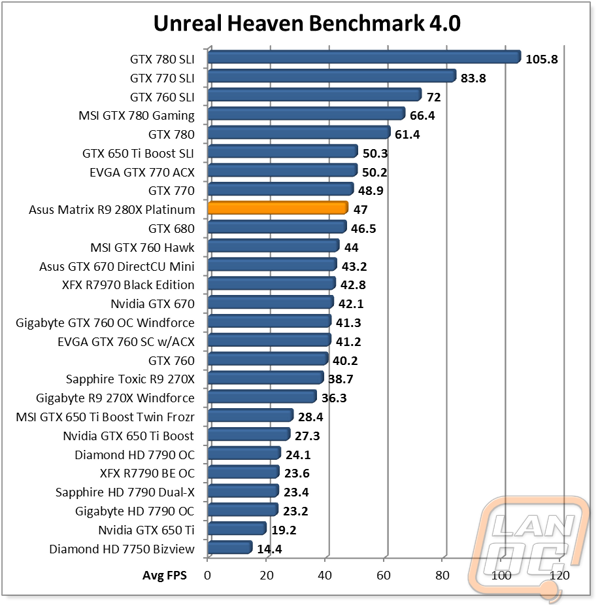
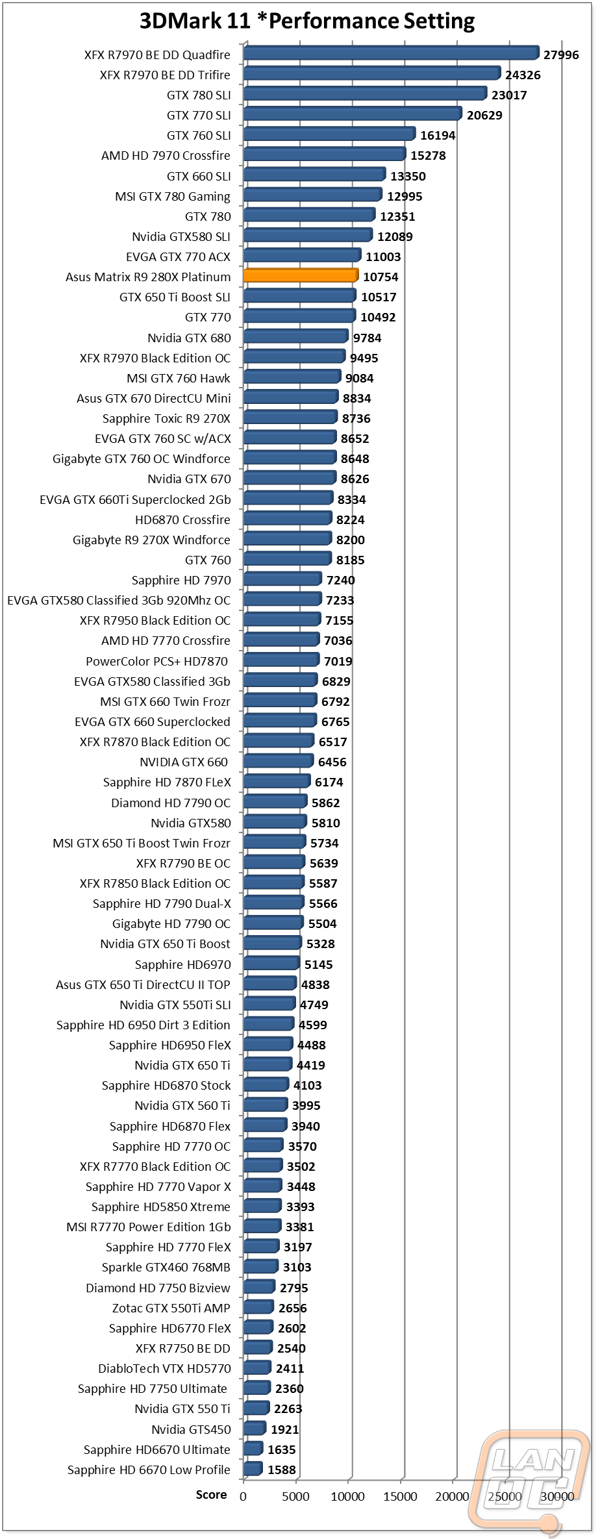
Synthetic Benchmarks
Synthetic benchmarks won’t give us any idea of the Matrix Platinum’s in game performance, but when it comes to comparing it to other cards they are a very reliable way to see where it stands. In this case, the Matrix Platinum performed extremely well in the new 3DMark Fire Strike benchmarks coming in close to the performance of the GTX 780 in the extreme test even. But in 3DMark 11 and Heaven Benchmark 4.0 it wasn’t as close and the card came in just below the GTX 770. Even so, that isn’t bad for what is basically an overclocked version of the HD 7970 of last year. The difference between the Matrix Platinum and the last HD 7970 I tested pulled a nice lead as well. I can’t wait to see what the R9 290 and 290X will perform if this is what the R9 280X with a hefty overclock can do.


In Game Benchmarks
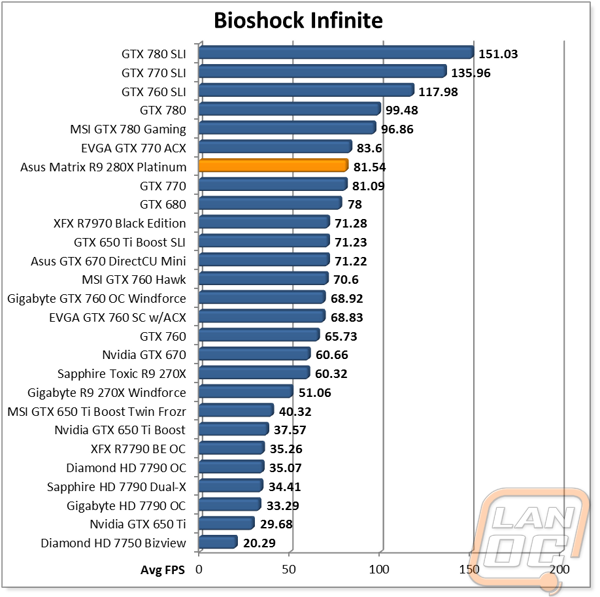
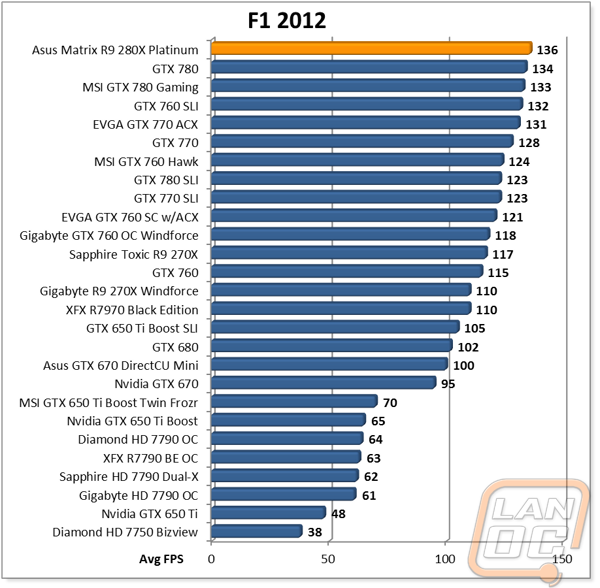
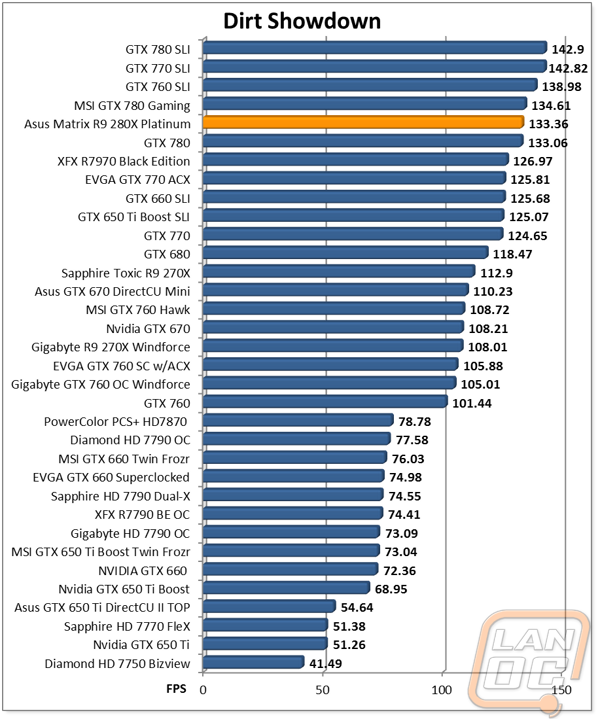
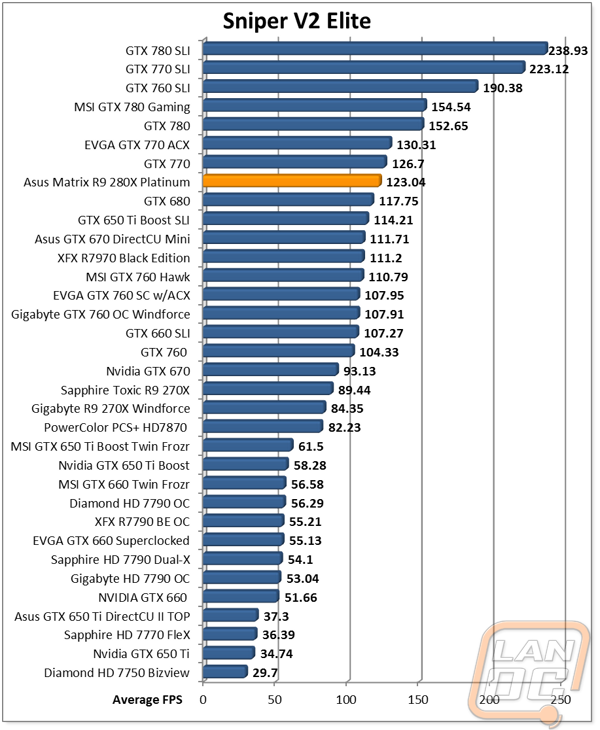
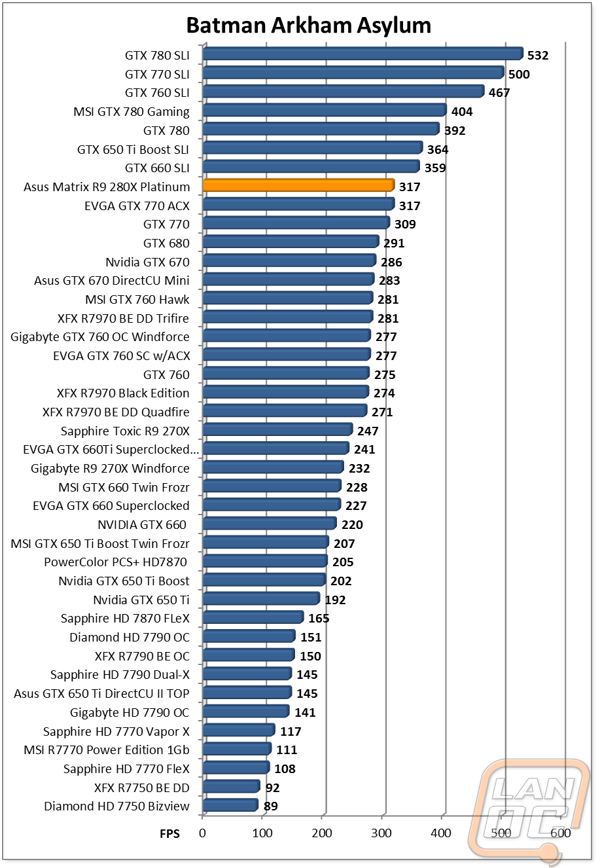
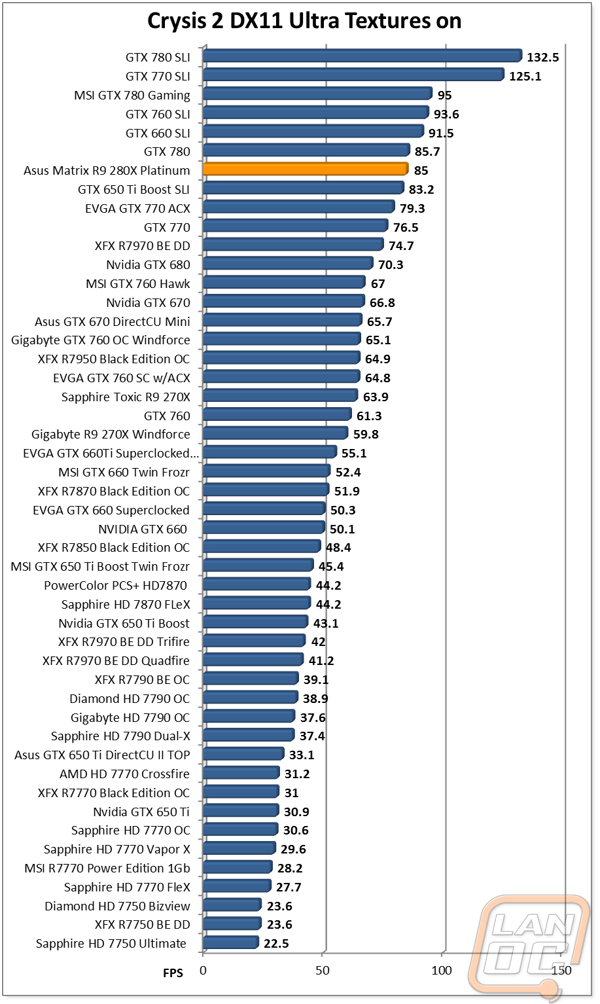
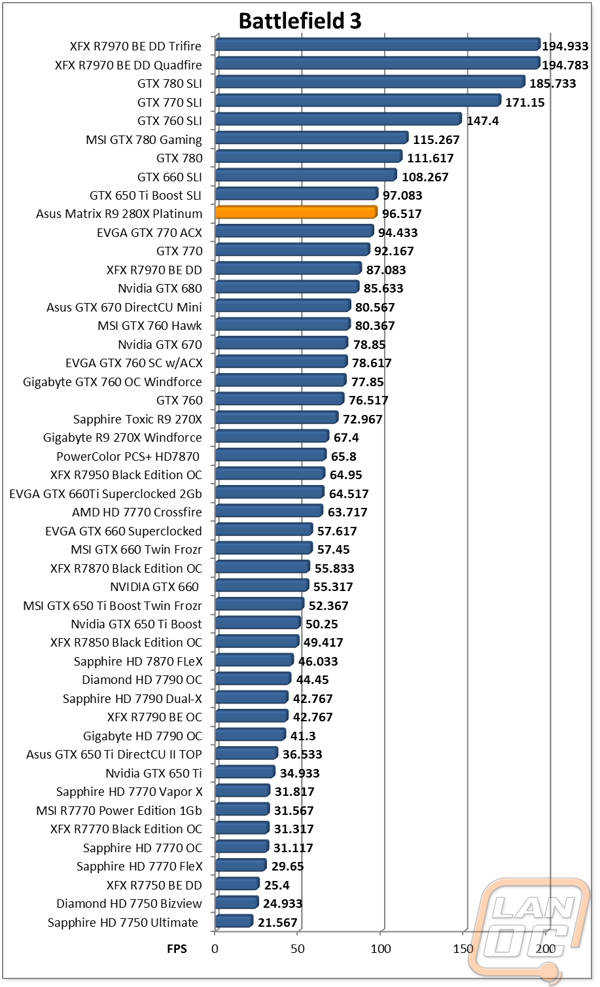
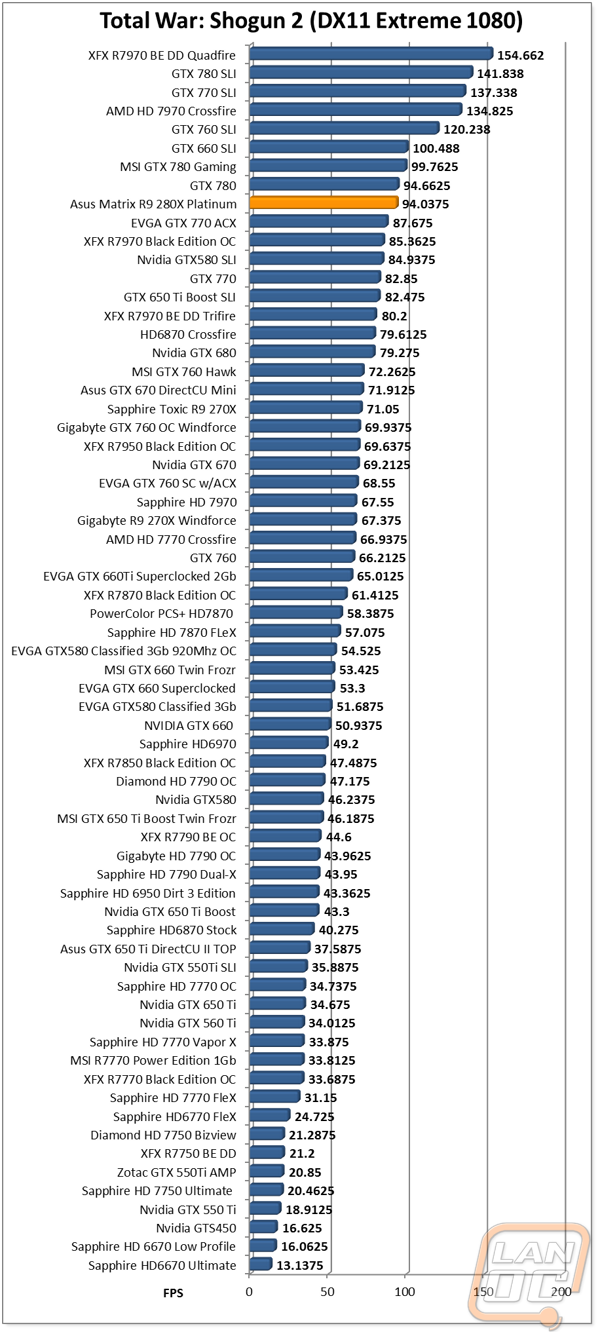
In game benchmarks are what we are all here for though right? It’s great that a card can cool well, or perform well in synthetic benchmarks, but we all want the best in game performance possible. Out of the 12 games I tested the Matrix Platinum with only two of them came in with an FPS that was less than 60FPS, that is amazing considering the two that came just a little short required multiple cards in SLI to get 60+FPS for other cards. That put the Matrix Platinum up near the top of our charts when it came to single card performance in nearly every case. Performance fell between the GTX 770 and GTX 780 depending on if the test favored AMD or Nvidia cards and in the case of Hitman: Absolution the Matrix Platinum came in at the top of our charts due to the low performance we have seen with Nvidia SLI in the game (the same with F1 2012). Even with all of our tests running at 1080p with their settings turned all the way up, including AA, the Matrix Platinum wasn’t fazed at all.
Overclocking
When it came time to overclock the Asus Matrix R9 280X Platinum I really couldn’t wait. Everything about the card design is focused on its overclockability from its increased power plan, the TweakIt controls, and Asus’s GPU Tweak. The card started with a nice overclock right from the start both on its GPU and Memory so I knew I had my work cut out for me from the start. I started with a big jump from 1100 to 1200MHz on the GPU with good luck. My next pass was at 1300Mhz and as soon as I loaded my 3DMark 11 benchmark it hard crashed requiring a reboot. The same happened when I ran at 1250MHz. I settled on an overclock of 1225MHz but I will admit that I think there is a lot more left in the card if you get into voltage adjustments on the card. On the memory side of things, the reference speed was 6000MHz and the Platinum edition came with an overclock to 6400MHz already. I jumped right up to 7000MHz and passed without any issues. Next I attempted 7500MHz with worse luck. From there I worked my way up only to find out that a hefty overclock of 7400MHz was still possible without any voltage. Just to be sure of my results, I put them together and ran through a combined test as well without any problems at all.
|
GPU Clock Speed Overclocking |
|||
|
GPU Clock Speed |
Pass/Fail |
FPS Result |
Notes |
|
1200MHz |
Pass |
60.75 |
|
|
1300MHz |
Fail |
N/A |
Hard Crash |
|
1250MHz |
Fail |
N/A |
Hard Crash |
|
1225MHz |
Pass |
61.83 |
|
|
Memory Clock Offset Overclocking |
|||
|
Memory Clock Speed |
Pass/Fail |
FPS Result |
Notes |
|
7000MHz |
Pass |
56.38 |
|
|
7500MHz |
Fail |
N/A |
Hard Crash |
|
7200MHz |
Pass |
56.58 |
|
|
7300MHz |
Pass |
56.64 |
|
|
7400MHz |
Pass |
56.64 |
|
|
7450MHz |
Fail |
N/A |
Hard Crash |
|
Combined GPU and Memory overclocks together |
|||
|
GPU Clock Speed |
Memory Clock Speed |
FPS Result |
Notes |
|
1225MHz |
7400MHz |
62.57 |
|
Overall and Final Verdict
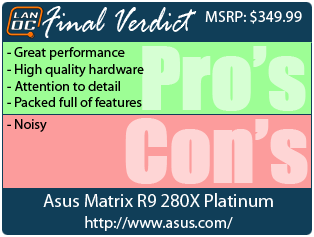
The final verdict I put together below has to be the most generic I have ever done. This isn’t because the Asus Matrix R9 280X Platinum doesn’t have amazing features that I want to point out. The problem is there are so many things I want to mention that I couldn’t pick just four to go into our Pro’s. First, let’s talk about the cards performance. I was extremely impressed with the in game and synthetic performance that I saw, the handpicked Platinum edition’s GPU and Memory overclocks helped it considerably in these tests. Really the only performance metrics I wasn’t impressed with were the noise performance numbers, it is a noisy card. As for the Matrix Platinum using high quality hardware, Asus went well and above on the design of this card. They expanded the power circuitry and packed in 20 phase power control with DIGI+ VRM to prevent voltage drop when overclocking and to decrease temperatures. The upgraded Black Metallic Caps are a nice bonus as well. What impressed me the most were all of the features the Matrix Platinum has though. The most obvious is the triple slot cooling but what I really found interesting was the on board voltage control and fan speed controller. The Matrix logo on top of the card that changes colors depending on how much load the card is under is a nice touch as well. Then you have the details like the backplate with the branding upside down to show off properly when the card is installed in your case or the ability to remove the entire Direct CU II cooler with four screws to replace thermal paste quickly. All in all I don’t think you will find another card on the market with features that come even close to the Matrix R9 280X Platinum. Because of that I didn’t put its premium price down as a con (I mean the included an LN2 heatsink and a SteelSeries mouse pad even). You are getting a lot for your money. If you want the best, or need the overclocking features this is the best R9 280X to pick up.