In the world of Small Form Factor builds you are always compromising. You either have to give up some performance for a smaller size or give up some size to get the performance you are looking for. Recently though, this trend has been starting to change. My last LAN build was easy to carry around while having (at the time) the second fastest GPU from Nvidia and a high end CPU. Of course because of my GPU I couldn’t go any smaller. Asus has a new GPU that is going to change that. Their new GTX 670 Direct CU Mini is the same length of a MiniITX motherboard. With that size, my LAN rig is going to need a complete rebuild.. To go smaller!
Product Name: Asus GTX 670 Direct CU Mini - GTX670-DCMOC-2GD5
Review Sample Provided by: Asus
Written by: Wes
Pictures by: Wes
|
Specifications |
|
|
Graphics Engine |
NVIDIA GeForce GTX 670 |
|
Bus Standard |
PCI Express 3.0 |
|
Video Memory |
GDDR5 2GB |
|
Engine Clock |
GPU Boost Clock : 1006 MHz GPU Base Clock : 928 MHz |
|
CUDA Core |
1344 |
|
Memory Clock |
6008 MHz ( 1502 MHz GDDR5 ) |
|
Memory Interface |
256-bit |
|
Resolution |
DVI Max Resolution : 2560x1600 |
|
Interface |
DVI Output : Yes x 1 (DVI-I), Yes x 1 (DVI-D) HDMI Output : Yes x 1 Display Port : Yes x 1 (Regular DP) HDCP Support : Yes |
|
Accessories |
1 x Power cable |
|
Software |
ASUS GPU Tweak & Driver |
|
ASUS Features |
DirectCU Mini Series OC Series |
|
Dimensions |
6.7 " x 4.8 " x 1.6 " Inch 17.01 x 12.19 x4.06 Centimeter |
|
Note |
● To have the best cooling performance, ASUS GTX670-DCMOC-2GD5 extends the fansink to 2 slots. Please double check your Chassis and Motherboard dimension prior to purchase to make sure it fits in your system! ● Note that the actual boost clock will vary depending on actual system conditions. For more information, please visit http://www.geforce.com/ ● Specifications are subject to change without notice. ● PCB color and bundled software versions are change without notice. ● Brand and product names mentioned are trademarks of their respective company. |
Packaging
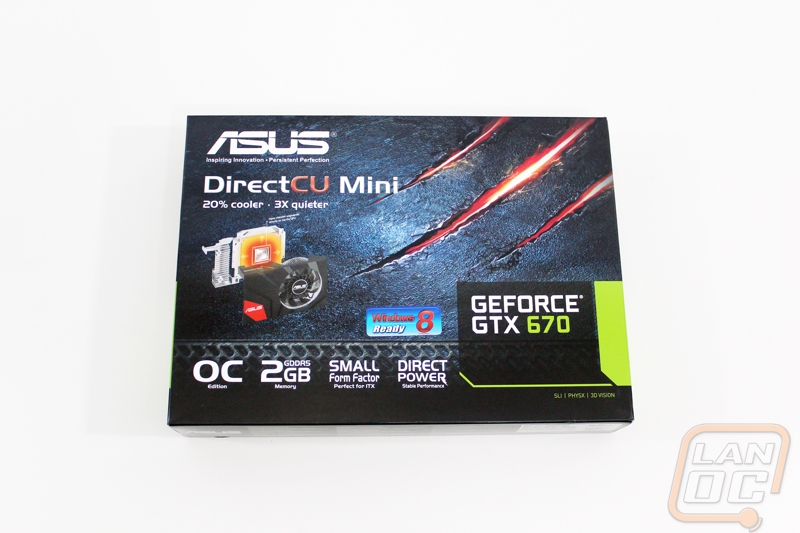
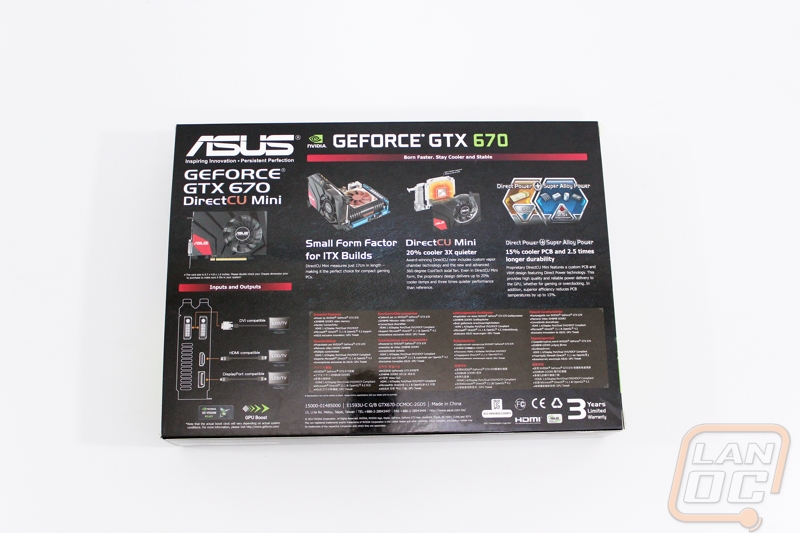
The first thing I noticed about the GTX 760 Direct CU Mini was its size. The box is smaller than most other video card boxes we get in. With such a small card there isn’t any reason for the box to be large. The cover of the box has most of the important information including the model, memory capacity, overclocked, a note about its size, and even a photo of the card as well, well at least of the heatsink. Around on the back side Asus has focused on showing off the DirectCU Mini’s size as well as its cooling. Part of that includes a pictures that really just sells the card for me where they have the card on a Mini ITX motherboard and the card is the same length of the motherboard. Right away that tells me that this card is going to fit and work in builds that all of the other cards won’t support due to their length. I also love the line drawn diagram of the cards connections to make sure your monitor will support the card before you get it home.
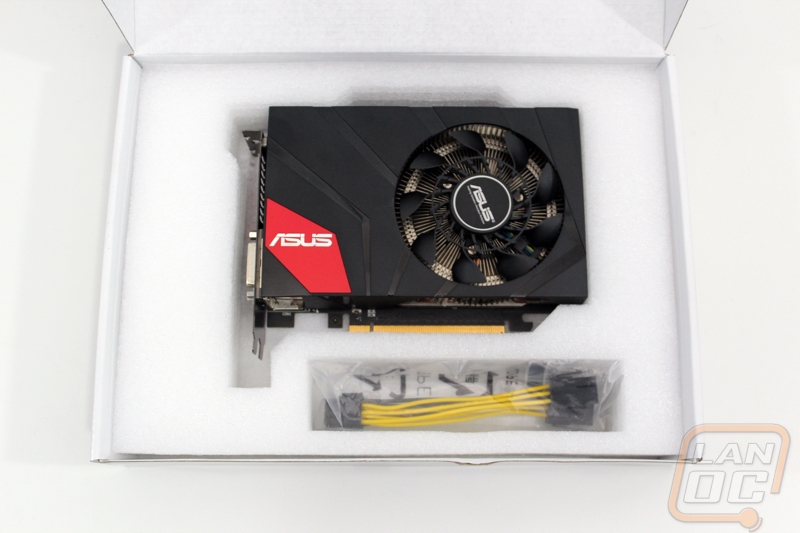
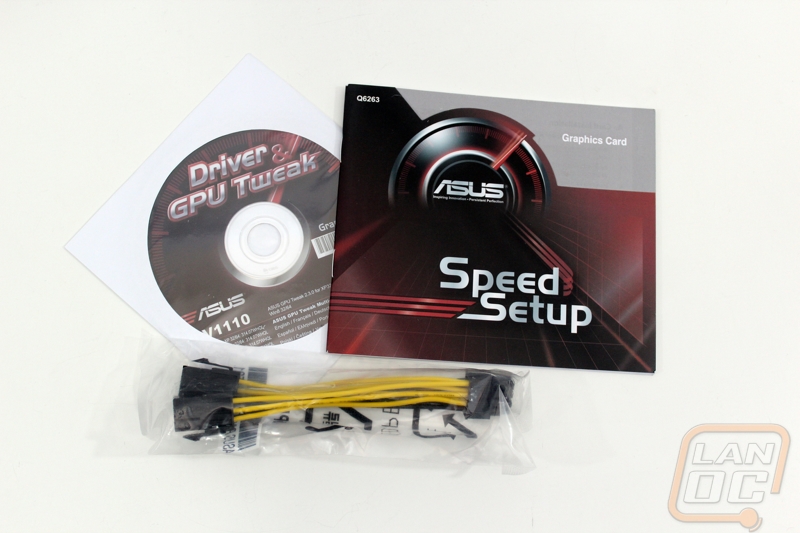
Inside the box I found the DirectCU Mini snug in its foam protection along with a cutout with all of the accessories included with the card. You get a setup guide, the driver and software disc and a two six pin to one 8 pin adapter cable just in case your power supply doesn’t have the connections needed for the Direct CU Mini.
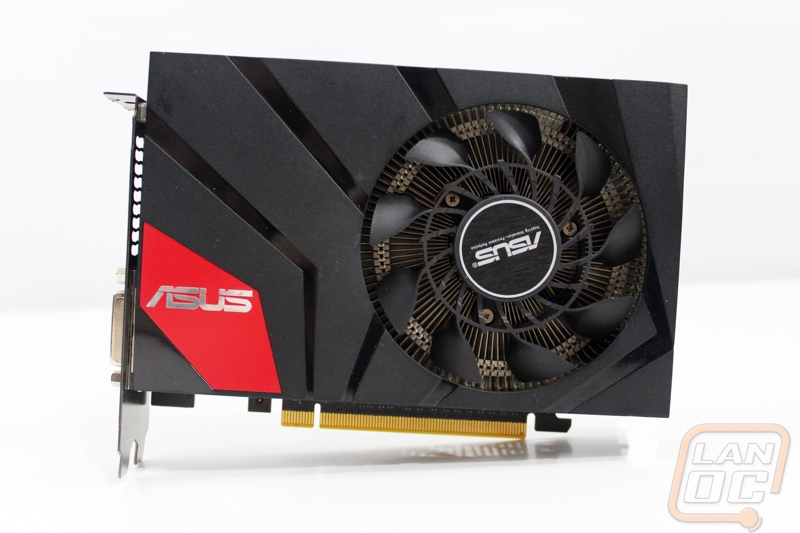
Card Layout and Photos
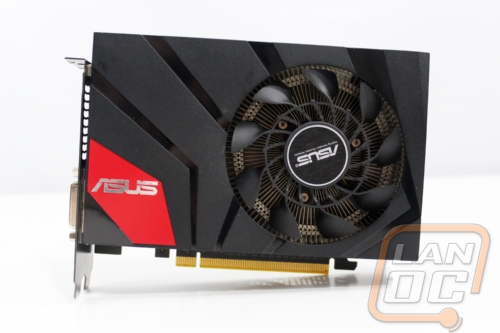
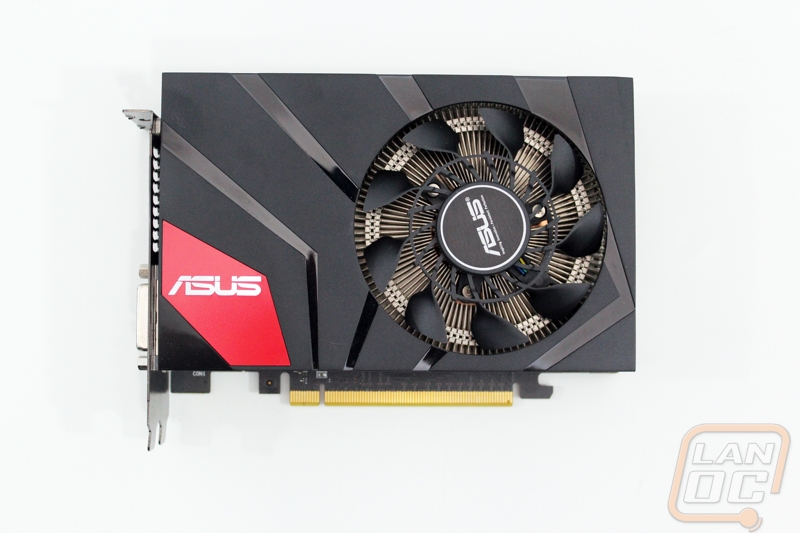
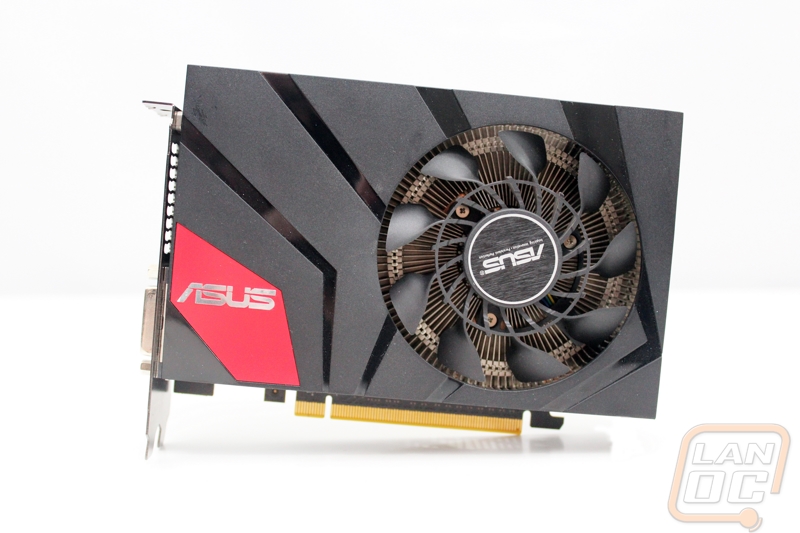
Even on our forums we saw big interest in the GTX 670 DirectCU Mini when it was first introduced both because of its size as well as its styling. Asus is well known for having a unique style that is both clean and eye catching. The GTX 670 DirectCU Mini, despite its size continues that tradition. You have a mostly black fan shroud with a small area of red in the bottom left corner. The red draws you to the Asus logo. The CoolTech fan design that Asus went with on this card is very unique looking as well. Rather than having normal fan blades, each blade has a twist in it. When you look at the card from its side you can see a lot more of the DirectCU heatsink than you normally would. Speaking of the DirectCU, Asus uses their normal design that mounts a vapor chamber directly on the GPU and helps spread the heat around to the heatsink. The cooling of the GTX 670 DirectCU Mini plays a big role in its size, even the GTX 650 DirectCU II that I took a look at a while back had a MUCH larger cooling design, on a card that generates less heat even. Because of that a lot of the design of the GTX 670 DirectCU Mini is about keeping temperatures under control, without that this form factor wouldn’t be possible at all.
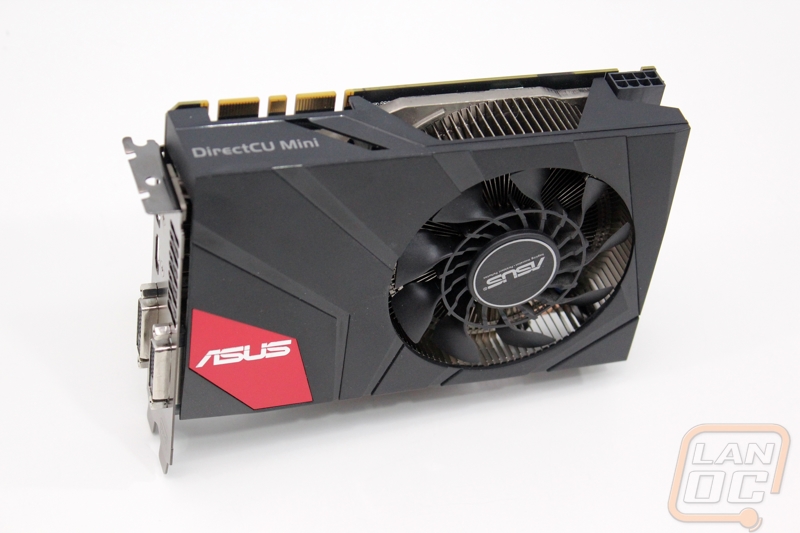
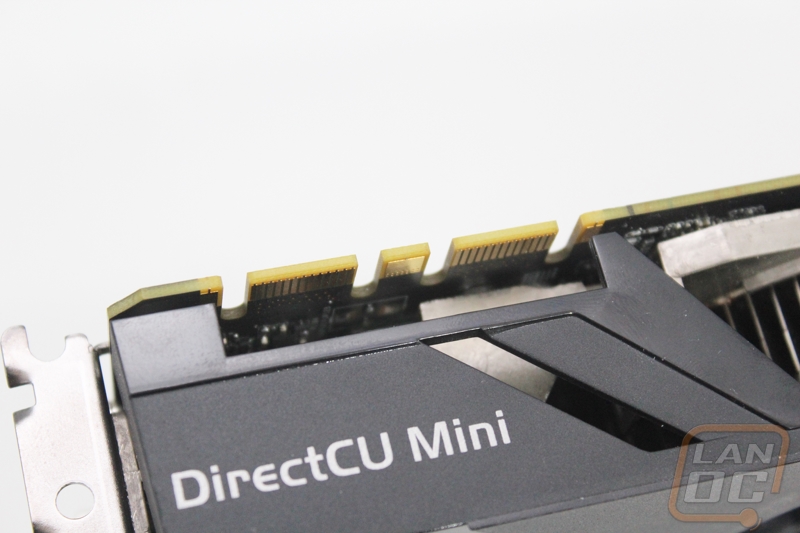
I do love that the top of the GTX 670 DirectCU Mini has a nice DirectCU Mini logo up top. Most cases that you would use this card in won’t have side panel windows, but even then Asus did keep that in mind when designing the card. My only nitpick would be the lack of the GTX 670 on there as well to show off how powerful of a card you have in your new small form factor build.
As with most cards with non-reference cooling the GTX 670 DirectCU Mini does have a semi open air design in order to get the air flow needed to keep things cool in such a small package. This does mean that not all of the heat that the card generates will be going out the back of the case and it could add a little more to the interior temperatures. This is especially important in the small form factor cases that this is designed for. Because of that if you build a rig with a GTX 670 DirectCU Mini be sure that you are keeping an eye on temperatures to make sure you don’t have any unforeseen issues.
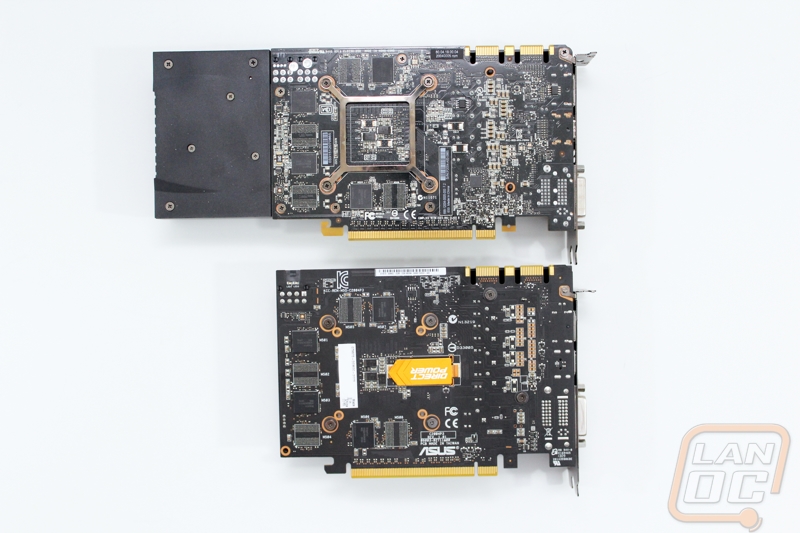
The size of the GTX 670 DirectCU Mini is most obvious when I put it up next to the reference GTX 670. The GTX 670 DirectCU Mini is considerably shorter than the reference design with its extended cooling design. The GTX 670 DirectCU Mini is a little taller than the reference card though in order to be able to pack all of Asus’s features into such a small package. When you put them together you can also see how much larger the GTX 670 DirectCU Mini’s CoolTech fan is over the reference fan. Originally I thought that maybe Asus just used the reference PCB design, but with its additional height made it obvious that this isn’t what Asus did. After looking closer the PCB is actually slightly shorter than the reference PCB. When you compare the two PCB’s you can see that the Asus design is cleaner/more efficient. Interestingly the GTX 670 DirectCU Mini doesn’t have a support bracket while the reference design does.

Although the GTX 670 DirectCU Mini is taller than a reference card, it does have the same two SLI bridge connections that you would find on a reference GTX 670. That means if you have two or three GTX 670 DirectCU Mini’s you could run them in SLI, but due to the unique design you couldn’t just mix them with a reference card.
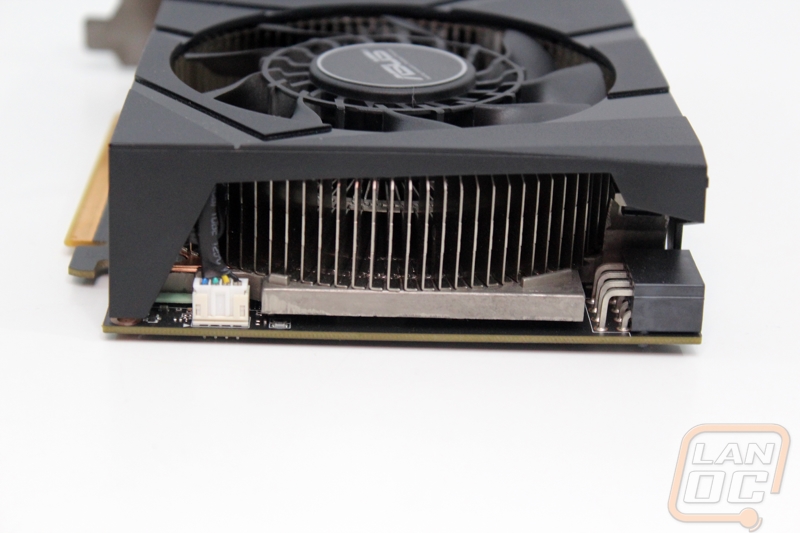
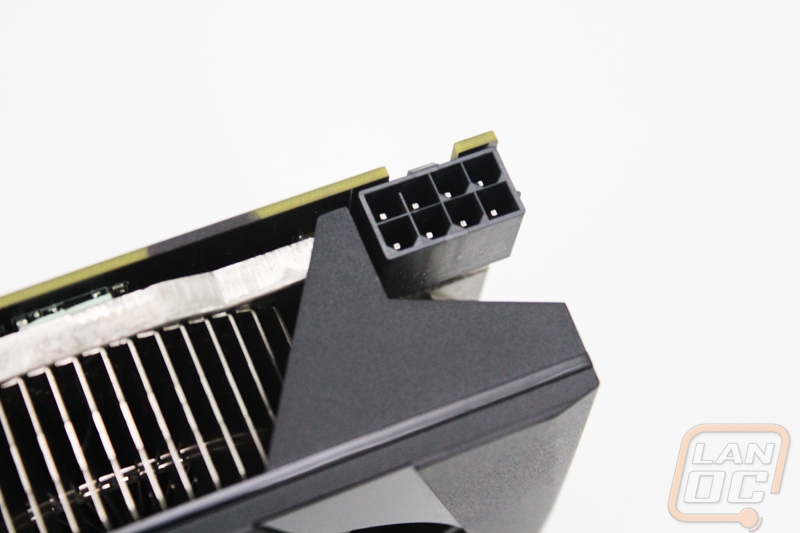
For power, Asus changed things up as well. The reference design of the GTX 670 used two six pin connections to feed its power. To help with the smaller size Asus went with a single 8 pin power connection on the GTX 670 DirectCU Mini. This is possible because two 6 pin cables supply 75 watts each while one 8 pin is regulated at 150 watts. This is why you sometimes see two six pin to 8 pin adapters, like what was included with this card.
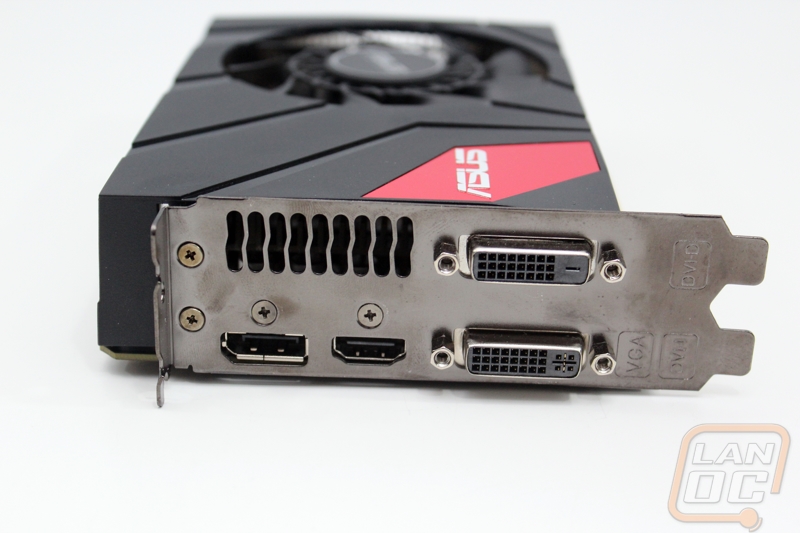
This view of the rear PCI Slot shows the additional height well as well as the GTX 670 DirectCU Mini’s multiple connection types. You can run DisplayPort and HDMI in their full sizes as well as dual DVI connections. One of the DVI ports will support VGA pass-through via an adapter (bottom in the photo) while the other connection is all digital.
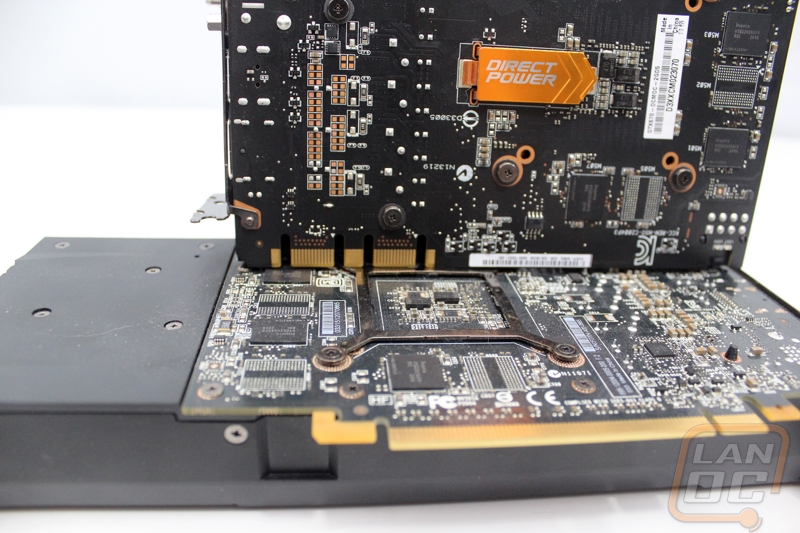
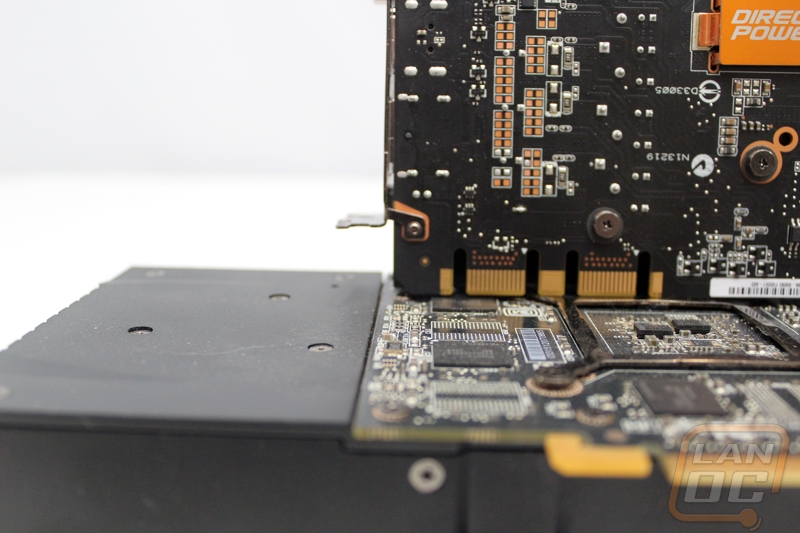
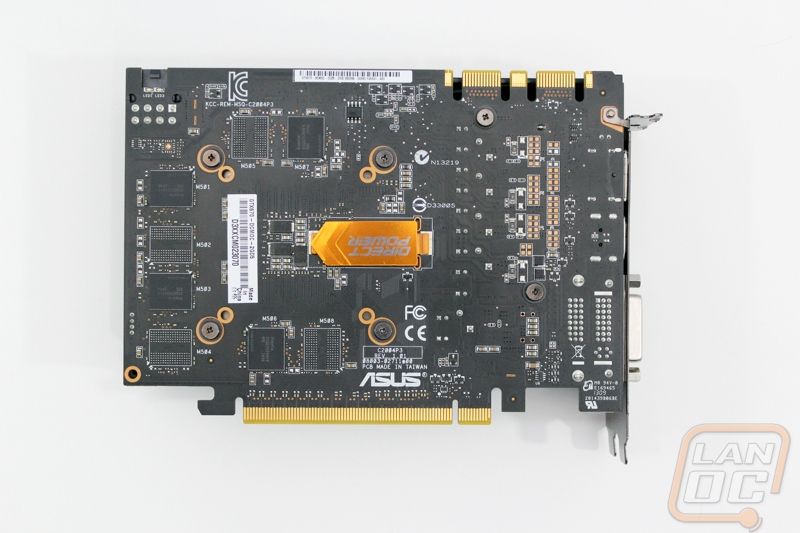
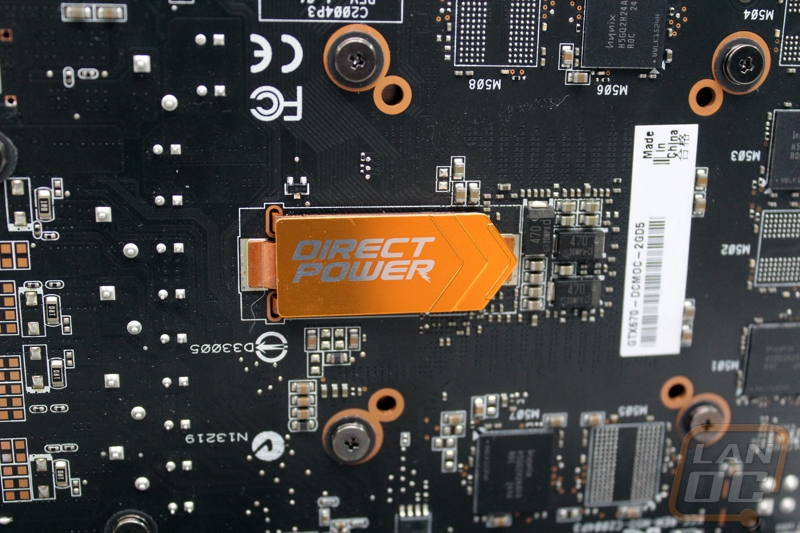
I already showed off the back of the GTX 670 DirectCU Mini in the comparison photos with the reference card. But here we can focus on one of Asus’s most interesting feature. To make it even easier they have even pointed an arrow to it with a label. This would be the Direct Power logo in the middle of the card on the back of the GPU. This can be used as a small heatsink but more importantly it shows that Asus changed from the reference design and placed the GPU VRM directly next to the GPU itself. This gives the GPU high quality and reliable power delivery and Asus claims this lowers overall PCB temperatures by 17%. It’s also important to note that the Direct Power logo is actually upside down when you look at the card sitting up, this is because when the card is in your PC it will read correctly, a small but nice touch.
Our Test Rig and Procedures
|
Our Test Rig |
|
|
CPU |
|
|
Memory |
|
|
Motherboard |
|
|
Cooling |
|
|
Power Supply |
|
|
Storage |
|
|
Case |
|
|
Our Testing Procedures |
|
|
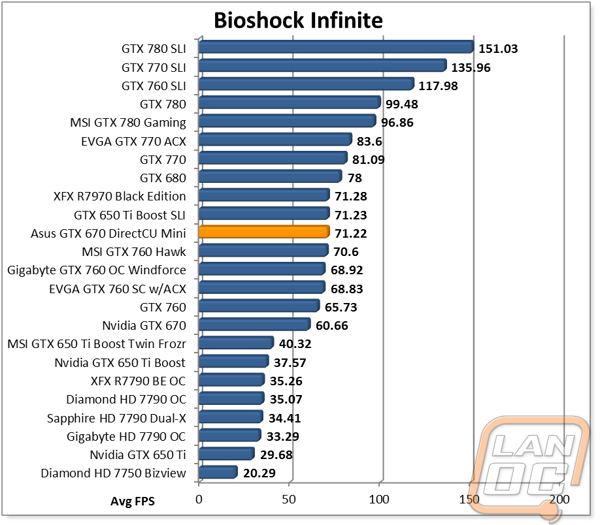
Bioshock Infinite |
Using the Adrenaline Action Benchmark Tool we run Bioshock Infinite on the “Xtreme” quality setting. This has a resolution of 1920x1080, FXAA turned on, Ultra Texture detail, 16x Aniso Texture Filtering, Ultra Dynamic Shadows, Normal Postprocessing, Light Shafts on, Ambient Occlusion set to ultra, and the Level of Detail set to Ultra as well. |
|
Tomb Raider |
Using the Adrenaline Action Benchmark Tool we run Tomb Raider on the “Xtreme” quality setting. This has a resolution of 1920x1080, Exclusive Fullscreen turned on, Anti-Aliasing set to 2xSSAA, Texture Quality set to Ultra, Texture Aniso set to 16x Aniso, Hair Quality set to TressFX, Shadow set to Normal, Shadow Resolution on High, Ultra SSAO, Ultra Depth of Field, High Reflection quality, Ultra LOD scale, Post Processing On, High Precision RT turned on, and Tessellation is also turned on. |
|
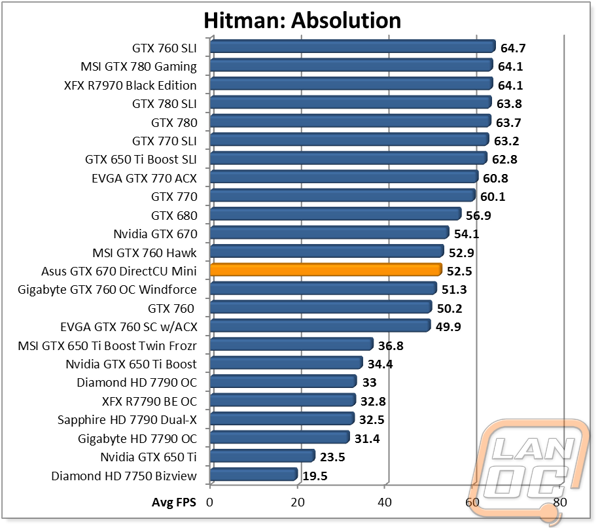
Hitman: Absolution |
Using the Adrenaline Action Benchmark Tool we run Hitman: Absolution on the “Xtreme” quality setting other than the MSAA setting is turned down from 8x to 2x. That setting puts the resolution at 1920x1080, MSAA is set to 2x, Texture Quality is set to High, Texture Aniso is set to 16x, Shadows are on Ultra, SSA is set to high, Global Illumination is turned on, Reflections are set to High, FXAA is on, Level of Detail is set to Ultra, Depth of Field is high, Tessellation is turned on, and Bloom is set to normal. |
|
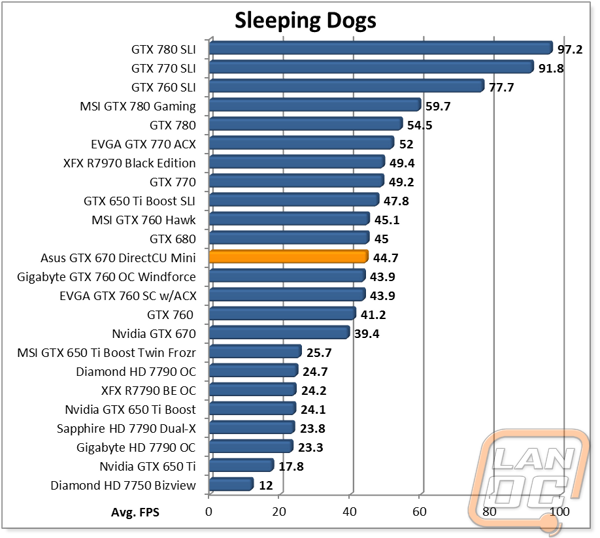
Sleeping Dogs |
Using the Adrenaline Action Benchmark Tool we run Sleeping Dogs on the “Xtreme” quality setting. That means our resolution is set to 1920x1080, Anti-Aliasing is set to Extreme, Texture Quality is set to High-Res, Shadow Quality is High, Shadow Filter is set to high, SSAO is set to High, Motion Blur Level is set to High, and World Density is set to Extreme. |
|
F1 2012 |
We use the built in benchmark for F1 2012. We set our resolution to 1920x1080 and then use the “Ultra” setting. |
|
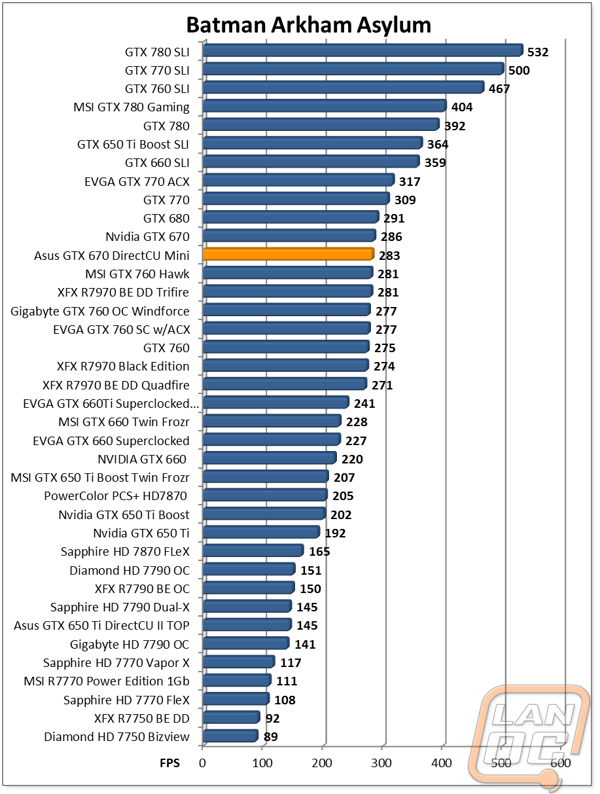
Batman Arkham Asylum |
We used the built-in benchmark set to 1920 x 1080, Multi Sample AA 16XQ, Detail Level, Very High, Bloom: Yes, Dynamic Shadows: Yes, Motion Blur: Yes, Distortion: Yes, Fog Volumes: Yes, Spherical Harmonic Lighting: Yes, Ambient Occlusion: Yes, PhysX: Off |
|
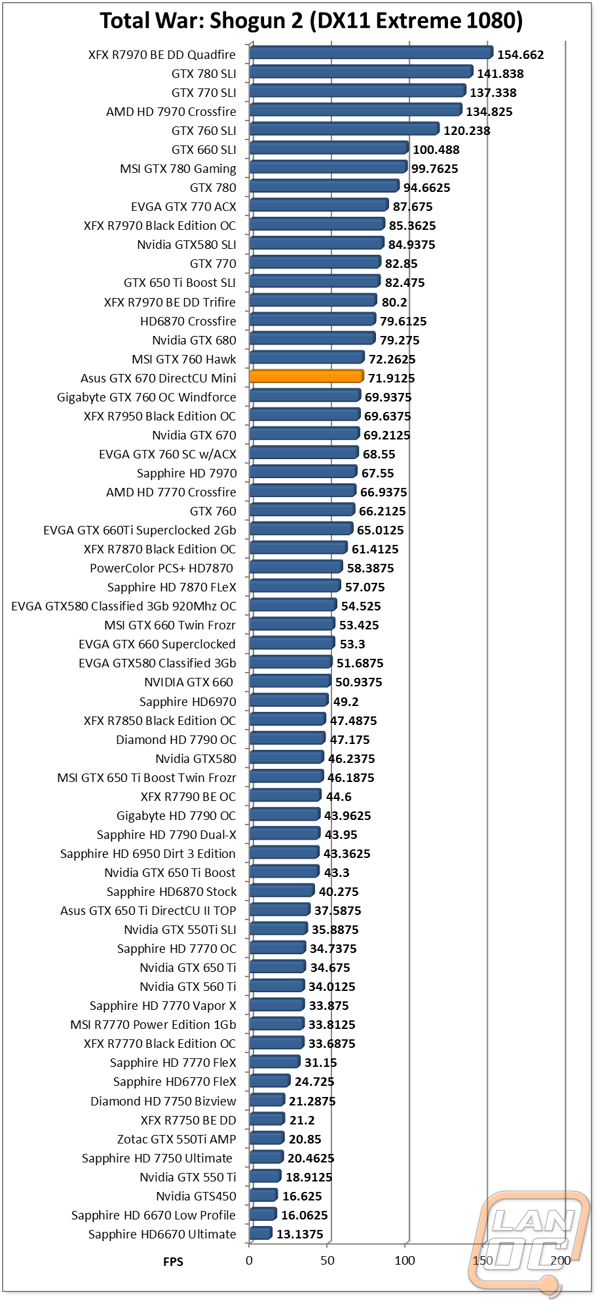
Total War: Shogun 2 |
Direct X11 Benchmark High setting |
|
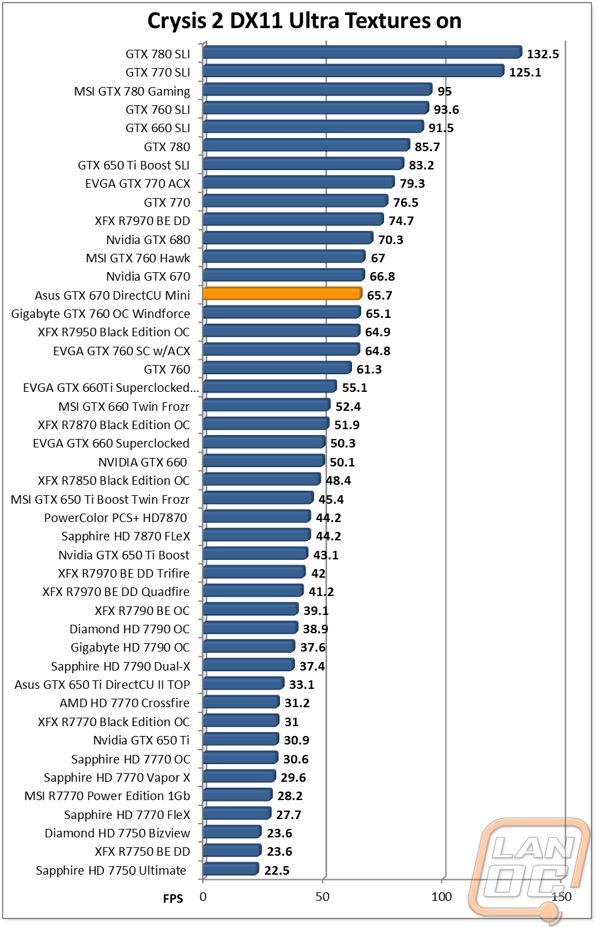
Crysis 2 |
Using Adrenaline Crysis 2 benchmark. 1080p, 4x Anti-Aliasing, DX11, Laplace Edge Detection Edge AA, on the Times Square map, with hi res textures turned on. |
|
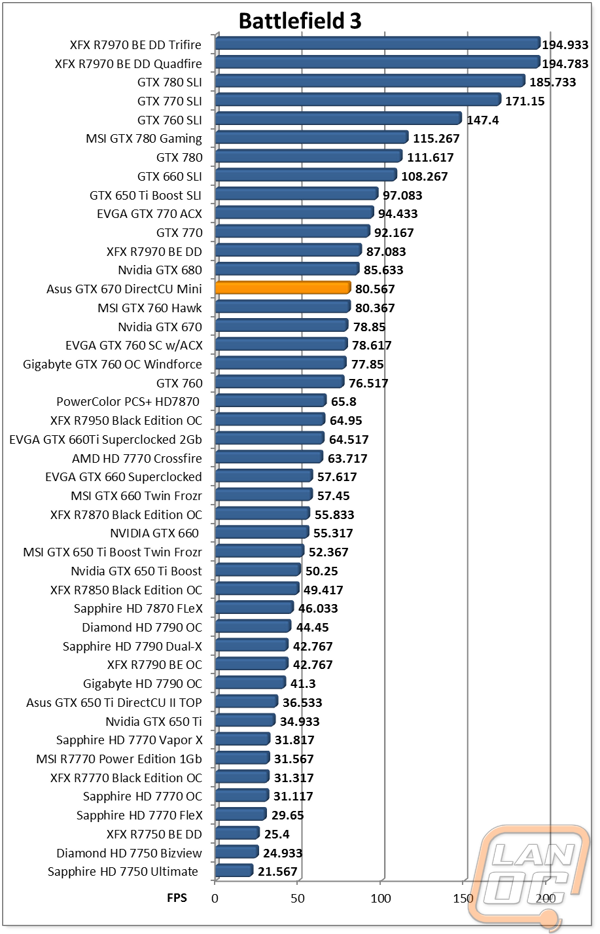
Battlefield 3 |
Using Fraps with the game set to Ultra settings with 4x MSAA Antialiasing Deferred, 16X Anisotropic Filter, at 1920x1080. |
|
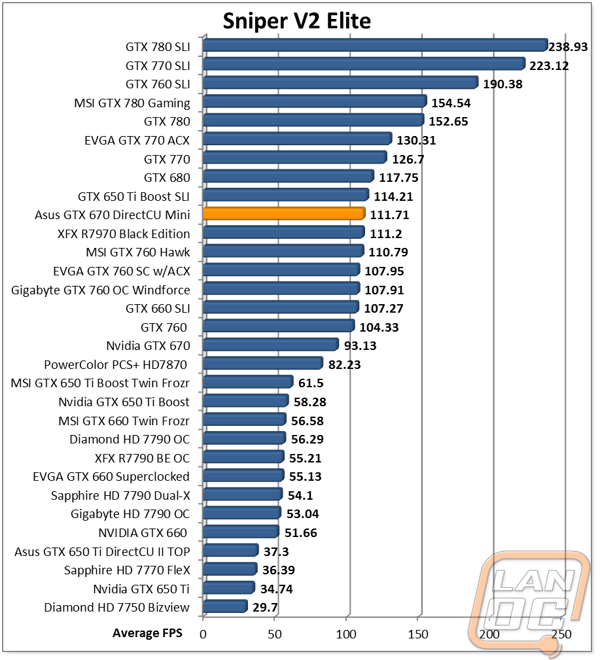
Sniper V2 Elite |
1920 x 1080 resolution, graphics detail set to ultra |
|
Dirt Showdown |
1920 x 1080 resolution, 4x MSAA multisampling, Vsync off, Shadows: ultra; Post Process: High; Night Lighting: High; Vehicle Reflections: Ultra; Ambient Occlusion: Ultra; Water: high; Objects: Ultra; Trees: Ultra; Crowd: Ultra; Ground Cover: High. |
|
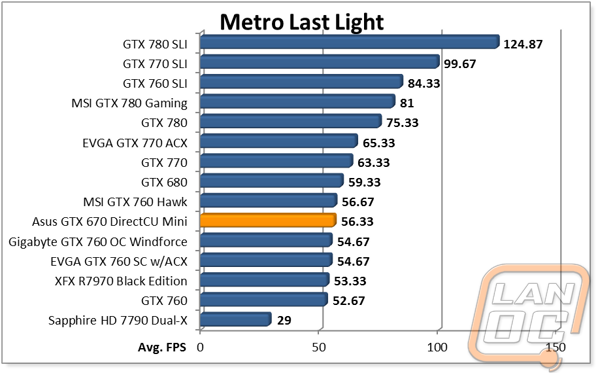
Metro Last Light |
Using the included benchmark tool. The settings are set to 1920x1080, DirectX 11, quality is set to very high, Texture filtering is untouched at 4x, and motion blue is set to normal. SSAA is unselected, PhysX is unselected, Tessellation is off. We run through scene D6 three times to get an average score. |
|
Synthetic Benchmarks |
For video cards our synthetic benchmarks are limited to 3DMark Vantage 2011, and 3DMark 2013 (AKA 3DMark). In 3DMark Vantage 2011 we run both performance and extreme benchmarks. The same goes for the most current version of 3DMark, we run through Fire Strike on standard and extreme settings. |
|
Unreal Heaven Benchmark 4.0 |
Using the “Extreme” preset |
|
Unreal Heaven Benchmark 4.0 heat testing |
We run through Unreal Heaven at 1080p for 30 minutes to test in game heat performance and noise output of the card while under load. |
|
Power Usage |
Using Unreal Heaven Benchmark 4.0, we get our “load” power usage number from the peak power usage during our test. We get our numbers from a Kill-A-Watt connected to the test benches power cord. |
|
Noise Testing |
Our Noise testing is done using a decibel meter 3 inches away from the video card on the bottom/fan side of the card. We test an idle noise level and then to get an idea of how loud the card will get if it warms all the way up we also turn the fan speed up to 100% and test again. The 100% test isn’t a representation of typical in game noise levels, but it will show you how loud a card can be if you run it at its highest setting or if it gets very hot. |
Cooling, Noise, and Power
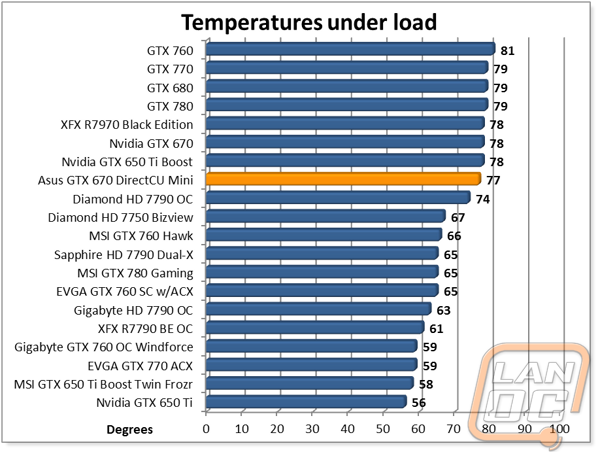
Asus spent a lot of time tuning and tweaking the GTX 670 DirectCU Mini’s design in order to be able to make it all work in such a small form factor. Because of that I was very interested to see what its cooling performance was going to be when I put it on the test bench. I didn’t expect it to outperform all of the cards that are nearly twice its size but I was really hoping to see it out perform the reference design. At 77 degree under load it just that, barely. It’s not a number to be all that proud of when taken on its own, but being such a small card with a high end GPU under the hood I think we can be a little forgiving, not to mention the GTX 670 DirectCU Mini is actually overclocked over the reference design as well.
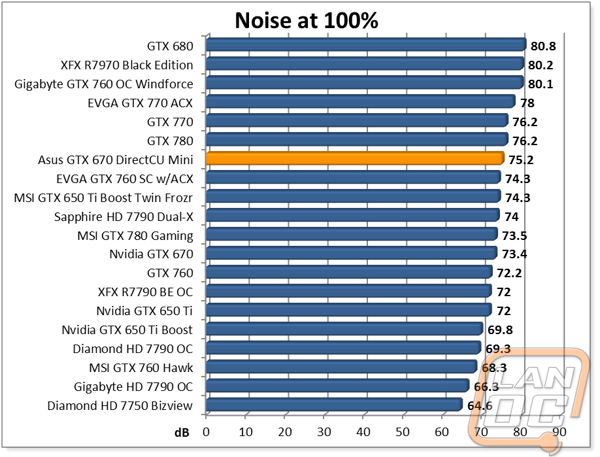
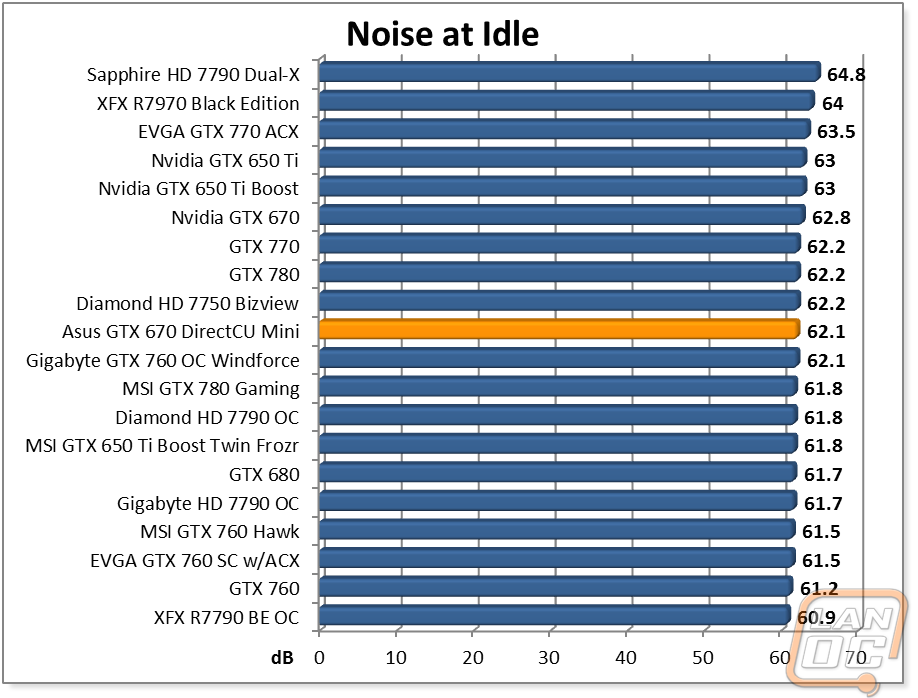
With the unique fan design I was curious to see how it would perform in my noise testing. I ran the card through both idle and full fan speed tests to see the range of noise that you can expect. At idle the GTX 670 DirectCU Mini came in at the middle of the pack, but the differences between cards are extremely small. Under 100% fan speed the GTX 670 DirectCU Mini did come in a little higher at 75.2 decibels, slightly higher than the reference GTX 670 performed. I can only assume that Asus had to give up some of its noise performance to make the small card possible.
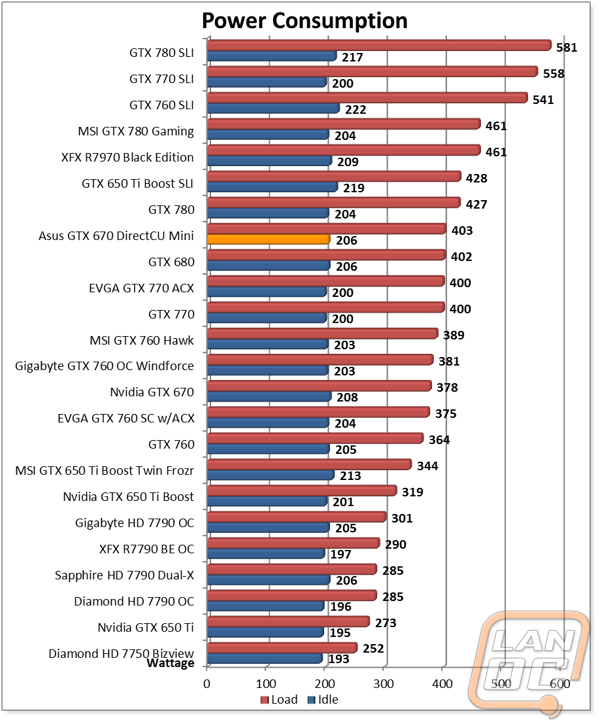
In my power testing at idle the GTX 670 DirectCU Mini was three watts higher than the reference GTX 670. The different cooling design could have played a role in that, along with the higher base clock speed (928MHz vs. 915MHz). Under load the difference was more with the fully loaded test bench with water cooling and a 3860X the GTX 670 DirectCU Mini pulled 403 against the reference cards 378. That difference is without a doubt due to the overclock that Asus included bumping the boost clock up from 980MHz to 1006MHz.
Synthetic Benchmarks
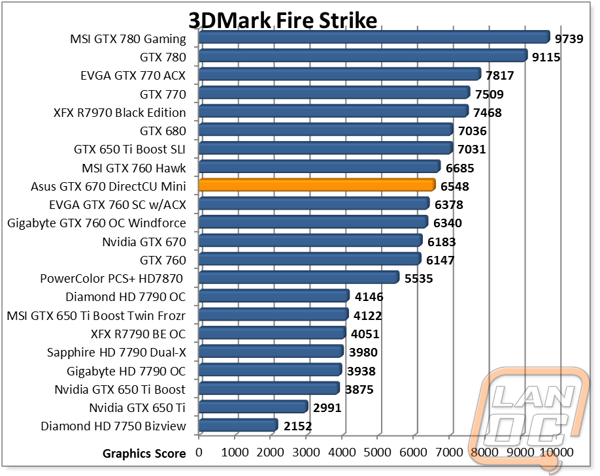
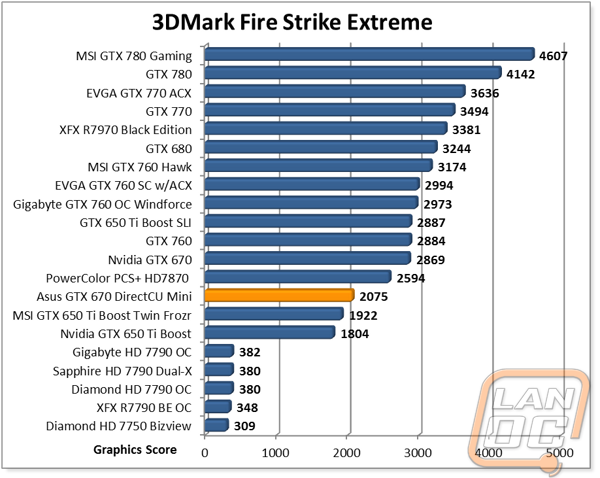
While synthetic benchmarks aren’t a great representation of actual game performance you might see. They are a great way to compare the performance between cards without having to worry about small inconsistency’s that can happen in hand run benchmarks especially. Not only that but there is less of a worry of tuning that favors specific manufactures, something we see a lot with games. This is why the first benchmarks I look at are our synthetic benchmarks, especially in this case. I want to see how well the GTX 670 DirectCU Mini performs up against the reference GTX 670 as well as all of the cards that have come out in the past year. In our regular 3DMark Fire Strike benchmark the GTX 670 DirectCU Mini came in right in between all of our GTX 760’s with the only card that out performed it being the heavily overclocked Hawk card from MSI. As for the GTX 670 reference card the GTX 670 DirectCU Mini pulled ahead of it by a fairly good number. Results from the extreme Fire Strike benchmark weren’t as favoring though, in fact the GTX 670 DirectCU Mini performed slower than the reference card by a large margin, I’m not sure if this is related to driver changes or if the extreme benchmark overheated the GTX 670 DirectCU Mini. Hopefully we will get more answers in the rest of our testing.
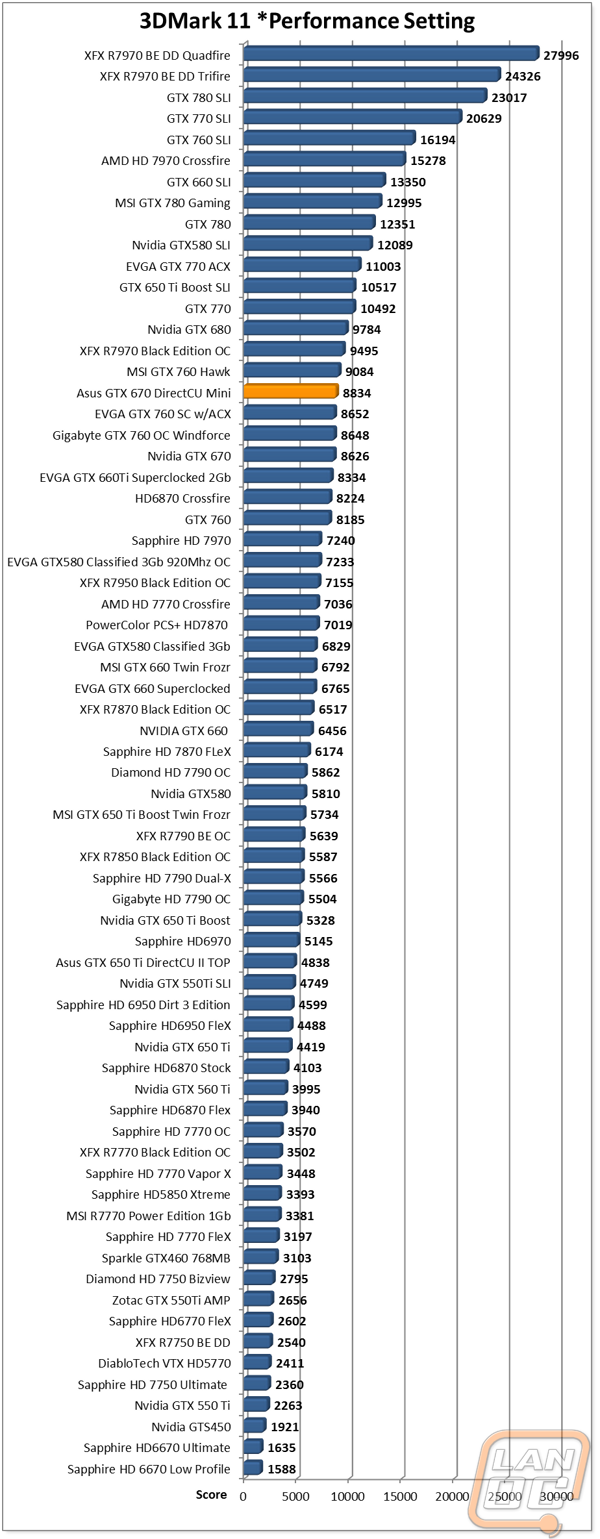
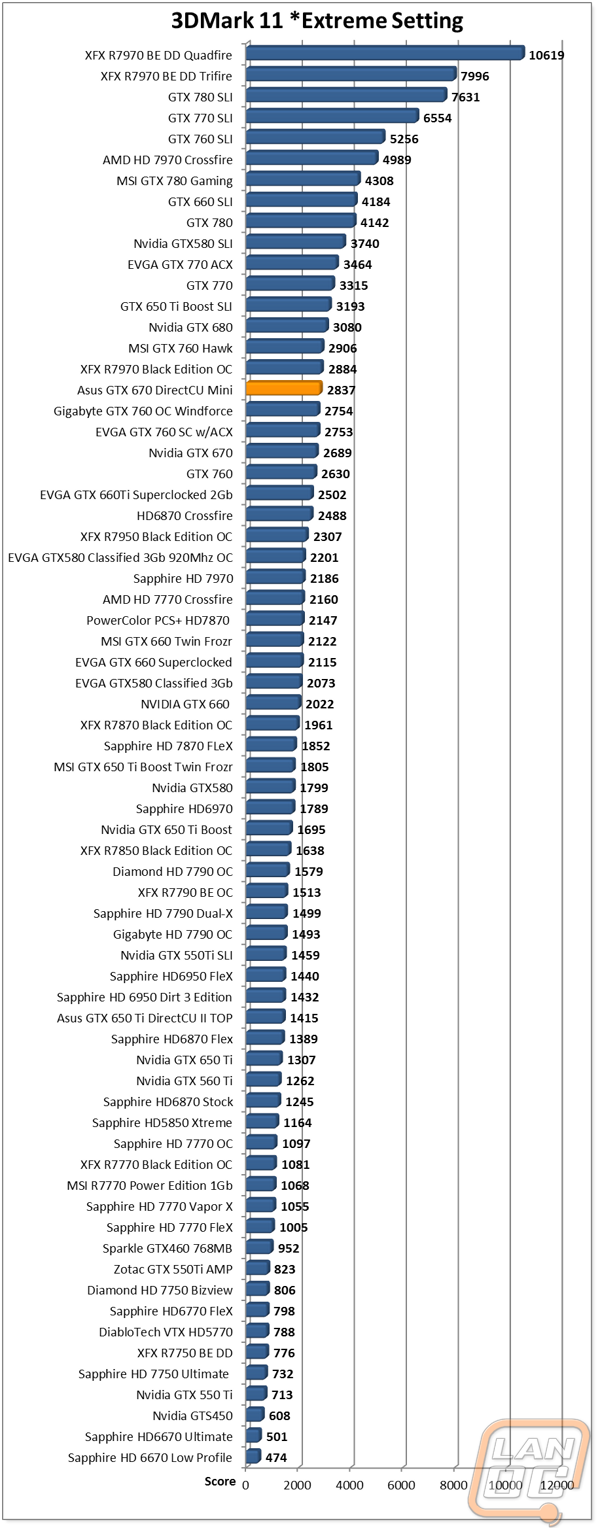
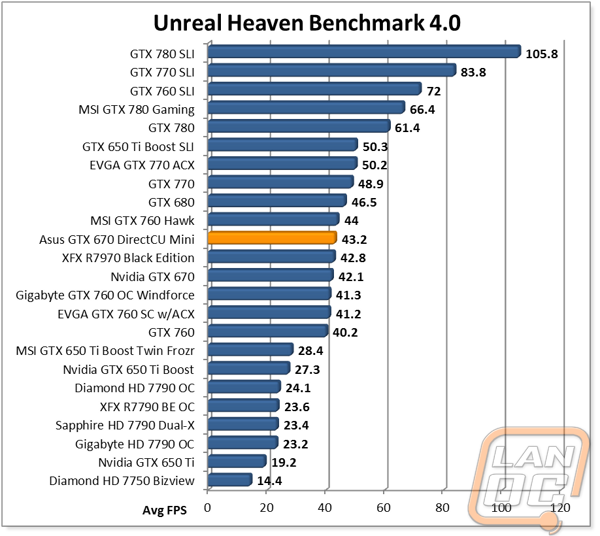
3DMark 11 results came in right in line with what we saw in the first Fire Strike benchmark even when I turned the setting up too high. It’s looking more like the Fire Strike Extreme results may have been flawed more than anything. The Unreal Heaven Benchmark results were more of the same as well. The heavily overclocked Hawk card did outperform the GTX 670 DirectCU Mini, but only slightly while the performance over the reference GTX 670 was more than noticeable.
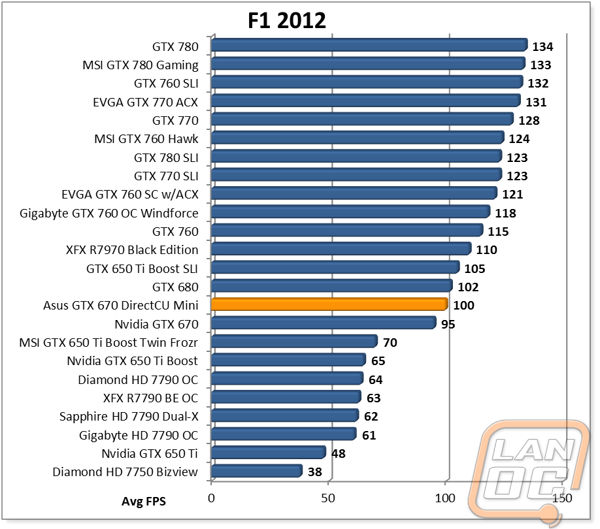
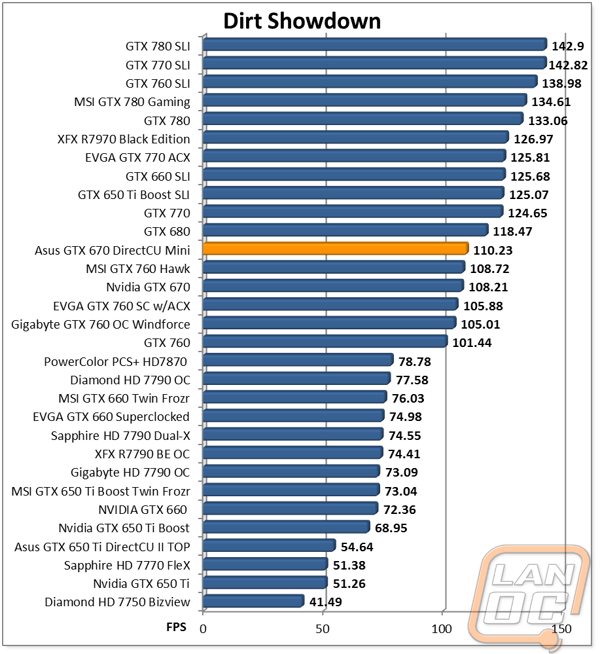
In Game Benchmarks
We could talk synthetic benchmarks all day, but at the end of th day the only thing that is going to matter is how the GTX 670 DirectCU Mini performs when you get into your favorite games. So what I have done is put it through our benchmark suite of 12 different games that cover a range of game types as well as AMD/Nvidia backing. Hopefully you will find a few games that you are interested in the results. So how did the GTX 670 DirectCU Mini perform? Well for starters, in some games like Sleeping Dogs, the overclocked card came remarkably close in performance to the GTX 680. I was also impressed with Bioshock where it actually matched the performance I saw with two GTX 650 Ti’s in SLI, not bad for half the cards in half the length. In most benchmarks though the results mirrored the synthetic results where the GTX 670 DirectCU Mini comes in slightly higher than all of the GTX 760’s other than the highly overclocked Hawk card. Considering every one of those cards was nearly twice the size of the GTX 670 DirectCU Mini I would consider that a win. Even more importantly you can expect playable performance in every game that you throw at the card, even at the highest settings like most of our benchmarks.

Overclocking
I’ll be honest, with a factory overclock already combined with the cooling limitations that the smaller form factor gives you I wasn’t all that confident that I would be able to push the DirectCU Mini all that hard. I pressed on and put it through our standard benchmarking suite that consists of breaking down the overclock by core clock and memory, pushing their limits, and then testing them in test 2 of 3DMark 11 on performance settings. I started with GPU core clock overclocking and as you can see in my documentation below the results weren’t as bad as I expected but still not as high as I think I could have gotten with additional cooling. Even so, a clock speed of 1359MHz is still very impressive! When I moved on to memory overclocking I was able to push the limit much farther, to the point where I got worried that I was going to damage the card. In the end I was able to run a 700MHz memory clock offset without experiencing any issues. Lastly I put the two together and ran them to see if they would run. Oddly enough they passed the first time through but the second time I didn’t have as good of luck, even with a slightly lower memory clock. This was most likely due to temperatures, had I let the card cool all the way down it would have been okay. If I were to overclock the card day to day though, I would be looking to take a noticeable drop from these numbers for reliability.
|
GPU Clock Speed Overclocking |
|||||||
|
GPU Clock Speed Offset |
Pass/Fail |
Resulting GPU Speed |
FPS Result |
Notes |
|||
|
100MHz |
Pass |
1228MHz |
44.69 |
||||
|
200MHz |
Pass |
1267MHz |
47.21 |
||||
|
250MHz |
Pass |
1359MHz |
48.65 |
||||
|
300MHz |
Fail |
1424MHz |
N/A |
Driver and 3DMark Crash |
|||
|
275MHz |
Fail |
1411MHz |
N/A |
Driver and 3DMark Crash |
|||
|
260MHz |
Fail |
1385MHz |
N/A |
Driver and 3DMark Crash |
|||
|
Memory Clock Offset Overclocking |
|||||||
|
Memory Clock Speed Offset |
Pass/Fail |
Resulting Memory Speed |
FPS Result |
Notes |
|||
|
100MHz |
Pass |
3105MHz |
42.38 |
||||
|
200MHz |
Pass |
3206MHz |
42.32 |
||||
|
300MHz |
Pass |
3305MHz |
42.40 |
||||
|
400MHZ |
Pass |
3402MHz |
42.49 |
||||
|
500MHZ |
Pass |
3506MHz |
42.34 |
||||
|
600MHz |
Pass |
3602MHz |
42.47 |
||||
|
650MHz |
Pass |
3649MHz |
42.79 |
||||
|
700MHz |
Pass |
3649MHz |
42.64 |
||||
|
725MHz |
Pass |
3726MHz |
42.64 |
Artifacts |
|||
|
Combined GPU and Memory overclocks together |
|||||||
|
GPU Offset |
Memory Offset |
Pass Fail |
FPS Resuts |
Notes |
|||
|
260MHz |
700Mhz |
Fail |
N/A |
||||
|
250MHz |
700Mhz |
Pass |
48.35 |
||||
|
250MHz |
650Mhz |
Fail |
N/A |
||||
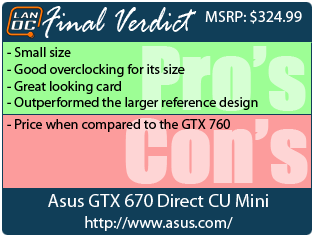
Overall and Final Verdict
Asus went out of their way to do something completely different with the GTX 670 DirectCU Mini. Because of that they have come up with a product that is the only real option for people looking for top shelf performance in a small form factor build. Sure you could work around it with a slightly larger case that fits a longer card, but if you are looking to push the limits of size and performance this is the way to go. They took a good performing card and designed a PCB that incorporated all of Asus’s features like their Direct Power and then come up with a cooling design that was able to keep it all cool. Even more impressive is on top of all of that they also slipped in a little bit of an overclock as a bonus. Really the only downside at this point is where its price point lands against the GTX 760 that performed close to the DirectCU Mini. Or course you should expect to pay a bit of a premium for a unique card like this. Currently you can even get a little more of a discount on it with a rebate being offered. I can’t wait to show off the build I’m putting together that takes advantage of the GTX 670 DirectCU Mini; let’s just say it puts my last LAN rig to shame both in performance and size.


") Can't wait to see how this all goes together.
Can't wait to see how this all goes together. 