It used to be rare for people to have cameras around their homes but with doorbell cameras becoming more and more common, once people buy in with a doorbell camera you do sometimes see them adding more. Another location where you see cameras being added is with floodlights because they are higher up and get a lot better coverage than your doorbell cameras but you are limited to where the camera is pointed. Eufy Security has a few standard options, but their Floodlight Cam 2 Pro caught my eye because not only does it have three lights for better light coverage, it also has a 2K pan/tilt camera built-in meaning you don’t have to be stuck with one view. We were upgrading the lighting in and on our garage which is a good time to check out the Floodlight Cam 2 Pro to see how it performs.
Product Name: eufy Security Floodlight Cam 2 Pro
Review Sample Provided by: Anker/eufy
Written by: Wes Compton
Amazon Affiliate Link: HERE
|
Specifications |
|
|
Field of View |
360° horizontal, 130° vertical |
|
Video |
2K, HD, live view, color night vision |
|
Smart AI Support |
Human detection. AI lock and track subject |
|
Motion Detection |
270°, 40-foot customizable motion detection zones |
|
Pan and Tilt |
1. Motion tracking and automated cruise 2. Preset views with activity zones |
|
Smart illumination |
Activated by schedule, sunrise/sunset, time, and motion detection |
|
Lighting Brightness |
3 tunable light panels at up to 3000 Lumens |
|
Lighting Color Temperature |
Adjustable from cool to warm, 3000 Kelvin to 5700 Kelvin |
|
Siren |
Remote-activated 100dB siren |
|
Audio |
Two-way talk |
|
Camera Lens |
130° field-of-view |
|
Video Storage |
Motion-activated event recording, on-device 8GB local storage (lasts 30+ days) (Recording duration estimation model: 45 times one day, 30s recording per trigger) |
|
Dimensions (Length*Width*Height) |
Wall mount: 17.7 (light extension) * 10.5 * 8.3 in / 45 * 26.5 * 21 cm Ceiling mount: 17.7 (light extension) * 7.5 * 7.3 in / 45 * 19 * 18.5 cm |
|
Installation Method |
Wall mount and ceiling mount support Installation Guide Video |
|
Weight |
4.9lbs (2.2kg) |
|
Color |
White |
|
Operating Conditions |
IP65-4°F - 122°F (-20°C - 50°C), Weather resistant Note: The cradle head explosion-proof cover resists snowy weather. At -20° the cradle head will not freeze and will rotate freely. |
|
Compatibility |
Compatible with Google Voice Assistance and Alexa, HomeKit Not Compatible. |
|
Power |
Hardwired (110-240V) Only |
|
Connectivity |
802.11 b/g/n Wi-Fi connection @2.4GHz |
|
What’s Included |
Floodlight Cam 2 Pro, Mounting Kit, Screw Packs, Quick Start Guide |
|
Warranty |
One year |
Packaging and Accessories
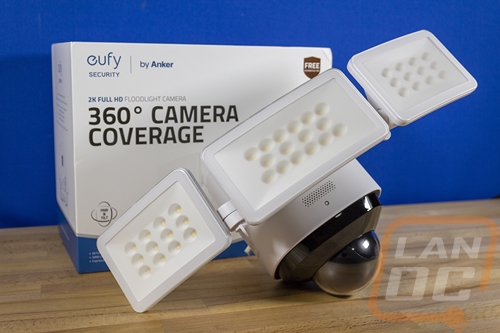
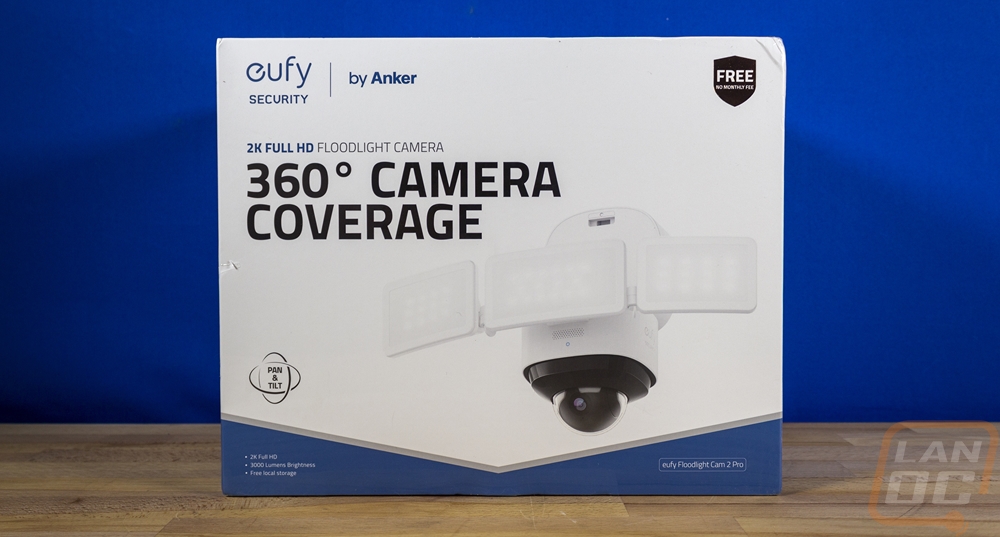
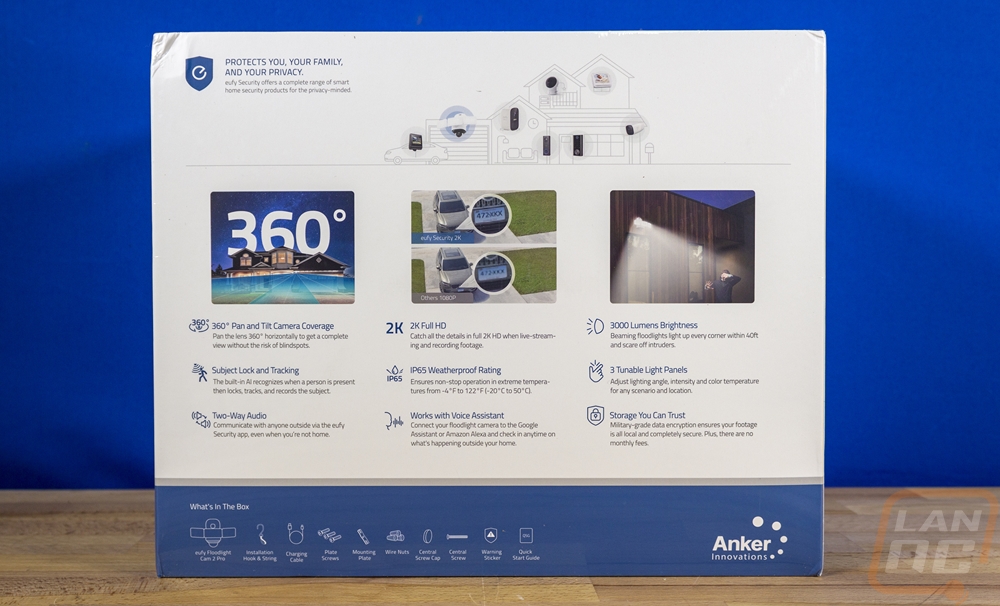
The eufy Security Floodlight Cam 2 Pro comes in a significantly larger box than any of the other eufy Security products that we have had in before it due to the size of the camera/light but the box has the same blue and white theme that all of the eufy Security products have had. This includes the V-shaped blue bottom and the white background on the front. They have a large picture of the light on the front but the model name is actually in the smallest text down in the bottom right corner. The largest text lets you know the camera has a 350-degree coverage area and above that in a smaller font eufy tells you that this is a 2k resolution floodlight camera. The eufy branding as well as the Anker branding are in the top left corner and in the top right, you have a shield shape that lets you know that there are no monthly fees. They repeat that and the resolution down in the bottom left corner and also mention the 3000 lumens brightness of the lights and this being a pan and tilt camera with the logo above that text. The side of the box shows the eufy Security app and touches on a few functions that you get like two-way audio, activity zones, and notifications. Then on the back, the eufy Security Floodlight Cam 2 Pro has three pictures that show some of its functionality as well as a line drawing showing how eufy Security devices can be tied in together to cover all of your home. Below the pictures, eufy lists out more of the key features and each has a short description with more information.

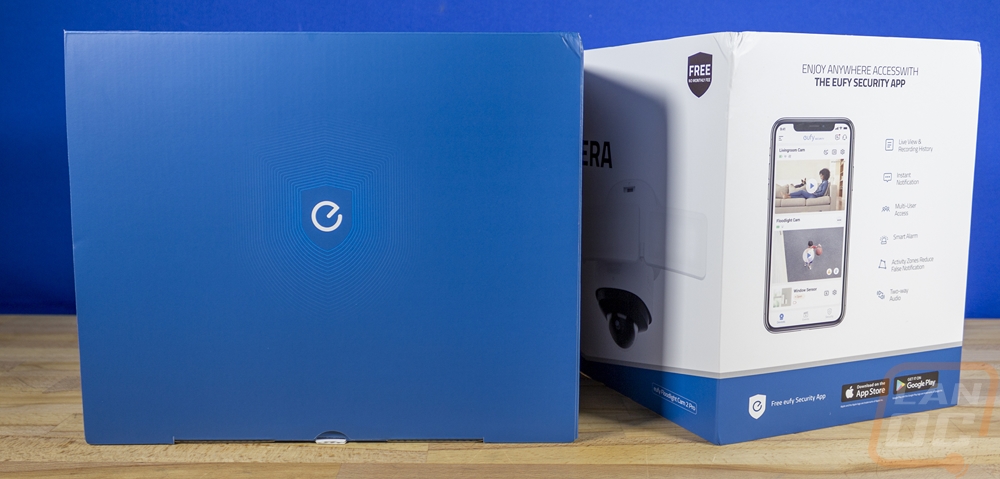
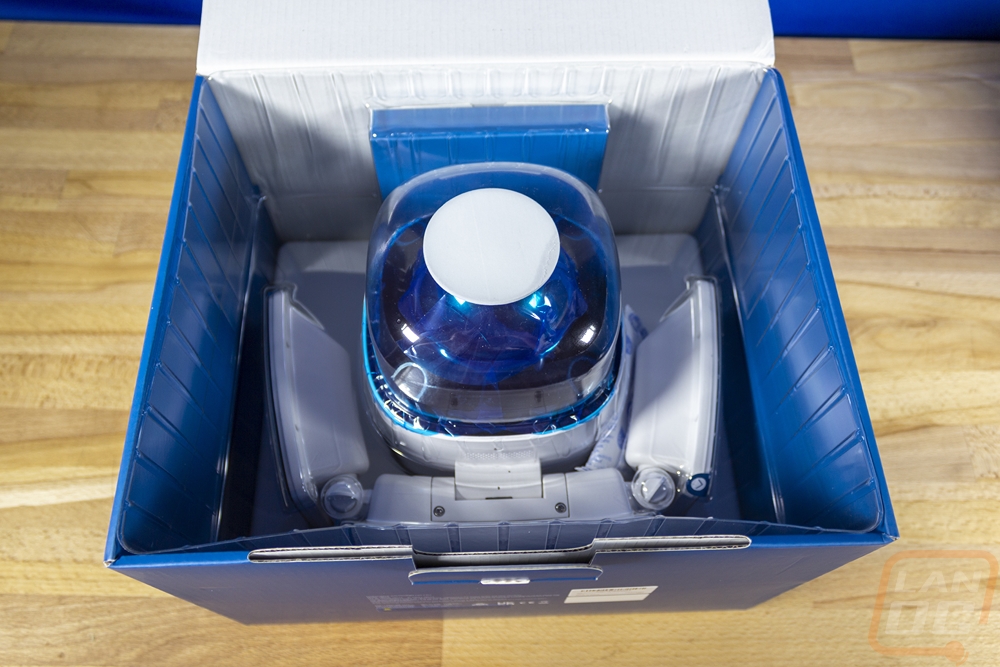
The outside of the box with all of the information on it slides up and off and behind it is a blue box with the eufy shield logo in the middle. That box opens up and inside the camera/light sits in the middle sitting between two clear plastic clamshell trays to keep it from moving around and to give some space to protect it from damage.
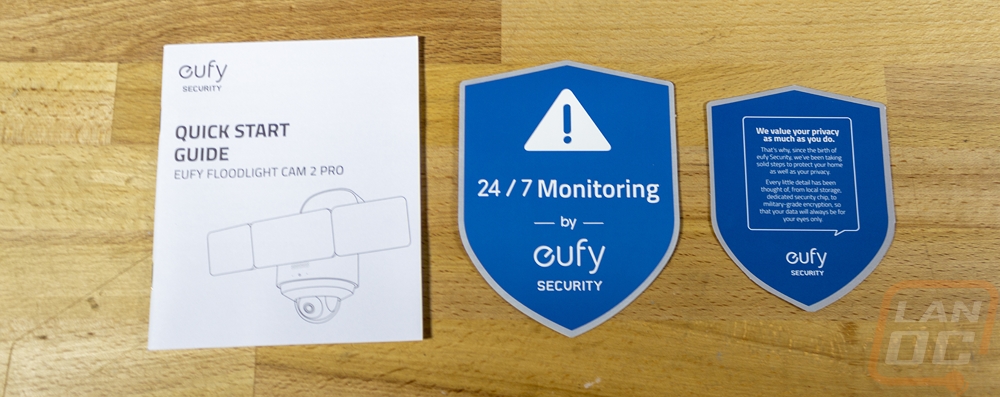
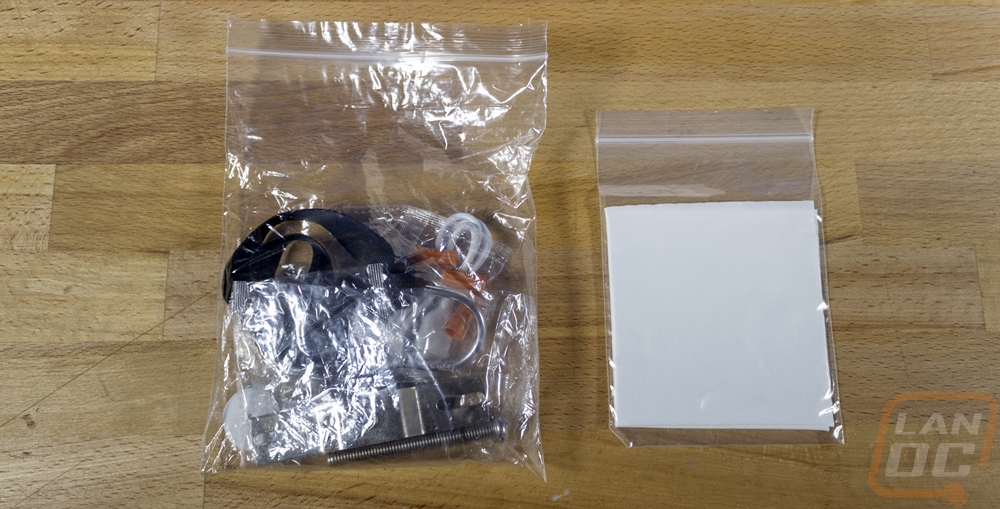
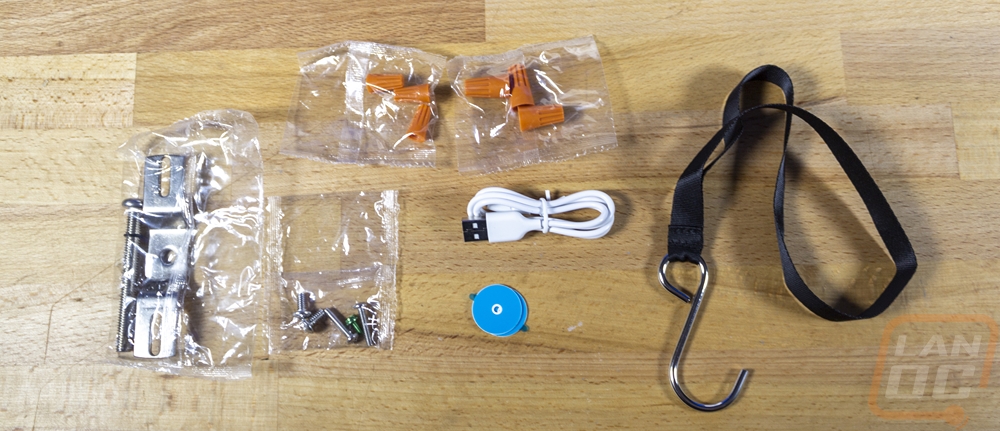
There is also a blue box with the eufy branding on it, this has all of the accessories for installation inside of it. You get a quick start guide and then two eufy shield-shaped cards. One lets you know that they value your privacy as much as you do and the other is a sticker that you can use to let people know you have 24/7 monitoring. There are two other bands, the smaller of the two just ahs a microfiber cloth to clean the dome on the camera and the other is larger and has everything else for installation. You have two sets of three wire ties, of two different sizes depending on the size of the wires you have in your home. There is a short USB cable needed to put power to the camera before installation for camera and wireless setup and a large strap with a hook on it that helps support the camera/light during installation. The two blue round pieces cover the center mounting screw once everything is installed, you get two in case you need to get back inside. Then you have the mounting bracket and the main big screw and a baggie of smaller screws for mounting the bracket into your box.
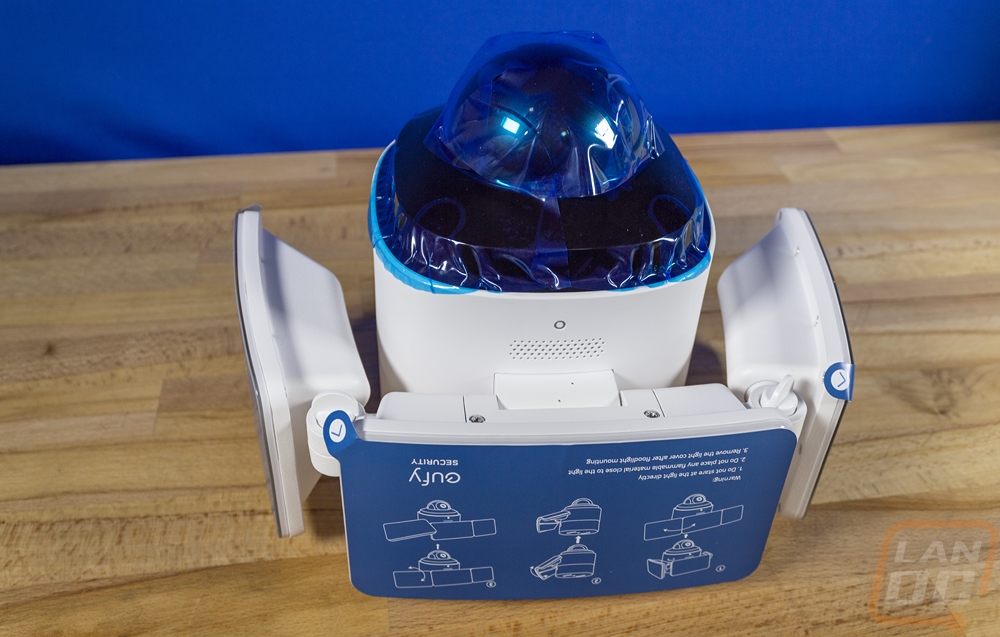
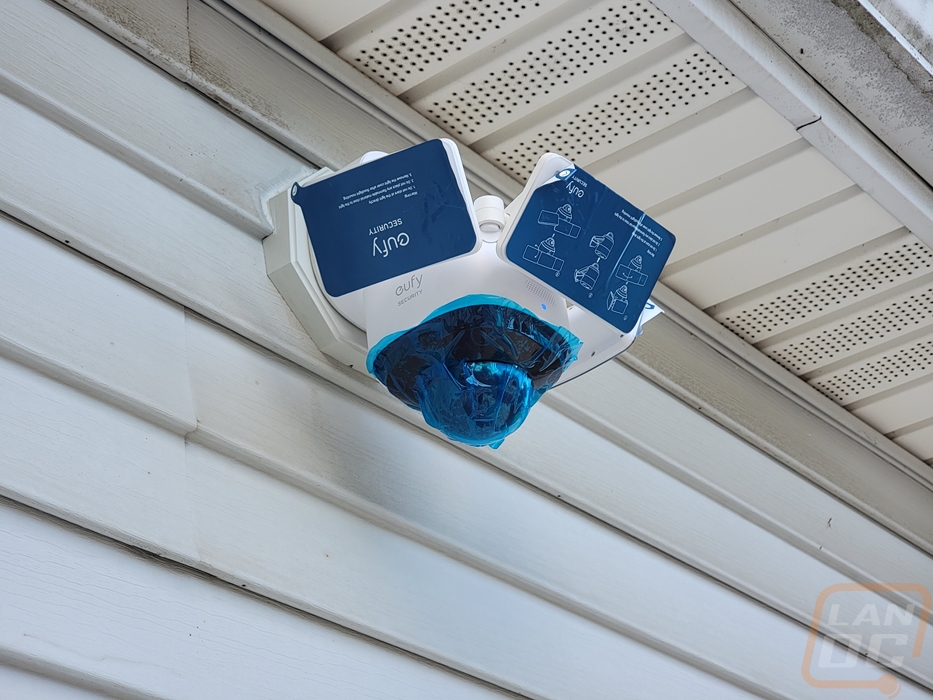
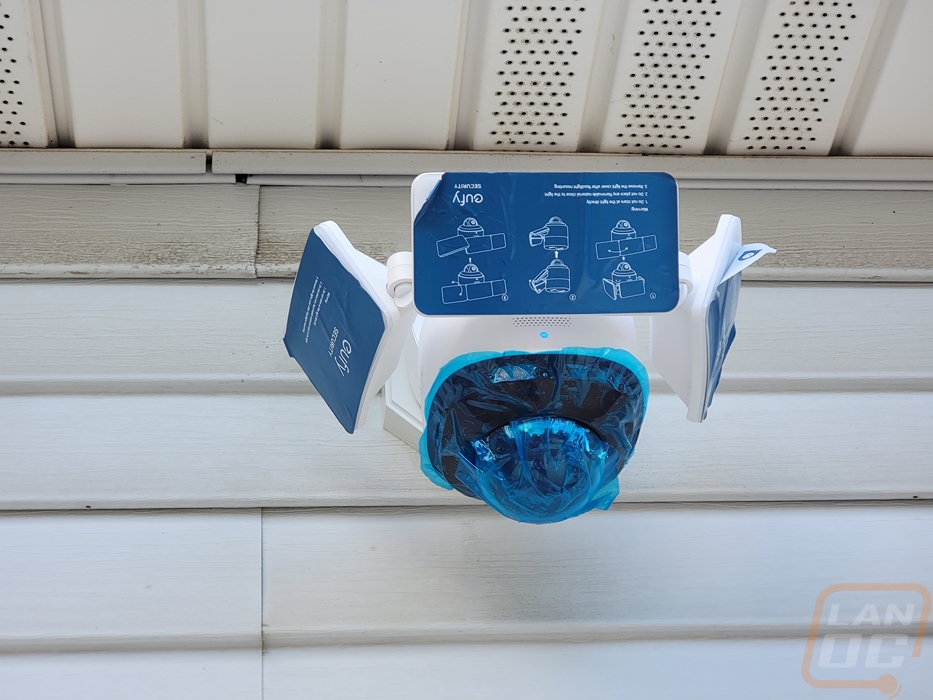
I should also point out that eufy was extra careful to try to protect the eufy Security Floodlight Cam 2 Pro during installation with blue plastic wrap all over the dome and any glossy plastic. There are also stickers over each of the LED light panels which they ask you to not remove until everything is installed and set up so that you don’t blind yourself or I would imagine scratch up or damage the front lenses.
Photos and Features
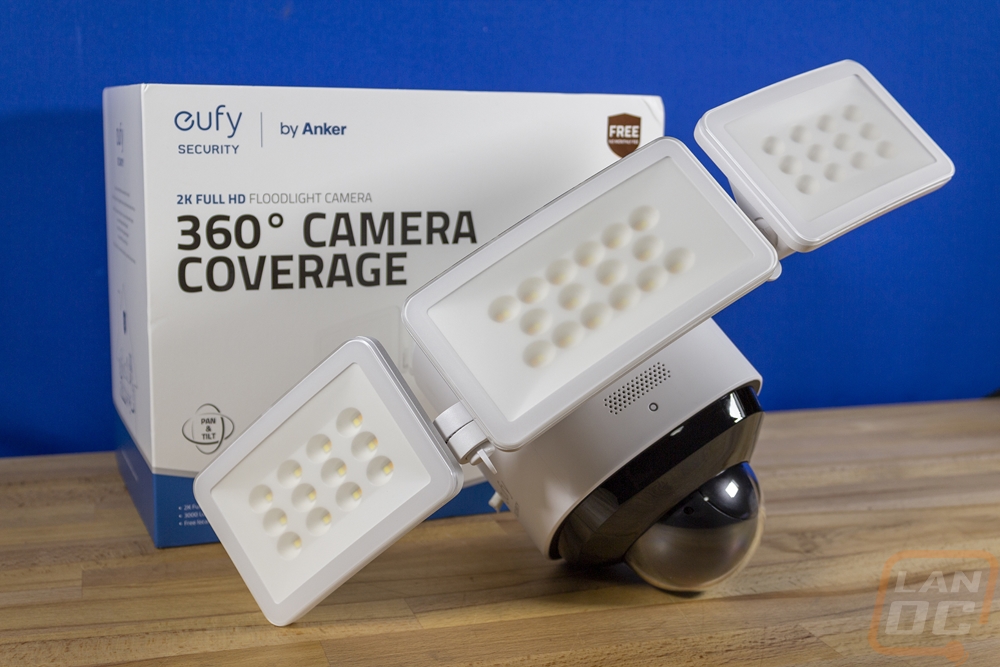
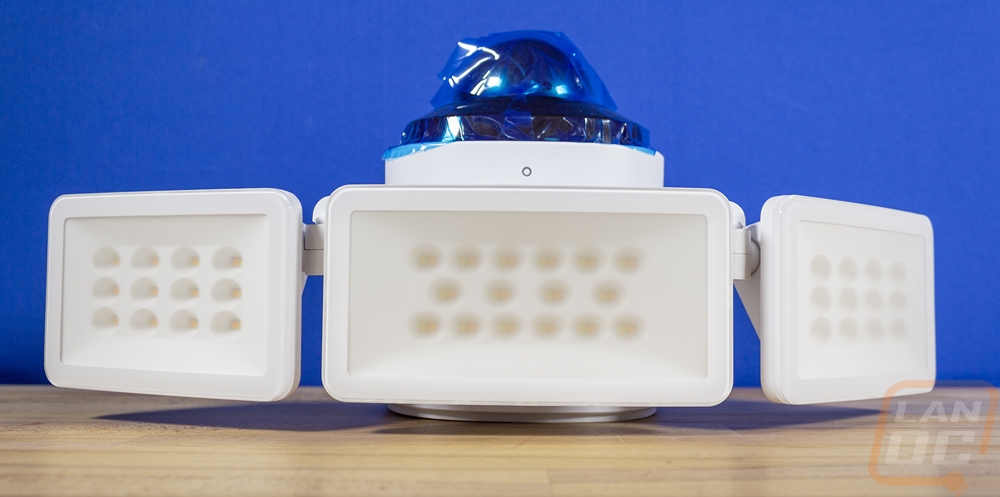
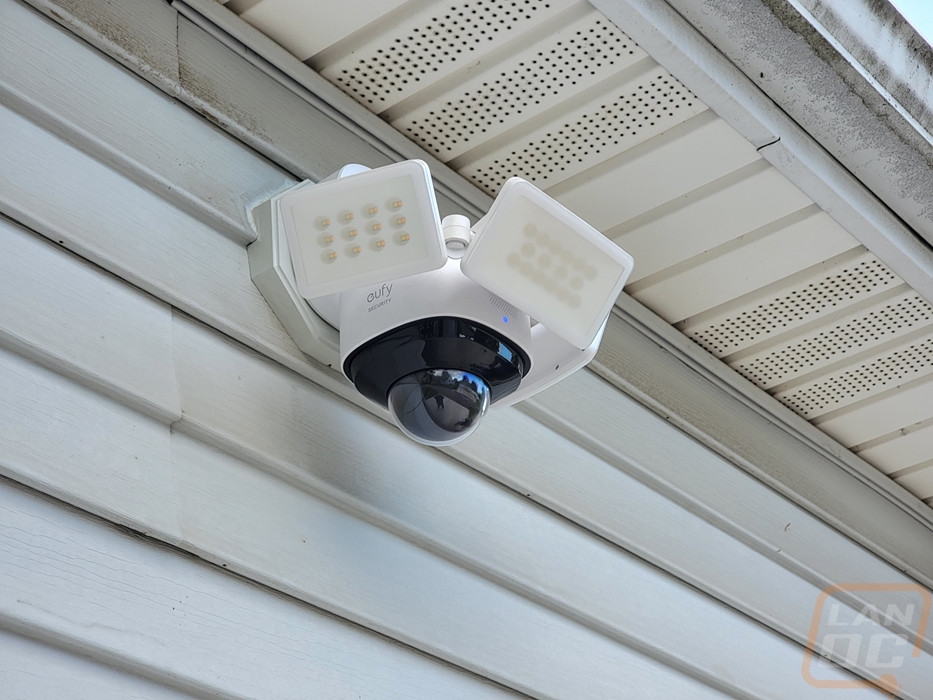
The Floodlight Cam 2 Pro is a huge light with three different light arrays as well as the pan and tilt 2K camera dome on the bottom of the housing. That along with everything needed to mount the light makes for a light that is significantly larger than any other floodlight out there. Most are just your standard dual lights and a camera shoved in the middle and eufy went out of their way to make the Floodlight Cam 2 Pro completely different. Dome cameras with pan and tilt functionality are never small though and the triple light does help hide some of the space that the camera takes up. Overall I would say that while it is very large, it takes up less space than a pan/tilt camera as well as a floodlight would.
The Floodlight Cam 2 Pro has two different tops depending on how you have it configured. Eufy has designed it in a way that you can mount it on a roof eve or flat on a wall. The mounting side has this thick padding around it as a seal with three wires coming out of the camera/light. Then in the center, there is a hole for the large mounting screw. This housing has a latch in it in the middle and can flip down for wall mounting. The second picture below this shows that. That area does have the legal information and certifications printed on it as well as a QR code in the middle used for setting the camera up. The wall configuration does leave a flat area that eufy warns can be a spot where birds may nest which I can see.

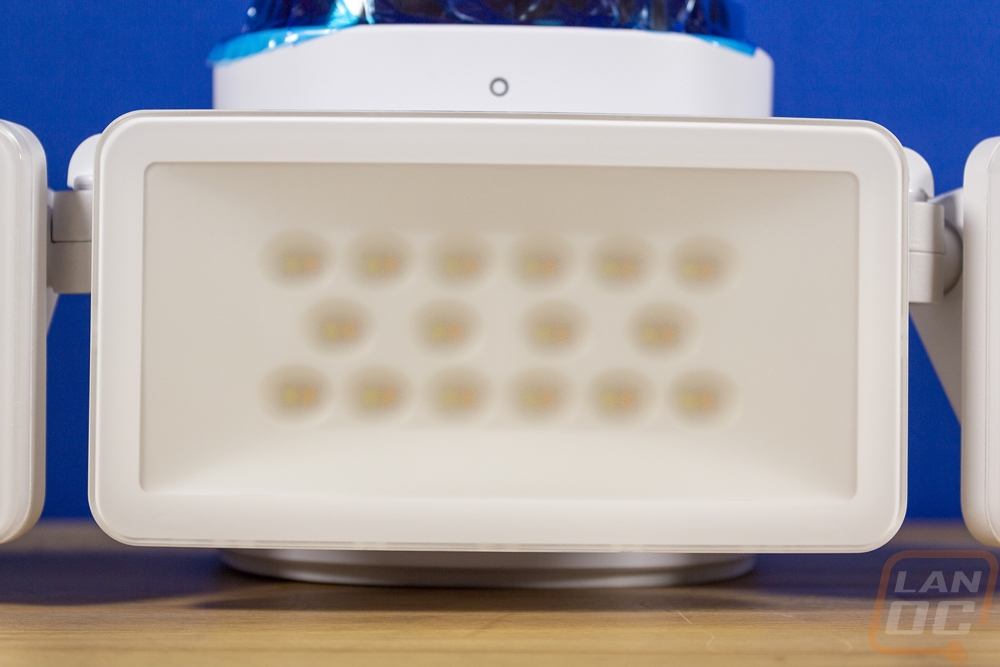
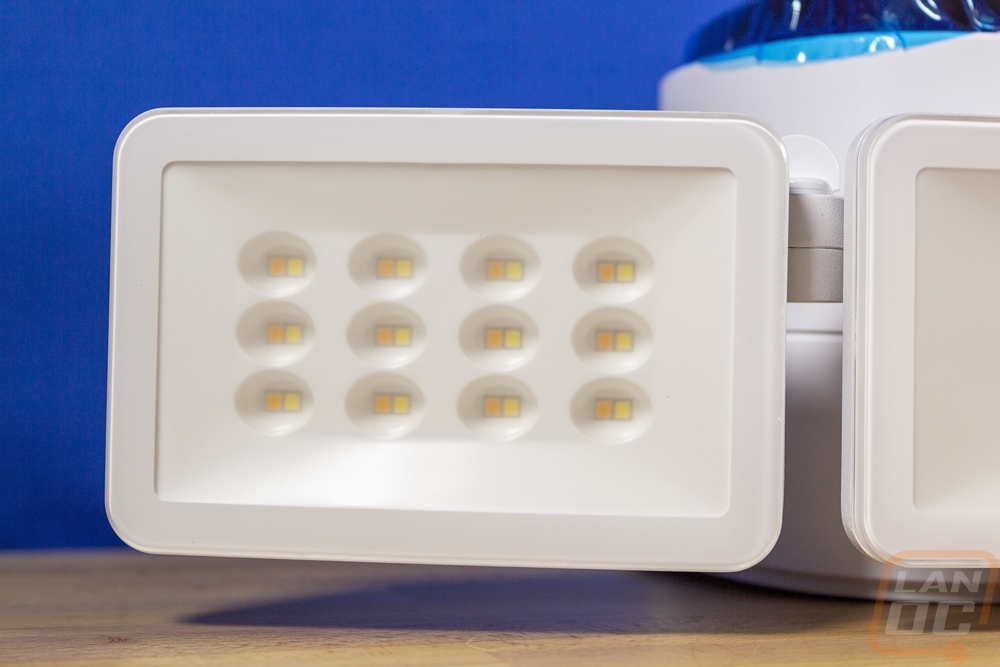
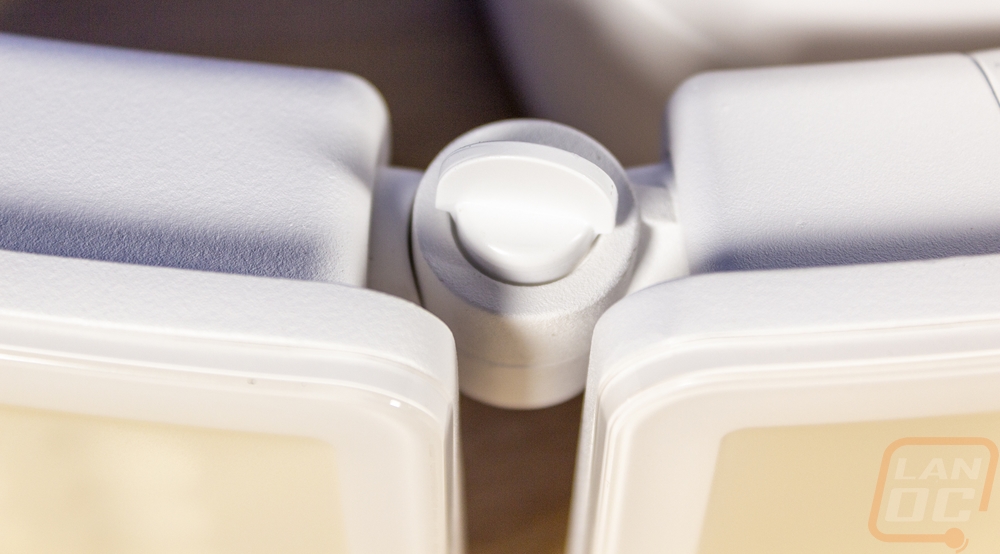
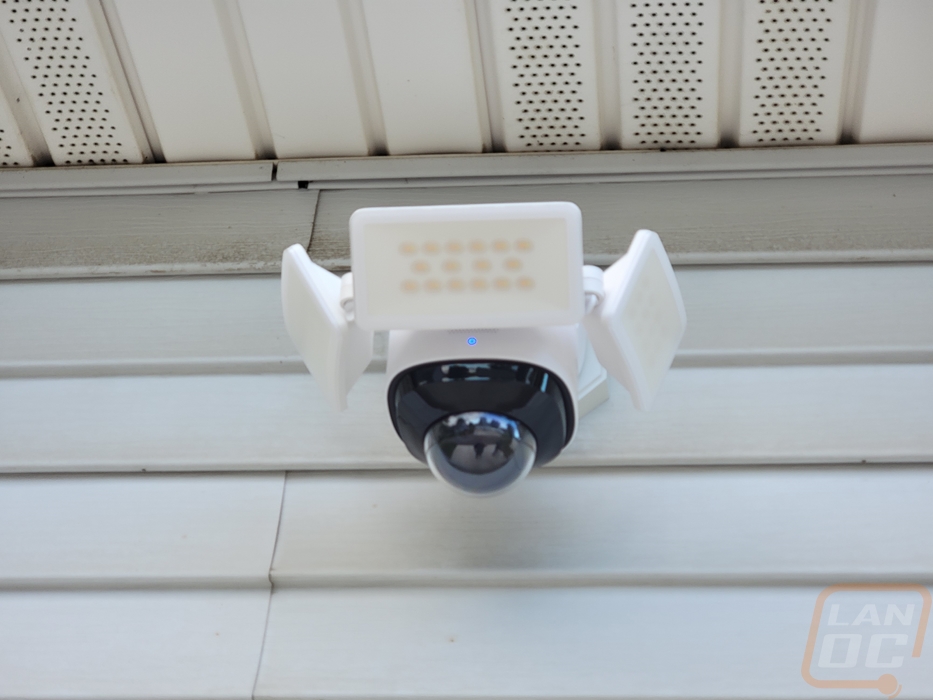
The Floodlight Cam 2 Pro as I mentioned before has a triple LED floodlight configuration hanging off of the front. All three of the lights are mounted together and the middle light is wider but has the same 16 LEDs that both of the outer lights have. These do have a diffuser over the front to help blend the LEDs some and eufy has doubled up the LEDs in each of the housings to allow for color tone adjustability. Each light has 16 yellowed lights and 16 blue and you can control the color temperature through the app. The front of the Floodlight Cam 2 Pro does also have a small ring status LED and below that hidden behind the floodlights is a speaker and microphone combo as well that lets you hear and talk to people through the camera.

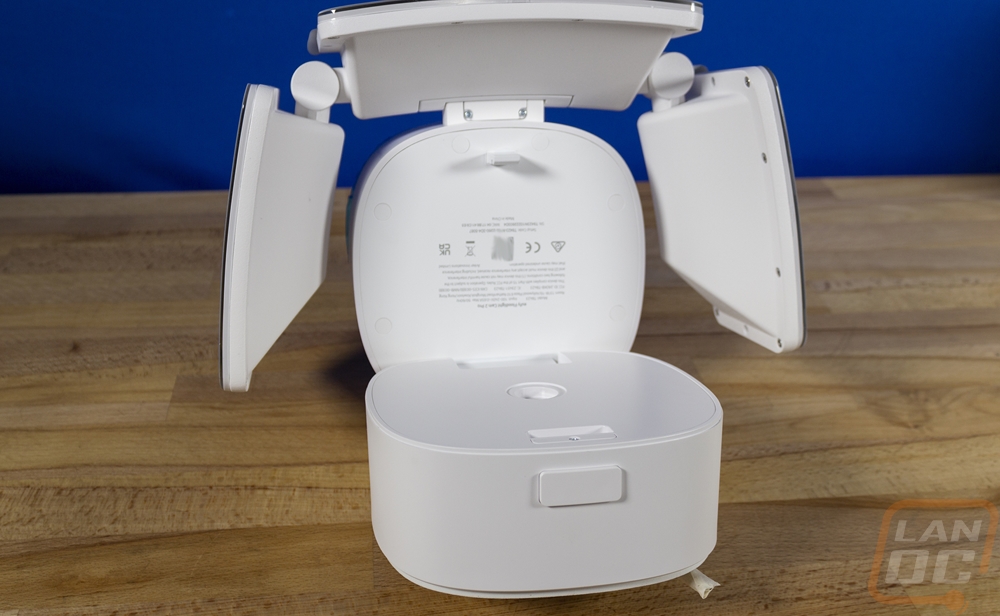
The triple floodlight portion does come with a lot of adjustability. Between the middle light and each of the outer lights, there is a knob that you can loosen up, and once loose that side will swing in the direction you need. That same mechanism allows the outer light to twist as well which controls how far down you want it to point. The middle light can’t be turned from side to side but can be angled down, you want to adjust this first though because it does also move the outer lights along with it. The back view of each of the lights shows they are thickest where the mounting is, being LEDs they don’t need much thickness for the rest of the light and this helps give room to tilt the lights down as well without them getting into the large housing in the middle of the Floodlight Cam 2 Pro.
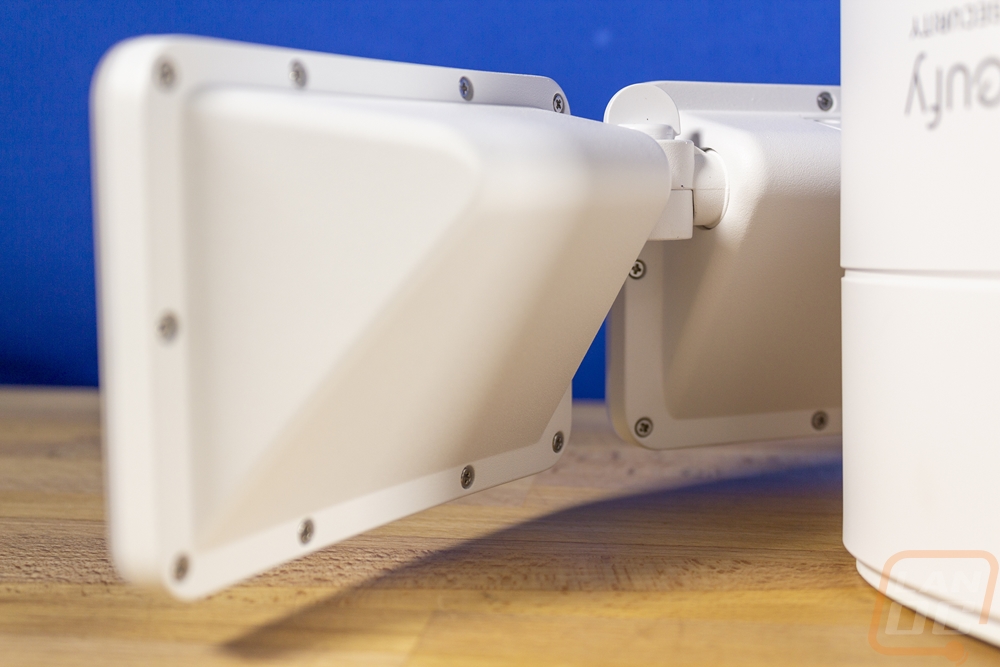
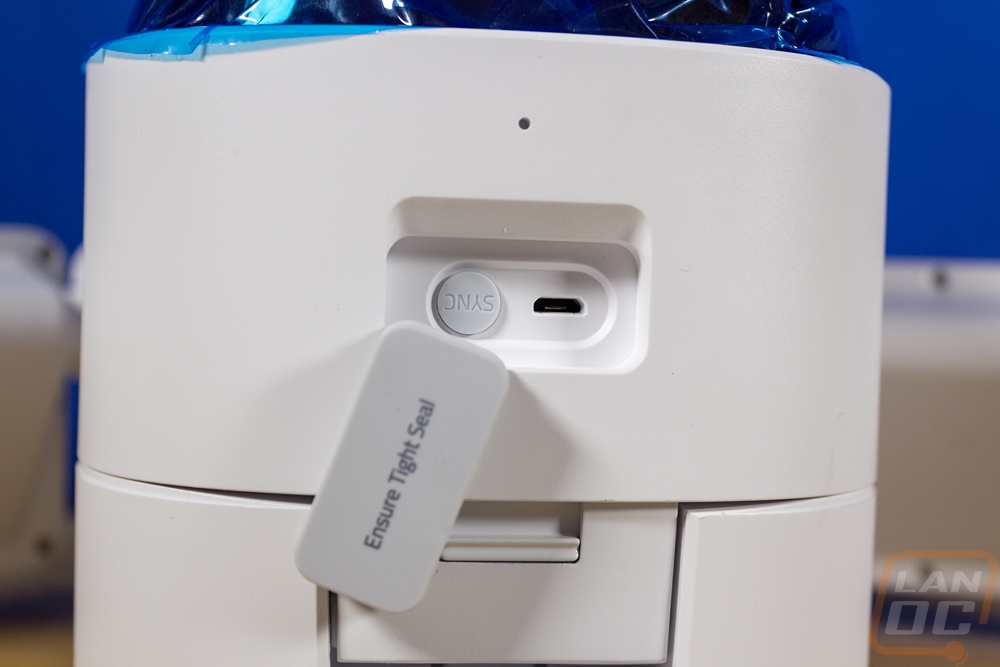
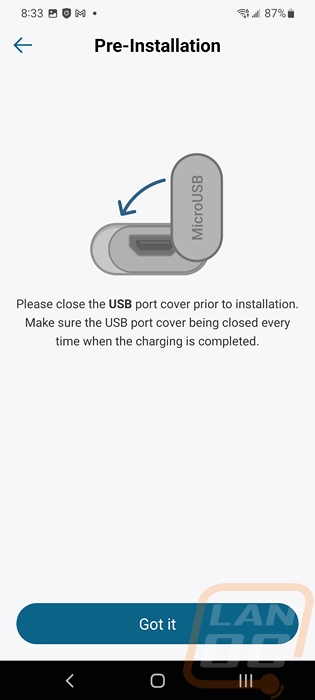
The back side of the Floodlight Cam 2 Pro which is where the wall or eve mounting mechanism pivots also hits two things. There is a small pinhole reset button for one and then they have a heavy-duty seal that covers up a micro-USB port and the sync button. Both of these are needed for setup. Once everything is installed, ideally these are up against the wall and hard or impossible to get to.
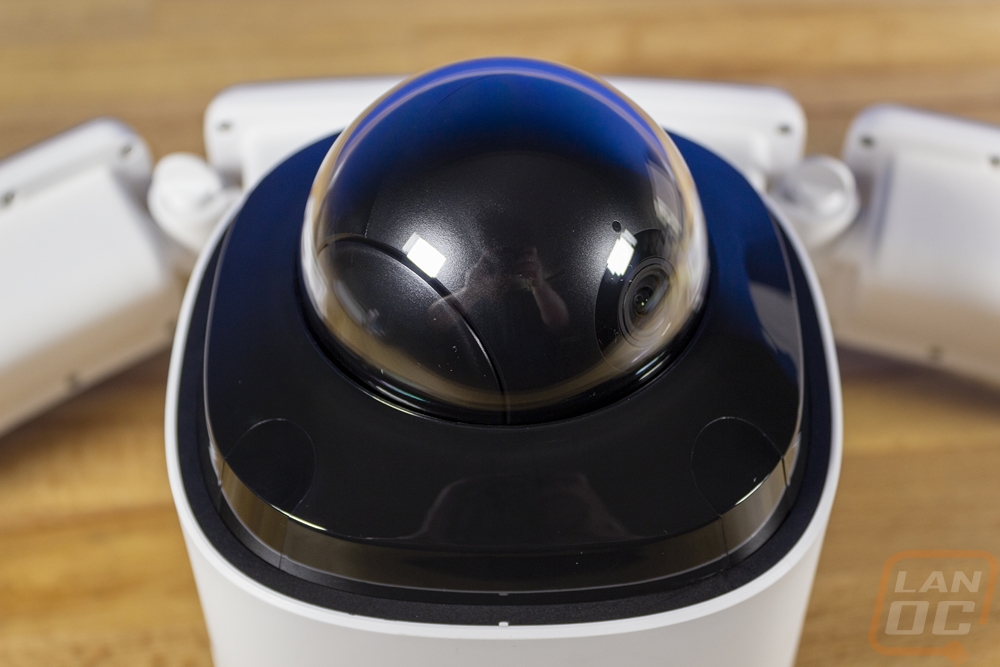
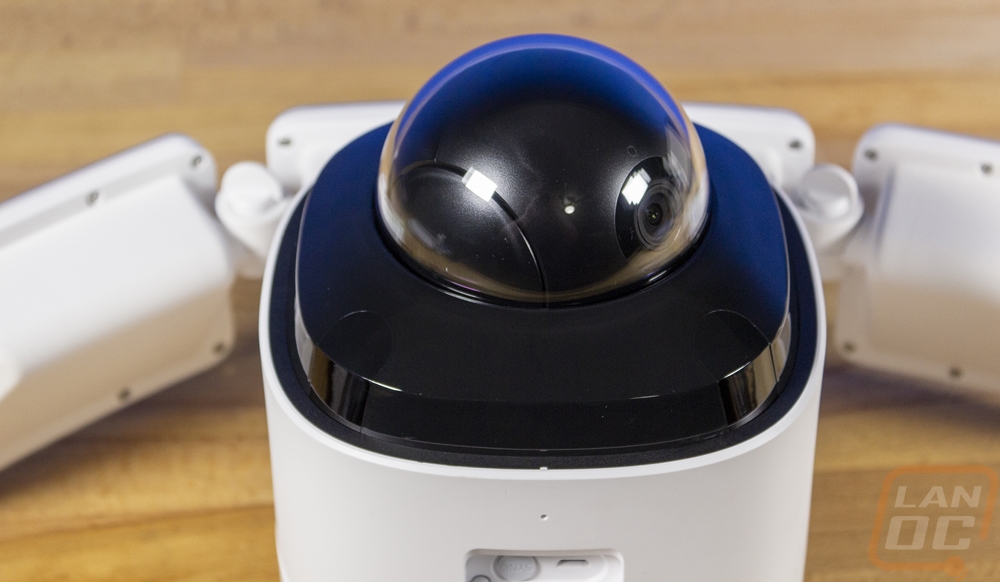
The biggest feature of the Floodlight Cam 2 Pro is the large plastic dome on the bottom of the floodlight. Every other floodlight camera on the market has a fixed camera attached to it which makes the Floodlight Cam 2 Pro unique by having a dome camera. Sensor-wise, this seems to be the same 2K resolution camera that is used in a lot of eufy products but it is set up on a gimble to be able to pan and tilt to aim the camera in any direction you might want to look, a full 360 degrees horizontally and 130 degrees for the vertical tilt. To go with this, in this area there are also three motion sensors and this is what has piqued my interest the most about this setup. The sensors are designed to face out three directions to turn the light on obviously but to also tell the camera when there is motion out of its view allowing it to turn and look in that direction. I’ve had a few pan tilt cameras in the past and that is a big limitation normally, they can only follow the movement that gets in front of the camera, with this setup in theory at least it can pick up movement out of view and get it in view. I will find out how that works for sure in testing.
Installation, Software, and Performance
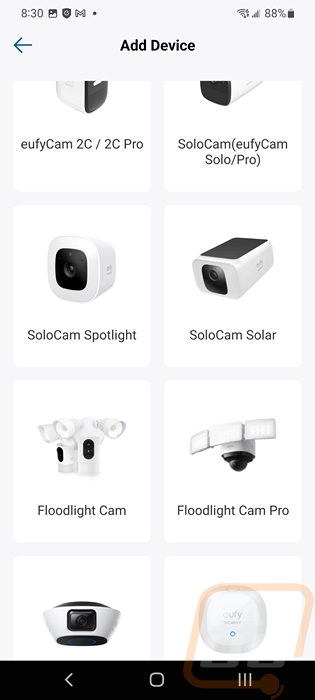
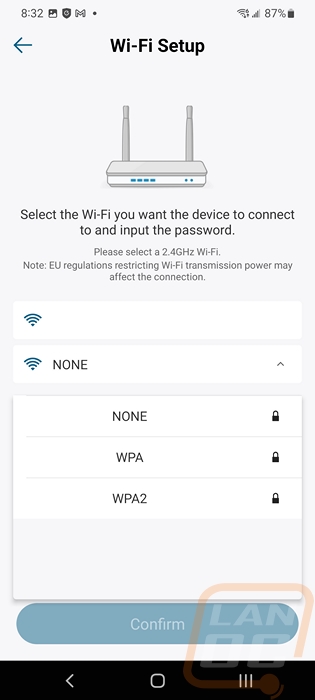
Getting the eufy Security Floodlight Cam 2 Pro up and running is a little more complicated than getting some of their other cameras installed because it does require electrical knowledge or hiring someone who does. There are two parts to getting things set up, you have to set up the camera and then installing the camera physically. Their instructions have you set up the camera first while it is in the house and then install the light. You do this by using the included USB cable to plug it in which powers up the camera. From there you use the eufy Security app and add the device. With the app you start off by pressing the plus sign in the top right corner, this will bring up a list of eufy devices that you can pick the Floodlight Cam 2 Pro from which includes pictures making it each. You then scan the QR code on the camera and it will ask you what wireless network you would like to set it up on. WPA and WPA2 are both supported, it isn’t a surprise at all because none of the smart home devices support it but WPA3 is still not supported which would go a long way in helping to lock networks down and avoid man in the middle attacks.

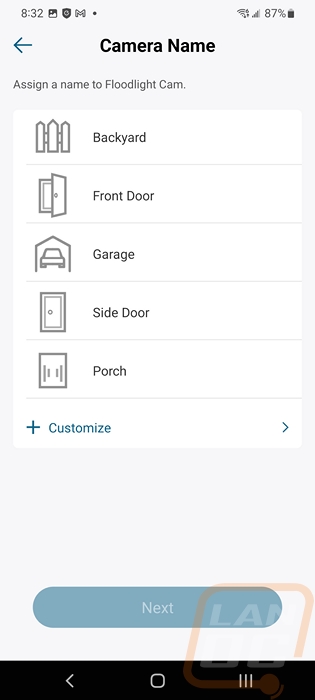
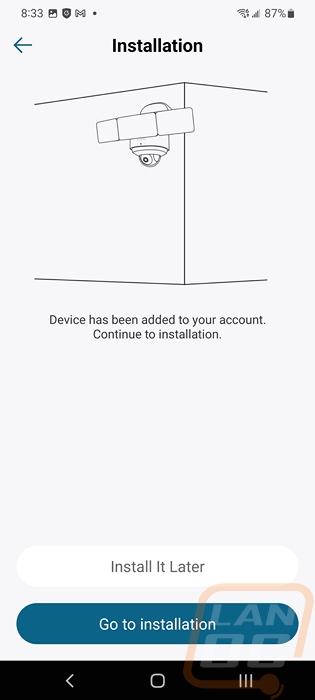
From there you can pick from the suggested names or give the camera a custom name. From here the camera is up and running and you can dive into the settings and see the view but you should wait until everything is installed before doing that or removing the blue protective plastic. Eufy does remind you to close the thick rubber seal that goes over the USB port to keep things waterproof. From there they give you the option to see the steps for installing the camera physically.
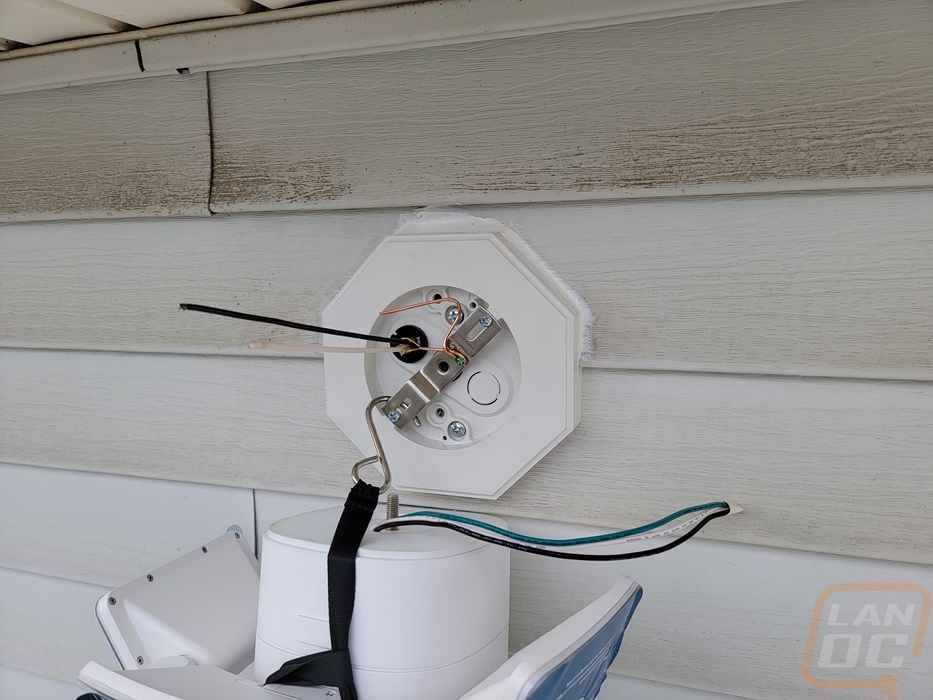
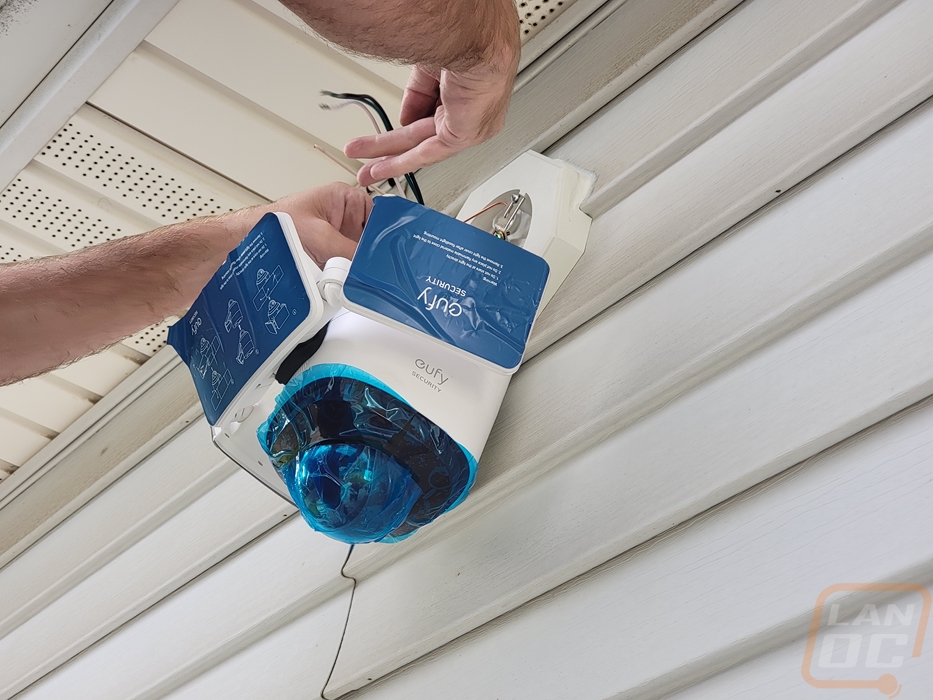
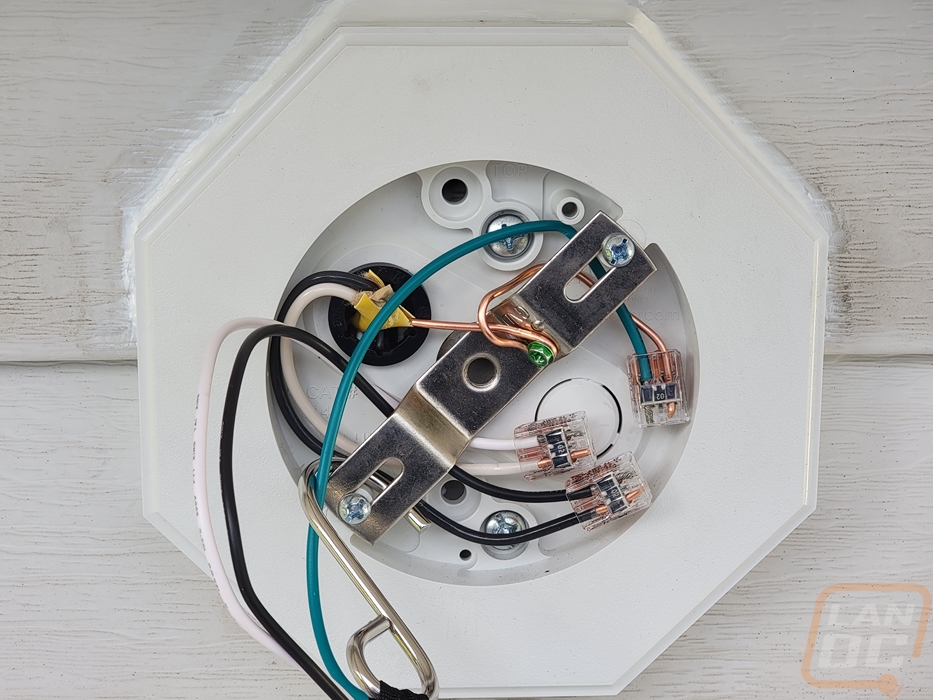
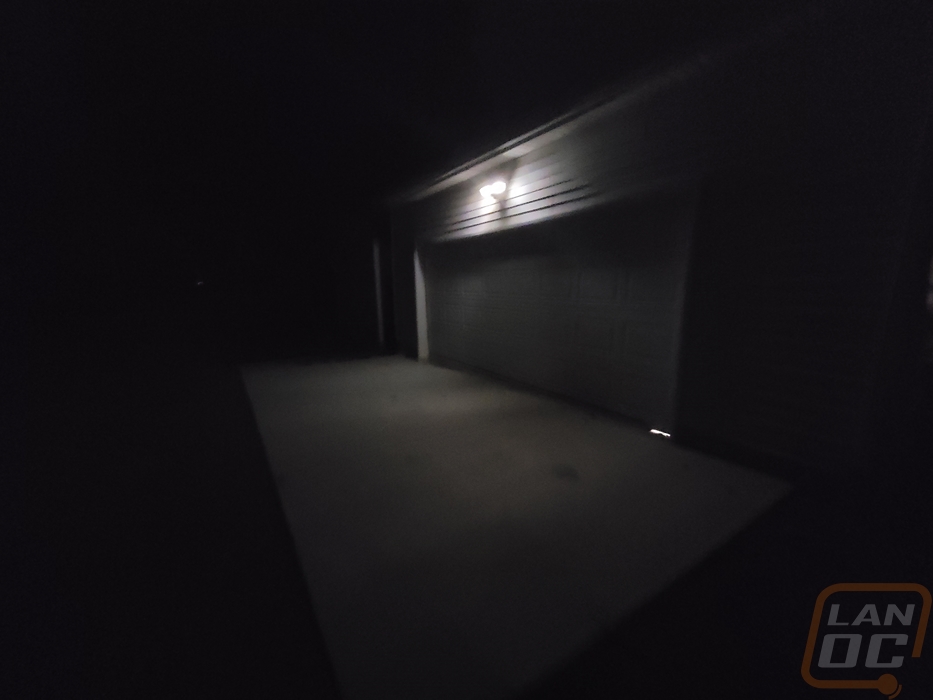
With that ready to go, it was time to install the eufy Security Floodlight Cam 2 Pro on our garage. I previously had an older light that wasn’t installed correctly so to go with this the old box and wiring (who uses an extension cord lol) was replaced and I went with a box that fit our siding. I don’t have any issues with wiring but did have an electrician friend help with the installation here which let me get pictures. The new box was prepped and ready to go and then the mounting bracket was installed. We noticed right away that the flush siding box that I had gone with was going to cause issues for the installation as well as the bracket was installed. The bracket fits, but with the floodlight mounting bolt screwing into the middle of the bracket we also knew that it was going to push through the back of the box. A normal larger box wouldn’t have this issue at all, but it is important to note just in case anyone is installing it into a similar box.

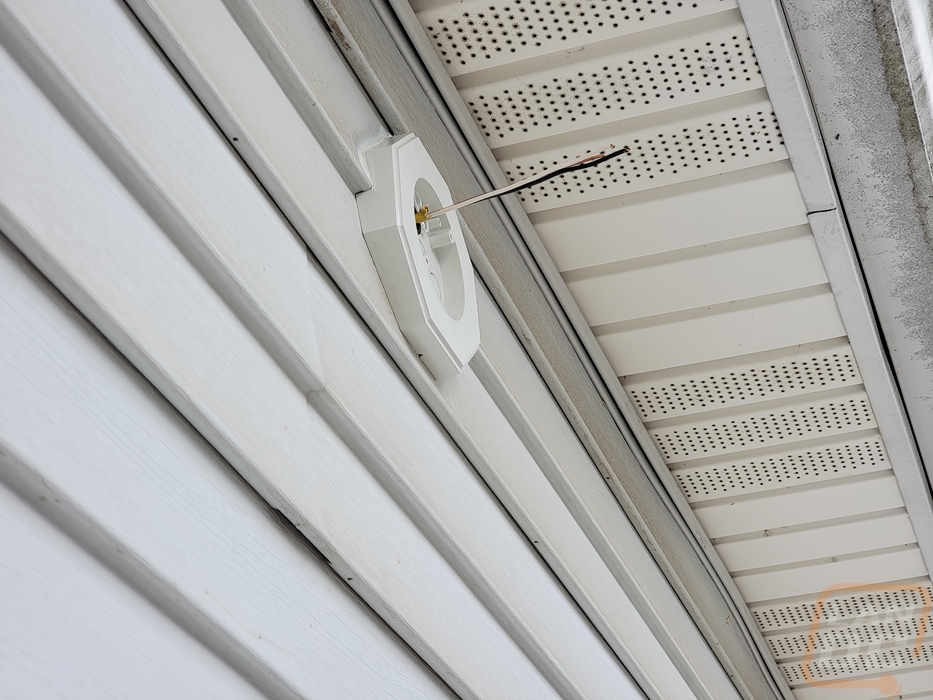
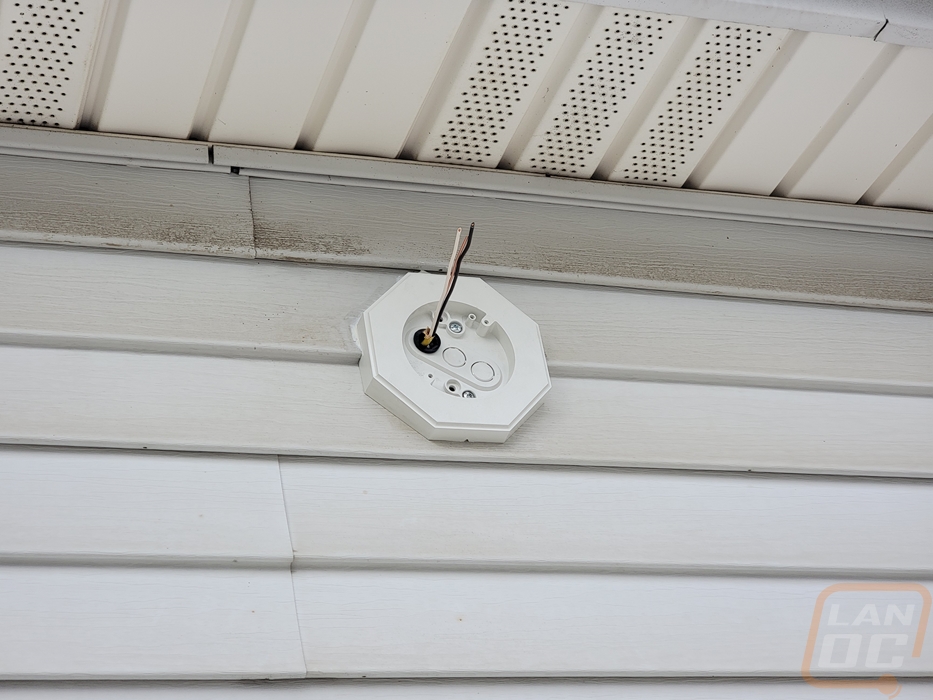
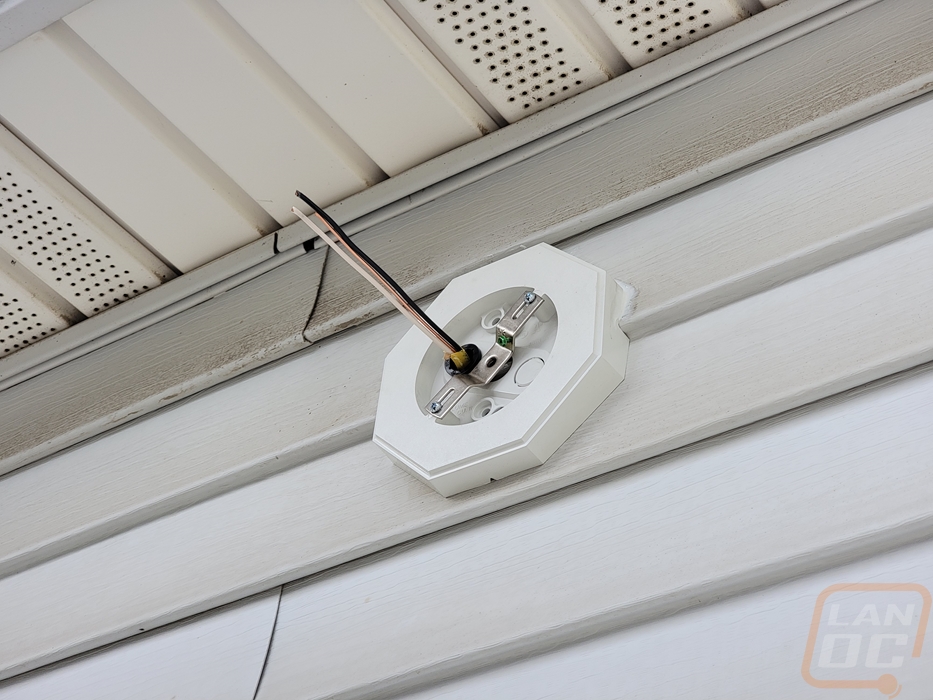
With the bracket mounted to the box the ground wire was run to the bracket and screwed down then we could use the hanging strap that eufy included. Given that we had just installed a standard light previous to this, this strap made a huge difference in helping with the installation. You hook it to the bracket and it holds the eufy Security Floodlight Cam 2 Pro up to give you both your hands for wiring. With the size of the eufy Security Floodlight Cam 2 Pro, this was especially important but it is also something I wish more lights had in general. We decided to go with wago’s for the wiring rather than the included wire nuts. Given how tight the box was this was a good decision. You can see that the ground wire is tied to the bracket and also to the green wire. Then from there, it is hot too hot and neutral to neutral for the wires. In a standard-size box, the wire nuts wouldn’t be a problem. Once everything is wired up you remove the strap and the single large bolt tightens the eufy Security Floodlight Cam 2 Pro down. Then once you are done eufy has included a small stick-on cap to go over that to keep the weather out and to make it look better.
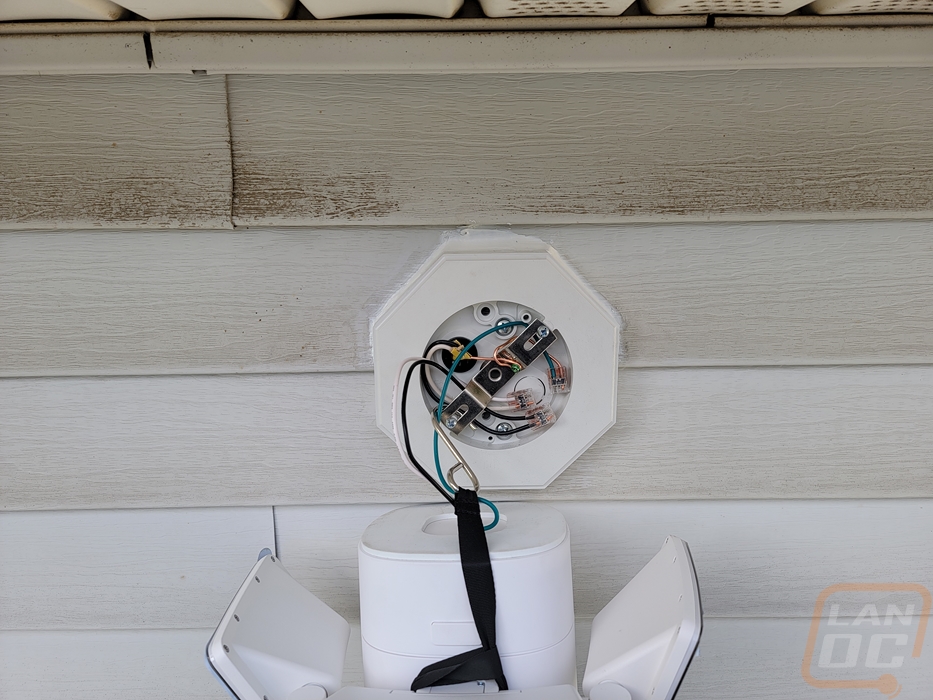
Because the back of my garage faces an alley we arranged both side lights to point to the sides completely to get a wider lighting coverage but tilted all three down as far as they would go as well to not put out too much light onto the property of the houses around us. In hindsight, because we were replacing the box we should have moved it up onto the eve where we would have been able to use the eufy Security Floodlight Cam 2 Pro latched which prevents having that flat area on top of it where birds can nest. It would also pull the camera away from the house a little more as well. But eufy did a good job of giving the option to install it in both configurations with what is a relatively small concession.
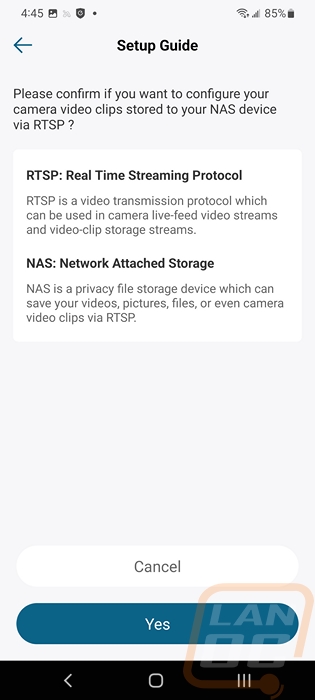
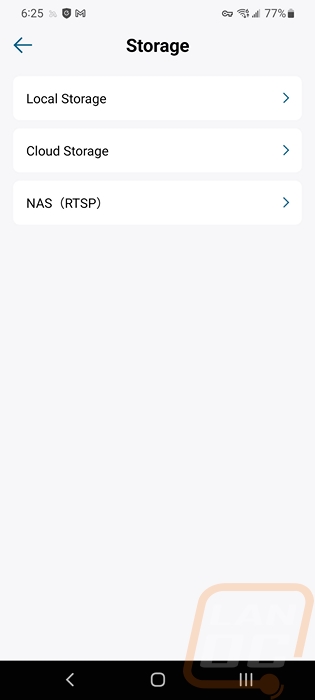
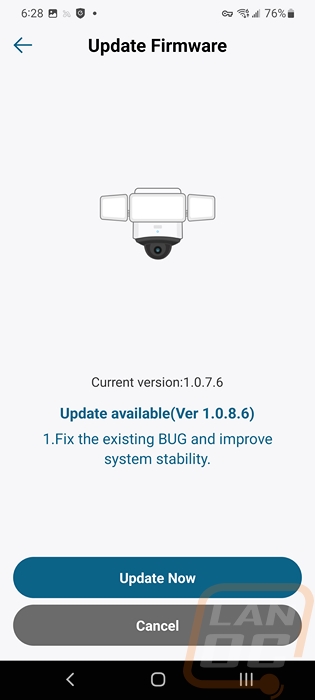
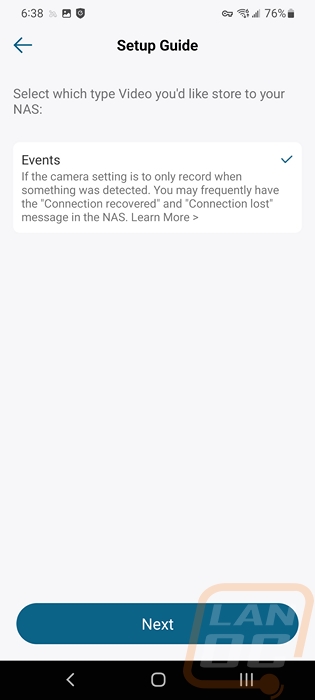
With the eufy Security Floodlight Cam 2 Pro having its initial setup done and being installed it powered up and connected to our wireless and I was free to finish setting things up. The first setting I jumped into is one that I use with the eufy Garage Control Cam Plus and a few eufy cameras in the house, I went to the storage settings and was looking to set up RTSP aka real-time streaming protocol which you can use to view the footage on other devices like a NAS or in our case a Blue Iris server. I was excited that the eufy Security Floodlight Cam 2 Pro had this support. It worked well to get things up and running but I learned quickly that for some reason the eufy Security Floodlight Cam 2 Pro only supports showing events whereas the other eufy devices that have had this can be switched between events and continuous recording. I could understand this if the eufy Security Floodlight Cam 2 Pro was battery-powered, but being hard-wired for power I really don’t understand why you wouldn’t get full RTSP. In short, it only sends the footage when movement is picked up. I even made sure to update the firmware thinking that it might be a feature that was added later without any luck.
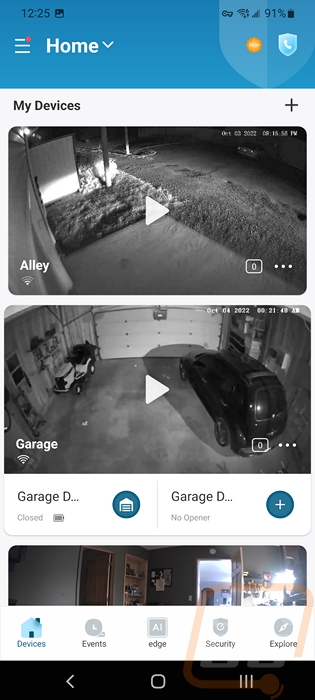
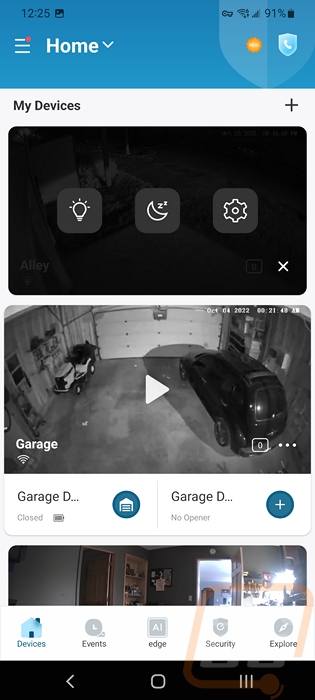
If you haven’t seen any of our other eufy Security reviews, the eufy Security Floodlight Cam 2 Pro does use the same app. So when you open the app up the home page has pictures of each of your eufy cameras from the last time that camera was opened up. From this page, you can click in the center to open it up or in the bottom right you can click the number which shows the number of motion alerts or the three dots which opens up the initial settings menu. For the eufy Security Floodlight Cam 2 Pro, this gives you an open to turn the floodlight on, the middle button is the snooze button which can turn off notifications for 30 minutes to up to 24 hours, or open up the full settings menu.
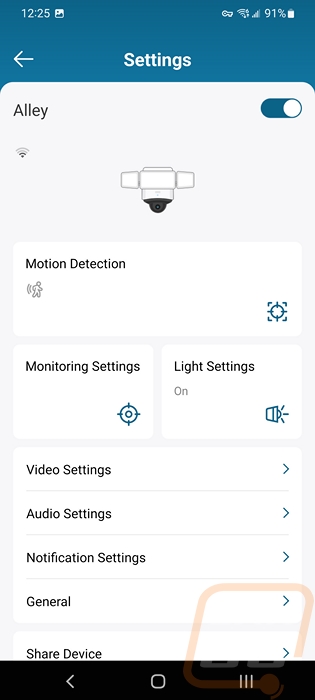
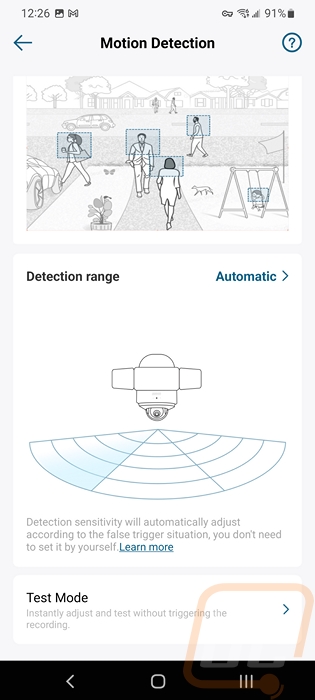
This is the main setting menu. Up top, you have a switch to turn the eufy Security Floodlight Cam 2 Pro camera off and you can see the current wireless connection speed. Then from there, motion detection has the largest button along with monitoring and light settings also having featured buttons to open up those settings. Below that the rest of the options are packed into the smaller list.
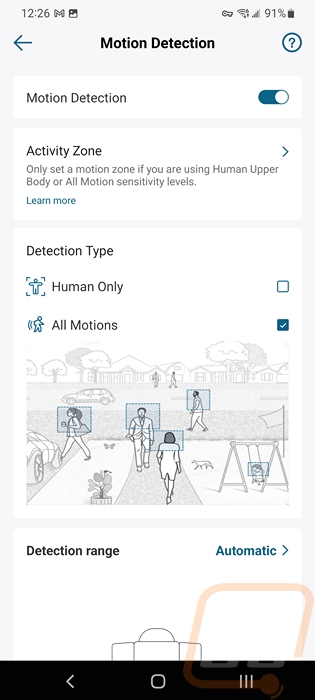
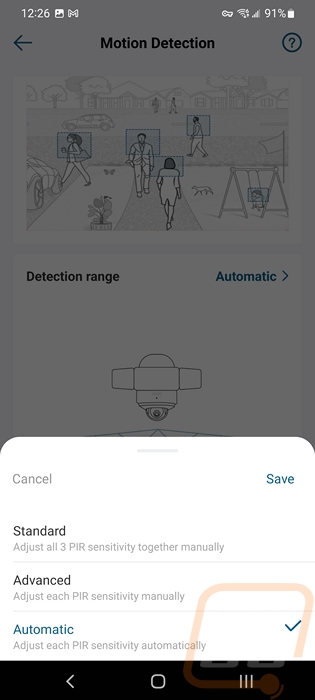
The motion detection page starts with the option to turn it off completely. The activity zone option opens up the camera view where you can set only specific areas for it to worry about. Like with the garage control camera you can decide if you want it to worry about all motion or just humans, for my situation I want to also worry about cars so I have to have all motion on. I’ve seen some eufy cameras adding cars as an option, I hope I can eventually get that option on the eufy Security Floodlight Cam 2 Pro because all motion does mean that things like trees or leaves moving can potentially set things off depending on your other settings. You can then set the detection range. There are three options here, standard which has a single range for all three sensors, advanced which uses the pie-shaped image to let you set the range for each sensor, and then automatic where you let the eufy Security Floodlight Cam 2 Pro figure it out depending on the motion it picks up to try to cut out false alarms. For my testing, I went with that, but normally I would set my own distances.
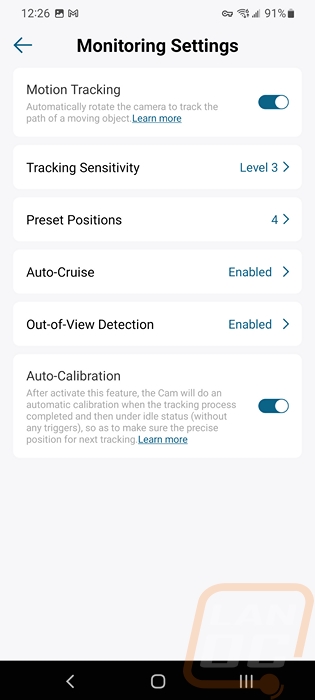
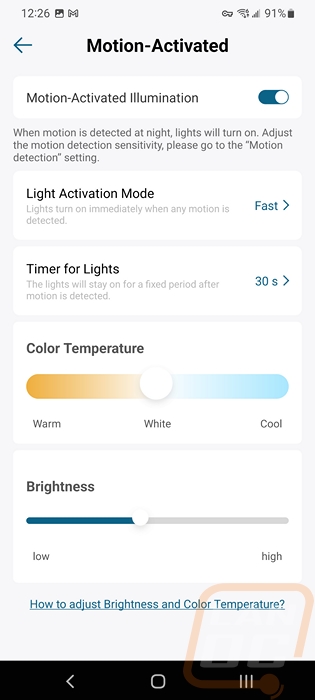
The second settings page was the monitoring setting. This is where you can turn on motion tracking and make adjustments to it. In short, the eufy Security Floodlight Cam 2 Pro has three PIR motion sensors whereas most floodlights would have just one. The idea is that with three you can pick up motion that is out of view of the camera and move the camera in that direction. With that setting on you can adjust the sensitivity and you can set preset camera positions where the camera can move to.
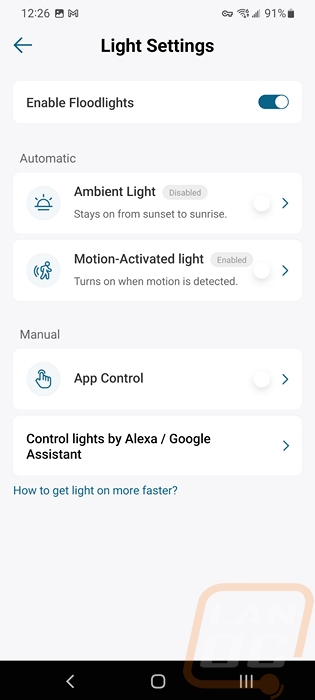
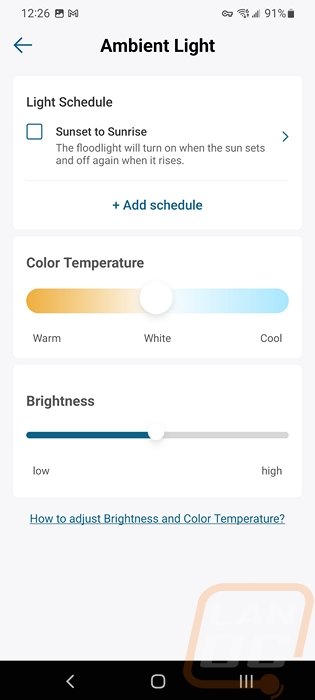
The light settings are exclusive to the eufy Floodlights. This is where you can adjust the settings for how the floodlight works. I never really considered having to climb up and make adjustments to a normal motion floodlight to be a big deal until when visiting family I realized that for some people, the elderly especially, that isn’t an option and they may wait months to have someone change a setting. So having this right on the app could be a valuable feature for some. The settings page starts with the option to be able to turn the lights off altogether. Below that you can turn on or off two features, ambient light, and motion-activated light. The eufy Security Floodlight Cam 2 Pro has the option to run the light all of the time at a lower setting or with a schedule which could be good if you want some light in the area you have this installed until you go to sleep. For my specific case, being in the alley I don’t want to add light that may bother our neighbors unless there is motion so I have that option off. The motion activation has its own page as well where you can set how quickly the light is activated, how long it stays on, its brightness, and the color temperature of the lights. Given that it is three lights I have the brightness turned down to below half and I only have the light staying on for 30 seconds after the motion is detected to keep it off as much as possible.
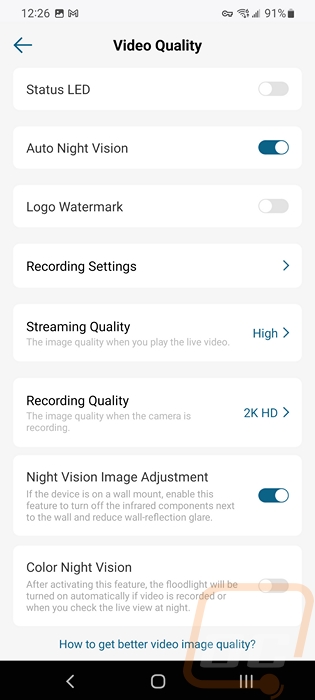
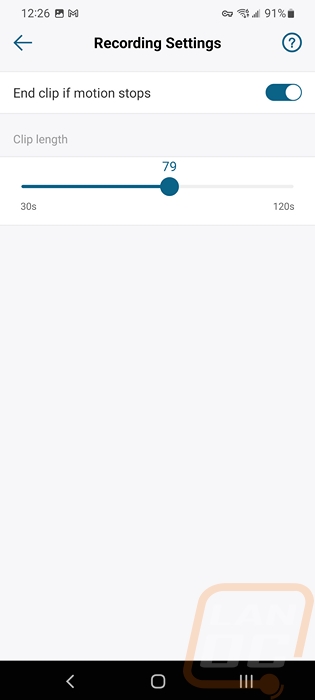
The next menu page is the video quality page and this covers both streaming and recording settings. The Floodlight Cam 2 Pro supports 2k for its resolution but you can adjust that down to 1080p for recording if you want to save storage space. Streaming just has low, medium, and high settings or auto if you want to let it adjust the detail depending on your bandwidth. Also on this page, you can turn off the status LED if you don’t want to draw attention to it if you have it in a location like I do. The night vision image adjustment setting is a nice addition, this helps when you have the Floodlight Cam 2 Pro installed on the wall rather than an eve. It turns off infrared that faces back towards the way to cut out reflections that can cause problems with night video. You also have the option to turn infrared completely off and run color night vision mode which will just turn the lights on any time the camera is on and use the floodlights for color night vision. The recording settings option opens up another page where you can set the amount of time the recording will be.
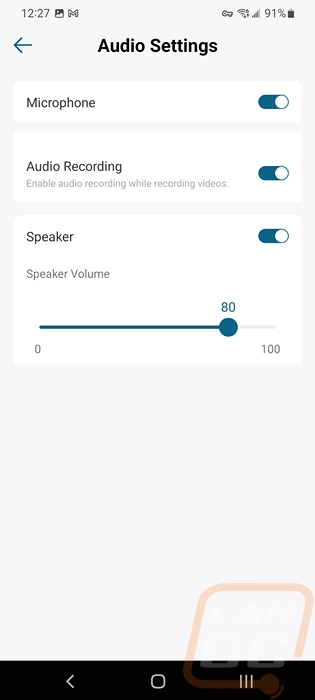
The audio setting page is simpler. This has options to turn the microphone and the built-in speaker off. You can adjust the speaker volume for when you talk through the camera to someone. You can also decide if you want to turn the audio on or off on the video recordings.
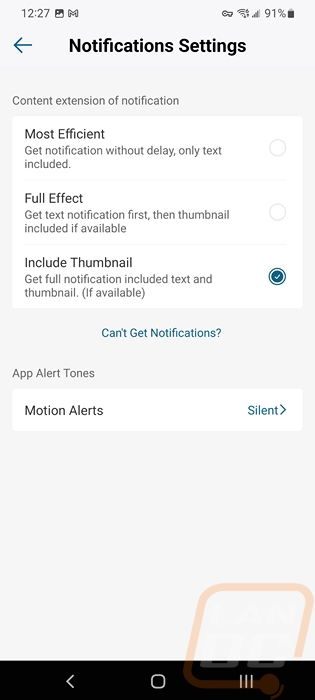
The notification settings page has the option to change how motion notifications are shown to you. You can get a quick text-only notification, get the text and then a picture later, or have them combined. Then down at the bottom, you can adjust the notification alert sound notification. I do wish that eufy would also give you the option to not have a notification as well. With this being our alley camera, I do want it to record motion, but I don’t need notifications each time something happens. Turning the sound to silent helped, but I still get a list of notifications when I check my phone and if I am active on my phone they pop up as they happen. I could turn off the app notifications altogether but because I have other cameras that I do want notifications from I can’t do that without losing those.
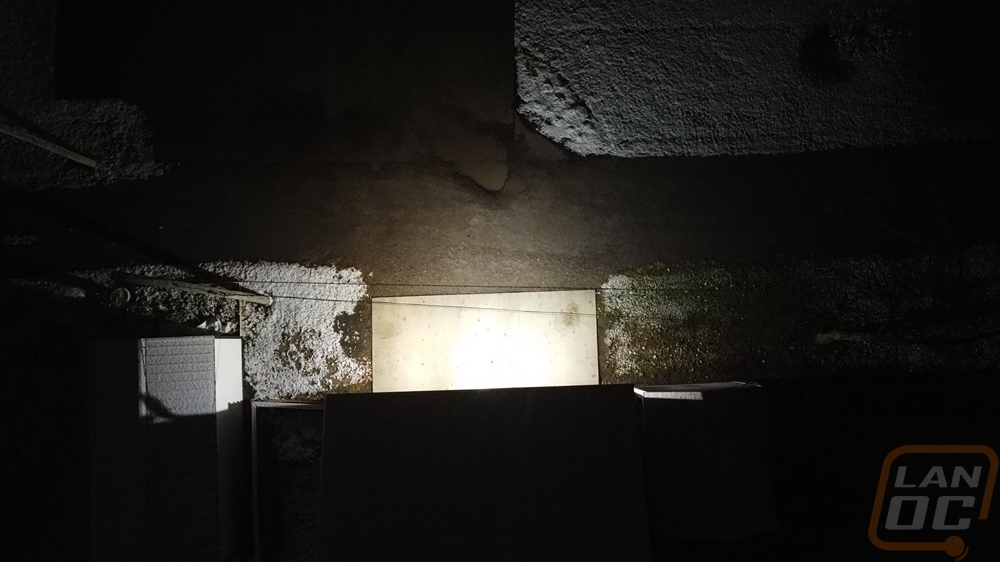
The first thing I wanted to check out was how well the floodlights themselves worked. To check this out at night I went out and tested the lights with a few different brightness settings. In the three pictures below I have the brightness set to 100% on the first, 50% on the second, and the lowest possible setting while having them on for the third. That lowest setting was still enough to put out some light but you can see from the light leaking out from under the garage door how much less it was even compared to the light inside of the garage and the picture quality has dropped with my phone trying to compensate for the low light. The 50% setting on the other hand lights up the entire area around the garage and down the alley. It’s less noticeable but going from the 50% image to the 100% brightness you can see how the concrete is extremely lit up and the light is reaching out a little farther out. Keep in mind that the three lights are set up to point to the side and down as much as possible which is why on that setting we can see the three lights shining on the ground. If adjusted to point out father they would without a doubt light up my entire block.
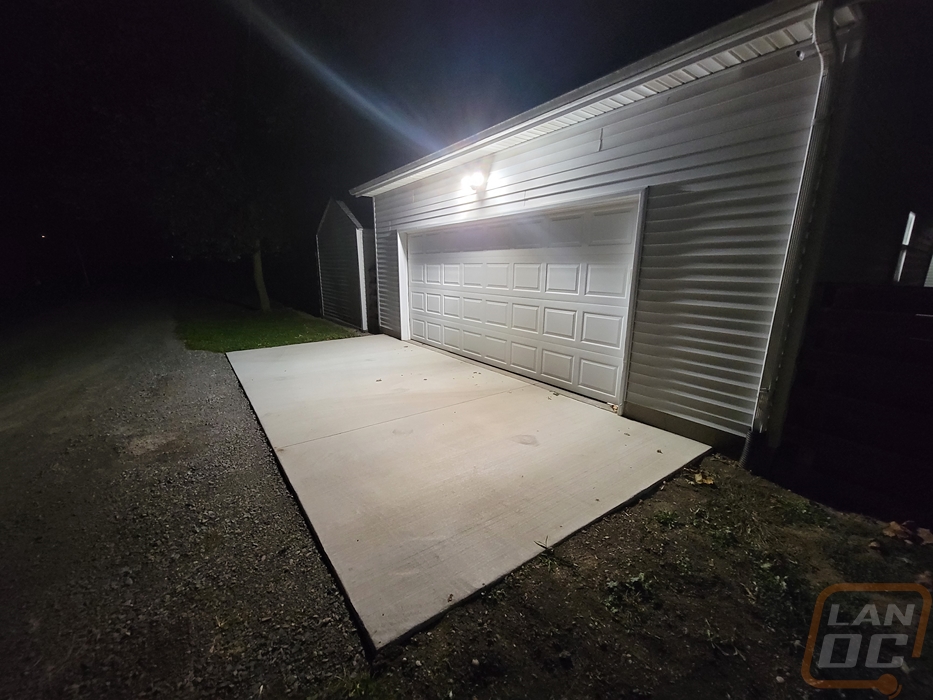
100%
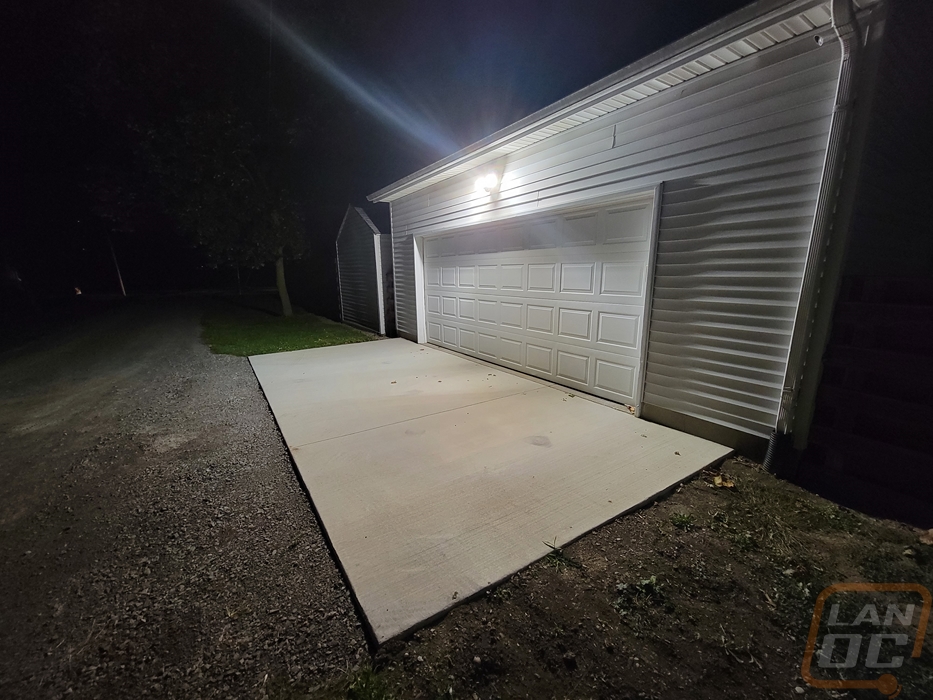
50%
Lowest Light Setting
I did also take a look at the lighting from an aerial view as well. This would have worked better if we had the lights aimed out directly so we could better see the full range, but I was really happy to see that even at 100% brightness we don’t have too much light bleeding out beyond the area that we intended. Because of the limited area, I only run the lighting at around 45%. Even more interesting though is at the lowest setting while it doesn’t light up the entire area, much like a nightlight, it lights up enough that you can move around which could be interesting when using the ambient light setting for times when motion isn’t picked up. The best part about all of the lighting though is that I can just change a setting on my phone to get things dialed in, not just on the motion detection, but on the brightness as well. I do have to get up there if I want to re-aim the lights but that is the only situation where I need to get up there for any lighting changes.

Of course, it is the pan and tilt dome camera on the bottom of the eufy Security Floodlight Cam 2 Pro that is its biggest feature. With any other floodlight camera, you have just a fixed view but with the Floodlight Cam 2 Pro, you have the same 2k resolution camera that a lot of eufy’s cameras use but you can move it around. As I mentioned in the installation section, the Floodlight Cam 2 Pro can be wall mounted or mounted under an eve and ours is wall mounted but it was designed with a full 360 horizontal field of view you can turn the camera around and look at the wall behind it. If you are mounted on an eve on a corner this could open up your total view even more.
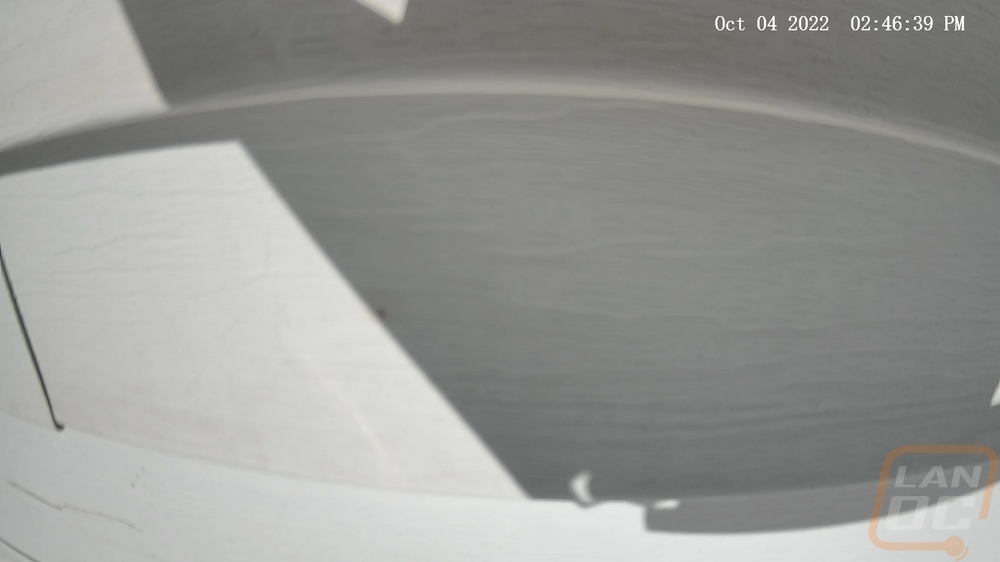
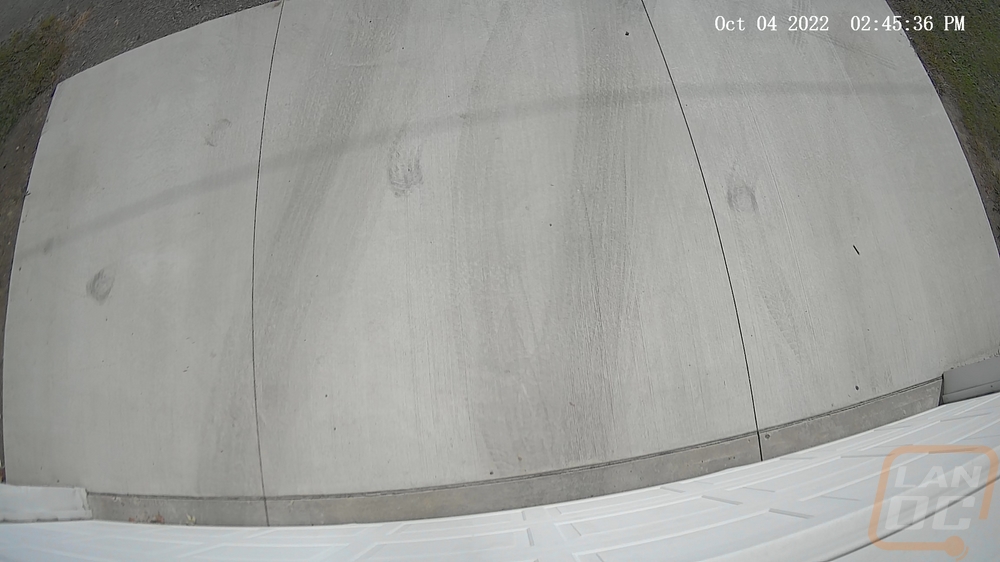
When you are setting up the motion detection you also set up your preset camera positions which helps set limits to avoid having it just turn and stare at your wall. But it really is impressive the range that the camera does allow. In addition to that, it has a 130-degree vertical field of view as well which means you can aim directly down below the camera. That combined with the amount of detail you get I thought it was interesting I could see two different paths for tire marks on the concrete depending on if my wife is driving or if I’m driving.
With the 360° horizontal and 130° vertical, you have the option of setting the Floodlight Cam 2 Pro to point in any direction you might need and you can change it which is something you can’t do with a normal bullet-style IP camera. For me though the motion detection which has a 270-degree field of view and is separate from the camera is what stands out for me. The motion sensors can pick up movement out of view of the camera and aim the camera in that direction which means you can see the entire area, not just the one spot you have the camera pointed. For our alley camera setup this means being able to see both directions and when a car or a person goes by the camera can follow them which increases the chances of you seeing who it is if something bad happens.
Here is a small video of a few of the action clips as well. I put together a few examples of cars and people being picked up by the Floodlight Cam 2 Pro. I mixed in night videos and day as well and on the night footage you can see what I’ve mentioned about how you need to keep the dome clean, the spiderwebs are only noticeable at night but because the camera is tracking and moving anything on the dome is a lot more noticeable than on a static camera. Now I have run into a few times where the tracking has worked until people move over to the right and you can see an example of that with the random person with a shopping cart going down our alley. I’ve seen it with cars as well but it has gotten better over time. I don’t have any examples now because they were beyond the 15 days of footage that I have saved but when the leaves were still on the trees and it would get windy the tree to the right did cause issues with movement causing the camera to move. Eufy does a great job on all of their devices using AI to filter down to movement from people and some of their new devices can do the same with cars. The Floodlight Cam 2 Pro doesn’t have that option in the software though and it would make a huge difference in my use case to be able to limit recording to people and cars which would cut out any tree movement. Thankfully though, I can see a lot of people using this in their back yard and in that situation you could limit it just to people and you won’t get those false alarms.
The night vision performance of the Floodlight Cam 2 Pro is going to depend a LOT on your overall settings. Initially, when I set things up I set it up similar to our other cameras with infrared turned on and the quality was good but the dome quickly picked up dirt, and the infrared brought spiderwebs which is an issue I fight with on all of our cameras. But because of the dome design, it affected the view more than our other cameras. I could keep things like this and just stay on top of keeping it cleaned off and it wouldn’t be a big deal. But the Floodlight Cam 2 Pro has three big floodlights on it, why wouldn’t we just take advantage of those? Switching over to the color night vision setting turns the infrared off and just turns the lights on any time the cameras are being viewed or have motion. This gives us full color, gets a lot less on the dome, and has easier to use images at night. Here is a view of what night vision without color mode looks like once spiders have taken over the dome.
As far as storage goes, the Floodlight Cam 2 Pro does come with 8GB of built-in storage and this is the first of the eufy cameras that I have had that didn’t have a MicroSD card slot built-in or support for their homebase’s for storage inside. The 8GB of internal storage is what I would consider to be a low amount but eufy lists it as supporting over 30 days of recording assuming 45 motion activations per day and 30 seconds for each recording. I’m currently seeing 15 days of recordings but I do have the recording limit set to allow up for 120 seconds when needed and being on our alley with people traveling through often and kids playing. Looking back I had some days with low motion events around 20 or so, a lot in the middle in the 40-50, and I saw some up in the 90+ so it does make sense that with some of those numbers being higher and the recording time I would only see half of the time advertised. That said I do wish there was a way to expand it without having to pay for cloud storage.
Overall and Final Verdict
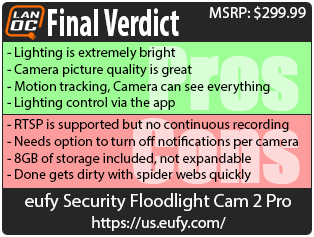
Now that we have taken a closer look at the eufy Security Floodlight Cam 2 Pro, installed it, and taken a look at its performance over time. Like with some of the other eufy cameras we have had in the office the Floodlight Cam 2 Pro has the same 2k resolution camera that the others have which has been a great sweet spot sitting between 1080p and 4k giving better detail but not requiring the much bigger storage needs that 4k does. The Floodlight Cam 2 Pro does go beyond being a standard camera though, eufy has combined the camera with a three-headed LED floodlight which in itself is a big security deterrent and can light up a large area and were so bright in our testing that I ended up running them at less than half brightness. This allows the potential for color night vision by turning the floodlights on and lighting up the night. On top of that, the Floodlight Cam 2 Pro’s camera is mounted to a pan/tilt gimble inside of a dome under the light. This is the biggest feature for me, one camera is capable of viewing 130 degrees verticle and 360 degrees horizontally which means one camera can take the place of multiple cameras depending on how you mount it. Eufy has also given it three motion sensors for 270 degrees of coverage that work independently of the camera which when you turn motion tracking on can be used to let the camera know when to move to look in a direction it isn’t facing to avoid missing movement out of view of the camera. Another aspect that I didn’t expect to be as useful as it was, but in addition to being able to control the camera from the eufy Security app you also have full control of all of the motion and lighting settings. You can adjust the brightness, the color temperature of the lights, and you can set how they function with ambient lighting and motion. We installed the Floodlight Cam 2 Pro at the same time as a second floodlight in another location on our property and I quickly got the Floodlight Cam 2 Pro dialed in but our other floodlight still needs adjustments because we need to get the ladder out and get out into the cold up there to make changes.
In my testing, I did run into a few areas where the Floodlight Cam 2 Pro could be improved as well. Some could potentially be fixed on the software side of things. A good example of that is adding in the option to be able to turn notifications off only for the Floodlight Cam 2 Pro, our other eufy cameras have the option but it is missing on the Floodlight Cam 2 Pro. Another that I think maybe fixable on the software side is the RTSP support. I was extremely excited that the Floodlight Cam 2 Pro supports RTSP which means you can stream it to a NAS or other IP camera security server which meant I could add it in with our other cameras on Blue Iris as we have with the Garage Control Cam but the Floodlight Cam 2 Pro for some reason only supports RTSP for motion events, not full streaming which I could understand if it was battery powered but being hard-wired should be an option. Beyond that, the Floodlight Cam 2 Pro does come with 8GB of built-in storage capacity which is nice, but I would love to see it have a microSD card slot to allow you to expand on that, especially if you have it set up in a location like we do that gets heavy traffic. The last issue isn’t avoidable but is something to keep in mind. If you run the infrared for night footage you are going to quickly get spiderwebs on the dome and because of the pan/tilt design, anything on the dome is a lot more noticeable. So be ready to clean it off from time to time. Unlike a bullet camera which would be exposed more to the weather, the camera being on the bottom of the Floodlight Cam 2 Pro is better protected so rain which helps clean spider webs off of our bullet cameras doesn’t help with cleaning the dome.
As for pricing, eufy has the Floodlight Cam 2 Pro priced with an MSRP of $299.99, and while they do have a black Friday deal on their website that gives you $100 off if you buy two they don’t seem to go on sale often or at all individually. The Floodlight Cam 2 Pro isn’t the cheapest option it is the most expensive option out there. But as of right now there aren’t any other floodlight cameras coming close to what eufy is offering here. Ring has their Floodlight Cam Wired Pro which is $249 and it has a 1080p camera to eufy’s 2k camera, their camera doesn’t move where this has full pan and tilt, and the ring has two LED floodlights to the Floodlight Cam 2 Pro’s three for $50 more. So while there were a few areas I would love to see the Floodlight Cam 2 Pro improve, it is still head and shoulders ahead of the competition.

Live Pricing: HERE


