Well, it wouldn’t be a new chipset and CPU launch if I wasn’t trying to get my hands on a good ITX board to use in one of our LAN rigs. Especially with a few LANs upcoming. Well from looking at the initial boards announced for the Z390, one of the most exciting ITX boards was the Strix Z390-I Gaming from Asus and I was excited to see it come in. I’m curious what is different from the Z370 or the Z270 for the matter and to dive into Asus’s feature set and see if the Strix Z390-I Gaming covers all of the bases for a high-end gaming PC that will take up less space on your desk and be easy to pack up and take to events to play with your friends. Let's run through the boards features, look at its software, check out the performance, then see how it fits in the market overall.
Product Name: Asus ROG Strix Z390-I Gaming
Review Sample Provided by: Asus
Written by: Wes Compton
Pictures by: Wes Compton
Amazon Affiliate Link: HERE
Packaging and Accessories
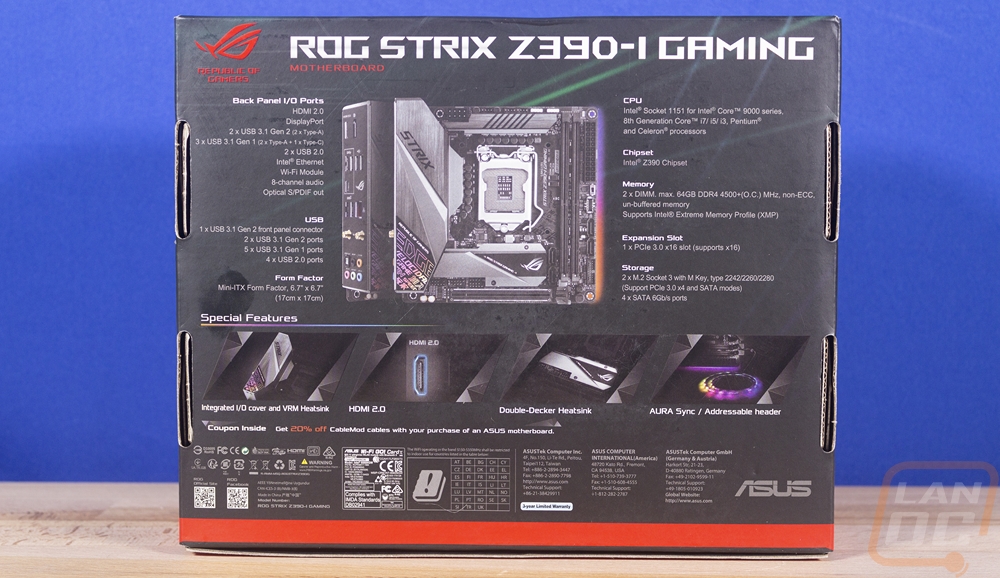
The Strix lineup from Asus has had the same packaging look for a while now so when the ROG Strix Z390-I came in I was surprised to see that they had changed things up. Asus highlighted the ROG part of the name more by adding in red trim on the sides and on the front. The ROG lineup has always had the red used but Strix has been independent of that even with the ROG name used in the packaging normally. So this box ends up being a lot brighter. That said it does still have the RGB ROG logo in the background like other Strix products but what I like the most is the use of a picture of the actual board on the top. Beyond the picture, the rest of the front is just the Asus and ROG branding with the model name in the middle. Around back there are two more board pictures that help show its features as well as the rear I/O connections. They also have a few specific features highlighted with smaller photos as well.
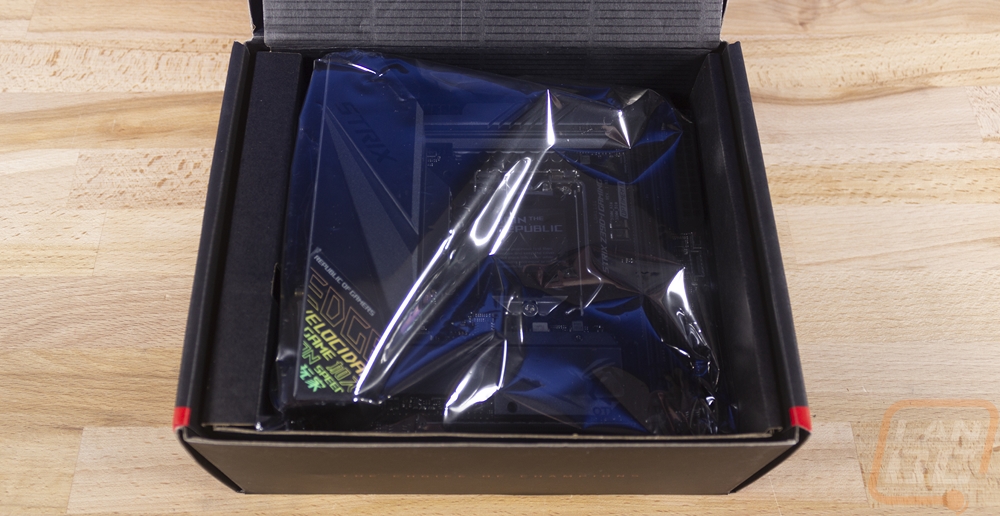
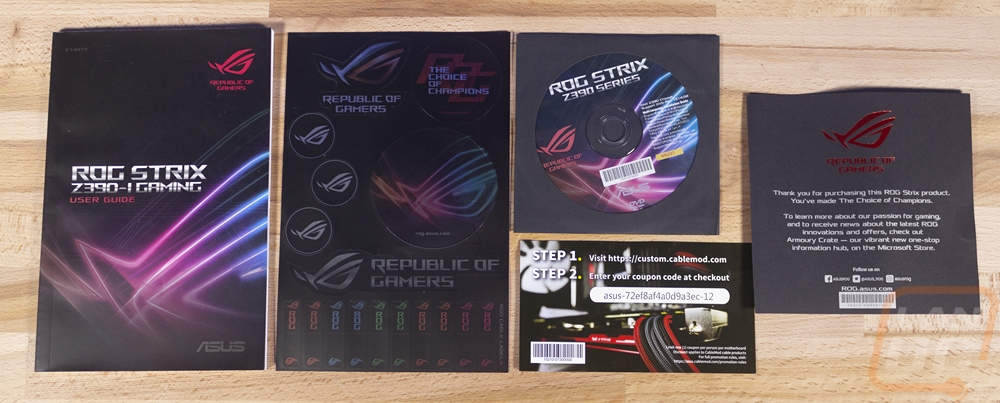
Inside the box, when you open it up you will find the board right up top in its static bag. Up under that is a cardboard tray holding the board up over all of the accessories and documentation in the bottom half of the box. For documentation, you get a user guide book. There is a holographic-like sticker sheet with SATA cable labels if you need them along with other ROG stickers. The drivers and software are on a disk and then you get a paper congratulating you on the purchase of a ROG Stix product. Last but not least is a coupon for 20% off any order from CableMod for lights or custom cables. I left our code showing so if anyone reading wants it they can use it.
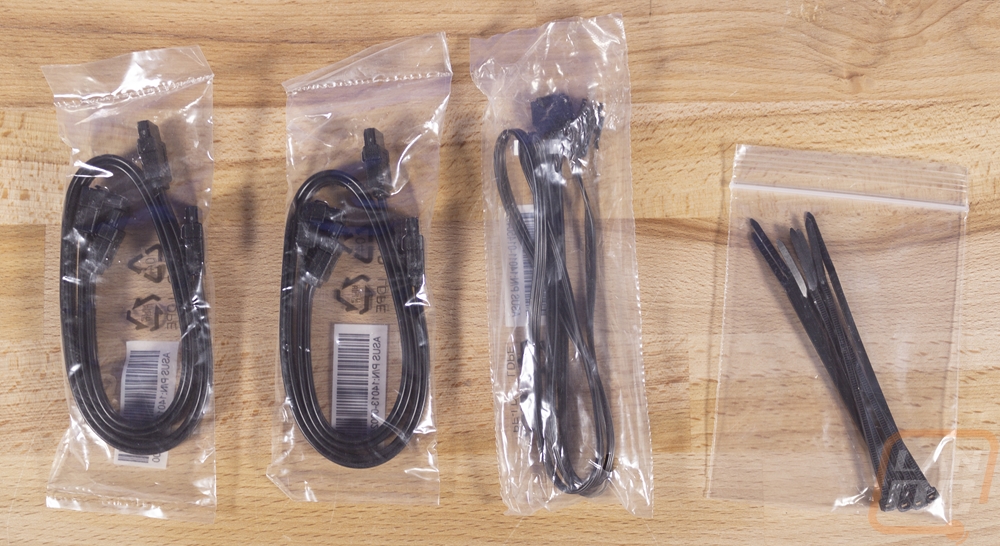
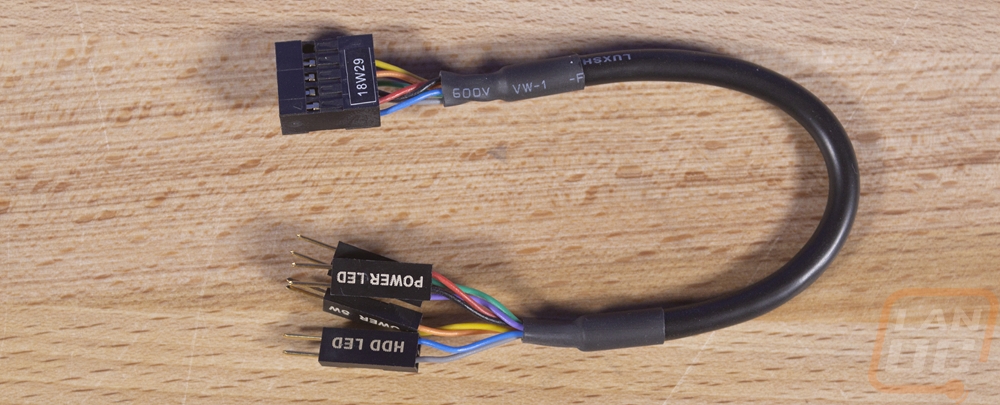
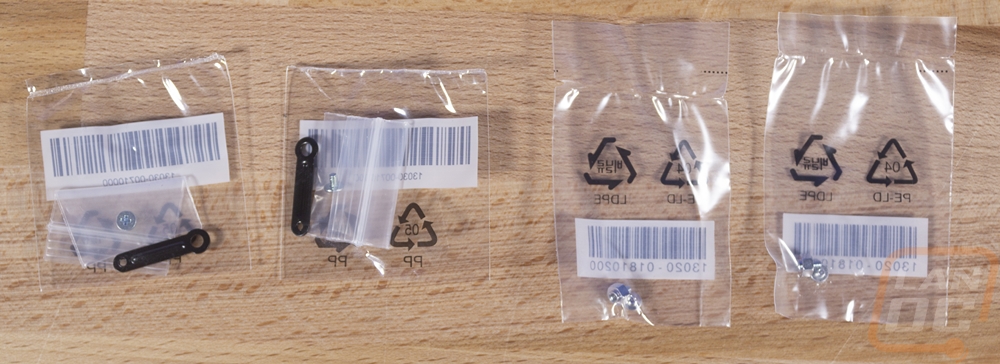
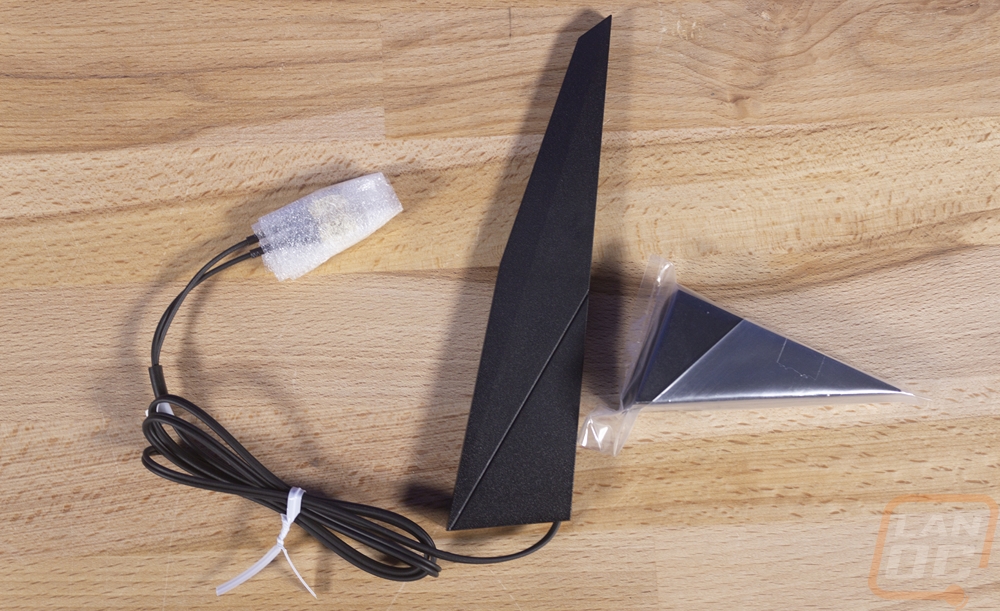
Then for accessories, even though this is a small board Asus made sure to load it up with different accessories. You get two packs of two SATA cables, two with 90-degree right angle ends. There is a long cable for addressable RGB LEDs and a baggie of zip ties. They also included a short adapter that allows you to hook up your front panel connections outside of the case and then plug them all in with one connection. This is nice even in a large build, but for an ITX build, it can be very important. Getting those hooked up is very tight in a small space. There are a few small bags two of those have the M.2 standoff and screws and the other two have mounts for the shorter 2242 M.2 drives (that’s the dogbone looking bracket). Asus also included the wireless antenna, this is the same design they have used for the last few years. It has a tall skinny angular design and it includes a desk mount to hold it up. My experience with this design hasn’t been all that great for it actually holding it up vertical.
Board Layout and Pictures
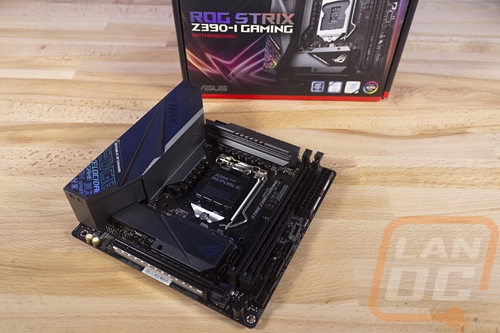
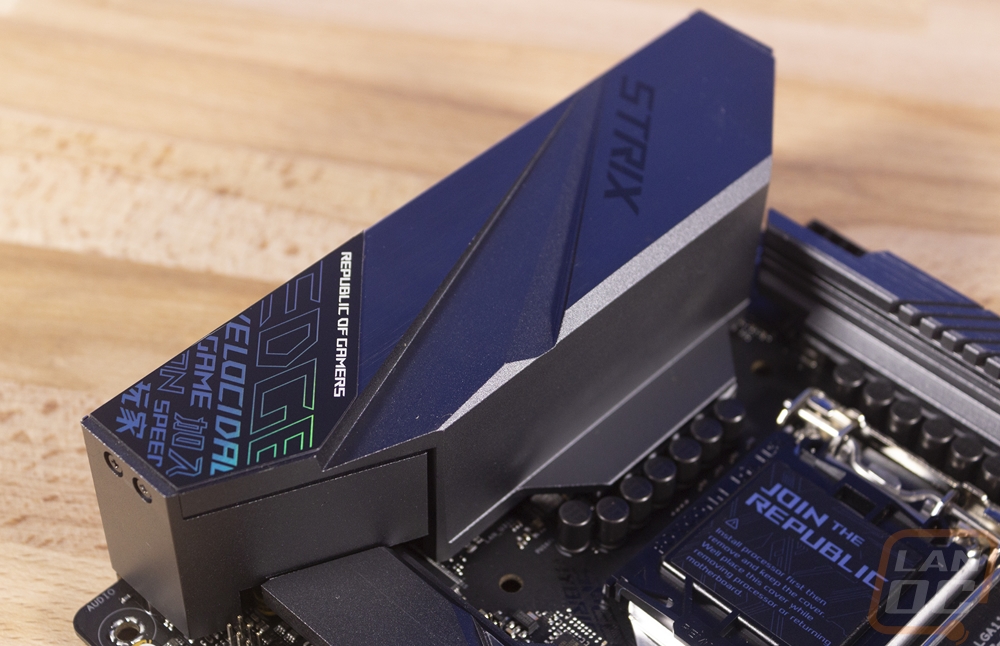
Well with the packaging having that new bright red look you might have come here expecting a significant design change from the Z370 and Z270 Strix ITX boards. There was one big change visually with them integrating the left heatsink into a full I/O cover but ignoring that there is only so much room in an ITX form factor and the M.2 and top heatsinks don’t have as significant of changes. That said the I/O cover does change the overall look of the motherboard a lot. But you get the same grey on grey on black look that has made Strix popular as well as the angular styling of the last few generations.

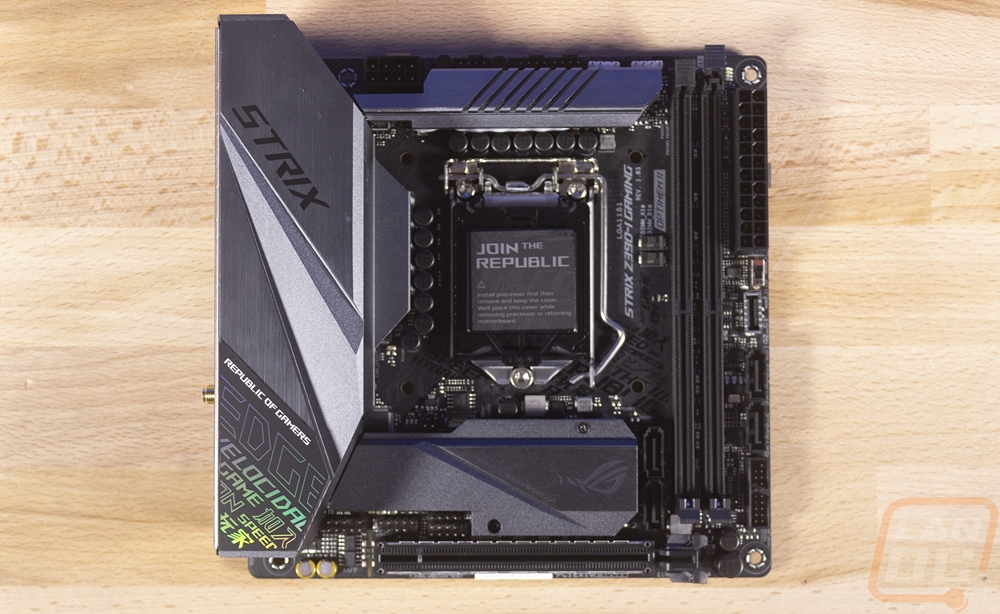
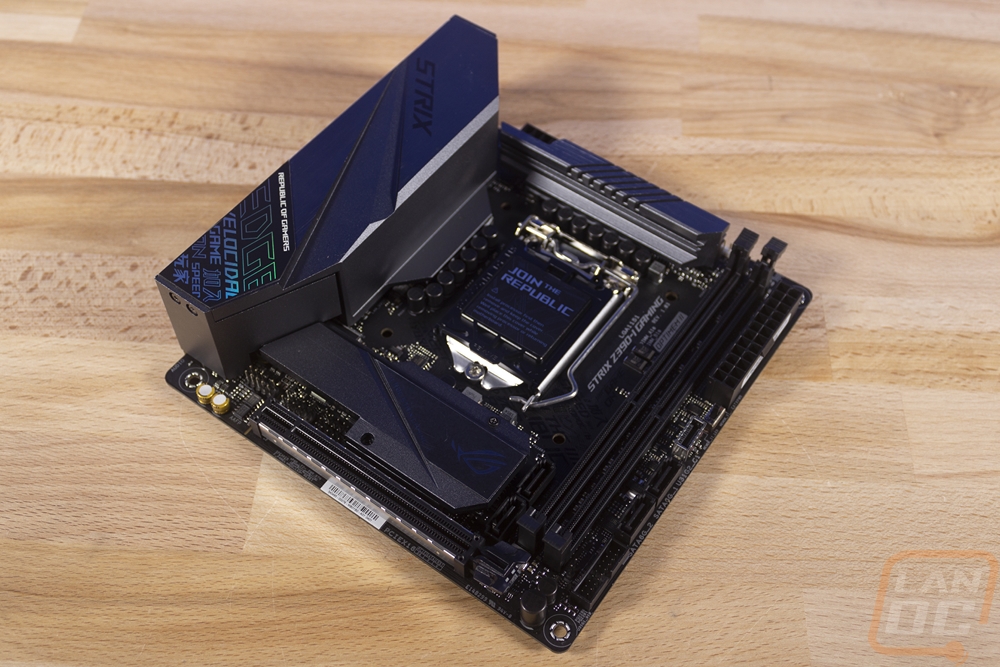
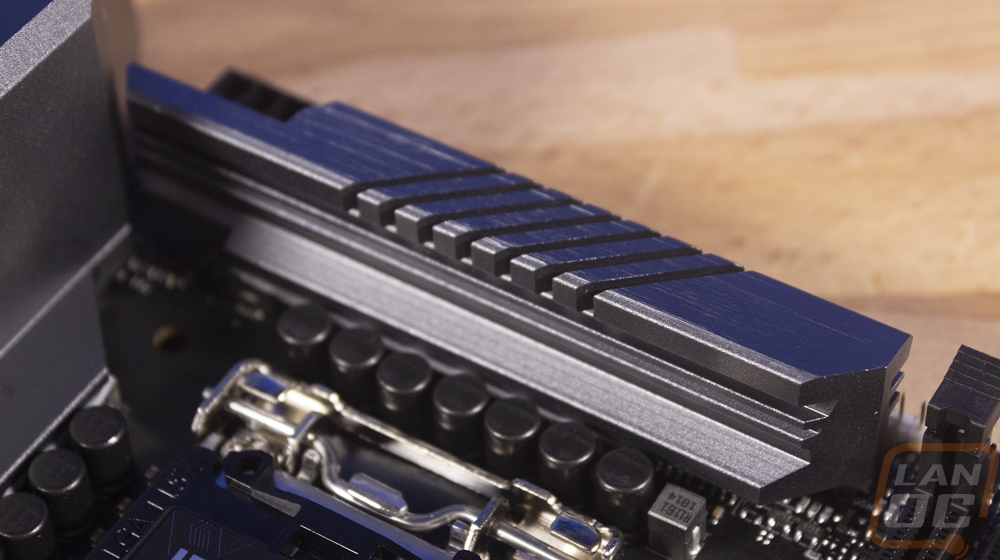
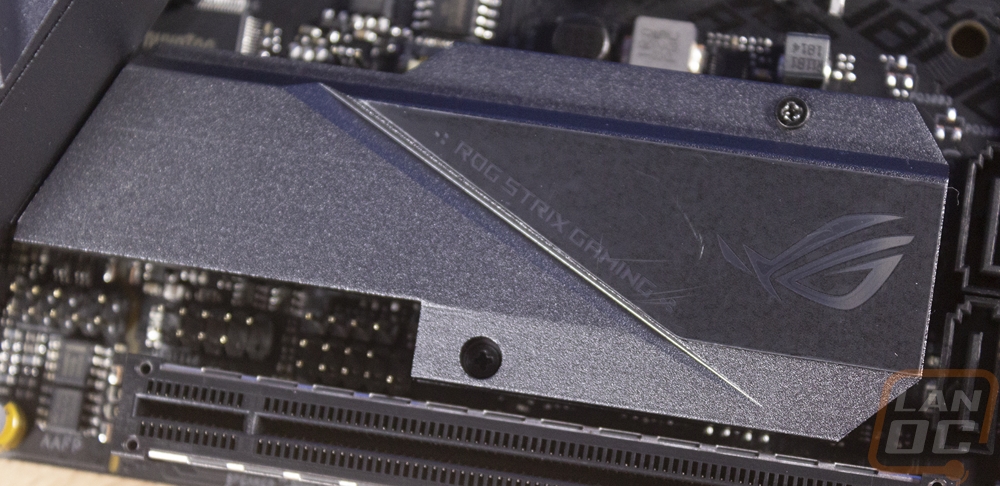
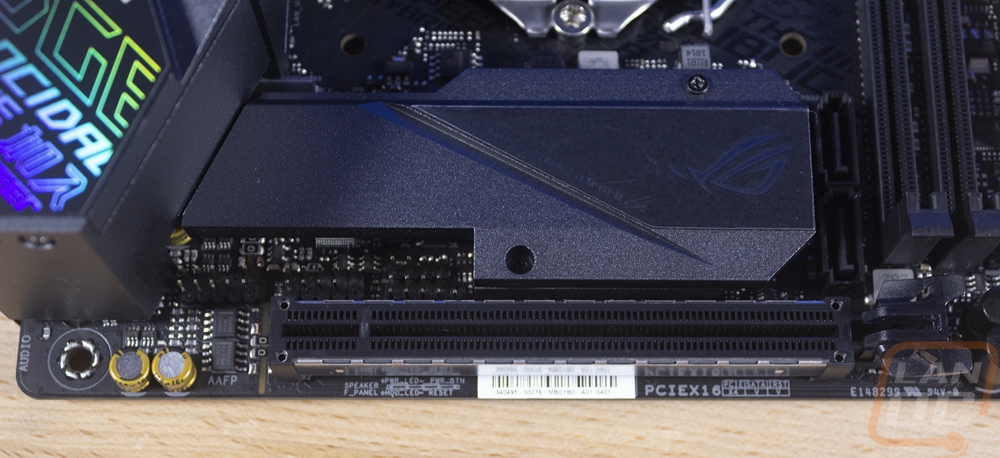
So for cooling, there are three heatsinks and frankly given that this is an ITX motherboard that in itself is a big accomplishment. There are two heatsinks that handle the power circuitry and then one that goes over the M.2 drive. The M.2 drive slots in just above the PCIe slot and the heatsink had two mounting screws holding it on. Under it, there is a full-length thermal pad and up on top, it has an ROG Strix logo with ROG Strix Gaming along the edge. The picture below as it turns out still has the plastic on it so it looks a little foggy compared to the black with chrome look that it should have so keep that in mind. The top power heatsink runs from the ram slots all the way over to the rear I/O with a notch cut out on the top for the 8-pin power. This is similar to the Z370 design but it has a little more material used this time and the top has the 7 grooves cut into it as well to add a little more surface area. Then the biggest heatsink is the left one. This is something Asus has done a few times in the past and I just love. They integrated the heatsink from the left power phases right into the rear I/O cover. A lot of the ITX boards don’t get a cover because of space so this addition not only is more space efficient but it also looks much better now without the bright chrome of the different rear I/O headers sticking up. This has the Strix branding on the dark grey finish and then down at the bottom left corner they have the ROG branding along with this holographic design with random words in different languages that I hated on in our X470-F review. Asus calls it their cybertext design.
Being an ITX board I can’t really divide it up into ¼’s like I normally do to break down board features. So let's just start with everything along the top edge. You can see just how right everything is on this board design with how Asus tucked headers in any location they could fit. The 8-pin EPS power is tight in between the top and side heatsinks with the top notched to fit around it. But then right next to it you have three four-pin fan headers, two for normal CPU and one for higher amperage pump if needed. I was surprised to see that some of these seem to be installed at different angles, normally Asus is tight on tolerances with that sort of thing. Then next to those there are two white RGB headers. The four pin is a traditional RGB plug and the three pin is for addressable LED lighting. I was happy to see both, the Z370-I was missing the normal RGB header. Beyond that, over on the far left corner, you can see four surface mounted LEDs and with them, Asus printed on the board to label them. These help diagnose no-boot issues by showing you the last part of the boot process that everything stopped on.

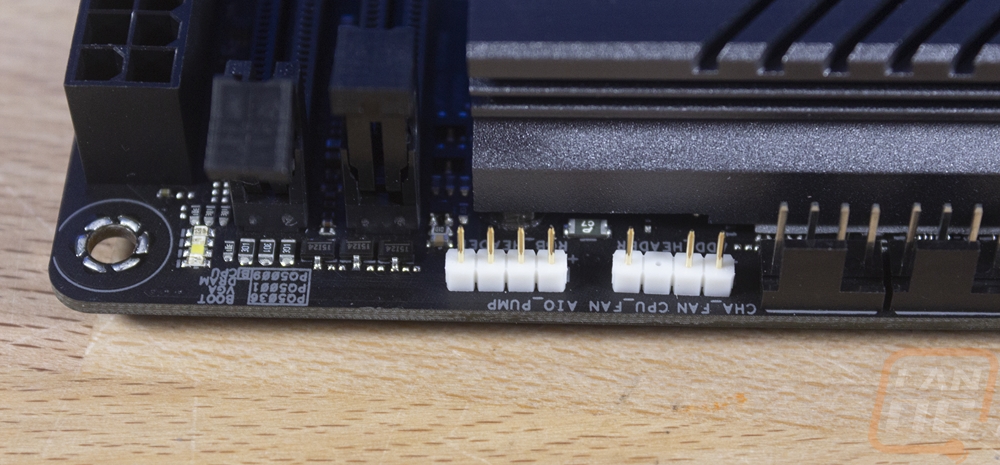
Over on the right side of the Z390-I, this is where the main 24 pin power connection is. Asus tucked it up close to the top right screw mount to make room below it. Below it is an on/off switch for the MemOK system. Below that is an internal USB 3.1 Gen 2 connection for use with new cases that have a high-speed Type-C connection on the front panel. Then with that, there are two SATA connections and another two tucked on the other side of the memory by the M.2 slot. Then down at the bottom corner, there is a normal USB 3.1 header as well as the clear CMOS pins. For memory, the Z390-I has the normal two DDR4 DIMMs but this board does support dual stacked memory so if you need the ultra high memory capacity that is an option.
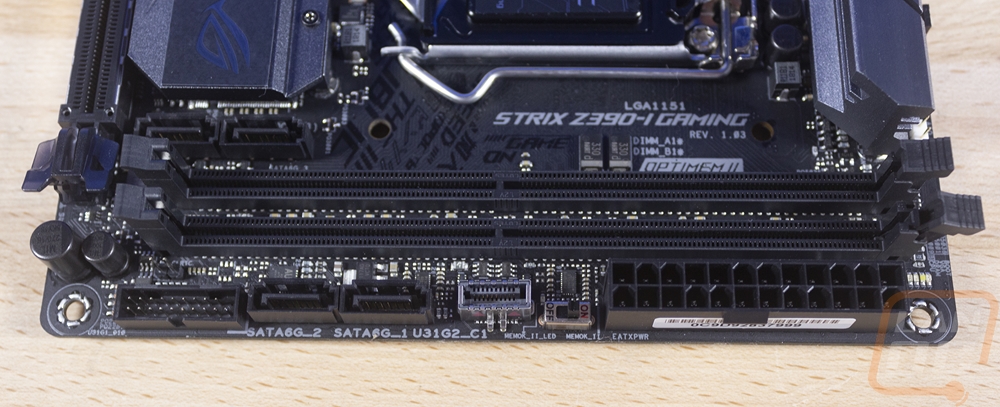
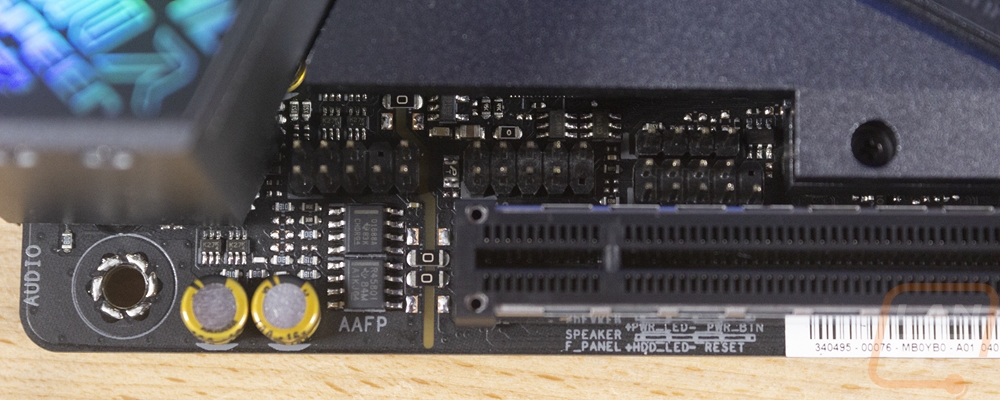
So on the bottom area of the Z390-I Strix, the most obvious things going on here are the main M.2 mount and heatsink and the PCIe slot below it. Being the only PCIe slot, this is a x16 length and bandwidth slot so no worries there. The M.2 slot has support for all of the normal drive lengths and both this and the second M.2 slot both support PCIe or SATA drives. If you use a SATA drive it does disable the SATA 2 port on the board though. Now the less noticeable thing in this area are the three headers tucked in just above the slot and below the M.2 heatsink. The one on the left is the front panel audio connection, it is right there with the audio chipset. Asus went with an 8-channel design using the S1220A CODEC, it has dual headphone amps as well as impedance sense on the front panel connection as well as the rear headphone jack. The 120 dB SNR on playback and 113 dB SNR on recording is solid, especially for an ITX motherboard with limited space. Then, of course, you can spot those gold premium caps in the far left corner. Also with the front panel audio connection, there is one USB 2.0 header and then on the right is the front panel plug with the motherboard speaker plug above it. This location for the audio header is good, but the other two are going to be hard to get at and hard to wire. Those two will have to run the wire along the top edge of your video card assuming you have one installed, but the audio jack can run under the video card next to the PCIe slot.
The rear I/O, in addition to having the metal heatsink/cover over it, has a reattached I/O shield. This is a nice touch that only a few boards have had that hope to see more often. With it, you don’t have to worry about forgetting the shield and then pulling everything apart or fighting with getting everything lined up when you installed the motherboard. Plus with some of the In Win cases that don’t even have I/O shield mounts like the D-Frame you can get a cover. For connections, you get the normal 5+optical audio array and next to that the WiFi. There is a Gig ethernet jack as well, both the wireless and NIC are running on the normal Intel chipset offerings so you get a quality NIC and with it being red indicates that this has Asus’s ethernet surge protection built in as well. Below that are two red USB ports, these are high-speed Gen 2 ports. Oddly enough those are both Type-A where a lot of boards do one A and one C. The Type-C is then over to the left and you can see that Asus was careful to put a box around this and the two blue ports to indicate that all three are USB 3.1 gen 1, so the Type-C connection here is an older slower type. Then above that, there are two USB 2.0 ports as well. For display options with the onboard video, you get a full-sized DisplayPort and an HDMI 2.0 header. The rear I/O shield itself is blacked out to match most builds and I also noticed that the use of bright white for the legends is a lot easier to see than the red that MSI has been using recently.

The back of the Z390-I is about the only area where you can really see that black PCB, the top is just too packed full. Also down here is a second M.2 slot. I don’t think I will ever be upset at additional M.2 slots being hidden back here, especially on ITX boards where M.2 drives open up even more space in already tiny builds. You can see the audio circuitry is partially split with the transparent line breaking it up over in the bottom right corner as well.

BIOS
To take a look at the UEFI on the Strix Z390-I I put together a basic video that goes through and opens up all of the options in the BIOS. I did this rather than just having a few pictures to allow everyone to see what options you have and to be able to pause at any point to get a closer look. You first boot into the EZ Mode, this is a single page where you have a lot of the normal information you might be looking for like all of the installed drives, memory, CPU, and BIOS revision. You can look at the fan profile and speeds as well as see a graph of CPU temps, voltage, and motherboard temps. You can turn on XMP and rapid storage here and the boot order is drag and drop. Basically everything the average user might need to get into without any of the more complicated options that you can cause problems or damage with.
The advanced mode dropped me right into the Ai Tweaker tab. This is where Asus has all of the overclocking focused options. Now all of the motherboards on the market have an overclocking focused page, but the number of options that Asus lets people get into, even on this ITX board, is on a different level. The My Favorites tab is just where you can right click and add any BIOS option to put often used things in one easy access location. Then the main tab is the normal home tab for most older BIOS where you can see the CPU model and BIOS revision as well as set system language. So 1/3 of the video is filled with the AI Tweaker options and another 1/3 is just on the Advanced tab. This is because both are filled with options. I think each take me as long to click and scroll through the options as it took for my last non-Asus motherboard video altogether. The Advance tab is basically where every other peripheral or chipset related option can be found.
The Monitor tab lists out the reading of every sensor on the motherboard. This includes temperatures and fan speeds of course. But also voltage readings. You can also get into the Qfan options down at the bottom to set up how fan speeds ramp up and to run the fan tuning that adjusts everything to your fans. The Boot tab is about what you expect. You can adjust boot settings like turning on the ROG logo at the start, set how the PC react to a power loss, and turn on newer windows boot features. You can also set your boot device or boot override to a specific device for a one time override.
The Tool tab is where you find all of the other tools. The main one here is the EZ Flash 3 utility where you can update your BIOS. You can download the update from a server here or what I prefer is to download it in windows to make sure I have what I want and then save it on an easy to find location and in the BIOS tool, you can read the file right from your installed hard drive, no flash drive needed. There is a hard drive secure erase tool and overclocking profiles can be found here as well. The Armoury Crate option is the new feature here. This is where you can turn this option on or off. The Armoury Crate (yes they used the British spelling) has been a little controversial. It bakes in a software notification from the BIOS to your windows install that will prompt to install (without internet) a few key drivers like your network driver to get you up and running. I gave it a try and I loved that I didn’t have to load my NIC driver on a flash drive from another PC. That said I also understand the security concerns some people have had with the idea of opening up a way to push software into your windows install. This option might be better placed somewhere more visible, but it is nice there is at least an option to turn it on and off.
Test Rig and Procedures
Test System
CPU: Intel i9-9900K- Live Pricing
Cooling: Noctua NH-U12S for cooling - Live Pricing
Noctua NT-H1 Thermal Paste - Live Pricing
Memory: Kingston HyperX Fury 2666 MHz - Live Pricing
Storage: Kingston A1000 M.2 960Gb - Live Pricing
Video Card: Nvidia GTX 1080 Ti - Live Pricing
Power Supply: Corsair TX750M - Live Pricing
Case: Dimastech Test Bench - Live Pricing
OS: Windows 10 Pro 64-bit - Live Pricing
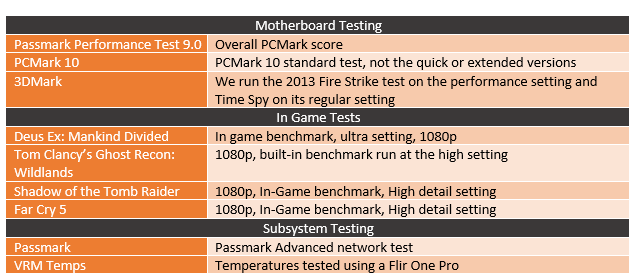
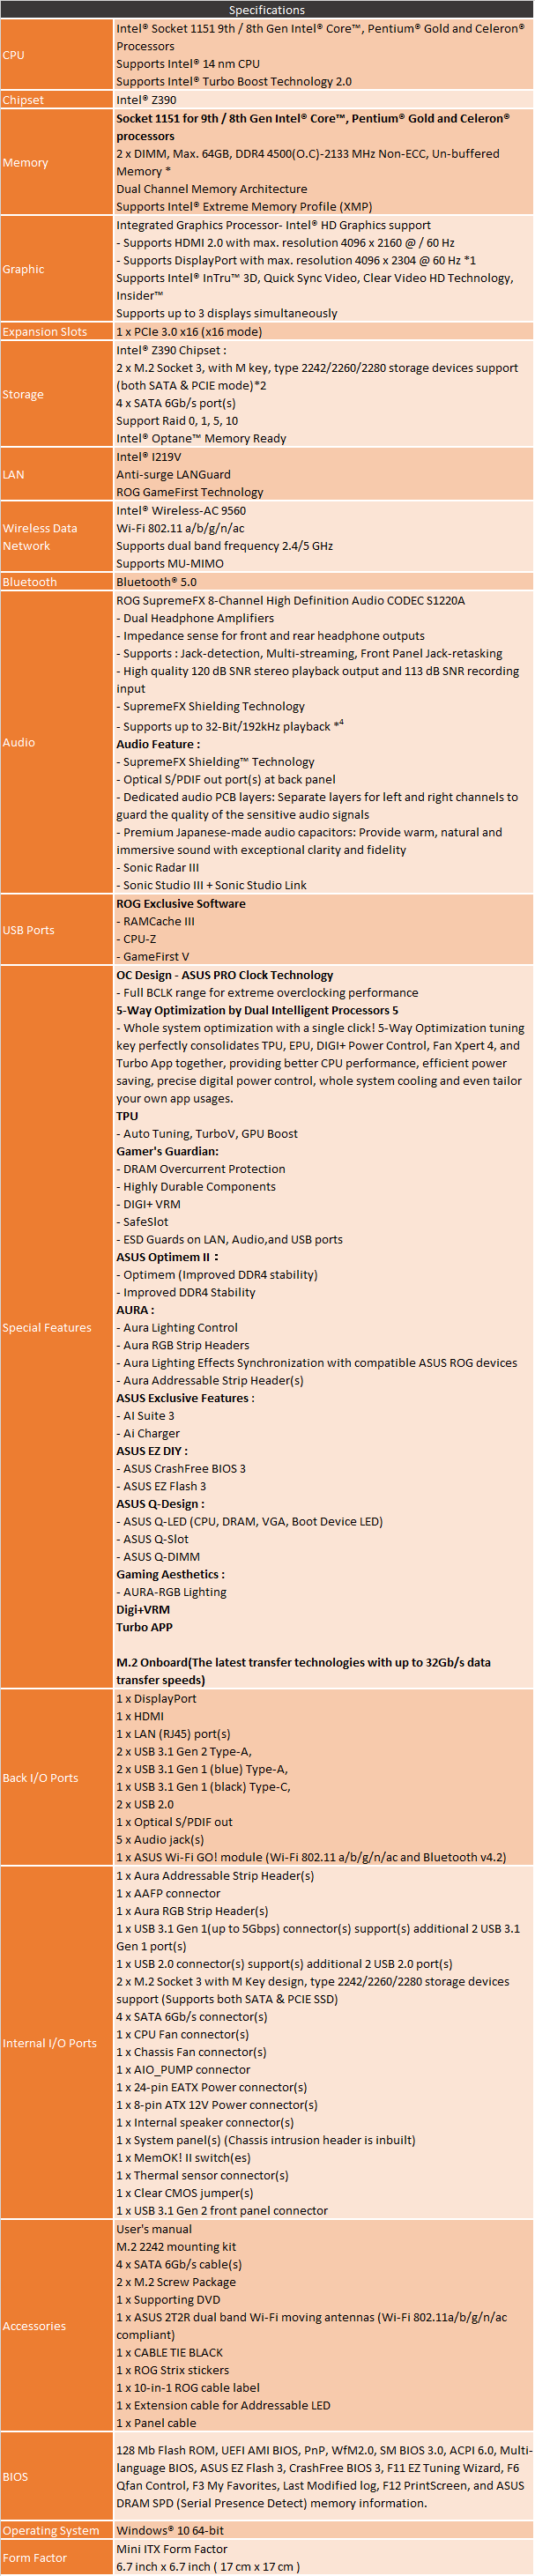
Performance
As I always like to mention as a reminder for everyone. Motherboard performance differences between boards with the same chipset aren’t really a thing. They all run the same chipset and performance differences in benchmarks more typically show the small variability in the tests themselves. But I do run a list of benchmarks on all of our motherboard reviews to keep an eye out for obvious performance issues or for weird performance boosts like auto overclocked CPUs. I currently only have two Z390 boards tested and there did end up being some swing back and forth between the MSI and Asus, most likely with how different boards are handling turbo differently. This was an issue for me when doing our 9900K testing as well, causing me to spend launch day retesting again. Specifically, the Asus board actually followed TDP with MCE turned off and XMP on. This resulted in lower results in the 3DMark and Passmark benchmarks but PCMark was still an odd man out. Gaming performance was solid and showed that the 9900K paired with the 1080 Ti is still a great setup.
Beyond that, I did look at the network performance as well. I did this on both the wired NIC that was using the Intel I219-V that all Z390 chipset boards use. Because of that the Asus Z390-I and the MSI board tested were close in performance. Now the Z390-I also had the Intel 9560 Wireless AC adapter as well and this is where I normally see the biggest differences, mostly due to the antenna designs. The performance here was good as well, something that I can’t always say for Asus’s antenna design.
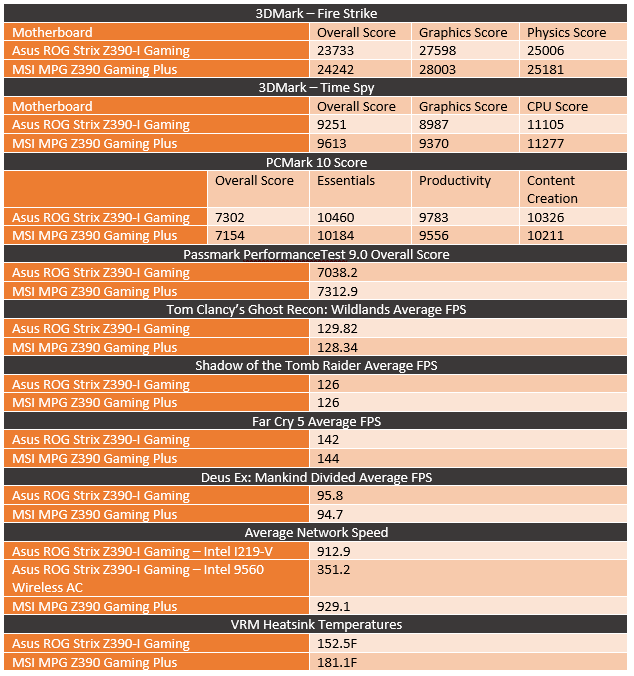
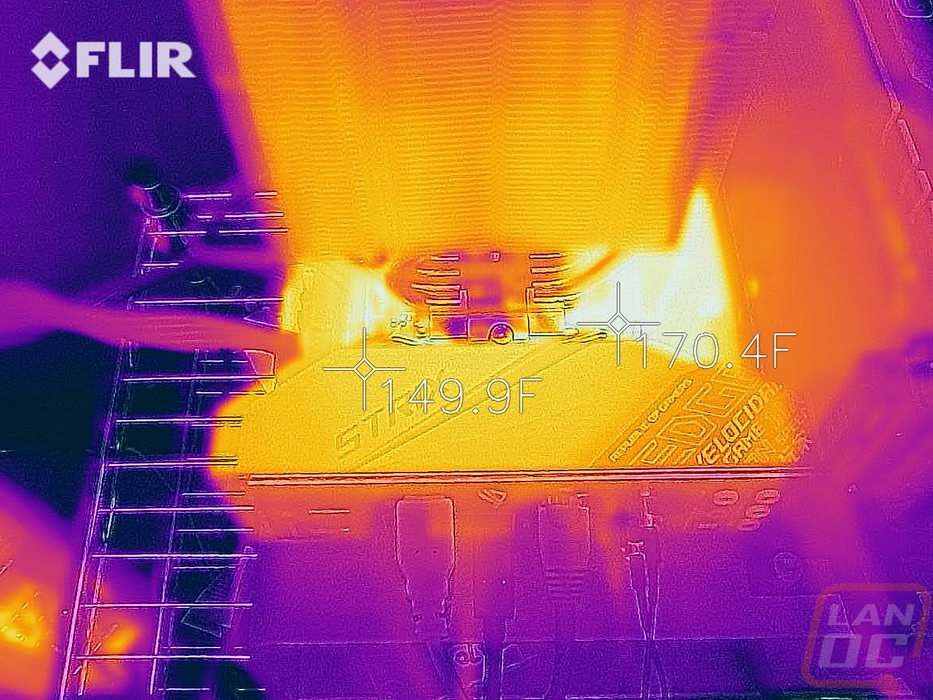
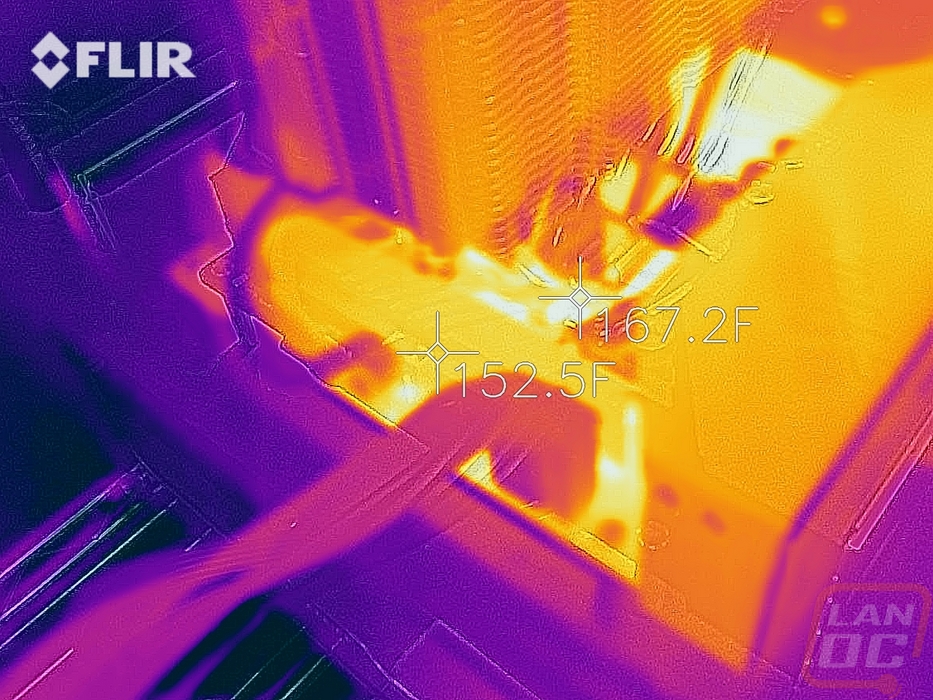
I also took a look at thermals using our FLIR camera. The MSI Z390 I tested had issues where it wasn’t cooling a lot of the VRM area, especially with the power usage of the 9900K. The Z390-I does run warm, but mostly on the area south of the CPU socket where the M.2 drive heatsink is. The large integrated I/O cover has a lot more surface area to dissipate heat and Asus didn’t skip out on a heatsink on the top of the CPU socket like MSI did. That said it does look like running an M.2 drive in addition to that area dealing with heat from the chipset might run a little warm.
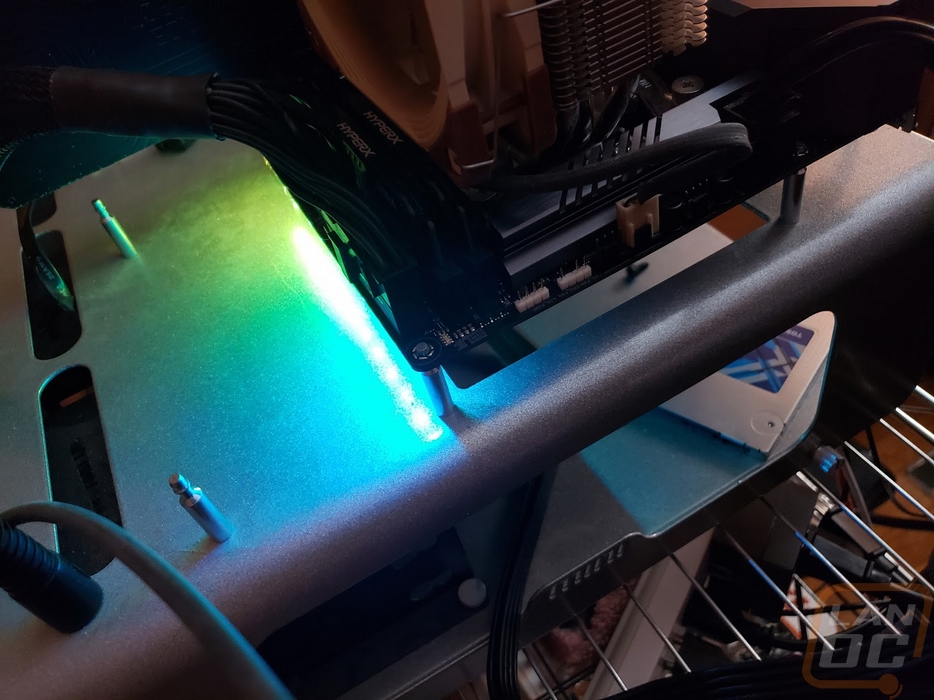
I also snapped a picture of the RGB lighting as well. While not your normal performance, it is a feature some people are looking for. Asus has their normal Aura lighting here with fully addressable surface mounted LEDs on the underside of the right side of the board. This allows for the lighting effects that like the one pictured that shows the lights all different colors. You do have full control of the lighting with the software, or you can turn it off in the BIOS if you don’t want any at all.
Overall and Final Verdict
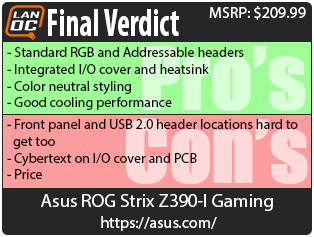
So now that I have finished up testing and have run through the board and BIOS lets recap and look at where the Asus Strix Z390-I is ahead and behind. When looking at this compared to the previous Z370 model the big addition was bringing back the normal RGB header. The Z370 model just had the addressable header and while nice there are a lot of products that integrate with the older 4 pin header so getting that back was nice and it is even better to still get the newer addressable one as well. Adding a rear I/O cover was also a nice addition both when comparing to the previous model and also to every other Z390 ITX board on the market, this is the only one with a full cover. It being metal and being part of the cooling is even better and a lot more efficient as well. Then you have the styling, there is a reason all of the other Z390 boards have the same grey on grey on black look at this board. It is because Asus went the right direction with their Strix styling and now everyone else wants to follow suit. Being color neutral and adding the RGB lighting under the board lets the board match just about every build direction you might want to go.
As for performance, the cooling performance was the best part. This also left me comfortable running our 9900K on here, even with MCE and the uncapped TDP that comes with it turned on. Being an ITX board there are limitations on the power phases available and space for cooling but Asus still did better there than the full sized MSI board I reviewed. Audio performance from the integrated sound was good and overall CPU performance was good especially with MCE on.
I really only had two problems with the board design. I still don’t really care much for the Cybertext styling that was on the rear I/O cover and was printed all over the PCB. Not everyone is going to hate that though. I also wasn’t a fan of the location of the USB 2.0 and front panel headers with them both being just above the PCIe slot. That said an ITX board that has internal headers for USB 2.0, USB 3.1, and USB 3.1 Gen 2 all on it is really nice and opens up options so I guess if that means one of them being harder to get too it isn’t all bad.
The other thing to keep in mind here is that when compared to the other ITX Z390 boards the Strix board is by far the most expensive. Everyone else (except super micro) is around the $150-$170 range but right now this board runs $209.99. That price difference gets you a better onboard audio, support for double stacked memory (even though Newegg listing doesn’t show it) so you can run up to 64 gigs if you can afford it, Bluetooth v5 support when the MSI ITX doesn’t have it, a full I/O cover, and addressable RGB lighting support. Not to mention I think that Asus is well above everyone else in both BIOS and software, the UEFI has a crazy amount of options. So is the price worth it? Well, you do get features to make up the price difference, it will just depend on your priorities. Personally, it is worth it just for the I/O cover to me, that makes a huge difference in both cooling and how the board looks.


Live Pricing: HERE


