 Now that Intel has opened up the flood gates with Ivy Bridge we can finally take a full look at their latest chipset including testing with the i7-3770. When combining the two we get the latest CPU with the latest chipset and a load of new features. You can now take advantage of PCIe 3.0 along with USB 3.0 integrated into the chipset. We were very impressed with the DZ77GA-70K when we first took a look at it, let’s finally see how it performs!
Product Name: Intel DZ77GA-70K
Review Sample Provided by: Intel
Preview by: Wes and Adam
Pictures by: Wes
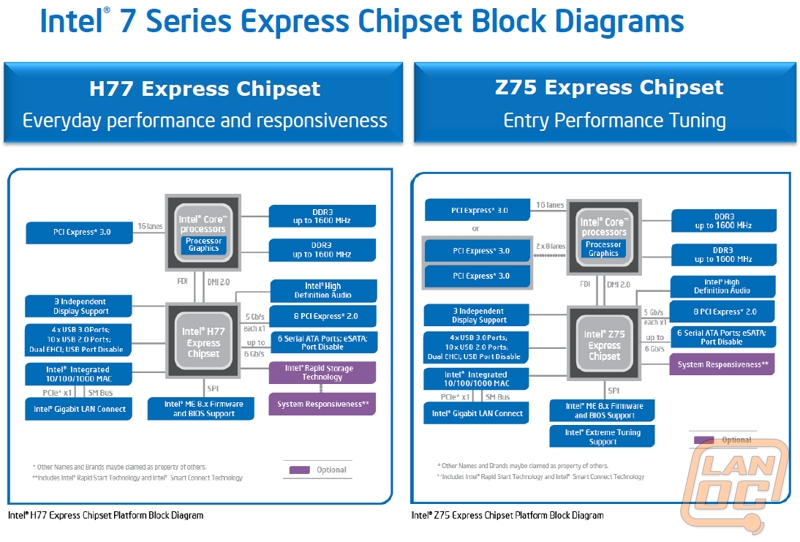
Intel 7 Series Chipset (Panther Point) Details
As discussed before, one of the largest differences between the 6 and 7 series is support for USB 3.0, which looking at the table below we see up to 14 USB ports available on both series, with the 7 series including up to 4 USB 3.0 ports as opposed to straight 2.0 on the predecessor. What this translates to is a faster communication from chipset to processor. Though we've seen USB 3.0 on boards previous to the launch of Panther Point, they were made possible through use of a third-party controller. When a controller is involved, it creates a middle-man of sorts, requiring that controller to communicate with the chipset, which then communicates to the processor. Those four USB 3.0 ports support directly on the chipset can skip that third step and talk directly to the processor, which means faster performance.
|
Item |
6 Series |
7 Series |
|
CPU Support |
Sandy Bridge / Ivy Bridge * |
Ivy Bridge / Sandy Bridge |
|
CPU I/F |
DMI 2.0 |
DMI 2.0 |
|
Package |
MB: 25 x 25 mm, DT: 27 x 27 mm |
MB: 25 x 25 mm, DT: 27 x 27 mm |
|
USB |
14 USB 2.0 |
14 USB Ports (Up to 4 USB 3.0 ) |
|
PCIe |
8 PCIe 2.0 |
8 PCIe 2.0 |
|
Storage |
2 SATA Gen 3, RAID, 4 SATA Gen 2 |
2 SATA Gen 3, RAID, 4 SATA Gen 2 |
|
PCI |
DT: 4 slots |
DT: PCI on B/Q skus only |
|
Display I/Fs |
VGA, LVDS, DP, HDMI (w/ cost reduced LS), Wireless Display |
VGA, LVDS, DP, HDMI (w/ cost reduced .LS), Wireless Display |
|
Display Pipes |
Dual Independent. Display Digital I/Fs |
Three Independent. DisplayDigital I/Fs |
|
Security |
PAVP |
PAVP |
|
Manageability & FW |
ME 7.0 |
ME 8.0 |
|
iRST |
10.0 and 10.5 (Intelligent caching and Optical Read Ahead) |
11.0 w/Intelligent caching |
|
LAN |
GbE MAC |
GbE MAC |
|
Integ. Clock |
Yes |
Yes |
Along with the Z77 chipset, which is featured on the board we are previewing here, Panther Point will introduce five other SKU's to complete the 7 series. As you can see below, these are classified between mainstream, corporate, and the full-featured Z77. There are a few small differences between the 6 SKUs, including performance tuning available on only those SKUs targeted for, as you may have guessed, performance: the Z75 and Z77.
|
Features |
H77 |
Z75 |
Z77 |
B75 |
Q75 |
Q77 |
|
Processor Support / Socket |
LGA 1155 |
LGA 1155 |
LGA 1155 |
LGA 1155 |
LGA 1155 |
LGA 1155 |
|
CPU Performance Tuning |
- |
?1 |
?1 |
- |
- |
- |
|
Processor Graphics Overclocking |
? |
? |
? |
? |
? |
? |
|
Switchable Graphics (Dynamic Muxless Solution)2 |
? |
? |
? |
? |
? |
? |
|
Built-in Visuals |
? |
? |
? |
? |
? |
? |
|
Intel® Rapid Storage Technology 11 |
? |
? |
? |
?3 |
?3 |
? |
|
Intel® RST Smart Response Technology4 |
? |
- |
? |
- |
- |
? |
|
Intel® Smart Connect Technology |
? |
? |
? |
? |
? |
? |
|
Intel® Rapid Start Technology |
? |
? |
? |
? |
? |
? |
|
Intel® Wireless Display /Music |
? |
? |
? |
? |
? |
? |
|
3 Independent Displays |
? |
? |
? |
? |
? |
? |
|
Intel® Active Management Technology 8.0 |
- |
- |
- |
- |
- |
? |
|
Intel Standard Manageability |
- |
- |
- |
- |
?5 |
?5 |
|
Intel® ME Firmware 8.0 SKU6 |
1.5MB |
1.5MB |
1.5MB |
5MB |
5MB |
5MB |
|
2012 vPro |
- |
- |
- |
- |
- |
? |
|
2012 SIPP7 |
- |
- |
- |
- |
? |
? |
|
PCIe Configuration |
1X16 |
1X16 or 2X8 |
1X16 or 2X8 or 1X8 +2X4 |
1X16 |
1X16 |
1X16 |
|
Total USB Ports (Max USB3 Ports) |
14 (4) |
14 (4) |
14 (4) |
12 (4) |
14 (4) |
14 (4) |
|
PCI Express 2.0 (5 GT/s) |
8 |
8 |
8 |
8 |
8 |
8 |
|
Legacy PCI |
- |
- |
- |
? |
? |
? |
|
SATA Ports (Max# 6Gb/s) |
6(2) |
6(2) |
6(2) |
6(1) |
6(1) |
6 (2) |
Regardless of the SKU, all of the 7 series not only supports USB 3.0, but all support a maximum of four ports, with the small business B75 chipset two USB 2.0 short of the rest. Though the 7 series chipset is capable of PCI Express 3.0, the speed is limited to PCI Express 2.0 while using Sandy Bridge based processors. Similarly, each SKU has at least one available SATA 6.0Gb/s ports, while the majority of the chipset, including H77, Z75, and Z77 support two, with four left for SATA 3.0Gb/s.
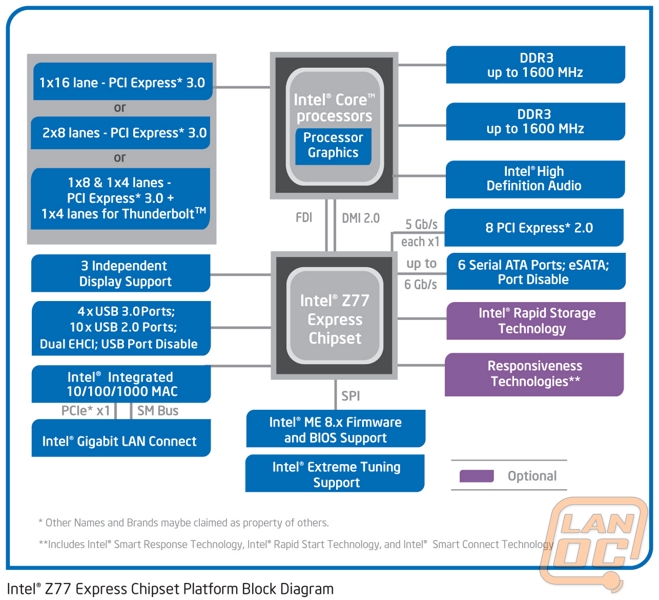
In addition to the newly added 7 series SKUs, the chipset is also backwards compatible with processors that worked with the 6 series chipset; in other words Sandy Bridge based CPUs.
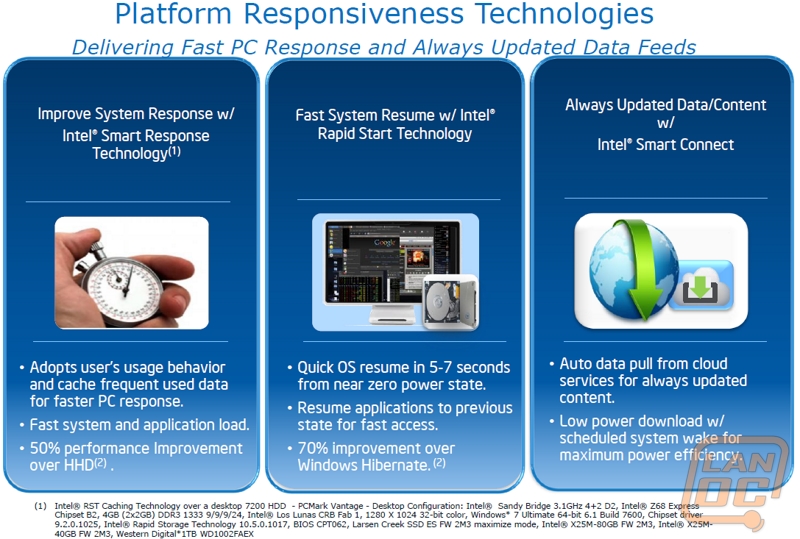
The chipsets also included a few new software features, such as Intel's Smart Response Technology, Rapid Start Technology, and Smart Connect, which adapt to the user's behavior as well as aid in over all response and resume from hibernation or stand-by.
Specifications
|
Form factor |
ATX |
|
AA# (Altered Assembly) |
G30742-XXX |
|
BIOS ID string |
GZZ7710H.86A with Intel Fast Boot Technology |
|
Processor |
At product launch, this Intel® Desktop Board DZ77GA-70K supports:
|
|
Memory |
|
|
Chipset |
|
|
Graphics |
|
|
Audio |
Intel® High Definition Audio (Intel® HD Audio) subsystem in the following configuration:
|
|
LAN support |
Dual Gigabit (10/100/1000 Mb/s) LAN subsystems using the Intel® 82579V Gigabit Ethernet Controller |
|
Peripheral interfaces |
|
|
Expansion capabilities |
|
Packaging
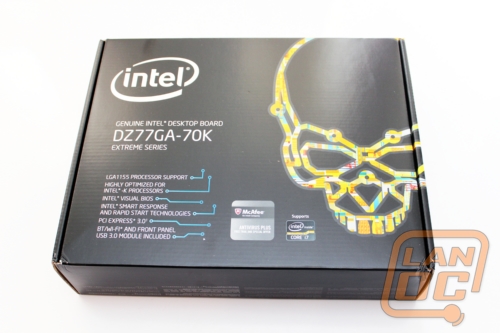
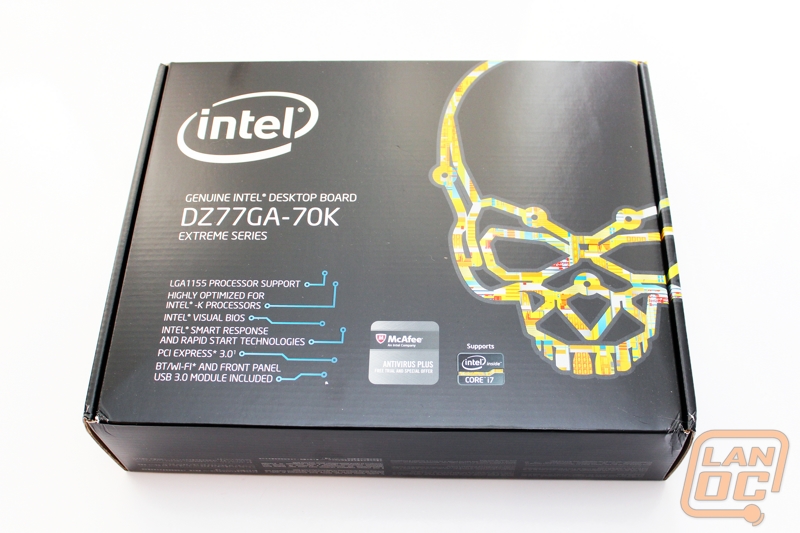
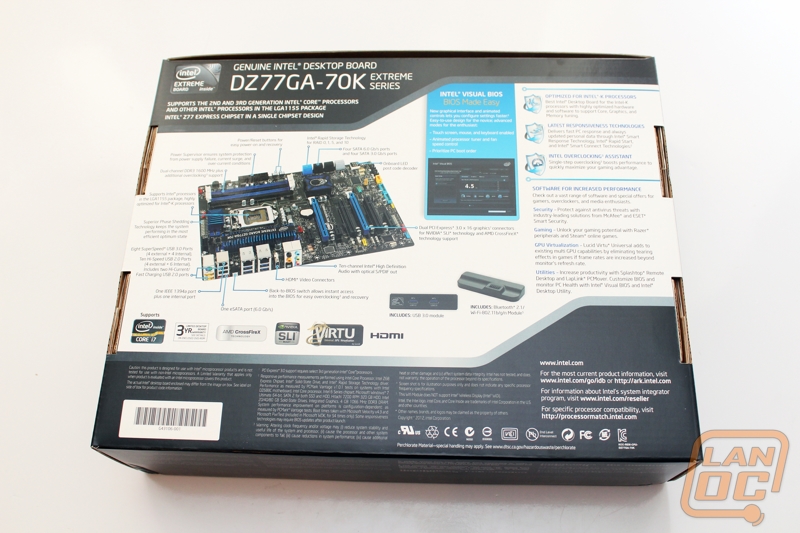
Intel is fairly straight forward with the marketing of their enthusiast Z77 board, the large Intel skull occupying most of the real estate on the front accompanied by a list of features such as PCI Express 3.0 and the included USB 3.0 module. On the reverse side we find an action shot with call-outs encircling the board. Intel has packed a lot of information here, as well as a few additional photos of the extras included inside.
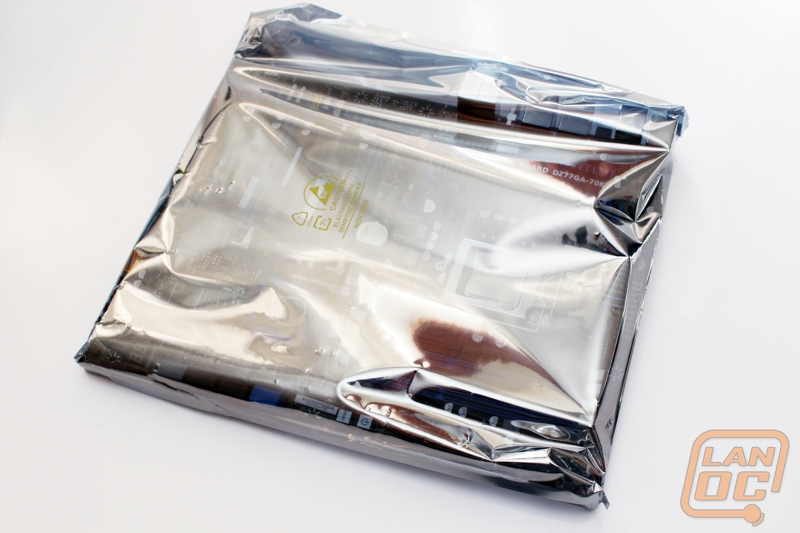
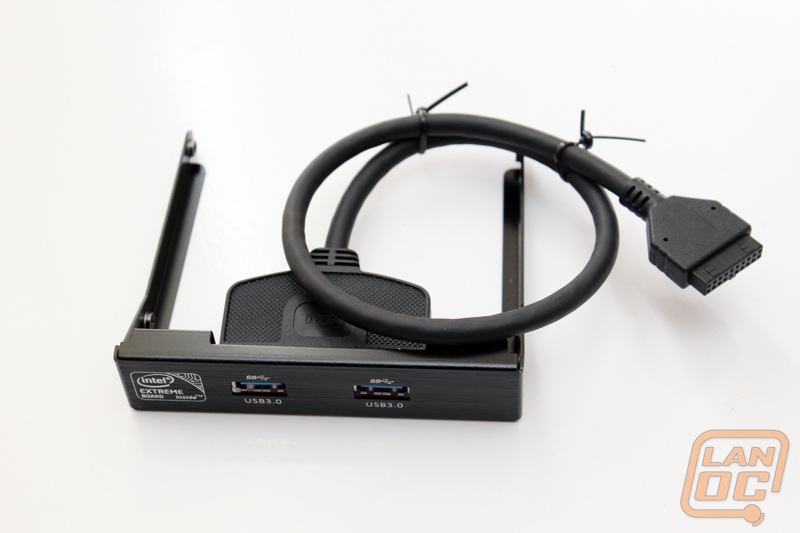
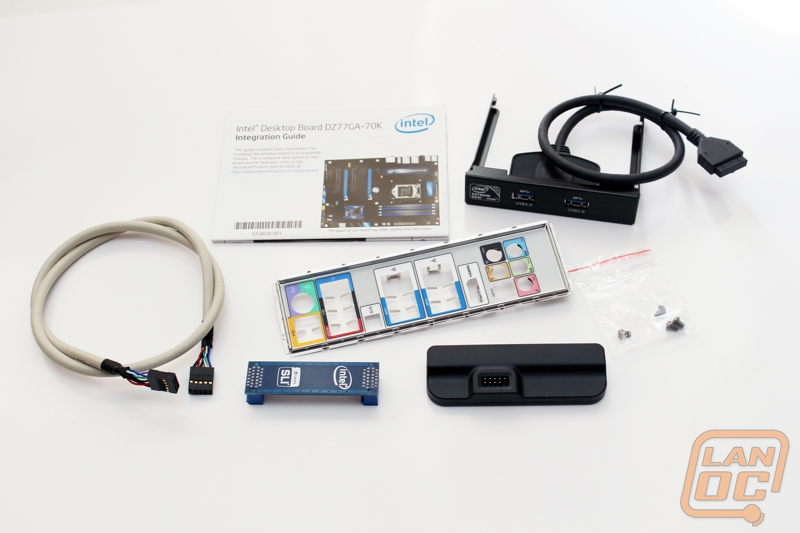
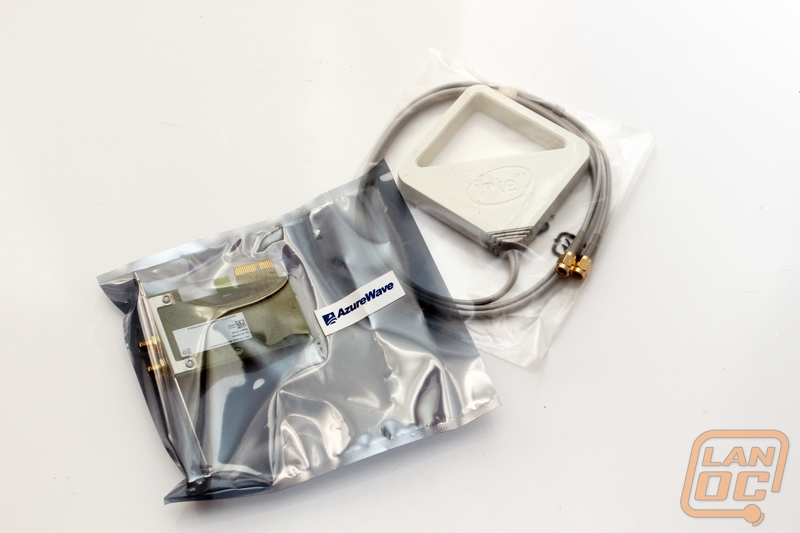
The box opens in typical clam-shell style, the board safely wrapped in anti-ESD material and resting atop a cardboard insert. Underneath you'll find the cove of accessories that include the standard rear I/O cover and SLI bridge. Intel has also included two very nice extras. The first is a front panel USB 3.0 module that mounts in any external 3.5” drive bay and provides two USB 3.0 ports. This is a great option not only for cases lacking 3.0, but also as an option to expand the number of ports for those that do, since Intel has provided two headers on the DZ77GA board.
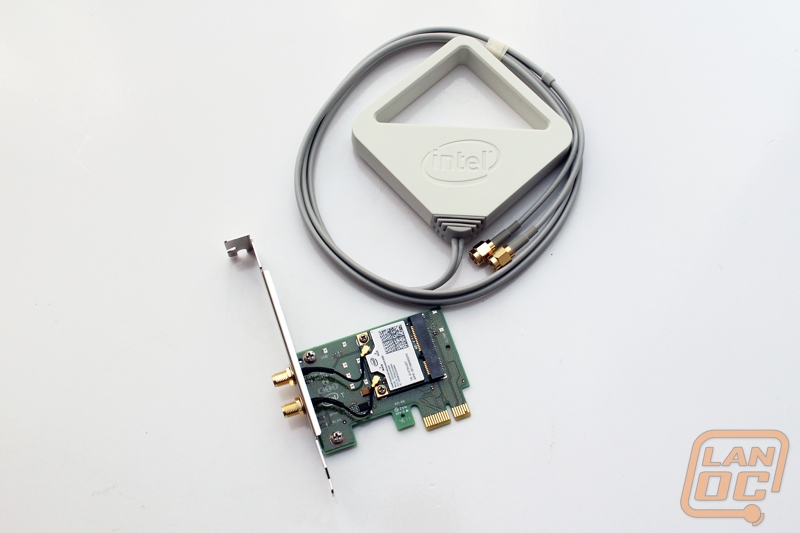
The second extra is a Bluetooth 2.1/Wi-Fi-802.11b/g/n module. This piece of hardware connects with a provided cable to any USB header on the motherboard. As you may have guessed, it then provides wireless and Bluetooth capabilities.
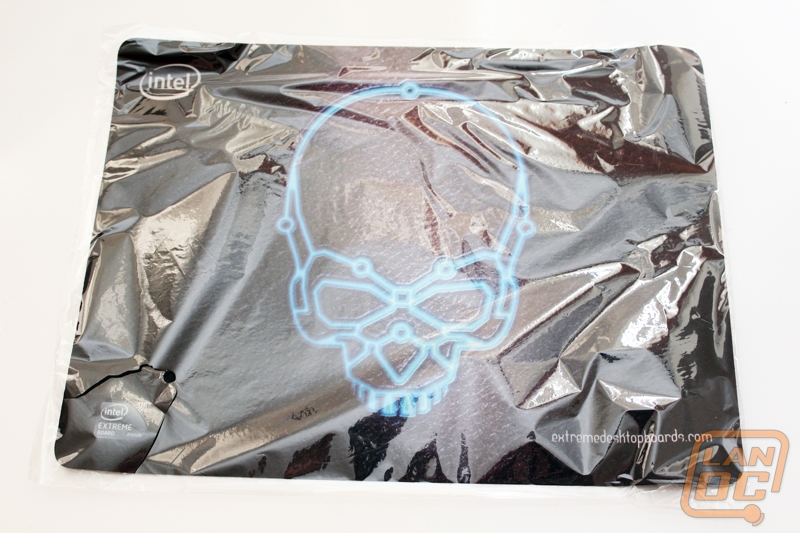
Finally, just as we saw with the Intel DX79SI motherboard, Intel has included a nice cloth mouse pad featuring the iconic enthusiast skull graphic.
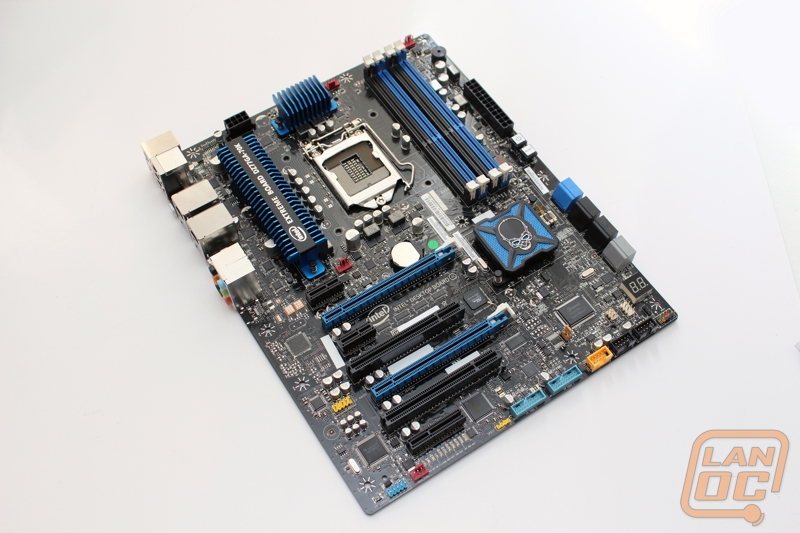
Board Layout
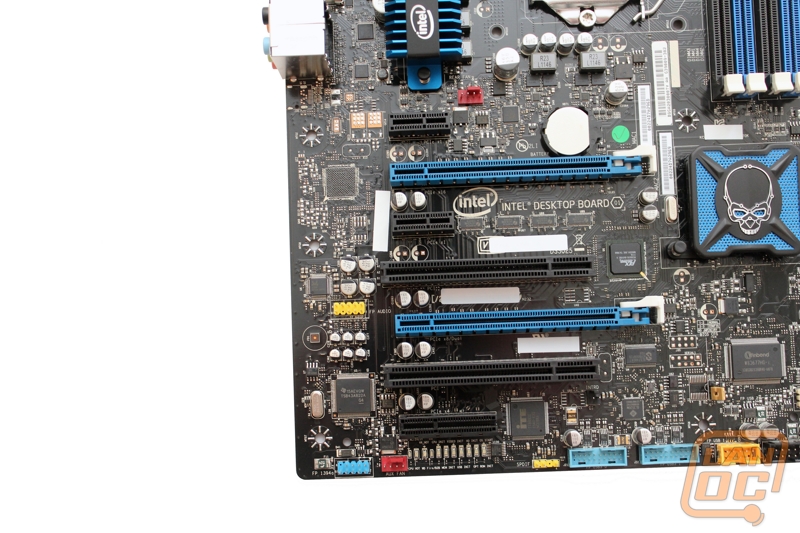
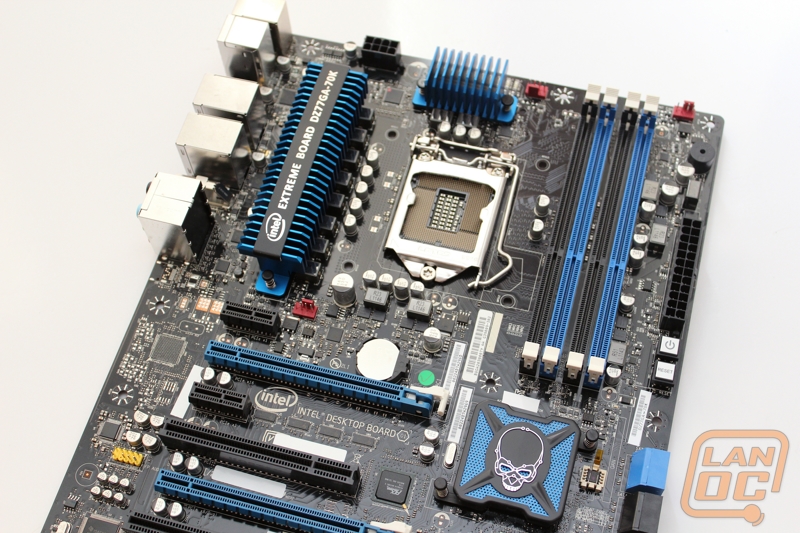
It’s clear even at first glance that this is an Intel extreme motherboard just by seeing their Intel Extreme skull facing you as you dig into the packaging. This board looks a lot like the last Intel board we had on the test bench, the Intel DX79SI. The main difference being the size of that previously mentioned skull. This time around it’s a little bit smaller, supporting the X79 as their enthusiast platform and Z77 being the new mainstream. Even so, with that skull on the board, this thing is bound to have a few surprises in store.
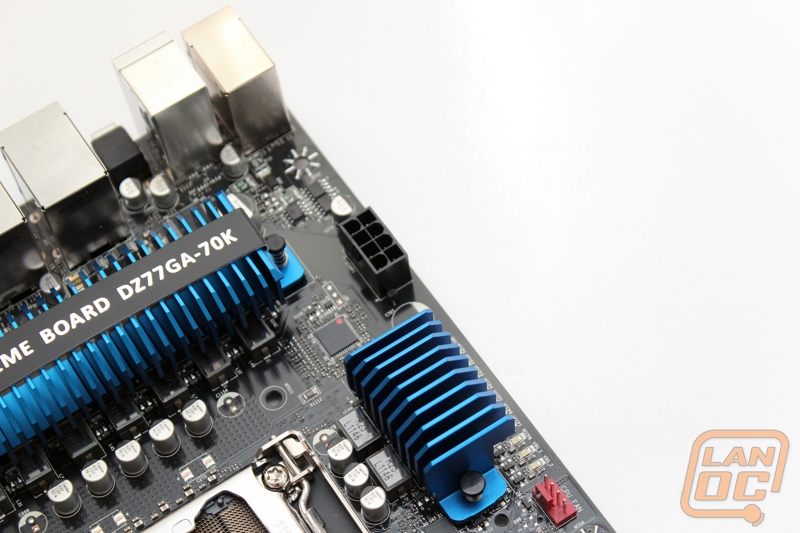
Starting in the top left behind the rear I/O panel we have an 8 pin CPU power connection. It looks a little lonely up their but that should give you more than enough room for clearance when hooking up that sometimes troublesome connection.
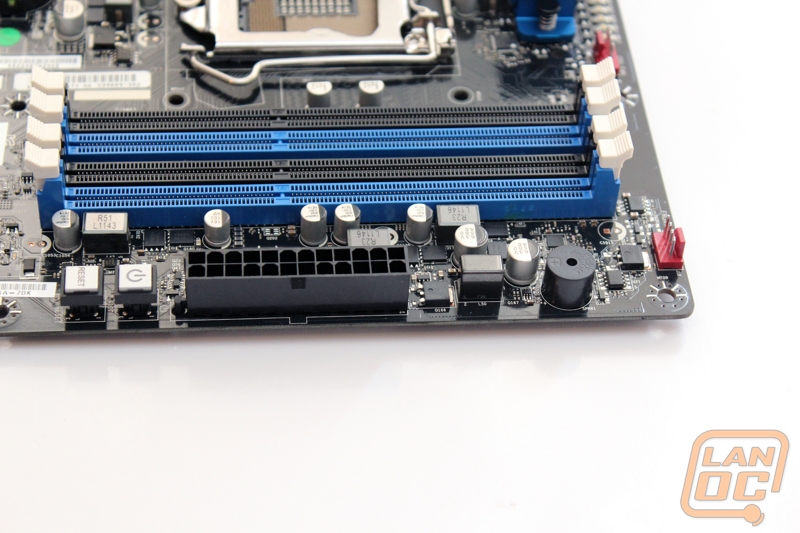
On the top right portion of the board you can see the four blue and black DDR3 dimm slots as well as two four pin fan headers along the top. These are two of a total of four PWM fan headers on the board, with each standing out in a red color. You also have the standard 24 pin power connection in black with power and reset buttons just below. I love this placement for using these buttons in a case sometimes, long video cards and wire management is rarely in the way.
A little farther down the right side you have a whole collection of SATA ports, eight in total. There are three different colors breaking down both connection speed and controller used. Six of the 8 ports are run on the built in control, two being SATA 3(blue) and the other four SATA 2(black) with two additional ports running on a Marvell 88SE9172 chipset(grey). Also tucked just below the SATA connections is the boards onboard diagnostic LED.
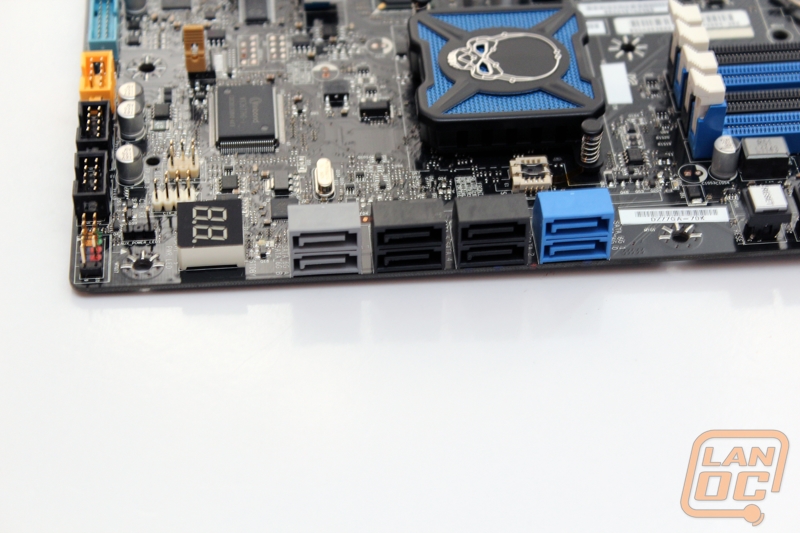
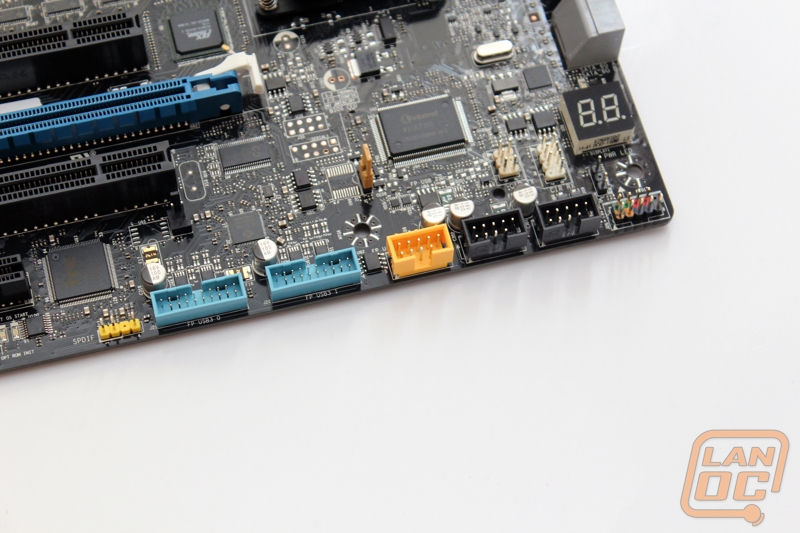
The bottom right of the board is very busy and packed full of different headers. You have a small SPDIF header towards the middle, two blue USB 3.0 headers, and three USB 2.0 headers lined up. One of the three USB 2.0 headers is a high power connection and is marked yellow in color, perfect for charging your tablets and devices. In the far right corner all of your front I/O connections are together and nicely labeled by color to help make connection easier. Last but not least you have a small clear CMOS jumper that is yellow in color. This header is questionable in location because a long video card in that second PCIe slot could make getting your hand in there a little difficult.
After seeing the bottom right corner of the board the bottom left seems almost empty without all of the headers. Considering that some PCIe devices might be taking up this space, this is a good thing. You still have one PWM fan header and you also have your audio header, but the rest of the space is taken up by an array of LED’s that show you where you are in your boot cycle. This is great for helping diagnose a hardware issue as well as hang-up’s in overclocking. It’s nice to see that Intel included this!
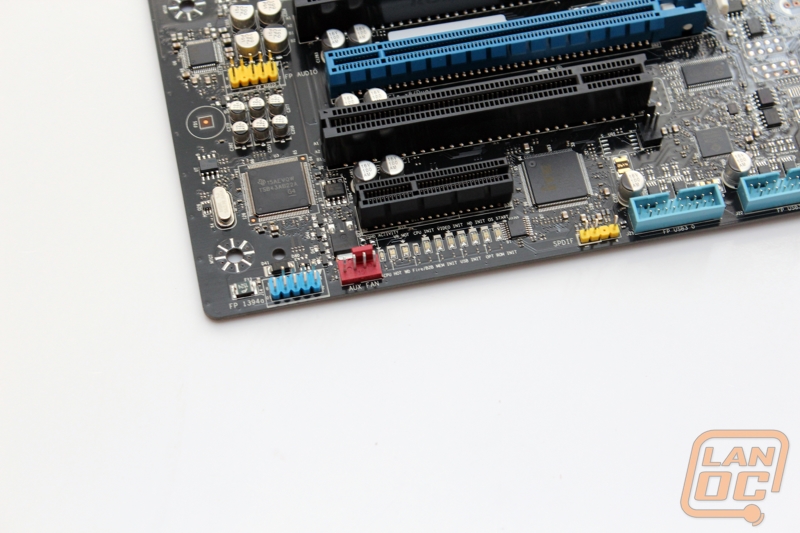
Here is the breakdown for slots for the DZ77GA-70K
PCIe x1
PCIe x16/8
PCIe x1
PCI
PCIe x8
PCI
PCI x4
This is an interesting layout considering the two legacy PCI slots but its also understandable because of the limited number of PCI lanes that socket 1155 allows. Intel gave enough room for you to have space between two GPU’s or you can use that space to use a PCI device while still sporting two video cards. On top of that you can ALSO run one PCIe x1 card and one PCIe x4 card along with your two dual slot GPU’s and the PCI slot. That’s a very useful layout giving you three different slot types even with two GPU’s in place.
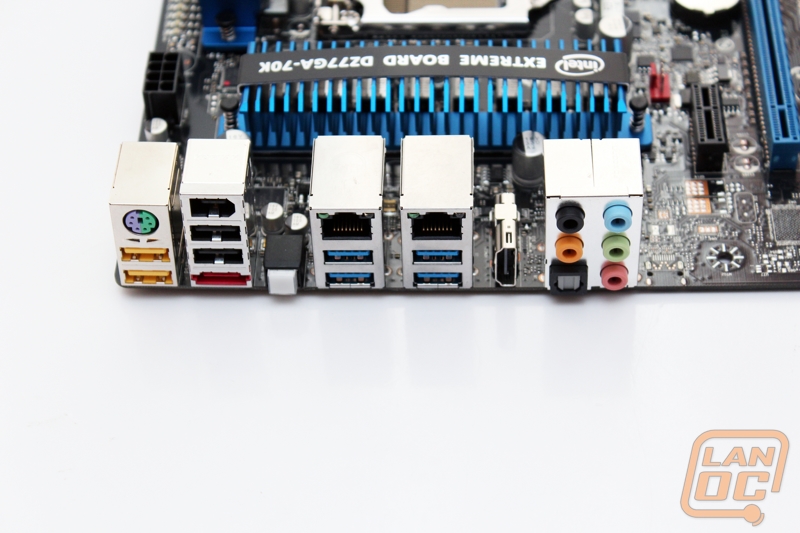
The rear I/O panel layout is absolutely filled to the brim. A good example of this is the HDMI port being tucked in sideways. A good portion of the ports are different USB variations with a total of 8 USB ports not counting the USB/eSATA port. Of those USB ports four are USB 2.0 and the four blue plugs are all USB 3.0. They did still manage to slip in a legacy PS2 connection for those Model M fan’s and you have a fairly standard audio configuration as well with a 5 port plus optical. Intel packed two full gigabit NIC’s running on their their Intel® 82579V Gigabit Ethernet Controller. Last but not least they have included a clear CMOS button on the rear, if this doesn’t show you how serious Intel is about overclocking nothing will!
Even though this is a new chipset, there aren’t any changes as far as the socket is concerned. With backwards compatability with older Socket 1155 CPU’s this isn’t really a surprise. At least we don’t have any special two spring designs with this one, unlike socket 2011.

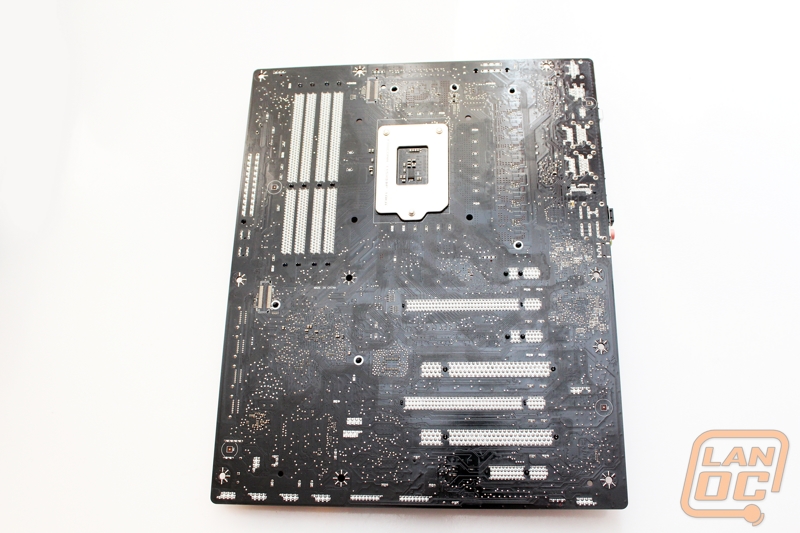
The black PCB Intel went with is proof that everyone loves the flat black look. It is the go to color for anyone looking to make an enthusiast board, if you are a manufacture looking to go with another color you really better make sure it’s going to go with your theme. Everyone likes black simply because it blends in with the black interiors we see with most cases now.
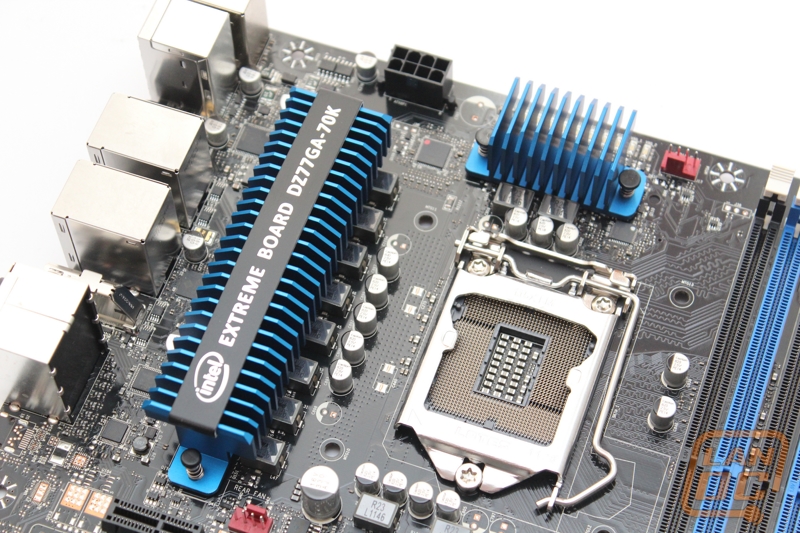
Cooling
Going with the blue and black theme on this board and all of their Extreme boards Intel plastered all of the DZ77GA-70K’s cooling in the colors. The two heatsinks around the CPU socket both are blue anodized aluminum with the larger of the two having a black placard mounted to it showing off the boards name and Extreme moniker. Between the two they will have no trouble keeping this board’s voltage regulation cool, especially the larger heatsink. The other 1/3 of the cooling for the DZ77GA-70K is down near the bottom right. I mentioned this before because of the Intel Extreme skull on it. This is more of a heat spreader than a heatsink yet still does a good job of helping with both cooling and styling on the board. The mesh painted in blue is a nice touch, helping it match the previous extreme board we had in the office while also being unique.

BIOS
Both in overclock ability and just overall usability Intel has made great efforts in their motherboard BIOS’s over the last few years. We found the X79 BIOS to be one of the most friendly to use BIOS for the whole platform. After booting into the DZ77GA-70K’s BIOS I was immediately impressed. The Intel Visual BIOS lands you on a hand page that allows you to do everything the average person will ever need to do in the BIOS including overclocking. That’s not to say that they didn’t pack the BIOS full of features. As you can see in the video below, not only is the layout easy to use, you have the capability to adjust anything and everything including in depth overclocking, something you would never see on an Intel board even just a few years ago.
Our Test Rig
Crucial Ballistix Tracer Ram 1600Mhz 2x2Gb
OCZ Agility 3 120Gb SSD
Cooler Master Silent Pro M 850Watt PSU
XFX R7970 DD Black Edition Overclocked
Microcool Banchetto 101 Test bench
Our Testing Procedures
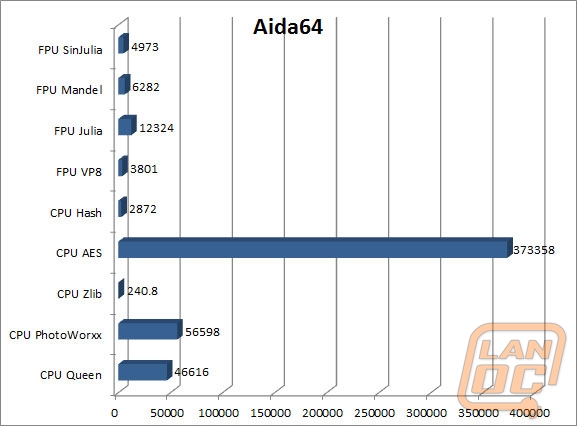
Aida64 – Formally Everest ADIA64 is a full benchmark suite. For CPU benchmarking we run CPU Queen, CPU PhotoWorxx, CPU ZLib, CPU AES, CPU Hash, FPU VP8, FPU Julia, FPU Mandel, and FPU SinJulia.
Breakdowns on each benchmark from AIDA64
CPU Queen – “This simple integer benchmark focuses on the branch prediction capabilities and the misprediction penalties of the CPU. It finds the solutions for the classic "Queens problem" on a 10 by 10 sized chessboard. At the same clock speedtheoretically the processor with the shorter pipeline and smaller misprediction penalties will attain higher benchmark scores. For example -- with HyperThreading disabled -- the Intel Northwood core processors get higher scores than the Intel Prescott core based ones due to the 20-step vs 31-step long pipeline. CPU Queen test uses integer MMX, SSE2 and SSSE3 optimizations.”
CPU PhotoWorxx - It performs the following tasks on a very large RGB image:
-Fill
-Flip
-Rotate 90 degrees CW
-Rotate 90 degrees CCW
-Fill the image with random colored pixels
-Color to black & white conversion
-Difference
-Crop
This benchmark stresses the integer arithmetic and multiplication execution units of the CPU and also the memory subsystem. Due to the fact that this test performs high memory read/write traffic, it cannot effectively scale in situations where more than 2 processing threads used. For example, on a 8-way Pentium III Xeon system the 8 processing threads will be "fighting" over the memory, creating a serious bottleneck that would lead to as low scores as a 2-way or 4-way similar processor based system could achieve. CPU PhotoWorxx test uses only the basic x86 instructions, and it is HyperThreading, multi-processor (SMP) and multi-core (CMP) aware.
CPU ZLib - This integer benchmark measures combined CPU and memory subsystem performance through the public ZLib compression library. CPU ZLib test uses only the basic x86 instructions, and it is HyperThreading, multi-processor (SMP) and multi-core (CMP) aware.
CPU AES - This benchmark measures CPU performance using AES (Advanced Encryption Standard) data encryption. In cryptography AES is a symmetric-key encryption standard. AES is used in several compression tools today, like 7z, RAR, WinZip, and also in disk encryption solutions like BitLocker, FileVault (Mac OS X), TrueCrypt.
CPU AES test uses only the basic x86 instructions, and it's hardware accelerated on VIA PadLock Security Engine capable VIA C3, VIA C7, VIA Nano and VIA QuadCore processors; and on Intel AES-NI instruction set extension capable processors. The test is HyperThreading, multi-processor (SMP) and multi-core (CMP) aware.
CPU Hash - This benchmark measures CPU performance using the SHA1 hashing algorithm defined in the Federal Information Processing Standards Publication 180-3. The code behind this benchmark method is written in Assembly, and it is optimized for every popular AMD, Intel and VIA processor core variants by utilizing the appropriate MMX, MMX+/SSE, SSE2, SSSE3, AVX or XOP instruction set extension. CPU Hash benchmark is hardware accelerated on VIA PadLock Security Engine capable VIA C7, VIA Nano and VIA QuadCore processors.
FPU VP8 Benchmark -This benchmark measures video compression performance using the Google VP8 (WebM) video codec Version 0.9.5 (http://www.webmproject.org). FPU VP8 test encodes 1280x720 pixel ("HD ready") resolution video frames in 1-pass mode at 8192 kbps bitrate with best quality settings. The content of the frames are generated by the FPU Julia fractal module. The code behind this benchmark method utilizes the appropriate MMX, SSE2 or SSSE3 instruction set extension, and it is HyperThreading, multi-processor (SMP) and multi-core (CMP) aware.
FPU Julia Benchmark - This benchmark measures the single precision (also known as 32-bit) floating-point performance through the computation of several frames of the popular "Julia" fractal. The code behind this benchmark method is written in Assembly, and it is extremely optimized for every popular AMD, Intel and VIA processor core variants by utilizing the appropriate x87, 3DNow!, 3DNow!+, SSE, AVX or FMA4 instruction set extension. FPU Julia test is HyperThreading, multi-processor (SMP) and multi-core (CMP) aware.
FPU Mandel Benchmark - This benchmark measures the double precision (also known as 64-bit) floating-point performance through the computation of several frames of the popular "Mandelbrot" fractal. The code behind this benchmark method is written in Assembly, and it is extremely optimized for every popular AMD, Intel and VIA processor core variants by utilizing the appropriate x87, SSE2, AVX or FMA4 instruction set extension. FPU Mandel test is HyperThreading, multi-processor (SMP) and multi-core (CMP) aware.
FPU SinJulia Benchmark - This benchmark measures the extended precision (also known as 80-bit) floating-point performance through the computation of a single frame of a modified "Julia" fractal. The code behind this benchmark method is written in Assembly, and it is extremely optimized for every popular AMD, Intel and VIA processor core variants by utilizing trigonometric and exponential x87 instructions. FPU SinJulia is HyperThreading, multi-processor (SMP) and multi-core (CMP) aware.
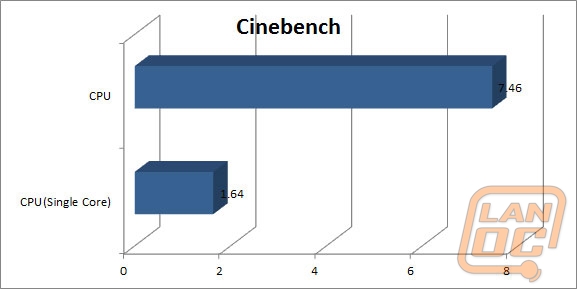
Cinebench - CINEBENCH is a real-world cross platform test suite that evaluates your computer's performance capabilities. CINEBENCH is based on MAXON's award-winning animation software CINEMA 4D, which is used extensively by studios and production houses worldwide for 3D content creation. The test procedure consists of two main components - the graphics card performance test and the CPU performance test.
Main Processor Performance (CPU)
The test scenario uses all of your system's processing power to render a photorealistic 3D scene (from the viral "No Keyframes" animation by AixSponza). This scene makes use of various algorithms to stress all available processor cores.
In fact, CINEBENCH can measure systems with up to 64 processor threads. ThIS test scene contains approximately 2,000 objects which in turn contain more than 300,000 polygons in total, and uses sharp and blurred reflections, area lights, shadows, procedural shaders, antialiasing, and much more. The result is displayed in points (pts). The higher the number, the faster your processor.
Graphics Card Performance (OpenGL)
This procedure uses a complex 3D scene depicting a car chase (by renderbaron) which measures the performance of your graphics card in OpenGL mode. The performance depends on various factors, such as the GPU processor on your hardware, but also on the drivers used. The graphics card has to display a huge amount of geometry (nearly 1 million polygons) and textures, as well as a variety of effects, such as environments, bump maps, transparency, lighting and more to evaluate the performance across different disciplines and give a good average overview of the capabilities of your graphics hardware. The result given is measured in frames per second (fps). The higher the number, the faster your graphics card.
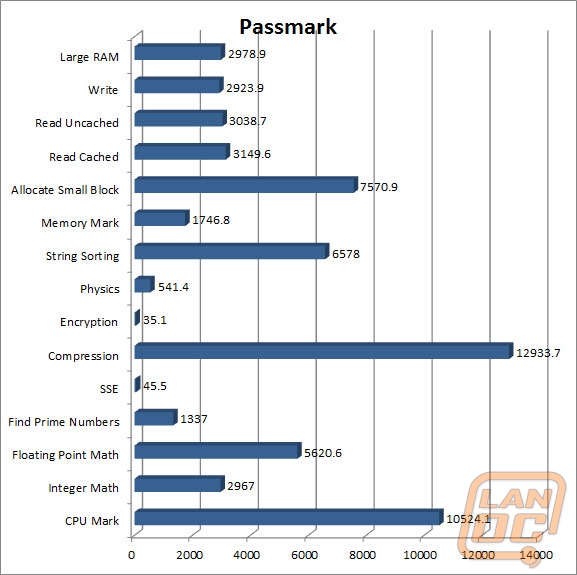
CPU Mark
Integer Math
Floating Point Math
Find Prime Numbers
SSE
Compression
Encryption
Physics String Sorting
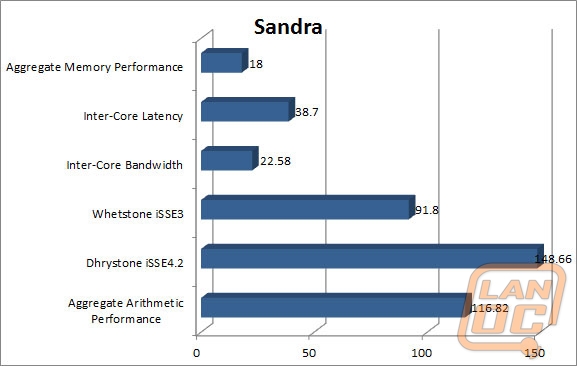
Sandra -
Processor Arithmetic-
Whetstone testing is great to see how well a CPU can handle floating-point arithmetic. We also do Dhrystone that is similar but for integer and string operations.
Multi-Core Efficiency-
A benchmark specifically designed to measure the efficiency of the different multi-core processors with their different architectures as well as compare their performance to traditional multi-processor (SMP) systems.
Performance measuring benchmarks do not show at-a-glance the differences between multi-core processors and how multi-threading programs should be designed to best take advantage of the underlying architecture while avoiding the "gotchas" .
This benchmark does not test processor unit computational performance, i.e. how fast the cores of the processors are; it tests how fast the connection between them is only.
Memory Bandwidth-
Sandra's algorithm is multi-threaded on SMP/SMT systems. This works by splitting the arrays and letting each thread work on its own bit. Sandra creates a thread for each CPU in the system and assignes each thread to an individual CPU.
Another difference is the aggressive use of sheduling/overlapping of instructions in order to maximise memory throughput even on "slower" processors. The loops should always be memory bound rather than CPU bound on all modern processors.
The other major difference is the use of alignment. Sandra dynamically changes the alignment of streams until it finds the best combination, then it repeatedly tests it to estimate the maximum throughput of the system. You can change the alignment in STREAM and recompile - but generally it is set to 0 (i.e. no).
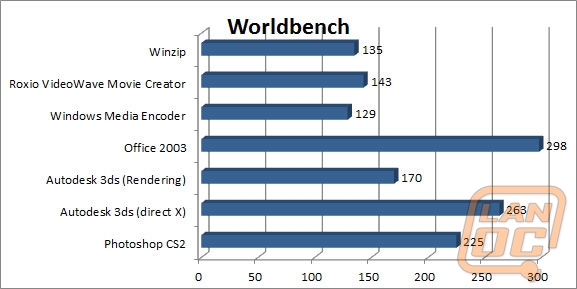
Designed by the guys behind PCWorld, Worldbench is a benchmark designed to use applications and utility’s that everyone uses day to day and benchmark their performance. This gives the most accurate REAL world results, something that no other benchmark does. Being fully automated, WorldBench 6's application tests are scripted to run consecutively, and those results are automatically combined and compared against a baseline system. Popular applications like Microsoft Office, Adobe Photoshop and Mozilla Firefox are each used as they would be in real-world situations to comprise the final WorldBench score.
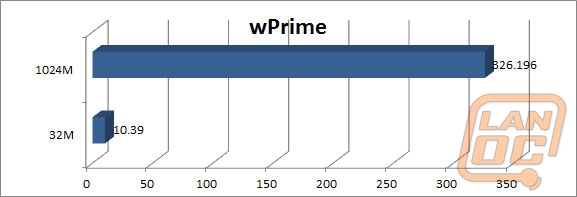
WPrime – Perfect for testing the multithreading of multiple core CPU’s. “wPrime uses a recursive call of Newton's method for estimating functions, with f(x)=x2-k, where k is the number we're sorting, until Sgn(f(x)/f'(x)) does not equal that of the previous iteration, starting with an estimation of k/2. It then uses an iterative calling of the estimation method a set amount of times to increase the accuracy of the results. It then confirms that n(k)2=k to ensure the calculation was correct. It repeats this for all numbers from 1 to the requested maximum.”
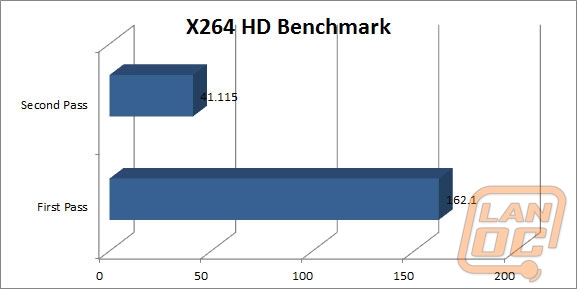
X264 HD – X264 HD is a CPU encoding benchmark. Using the x264 codec this test encodes a video file and times its performance.
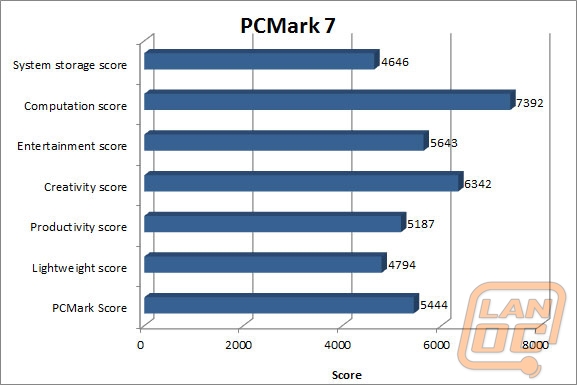
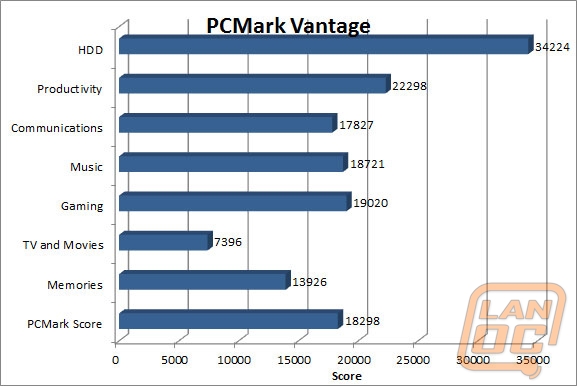
Overall Synthetic Benchmarks
We run the entire collection of Futuremark’s PC and 3D benchmarks. Although they are synthetic, they do run consistent benchmarks on both in game performance and PC performance. Their new PCMark 7 does an amazing job of testing real world programs including web page loading speed and other activities nearly everyone does on their PC daily.
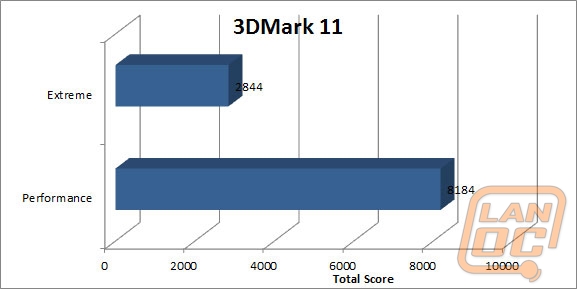
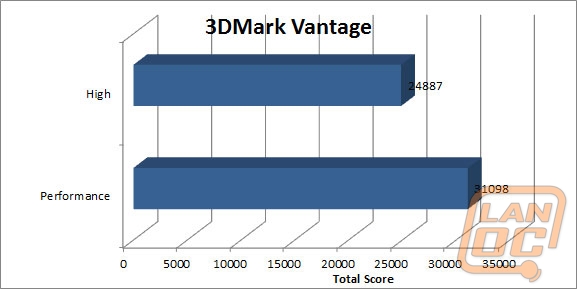
3DMark Vantage Performance
3DMark Vantage High
3DMark Vantage 2011 Performance
3DMark Vantage 2011 Extreme
In Game Tests
Shogun2 (In game benchmark, 1080p on high setting)
Batman Arkham Asylum (In game benchmark, 1920 x 1080, all settings turned up to their highest settings including AA)
Super Street Fighter 4 Arcade Edition (in game benchmark, 1920 x 1080, highest settings)
f1 2011 (in game benchmark, 1920 x 1080, highest settings)
Dirt 3 (1920x1080 – 4x MSAA – high settings, in-game benchmark)
Metro 2033 DX11 test (built-in benchmark, 1920 x 1080; DirectX: DirectX 11; Quality: Very High; Antialiasing: MSAA 4X; Texture filtering: AF 4X; Advanced PhysX: Enabled; Tessellation: Enabled; DOF: Disabled)
Metro 2033 DX10 test (built-in benchmark, 1920 x 1080; DirectX: DirectX 10; Quality: Very High; Antialiasing: MSAA 4X; Texture filtering: AF 4X; Advanced PhysX: Enabled; Tessellation: Enabled; DOF: Disabled)
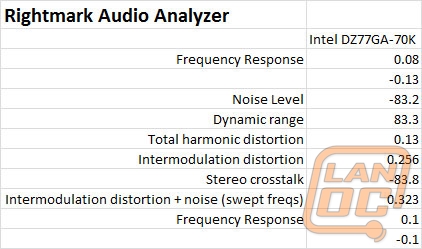
Audio Testing is done using Rightmark Audio Analyzer
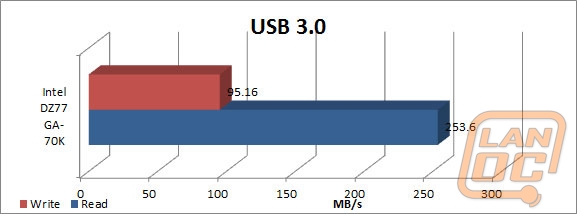
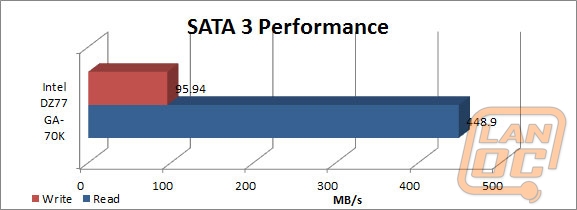
USB 3.0 and SATA 3 testing is done with Crystal Disc Mark with a Corsair Force GT 60 Gb. USB 3.0 testing is hooked up through a Thermaltake BlackX with USB 3.0 support
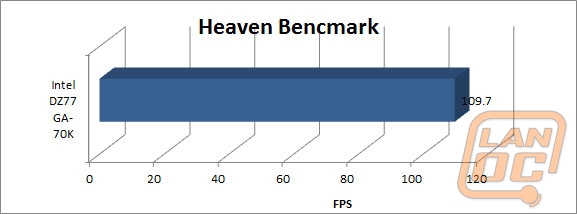
Performance
Typically we would break down each of our results explaining what and why each board is faster or slower than the rest. Unfortunately with this being our baseline Z77 benchmark, the DZ77GA-70K doesn’t have much to compare too. I am still going to give you all of our results. But you will have to check out a few of our upcoming Z77 reviews later today and later this week to see where it stands.

USB 3.0 and SATA 3
One of the new tests we have added to our suite is both SATA3 and USB 3.0 performance testing using CrystalDiscMark to test the total read and write speed on our Corsair Force GT 60 Gb. You can use these numbers to see the speed lost between the two interfaces but also as we test more boards you will be able to see what boards have better performance on both.
Audio
Until we have more boards to compare against these numbers don’t show very much. This is the price the Intel DZ77GA-70K has to pay for being our baseline Z77 board.
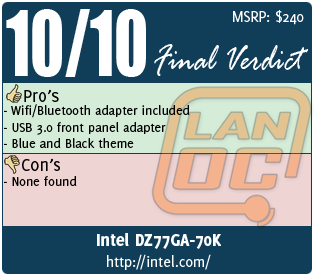
Overall and FV
With the Intel DZ77GA-70K I really didn’t know what to expect when going in. I know my last few experiences with Intel board have been great. But it’s still always hard to get the old non overclockable boards out of your head. The DZ77GA-70K is an impressive board packed full of features including total of 8 SATA connections. The black PCB along with blue highlights gives the board a stylish look to go along with its great feature set. In addition to that I was really impressed with Intel including both the USB 3.0 front panel extender and the Bluetooth/wireless adapter. It’s accessories like those that both add value and usability. If you don’t believe me, try having your internet go out in the middle of work (something that happened to me in the middle of this article ironically), I was able to open up my phones wifi hotspot and continue working. Something I wouldn’t have normally been able to do on my main PC in the past.