When it comes to fans, they aren’t typically something people get too excited about. High-end fans can be ultra quiet, have lots of power, and of course, some have RGB lighting. Companies have been going crazy on the lighting side of things, but last year Lian Li shook things up with their UNI FAN SL120’s. I took a look at them in August. What is interesting though, is people have been surprisingly excited about these fans. The latching design that cuts down on your wiring along with addressable RGB lighting had them sold out immediately with for sale subreddits on Reddit having people constantly looking for them. Well, Lian Li is back at it again, almost a year later with a new Uni Fan design called the AL120. They have still included the same latching design but with a new lighting design and upgraded static pressure and airflow. Once again they are available in black and white and today I’m going to check out both and see how they compare to the SL120’s that we already love.
Product Name: Lian Li UNI FAN AL120
Review Sample Provided by: Lian Li
Written by: Wes Compton
Amazon Affiliate Link: HERE
|
Specifications |
|
|
Fan Quantity |
Available in Single or Triple packs |
|
Color Options |
White and Black |
|
Fan Dimensions |
120 x 120 x 25 mm |
|
Rated Voltage |
DC 12V (FAN) & 5V (LED) |
|
Fan Speed |
800~1900 RPM |
|
Air Pressure |
2.62 mmH2O (Maximum) |
|
Airflow |
64.5 CFM (Maximum) |
|
Acoustic Noise |
17 – 28.3 dB |
|
Locked Current |
>= 0.5mA |
|
Bearing Type |
Fluid Dynamic Bearing |
|
Operation Voltage |
DC 12V & 5V |
|
Start-UP Voltage |
DC 6.0V |
|
Unput Current |
0.22A (FAN) / 0.66A (LED) |
|
Input Power |
5.94 Watts |
|
Warranty |
2-years |
Photos and Features
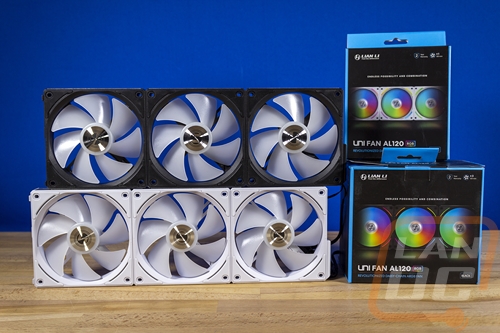
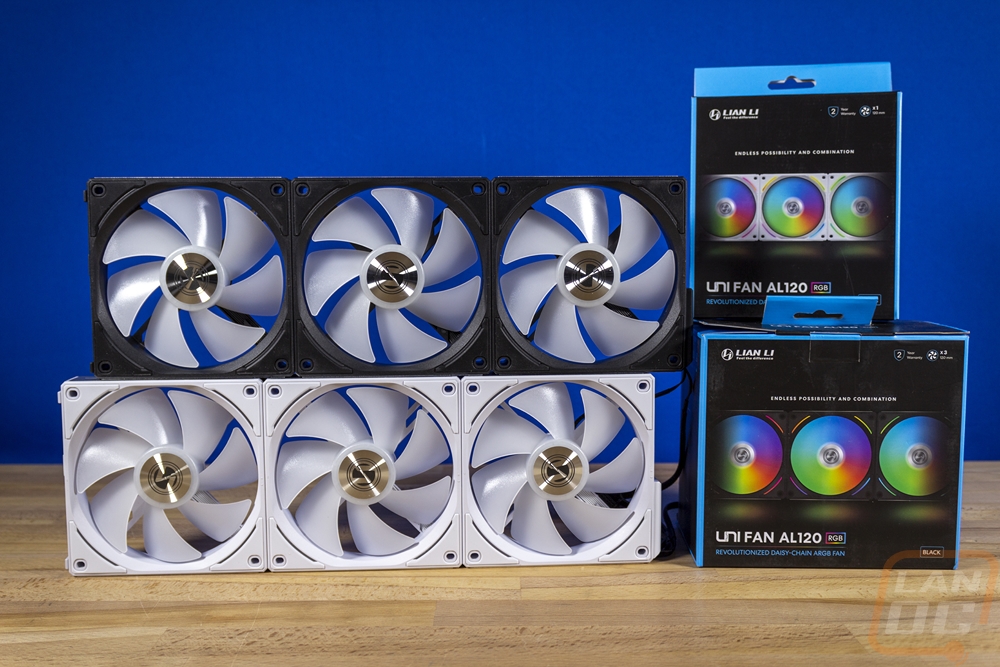
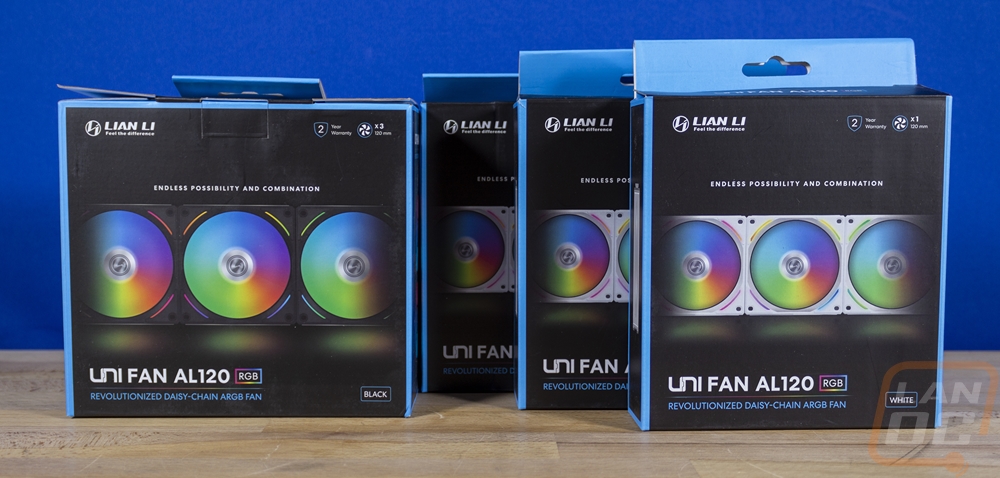
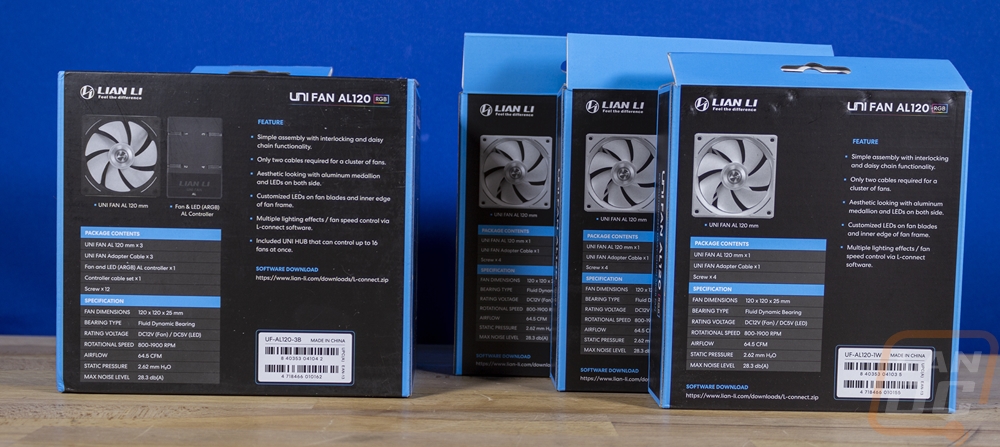
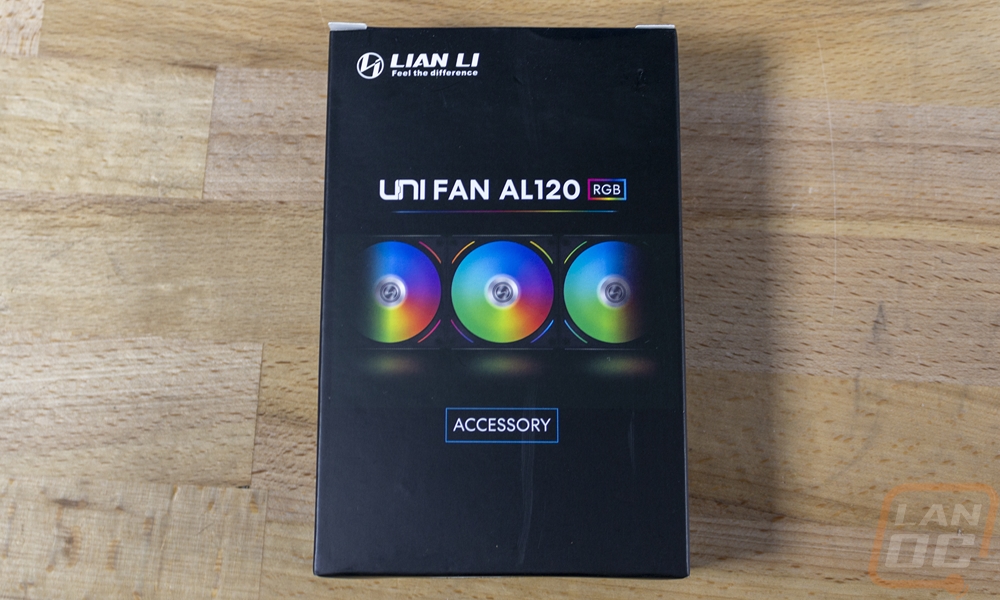
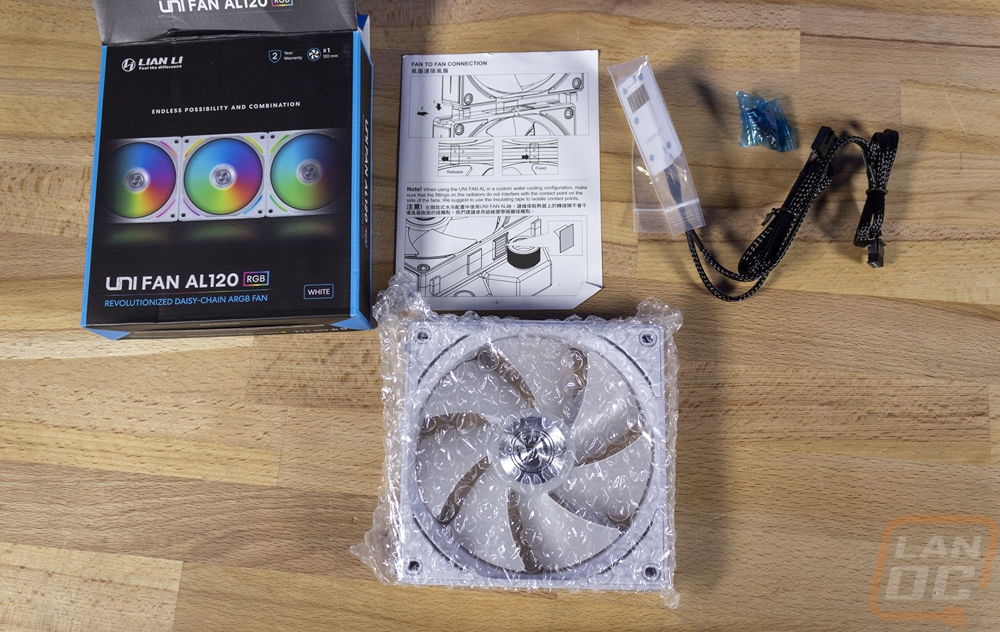
So Lian Li sent over one of the Uni Fan AL120 3 fan kits as well as three individual white AL120’s as well so I could check out both. The packaging for both is very similar to the SL120’s. They both have the light blue trim around the front with a black background. I love that they have an actual picture of the fans on the front and they even went as far as to make sure the white fans have white fans on the front. The pictures show the fan lighting on and on the front they do let you know up in the top right corner that the set has three fans and the individual packs have one fan as well as mentioning the 2-year warranty. Around on the back, they have another picture of the fan and on the set, they also have a picture of the controller that is included. Below that they have a full specification listing and a list of what you will find in the box. Then Lian Li has a feature list to highlight a few of the key features as well as a link to the software download as well.
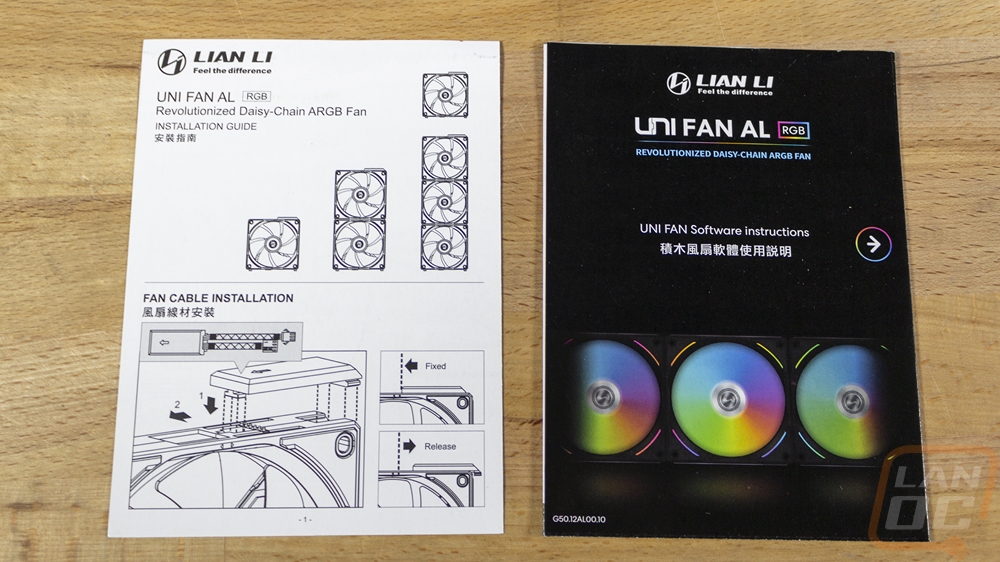
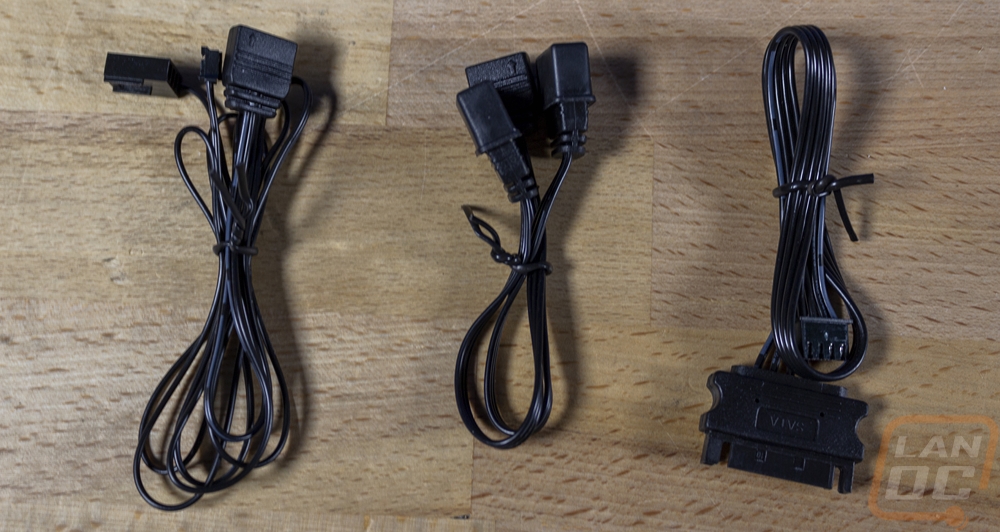
When you dive into the set, right up on top they have three of the adapter cables. These come with a small bag covering the connection part of the cable. Then all three fans have a bubble wrap bag on them and you have an accessories box and documentation. They include a basic paper that kind of goes through how you can attach all of the fans together and how to hook the cable to them. Then the color book has instructions on how to use the included software.
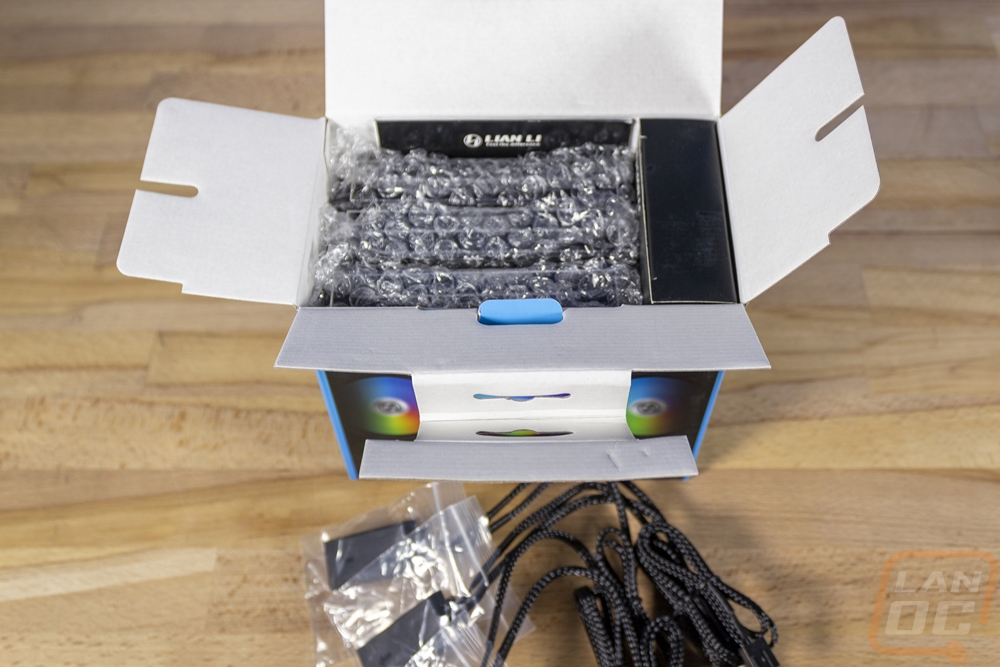
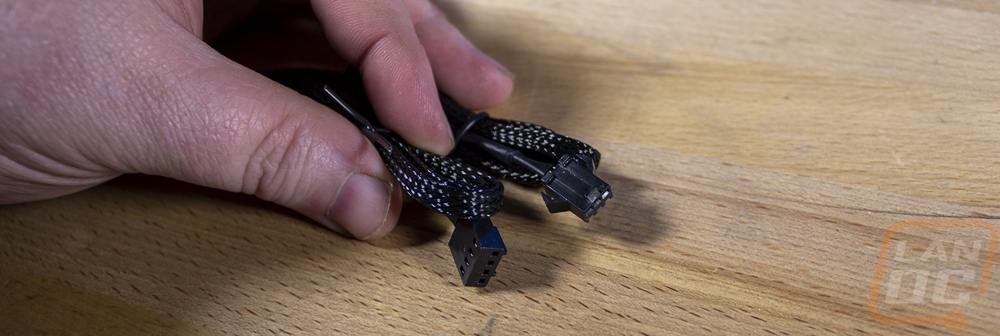
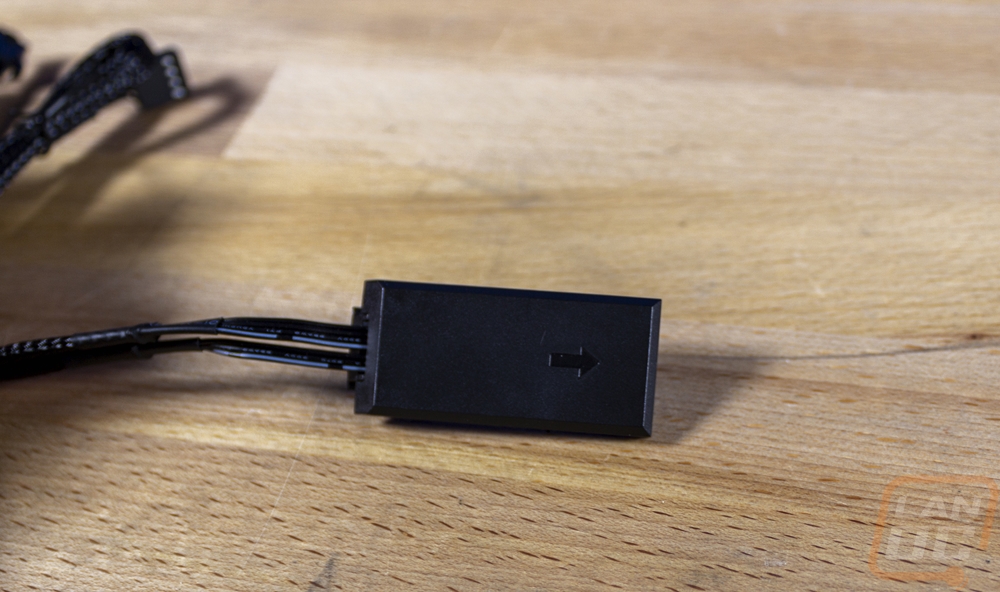
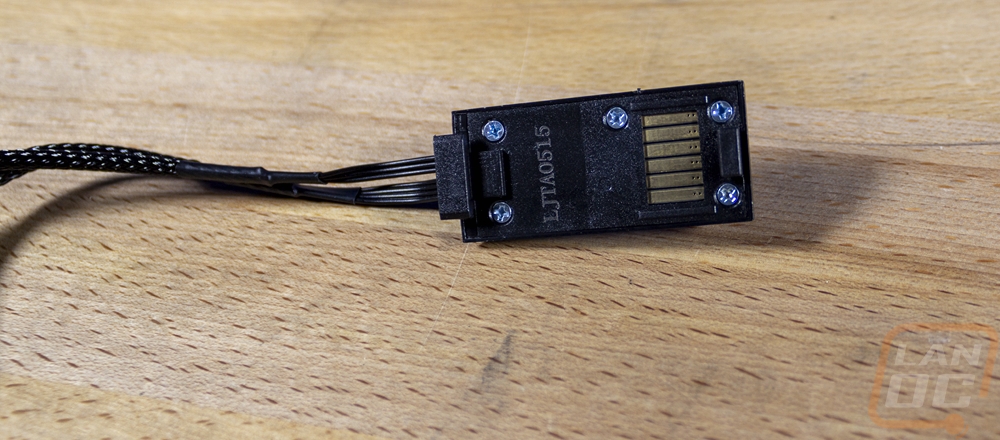
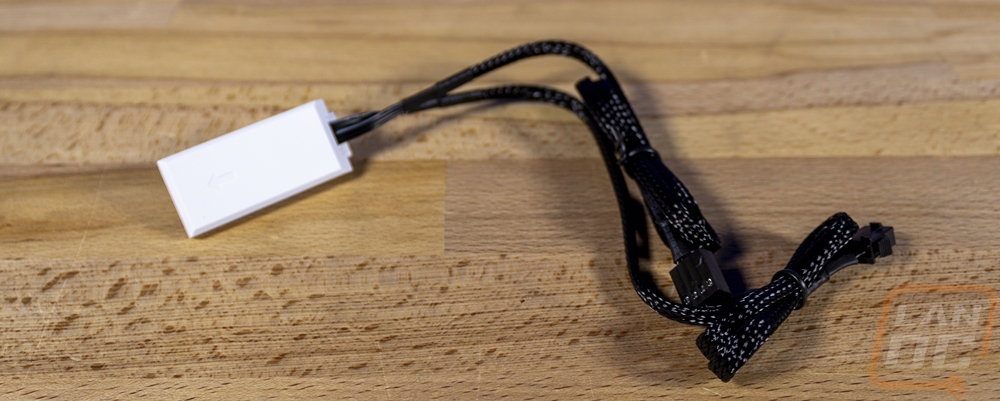
So the adapter cables all come with a heavy black sleeving and each adapter cable has two cables on them. One is a traditional 4-pin fan plug and the other is the lighting connection. The connection has two tabs that stick out to latch on to the fans and on the underside, they have 6 pads to pass through the connection through the pins on the fans.
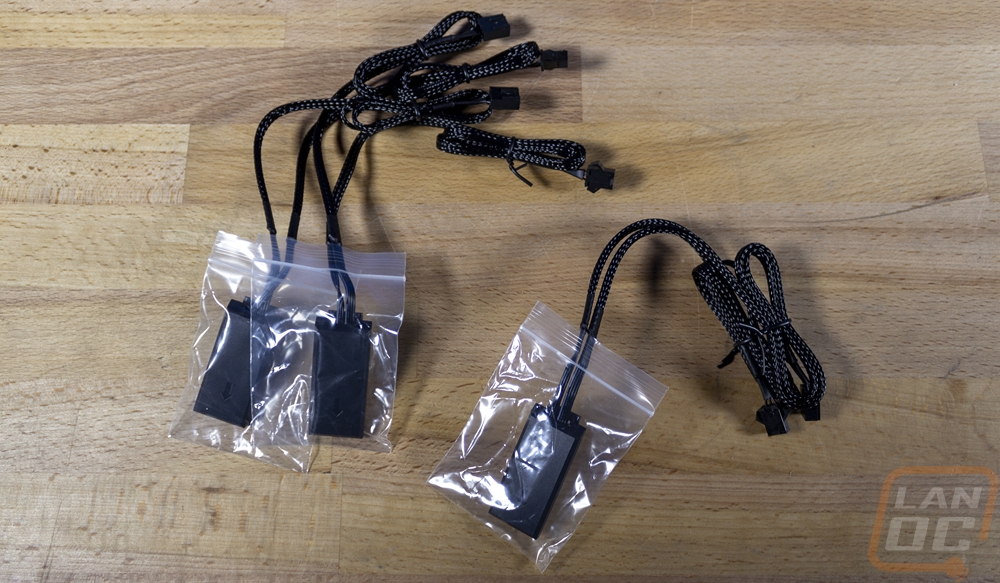
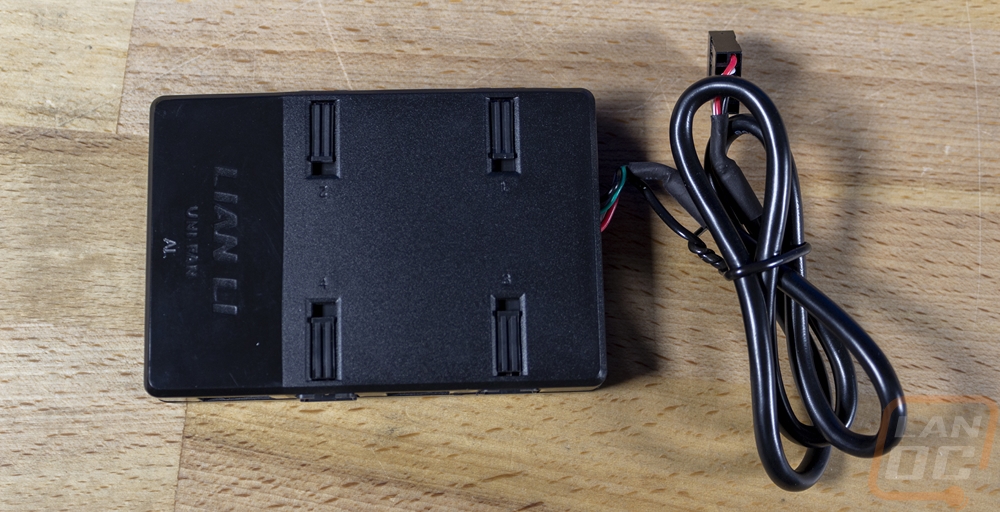
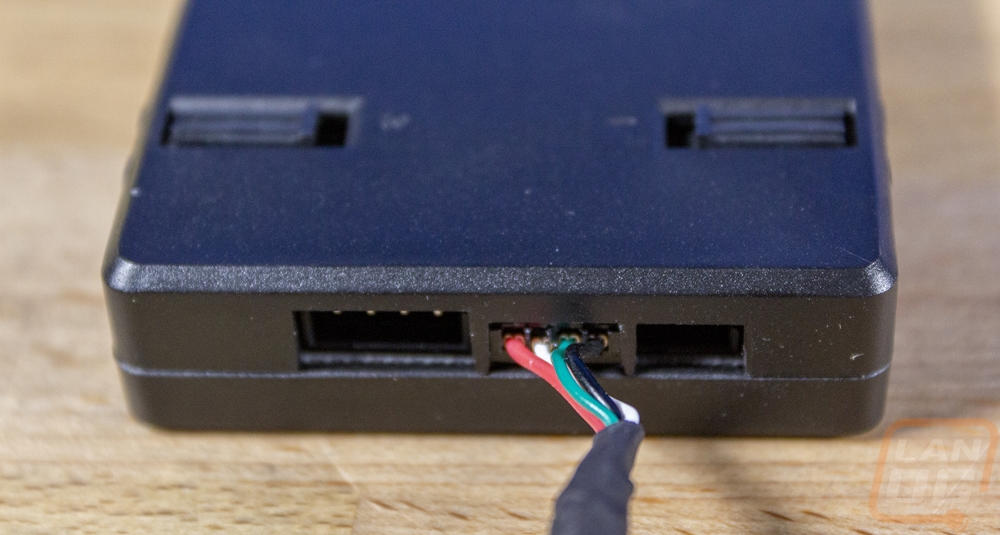
The accessory box has the same picture as the front of the packaging and the model name across the top. Inside they have the box packed full. They have the controller which comes also inside of its own protective bag. Then there are a few cables. One is the controller's power cable which uses a SATA power plug. One of the cables is an adapter to double up an RGB connection if your motherboard doesn’t have extras. Then the last is a cable that lets you tie the lighting and fan controls to your motherboards headers. The box has three small bags of black fan screws. Then two mounting pads for the controller.
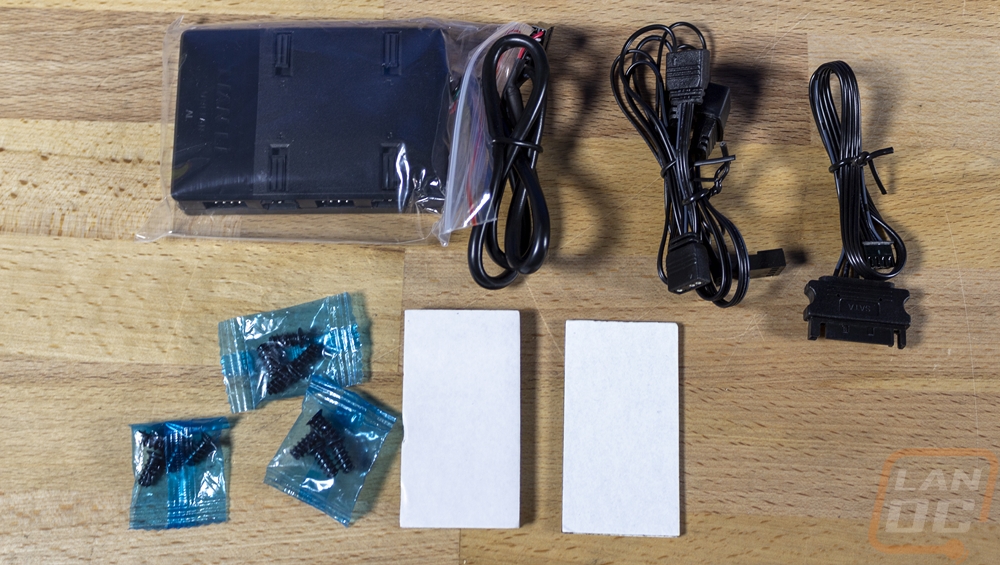
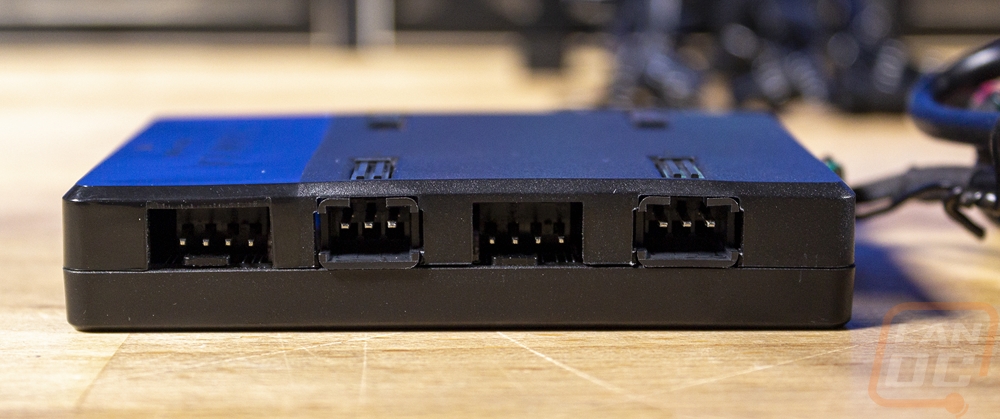
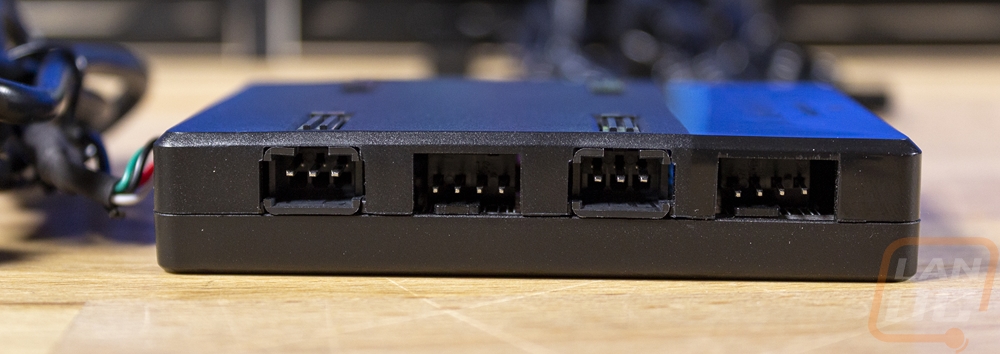
The controller has the Lian Li branding on top as well as UNI FAN AL etched into the top. But it looks basically the same as the controllers that came with our SL120 sets other than the plug numbers aren’t labeled. The top has small clips for each of the RGB plugs, these are how you unlatch the cables later if you need to remove them. On the sides, you have a total of eight plugs for four fan cable connections. You can hook up a total of four fans to each of these plugs meaning one controller can handle 16 fans. So there is room for expansion well beyond the 3 that come in the original set. Each set of fans has a four-pin fan header then the three-pin addressable RGB plug. Then at the bottom edge, you have all of the controller's own connections. It comes with the USB data plug preinstalled. Lian Li didn’t do this with the SL120 sets, but that is a sensitive connection so I have to wonder if they did this to prevent damage. Then the right plug is the power plug and the left hooks up to the included fan and RGB cable for when you want to link everything to your motherboards control.
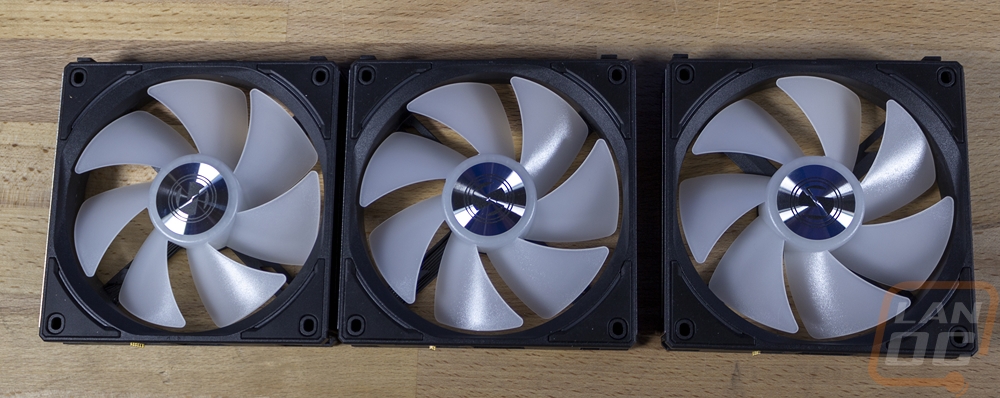
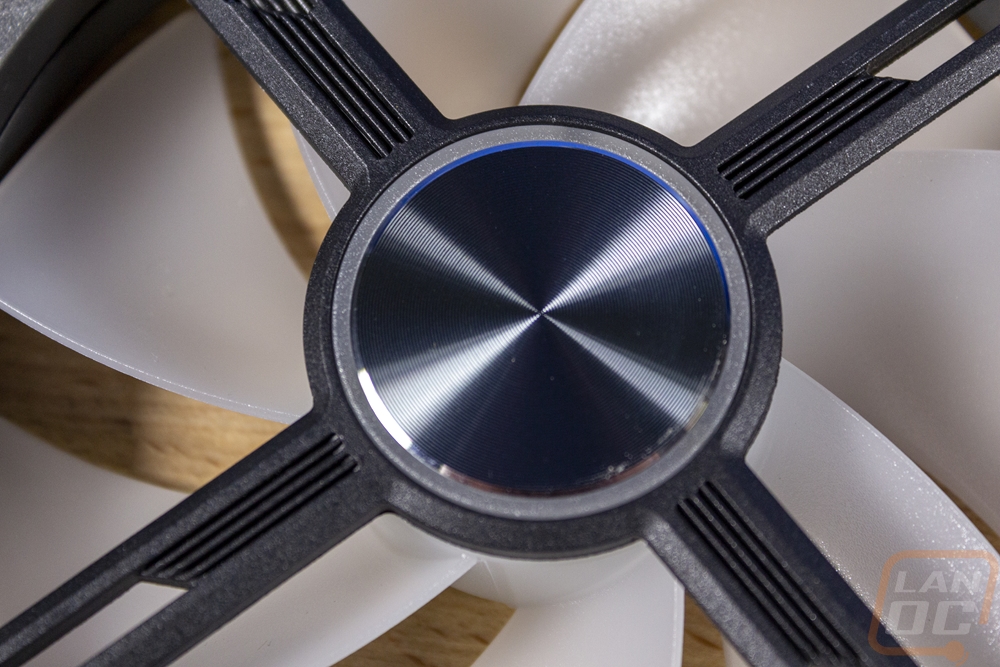
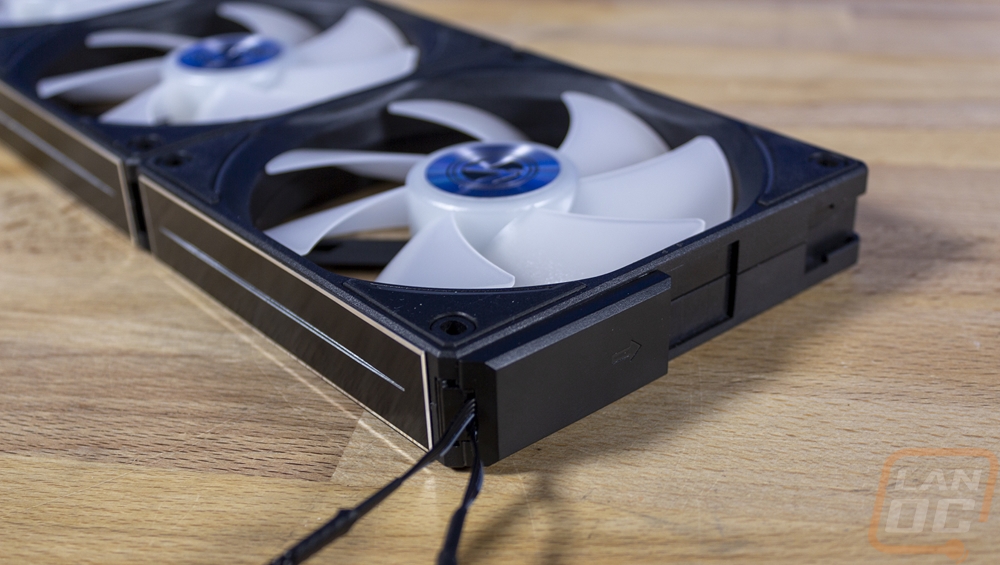
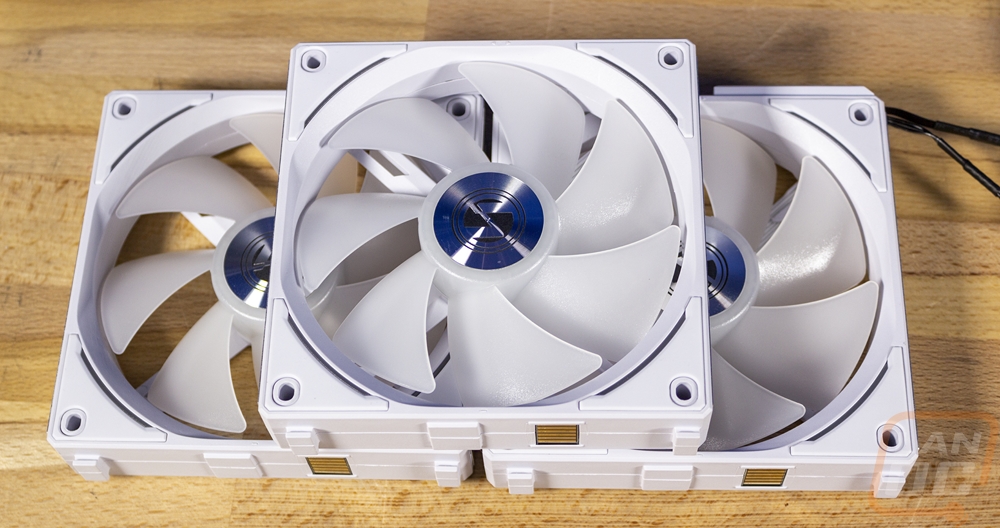
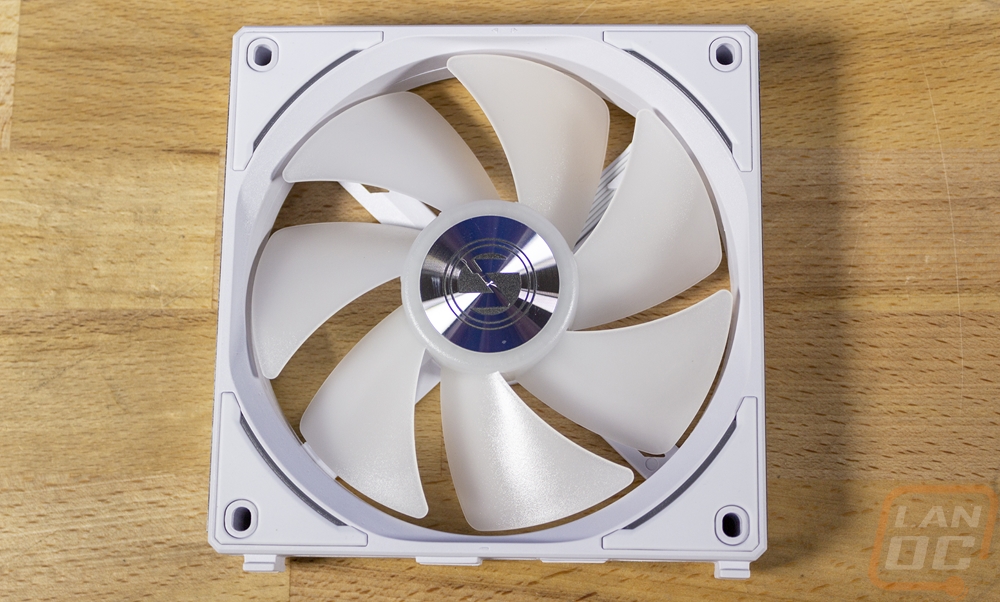
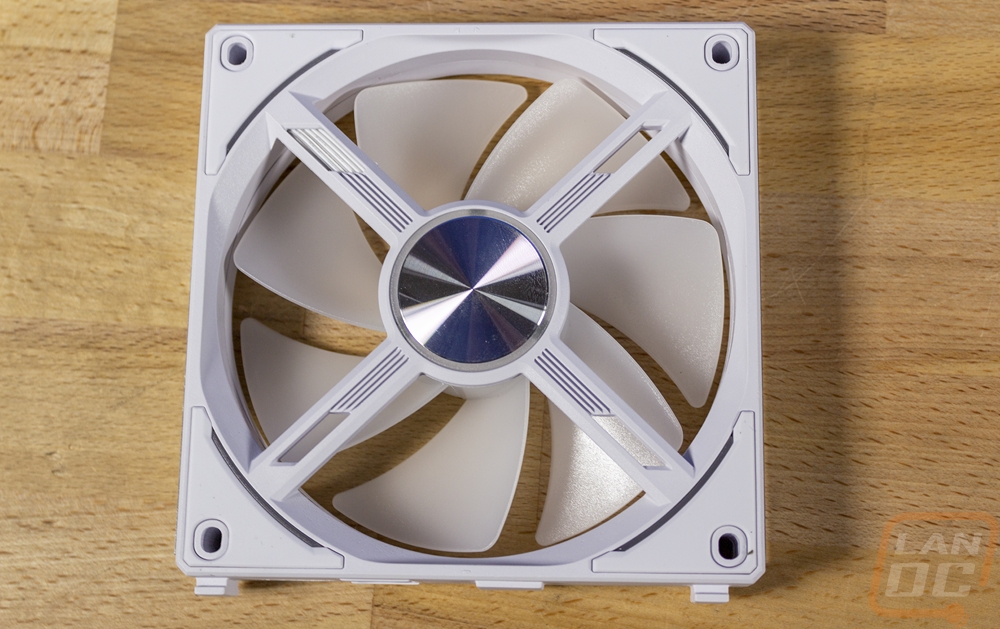
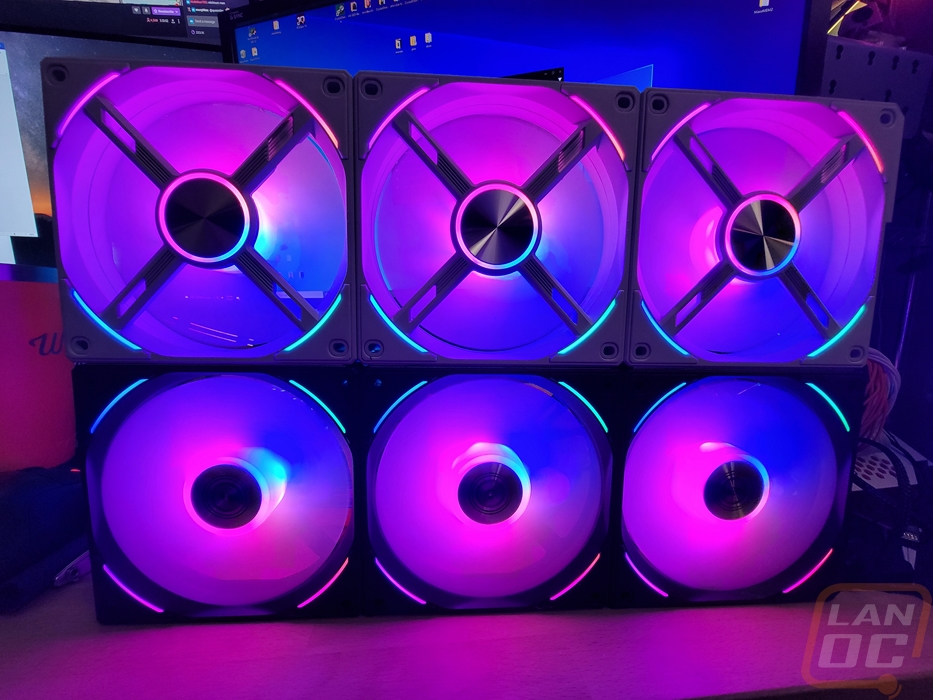
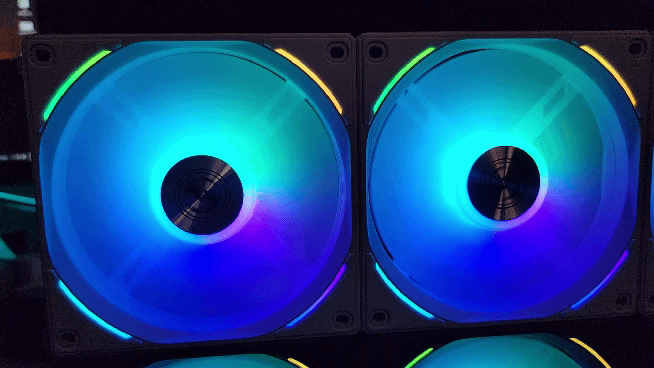
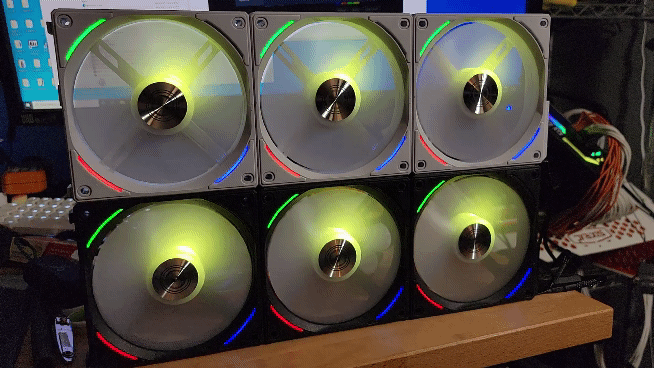
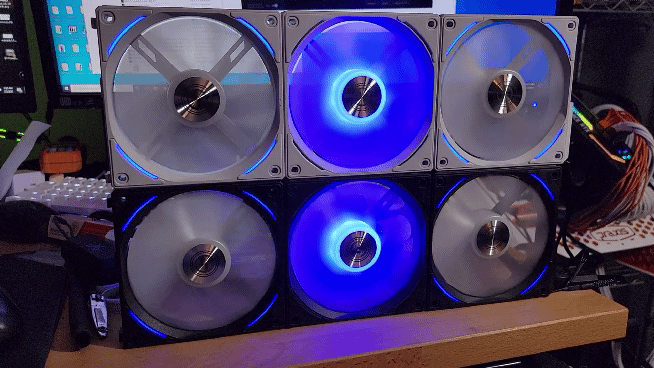
So there were a few big changes coming from the SL120’s to the AL120’s here. The first is in the fan blade itself. These have a slightly wider blade which is how they were able to improve the static pressure from 2.54 mmH2O up to 2.62 mmH2O. They also improved airflow from 58.54 CFM on the SL120’s to 64.5 CFM which is a big step up. The overall size of the fans is a little smaller now as well, fitting into the 120mm dimensions where the original fans were just slightly wider which also made the fan blade inside look small when it wasn’t. Then the other big changes are aesthetic-focused. The SL120’s has a U-shaped RGB bar design at the top and bottom on both sides. The AL120’s have dropped that and have lighting in two areas. Each of the corners just below the rubber pads have a small accent. Then the fan blades themselves are now translucent and they have the entire blade lit up. For the centers, they have real metal caps with a machined face and the Lian Li logo etched into them which look great.
On the back, Lian Li has dropped any additional branding by putting a machined cap on the center as well. This means they don’t even have a sticker showing all of the fan specs visible and it gives the back a clean look. That center cap has its own RGB lighting ring around it as well as the back having the same accents on each corner just like the front. Then the fan motor has an X-shaped mounting which is a little different than the SL120’s which had a twitch to them and they have the lighting cable hidden in one of the arms to keep things clean.

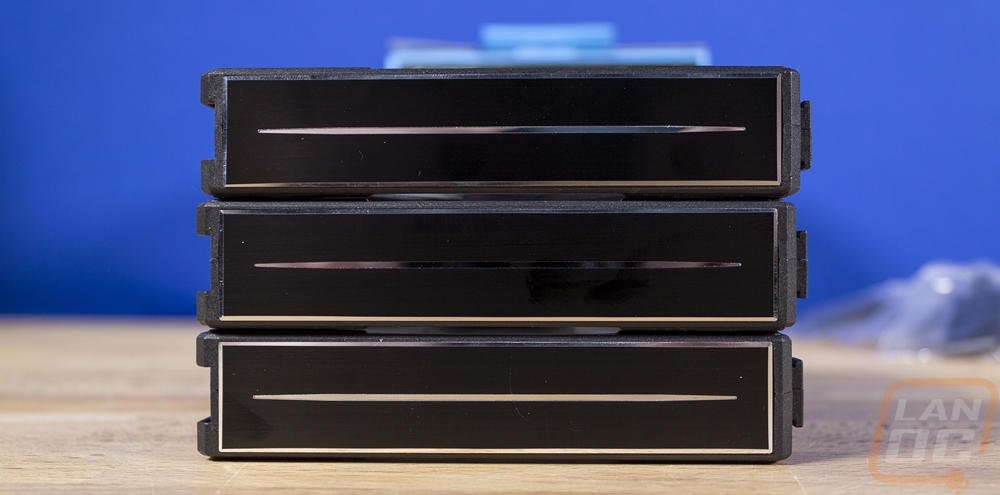
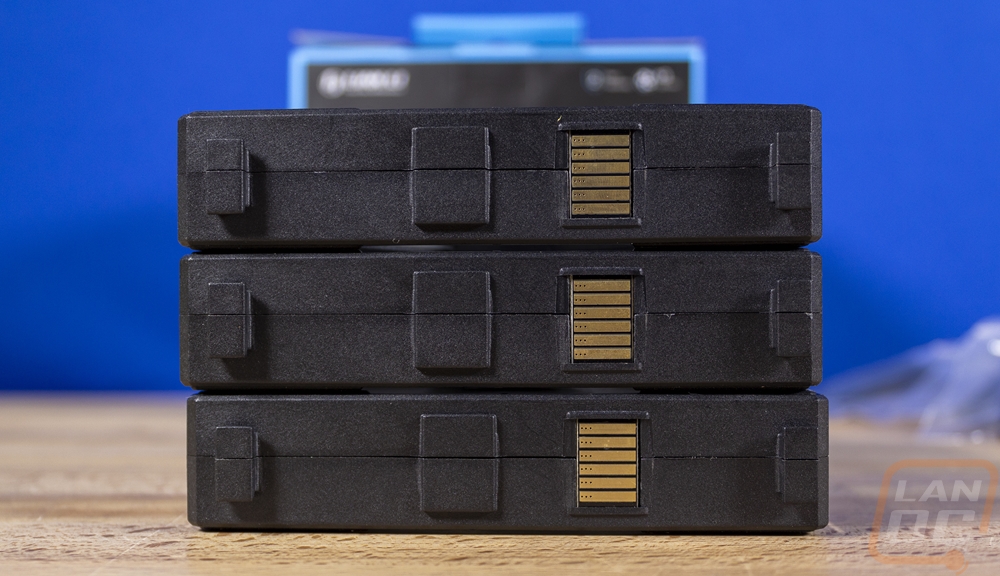
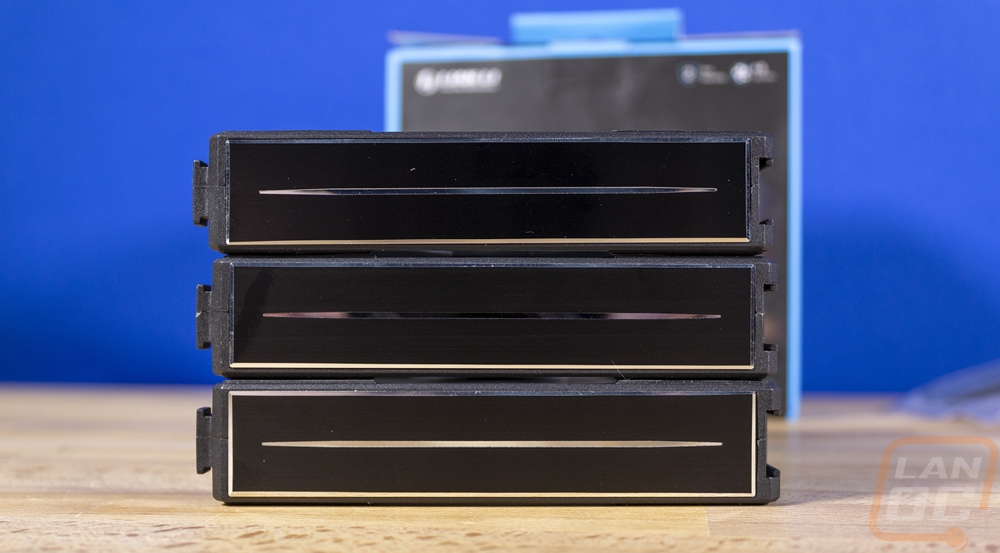
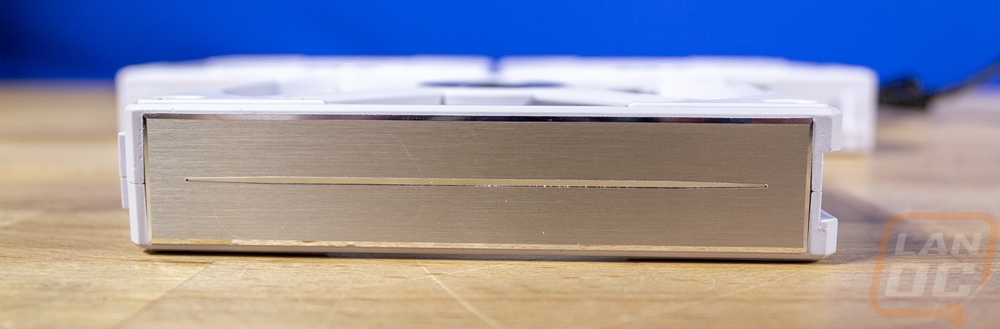
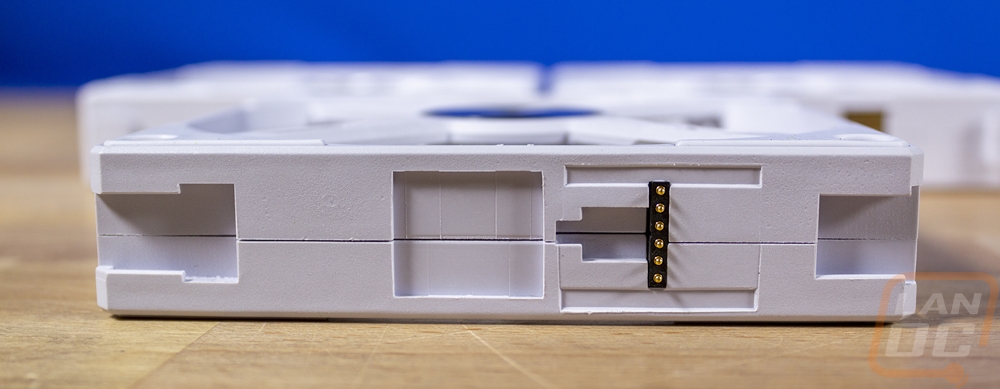
It’s what does on the edges of the AL120’s that make them so unique though. Two of the sides have a metal plate which on the black fans has a black finish and a machined line down the center. The SL120’s had an aluminum trim as well that was a little different from this. I liked the SL120’s design better honestly, but the thickness of that metal accent is also part of why those fans didn’t fit the “normal” 120mm fan size and could cause fitment issues. The other two sides are where everything connects together. One side has a set of six pins sticking up and the other has a contact section with 6 pads to match up together. That’s how the fan and RGB connection is passed from fan to fan. Then to latch everything together these have the same T-shaped hooks sticking out and those slide into matching indents on the other side of the fans.
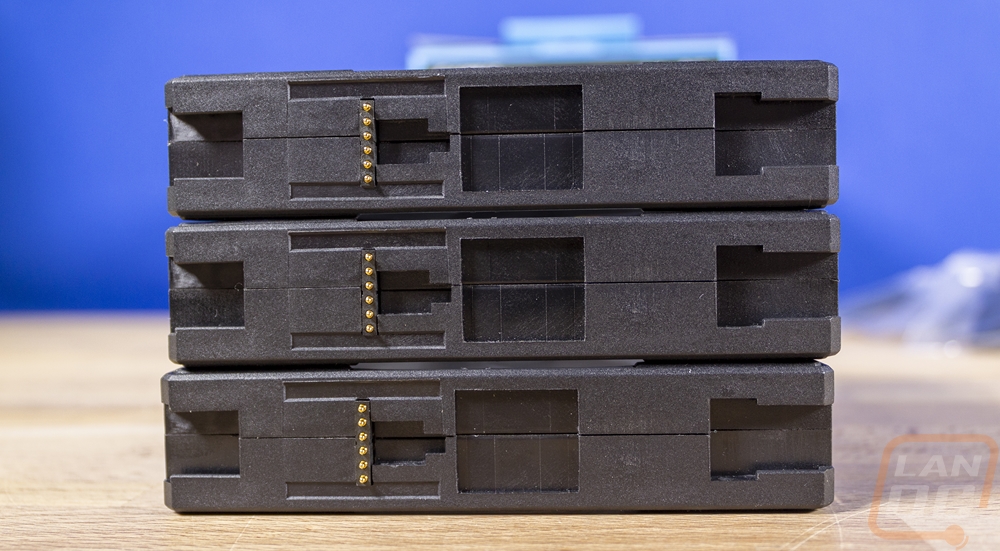
The same mounting setup used to attach the fans together also works with the included adapter cable that you hook everything up with.
While the black AL120’s do look good. The white fans look even better. This is partially because the translucent blades match the white. But also because of the silver used for the metal trim on the top and bottom edges of the fans which looks amazing. The white fans also light up a little better in my opinion with the lighting but I will get into that later. I like that Lian Li even matched the plastic on the adapter cable as well, though white sleeving would have been even better as it does stand out a LOT against the white. Especially if you use these in an all-white build.
Lighting, Software, and Performance
When it comes to fans, there are only a few aspects that you can focus on when it comes to performance. For me, noise is the biggest. I want good cooling, but my house is quiet and a noisy PC will stand out. In some households that isn’t going to be as big of a focus of course. So I did want to check out the different fan modes that the software has (that I will dive into in just a minute. You can of course run in PWM mode which passes everything through from your motherboard. The software-controlled modes however are quiet, high, and full modes. I did my testing with the meter setup 18 inches away and I had all six fans running. With everything at full speed they ran at 1900 RPM and they were up to 50.8 decibels. The high-speed mode was a lot better, only turning things down slightly to 1570 RPM but it dropped down to 45.4 decibels. Then the quiet mode was great, running at 800 RPM all six fans only registered at 33.1 decibels.
|
|
Decibels |
RPM |
|
Quiet mode |
33.1 db |
800 RPM |
|
High speed |
45.4 db |
1570 rpm |
|
Full speed |
50.8 db |
1900 rpm |
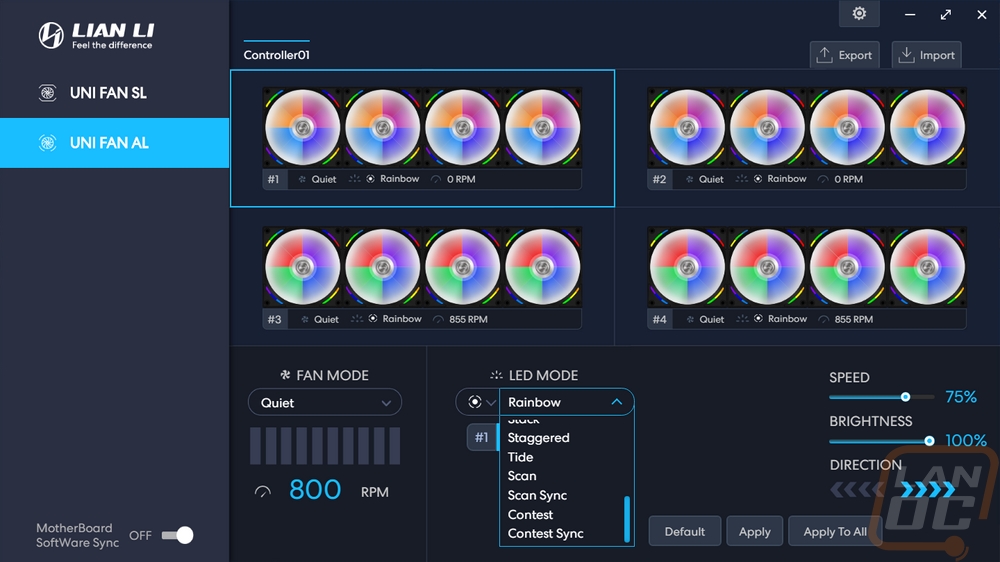
When it comes to RGB fans, the software can make or break the overall experience. If it isn’t easy to control things or if you don’t have a lot of lighting effects available it doesn’t matter how good the fans are. Lian Li uses what they call L-Connect for the software to control their fans and this is the same program that they used with their SL fans as well only it has seen a few updates between that launch and now. When you first open up the software you have a page with four sets of four fans showing. These are all of the fans that the controller can support. Then up top, you can have more than one controller listed if you are running more than 16 fans or if you are running a mix of the fan types. That last one is important to keep in mind, even though this controller can be used with either type of fan, from what I can tell you can’t mix them on the same controller because you select the fan type on the left. Another area that I mentioned previously and that is still an issue, in my opinion, is that they don’t have you do a setup and enter the number of fans that you have hooked up. The software assumes you have all four used and four fans on each so you will need to tell it the number of fans using the 1-4 option down below for each set. This also resets when you switch to lighting effects that you haven’t used before as well. A one-time setup could simplify this and it could also drop all of the extra fans off the screen if you aren’t using them.
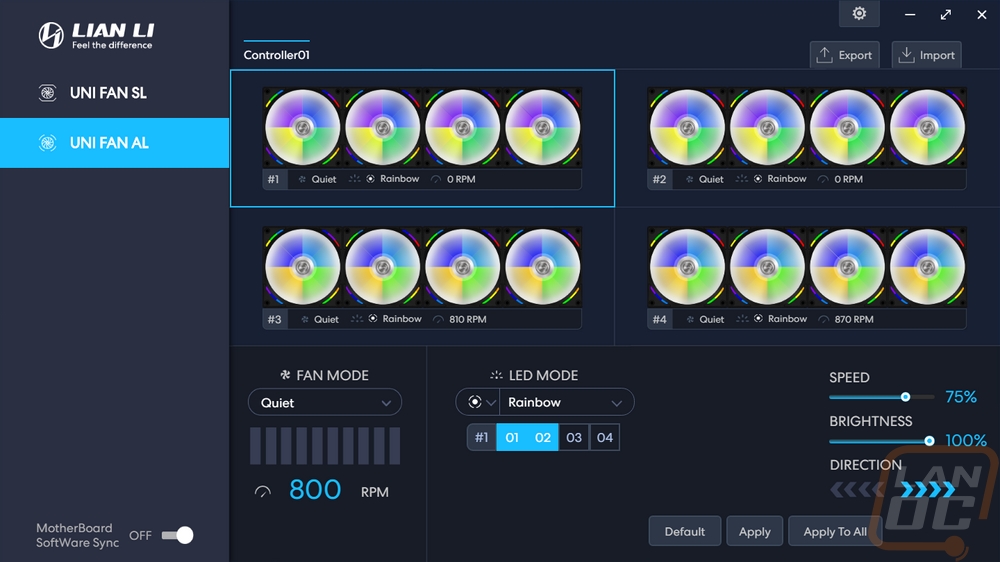
So down in the bottom left corner is where you set your fan speed modes. You have PWM which is the motherboard passthrough mode. Then you have quiet, high speed, and full speed which are all controlled here by the software to one speed. Then the last is manual and that lets you get a little more control. You can also see the RPM of each “set” of fans up under their picture which also shows what mode they are set to and what lighting effect as well.
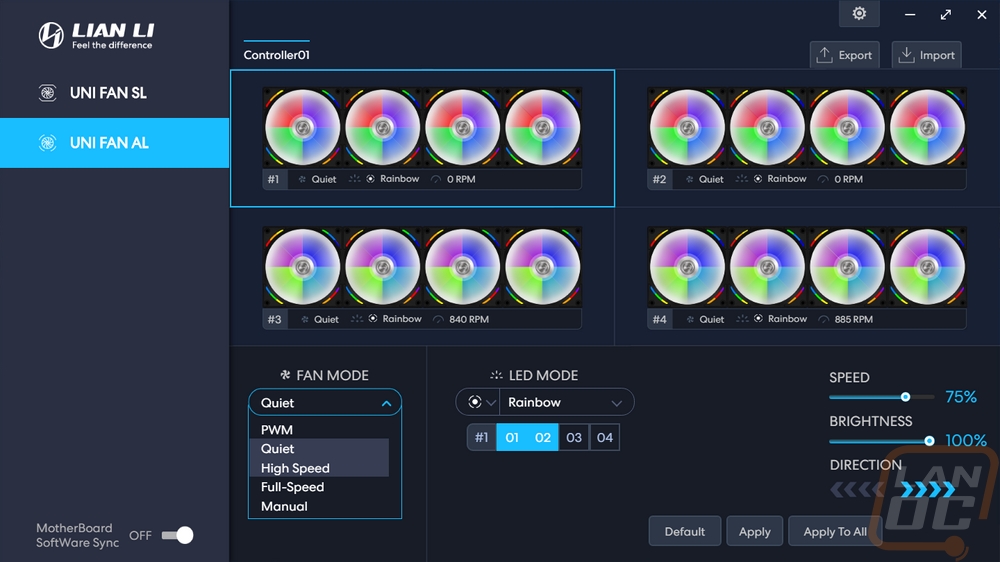
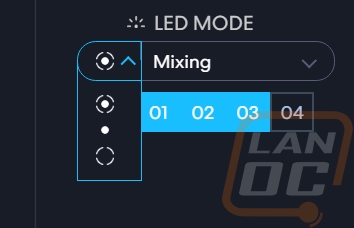
So on the lighting modes, on the left, there is a small dropdown. This is how you set which of the LEDs you are controlling on the AL series fans. There are three options the top is all of the lights, the middle dot means just the fan blade lights, then the Xbox looking icon means just the outside fan housing lights. You will need to select this before picking the effects. You also set the fan number count as I already mentioned, you can see for ours we have sets of 3.
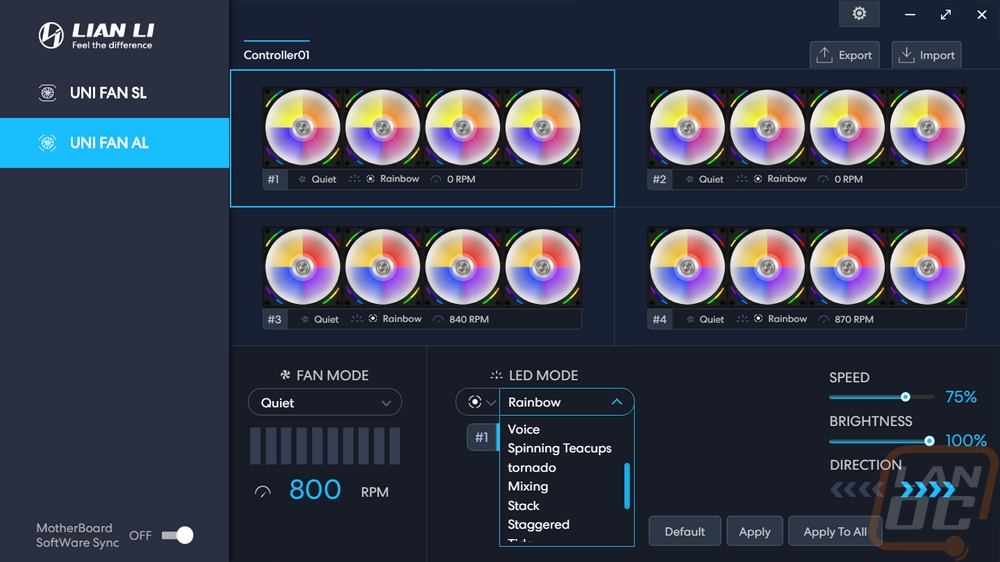
For the lighting effects, Lian Li has added a few new options like the spinning teacups and warning while keeping most of the effects we saw on the SL series fans. But there are a few that did go away like firework and meteor. Meteor can still be found when you control just the outer lights however
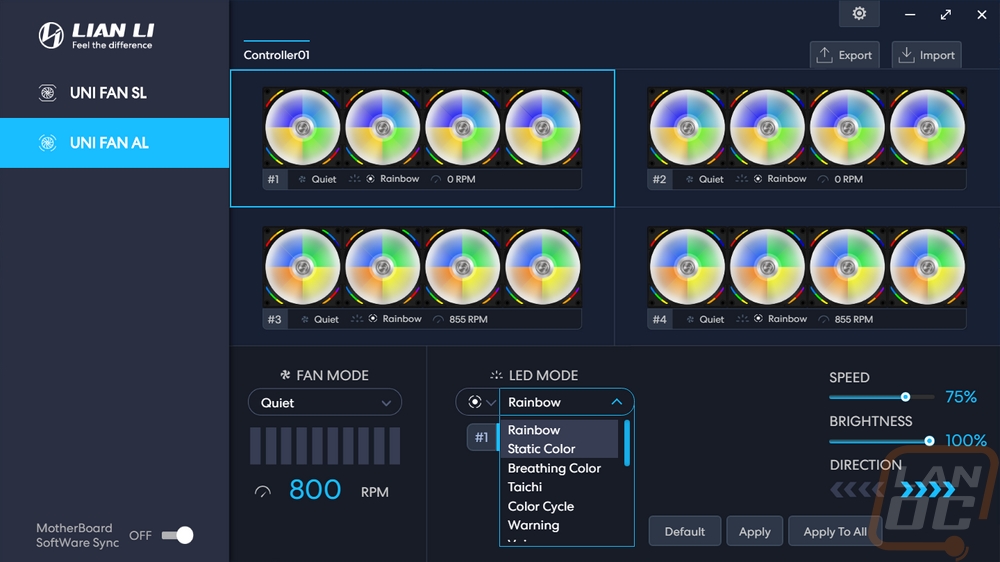
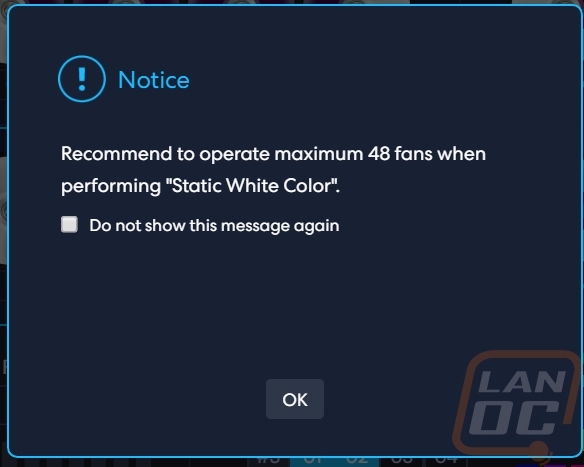
I thought it was interesting that you get a warning when you set the lighting to a static color that the number of fans that you can control drops down to 48 from 64 when running static white. White does use the most power because it lights up all three RGB LEDs and a static setup will also have all of the lights on where effects often have at least a small portion of their lights off at times. I assume this also means that even if you are only running one controller you are limited to 12 fans if running static white as well (64 fans on 4 controllers = 16 per controller vs 48 fans on 4 controllers) but the message doesn’t indicate that.
The settings page doesn’t have many options. I’m surprised the software doesn’t check for updates. But the only thing you have in the settings is to set the software to turn on when your PC boots up.
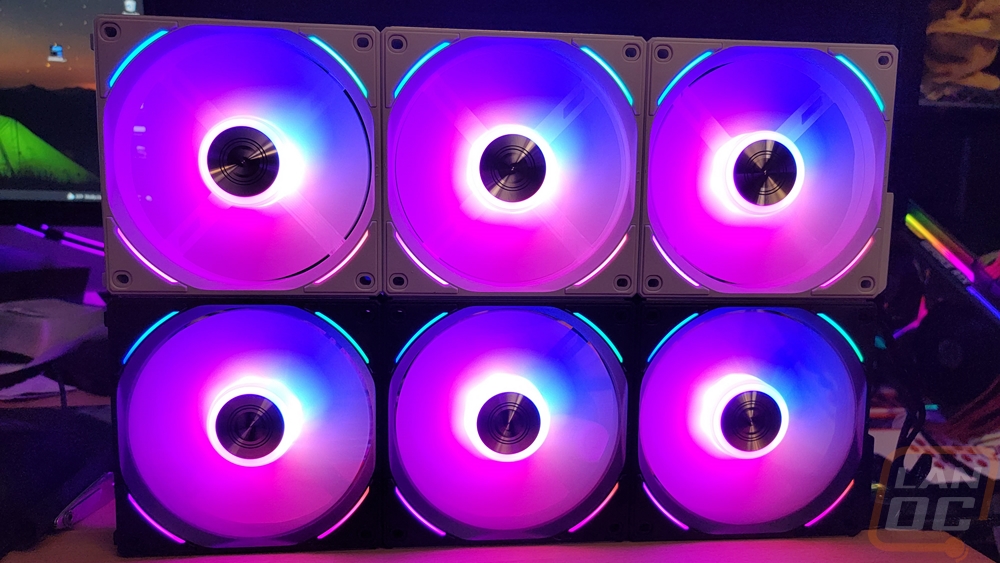
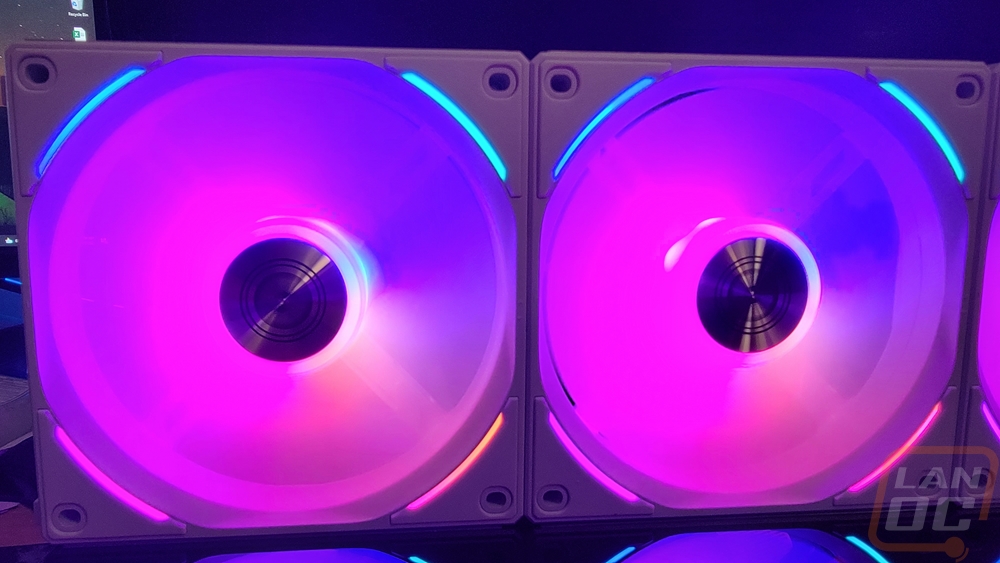
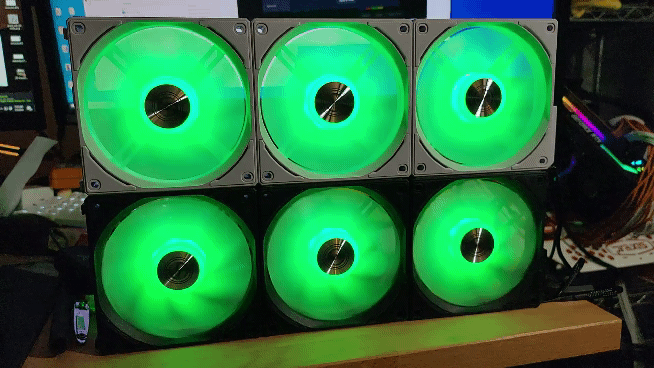
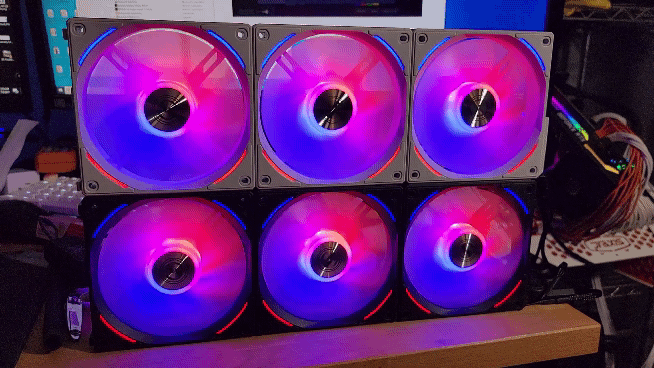
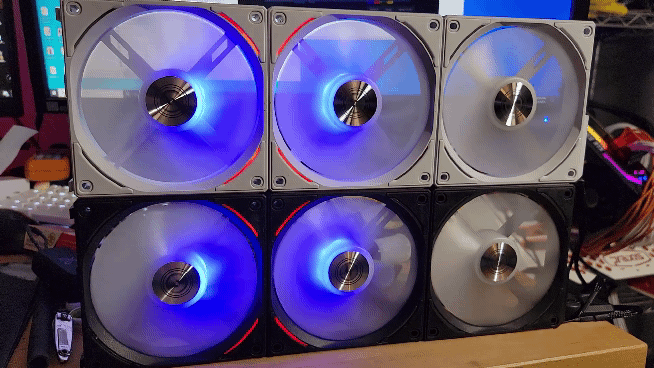
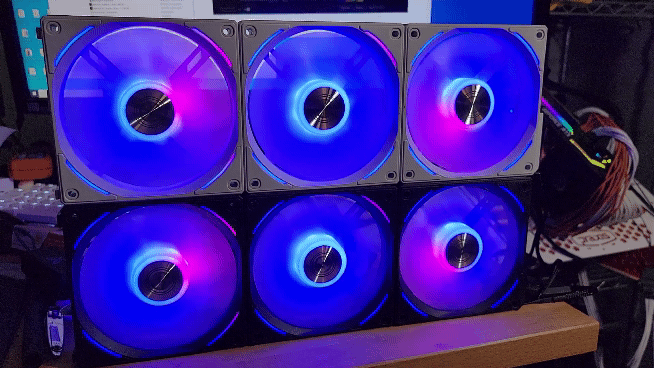
Now that we know how the software works and how you set the lighting modes I did want to check out how the lighting performs. The lighting for the fan blades all comes from the center of the fan, there isn’t an outer ring of lighting like some RGB fans will use but the LEDs do a good job of covering the entire fan. In fact, I would say that the lighting is bright. The white AL120’s are a little brighter in my opinion just due to how the white reflects the lighting but both the white and black versions look amazing as you can see in my picture below.
Even from the back things look good. Especially with the machined center caps and the extra diffuser ring on the back around the center.
The outer lighting almost blends in with the fan blade lighting when you have them running the same effects. But playing around with things, the outer lighting can bring in a new effect.
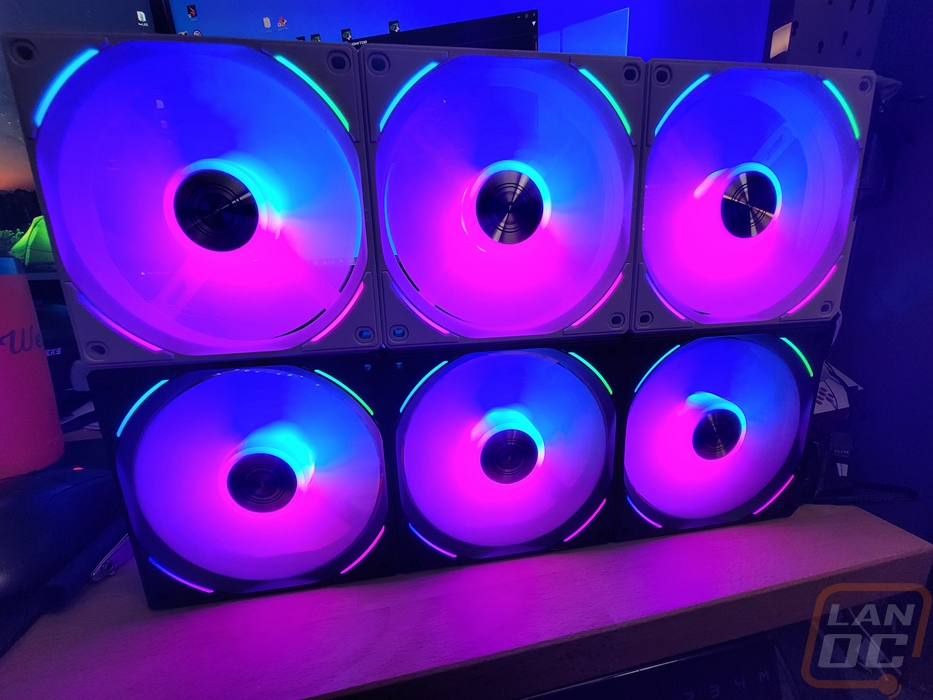
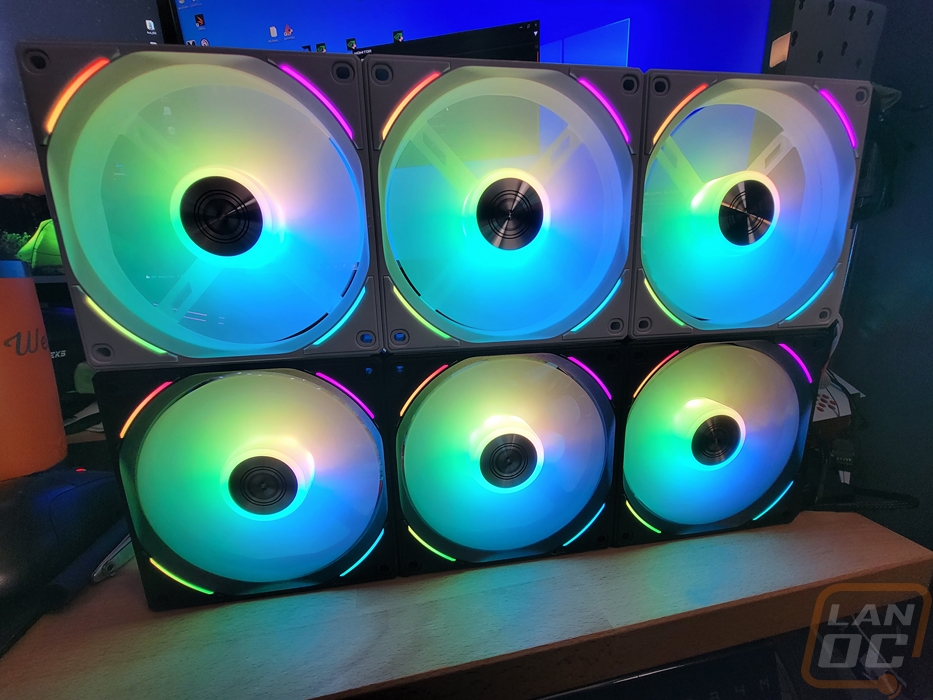
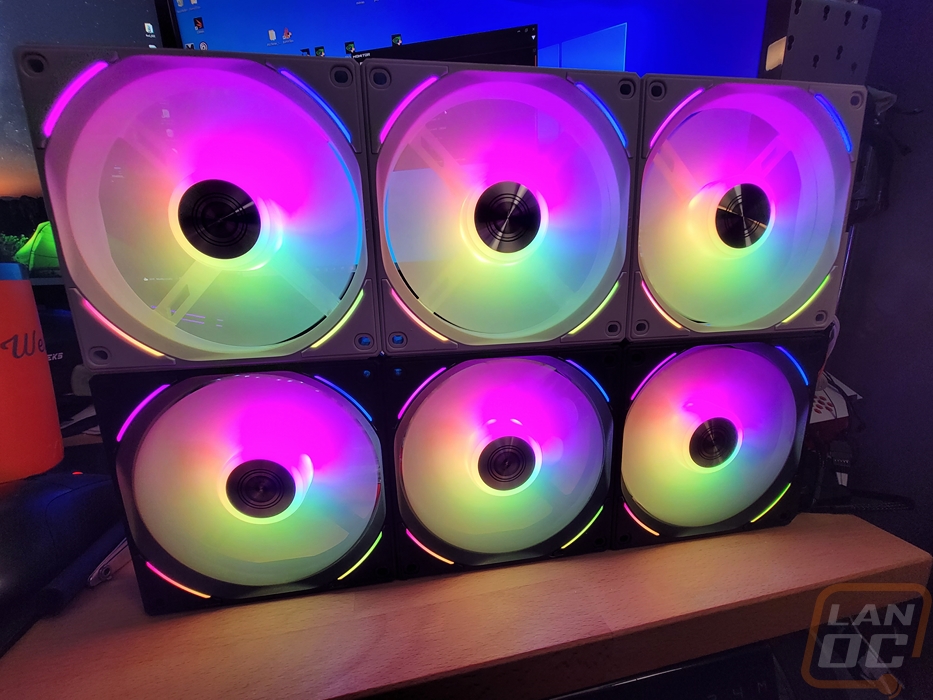
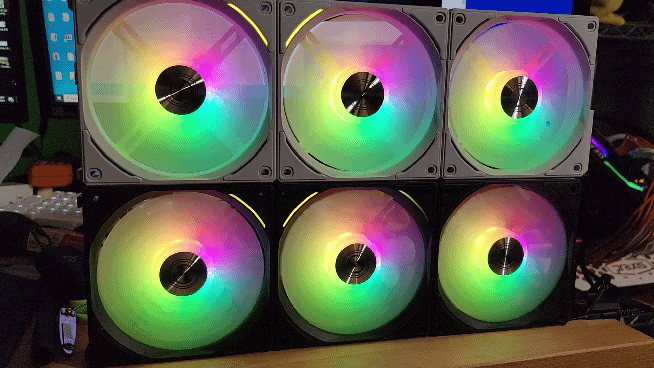
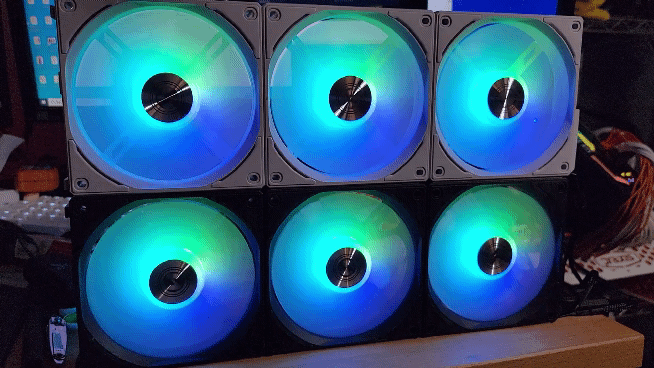
A made a few gifs as well so everyone could get a better look at some of the lighting effects. Some of these were with me playing with just the outer lighting effect and some were when I was changing the whole fans' lighting effects together. This first one is the most basic effect that every RGB device has, rainbow.
This has the center lighting still set to rainbow but the outer lights are set to spring mode which runs across the top then across the bottom. You pick four colors and it will switch between those colors.
This is similar to the previous setup. The blades are still set to rainbow and the outer lighting is set to tail chasing which runs across the top then bottom like spring mode but this time you have more than one set of lights chasing the other.
This effect is once again for the outer lights and they call it warning. You can pick from up to four colors and it will flip between them flashing. The fan blades are still set to rainbow but this effect looks good when you are running a static color in the center.
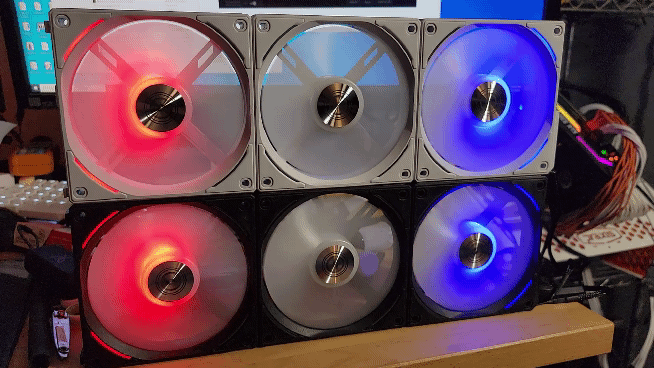
This is where I started changing the effect for the whole fan. This is tornado mode and it again flips through four colors than you pick. The inner effect and outer effect have the same spinning effect but don’t have the same colors showing for that chaotic “tornado” effect.

So this effect is the new spinning teacups effect. The lighting wraps around and turns off then does the same to turn back on with a four-color spinning effect.
This is the warning setting when running it on both the inside and outside lighting. I personally think this effect works best when it is just used on the outside lights with something calmer on the fan blades. All together like this it really gets your attention.
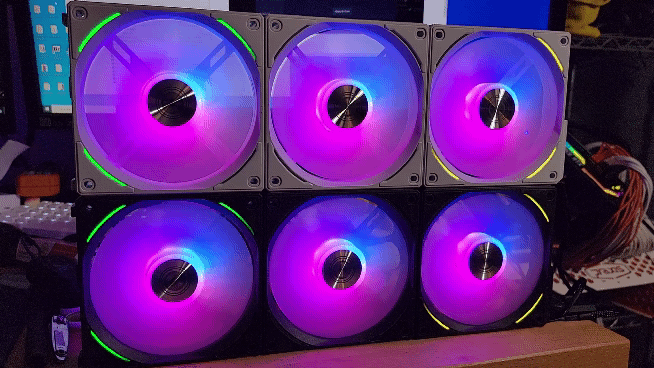
This is the taichi lighting mode which uses two colors (red and blue here) that can be customized. This spins the lighting on the inside one way and the outer lighting in the opposite direction.
This is the scan lighting mode which scans back and forth from side to side like nightrider. There are two color options and one will be the fan blade lighting and the other goes to the outside lighting. They also have a scan sync lighting which will scan across all of your fans
This is the staggered lighting mode which flips back and forth between every other fan being lit up by the blade lights or the outer lights. Flipping back and forth and changing colors between the four selectable colors while doing it.
This is the stack effect. It uses two colors starting with one solid color for all of the fans. You see one set of LEDs light up with your second color and it runs through the fans and then they stack together until all of your LEDs have switched to the second color.
This is what they call the mixing effect. You pick two colors and the lighting on the outside edges will start as those colors. Then as the lighting pushes to the center they mix together and then it spreads to the outside.
The only issue with the lighting that I ran into with my testing was with how the software handles adjustments. All of the effects have speed and brightness settings and some can also change the effect direction. Then you can also pick from colors. I found that the 0% to 100% speed setting even when set to 0% is still very fast for most effects. I would love it if going down to near 0% slowed them to a craw. Some of these effects would work even better when not at speeds that could give someone epilepsy.
Overall
So when compared to the previous SL series of fans, the AL120’s are a little closer to being a traditional fan. They are now back down to normal fan sizes which means they are less likely to have fitment issues and with that, the fan blades don’t look undersized. Lian Li upgraded the fan performance with more CFM and static pressure which is good because this design complements a nice water cooling setup. Lian Li also leaves options depending on how you want to control everything. You can use their software or you can link everything into your motherboard and use its software to handle everything. All of the Uni Fans have a very unique feature which allows you to latch them together. This passes all of the wiring through fan to fan and cuts WAY down on the number of cables needed for everything. If you have ever used any other RGB fan design where each fan has two sets of cables all going it can add up quickly and with these, you can cut that down to just one pair of cables for up to four fans.
The new slimmer fan design for the uni Fan AL120’s does lose a little bit of the high-end effect that the SL120’s had with their thick aluminum sides. But the new fans do still integrate machined aluminum sides and they now have cleaned things up even more by dropping the sticker you would normally find on the back of the fan for a machined panel. The back of the fans doesn’t look like the back of the fans anymore which is great. They have both white and black color options to go with any build type and overall the lighting looks amazing with the entire fan blade being lit up then smaller accents on the outside edge on both the front and back of the fan.
I do wish that the white fans which have a nice matching white adapter also had white cables. It’s a small detail, but I know the black-sleeved cables will stand out like a sore thumb in an all-white build. My other complaints about the fans were all on the software side of things and still mostly trivial. Lighting effects can’t be slowed down anywhere close to as slow as I would like to slow them too. Even when setting them to 0% speed they run extremely fast. Then there are a few other small details in the software like having to tell it how many fans you have each time you set up an effect that could be improved.
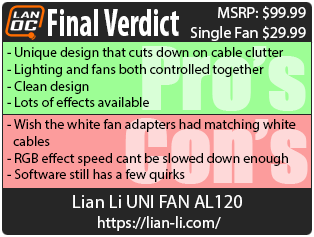
Overall I think the Uni Fan AL120’s will do a great job complementing the SL120’s in Lian Li’s lineup. These offer a different lighting effect giving people options while still allowing them to cut down on their wiring with the unique latching fan design. Lian Li has raised the pricing slightly, the original SL120’s were available for $79.99 with an extra discount at launch and $24.99 per extra fan where these are now $99.99 and $29.99. But given the popularity of the original launch and that these now light up the fan blade itself I don’t think the cost is too high. Well at least not compared to the competition. Corsairs options for example have an MSRP of $129.99 for a similar 3 pack.

Live Pricing: HERE


