Let’s be honest, for the most part, innovation in the AIO cooler market these days consists more of adding more RGB lighting than anything on the performance side of things. But Cooler Master did recently pair up with Intel and change that up. They introduced the MasterLiquid ML360 Sub-Zero. They added a TEC cooler into the loop to push AIO cooling into the sub-ambient cooling range. If you haven’t heard of a TEC cooler, I wouldn’t blame you. TEC is a shortened version of Thermoelectric Unit and they can also be known as a Peltier cooler. In short, they use electricity to cool and while they are effective they aren’t particularly power efficient which is why fridges and air conditioners use refrigerant-based cooling options. But they have been used for cooling computers before, in fact, Cooler Master themselves have used them with their V10 design that I took a look at 11 years ago. So today I’m going to check out the ML360 Sub-Zero and see how they have incorporated the TEC cooler in with an AIO and step away from our normal cooler testing which is normally on a range of Ryzen CPUs to test this on the Intel 10900K as this is an Intel exclusive cooler.
Product Name: Cooler Master MasterLiquid ML360 Sub-Zero
Review Sample Provided by: Cooler Master
Written by: Wes Compton
Amazon Affiliate Link: HERE
|
Specifications |
|
|
Product Number |
MLZ-D36M-A19PK-12 |
|
Exterior Color |
Black |
|
CPU Socket |
LGA1200 |
|
Waterblock Dimensions |
89 x 79 x 86.7 mm / 3.5 x 3.1 x 3.4 inch |
|
Radiator Material |
Aluminum |
|
Radiator Dimensions |
394 x 119.6 x 27.2 mm / 15.5 x 4.7 x 1.1 inch |
|
Pump Dimensions |
57.3 x 57.3 x 92.2 mm / 2.3 x 2.3 x 3.6 inch |
|
Pump MTTF |
198,000 Hours |
|
Pump Noise Level |
< 35 dBA |
|
Power Connector |
4-Pin |
|
Pump Rated Voltage |
12 VDC |
|
Pump Rated Current |
1.0 A |
|
Pump Power Consumption |
13.8W (Max) |
|
Fan Dimensions (l x w x h) |
120 x 120 x 25 mm / 4.7 x 4.7 x 1 inch |
|
Fan Quantity |
3 PCS |
|
Fan LED Type |
Non-LED |
|
Fan Speed |
650-1900 RPM ± 10% |
|
Fan Airflow |
59 CFM (Max) |
|
Fan Noise Level |
8 - 26 dBA |
|
Fan Pressure |
2.0 mmH₂O (Max) |
|
Fan Life Expectancy |
160,000 Hours |
|
Fan Power Connector |
4-Pin (PWM) |
|
Fan Rated Voltage |
12VDC |
|
Total Power Consumption |
200 W |
|
Ram Clearance |
N/A |
|
Warranty |
5 Years |
Photos and Features
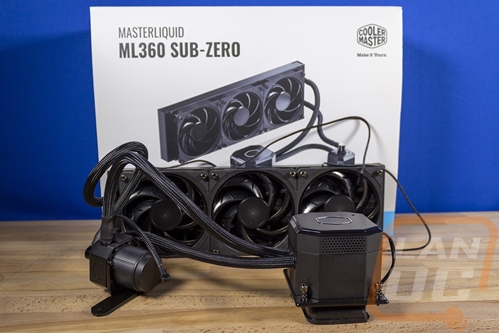
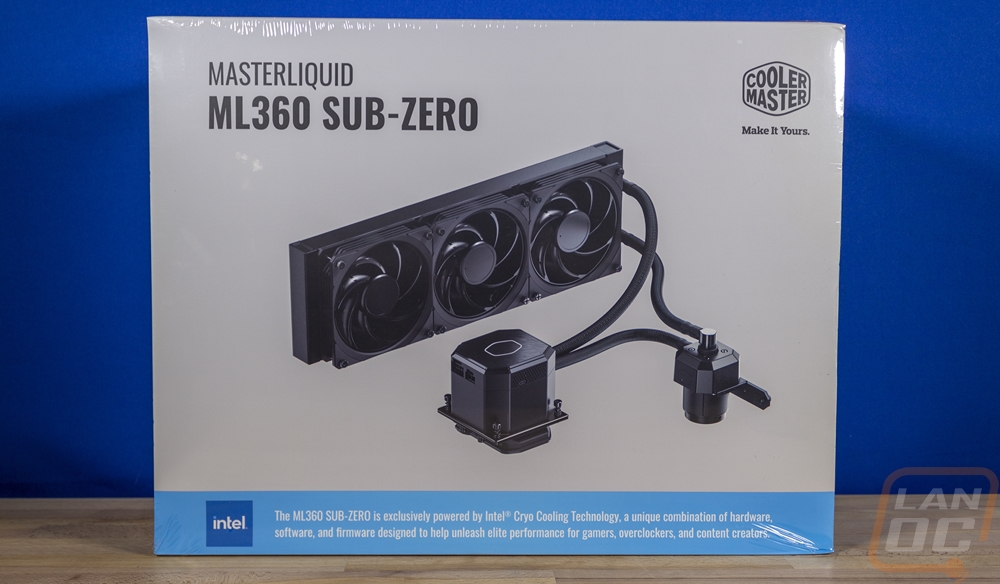
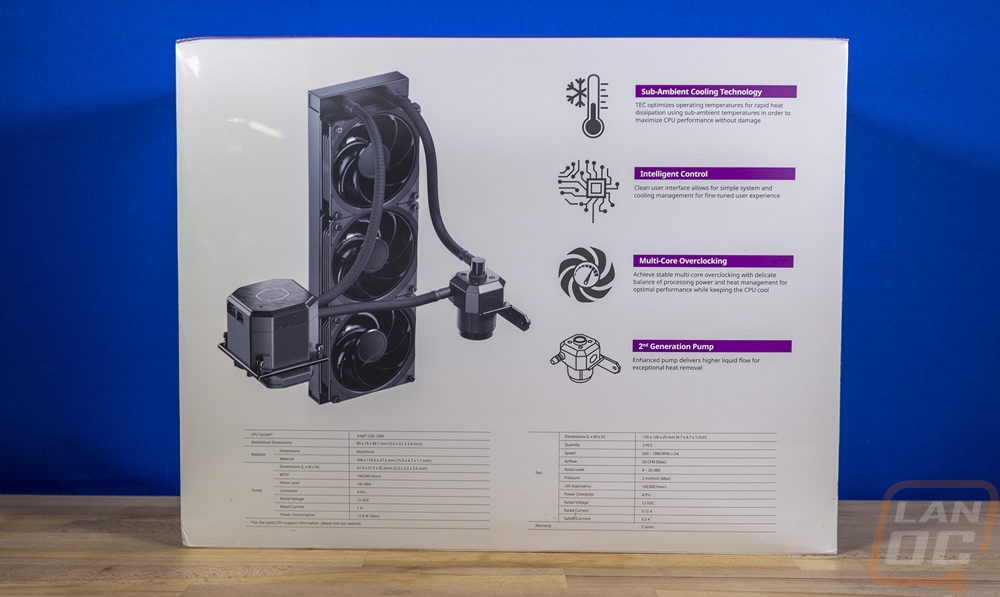
The Masterliquid ML360 Sub-Zero isn’t your standard run-of-the-mill water cooling kit and that shows right from the start with the packaging that Cooler Master went with. The ML360 Sub-Zero’s box is much larger than your standard 360 AIO cooler would come in for one. The front of the box has a white background and then blue on the bottom section. I was expecting some purple to be used but it looks like they switched what would normally be purple to the blue to show that this is an Intel exclusive design. I like that the front also has a picture of the entire cooler, it's always good to be able to see what you are getting. Around on the back is another picture and this time they have a few of the key features highlighted with descriptions. There is also a full specification listing which is nice because you can find out the dimensions to make sure this is going to fit in your system.
The white part of the packaging is a slide off cover and under it is a blacked out box with the Cooler Master logo on top as well as the Intel logo. This opened up and they have a layer of foam covering everything, then inside the cooler is spaced out with thick foam keeping everything protected with cutouts for each component. The pump and water block both come wrapped up in their own plastic as well and in the top right corner, there is a small black box with accessories and hardware. I love that the radiator comes with the fans pre-installed though this makes installation a lot easier assuming you don’t need to mount with the fans on top. If you do, then you will need to take them all off to get started.
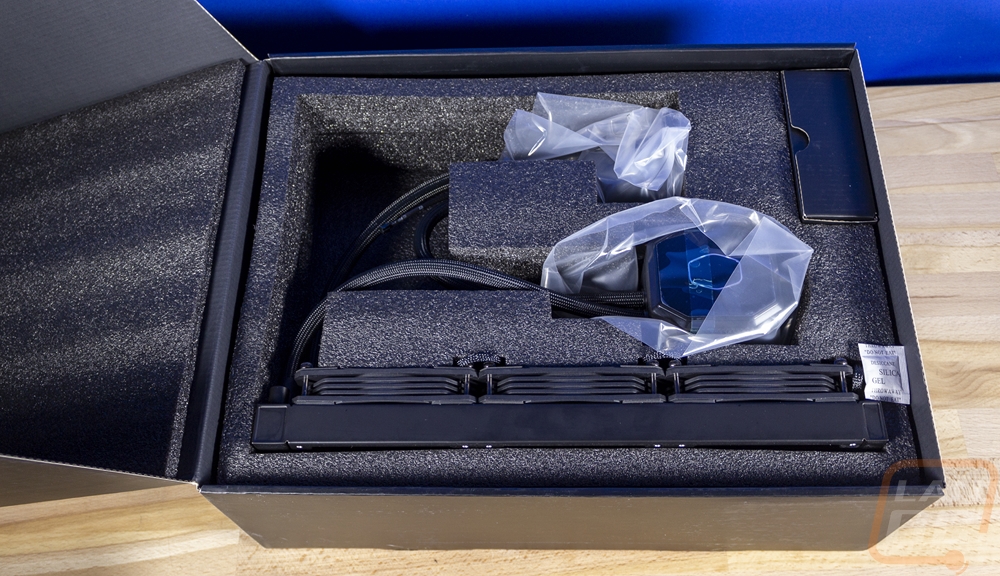
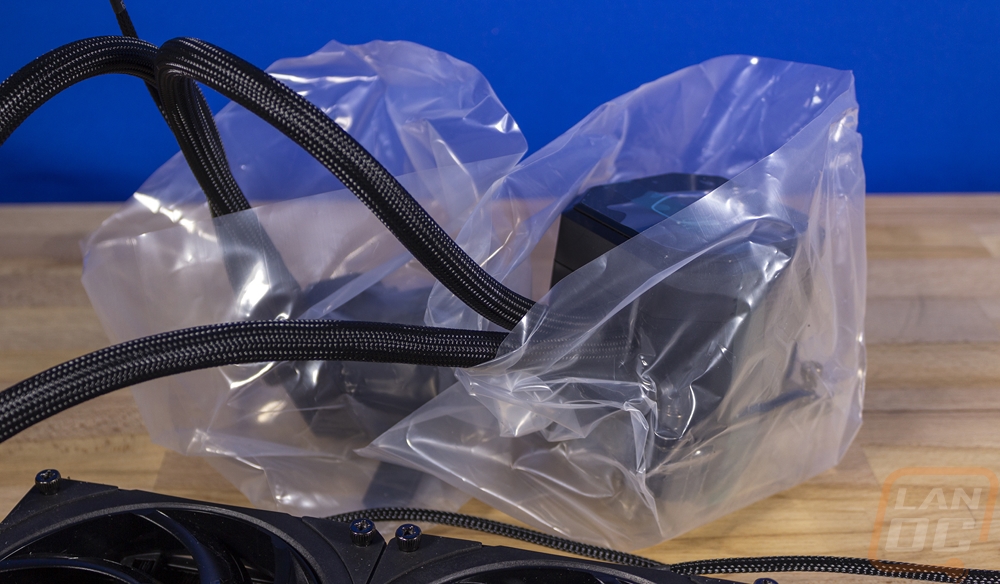
When you pull the ML360 Sub-Zero out, being an AIO cooler everything comes together, and with the detached pump which I will talk more about later, it is a lot to get under control. The holes want to get all looped up and push things around.

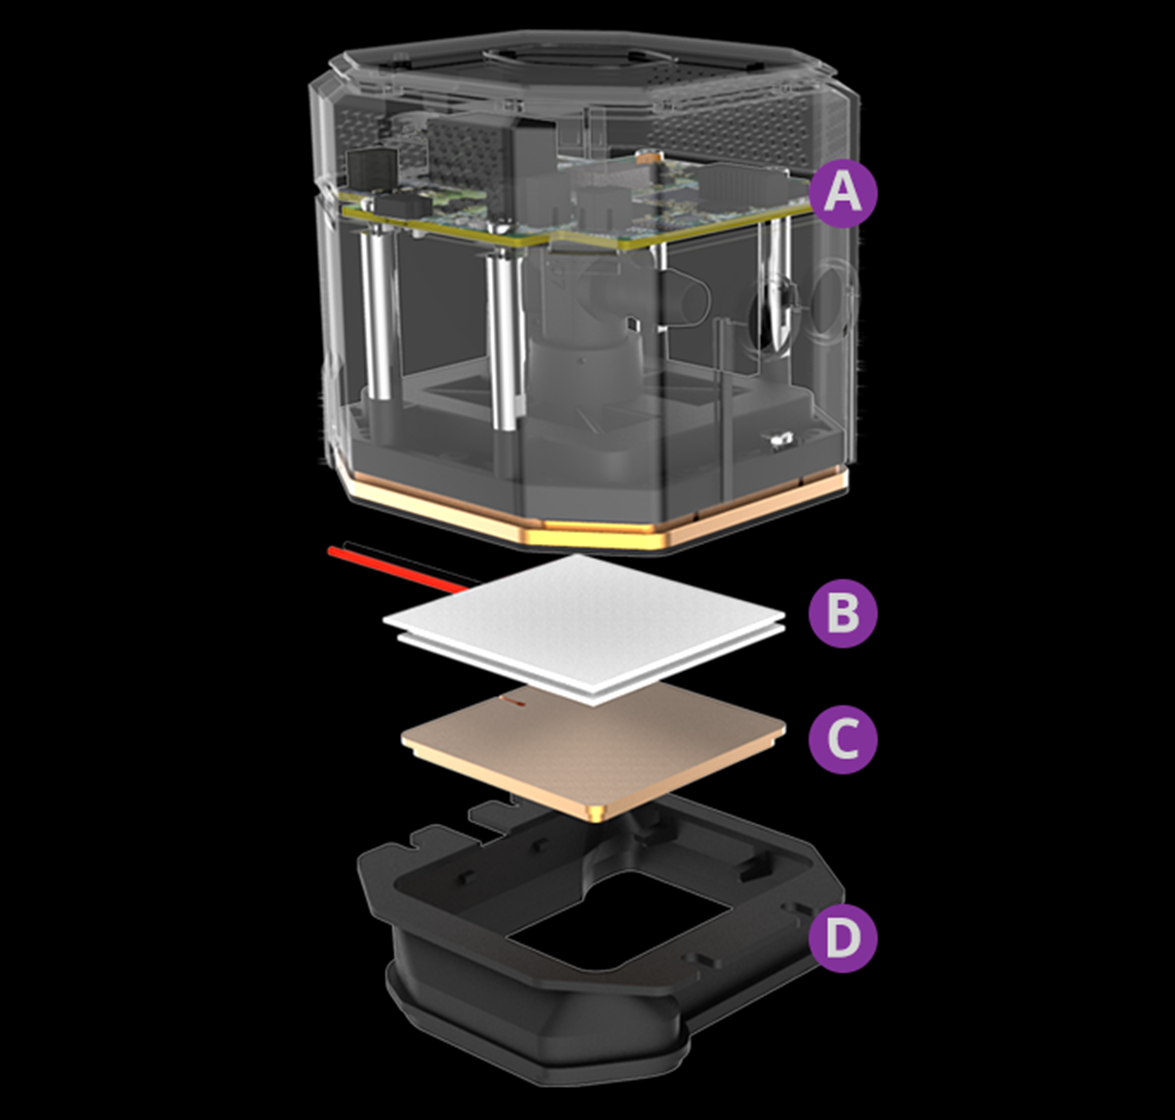
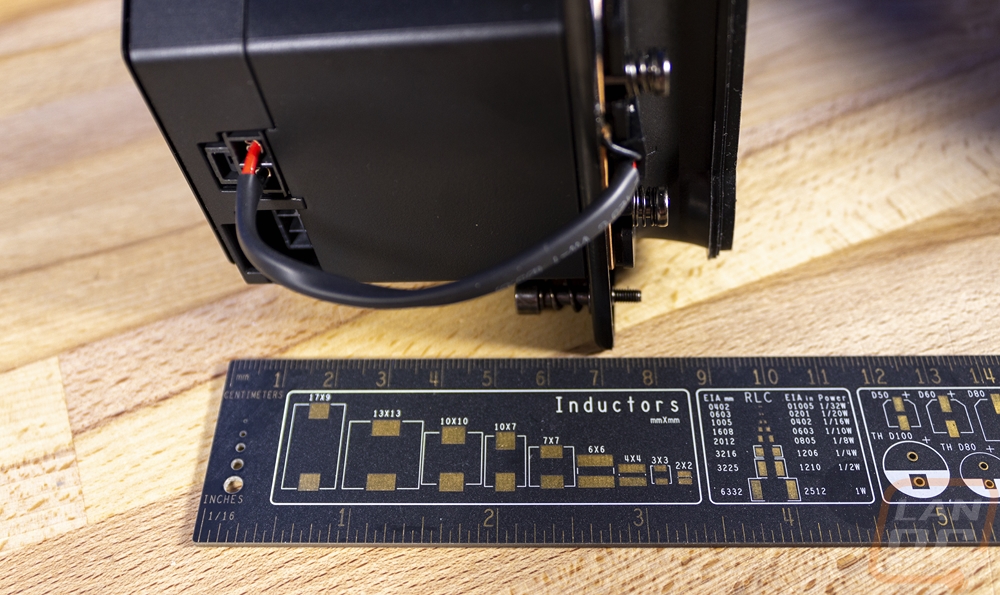
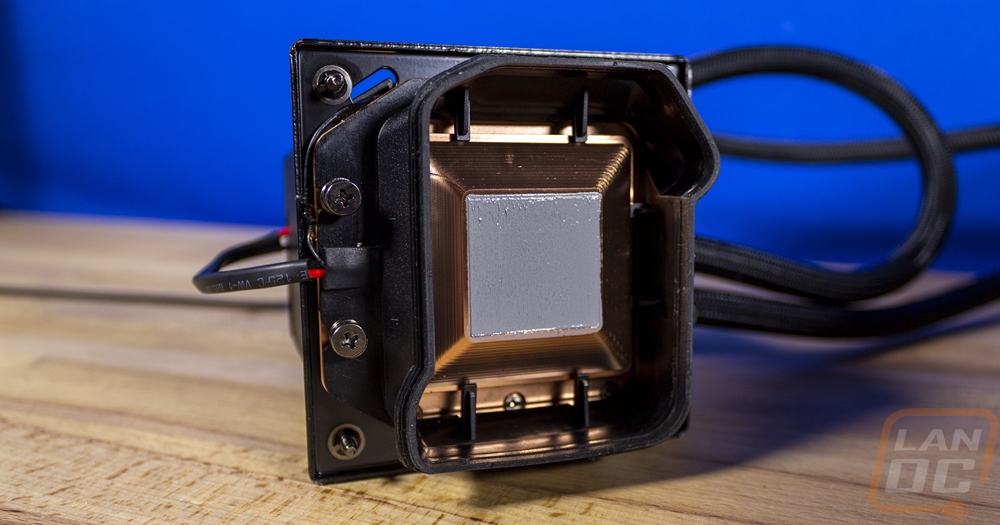
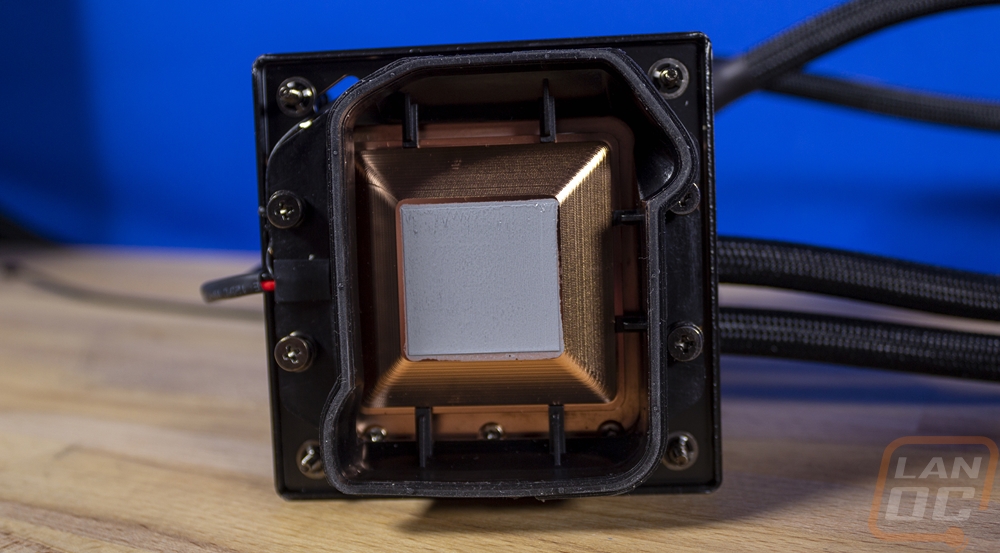
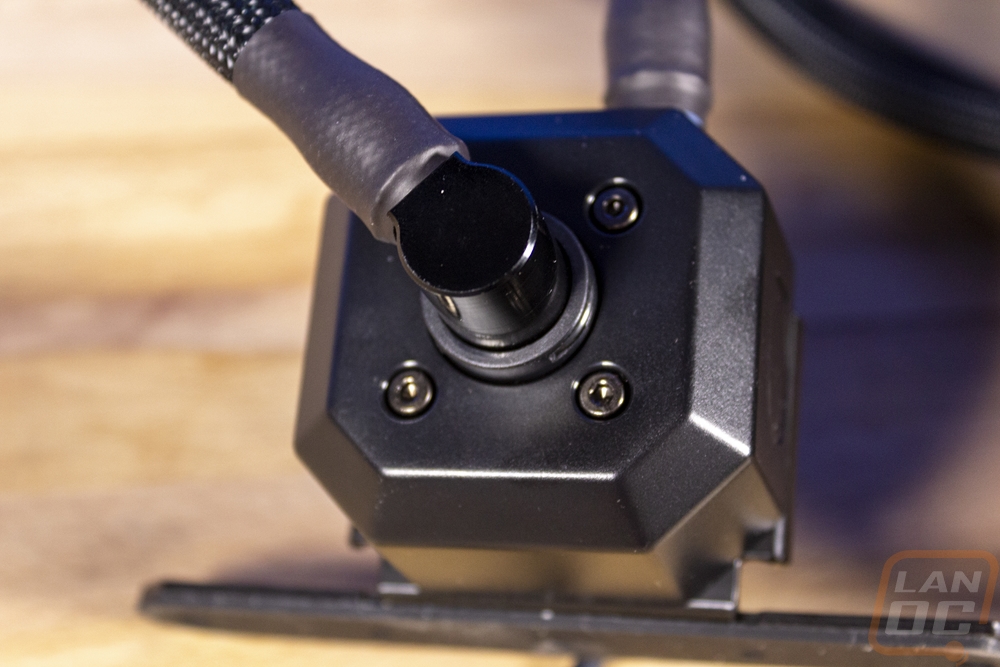
So here is where the action is and what sets the ML360 Sub-Zero apart from the normal ML360 coolers. This looks a lot like your standard pump block combo but the water cooling pump isn’t in this housing at all. The Sub=Zero part of this cooler comes from the TEC or Peltier cooler built into it. TEC stands for thermoelectric cooling which uses the Peltier effect to pull heat from one side of the cooler to another. Basically using electricity to cool one side of the cooler and heating the other. Cooler Masters design here is interesting though and to help I have included a diagram that they made showing inside of the cooler. At the bottom, the D portion is one of the most important parts of their entire setup. They have designed a seal that goes around Intels LGA socket with flexible rubber seals at the bottom to prevent moisture from getting past it. Running at sub-zero means condensation, this is avoided with overclockers with putty, protective coatings, and even petroleum jelly along with towels to keep condensation from getting on to your motherboard and frying everything. This is also at least part of the reason this entire setup is Intel exclusive, this needs to fit the socket perfectly and they have a list of motherboards that work as well. Above that, the C labeled portion is the contact surface and has sensors to send information back on the cooling, humidity, and CPU temperatures. The B labeled section is a 52mm squared TEC. You can see that below it pulls heat from the CPU and above it, they have the contact surface for the water cooling to pull the heat from the TEC and keep things cool. Then A is mostly a normal waterblock with the water lines going in and out but up on top is a PCB for the circuitry for the whole system as well as built-in sensors to help with the overall dew point so it knows how cool it can go before dew forms.
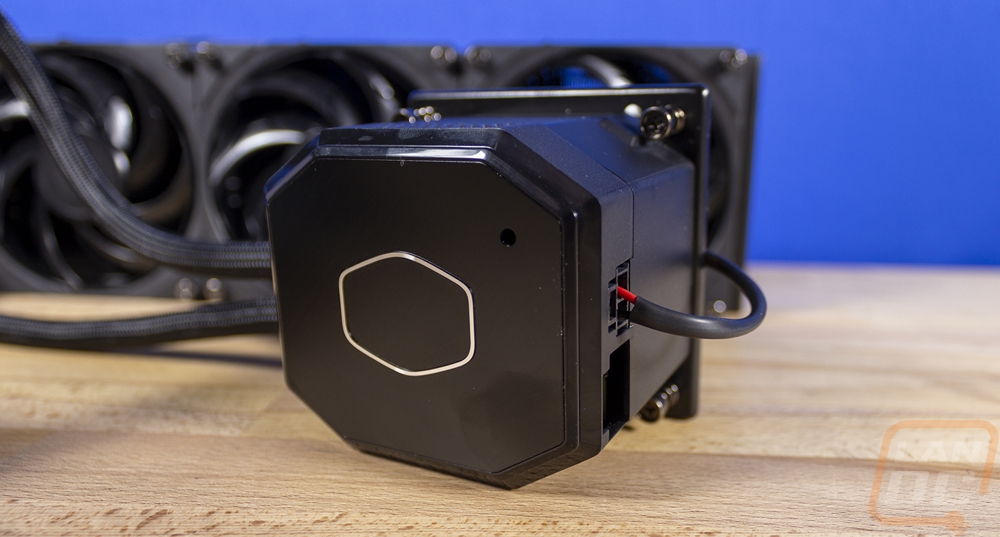
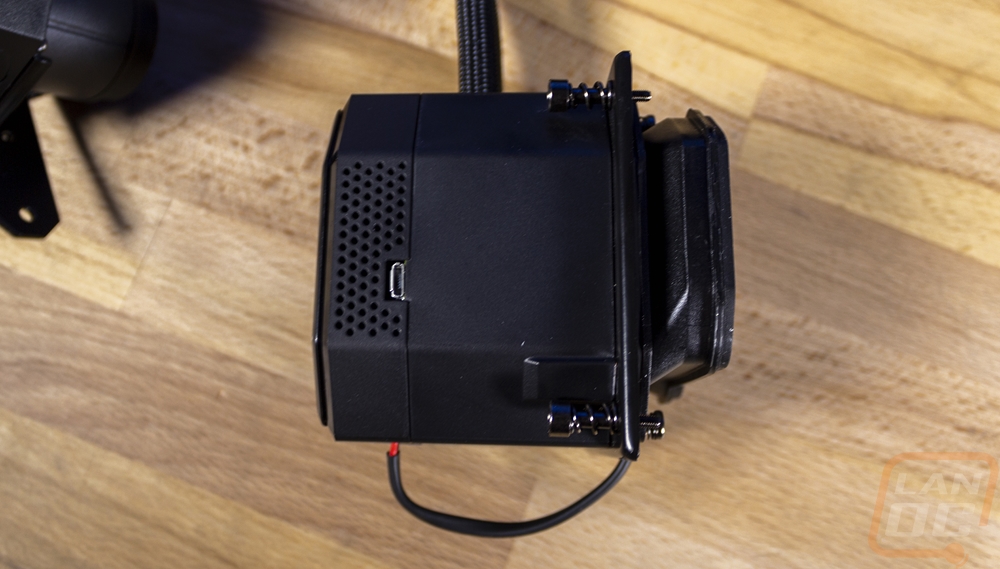
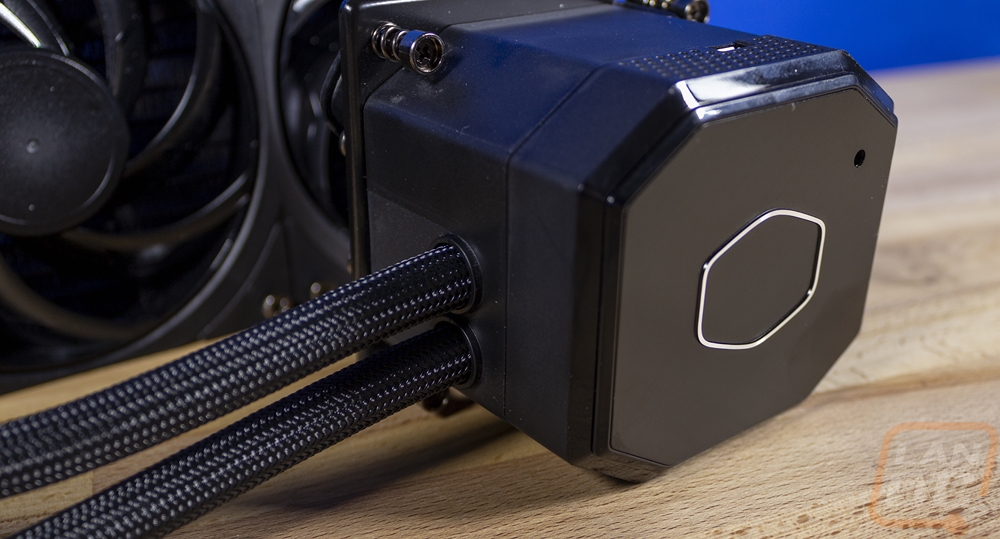
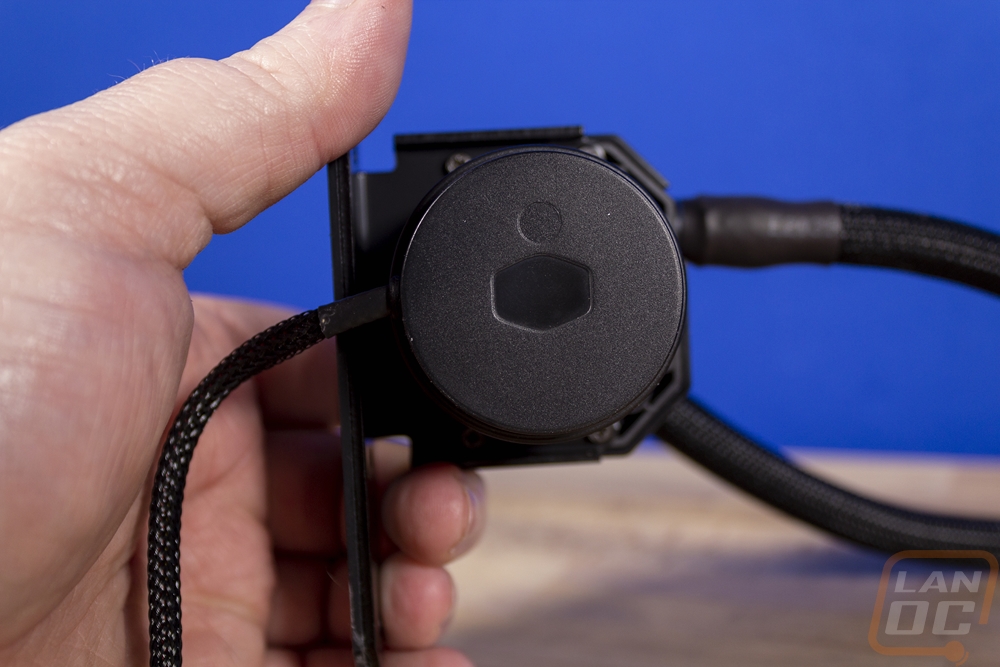
I like this first picture because it shows how much of the overall housing is dedicated to the water cooling and you can see where the TEC is because you have the wires running from it up to the top where the PCB is. This also shows that to power everything you also need to hook a full 8-pin PCI power up to the cooler. Cooling with electricity takes power. The next side over has ventilation on it and a micro USB port which is the communication port for your PC. Up on top, they have the nameless Cooler Master logo which has a machined surface, I’m surprised this didn’t end up being RGB given the USB connection is already there and the top-mounted PCB.
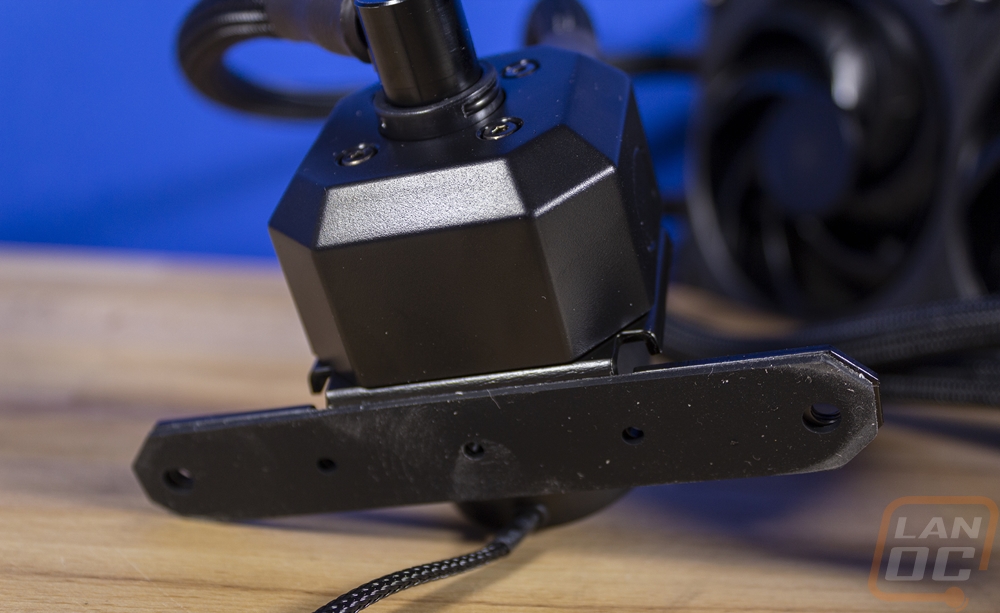
Even just the water block portion of the assembly is taller than a lot of the AIO kits available, but adding the PCB up top and the thick contact surface on the bottom puts the overall height around 95mm but they have it listed at 89mm which I assume is when bolted down and the seal is compressed.
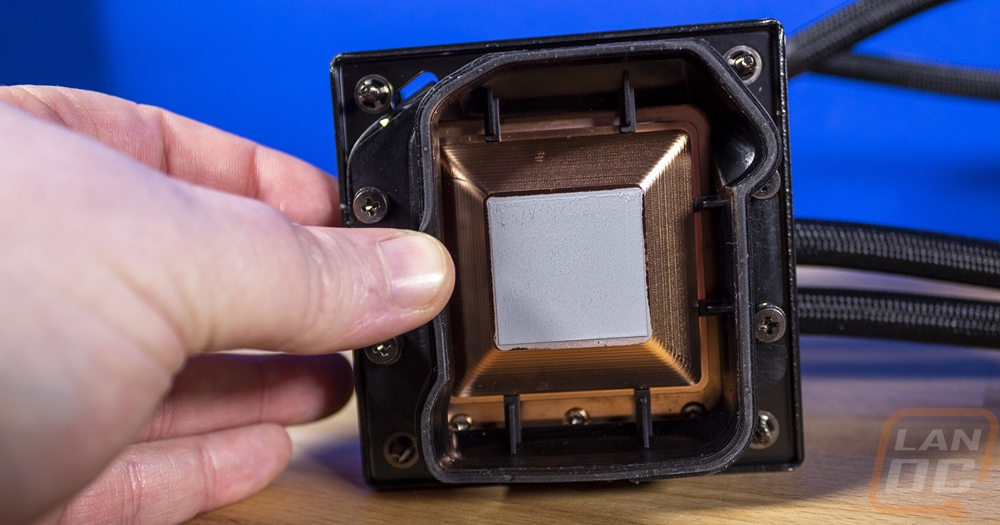
Here is a closer look at the bottom of the ML360 Sub-Zero. You can see the Intel-specific deal which fits perfectly around the hold down arm and has the rubber seal at the bottom. But the shape of the contact surface caught my eye as well because in Cooler Masters diagrams it looked thin and flat but it's clearly much thicker. The pyramid shape is a lot like an Ln2 pot which I would bet isn’t a coincidence. This thick portion helps absorb heat spikes a lot better and the pyramid shape uses less material and I’m sure it helps with condensation but I’m not going to pretend to know for sure.
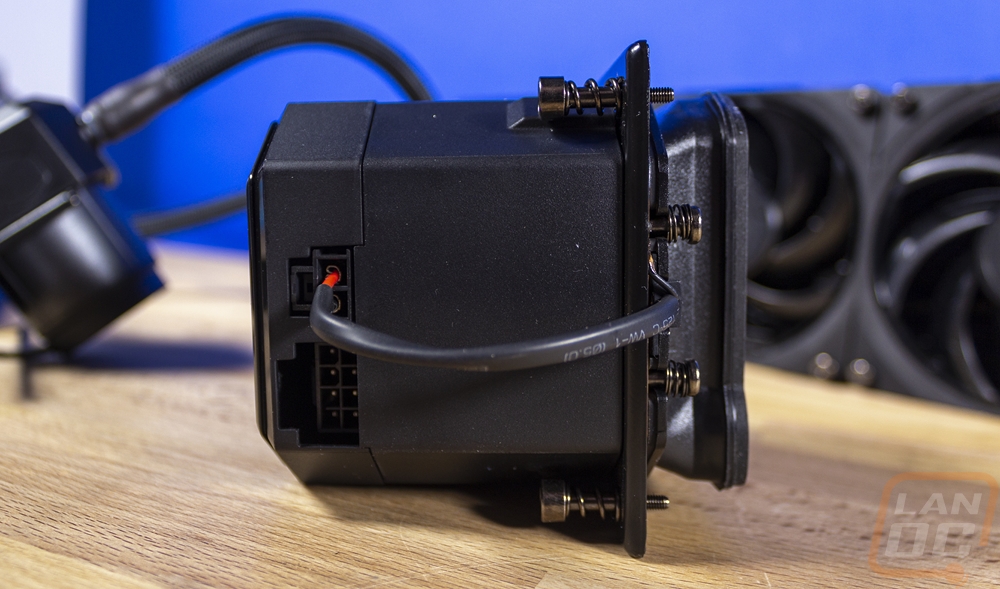
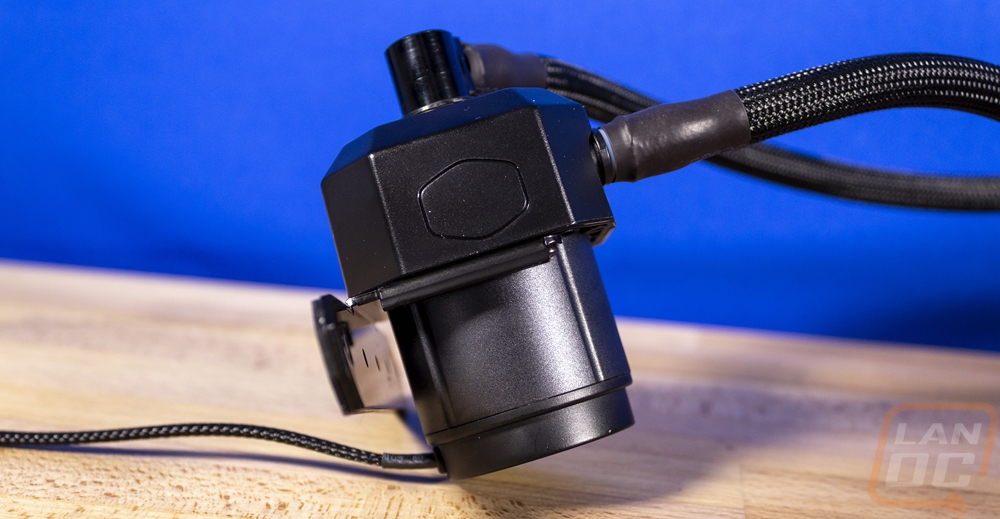
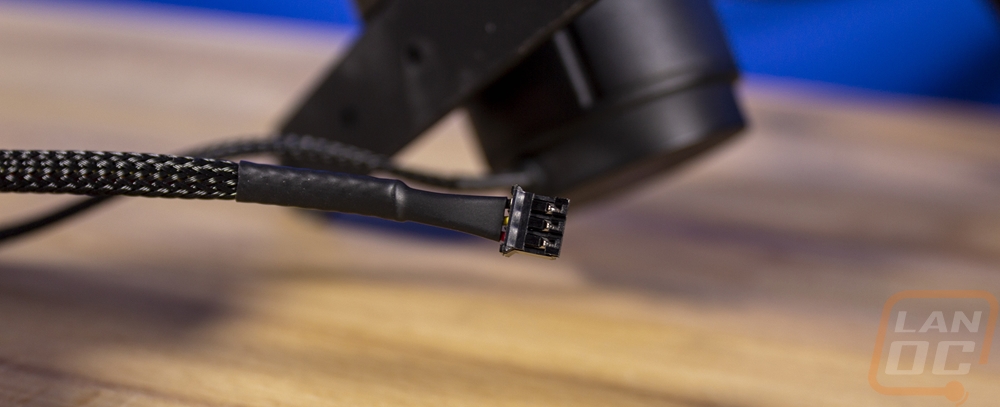
Now without a pump inside of the main water block housing Cooler Master went with an inline pump design. This layout helps with litigation as there are a lot of patents on the “standard” AIO water block/pump design. But it also means they can go with a larger pump as well, much like custom water cooling. The pump has hoses coming in at the top which is the intake and on the front which is the output with the pump down at the bottom of the housing like a smaller D5 pump. Then the back of the pump has a wide mounting bracket made out of a thick steel. It also has a layer of rubber to cut down on vibration as well. The pump then has one cable running out of it that is sleeved in black sleeving with a small proprietary plug that plugs into one of the included cables.
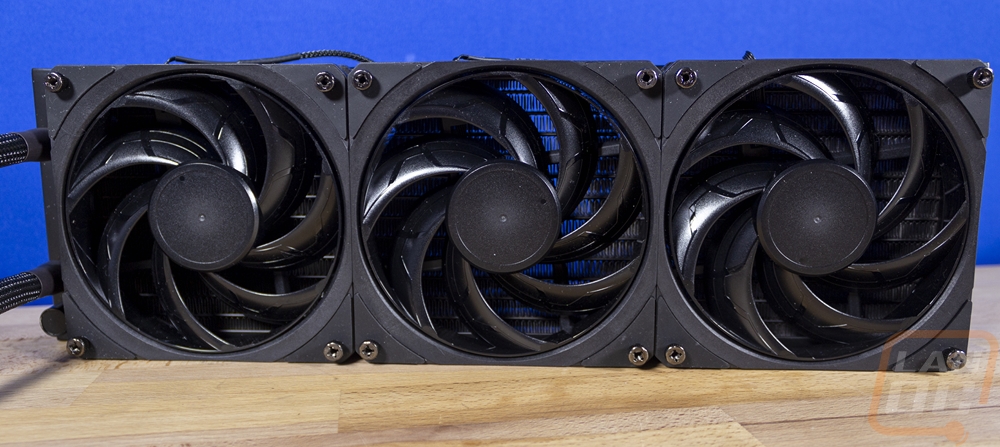
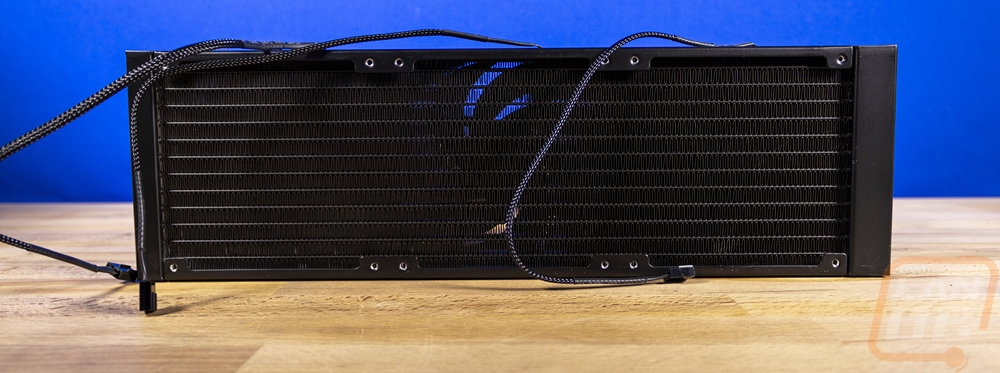
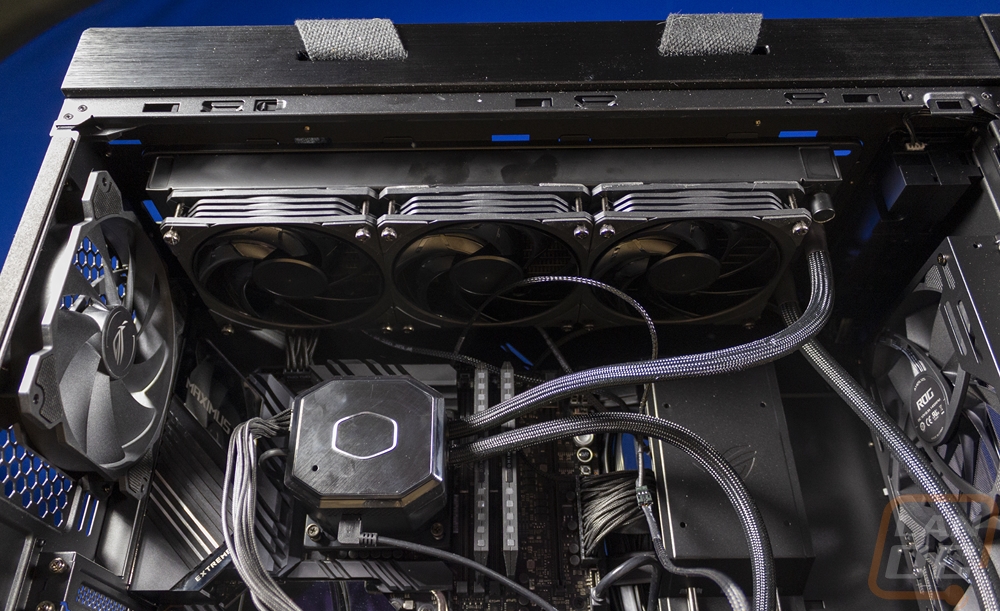
The ML360 Sub-Zero comes with a triple fan 360mm radiator which has boxed in ends much like a lot of custom radiators. Overall though this is your standard AIO 360 radiator. Then for fans, you get three 120mm fans. They don’t have the mid fan branding, but they look like Cooler Masters Sickleflow 120’s but are set to run 100 RPM less and with that have a touch less flow. I do like that without the stickers they all have a blacked out look.
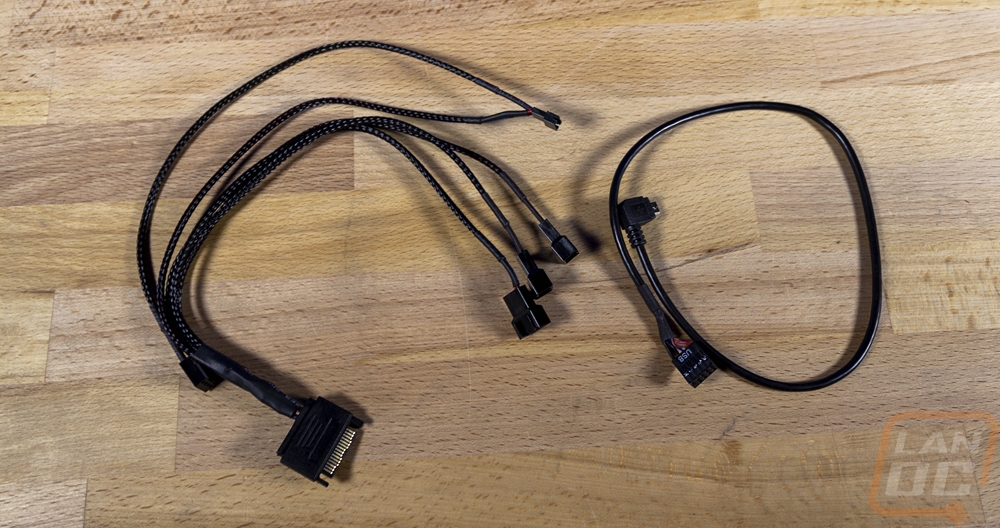
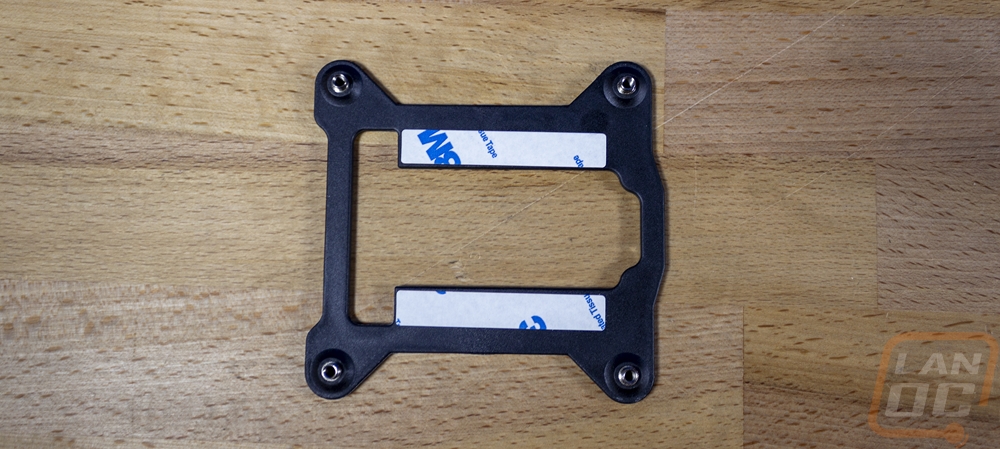
The accessory box that comes with the ML360 Sub-Zero isn’t that large which is mostly due to not having to pack in multiple mounting brackets and having the fans preinstalled. Overall you get a user manual and a warranty paper for documentation. Then there are two cables. One is a micro USB to USB internal header cable for the data connection and the other is a combo cable that hooks up to a SATA power plug for power, has all three fan connections, one plug for the water pump, and then a female fan header to plug into your motherboard for signal. There are two bags with mounting hardware. One is full of short screws for mounting the radiator. Then the other bag has all of the hardware for the water block mounting. You get four large standoffs that screw into the included backplate and a screwdriver adapter for installing the standoffs. Then two thick screws for mounting the pump.

Noise Testing and Fitment
Before jumping into the performance testing the first thing I wanted to look at was overall fitment. When I test air coolers, part of this is making sure that you will have memory clearance. But for a kit like the ML360 Sub-Zero, it has a whole new list of potential issues. The water block height is one, at around 90mm it is as tall as shorter tower air coolers and taller than almost all AIOs. If you have a case that has a vertical mount for the GPU that puts it in front of your CPU you will want to make sure there isn’t an issue. Cooler Master lists out their cases that will work and they even have notes on the exact configurations like when you have to use a front mount or a top panel mount. But the Sub-Zero portion of this kit also brings other compatibility issues as well. For one, this is only designed to work with unlocked 10th gen core processors from Intel. I’m wondering if it could potentially still work with other older Intel CPUs as their mounting hasn’t changed at all or if they are doing anything on the software level. But that brings me to the other potential issue. The seal has to have clearance and some motherboards may not work so they have put together a list of boards tested and it isn’t a long list. They have touched on the higher end boards from everyone
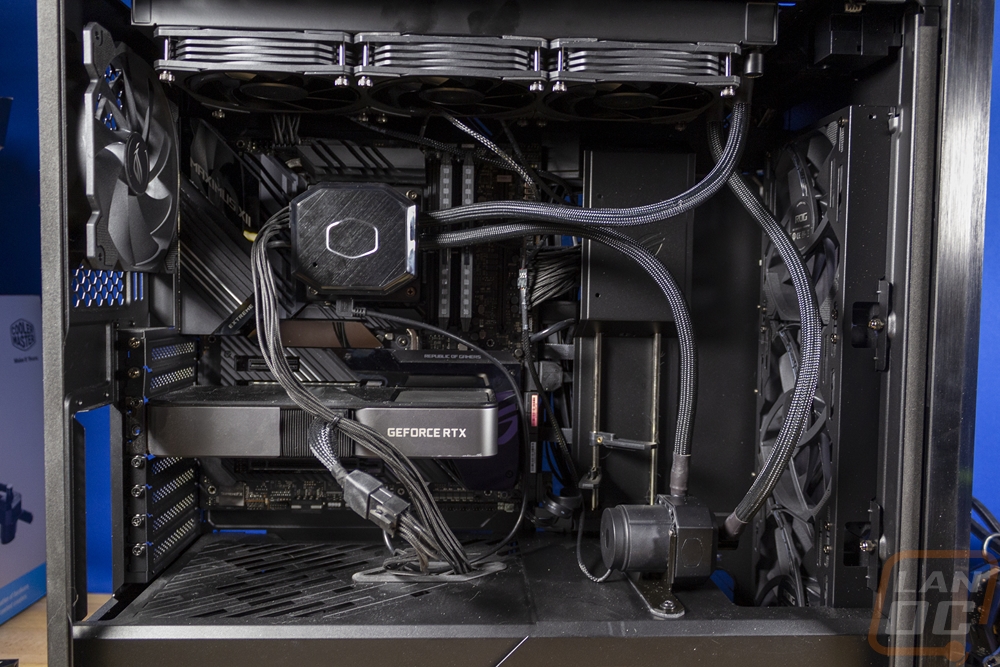
As for our actual installation for testing. I ran the Asus ROG Maximus XII Extreme with the 10900K for the CPU. Then I did the testing inside of the Asus ROG Helix case because I still had that build together and it gave me a good chance to test this out inside of a large case with support for the 360mm radiator and that build already had the ASUS ROG Ryujin AIO in it which is a great comparison point with this kit. It is also 360mm and because of its lighting, OLED screen, built-in VRM fans, and Noctua fans, it is also similar in price as well. The installation wasn’t hard, I started by installing the radiator to get the most cumbersome portion hung up. Thankfully I didn’t have to change the fan configuration so it was just hanging it with the included screws. Mounting the water block wasn’t too bad as well, you get the backplate at the back and start two of the standoffs. Then you can install the other two and tighten all four down. From there you screw the mount down. The pump did take a little thought but the Helix had a mounting spot right on top of the bottom cover that worked well. From there plugging in the three fans, the pump, power, and signal header were all simple. I think the results didn’t look too bad though I could have done a better job cleaning up dust from the system sitting around (we have been doing work on my office) and the fingerprints I put on the pump.
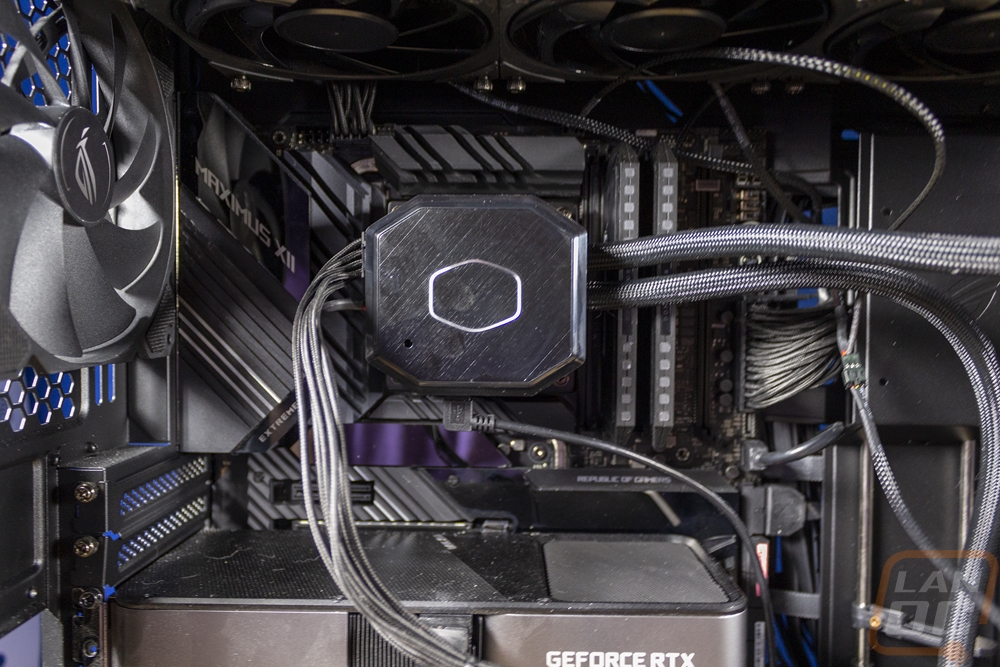
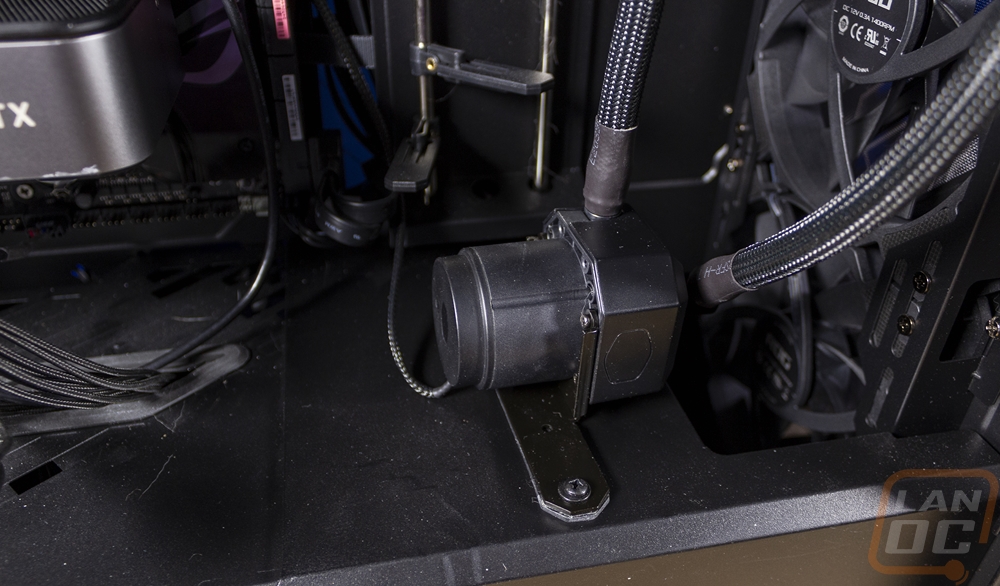
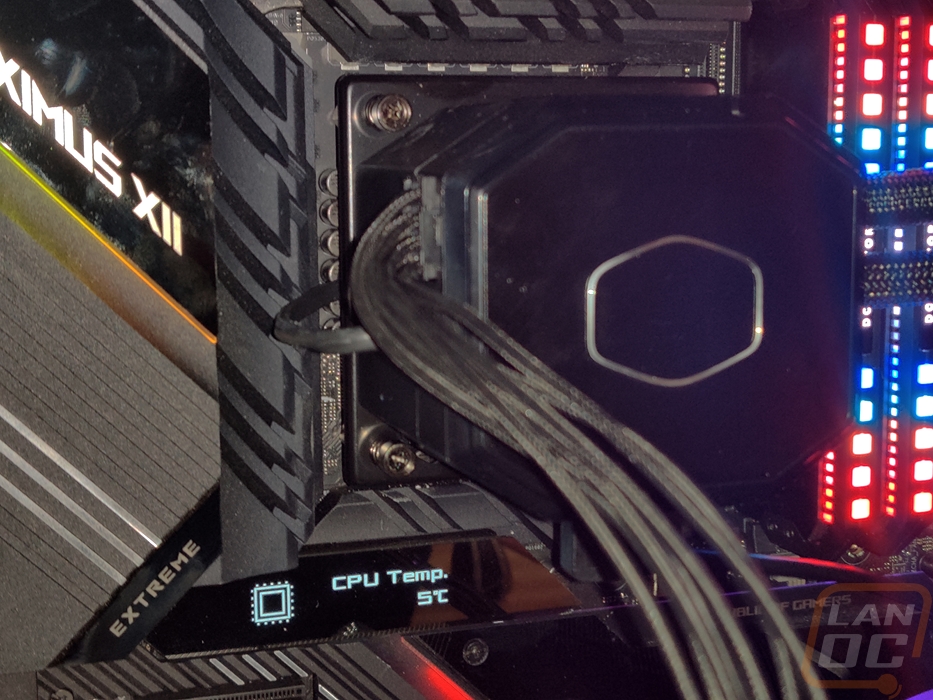
You also don’t want to forget to plug in the 8-pin power which is on the side of the water block. This one is such a tall case that did leave me stuck running it over top of the GPU but a cable extension could give the extra length to better hide this cable. This plug was a little hard to get, I found out later that you can pop the top cover off which gives a lot better access for plugging this in and unplugging it as well. There is a little clue at how well the cooler worked in this picture as well with the motherboard temperature readout. Not often you will see something like that.
I then did some testing of noise levels. I did the same to the Ryujin before swapping coolers. I did two noise tests. One after running the cooler for over a half hour with an FPU load and the second with the fans/pump turned up to 100%. The fan speeds only changed things with the Ryujin. The Ryujin came in at 41.5 decibels when under the FPU load and then when I cranked up the fans it reached 54.2 decibels which isn’t too bad. The ML360 Sub-Zero had just the one result which was 45.8 decibels using our normal settings which is set to A mode. Our Sub-Zero kit had a surprisingly noisy sound that I initially thought was a loud pump which had a high pitch noise that when I tested using the C weighted mode came in higher at 55dB. This noise ended up coming from the top of the TEC cooler PCB which I guess was coil noise because from what I can see there isn’t a fan in there.
Cooling Performance
With everything set up and with noise testing out of the way I could finally get into performance testing. For this, I wanted to look at a few different angles. I did our normal testing which includes FPU and CPU workload temp testing. Then I took a look at power usage to get a feel for just how much the TEC is pulling. After that, I jumped into overclocking to see what I could pull off with the additional cooling power.
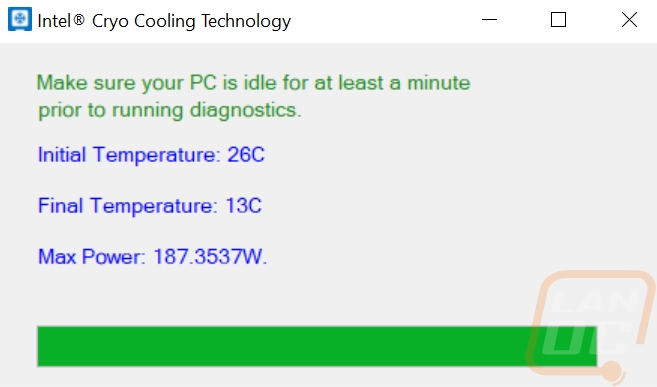
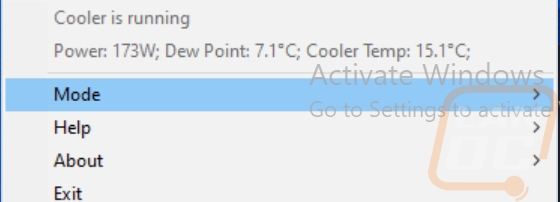
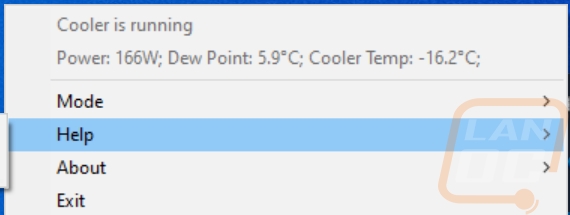
Before getting into that I do need to talk a little about the software Intel put together to control the cryo cooling. You will need to run this to get everything working and it is a lot more basic than I had expected. I expected a big program but when it ended up being was just an icon in your taskbar that has a little bit of info at the top to show you if the cooler is running or not, its power, dew point, and current temperature. Then a mode that you can select which gets you an off mode, cryo mode which runs the cooling when needed but not all of the time to avoid the risk of condensation, then an unlimited mode. There is also a diagnostic test that you can run as well that makes sure everything is working and shows the max power.
In my first round of tests, I wanted to get an idea of just how much power the ML360 Sub-Zero would pull compared to the normal 360 AIO that I had installed previously. I tested the full power draw of the system using a Kill-A-Watt while running the AIDA64 FPU Stress Test. The system with the Ryujin ran at 201 compared to the Sub-Zero which pulled over twice that at 409 watts when in Cryo mode and 410 when in unregulated mode.
|
Power Usage |
Watts |
|
ROG RYUJIN 360 |
201 |
|
ML360 Sub-Zero – Cryo Mode |
409 |
|
ML360 Sub-Zero – Unregulated Mode |
410 |
For the first thermal tests, I jumped right into things using the AIDA64 FPU Stress Test which is a heavy workload that pushes coolers to the max. I started with the Ryujin which came in at 65c on the CPU package and 54c on the sensor built into the motherboard socket under the CPU. 65c isn’t bad at all and a lot better than the 10900K runs on most air cooling or smaller AIO setups. Cranking the fans up to 100% on the Ryujin helped as well, dropping the package temperature down to 53c. But the ML360 Sub-Zero had the 10900K running down at 41c and 33c on the motherboard readout.
|
AIDA64 FPU Stress Test |
CPU package |
MB CPU |
|
ROG RYUJIN 360 – Stock Fan Profile |
65c |
54c |
|
MasterLiquid ML360 Sub-Zero – Cryo Mode |
41c |
33c |
|
ROG RYUJIN 360 – 100% Fan Speed |
53c |
42c |
|
MasterLiquid ML360 Sub-Zero – 100% Fan Speed |
41c |
33c |
Switching over to a workload that is less demanding the Ryujin performed the same but the ML360 Sub-Zero while in Cryo-Mode cooled things down to 36c as the hottest spot on the package and 28c on the motherboard sensor while under load. I also toyed around with the base mode on the ML360 Sub-Zero which turns the TEC off completely. With the waterblocks layout which has the thick contact surface, the TEC, THEN the water cooling on top of that. This configuration does still cool but as you can see with the load temperatures reaching 86c on the package and 74c on the motherboard sensor that configuration isn’t going to get you the same performance as the 360 AIO but it is good to know that you don’t need to run the TEC all of the time and just waste power.
|
AIDA64 CPU Stress Test |
CPU package |
MB CPU |
|
ROG RYUJIN 360 |
65c |
54c |
|
MasterLiquid ML360 Sub-Zero – Cryo Mode |
36c |
28c |
|
MasterLiquid ML360 Sub-Zero – Cryo Turned Off |
86c |
74c |
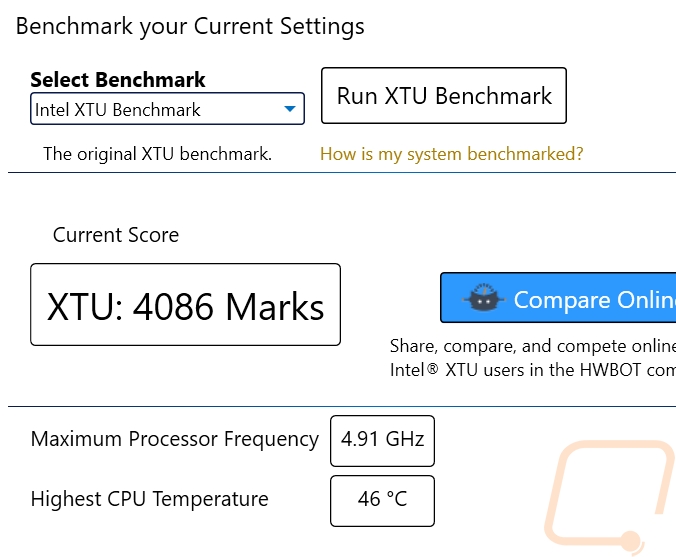
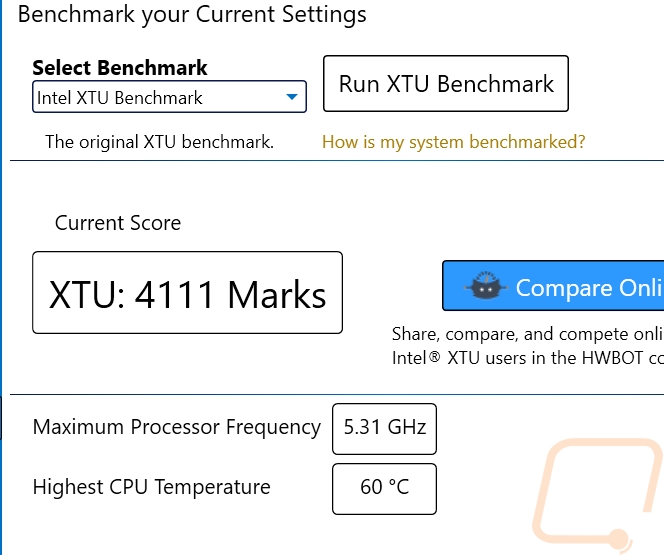
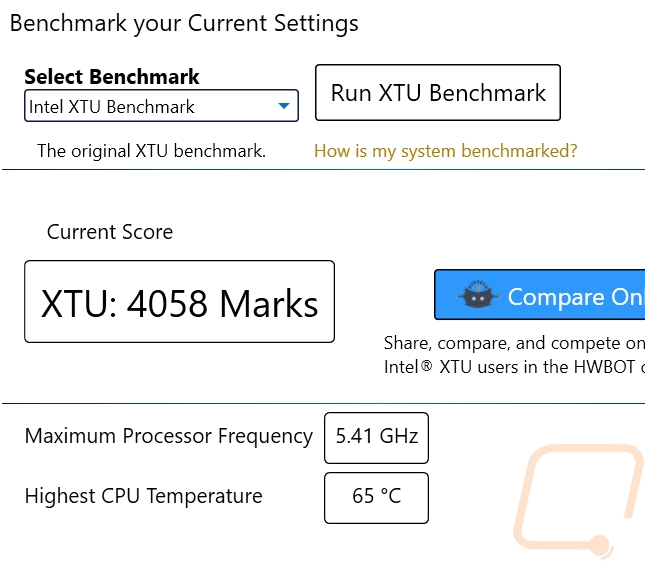
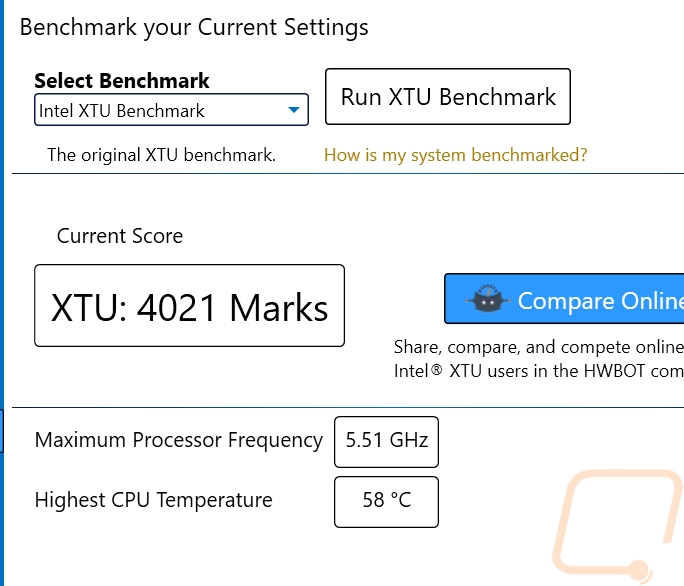
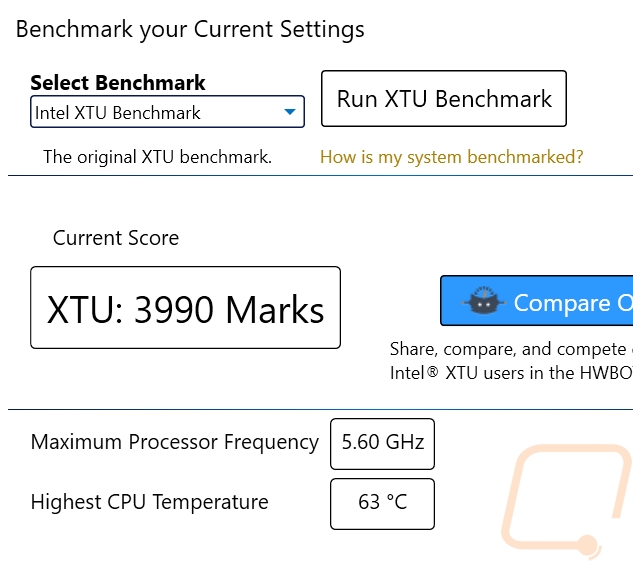
With the base thermal testing out of the way, I finally jumped into Intels overclocking tool which they call Intel XTU or Extreme Tuning Utility. XTU is surprisingly easy to use to overclock. If you are looking for a small overclock you don’t even need to get on their advanced page, the basic tuning page lets you bump the CPU multiplier up .1 GHz at a time for all of the cores. If you want to do core by core, aiming maybe to have a few higher clocked cores you can do that as well on the advanced page. Then they also have a small benchmark that can give you scores and document what frequency you reach as well as the highest CPU temperature. I ran this on the Ryujin at the stock 4.9 GHz and then worked my way up to see how much of an overclock I could get with the cooler. Even the base clock speed (which is still an overclock because 4.9 GHz was set to all cores) had the CPU reaching 80c. Working up from there you can see the XTU scores dropping but the CPU does reach the clock speed at least initially. But with the 360mm AIO I was only able to reach 5.2 GHz and really anything above the stock clock speed here was throttling down during the test which is why the scores went down.

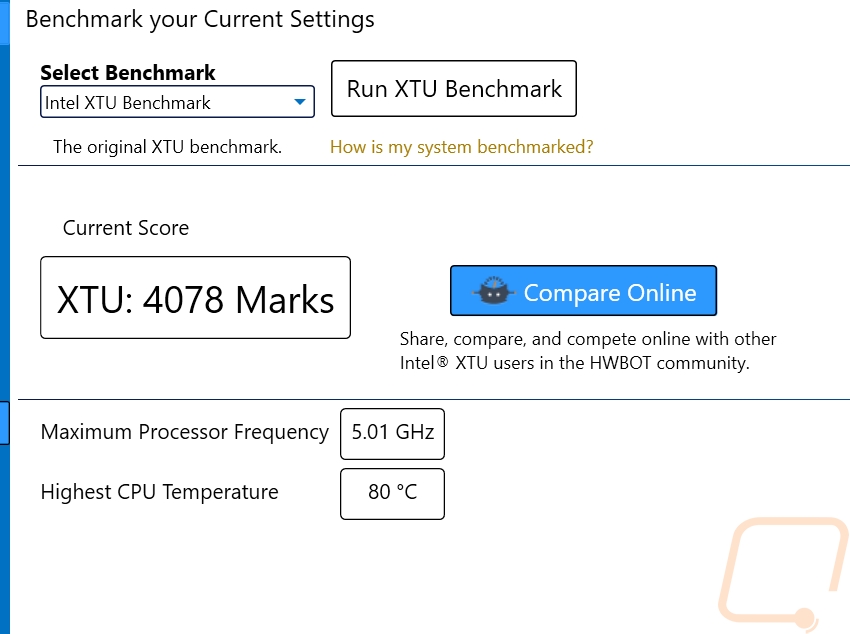
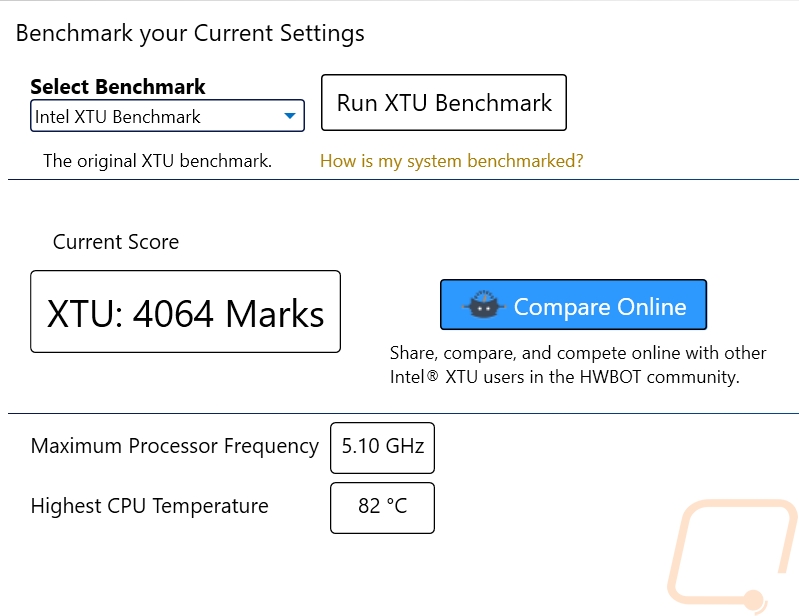

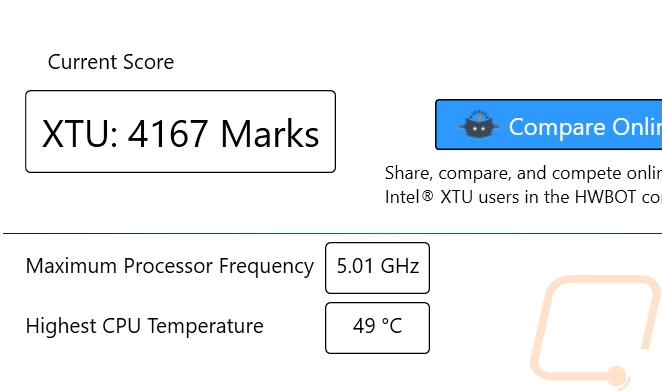
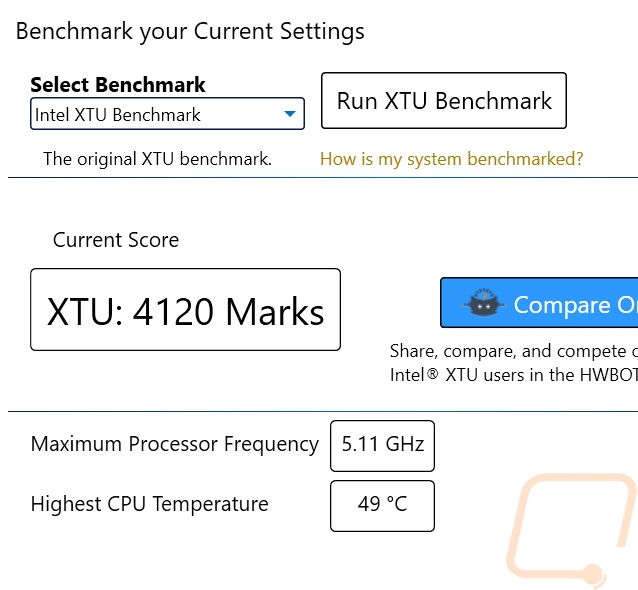
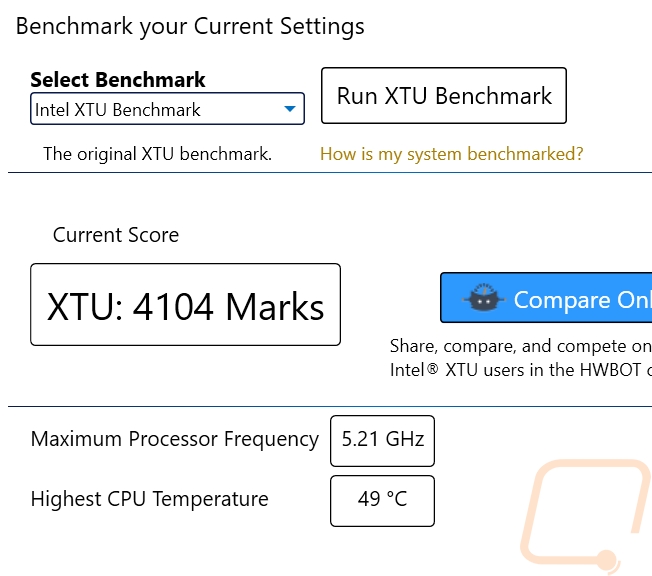
I did the same overclock testing with the ML360 Sub-Zero and right away you can see that the hottest temperature at 4.9 was 34c lower. In fact, the temperatures didn’t start to go up until I reached 5.3GHz and higher. But even there the highest was 63c. Overall with the Sub-Zero cooling, I was able to consistently overclock the 10900K up to 5.6GHz with almost no work. I didn’t even toy with voltage settings for that.
Similar to my previous thermal testing, I did want to check out how both coolers would perform with a slight overclock. I decided to take a look at temperatures while running the AIDA64 FPU Stress Test with all cores running at 5GHz which is an overclock a lot of people aim for. The Ryujin 360 handled this but the temperature difference between it and the Sub-Zero was huge. 35c difference on the highest package temperature and 31c on the motherboard sensor. 34c is getting close to room temperature even with that being 93 degrees Fahrenheit for anyone who is used to that.
|
Temps when overclocked to 5GHz |
CPU Package |
MB CPU |
|
ROG RYUJIN 360 |
76c |
65c |
|
MasterLiquid ML360 Sub-Zero |
41c |
34c |
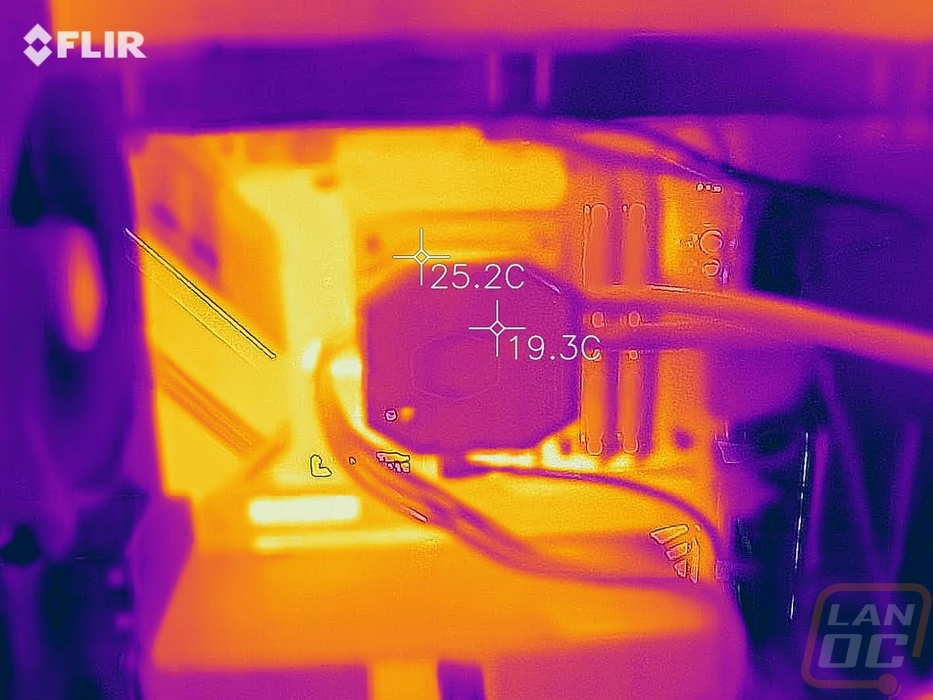
After the rest of my testing, I did toy around with things by running an FPU stress test and getting thermal images of the outside of the cooler. You can see the hottest area is up near the control PCB where the power comes in with the metal mounting brackets only running at 24.7c or 76f.
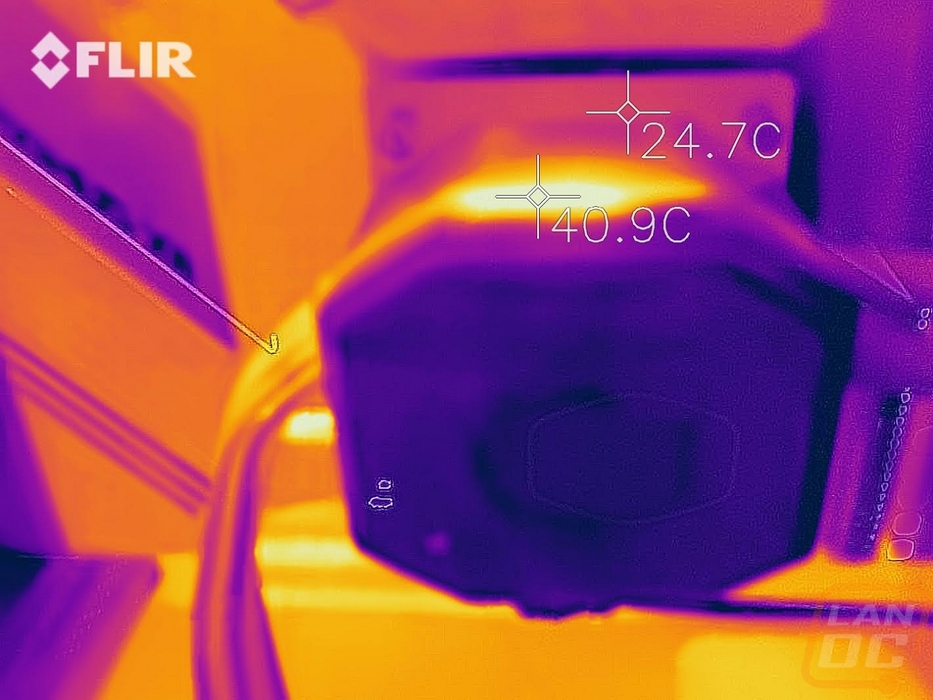

I also turned off the cryo mode for the unregulated mode. Which gives you huge warnings letting you know that you can damage your system from moisture damage and let it run until it leveled off. This was with the system basically at idle and you can see below that even the motherboard sensor which is below the CPU was down to 5c. The CPU itself was down around -10c. The temperature leveled off and didn’t go any lower but I also wasn’t jumping at the chance to keep trying for very long and cause water damage to our only 10900K or the $750 ROG Maximus XII Extreme.
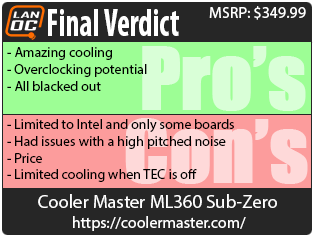
Overall and Final Verdict
I’ve been in the industry for 13 years now and every year it is, of course, exciting to see things like the latest CPUs and GPUs but for the most part over time you start to see that most things are improvements on the previous generation. But every once in a while something comes out that you just don’t see anyone do before or after. When Cooler Master brought out their V10 cooler, it was one of those products. The ML360 Sub-Zero is another one. I didn’t think we would ever see Peltier cooling come back into anything close to a mainstream part. But here we are. Cooler Masters partnership with Intel on this has created a unique and interesting product. The combination of the 10900K and the ML360 Sub-Zero allows for pushing the limits of the CPU in a way that just isn’t possible with traditional cooling. The 360 AIO that I tested it against, which is a solid cooler in itself, only allowed me to overclock up to 5.2GHz and that was with heavy throttling where the ML360 Sub-Zero allowed our 10900K to run at 5.6GHz without breaking a sweat.
The ML360 Sub-Zero is completely blacked out which isn’t what I would have expected for such a high-end product. But I do like that they went all-in with it, even not using stockers on the center of the fans. The only downside to the overall look is that it is a large cooler. Both with the water block with the TEC being built-in being taller than any other AIO and because that doesn’t include the inline water pump that you also need to mount.
The ML360 Sub-Zero also had a few large downsides as well to keep in mind. Like it being limited to just Intel and some boards not fitting as well but Cooler Master has a list of cases, power supplies, and motherboards that they have tested on it. The cases and PSUs are from their lineup. It also pulls a LOT of power when cooling. It doubled the power draw of our test system. When you turn the TEC completely off it is also limited in its cooling capabilities. It can keep things cool to a point, but don’t expect to have a 360mm AIO coolers cooling with it off. It runs 20c warmer than a similar sized AIO when the TEC is off. I also had noise issues, but I think that might be our kit specifically. If the PCB isn’t putting out a coil whine the pump and fans are quiet.
The other big hurdle is of course the price. It has an MSRP of $349.99 which would get you multiple high-end AIO coolers. Of course, none of those will perform like the ML360 Sub-Zero. In the end, this is a niche product but if the ultimate gaming performance is your goal the 10900K paired up with the ML360 Sub-Zero doesn’t have any competition.

Live Pricing: HERE


