When it comes to water cooling EVGA isn’t exactly new to the scene. While they haven’t been making CPU AIO’s they have been using them with their Hybrid coolers for GPUs and their Hydro water cooled GPUs as well. They have also had heatsinks in the past as well. So it wasn’t a big stretch when they introduced their CLC line of coolers at CES this year. They showed off a big variety of coolers but at launch, they only had a 120mm design and a 280mm design and today I have the CLC 280 with a 280mm radiator in to check out. I’ve been testing it out on our video card testbench and today I’m going to talk a little about the cooler as well as how it performed so check it out.
Product Name: EVGA CLC 280 Water Cooling
Review Sample Provided by: EVGA
Written by: Wes
Pictures by: Wes
Amazon Affiliate Link: HERE
|
Specifications |
|
|
Waterblock |
-Premium Retention parts for Intel LGA2011/2011-v3/1150/1151/1155/1156/1356 and upcoming variants -AMD retention ring for supporting AM2/AM3/FM1/FM2 and upcoming variants* -100% Copper -Fully controllable RGB LED -Noise Level = 20dB(A) (MAX) |
|
Radiator |
-312mm X 139mm X 27mm (LxWxH) -Aluminum |
|
Fan |
-Size: 140 x 140 x 25mm (x2) -Teflon Nano Bearing -Speed = 600-2200RPM -Airflow = 113.50 CFM (MAX) -Static Pressure = 4.20 mmAq (MAX) -Noise Level = 16.0 dB(A) (MIN) – 39.5 dB(A) (MAX) |
|
Warranty |
5-Year Limited Warranty |
Photos and Features
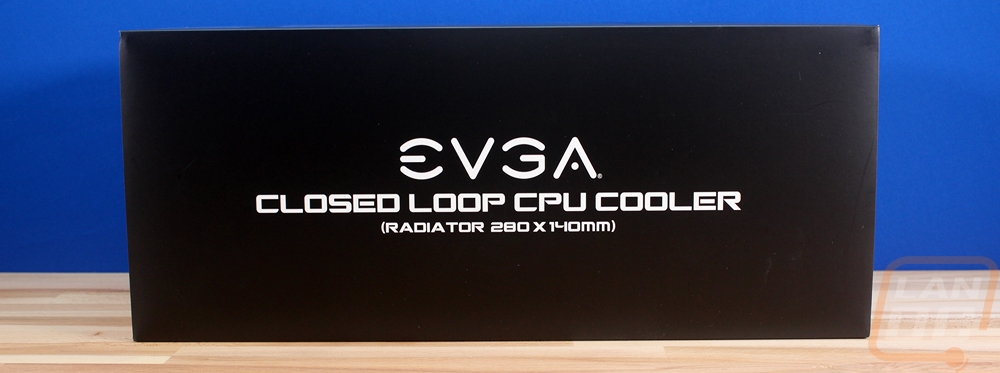
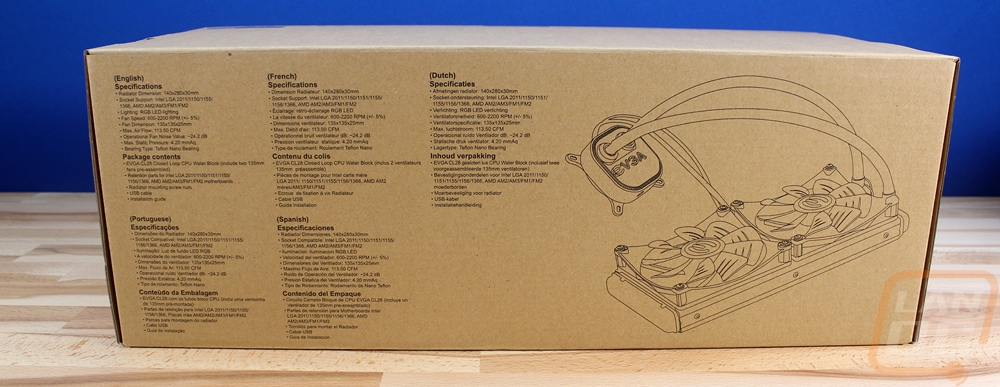
Starting off with the packaging, the CLC 280 came in a cardboard box with a slide on black cover. The black cover has the EVGA logo, the product name, and fan size on the front. On the back, there is a photo of the cooler along with a short feature list in multiple languages. Once you slip off the cover the box itself also has a specification listing and a line drawing of the cooler as well.

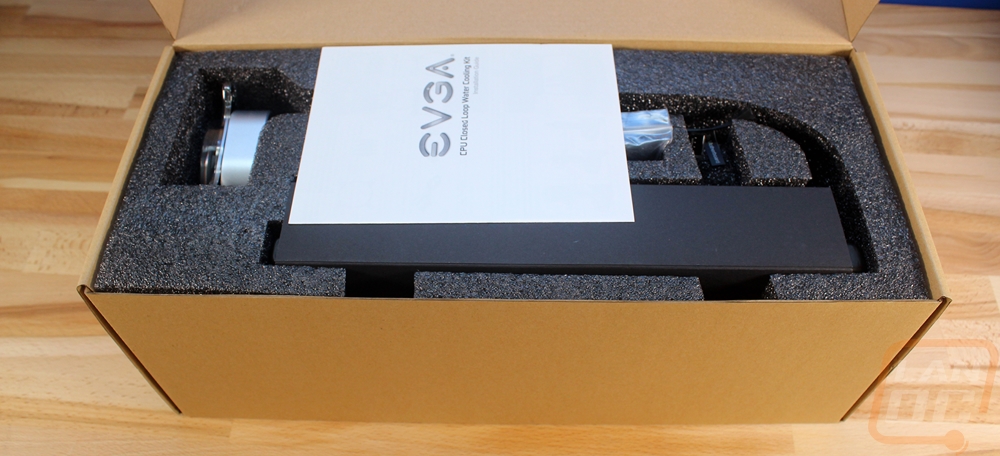
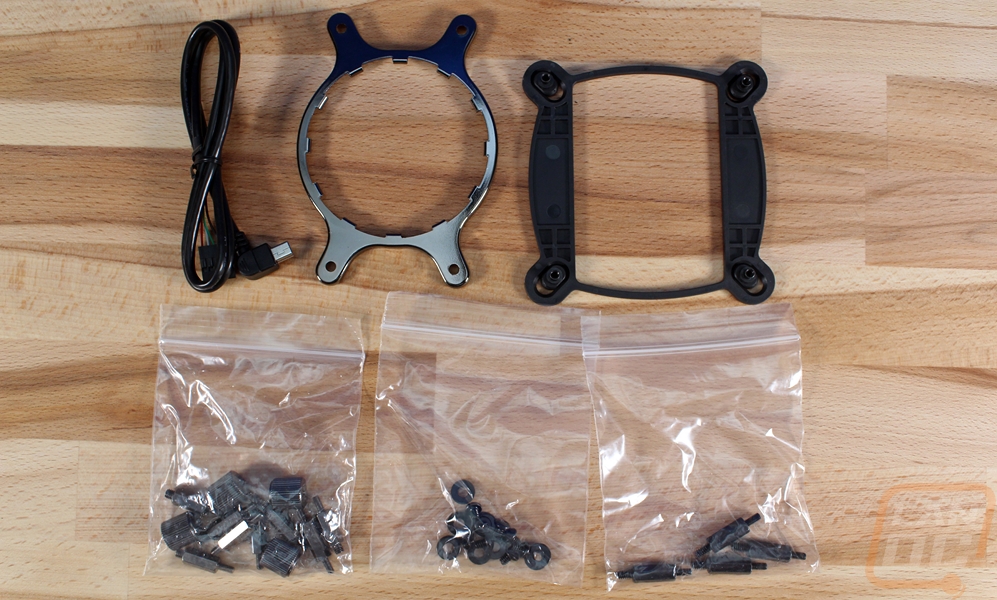
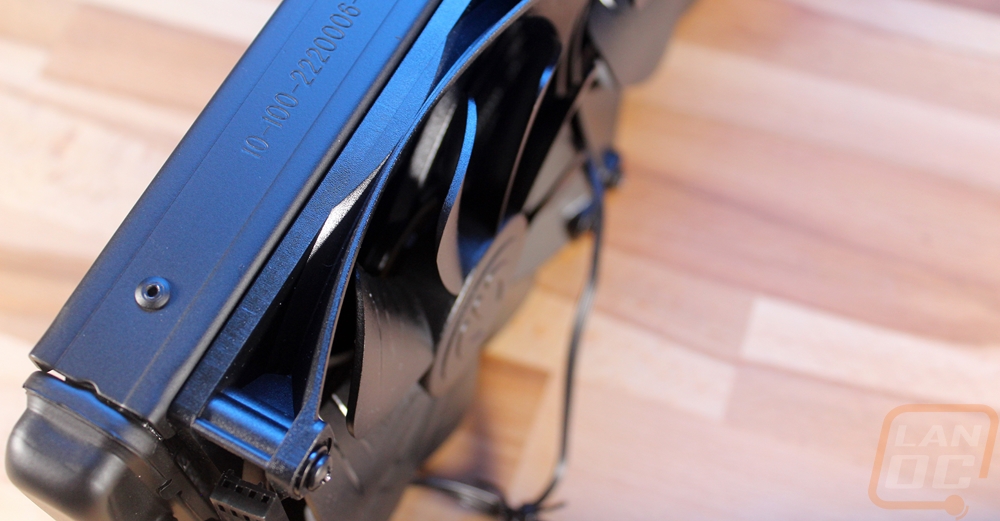
Inside the box, the documentation is up on top then everything else is placed in a thick foam padding. The radiator has the fans pre-installed and is wrapped in a slide off cover as well before being put inside of the foam. All of the mounting brackets, as well as the USB cable, are in a plastic bag. The kit right now comes with an AM3 mount as well as an Intel bracket that is pre-installed. This covers just about everything used in the past 5+ years with the exception of the new AM4 socket. For that they do have brackets available, you just have to contact them if your kit doesn’t have them. I imagine soon the kits will come with the automatically though.
So with the CLC 280, when you pull it out of the box you get just about everything all ready to go, especially if you have an Intel setup. Obviously, being an AIO kit it has the pump and water block combined with two lines and the radiator all in one sealed loop. That means it comes pre-filled and you can’t make any adjustments to the length of the lines or anything. What did surprise me though were the pre-installed fans. Most kits don’t do this and let you pick the direction you want them. Depending on how you plan on installing everything this can be a time saver or you might have to pull them off and remount them. For a lot of people who don’t care, this should save them time though.

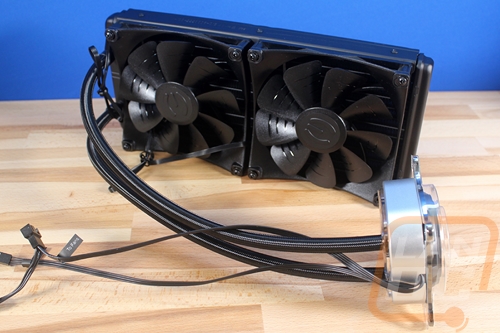
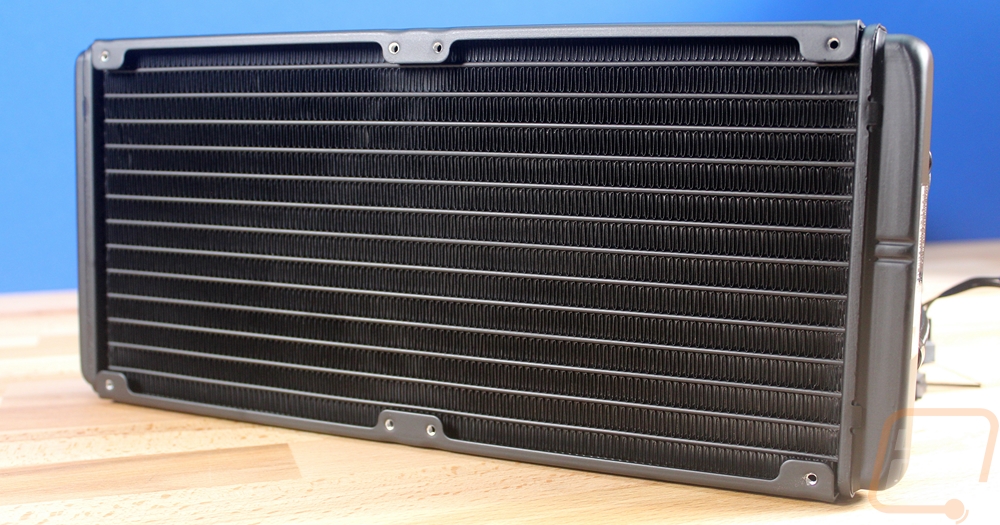
The radiator that comes with the CLC 280 is a 140mm times two configuration so it is just over 140mm tall and holds two fans. There is also a little addition length on both ends. The fin density looks to be normal and overall it is an inch thick. I’ve seen thinner AIO radiators before but this is an area where custom water cooling gives you additional cooling capacity, you can go all the way up to extremely thick radiators or increase the fin density. Everything on this one is blacked out and that is standard for almost all radiators.

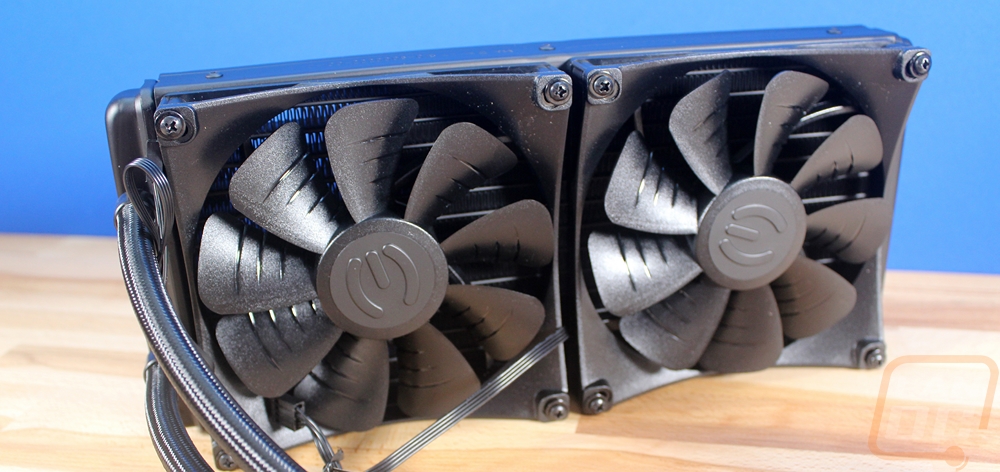
I would have expected EVGA to go with the normal fans that they have used in their GPU kits in the past but for the new CLC coolers they actually designed a new fan and it is completely different. Most companies just make a few changes but for these, I think they tossed out any carryover from previous fan designs and did something different. The main thing that you will see is that the fan blades are partially exposed. The fan shroud comes up to a normal thickness just at the corners but opens up in the middle. This means the blades are exposed to be touched or to catch or rub on wires if you aren’t very careful. They look very unique but I’m a little unsure about them simply because of the concern of anything getting caught in them. The CLC 280, of course, comes with 140mm variations and the fans use Teflon Nano bearings. The design is to keep the noise down and I would imagine from looking at them it also helps pull in air from the sides for additional flow. They are rated to run between 600 and 2200 RPM an airflow rating of 113.50 CFM at max speed with 4.2 mmAq for static pressure. Static pressure is important for water cooling fans and air coolers to help push the air where case fans only need airflow for the most part. They are also completely blacked out just like the radiator and they have the EVGA E logo embossed on the middle of each fan.
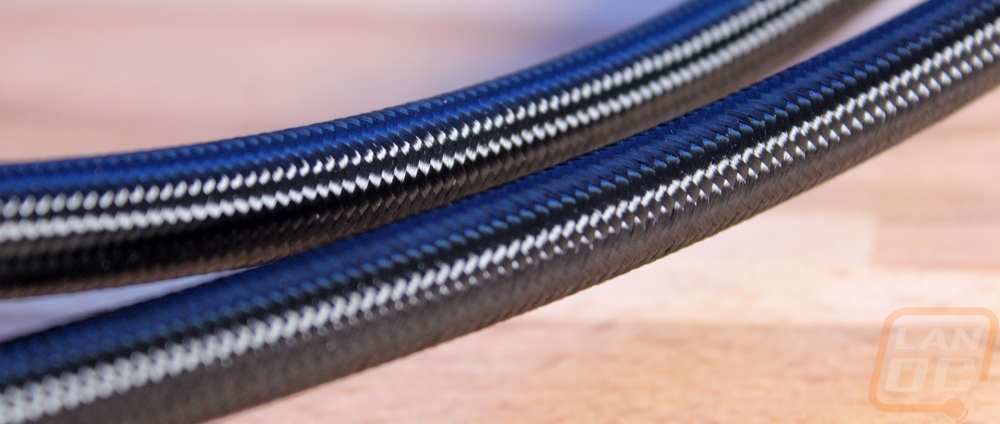
Another area where EVGA didn’t stick with the norm is with the tubes. The tubes are a little thicker than most kits and they have been wrapped in a sleeving. The sleeving has a bit of a shine to it that gives a nice effect in the weave and is similar to what Corsair has been using on their AIO kits as well. Anything is better than the plain rubber or plastic tubes that the other AIO kits use so I’m happy with this choice.
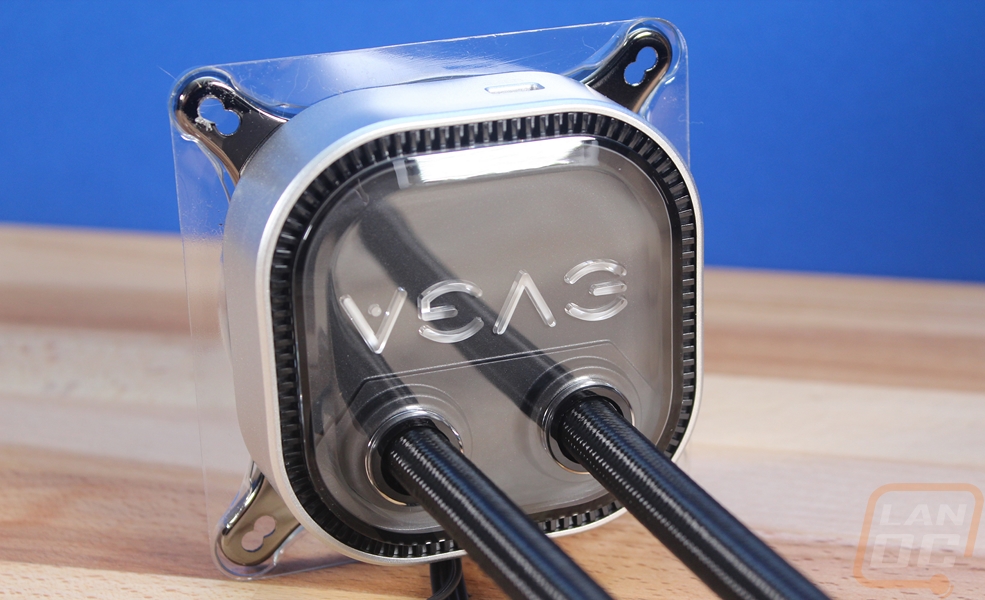
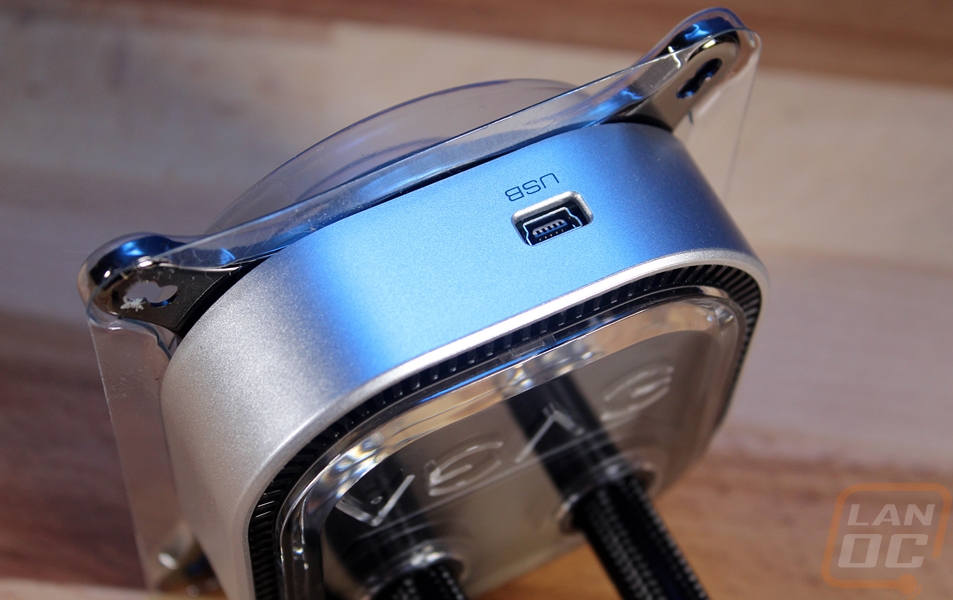
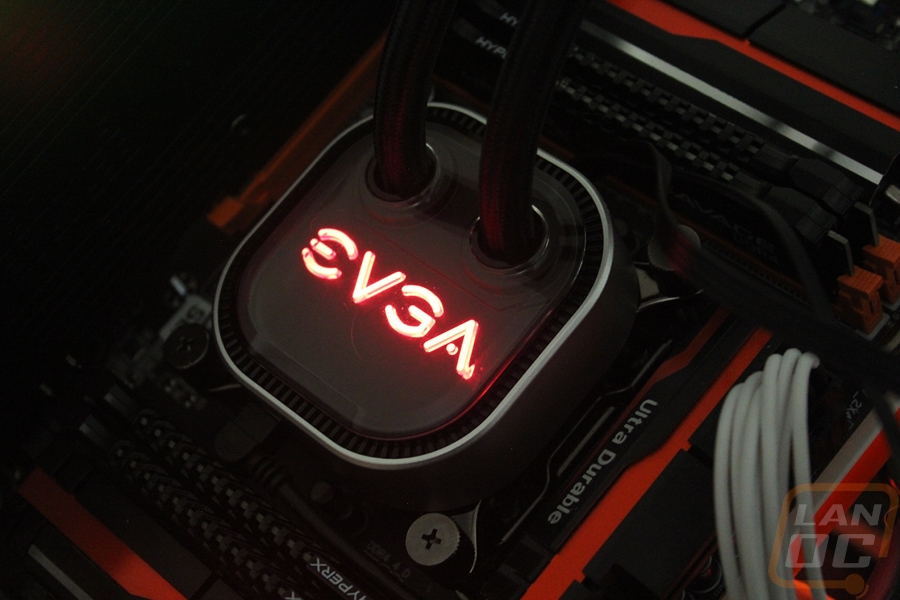
The last and most important part of the whole setup is the water block and pump assembly. Actually, for this one, they packed even more than that into it all. So to move the coolant you have a water pump and with most kits, especially any who are made in conjunction with Asetek like this one is, you have the pump sitting right on top of the water block to save space. This one is unique though because they haven’t gone with the standard round design. It is squared off with round corners and on top, it has a transparent top with the EVGA logo behind it. The EVGA logo is backlit with RGB and everything is packed together with a controller inside. You see, where most just use a splitter to power the two fans and then another header for the pump, for this one everything runs off of one header and is controlled via software. Because of that, the aluminum housing of the pump has a USB plug that you need to hook up. The pump, being a very visible part of the kit, looks amazing as well.
Our Test Rig and Methodology
|
Our Test Rig |
||
|
CPU |
Intel i7-5960X |
|
|
Memory |
Kingston HyperX FURY Black 32GB Quad Channel Kit 2666 MHz |
|
|
Motherboard |
Gigabyte X99-SOC Champion |
|
|
Power Supply |
Corsair RX1200 |
|
|
Storage |
Kingston Hyper X Savage 960GB SSD |
|
|
Case |
Praxis WetBench |
|
|
Test Methodology |
|
|
Fan Noise |
Using a decibel meter 6 inches away from the fans or pump we test 25%, 50%, and 100% fan speeds |
|
Fan Speeds |
To go with our noise testing we also document the fan speeds when they are running at 25%, 50%, and 100%. This is done using a Protmex PT02 Sound Meter that is rated IEC651 type 2 and ANSI S1.4 type 2. Tests are done set weighted to A and set to a slow response using the max function. The ambient noise level in the testing area is 33.3 decibels using the test settings. |
|
Idle Temperatures |
We test the idle temperatures using the included tool from our motherboard. |
|
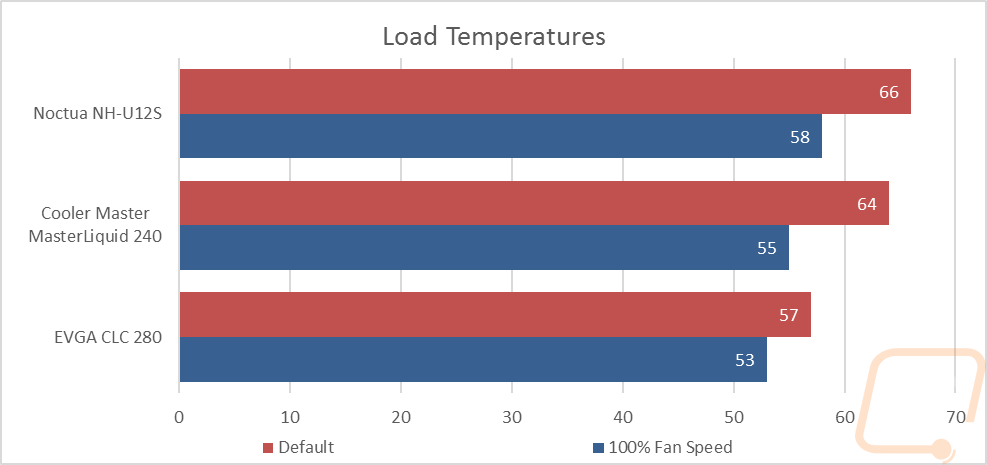
Load Temperatures |
Using the latest version of Prime95 on the Small FFTs setting we put the CPU under load for 30 minutes. This always tested at 100% fan speed and then again with the fan profile set to the stock profile on our motherboard. |
|
Test room temperature |
The room is always set to 70 degrees no matter the season |
|
Temperature readings |
We use the Intel Extreme Tuning Utility to get package temperatures from the CPU |
Installation and Performance
So before getting into testing, I did need to get the CLC 280 installed on our test bench. The test configuration is our X99 board so I was able to keep the Intel bracket that came pre-installed on the cooler. Combine that with the pre-installed fans and the water block having thermal paste already applied made installation extremely easy. To get the block mounted I just had to find in the accessory bags the four 2011 socket risers that screw into the sockets mounts and raise up the mounting points. From there you have to also find the four big thumbscrews. They have grips to be installed by hand or a Philips head on top to be screwed in.

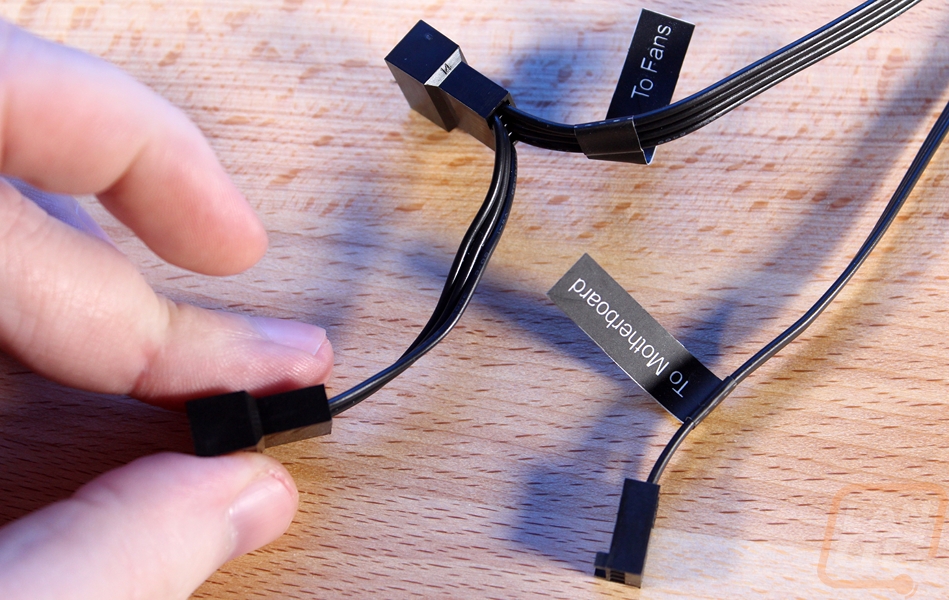
From there I had to mount the radiator, like I said the fans come pre-installed so I just had to use the included screws to mount it to our test bench. Sadly the hoses weren’t long enough to reach for a proper installation so I mounted it vertically so they would reach. From there I just had to wire everything up. Normally you have to hook the two fans up to the motherboard directly or with a splitter but EVGA went with a unique design that powers the fans from the controller itself. So you hook one wire up to the motherboard's CPU fan header and then there is a second fan lead that you hook both fans up to. Both are labeled as well to help. Then lastly you take the included USB cord and hook it up to a USB 2.0 header on your board and then into the water block. It is right-angled for better clearance but I did have to remove the ram from our test system to hook it up then reinstall the ram and It was tight going back in, so keep that in mind if you are installed the CLC 280 on a board with ram slots close to the CPU socket like on X99 boards.
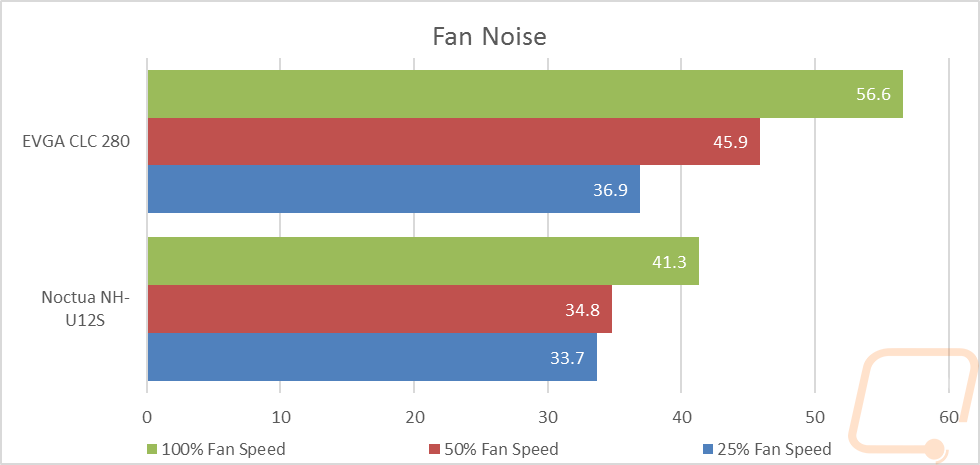
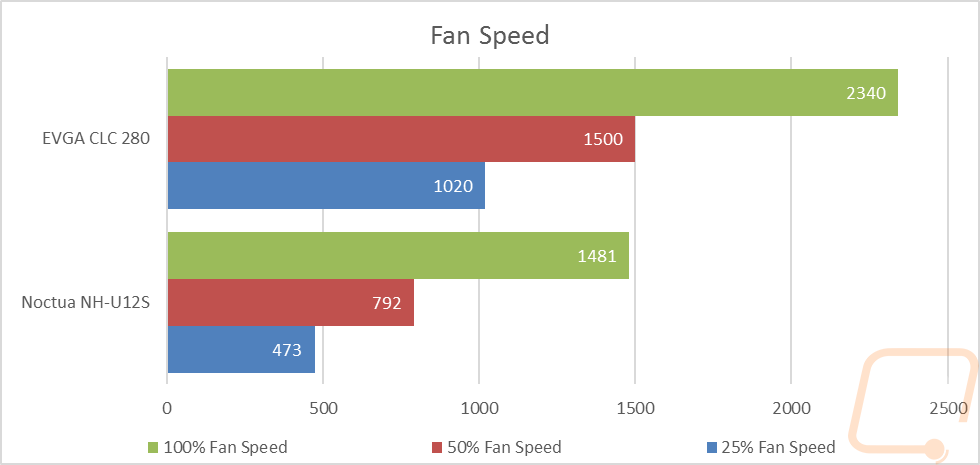
To start off my testing I tested the two fans included with the kit at three different fan speeds. I ran at 100%, 50%, and 25% to get a good look at the range and I documented both the RPMs and the noise levels with those. Because we also replaced our decibel meter I also retested the Noctua NH-U12S as well. The fans maxed out at 2340 and even at 50% fan speed were actually at the highest speed the Noctua cooler reached so I wasn’t too surprised when the CLC 280 was significantly louder. The kit is also running two fans and they are also larger as well and frankly in person at 100% fan speed, it was loud and even scary with those exposed blades at that speed. Down at 25%, the kit was very quiet though.
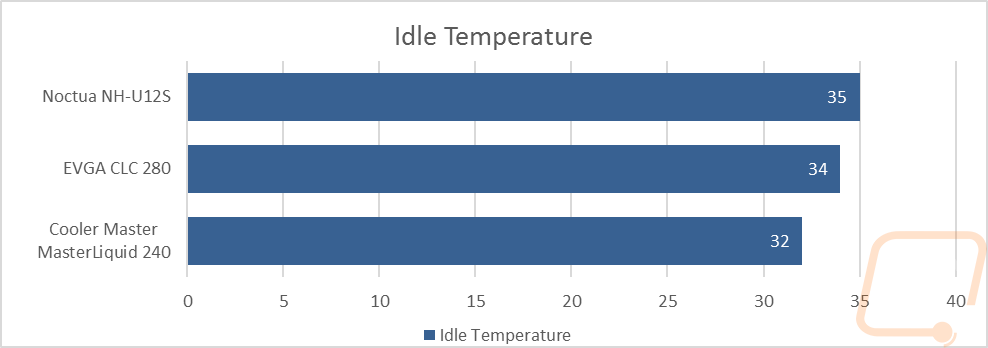
Then for temperature testing, I documented the Idle temps and then heated things up with Prime95 to see how well the kit cooled. Going up against a single fan air cooler and a smaller AIO did give the CLC 280 an advantage though. The end results were really good with the kit running the coolest out of the three tested. I tested with the stock fan profile and again with the fans cranked up and it was especially better with the stock fan profile. I will say that the kit never really had to crank up into the 50 and 100% fan speeds, even when putting it under load so that did help a lot with the overall noise performance.
I was also impressed with the lighting on the CLC 280. The backlit EVGA logo on top of the kit was simple but with the RGB lighting, I was able to adjust it to different colors. Orange was still an issue, for whatever reason, it is rare to be able to get a good orange with an RGB kit and the CLC 280 couldn’t even get close so you may have to toy with it a lot to get your colors perfect.
Software
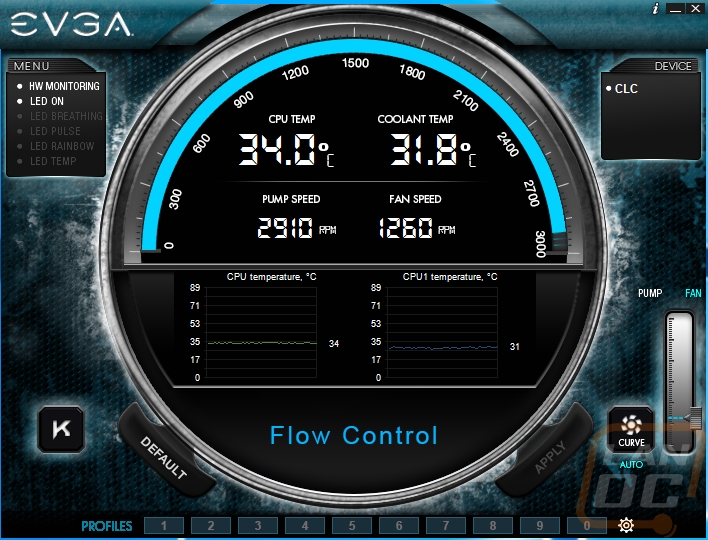
Unlike most other AIO water cooling kits, the EVGA CLC 280 does use software. Once you have everything installed you can jump on EVGAs website and download the installer. Once installed it boots up looking a LOT like EVGAs GPU software only this one is called Flow Control. It has a round circle in the middle with all of the important info right in front of you. The top blue bar shows the pump speed and you can also get a number readout in the middle as well as the fan speed next to it. For temperature readouts, you have a CPU temp that is pulling from the die temp and then a second temperature readout showing the coolant temperatures. This is interesting and something you don’t normally see so you can see when your coolant temps are starting to get saturated.
The main page has basic LED controls up in the top left corner when you can turn the lights on or off or switch to basic effects like breathing, pulse, rainbow, and a temp mode that changes depending on the CPU temps. Over on the bottom right you can control both the fan and pump speeds with a slider or turn on auto mode.
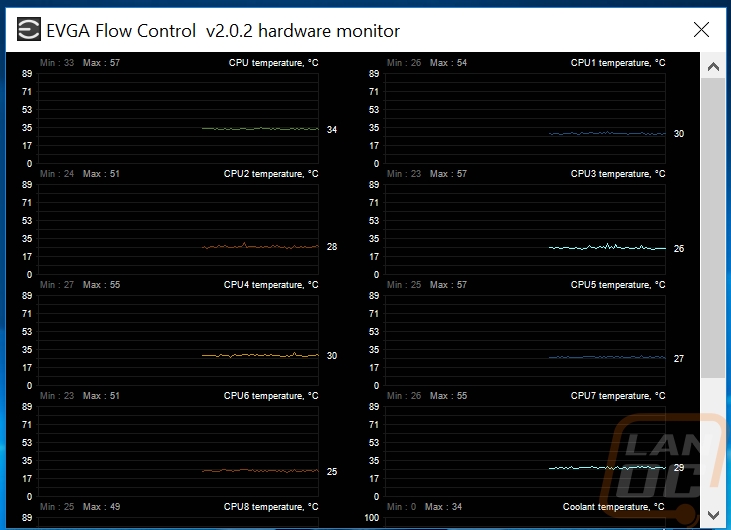
In addition to the two graphs on the main page, you can also open up a more in-depth hardware monitor that breaks down individual CPU temps and graphs out fan and pump speeds.
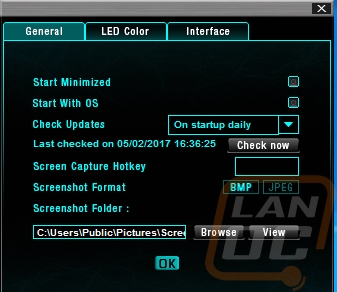
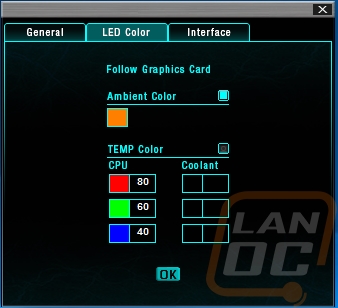
The software has a few options mostly starting with how it boots up and if it starts with windows. There is also a built-in screen capture software and you can pick your screen capture hotkey, save folder, and file type. For LED controls you can also adjust the individual color with a color dropper, pick the colors for the temp readout, and if you have an EVGA video card you can set the cooler to just match your GPUs color.
Overall and Final Verdict
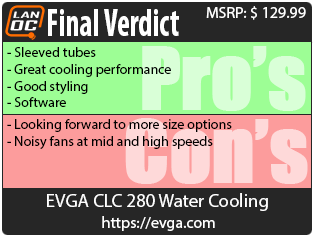
So for EVGAs first jump into the CPU AIO Cooler market, they didn’t follow the normal trend and just repackage a basic OEM kit like everyone else. They designed a unique all in one unit with more control, a clean look, and their own fan design as well. The sleeved tubing, RGB lighting for the logo, and the overall waterblock look all together gives it a great style that should look good in just about any build. You can turn off the lighting if you want or set it to match your build. Their software is still a little laggy but even in this early state it has a lot of control and gives more information than you get with anything else that I have tested. Especially being able to see the coolant temperature on top of everything else. The cooling performance was also great!
Being still new to the market, EVGA does need to work on getting more size options out. Especially a 240mm option as that is normally the most popular size. I’m also still a little unsure about the fans. They were quiet when I didn’t mess with fan speeds because the CLC 280 ran cool but when I turned the fans up they got a little noisier than I expected. The unique design also makes it easier to get wires or fingers in the fan accidentally so you have to be careful of that as well.
Pricing wise EVGA has the CLC 280 that I tested today priced with an MSRP of 129.99 and you can already get it cheaper in stores. This puts it right with the Corsair H110i and NZXT X61 that are the closest competition with similar features. The clean look and sleeved cables put EVGAs new kits up near the top of the list for people looking for a nice AIO kit where in the past I only recommended the H100i and H110i kits. It's nice to see more premium AIO kits becoming available and I’m excited to see what EVGA is going to bring out in the future. If their GPUs are any indication, they won’t just leave things alone, they will continue to try to improve.

Live Pricing: HERE


