Today we are back again with another multi-heatpipe CPU cooler, this time from one of the larger names in performance cooling. Gelid Solutions has been around since 2008 and have proven themselves to be manufactures of quality cooling products and accessories. Slated for the test bench is The Black Edition, a seven heatpipe air cooler that promises both quiet operation and high end performance. Will this cooler be able to stand up to our tests and impress or be relegated to the bottom self and forgotten? Let’s find out.
Product Name: The Black Edition
Review Sample provided by: GELID Solutions
Review by: Debo
Pictures by: Debo
|
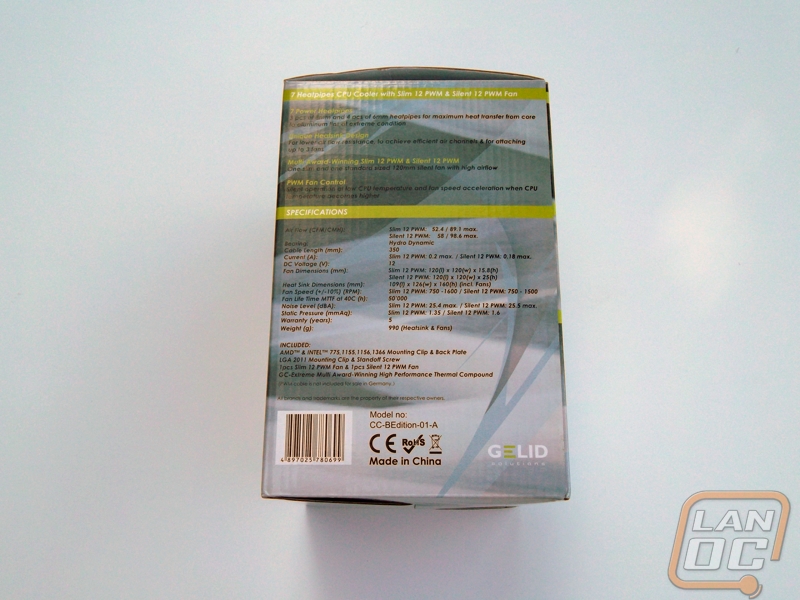
Specifications |
|
|
Cooler Unit |
|
|
Model Number |
CC-BEdition-01-A |
|
Material & Finish |
Aluminum fins; nickel-plated copper heatpipes; copper base |
|
Socket Compatibility |
Intel: LGA 775/1155(1150)/1156/1366/2011 AMD: AM2(+)/AM3(+)/FM1/FM2 |
|
Dimensions |
109 x 126 x 160mm () |
|
Weight |
990g (w/ fans) |
|
PWM Fan |
|
|
Dimensions |
Slim 12: 120 x 120 x 15.8mm Silent 12: 120 x 120 x 25mm |
|
Fan Speed |
Slim 12: PWM: 750 – 1600 RPM Silent 12: PWM 750 – 1500 RPM |
|
Air Flow |
Slim 12: 98.6 m3/h; 58 CFM Silent 12: 89.1 m3/h; 52.4 CFM |
|
Noise @ 100% |
Slim 12: 25.4 dB(A) Silent 12: 25.5 dB(A) |
|
Lifetime |
50,000h |
Packaging and Overview
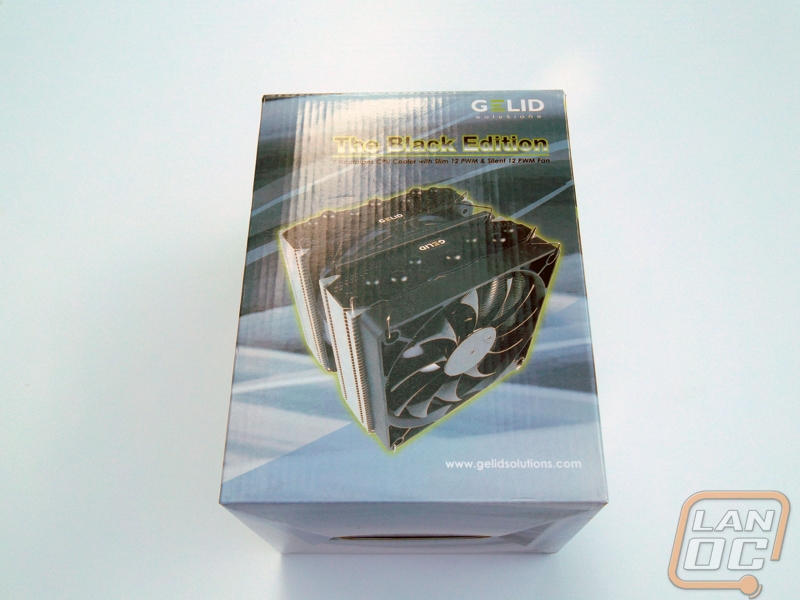
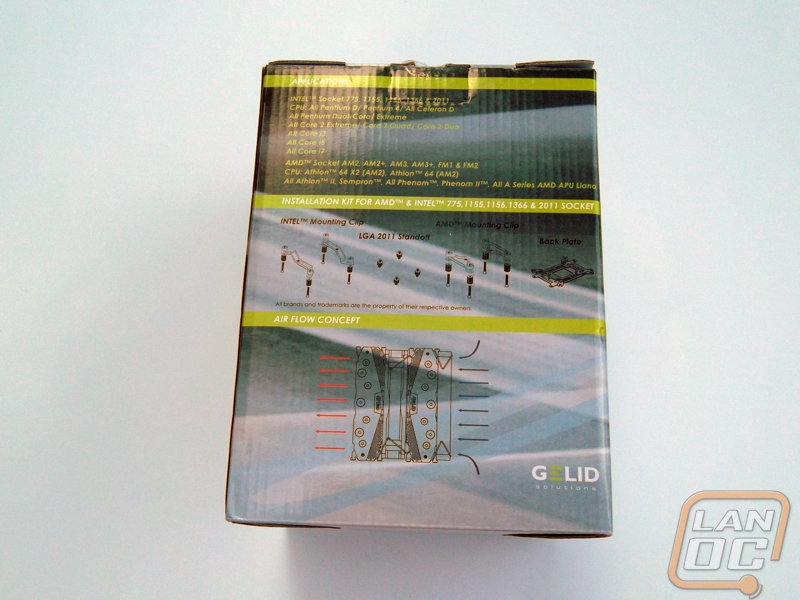
The first look we get at the Black Edition is right on the front of the box in the form of a slightly downsizes photo to go along with the coolers logo is recognizable Gelid neon green. The rear has more information for us in the form of socket compatibilities, the included installation kits and the basic air flow concept for the cooler.
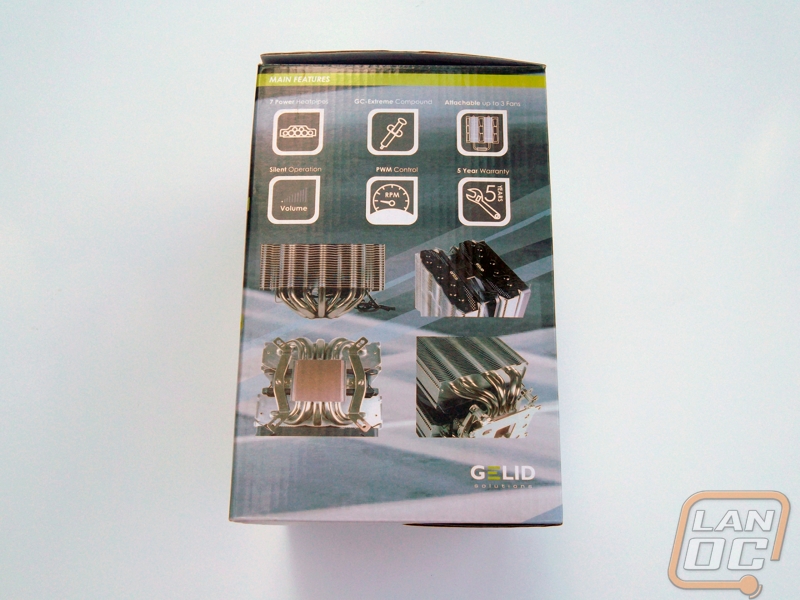
All four sides of the box are packed with information and graphics to grab your attention with one side offering some more pictures of the Black Edition and features while the other side tackles additional features and the specifications for the cooler. All in all the outer shell is nice from a consumer stand point acquainting you with the product.
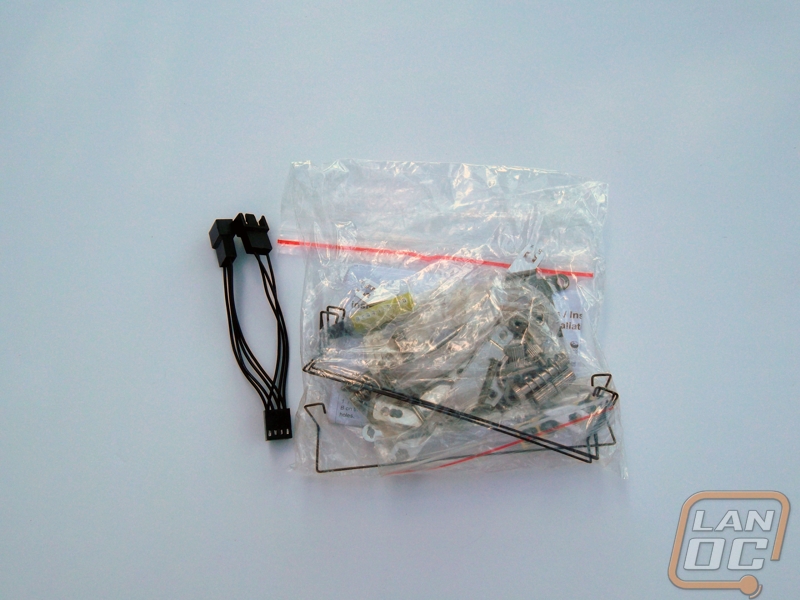
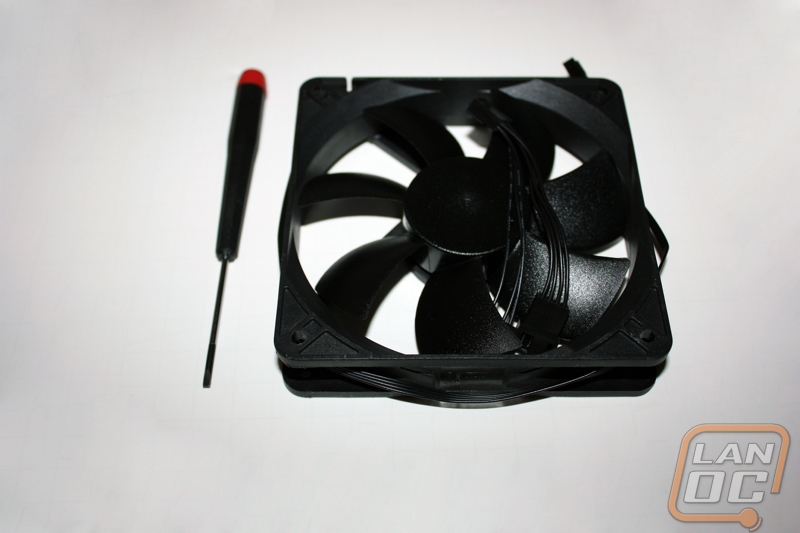
With the outside covered, we can dive right in to the good parts where we first find a small white box filled with all our packed in installation goodies. Clamps, nuts, spring screws and our backplate are all there to go along with the fan clips for the Silent PWM fan and a two-in-one PWM hookup to power both fans simultaneously. The included tube of GC-Extreme thermal compound is enough for a few installs so mind your usage.
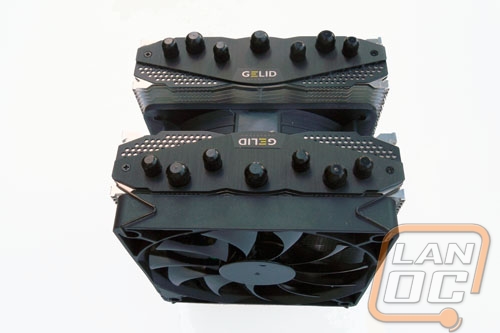
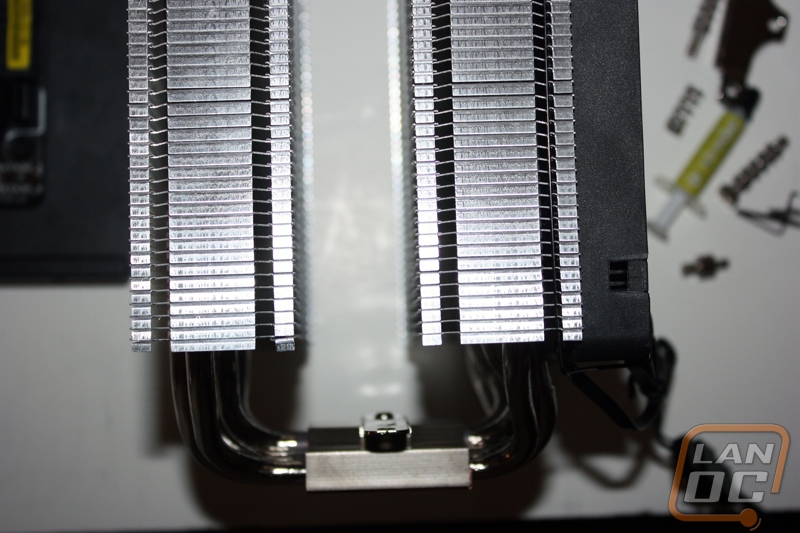
Once we set aside the extras we can take a look at the Black Edition fully. The first thing of note is the enclosed sides of the fins meaning any air you push through the cooler will make it all the way across the fins increasing efficiency.
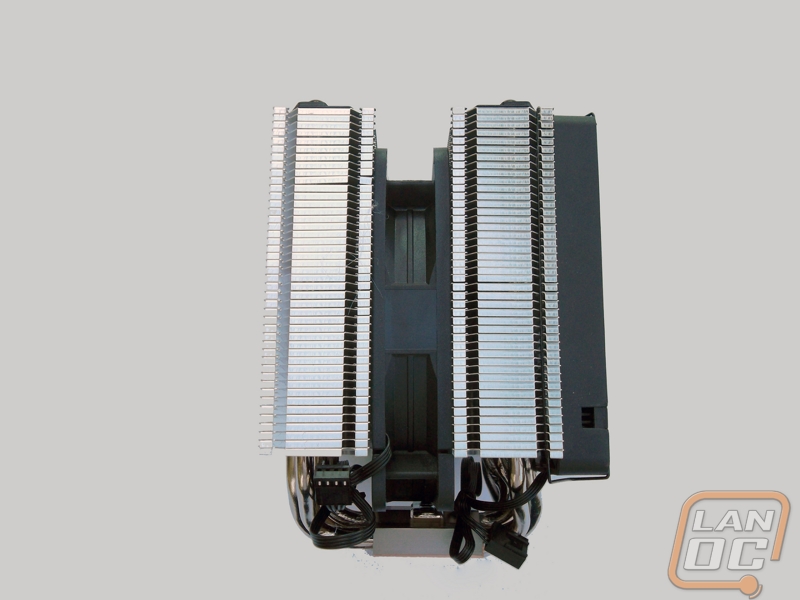
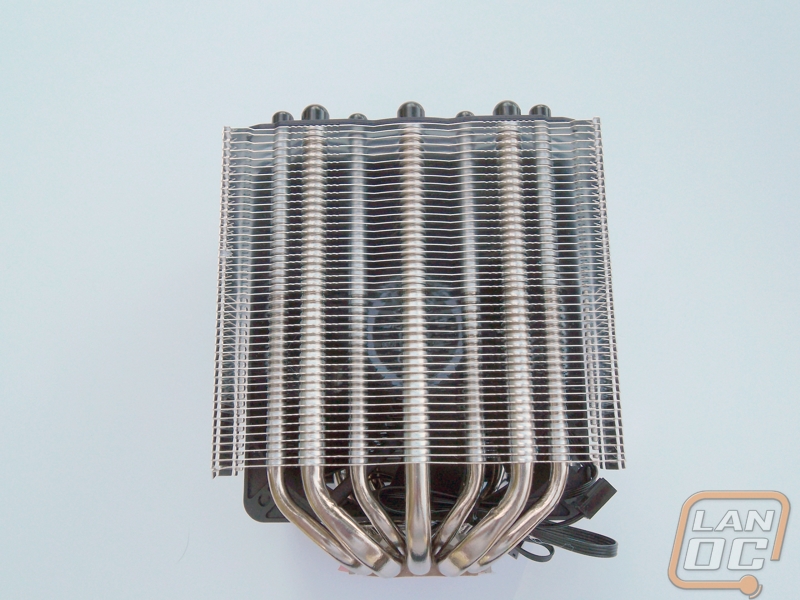
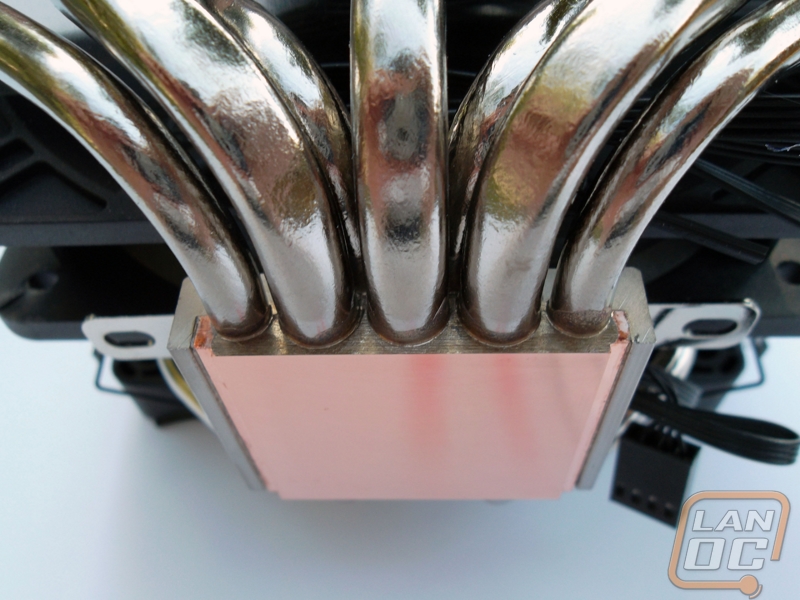
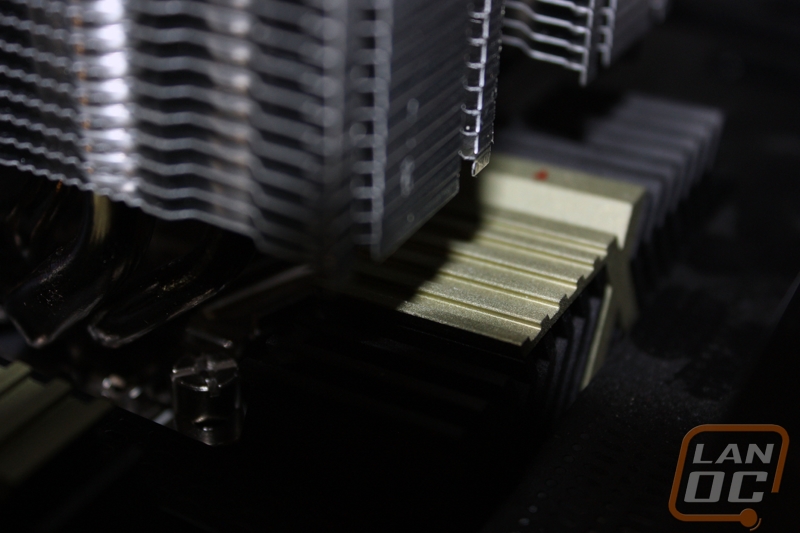
Rotating the cooler we can now take a look at the heatpipe arrangement. The Black Edition sports a trio of 8mm as well as four 6mm pipes all made of nickel-plated copper and running through the base. As you can see upon closer inspection, the base is made of solid copper with no plating and machined to a mirror finish. The layout of the heatpipes within the base is meant to take advantage of each individual pipe while dissipating heat from the most concentrated part of the base.
Testing Methodology
Our testing rig is as follows:
- Processor: Intel Core i5-2500 @3.3GHz
- Motherboard: Asus Sabertooth P67
- HDDs: Seagate Barracuda ES.2 1TB
- RAM: 8GB Kingston DDR3 1600
- Video Card: NVIDIA GeForce GTX 560 Ti
- Case: CoolerMaster xB
- OS: Windows Home Premium x64
A total of two tests will be run. These tests are as follows:
- A Peak Test with the supplied cooler and fan setup running Prime95 for a total of 30 minutes.
- A Real World Test using the supplied cooler and fan setup running 3DMark 11 for a total of 30 minutes.
The Peak Test is meant to test the absolute worst case scenario you could throw at your perspective cooler and will both be conducted with the CPU fans running at 100% RPMs under load. The real world test is something a bit less stressful, meant to give you an idea of the coolers performance in a more day-to-day sense.
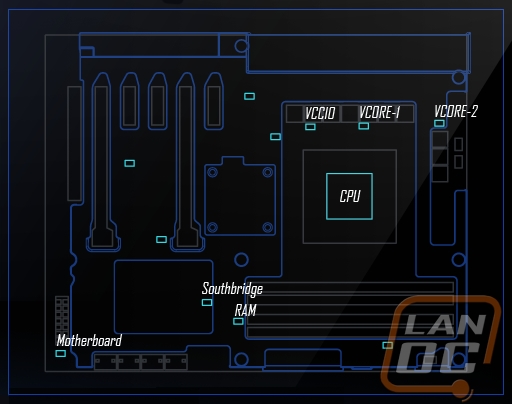
All tests will be performed using Noctua NT-H1 thermal paste in order to eliminate that variable from testing. CPU temperature reading will be taken using RealTempGT, RAM DIMM temperatures will be taken with a non-contact infrared thermometer and the remaining temperature results will be taken using the Sabertooth P67’s own temperature sensors using the following layout.
The Peak test will also be subject to noise level measurements taken with a digital sound level meter every 10 minutes throughout the test to be averaged into an overall comparison score during both load and idle timeframes.
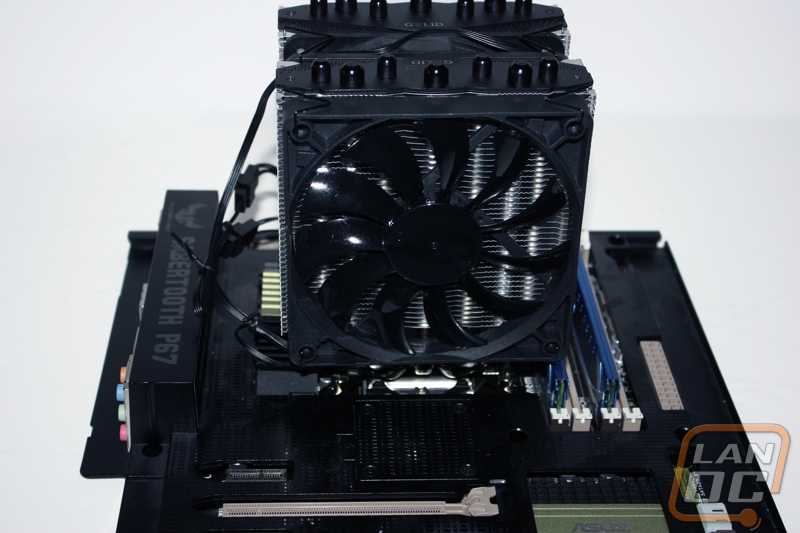
Installation
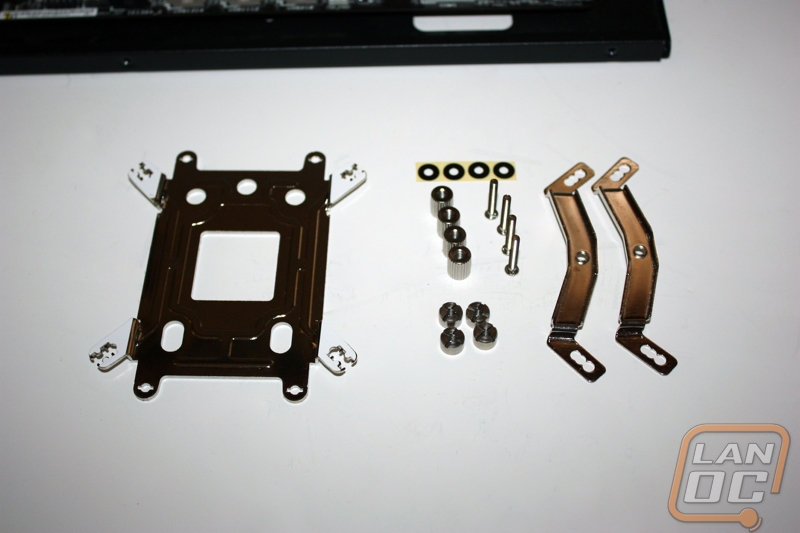
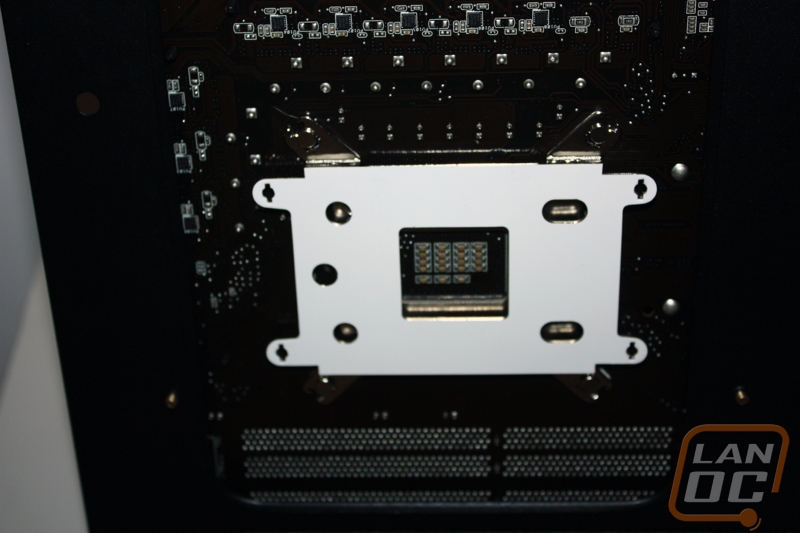
Our test bench uses an LGA1155 processor so those will be the directions we follow for our installation. After a bit of part gathering we are left with quite the task as securing the backplate and mounting brackets is a nineteen (19) piece affair requiring plastic spacers, threaded screws and a pair of nuts to hold the backplate and mounting brackets firmly in place.

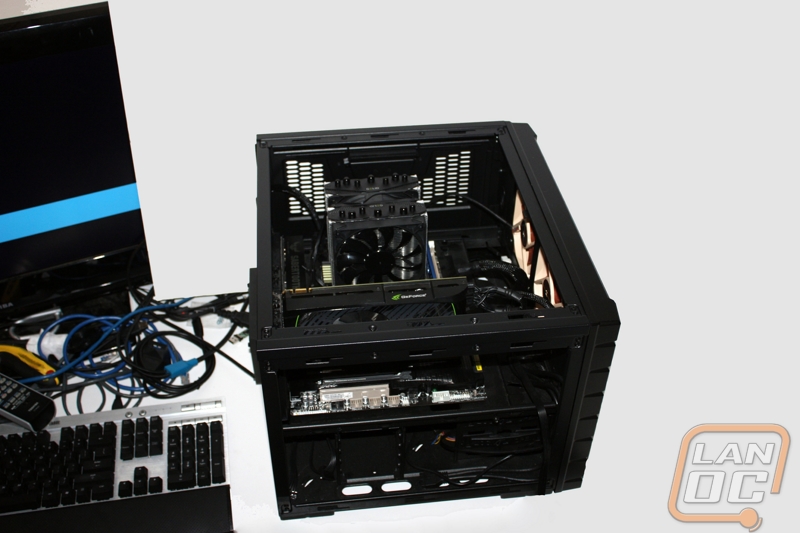
Admittedly my task was made easier due to the removable motherboard try in the test bench but this particular part of the install did not turn out to be too taxing as about 10 minutes later I had both the backplate and mounting bracket secured and ready for install.
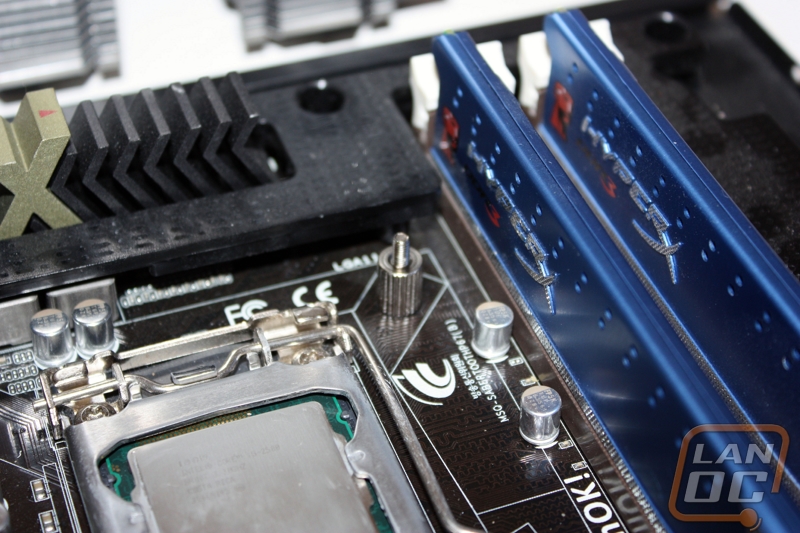
The next part is where the whole process went south. The first hurdle encountered was the fact that the Black Edition’s heatpipe arrangement crowed the P67 Sabertooth’s MOSFET heatsinks and simply would not fit in its optimal positioning. This is something to consider before purchasing if your board has similarly large heatsinks around your processor.
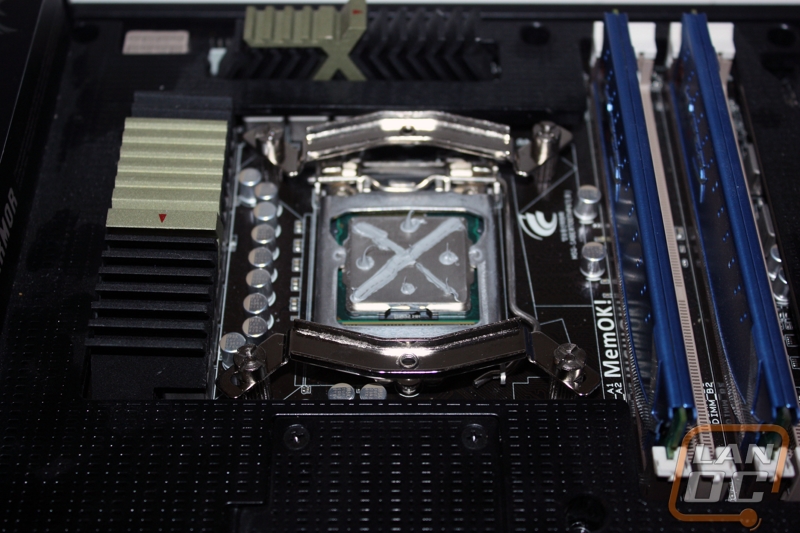
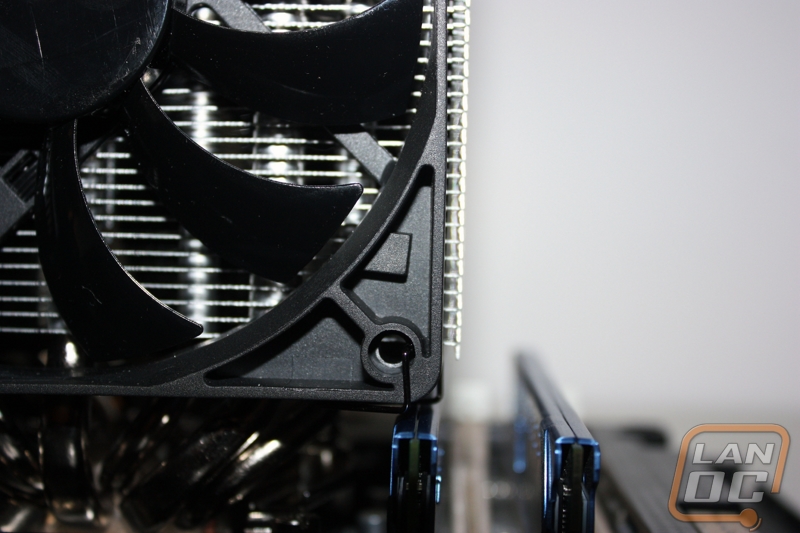
After removing the mounting brackets and arranging them to face the other direction the second hurdle came when trying to secure the spring screws that hold the base of the cooler to the processor. To accomplish this feat you are told to remove the Silent PWM fan in the center and tighten down the screws but the space allotted for this task is incredibly small for the task especially if you are someone like me without small fingers. I’ve included a few pictures for reference pertaining to this particular ordeal. What is worse is the fins inside the cooler are not dull and it was close to a half hour struggle just to tighten down a pair of screws.
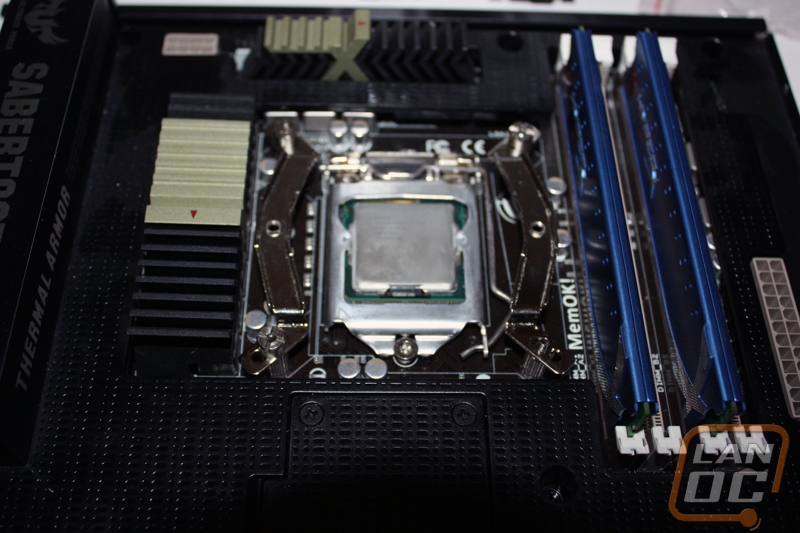
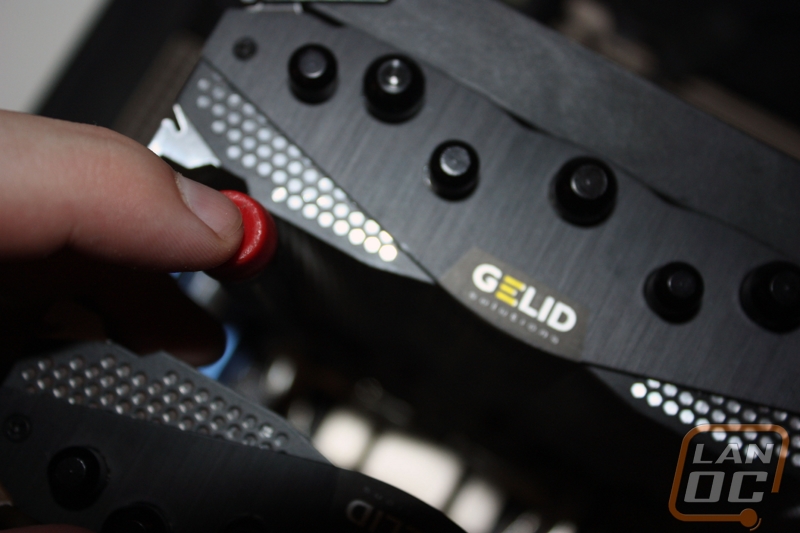
The last issue arises in securing the Silent PWM fan back into the center of the cooler with its clamps. As the coolers position is set in stone, the clamps have to essentially be secured in place blind. This task was made a bit easier for me with a removable motherboard tray but I cannot imagine the problem installing it in a standard case would be. All said and done, I wrestled with the Black Edition for close to an hour but it was finally tamed and quite secure to the board. It is here You can see the requirement for low profile RAM DIMMs when unsing this cooler as even with the thinner orientation facing the RAM we still crowd the first slot.
Performance
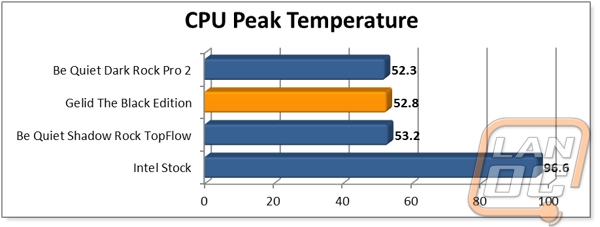
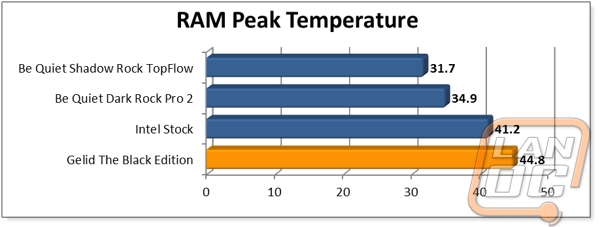
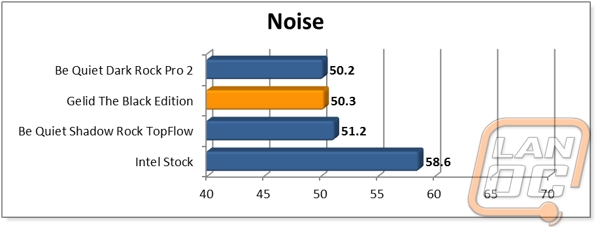
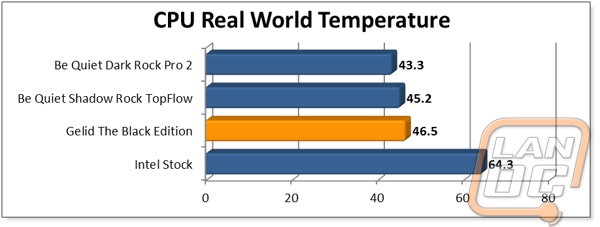
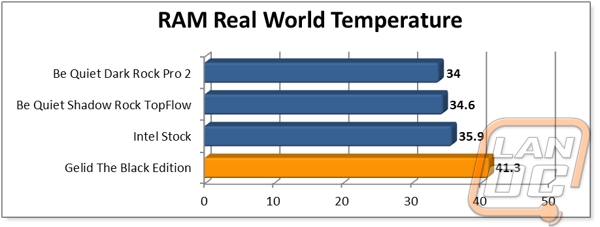
The inability for the Black Edition to be installed in the optimal configuration in our test bench is sure to skew testing numbers slightly, particularly in the RAM temperature results. Still, with that under consideration, The Black Edition nearly equaled our other seven heat pipe behemoth thus far and with 300 grams less bulk to boot. The RAM temperatures are less then spectacular but this is mostly because of the lack of air being moved across the heat spreaders during the test. Noise was another pleasant surprise with nearly equal averages to its direct competition.
When it comes to the real world test the suboptimal positioning begins to show more. In these tests the video card generates more heat than during the peak test and with the fan sucking air right off that cards PCB you can start to understand why the cooler falls off in performance. Still the issue is one with space so the Black Edition is not fully without blame on this handicap.
Overall and Final Verdict
I will admit I would like to retest the Black Edition in the proper orientation at some point but again, I am not looking forward to the installation. While it did preform admirably in several areas even at a handicap it isn’t completely without blame. The unique arrangement of the heatpipes sits so low that without sufficient space around the CPU socket you are forced to face it in a different direction that is optimal for performance. This completely eliminates any gains that may have been achieved.
The Black Edition was a pleasant surprise after all of the wrestling and hoops I had to jump through to get it installed. The quiet operation and equal performance in a smaller package are certainly upsides to look at. However, the space required by the heatpipe arrangement coupled with the bear of an installation leave me with less the pleasant feelings.