Over the past few years it seems like everyone has been jumping into the portable bluetooth speaker market. You have trendy brands like beats pushing it heavily and even smaller companies bringing them out to slip into the market as well. Well Creative Labs got in fairly early with the original Sound Blaster Roar but I never took a look at it. Frankly portable audio isn’t exactly something that fits in my life very much, I’m typically in my car if outside of the house and in the house I have more than enough to output sound including the Sound Blaster X7 that I recently reviewed. That said a while back Creative Labs asked if I would be interested in checking out the Roar 2 and I figured it was about time I took a look. I’ve been using it around the house and whatnot for a while and now I can finally sit down and dive into its features and talk a little about my experience. So hang on, let’s take a close look at the Sound Blaster Roar 2.
Product Name: Sound Blaster Roar 2
Review Sample Provided by: Creative Labs
Written by: Wes
Pictures by: Wes
Amazon Link: HERE
| Specifications | |
| Dimensions |
Speaker: 51.0 x 188.0 x 109.0 mm (2.0 x 7.4 x 4.3 inches) Power Adaptor Cord Length: Approx 1.7m USB Cord Length: Approx 0.7m |
| Weight |
Speaker: 1kg (2.2lbs) Power Adaptor: 150g (5.3oz) USB Cable: 26g UK Interchangeable Adaptor Plug*: 19g CE Interchangeable Adaptor Plug*: 17g |
| Color |
Black White |
| Included Accessories |
1 x Micro USB Cable 1 x Power Adaptor 2 x Interchangeable Adaptor Plugs |
| Bluetooth® Version | Bluetooth 3.0 |
| Bluetooth Profile |
A2DP (Wireless Stereo Bluetooth) AVRCP (Bluetooth Remote Control) HFP (Hands-free Profile) |
| Supported Codecs |
AAC aptX SBC |
| Near Field Communication (NFC) | Yes |
| Multipoint | Yes |
| Connector Type |
AUX-in Bluetooth USB |
| Volume Level Control | Yes |
| Drivers |
1 x 2.5″ Woofer 2 x 1.5″ Tweeter 2 x Passive Radiators |
| Design | Bi-amplified Design |
| Microphone | Built-in |
| Mobile/Smart Devices | Mobile / Smart devices with A2DP -enabled Bluetooth technology |
| Computers |
Compatible with PC (Windows XP/Vista/7/8/8.1) Apple Macintosh equipped with Bluetooth wireless stereo |
| USB Audio | Yes |
| Battery Type |
Built-in Li-ion 6000mAH |
| Battery Life | 8 hours |
| Charging by |
Micro USB Proprietary Adaptor |
| Charge Mobile Devices |
USB 1.0A Max Output |
| MicroSD Slot | Yes |
| Supported Audio Formats |
MP3 (up to 320kbps) WMA (up to 320kbps) WAV (16 bit 48kHz PCM) |
| Other Features | Sound Blaster Control Panel |
Packaging
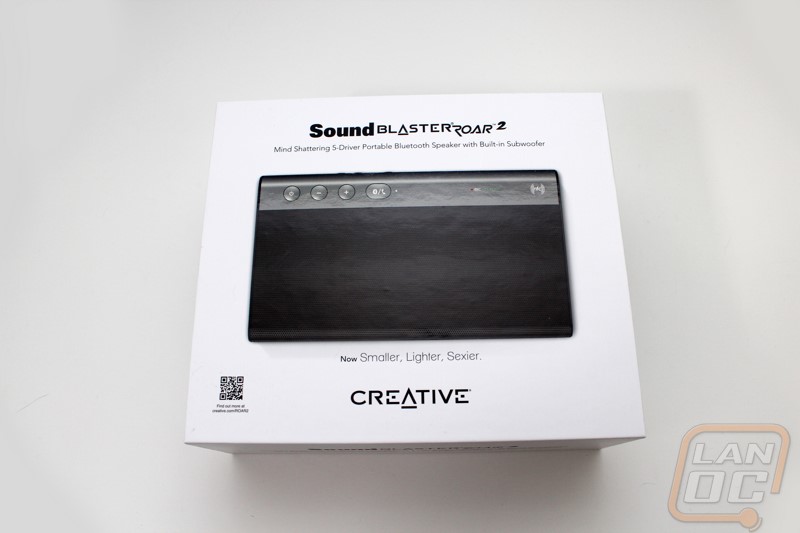
Before I could get into my testing I did have to dig the Roar 2 out of its packaging. In addition to the Roar 2 they also sent over a case as well so I will touch on the packaging for that also. So the box for the Roar 2 reminded me a lot of older Apple boxes. It was bright white and in addition to the product name and Creative branding the top of the box had a large photo of the Roar 2 on it. The picture actually looks down on the speaker just like you would from the top angle. To match that each side has a photo of the corresponding area on the Roar 2. While you can’t get your hands on the speaker before you buy it, this is a great way to show what you are getting. I wish a lot more products did this.
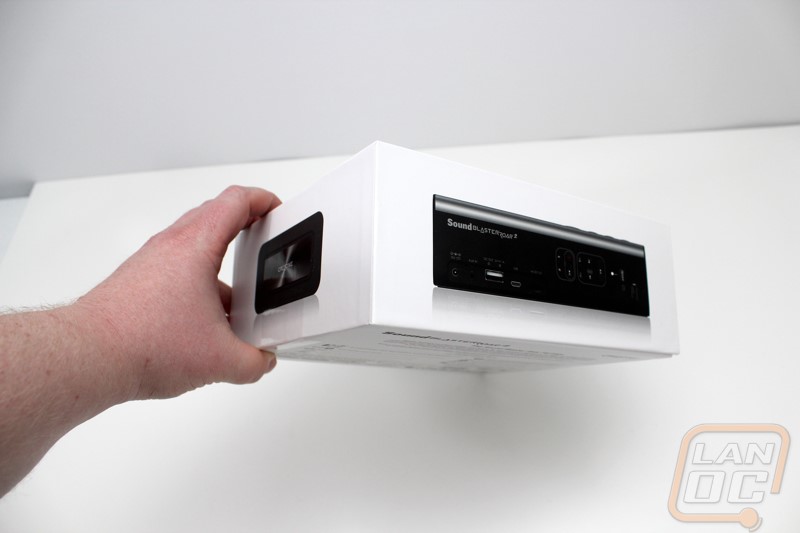
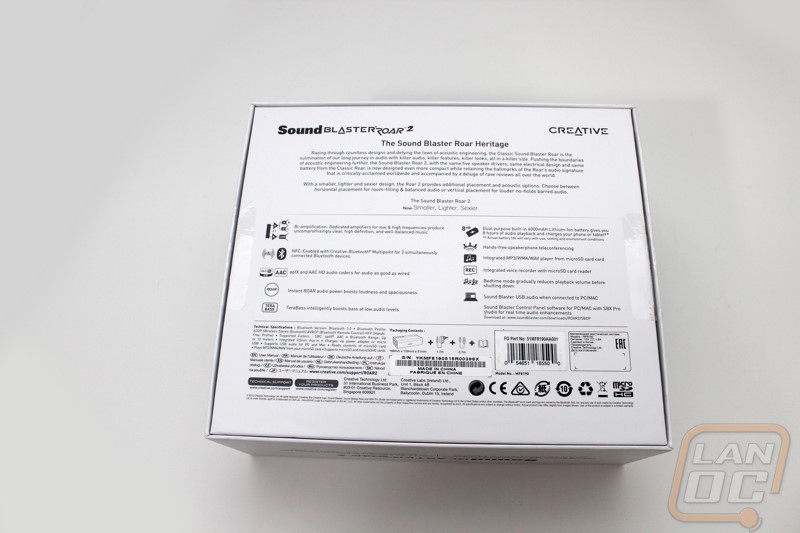
The bottom of the box however didn’t continue the theme. They had to take the space to fit everything that they didn’t fit on the rest of the packaging. So here we have all of the certifications and fine print. In addition, there is a small serial number and the UPC. Then up in the top 2/3rd of the back they quickly cover what the Roar 2 is all about and break down some of its features one by one. They even slip in a small image that shows what you get in the box.
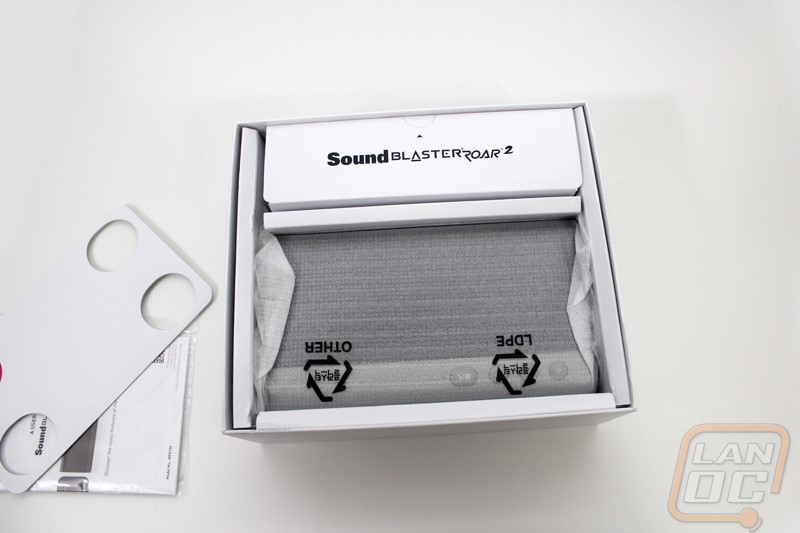
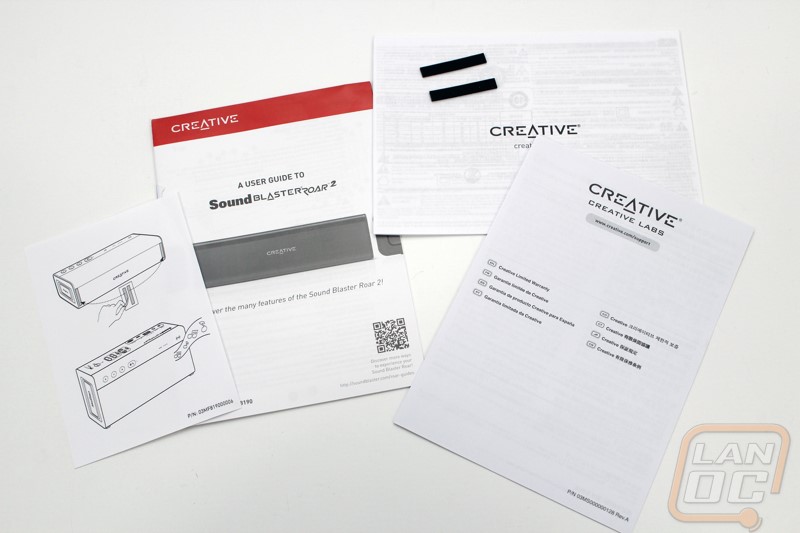
Inside the box the Roar 2 comes wrapped up in foam with cardboard in between it and a small section where they include the power adapter. On top of the speaker they also have bag with all of the documentation. You get a user guide that stands out with the red strip across the top, you also get information on the warranty and other details that most people will ignore. There is also a small paper as well as two rubber strips. The paper shows you how to install the two feet on to the Roar 2 should you want them. This is so you can run it on its side if you would like. I went ahead and did it both because I didn’t want to lose the feet and I also wanted to test the speaker in both orientations.

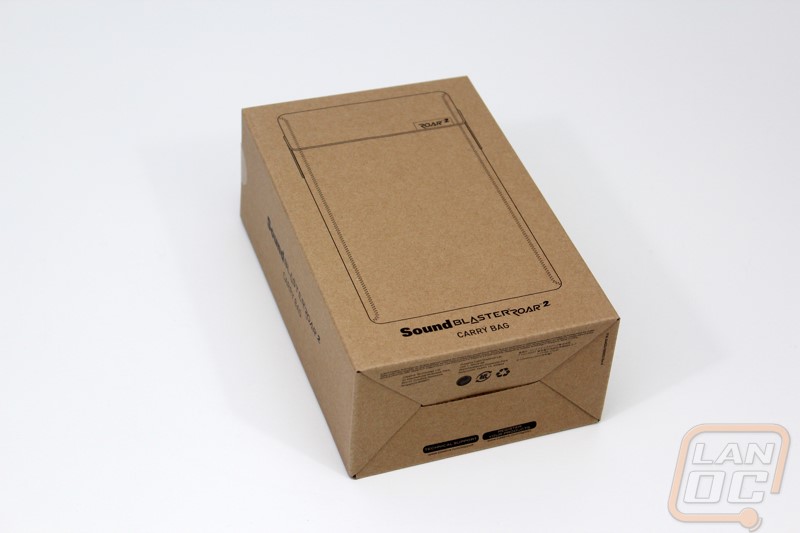
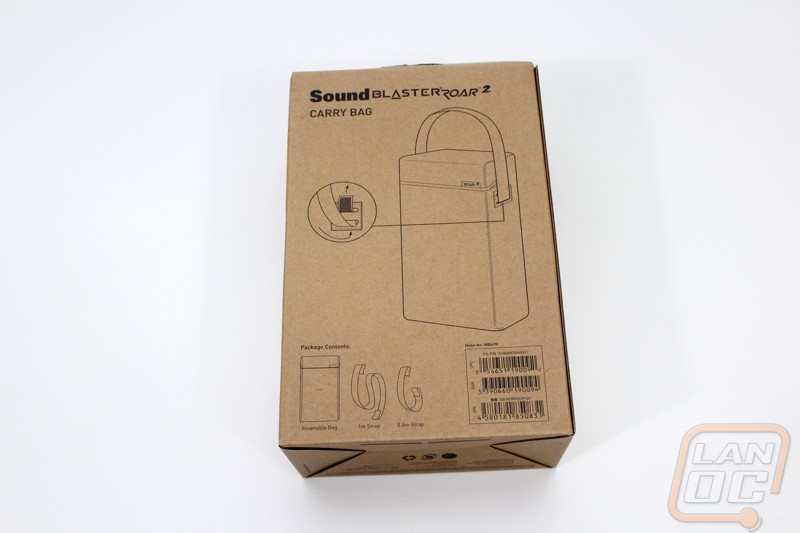
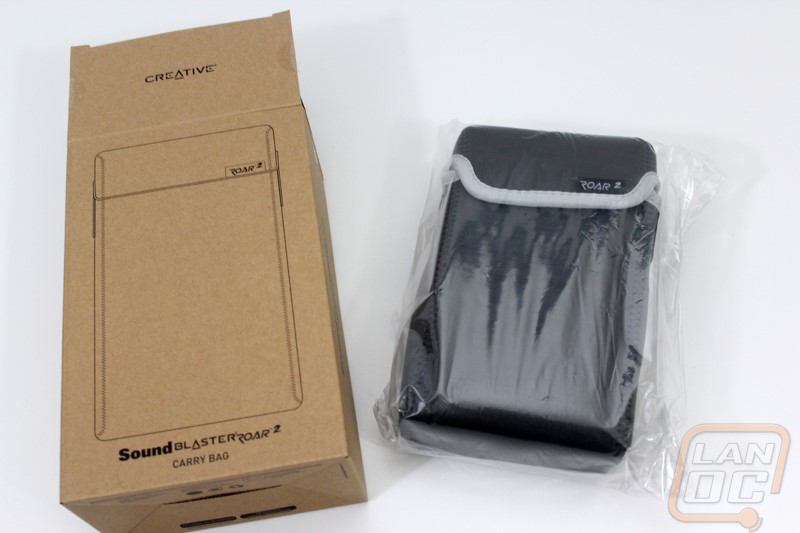
The box for the carrying bag was much simpler as expected. They dropped all of the color and went with a brown box. On it is a printed line drawing of the carrying case on the front along with branding on the front and sides. The back has more line drawings but these show what is inside (the bag and two straps) as well as how to use them. Beyond that when you get inside the carrying case is wrapped up in a plastic bag and has cardboard inside to help it keep its shape. In other words, simple and to the point.
Photos and Features
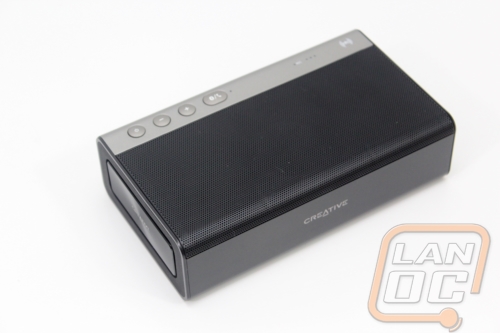
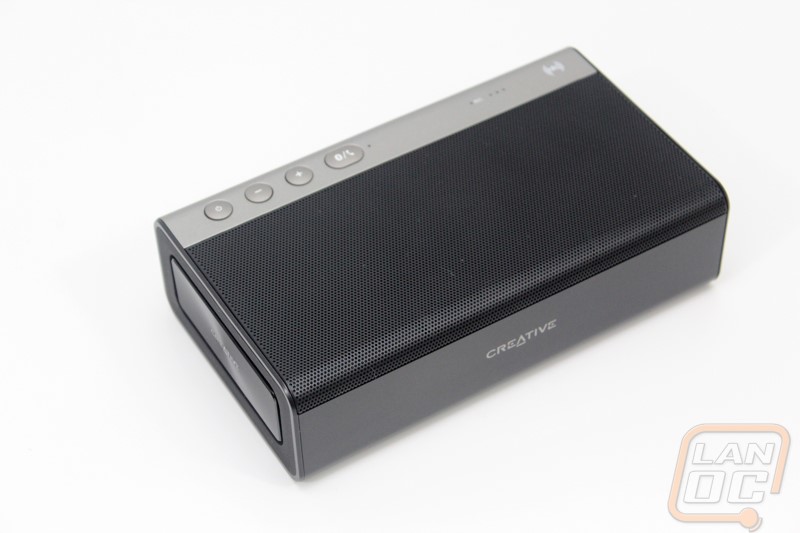
If you have seen the original Sound Blaster Roar the Roar 2 maintains the same shape and a lot of the same features. If this is your first time, like me, the Roar 2 has a similar shape to two old VHS tapes stacked together. This makes it easy enough to carry around but it isn’t exactly portable enough to just put in your pocket. Even if you have large pockets. All of the speakers on the Roar 2 face out the one direction making it easy to direct the sound in the direction you need or lay it flat on its back for music all around.
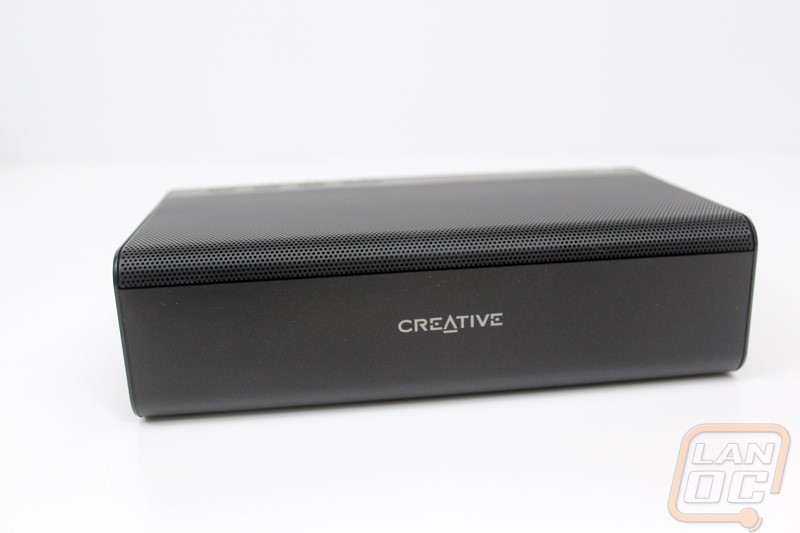
The front edge of the Roar 2 has nothing going on other than the Creative logo across it. This is the side that you can put the additional rubber feet on to angle the Roar 2 in one direction.
On both ends of the Roar 2 Creative replaced the mesh ends of the original Roar with panels. They call these panels passive radiators and what they do is move with the airflow of the 2.5 inch mid and bass driver up top to increase the Roar 2’s bass output. You can also see them move when in use as well, just like a bass driver.
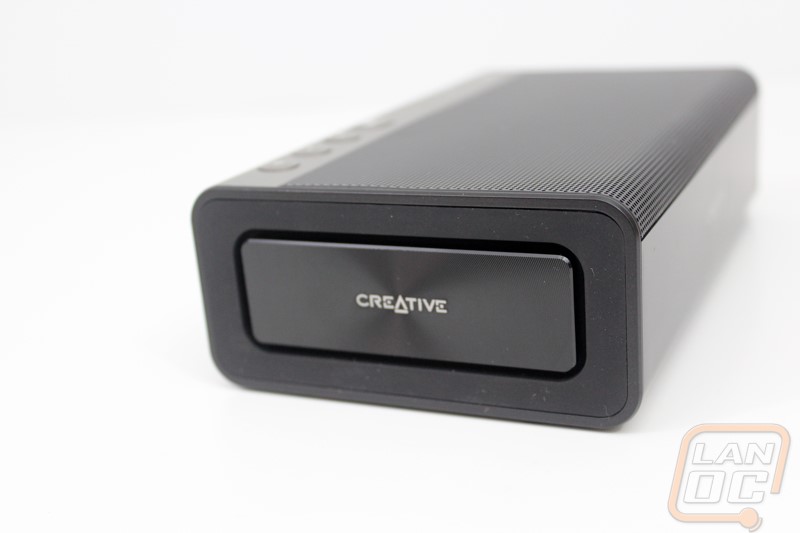
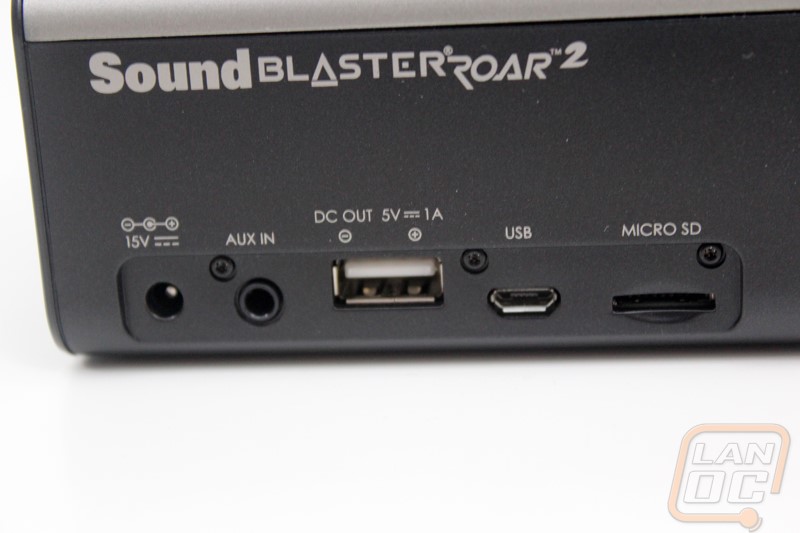
All of the controls and connection options for the Roar 2 are all packed into the one end of the speaker with the exception of a few of the buttons that wrap up around onto the top. There is a lot going on here so let’s try to break it all down. For connections everything is down in the bottom left corner. You get a power connection to recharge the built in battery in the Roar 2. Next to that is an auxiliary in port that you can hook up nearly anything to if needed. After that is a USB port that you can actually plug your phone or tablet into to use the built in battery to recharge or maintain the charge on your device when playing music on the go using the built in 6000mAh battery. Next is the micro USB port, you can use this to recharge the Roar 2 or you can even hook it up as an audio device this way. It will even connect to a PS4 using the Micro USB port to enhance your gaming experience. The last connection is a Micro SD card slot, you can load up your music and play your music without having any other devices hooked up to the Roar 2.
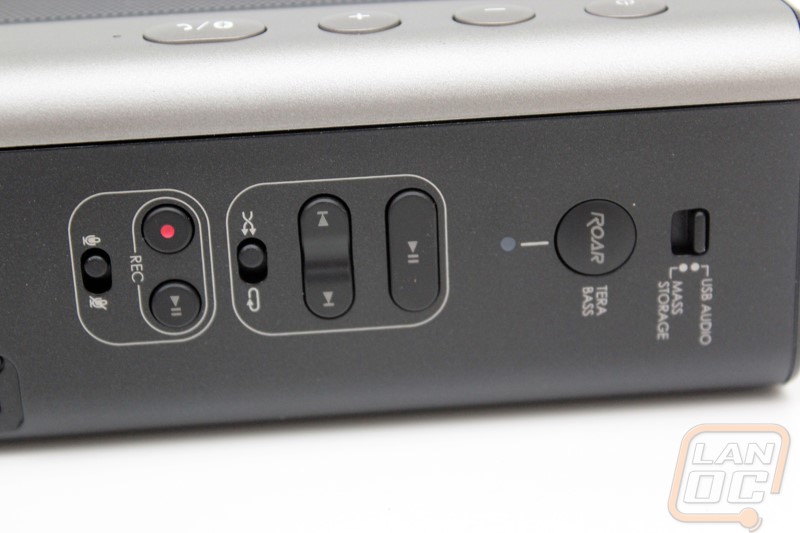
Over on the right half of the back panel we have all of the controls. For starter the switch at the end is how we flip between USB audio or using the built in Micro SD card. Next to that is the Roar button, this bumps up the bass performance. Next you have playback controls to flip through songs, play/pause, and to have random songs or to play them in order. Next are the recording controls. Along with being a speaker the Roar 2 actually has a built in microphone for use as a speakerphone and you have the option when you have an SD card in to record notes or even record a speakerphone call if you want.

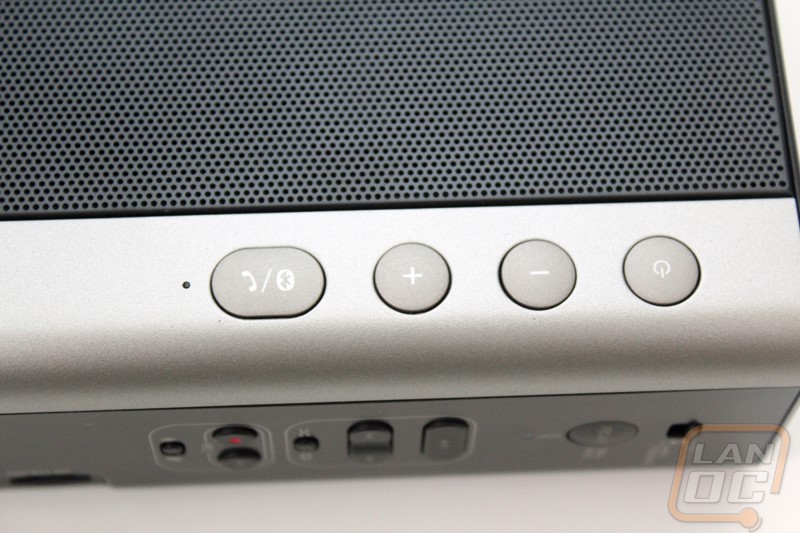
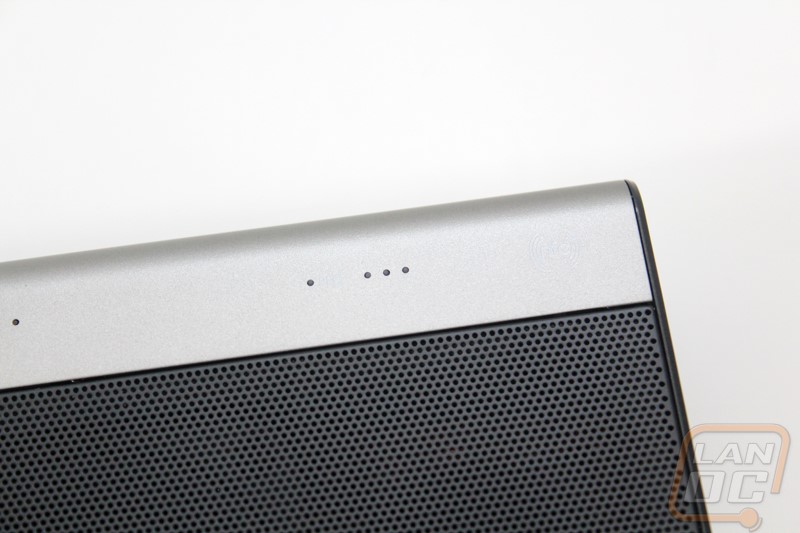
Up on the top edge of the Roar 2 next to the side panel controls we have the rest of the Roar 2’s controls. Here we have a power button, volume controls, and the speakerphone/bluetooth setup button. The controls are large and easy to use due to their size. To turn the Roar 2 on and off you press and hold the power button, the two middle buttons handle volume and the end button will answer your phone on speakerphone if you get a call or if you press and hold it you can put the Roar 2 into a Bluetooth searching mode to connect it to your devices. Also long the edge are a few pinhole LEDs that will let you know how the Roar 2 is doing on battery life. Next to the pinholes the Roar 2 also has a small NFC logo, this is because on the top they have built in NFC to let you touch your phone and automatically connect it as a speaker to make setup even quicker.
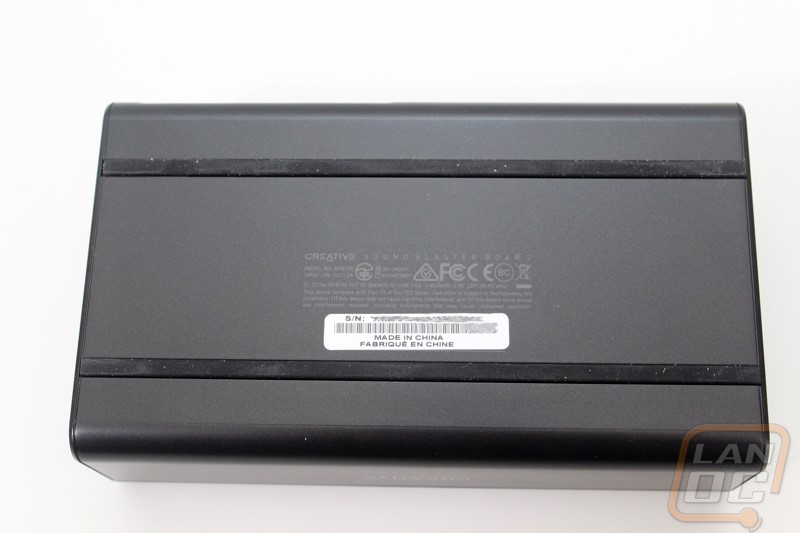
The bottom of the Roar 2 doesn’t have to much going on. Here you have all of the standard required stuff printed on the bottom and then a sticker with the serial number should you need to RMA it. Then from one end to the other there are two rubber strips to keep the speaker from getting scratched up and to keep it from sliding when you have it out.
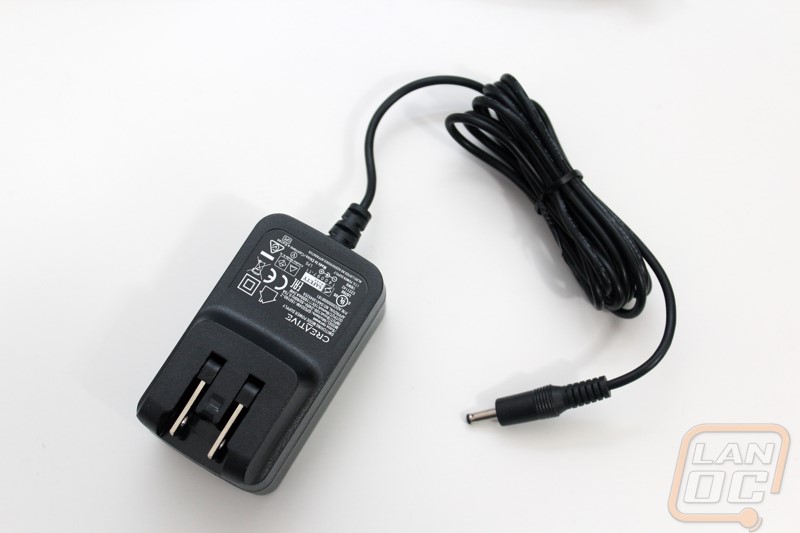
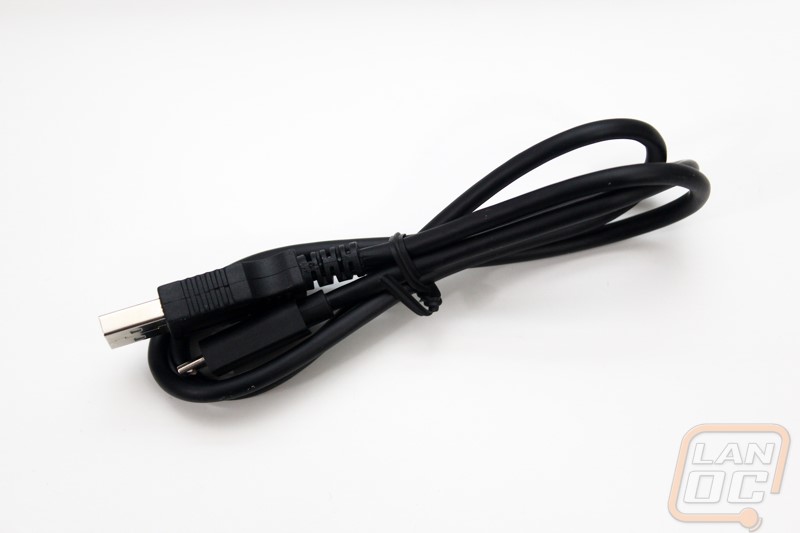
For accessories, the Roar comes with its power cord to get it recharged in between uses or during extended use as well as a thick USB to Micro USB cord for hooking up some devices.
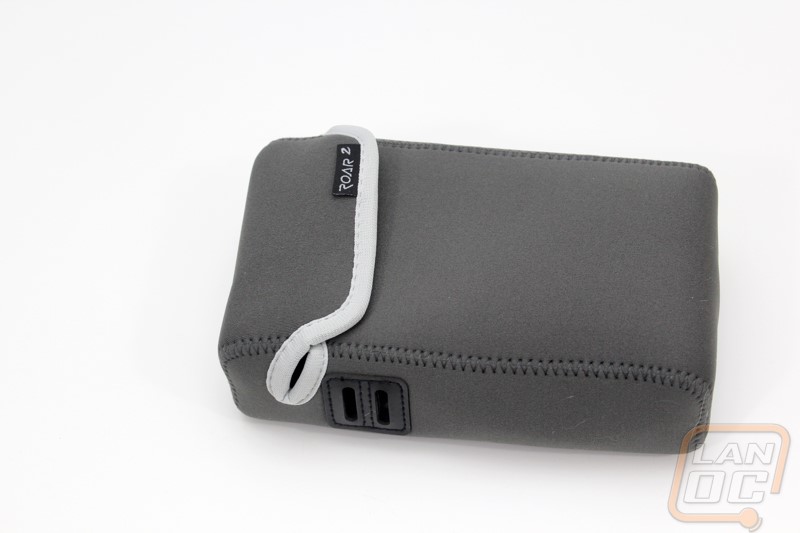
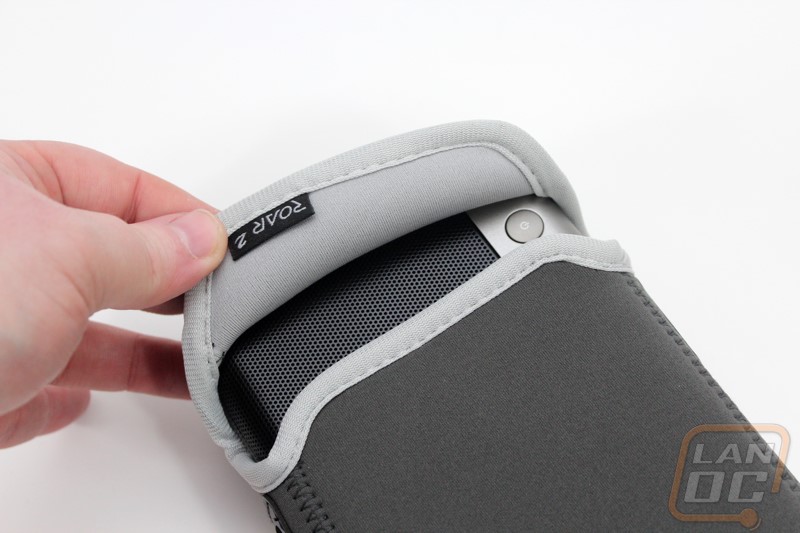
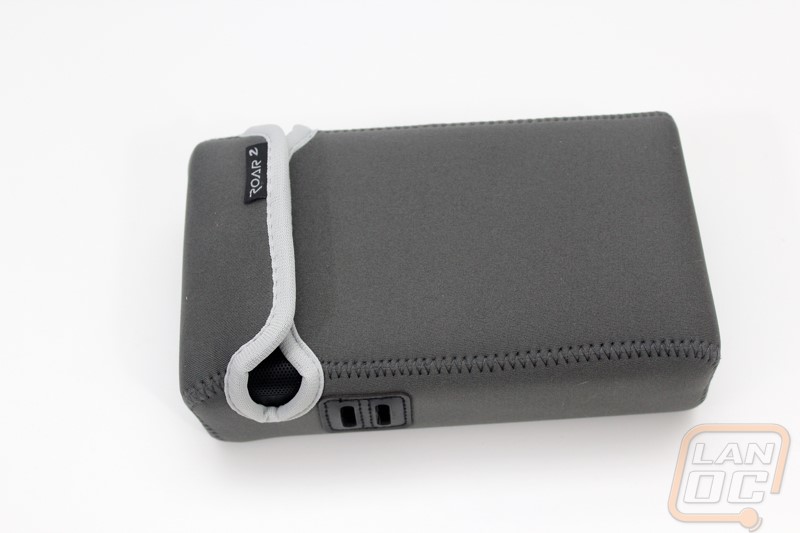
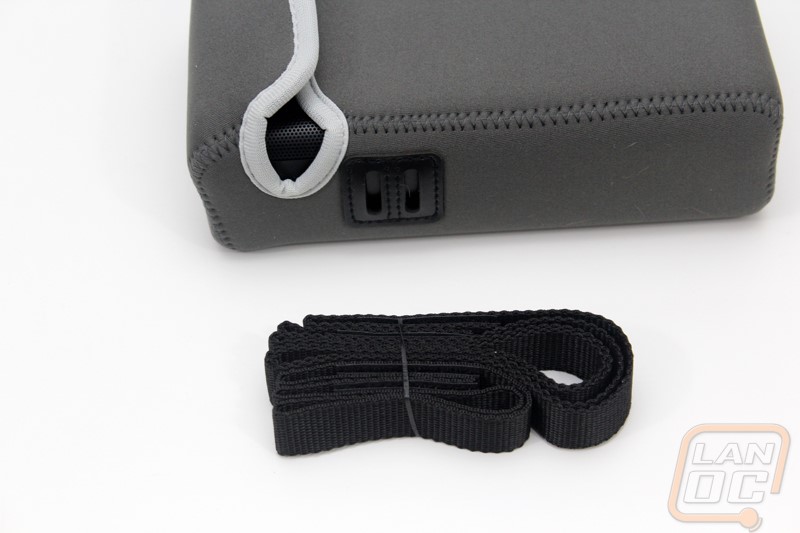
Like I said earlier they went ahead and sent a carrying case with the Roar 2. This doesn’t come with it by default but is available from Creative Labs or if you look on Amazon there are a few other aftermarket options as well. The official case is made out of a padded neoprene. The design is very simple, the top of the case flips open and you can slide the speaker in. It is a very snug fit. You can flip it inside out to get a light grey or the dark grey. Then they include two different straps. One is a long shoulder strap and the other is a short strap for carrying it.
Performance
For testing the Roar 2 there were a few different things I wanted to look at. For starters I wanted to find out just how much use it would see for someone like me who just isn’t as active. Typically, with a portable speaker like the Roar 2 I imagine it more of something you take with you when on vacation, at the beach, or maybe something you bust out when people are over for music. None of those are things I would normally do though so I wanted to see what I would end up using it for. The of course I wanted to see just how good the Roar 2 sounds. The other aspect was just how easy it to work with. This is the type of device that need to be easy to use and accessible for anyone.
So first off just how did I end up using the Roar 2. The first time I busted it out was just in the office doing some audio testing, this seemed especially pointless though because I could just as quickly attach my phone to the X7 and have even more power. So the Roar 2 sat around for a little while until one weekend I was out in the garage working on my car. I have a stereo in the garage but using the Roar 2 was a much better option because I wanted to listen to Pandora. Then after that the Roar 2 ended up in our living room during the college football season. On top of our big screen TV for a few weeks we also had our projector hooked up and the Roar 2 provided a perfect way to get audio from the small PC hooked up. I could have just gone with the speakers on the projector but let’s be honest those typically don’t sound very good.
So how easy was it to get connected to the Roar 2 during my testing? Well in the first few tests I was just using the speaker with my phone so all I did was make sure I had NFC turned on and tapped the phone to the Roar 2 and it did all of the work. I don’t think setup could be any easier. When hooking up a PC I did have the option to hook up via the audio input but I just went with bluetooth so going that route was as simple as holding the bluetooth button on the Roar 2 while in the search screen on the PC, once again very simple. This actually brought up to me how great the Roar 2 would be when traveling to hook up to my laptop to improve audio quality when listening to music or even when on group calls.
That leads me to the third and most important part of my testing. Just how good does the Roar 2 sound? Well as far as power it was the perfect size to fill the room both in our living room and in the two car garage. It’s not going to replace a full stereo for really turning things up but for a portable device I was really impressed with how loud it could go. As far as the audio quality goes. Initially I was a little concerned with the lack of bass but when I turned on the Road mode it bumped up the bass performance to right where it needed to be. As I mentioned when using the Roar 2 with our projector it was a huge difference in performance compared to the built in audio. The audio quality depends a lot on how the device is positioned, laying it flat fills the whole room and running it on its side is very directional. That said I was seriously impressed with how the Roar 2 sounded, it makes the Sound Blaster name proud that’s for sure. Obviously you will still get a better experience with a full audio system but I have a hard time believing that you are going to get a better portable audio experience.
How was the battery life? Well the suggested battery life was about 8 hours and that seemed to be lose to what I experienced when using in longer term in the living room. Of course even once it was low I just had to plug it in and didn’t get any interruption. You could easily take the Roar 2 out for most of the day and listen to your music. Hell you could even keep your phone charged all day as well using the built in USB port.
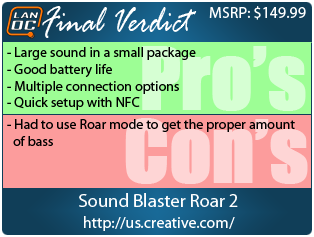
Overall and Final Verdict
So at the end of the day was it all that I expected? Well frankly I didn’t really have high hopes, simply because I didn’t think it would fit in my lifestyle all that much. Oddly enough the more time I spend with it the more I think it could come in handy at different times, like during LAN setup. Even beyond the more obvious uses like that I can see it getting backed when going on trips as a great way to connect to my phone or laptop for music or to better hear things that I watch. The Roar 2 has a slightly smaller form factor than the original but they still packed in that big room sound. I even used it to crank up a few football games in the living room. The sound quality was top notch. Really my only complaint was that I needed to turn on the Roar mode to get the amount of bass I wanted, but that isn’t much of a complaint. The long battery life that will last the better part of a day paired up with all of the different ways you can use the Roar 2 really help.
You can use NFC to connect almost instantly with your phone or if you want you can just load up a Micro SD card and use the built in MP3 player. Creative Labs included the optional carrying case as well when they sent out our review unit but if given the choice I would rather go with one of the new silicon cases that they now have available that you don’t need to take the Roar 2 out of the case to get the music going.
At just under $150 the Roar 2 isn’t exactly cheap but I don’t think it’s a bad value as well. There are a lot of other options out there and some of them will cost lest but the Roar 2 has the versatility and audio quality to hang with anything on the market. If you need to bring your jams with you out into the garage, to the beach, or even into work if you have a private office the Roar 2 way to do just that.


Live Pricing: HERE


