So yesterday I did a relatively short rundown on what is 3d printing and I also spoke about my visit with SeeMeCNC. Well today I’m actually going to dive into the SeeMeCNC Eris 3d printer that I picked up when I was visiting them. The Eris is their brand new portable delta printer. Not only is easy to carry, but they set out to make the Eris their first truly out of the box and printing experience. Generally, with most 3d printers you have a lot of build and setup time, but with the Eris shipping completely built and with their new Auto Leveling system they are hoping it will be a great printer for new 3d printing users. Well it just so happens, I’m that 3d printing noob, so I’m going to run you guys/girls through my experience from start to finish to help you decide if the Eris is the printer for you.
Product Name: SeeMeCNC Eris
Review Sample Provided by: SeeMeCNC
Written by: Wes
Pictures by: Wes
Amazon Link: HERE
Be sure to check out our coverage yesterday as well, we visted SeeMeCNC and took a tour.
| Specifications | |
| Printer Design | Delta |
| Machine overall dimensions | (no filament spool) 9-1/2" (240mm) dia x 17-1/2" (444mm) |
| Build Volume | 4.9" dia x 6.5" tall |
| Build Surface | Bborosilicate glass build plate with a custom build surface laminate pre-installed |
| Hot End | HE280 metal hotend with acceleromter probe (Up to 280c) |
| Calibration | Automatic calibration |
| Filament Compatibility | 1.75mm |
| Printable Materials | PLA, PETG and other materials such as the blended PLA's |
| Power requirements | 100-240VAC 50-60Hz 2Amp |
| Controller | Mini-RAMBo 3D printer control board by UltiMachine |
| Connection | USB 2.0 |
| Compatibility | Windows and Mac |
| Shipping dimensions | 13" x 13" x 23" tall (330mm x 330mm x 584mm tall) |
| Shipping weight | (includes 1 lb (0.5kg) spool of filament: 13.8lb (5.81kg) |
| Ships with |
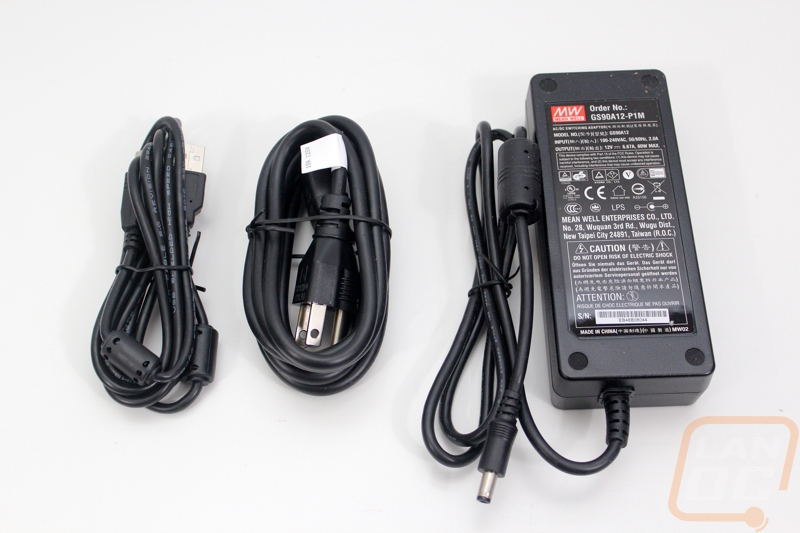
(0.5kg) spool of filament 80 Watt power adapter |
Packaging
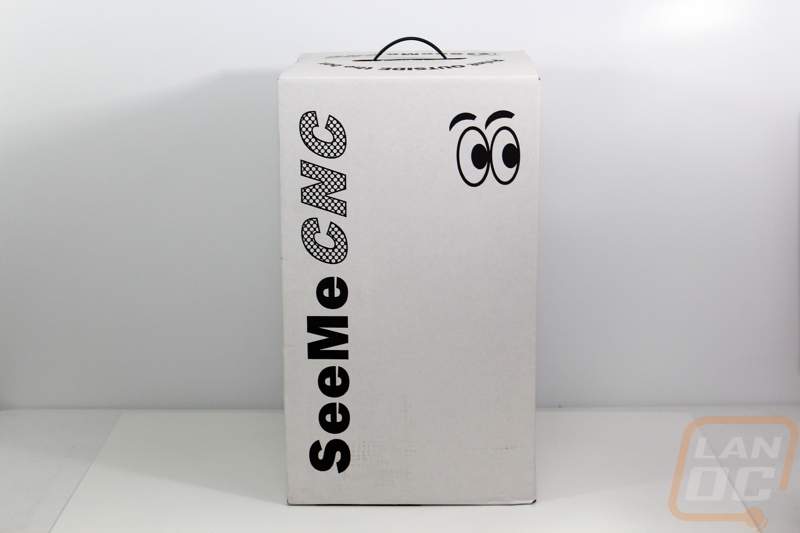
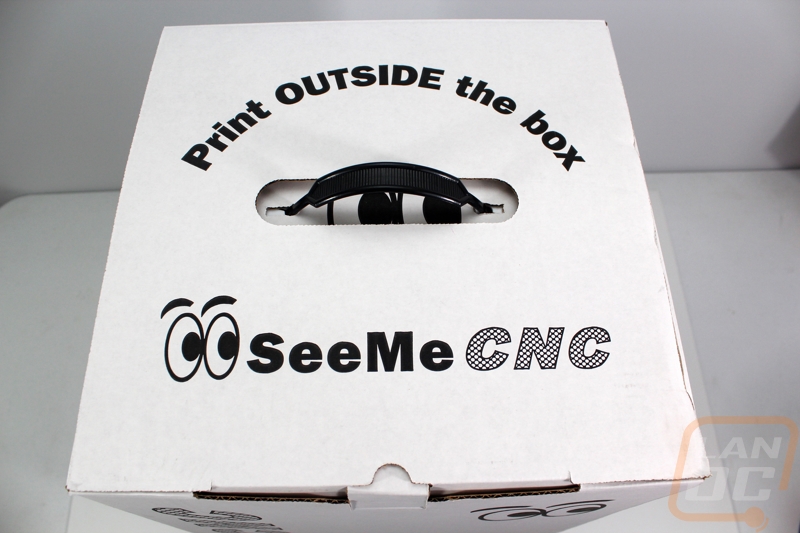
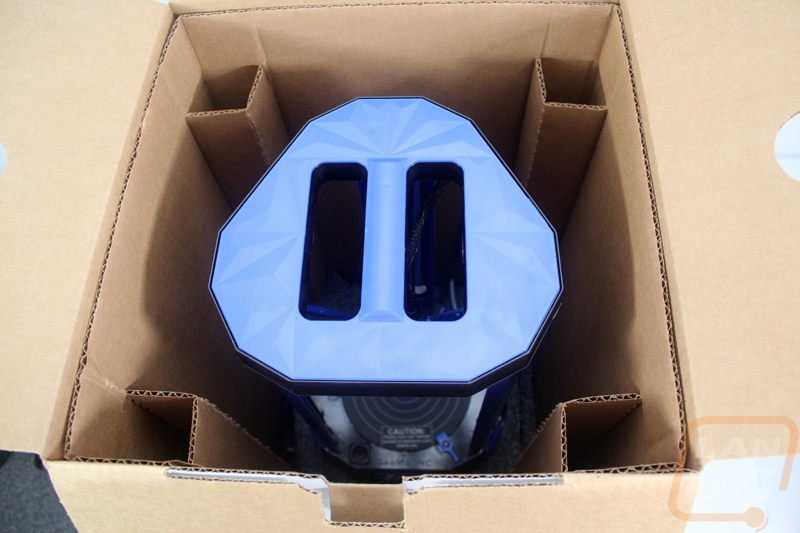
One of the big aspects with when designing the Eris, SeeMeCNC wanted a printer that would be cost effective to ship completely assembled. If you haven’t seen their Rostock Max, when assembled it is huge. All boxed up the Eris is 23 inches tall and 13 inches wide. It only weighed 13 pounds and 4 ounces for my kit though I expect that to be a touch higher with documentation included. With my printer being the first one all boxed up there are a few differences from what you might see if you picked this up in a retail shop for example. The box is all white with the SeeMeCNC lettering and the eye logo as well. Up top, it has a handle and their eyes peeking through the handle hole as well. They also slipped in a play on words with the Print OUTSIDE the box on top. The box is designed to have a color printed sticker on two of the four corners that will brighten things up and put the Eris name on the box. I also heard that if the Eris ends up in a full retail setting you would see it with a full color slide on as well.
Inside the box the Eris sits up near the top with an x shaped foam panel holding it in place on the top and bottom as well as a cardboard liner. Pulling the printer out is extremely simple due to its built in handle being right up on top. I’m told most printers will also come wrapped up in a bag to keep it clean and ready to print.
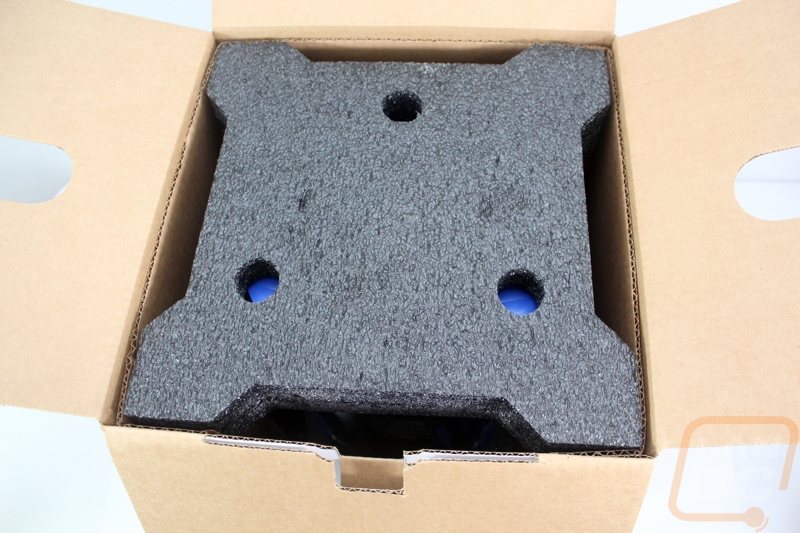
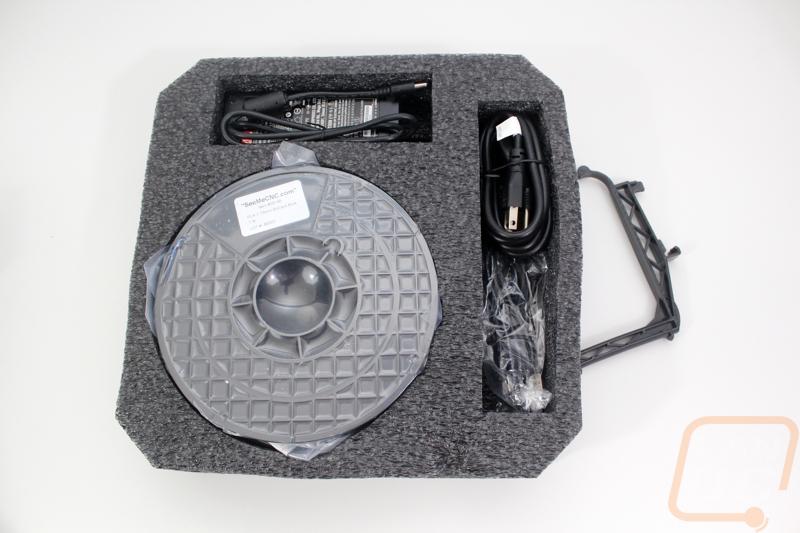
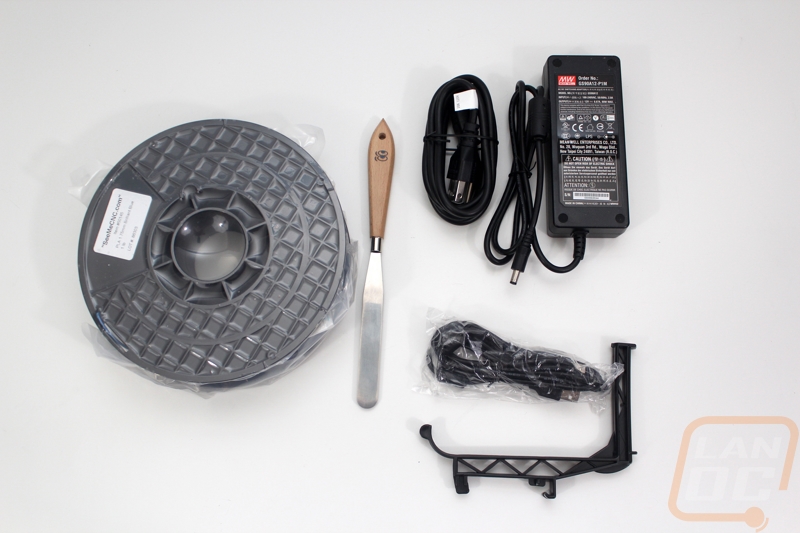
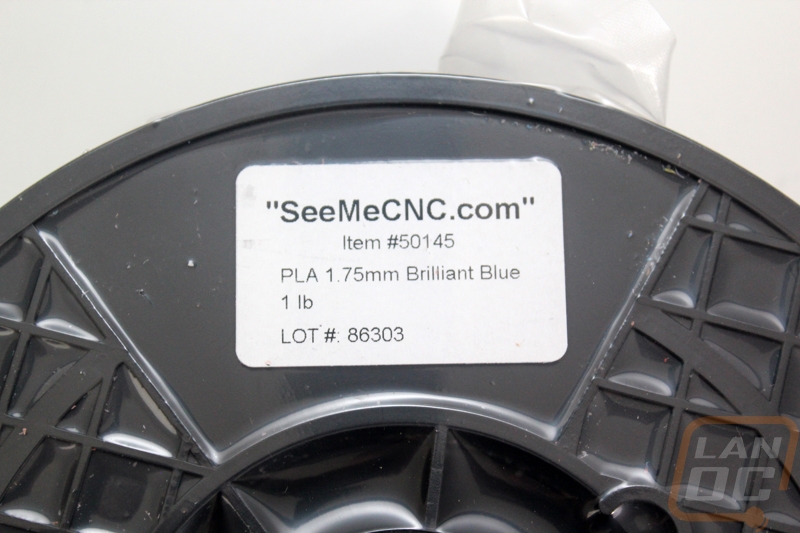
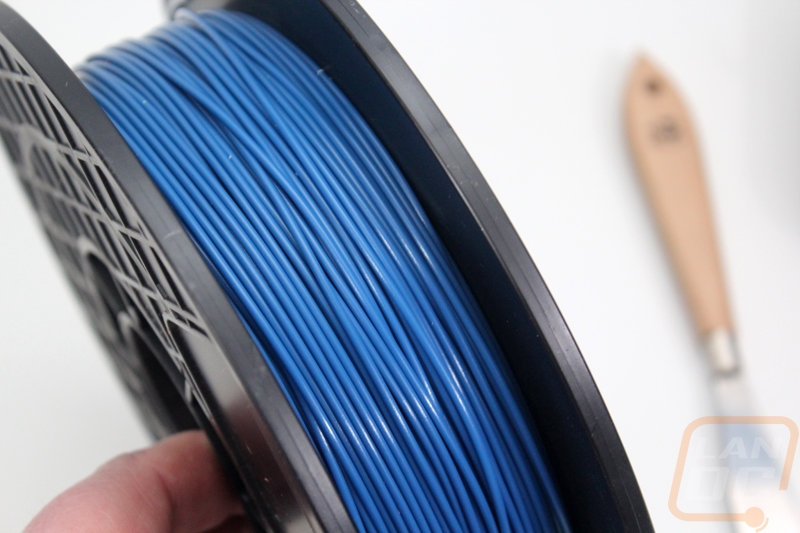
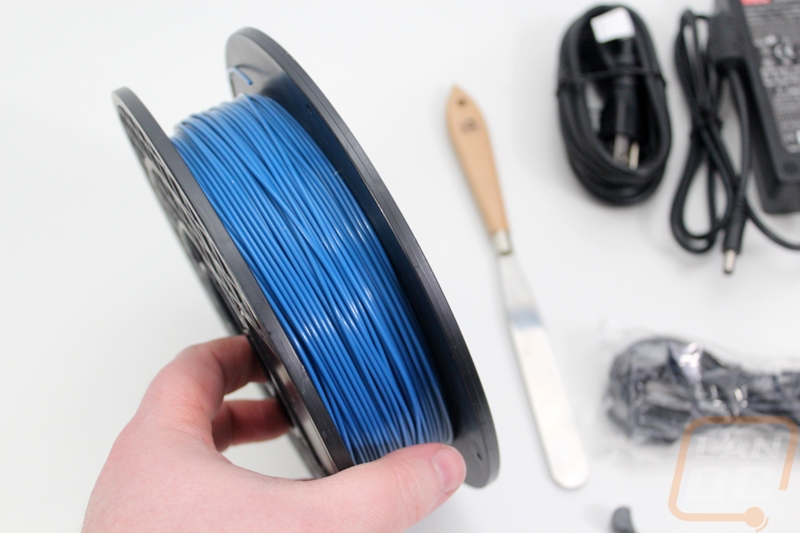
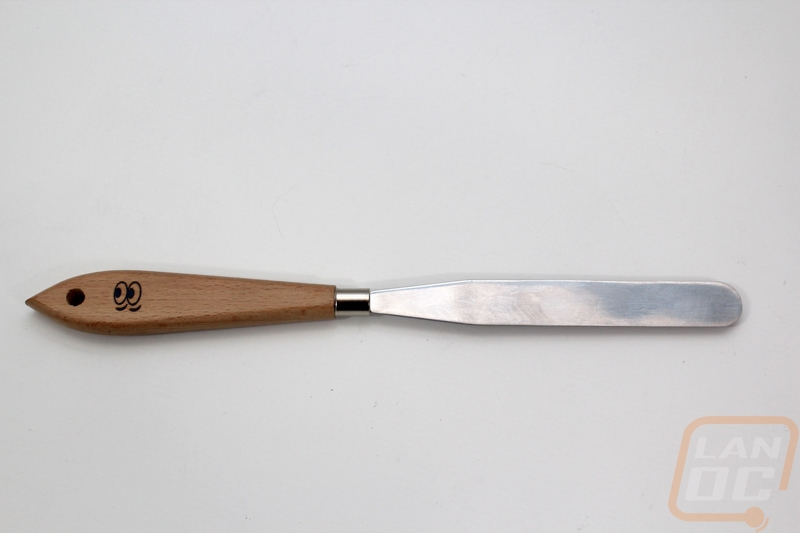
Up under the printer and the second foam panel is a third panel. This one has the 1 pound of filament that the Eris comes (ours was blue) with along with all of the included accessories. The filament comes vacuum sealed to keep moisture out, if you don’t already know most filaments absorb moisture in the air and can become hard to work with once they get too much. Also inside is the laptop style power adapter, a USB cord, a scraper to pop off your prints, and a spool stand. The scraper is actually a spatula that you would see in painting as well as cake making but this one has the SeeMeCNC eyes burnt into the side.
Photos and Features
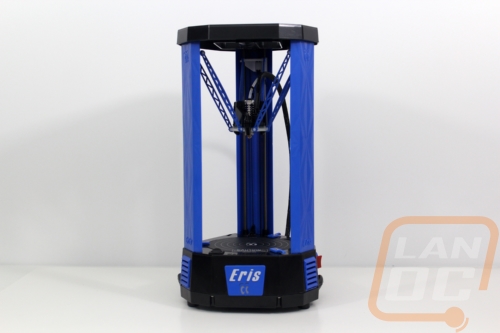
I touched on it a little in the section about 3d printers but if you didn’t catch that SeeMeCNC has been making in the 3d printer market now for five years and most of that time their printers have been deltas. The Eris isn’t any different. Well it is very different, but it’s still a delta! That said no one has ever tried to make a significantly smaller Delta design. Most have been based on the Rostock design with different variations. Now in the Cartesian printer market there is a wide variety of small format printers. SeeMeCNC has been working on the Eris design for a long time, I mean they were showing off photos that looked to be late in the development process back in December of 2014. So you can imagine just how happy they are to finally bring the Eris to market.
The Eris shares a lot with those 2014 photos but of course you can see that things have been tweaked and worked on at well. The overall design is black and blue and unlike SeeMeCNC’s other printers a good portion of the printer Is injection molded plastic. I have to be specific there because there are 3d printers that come with plastic parts that have been printed. There obviously isn’t anything wrong with that, but going as far as to injection mold everything does improve the overall build quality and fit and finish. The design is a little different because everything is housed in the base where the Rostock Max has a top mounted extruder and end stop switches for each post.
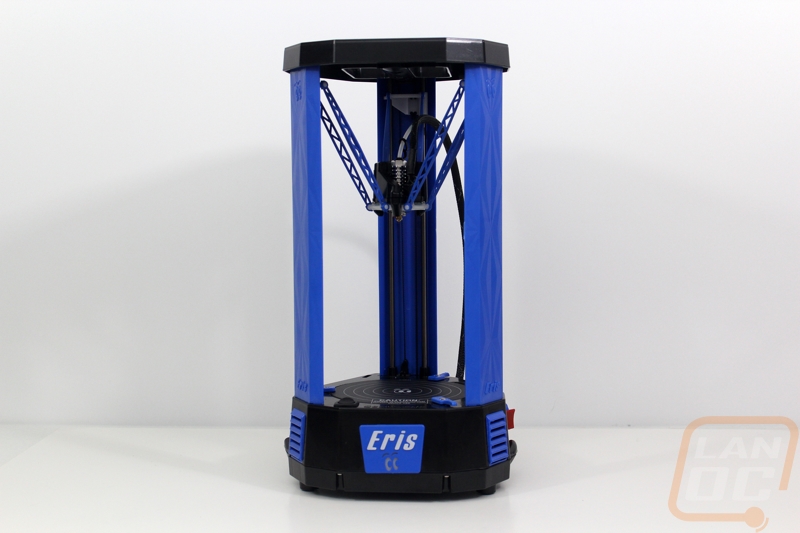
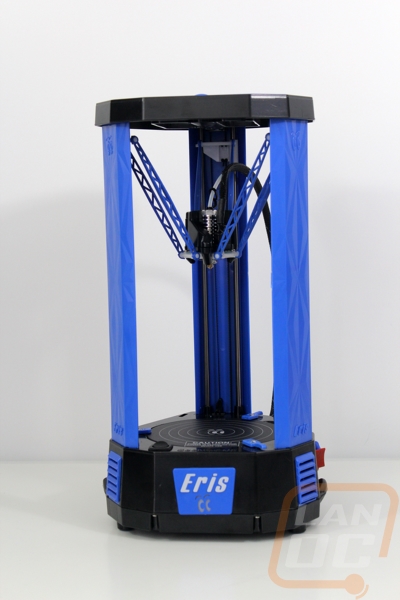
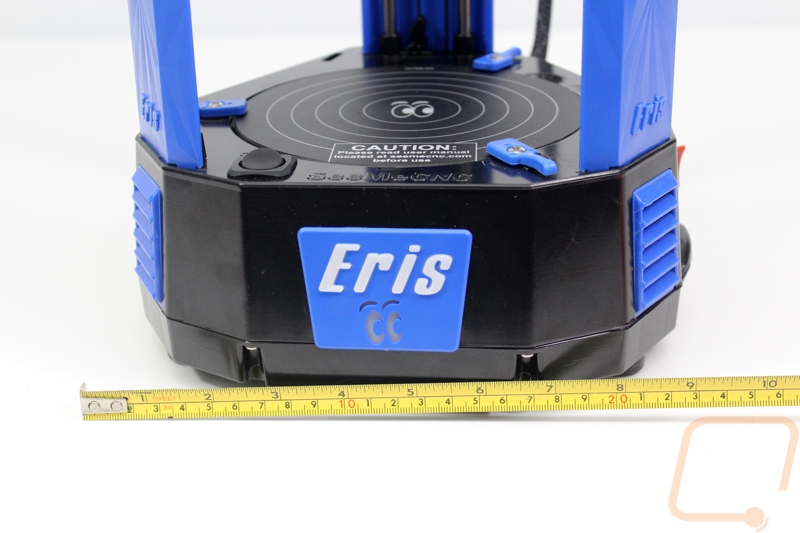
The Eris is 17 inches tall and about 9 inches wide at its widest point. The overall footprint is more like a triangle than a circle. This is because it has to fit its three poles as well as the circular build plate.
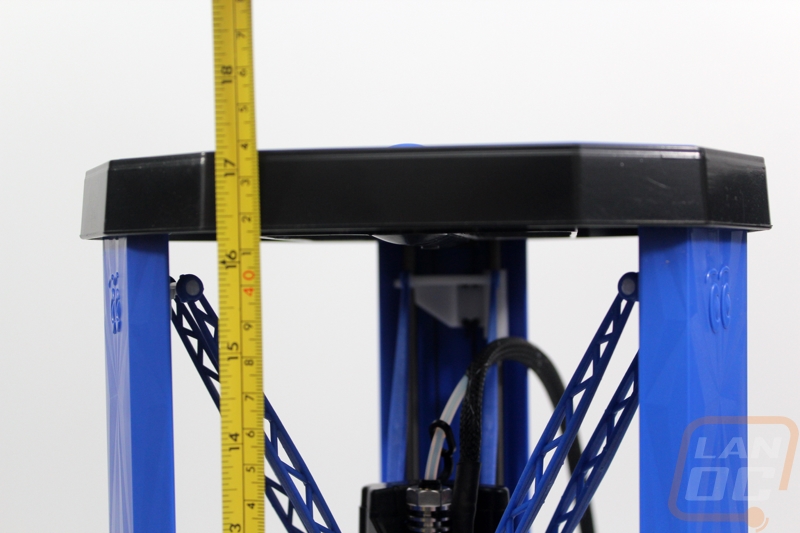
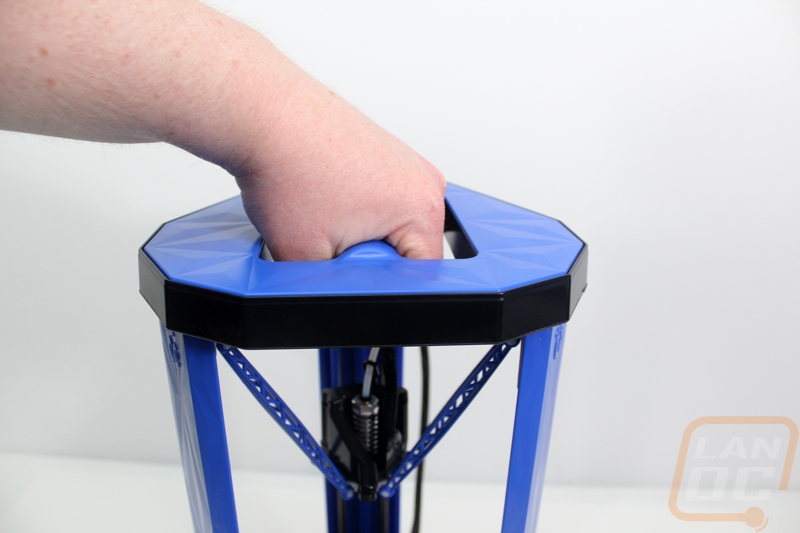
Given the Eris’s already small footprint and small size I was really excited that it has a built in handle. The top panel has an angular finish but the handle is round and sticks up higher than the rest of the top panel to give it enough bulk to make it easy to grip. It fit my large hands just as well as it did my wife’s tiny hands. So you might be asking whats the point of a handle on a 3d printer. Well it really depends on how you plan on using it. At minimum having a handle helped to make it quick and easy to get out of the box. It also makes moving it around your office or house simple, not to mention if you ever move. But it really comes into its own for people and companies who sometimes use 3d printers at events. I know I’ve been to a few events and have seen a big printer setup printing small trinkets to get your attention and have to stop by and talk to them. A quick google search for portable 3d printer will bring you back a lot of results for large printers with handles on both sides, printers that require setup, and a few vulnerable open designs that would quickly get banged around being moved to much. The Eris’s design isn’t completely enclosed but the casing does protect it well.
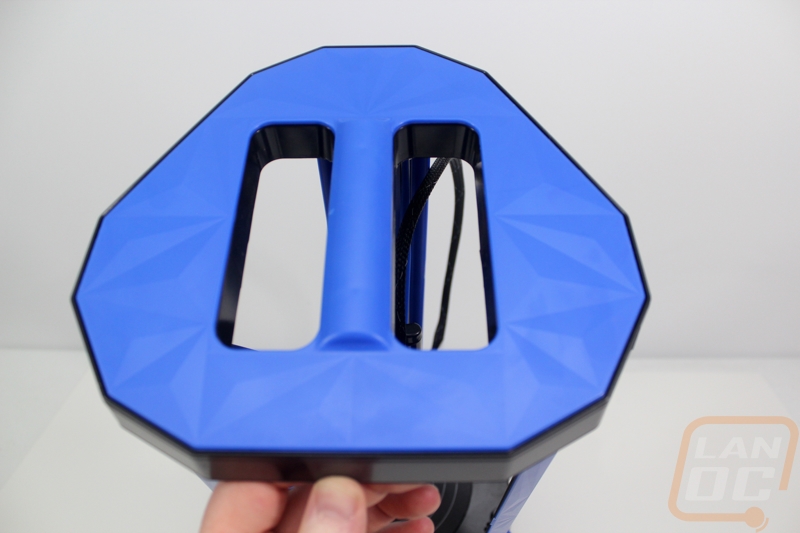
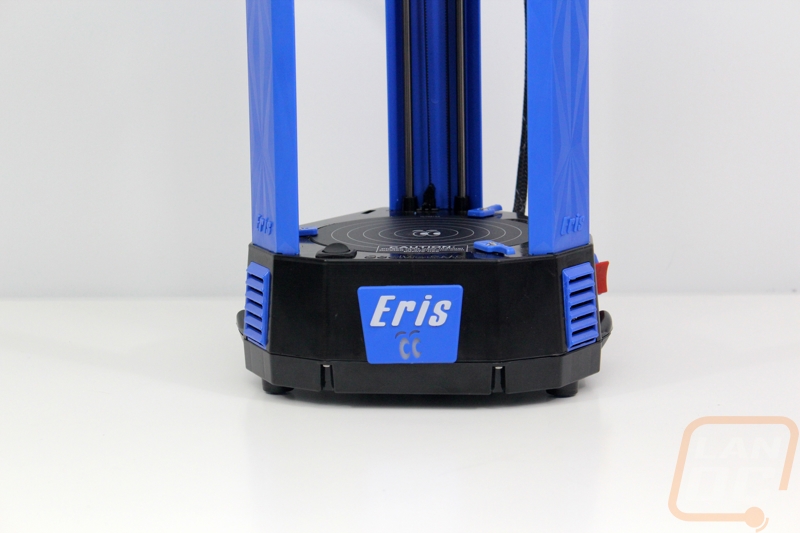
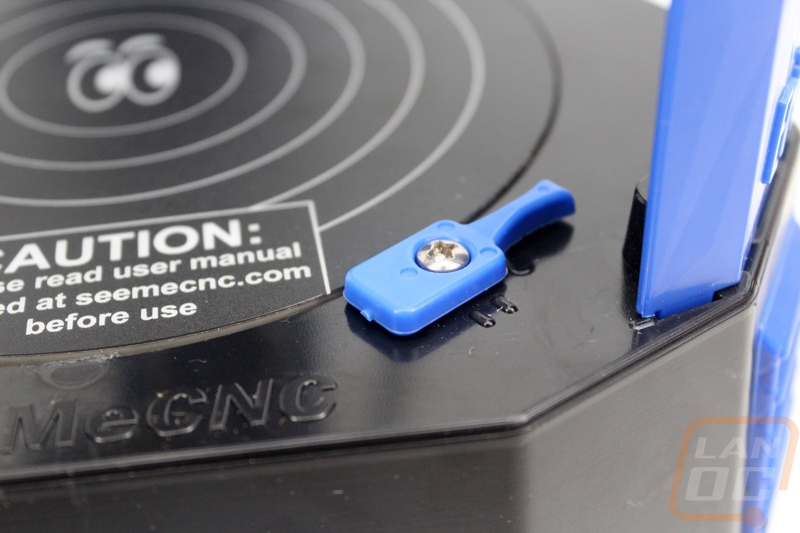
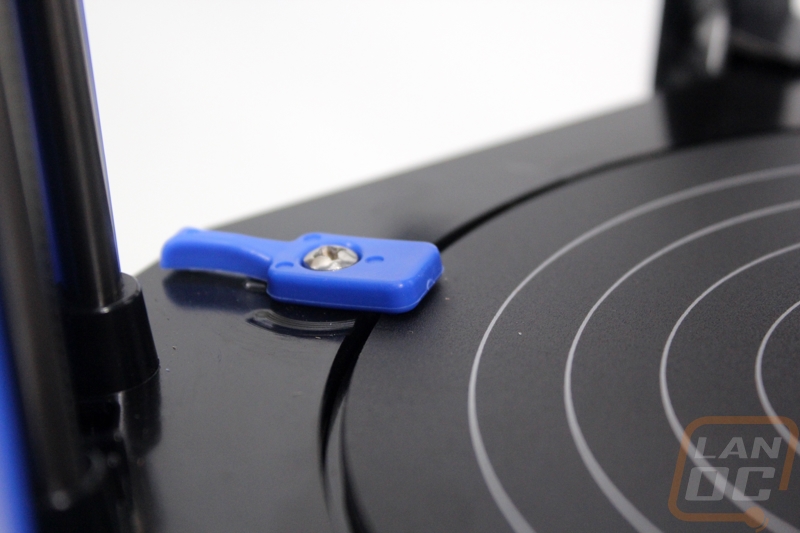
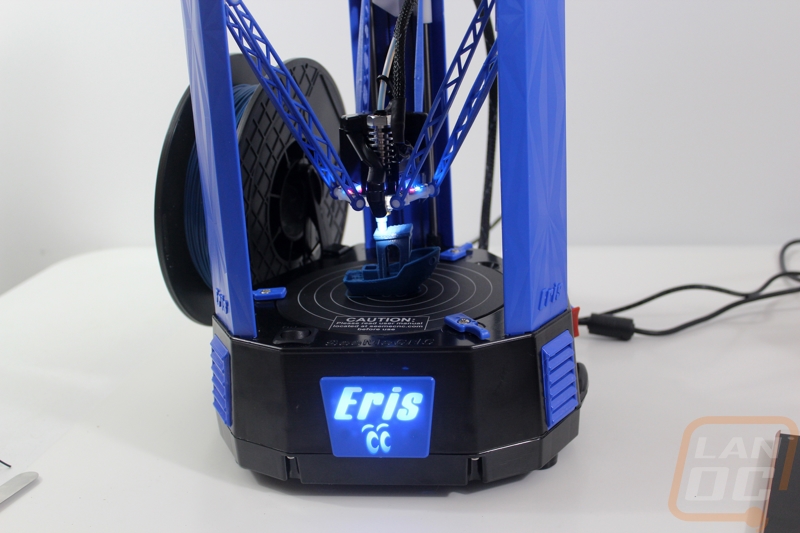
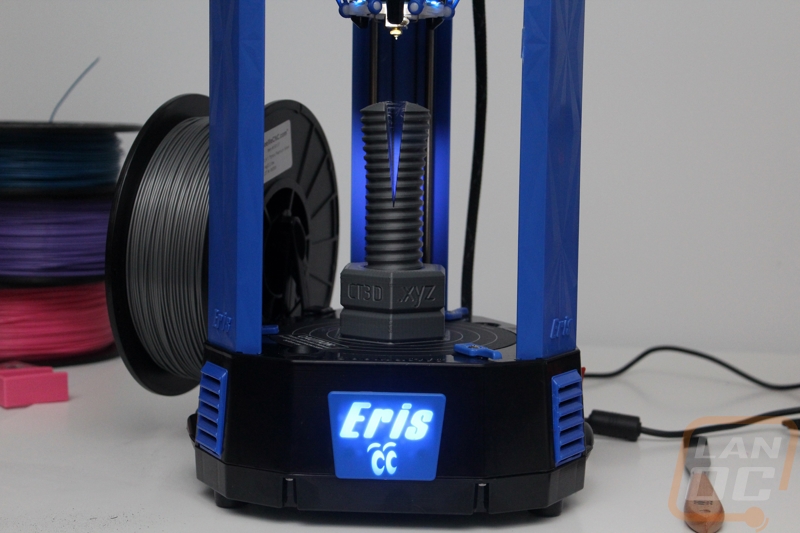
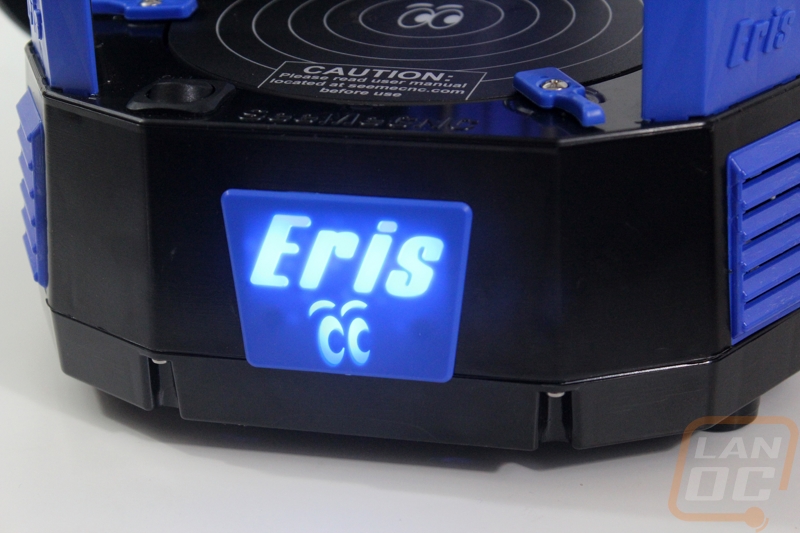
So SeeMeCNC’s Rostock based printers all have a smart control panel down on the front with a controller knob and an LCD screen. The Eris isn’t just designed to be portable, it was also designed to be an affordable delta and to do that they did drop the controller. When talking with them it does sound like they are looking at the possibility of adding another model down the road with a smart controller and a heated bed. That said for now the Eris is locked to your computer or laptop. In place of the smart controller they designed a nice blue insert that has a transparent white Eris logo and the SeeMeCNC eyes. This has blue backlighting to light up the transparent parts when the Eris is powered on as well.

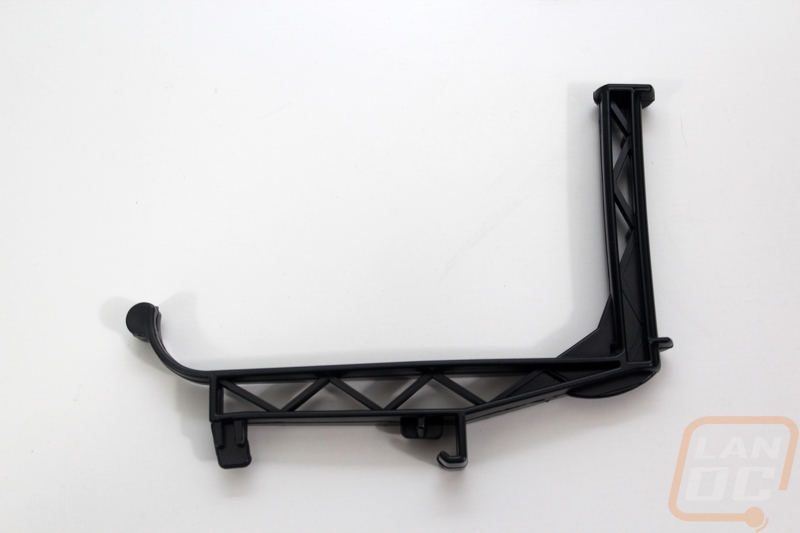
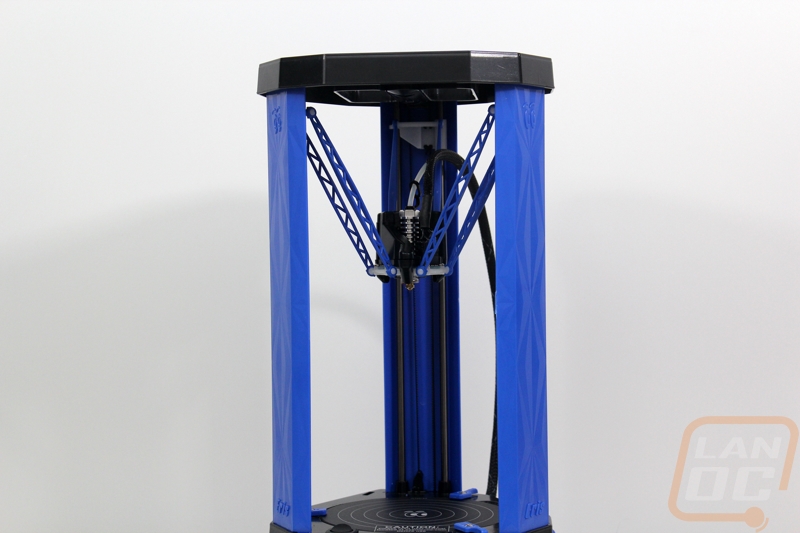
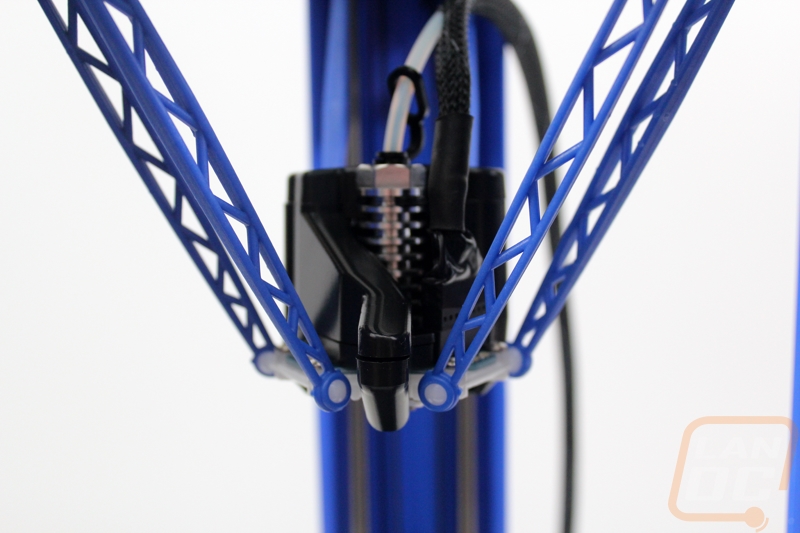
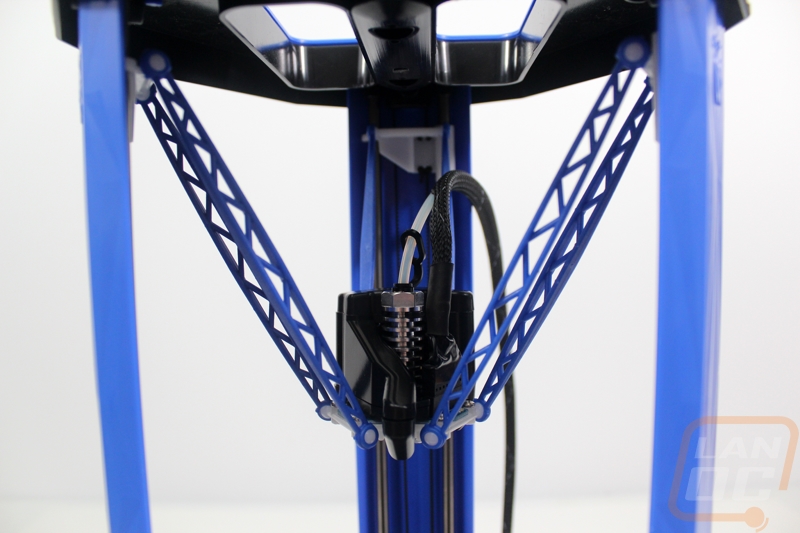
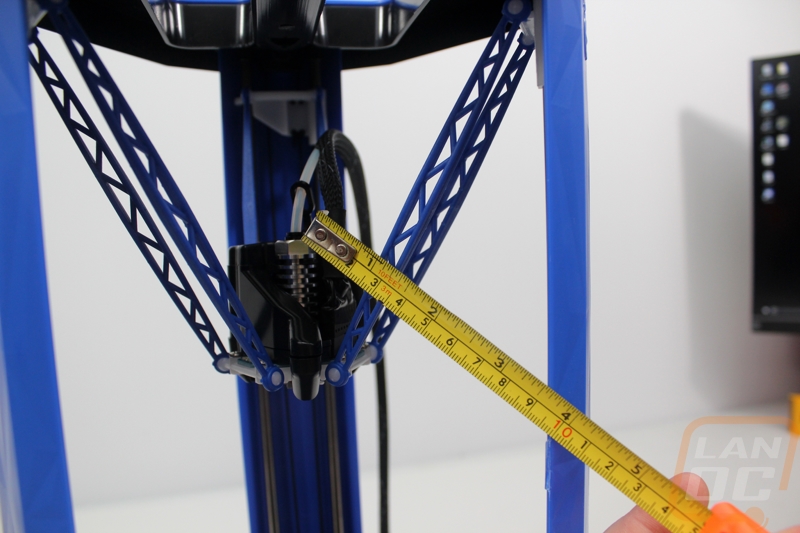
So they went with injection molded arms to hold the hot end up. Specifically, there are six arms. Frankly when you first see them they are very underwhelming, there is a reason people like to go with carbon arms on their deltas, and that is because any flexibility in the arms will quickly translate right into poor quality prints. The arms on their wider side are well under a half inch thick but I was very surprised at just how strong they are. SeeMeCNC went with a stronger plastic here, one with fibers. So while I know the first impression is that you are going to want to replace these, don’t judge a book by its cover and wait and feel them in person.
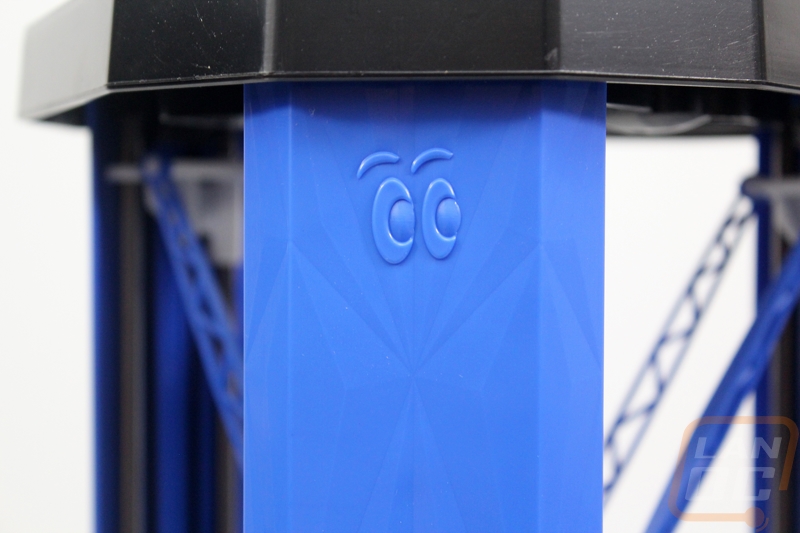
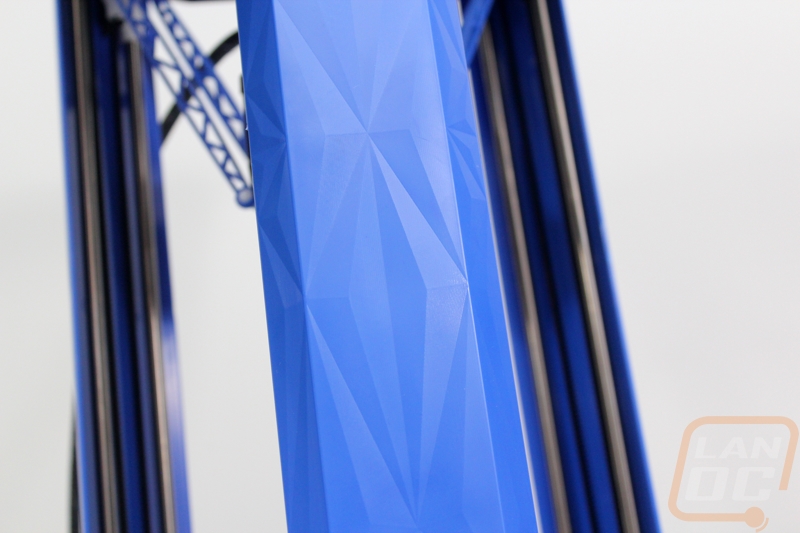
So the plastic casing for he main three posts has the same angular design on it that we found on the top. You can hardly even feel the difference in angles when rubbing your hand across them and they were even a little difficult to capture in photographs. That said I love the touch of styling. Also up on the top the SeeMeCNC eyes are molded in as well.
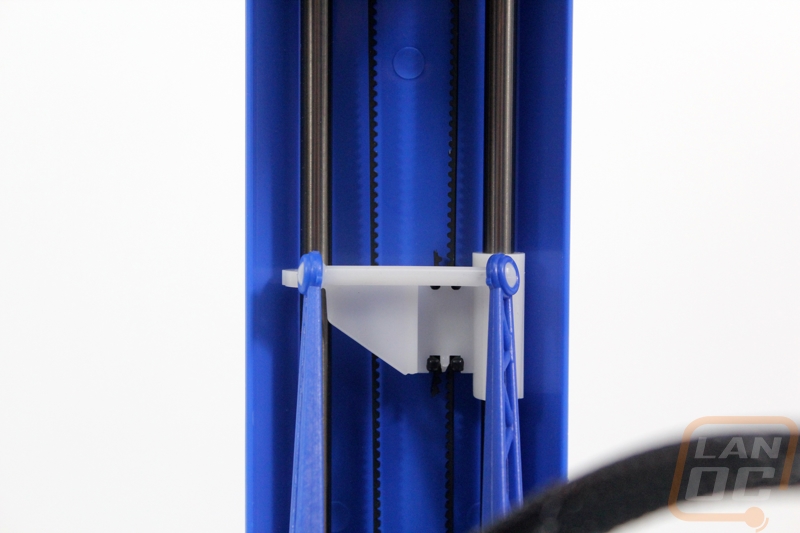
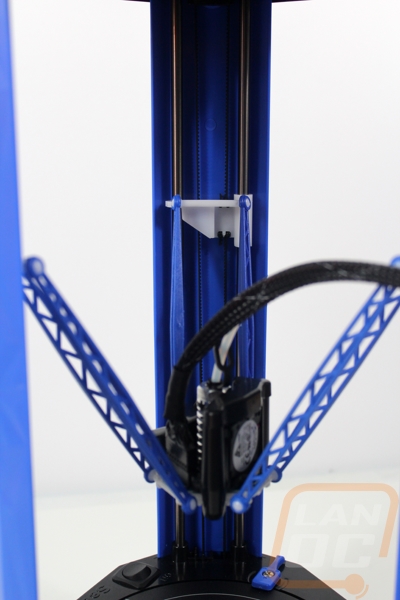
So with the three posts that form the main structure of the printer. Behind the fancy panels I spoke about above. Each post actually consists of two metal rods. These rods give the printer most of its structure and they also double as the tracks for each arm. The small arms attach to a white assembly that attaches to both rods and also has a small clip attached to it and the belt that runs from the bottom where the stepper motors are up to the top of the printer. The belt helps guide the arms up and down and the assembly that attaches to the rods is self-lubricating and fits tightly to make sure you get a good print. The two arms snap on to ball joint, this should make replacement easy should that ever become an issue.
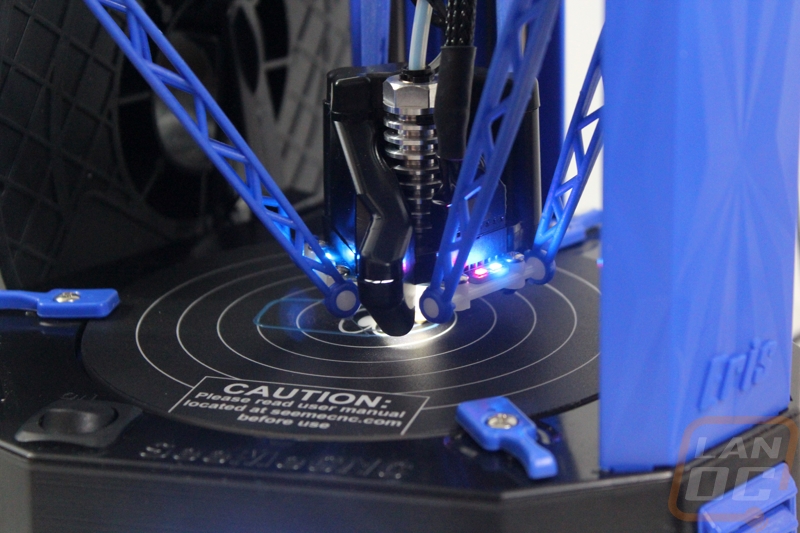
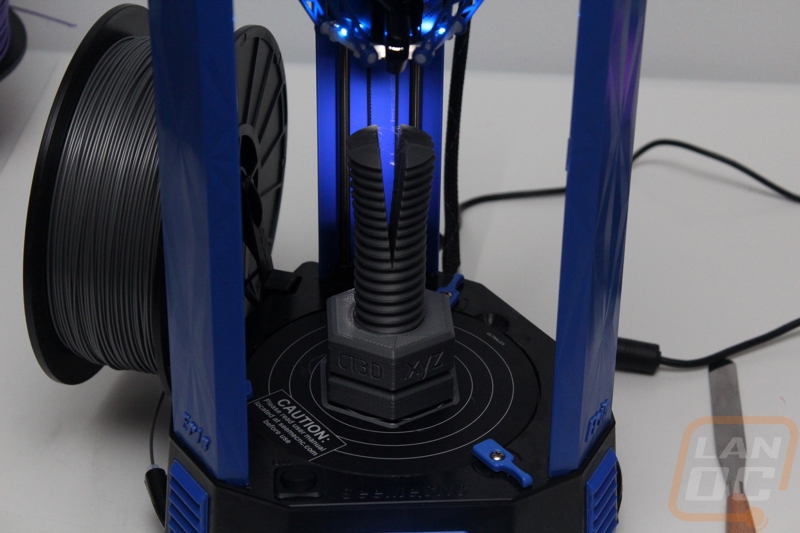
For the hotend on the Eris SeeMeCNC really stepped up their game. For starters the main part of the hotend is all metal. This means from the nozzle, the heat break, up into the heatsink it’s all metal. Its everything else that really sets the HE280 apart though. For starters right at the heat break is a triangle shaped PCB. The Eris is designed to auto calibrate and SeeMeCNC did this is a unique way. On the PCB they integrated a cell phone style accelerometer. In the past auto calibration has been done with moving parts on the hot end or switches down on the print surface. This accelerometer allows the hot end to bump the surface and know exactly where it is at. The PCB also has status indicators on it to show when the hot end is heating up, when you are turned on, and when the fans are running. All of the power and controls run through the unplugable connection up on top and then on the underside the resister and even an LED light to light up your print area are all connected to the PCB. If you look close you can also see that they left a pair of connections for anyone looking to add another fan as well.


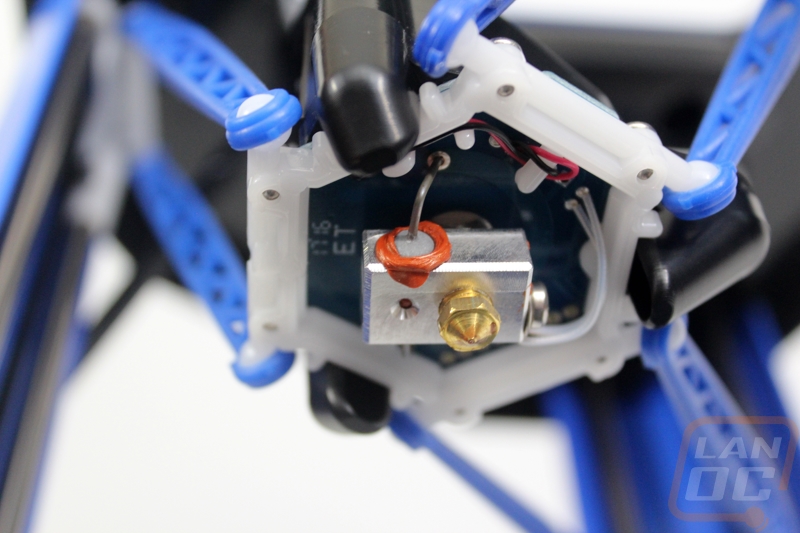
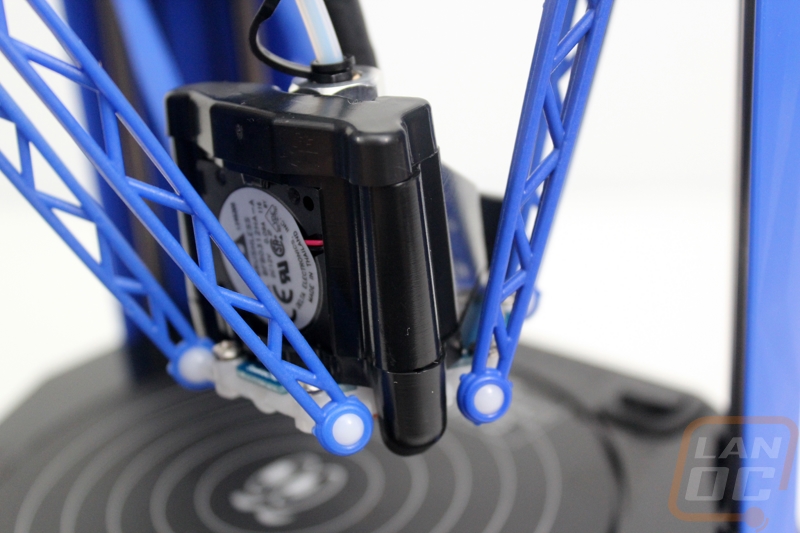
Up on top around the hot end they designed a fan shroud that is able to both cool the heatsink and also output on all three sides of the hot end to blow air on your part as you print. On the back is a 30mm fan to push air into the shroud. Up on top the cap can actually rotate out of the way if you don’t want air blowing on your print, it will blow everything out the top. The Eris is designed mainly for PLA use but its clear they have kept in mind other materials like ABS with this design.
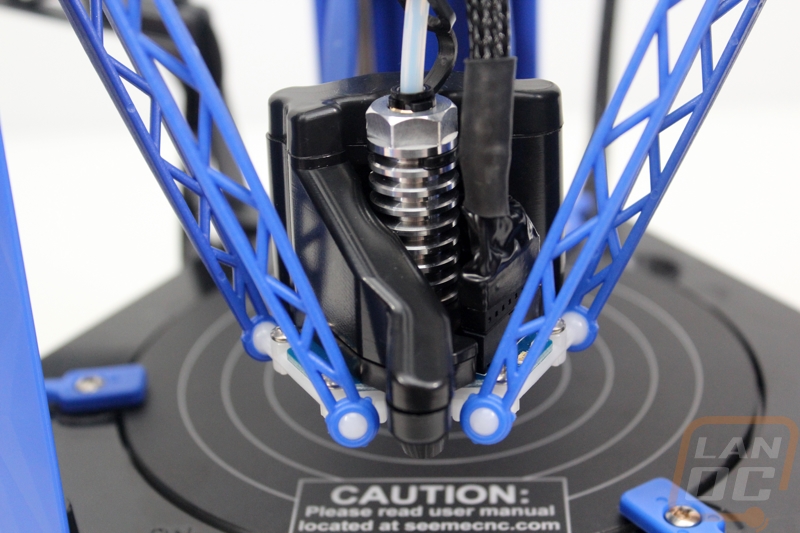
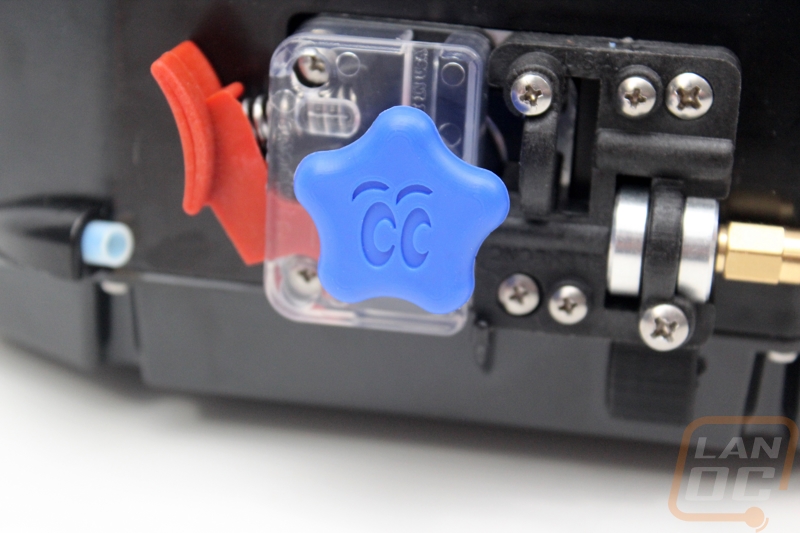
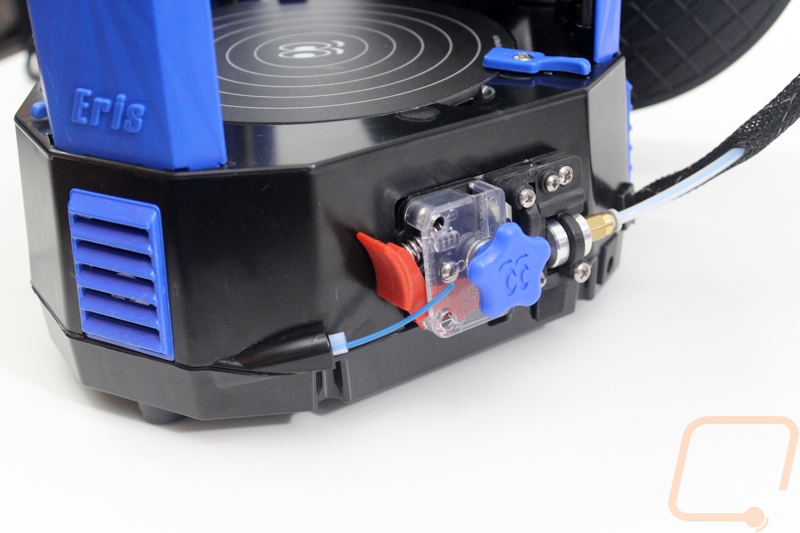
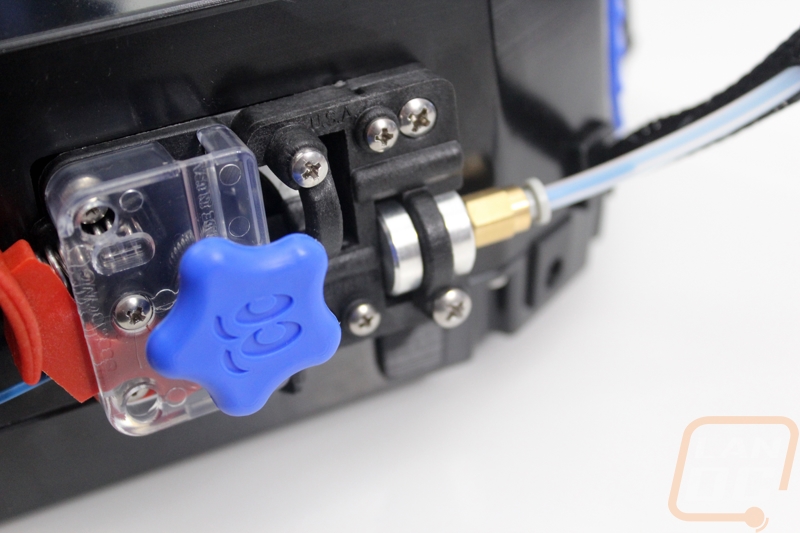
So in order to get your filament to the hot end you are going to need an extruder. For the Eris the extruder is down on the side of the printer. SeeMeCNC went with their standard EZStruder kit. This design runs a stepper motor inside of the base and then on the outside the EZStruder has the gear with a bearing above it to push the filament into the gear. The bearing is attached to the red quick release button, this way you can push the button and run filament up quickly, making color swaps easy. The Eris uses PTFE (Teflon) tubing on both sides of the EZStruder. They have a tube that goes from the opposite side of the printer where the spool hands that comes out just before the EZStruder and then PTFE that runs from the extruder output up through braided sleeving alongside of the power cable for the hot end. The PTFE tubing then runs down into the heatsink all the way past the heat break. On the EZStruder they also designed a new knob for when you need to manually spin it. The new knob matches the blue them and has the SeeMeCNC eyes on it and looks great.
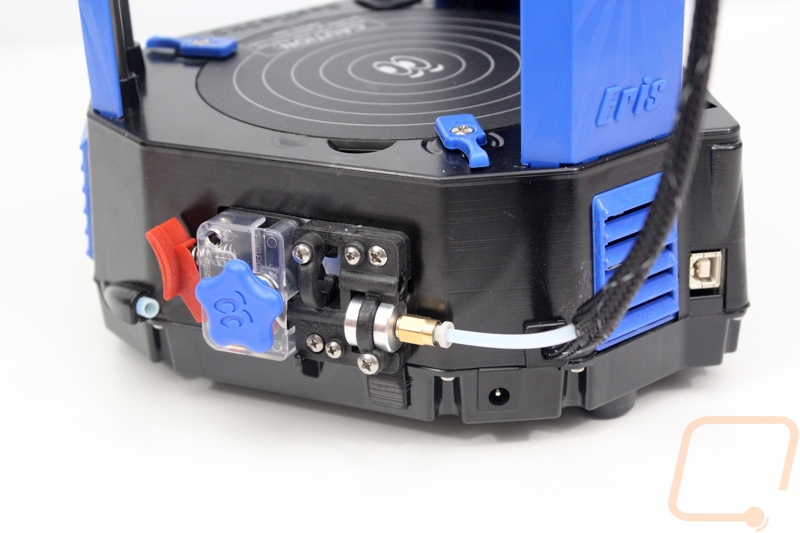
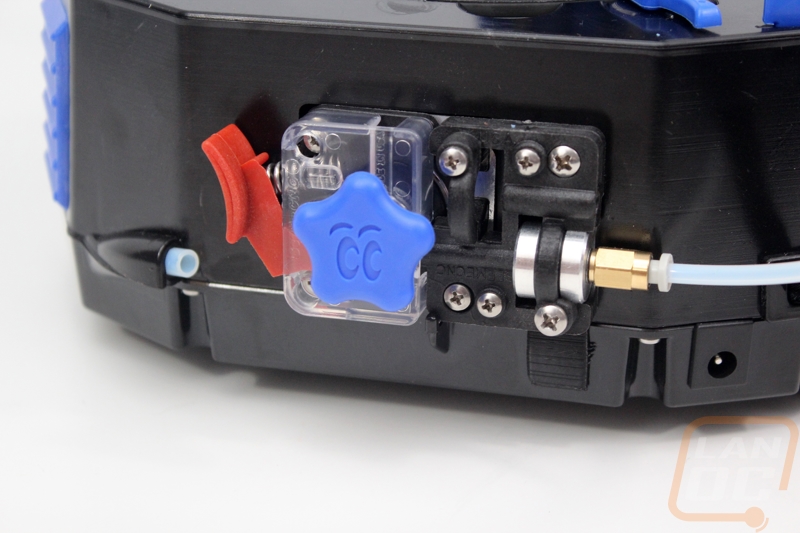
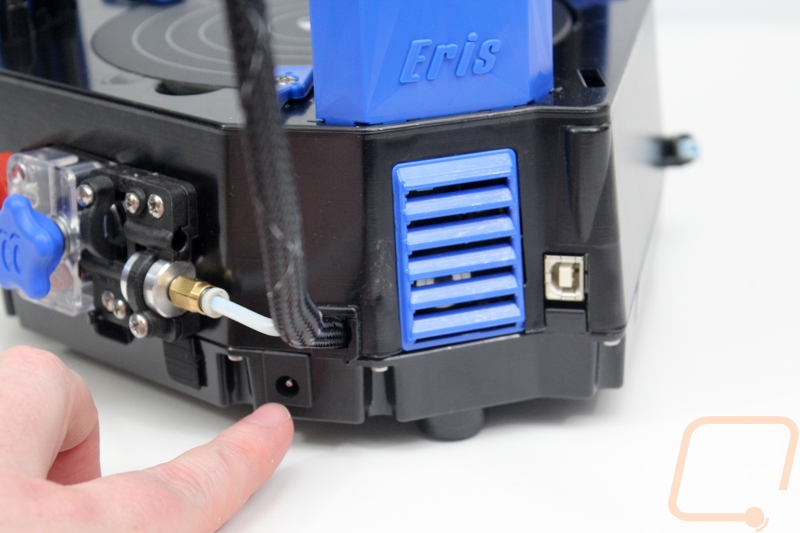
For external connections the Eris actually only has two and they are both back in the back corner. You have a small power plug for the laptop style power adapter and then a USB connection.

The filament spool holder comes detached but latches on over on the left side. If you look closely you can see the PTFE tubing that I mentioned earlier as well where the filament feeds into to go over to the extruder.

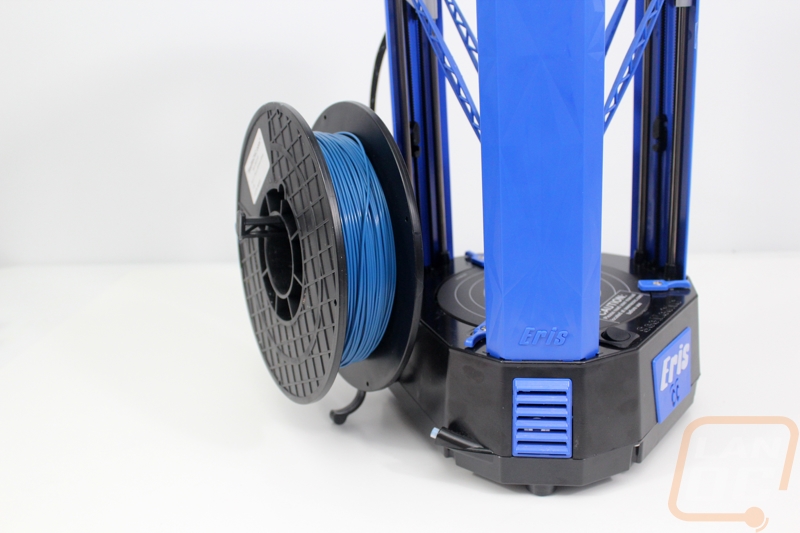
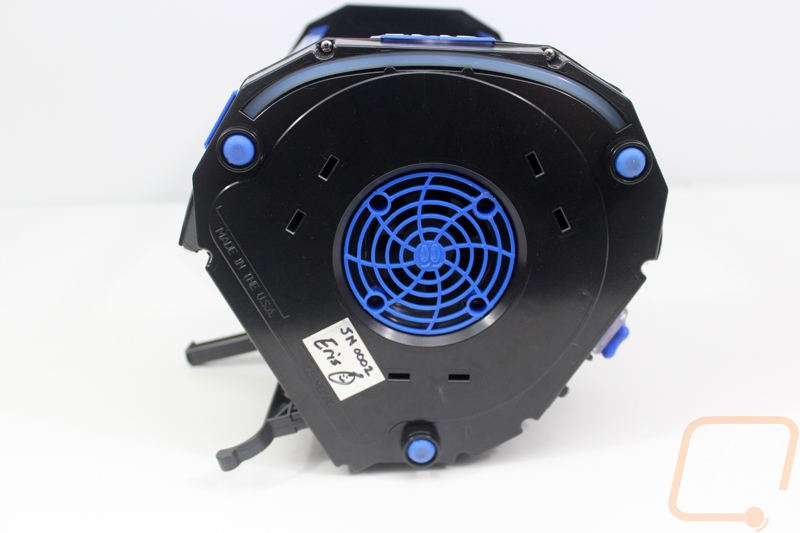
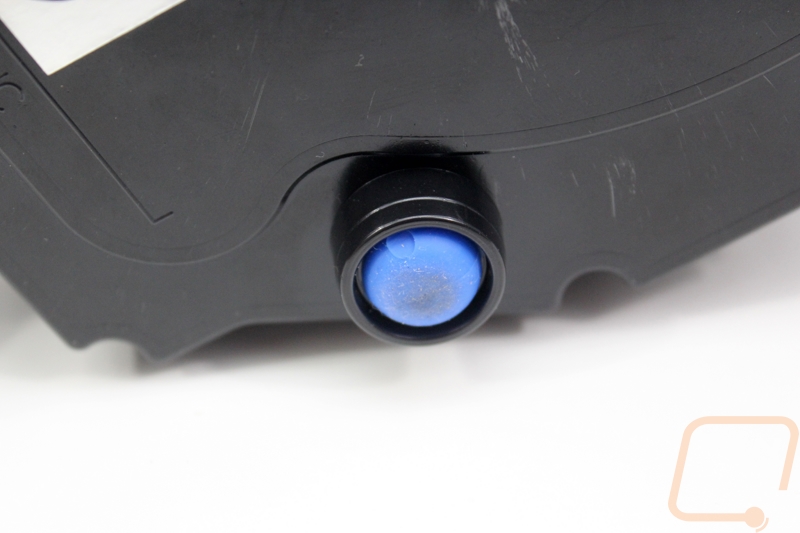
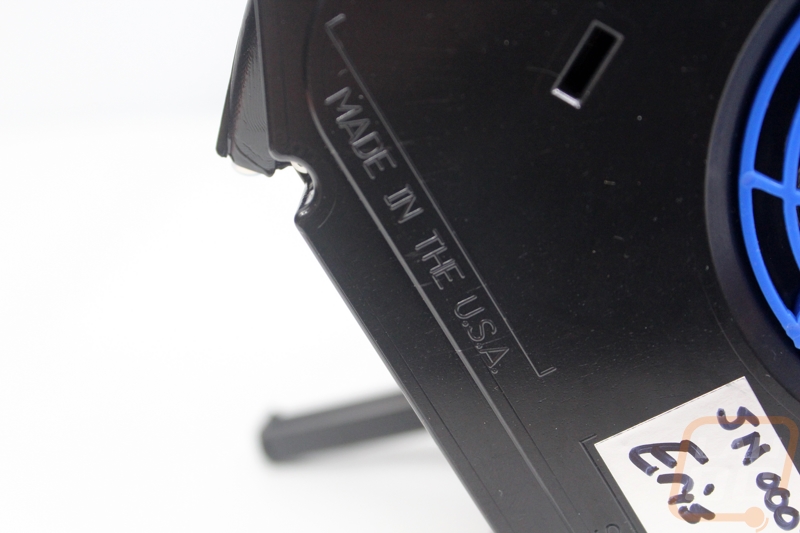
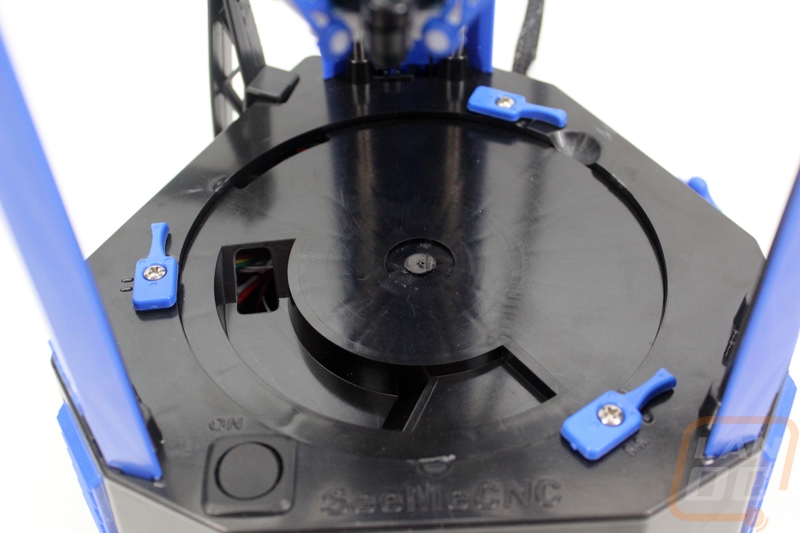
Next we have the base of the Eris. This view is going to be a little different than a full production model because no one else is going to have a Part Daddy hand drawn serial number plate. The bottom of the Eris is held on with 7 screws. Inside is where we will find the Mini-RAMBo controller and four stepper motors, three for the arms up top and one for the extruder. The base also has a small fan in the middle to help pull out a little of the heat that everything being in one small space is bound to have happen. SeeMeCNC are proud to show off that the Eris is made in the USA with that molded in. Then for feet the printer has three bright blue feet, one in each corner to keep things stable.
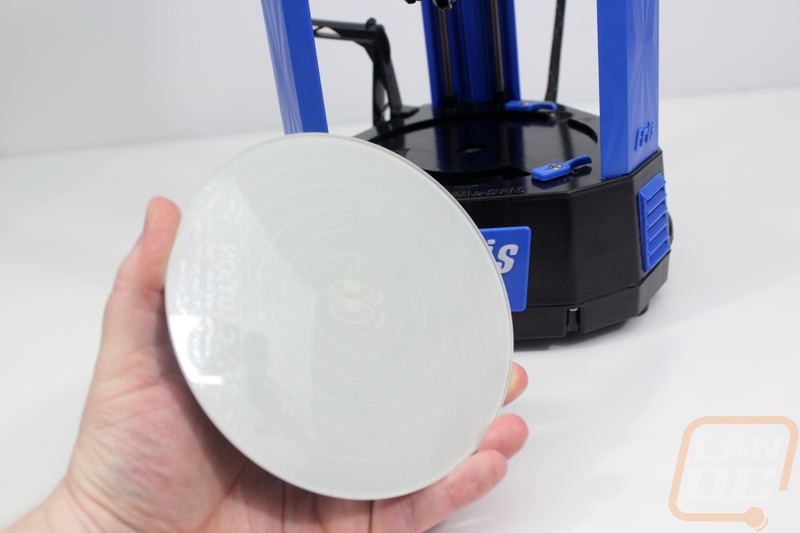
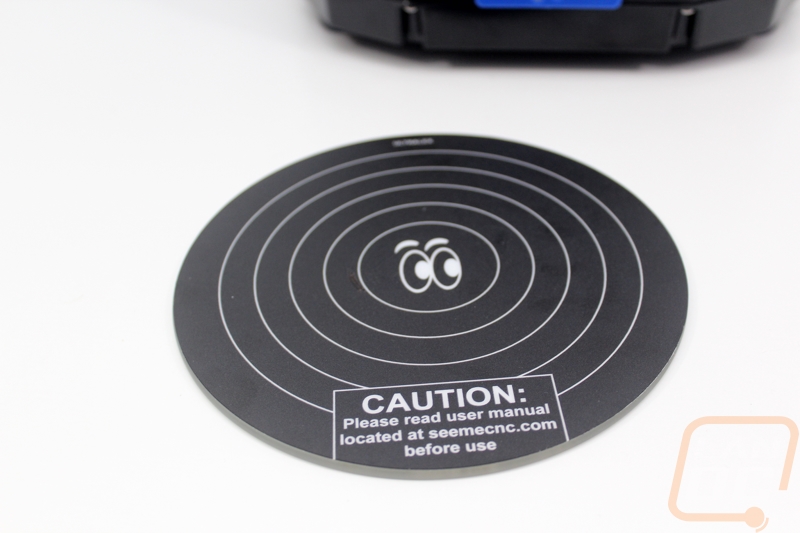
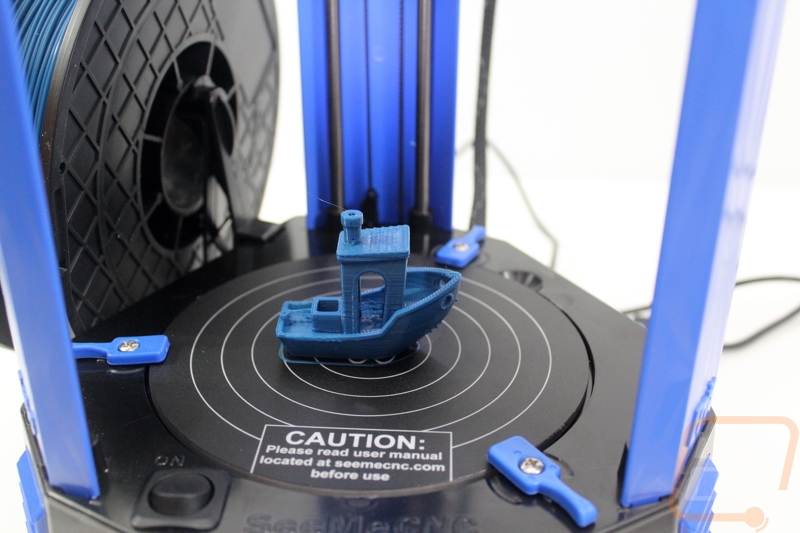
With the printer flipped back on its feet the last area we have to look at is the build plate itself. As expected being a delta printer the Eris has a round build plate. The plate is made of borosilicate glass and is 146mm wide and 3mm’s thick. It is covered in a laminate textured surface with the SeeMeCNC eyes in the middle as well as a warning label down at the front edge. The build plate can be quickly removed and is held in place with three plastic clips that spin out of the way. This is a nice improvement over the normal build plate mounting designs of the Rostock Max and a lot of other printers that just use metal binder clips. The build plate is mounted into the surface so when you unclip it you have to stick your finger in the small area on the right side that they give you to lift up on it. With the back side still being glass you can always flip over to it if you prefer that as a build surface.
Under the build plate we do see something a little unique. SeeMeCNC once again was thinking ahead when they included a gap under the build plate as well as a small hole into the base. This is so you can add a heated bed in the future. In fact, the Mini-RAMBo controller is plug and play for this.
Installation and Setup
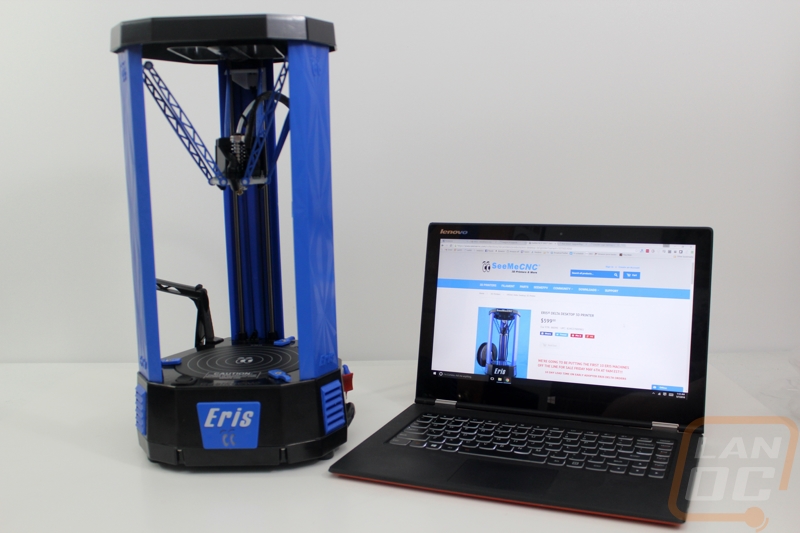
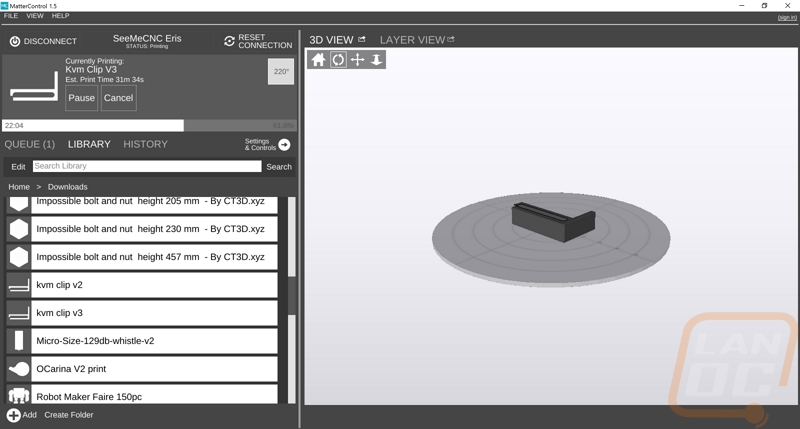
To get the Eris up and running you have to have a PC to hook it too or use one of the Matter Control tablets that SeeMeCNC also sells. While I had a few different PCs available, I wasn’t really sure where I would be setting the printer up at after my initial testing. Because of that I went ahead and went with my laptop. The secondary benefit to this is that using a laptop makes the Eris even more portable than it already is. Before we power up the Eris I did need to download and install the software that we would be using it with. You can go with a variety of programs but I stuck with Matter Control. Its open source, so that’s a bonus, but the main reason is because SeeMeCNC has most everything setup with Matter Control as it is.
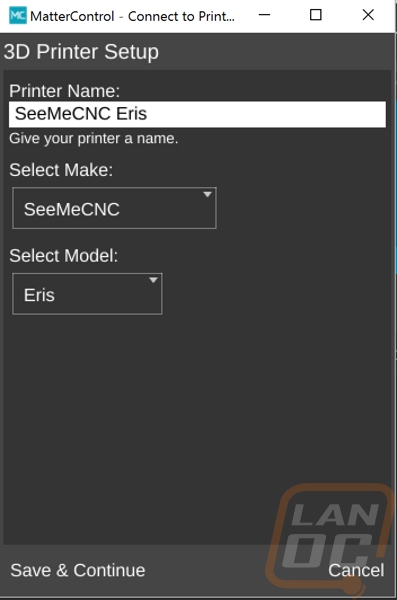
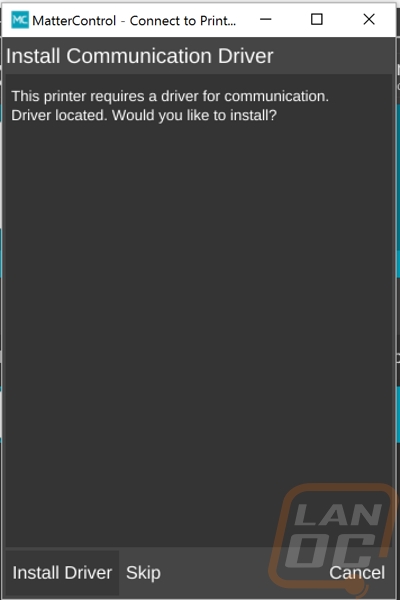
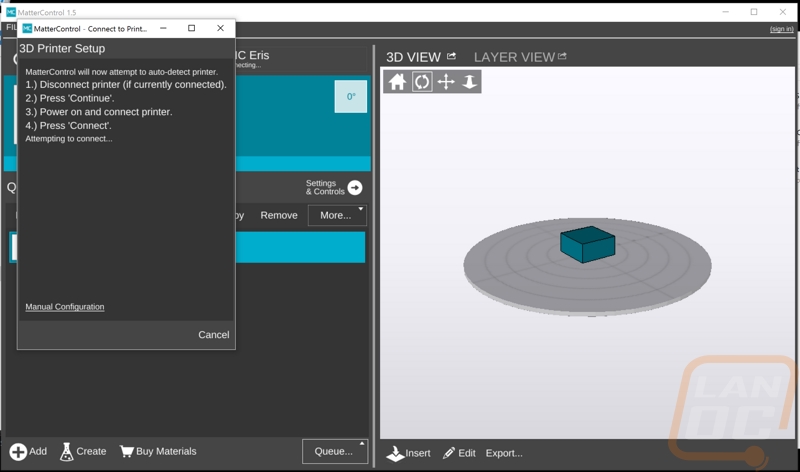
Once downloaded and installed I opened up the program and clicked to add a printer. You can give the printer a name and then from there you select SeeMeCNC and then the Eris. Next it will prompt you to install the driver, this as simple as just the one click. Next it will try to auto detect the printer. So now we hook the power cable up to the printer, plug in the USB connection, then turn the printer on. For me it picked up the printer right away both on my laptop and on a PC later as well. I did read in the beta test forums that a few people don’t have luck with the auto detect, if that happens you just click manual configuration and point it at USB ports until it picks it up.
Now before we get printing, with my printer being a very early model, the settings that came with Matter Control weren’t optimal. SeeMeCNC will be providing Matter Control with the updated settings for an upcoming update so this won’t be an issue for most people, but you can also download the settings on the Eris product page. The zip folder has a settings page and three Gcode files. You can rename those three files to have gcode as the file type and add them into the print queue or you can open them up and copy the contents into the macros page. I went with the macros way but it seems both are an option.
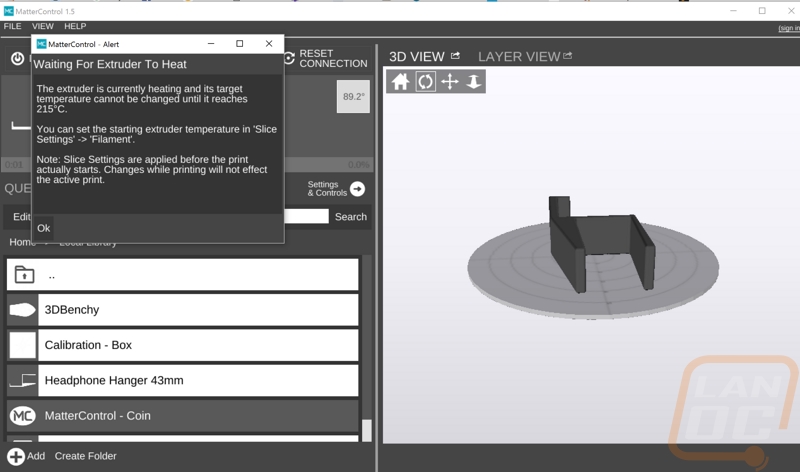
Now the last thing we have to do is prep the printer for our first print. You get out the filament spool that came with the printer. Make sure the end of the filament is flat by breaking off a little of the end and also make sure there aren’t any bends in it. From there you feed it into the tubing around to the extruder on the other side. On the extruder side you hold the extruder open with the red release and slide the filament in. Once in you can let go and twist the knob a few times counter clockwise until you can see just a little filament in the tube to the right. From there we go into Matter Control and run the load filament gcode script that SeeMeCNC provided. This will heat up hotend to 215c and then feed the filament up to the hotend and extrude a little to make sure it is primed.
Before printing you should make sure the print bed is clean and run the calibration script. I like to wait until the hotend cools back down to about 180 and then I clean off any plastic that has come out of the nozzle. That way when you run the calibration it gets full contact. It will come down three times double tapping on each test to confirm. Once it finishes up you are good to print.
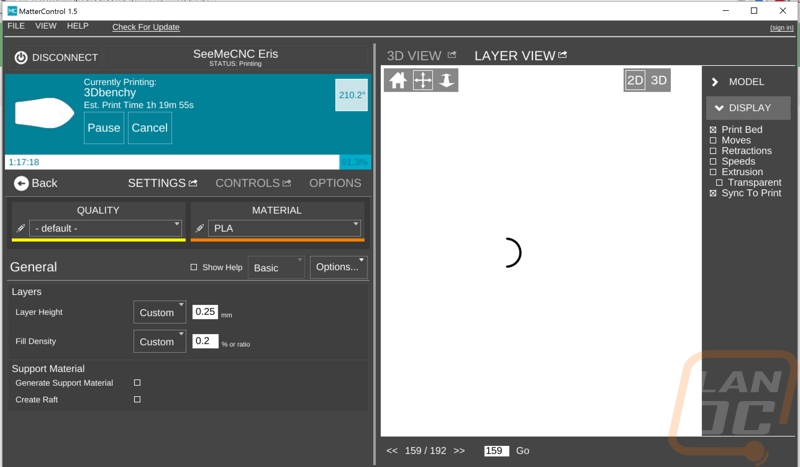
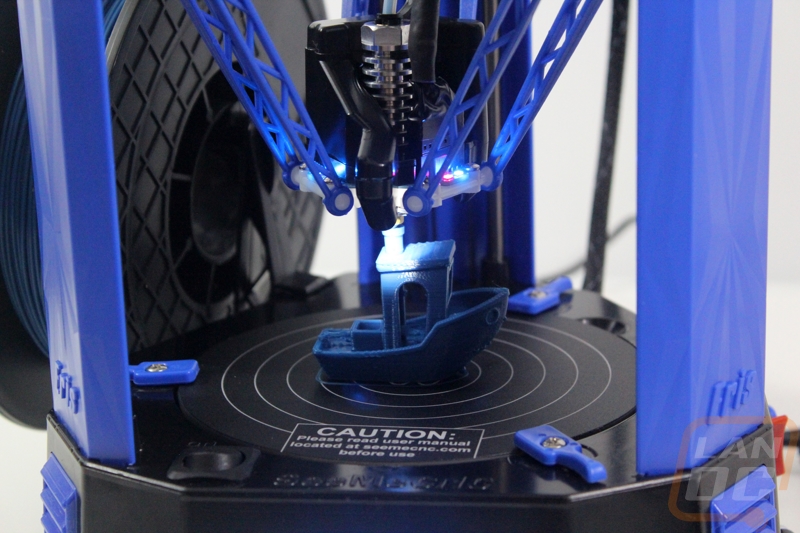
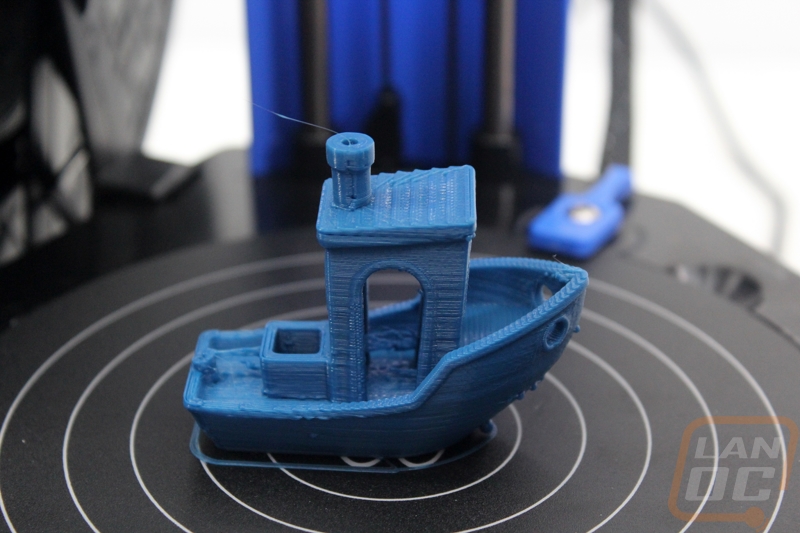
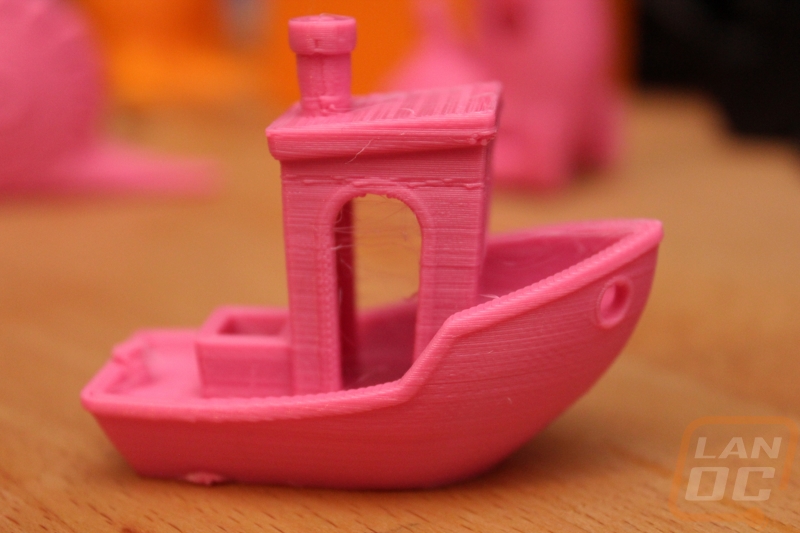
I started with a 3D benchy boat as my first print. My wife loves the boat but the goal here is to test how the printer prints in multiple different situations. You can download this and other designs on thingiverse.com. You can pull the file from the zip you download and put it into your download folder for direct access or if you put it somewhere else you can click add in Matter Control down in the left corner and import it. From there you just have to click print and you are off to the races. While printing you can see the 3d model or you can set it to show the print progress for each layer as it prints.
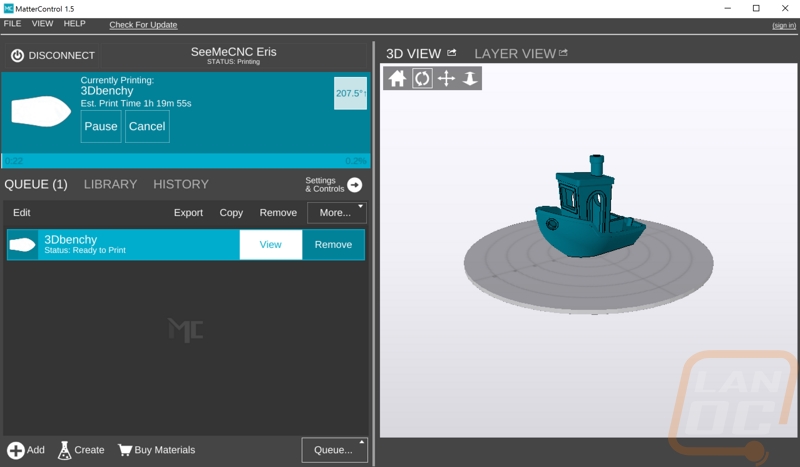
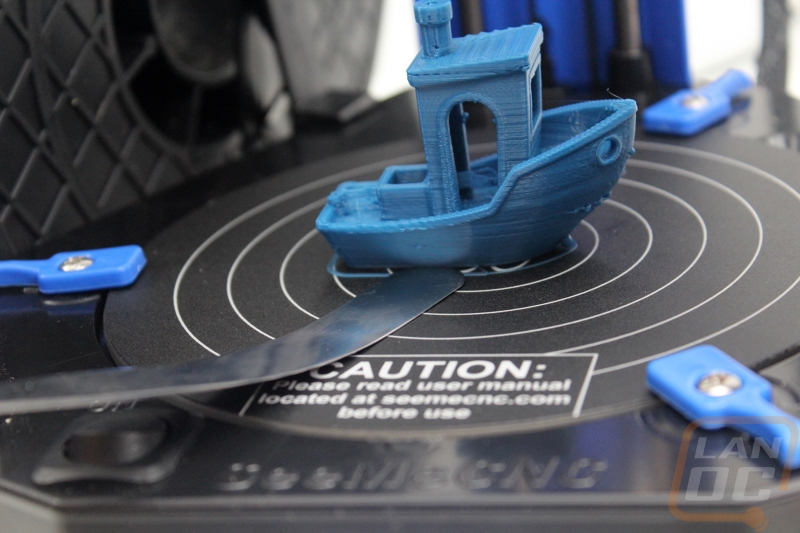
Our first print wasn’t perfect but still a world better than what a lot of printers will print on their first print. The initial setup is currently taking in feedback from multiple beta testers and reviewers to get the tune just right. Once finished we take the scraper and gently get it up under the edge of the print. This works best if you hold your hand across the scraper as well to keep it from popping up. I didn’t know this at first and ended up damaging our scraper lol. My loss is your gain though!
Performance
Before jumping completely into how my experience with the Eris has been, I want to again point out that this is my first time with a 3d printer. The Eris is deigned to be a ready to print right out of the box experience and I don’t think we could ask for a better way to test that than to throw me to the wolves and jump right into everything. After spending part of the day at SeeMeCNC, where I did get a quick run through on how the printer works, I had my photos taken and had the Eris out and printing the next morning. From that time until the time of me writing this I have about 140 hours of print time on the machine. Considering that is all in about 11 days you can see I have had the Eris running nearly 24 hours a day. Why? Well for one I really wanted to put the new printer through a beating before I wrote about It, but also I’ve been excited to finally be printing things. I literally had a long list of things I wanted to print as well as a list of things I wanted to design then print. In the past 11 days I have managed to put a good sized dent in both with some being beyond the size limitations of the Eris as well.
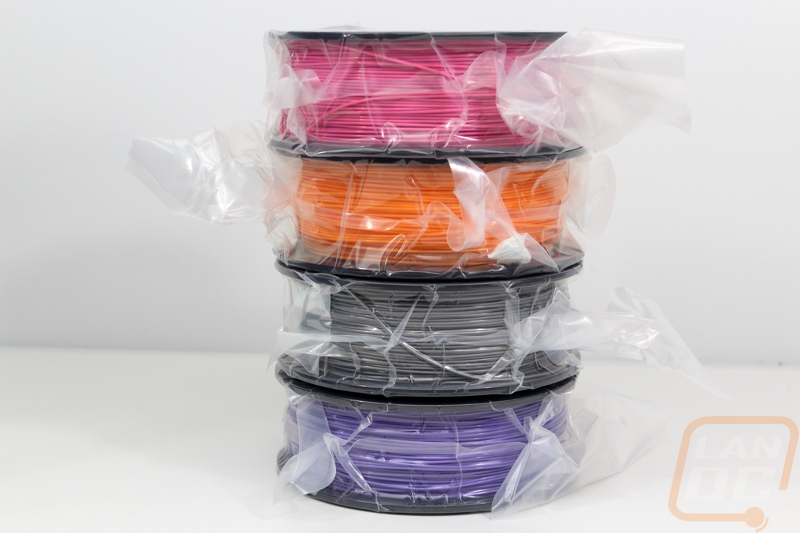
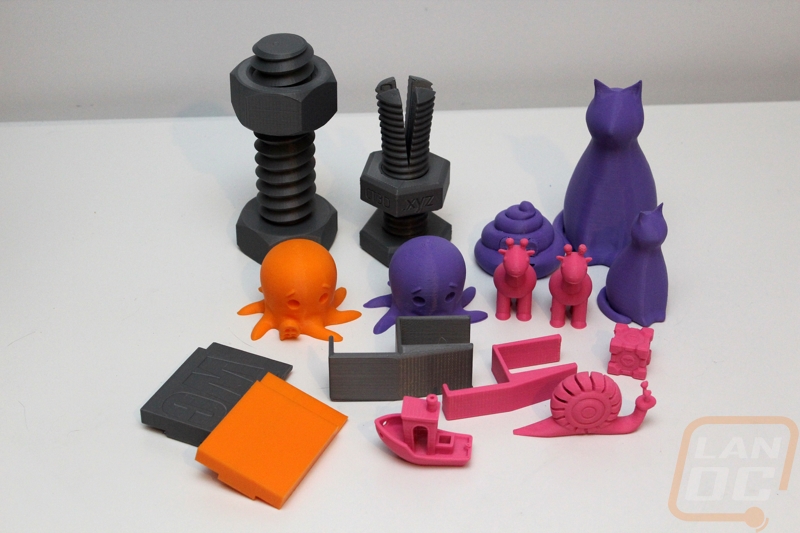
So when I was at SeeMeCNC they let me grab a stack of filaments for our testing. There is no doubt that I would grab orange, but I also picked up pink as it is also bright and should show up well in photos. For darker colors I went with the purple and a grey. Then of course we have the 1-pound spool of blue that comes with the machine. Even with that variety of colors I’m already looking at picking up other colors as well. When I picked out the colors I was focused on what would look good in photos, I didn’t really consider what would be useful in various prints. I would highly suggest to a new user to pick up a few base colors as well like a white and black. There have been multiple prints that I really want to do but would like to use base colors, especially in multi piece prints where multiple colors come in handy. Picking up a spool is about $17 for a 1lb and $30 for a 2lb spool through SeeMeCNC and you will find similar prices from other places as well. If you are close to a Microcenter you can even get them there.
So once I was started printing the biggest challenge for me was to figure out what to print. It wasn’t that I didn’t already have a list of things that I wanted to print, but what do I want or need the most. In the end I toyed around with making a few things for my wife, specifically a companion cube from Portal and then I jumped into a larger purple octopus print.
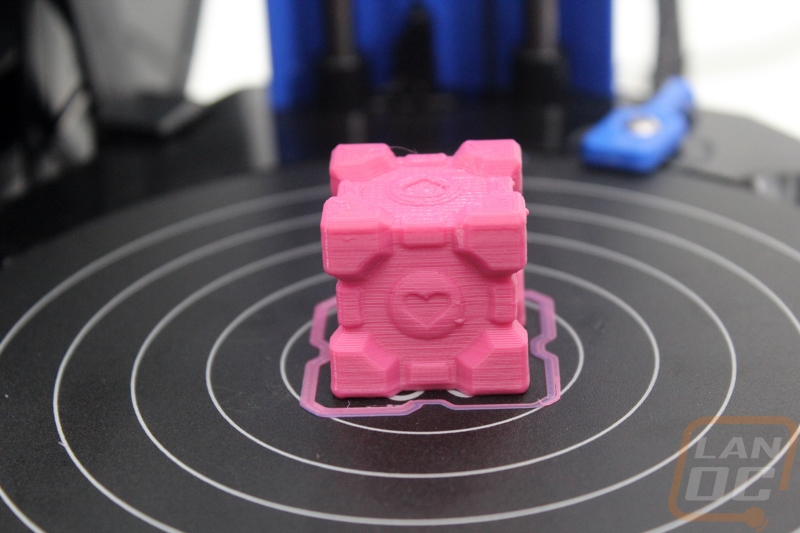
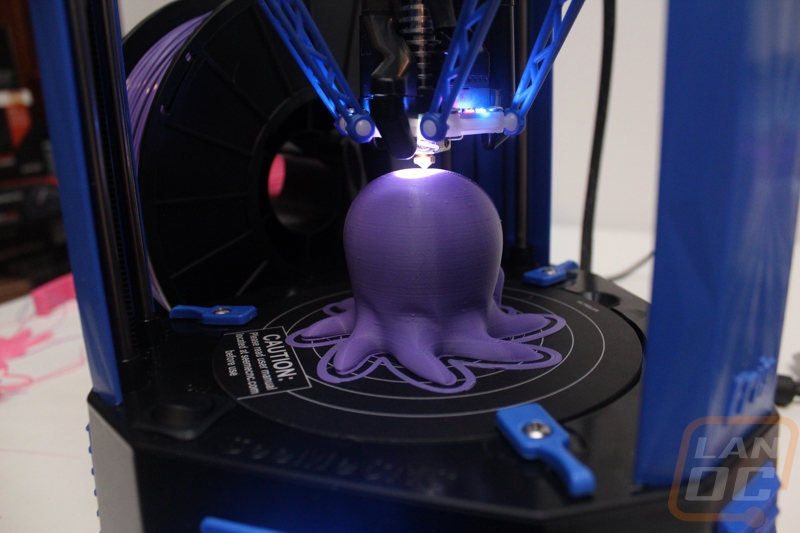
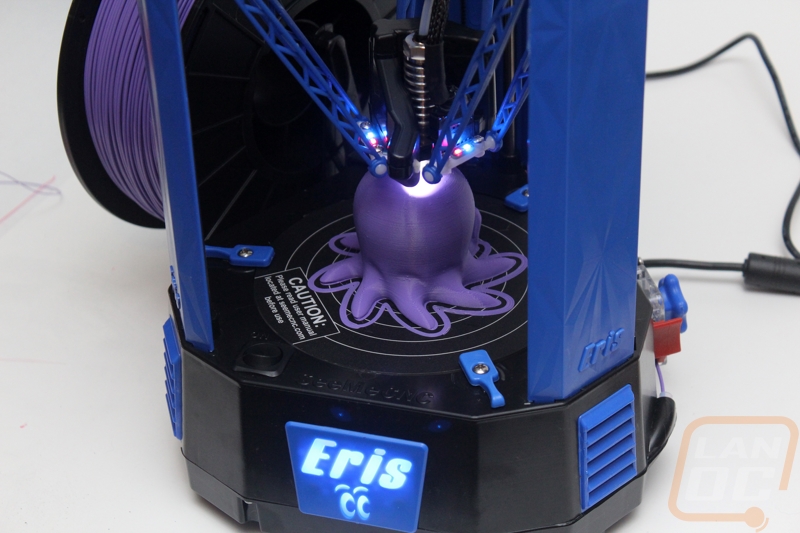
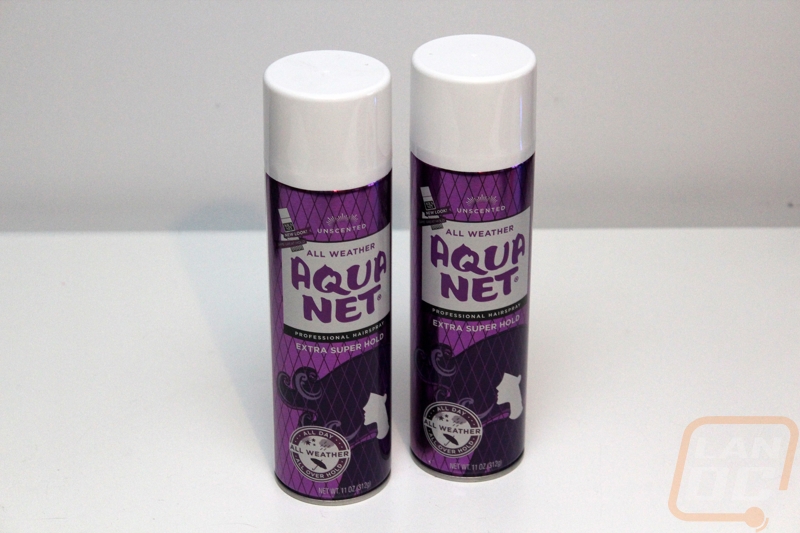
I had no issues with ether print but when I went to take the octopus off the build surface I was shocked at just how well it stuck. In fact, this is where I ended up bending the included scraper. I grabbed a razor blade to try to work the print up and this worked. Sadly, when I did this I managed to cut into the build surface in a few areas. I went ahead and used the damaged surface for a while but later flipped the build plate over to try printing directly on glass. SeeMeCNC told me that I should be able print directly on freshly cleaned glass using PLA, something that a lot of people online think you need a fully heated print bed for. Well I gave it a try and I was able to do it. It was a little stressful worrying that the print might slip and watching over the first few layers every time. So I went ahead and picked up purple aquanet with no sent. This is what is recommended to use on a clean glass plate. I tested it out and it worked better than I could have imagined. With one quick spray the prints stick perfectly but come up without much effort. On top of that when using the glass plate the bottom of your prints are glossy and flat. I am planning on replacing the stick on surface though, I pulled it off and tried printing without it and the build plate wasn’t thick enough for the hold downs causing the plate to move when printing. I should also point out how easy taking the print surface off was!

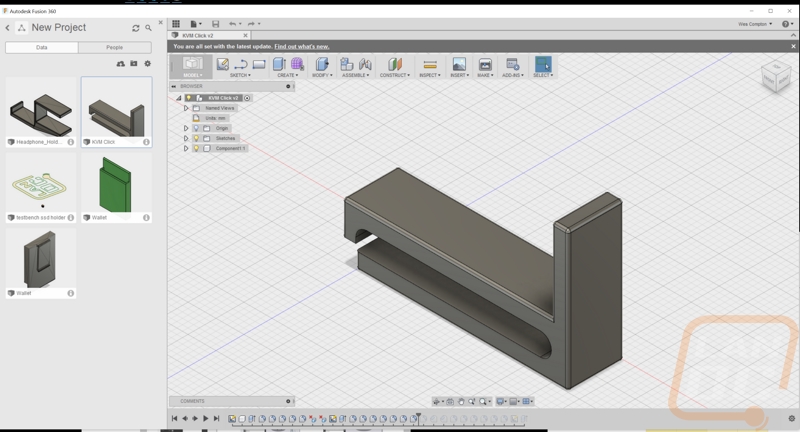
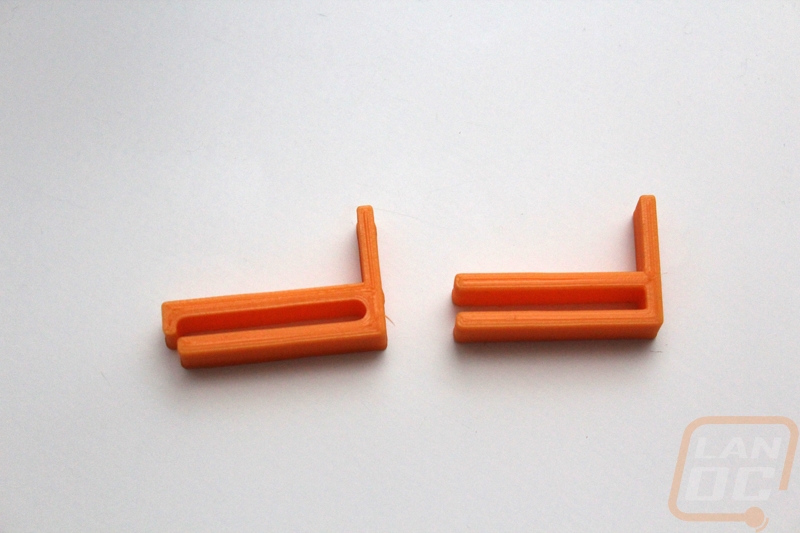
After a few days printing nearly anything I could find on Thingiverse I was finally comfortable enough to start learning how to design and print my own designs. There were a few things that I wanted to work on. About half of them were just too large for the build surface of the Eris. Specifically, I want to work on a few keyboard parts and a RAM holder that I had to skip out on. That said I started small, I have been having issues with the KVM that I use for my test benches sliding back on the metal wire rack that it sits on. So I installed Autodesk Fusion 360 I drew up a small part designed to slide over the wires. My initial design was simple and even that took me a little while to figure out as I learned Autodesk. I printed it up and it did work but I knocked it off multiple times. So before printing a second design I jumped back in to modify my design and add a lip on the back edge to keep it from sliding on. While doing that I also worked on rounding off corners and even rounding the clip part to better fit the wire rack. In the end my design, although still simple, worked perfectly to keep the KVM from sliding back on me.
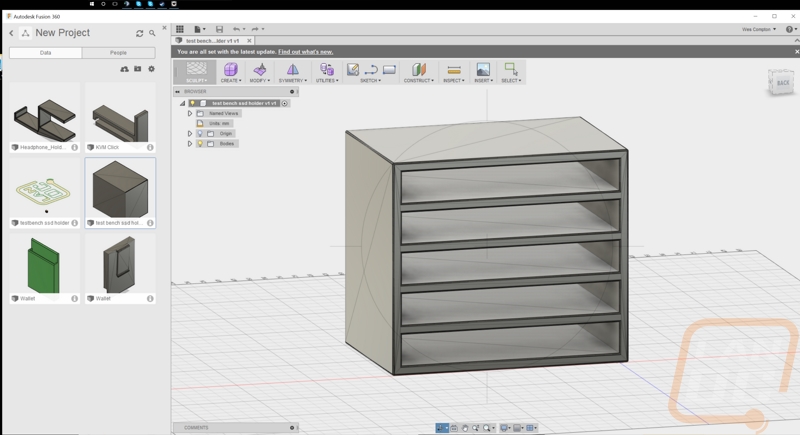
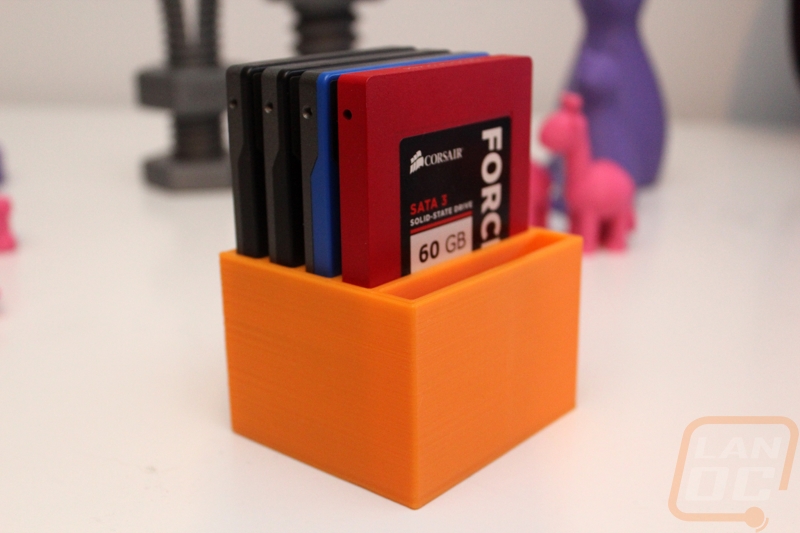
After that I felt comfortable enough to get into a larger project, building an SSD rack for our main test bench. I always keep one SSD with everything setup for each chipset and they get knocked around a lot. So I designed a simple case that holds 5 SSDs. HERE is a link to the files if you would like to make your own.
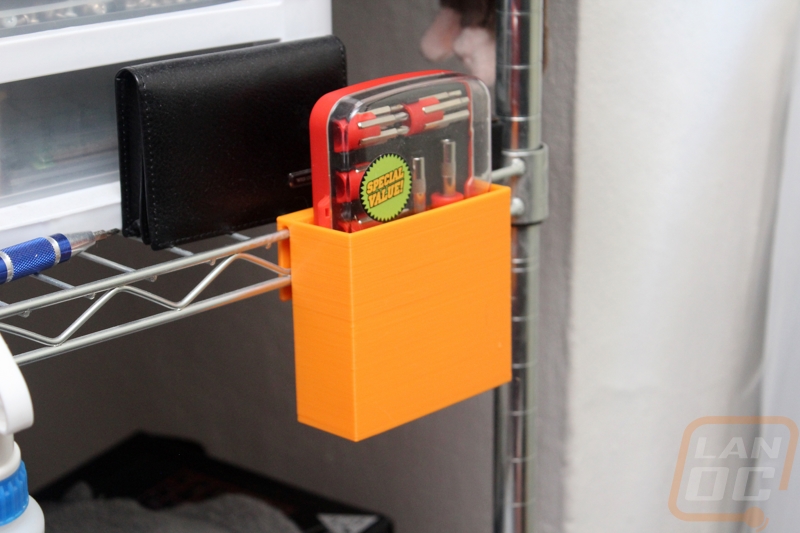
The last new design I did was a box to hang tools and other items off the side of a wired rack. The goal here was to clean up some of the random stuff that I use often but don’t have a home for. The design took a few redesigns but works well and I’m printing more to put my box cutter, key puller, and cutters that are also always in the way. If you are interested in printing your own click HERE for a link to the download.
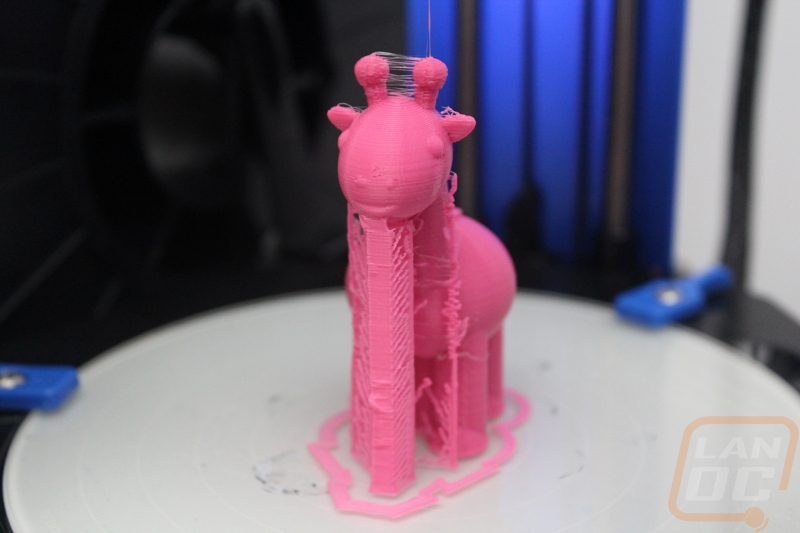
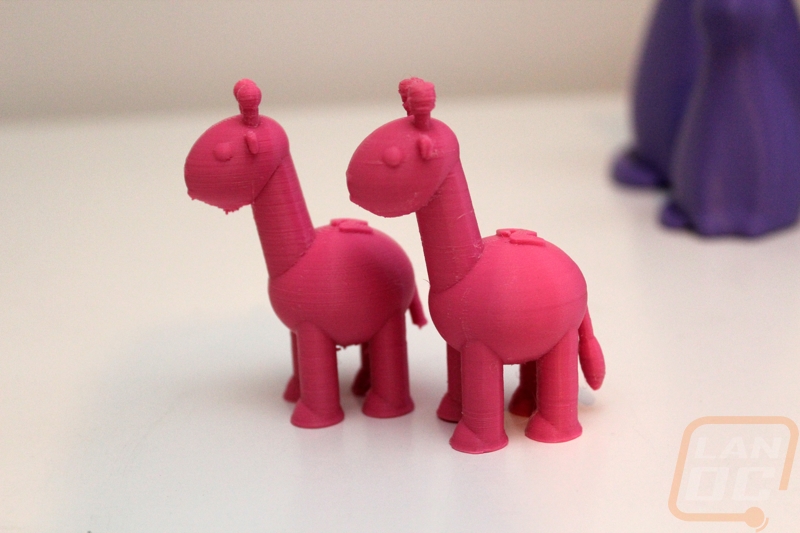
When doing a few of the prints including the hanging box that I designed I did have to learn when I should use supports on my prints. Basically when printing anything that overhangs or has an angle of more than 45 degrees is going to become a spaghetti mess if you don’t add supports. They build up along with your main object to help support the vulnerable areas once you start to print them. Here is a shot of our giraffe, without the supports his belly and chin become a mess. You can tell in the second shot below where one has a goatee. That show also shows the quality difference when printing at .1mm layer heights over .22.
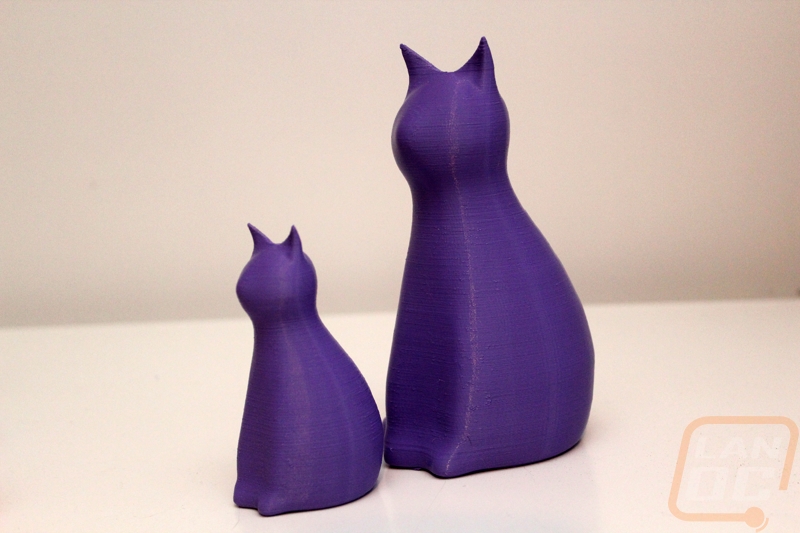
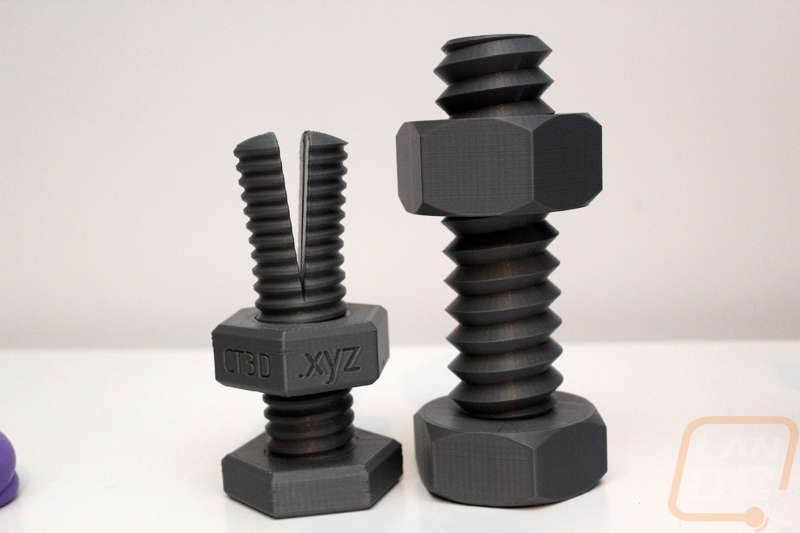
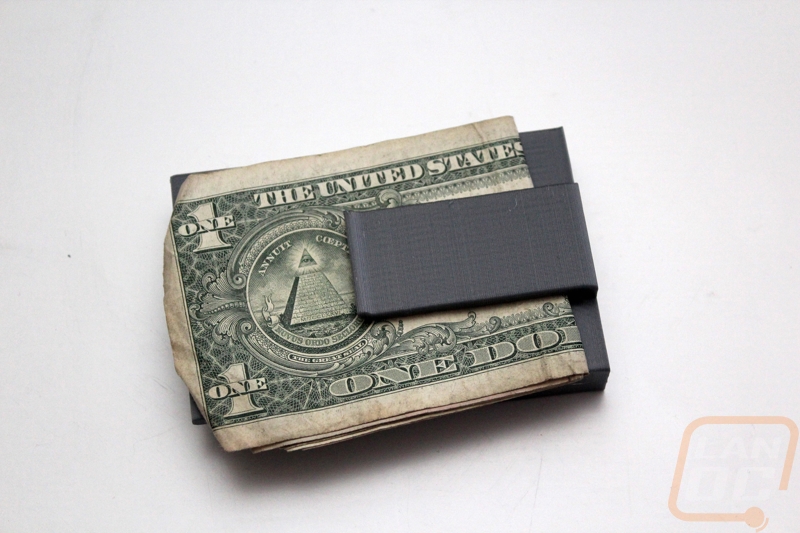
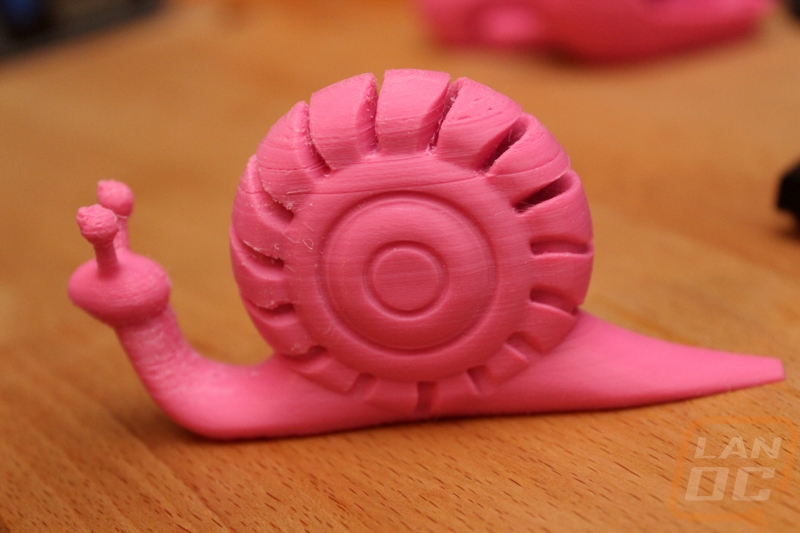
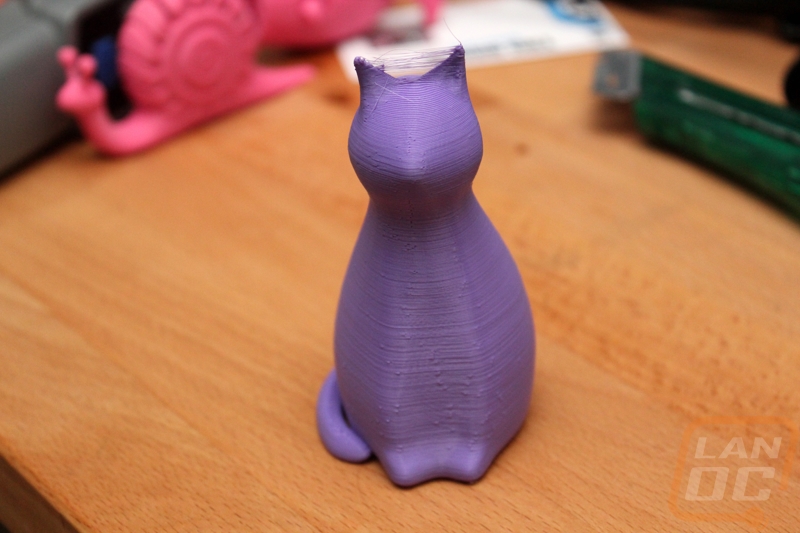
I’m sure by now you are starting to get a feel for what you can print with a 3d printer. When I first started looking at them I was a little worried that it would just end up being a toy that lets me build other toys. Its true that early on I printed a lot of the cute toys and figures for my wife. I imagine if you have a kid this could become a never ending thing printing toys for them as well. That said I did quickly start to find a lot of things I could make to improve things. I printed myself a wallet and spent time customizing it to fit my credit cards and even added my initials too it. The two purple cats I printed as a decoration for our living room. The larger cat was also my first attempt at printing a large object without any infill for support inside. Then I printed the bolts as something to keep on my desk both to show people and for me to mess with from time to time. I even printed a new knob for our crockpot after the old one had broken!

What I’m really excited about though are the possibilities in the future with upcoming PC builds. In the past I’ve made sheet metal brackets for hard drives and water cooling components, now I can go even crazier there. I’m also planning on designing a few fan covers once I get some red and black filament in. The same goes for covers for wiring and wire looms. Not to mention the possibilities for cosplay and gaming related figures.
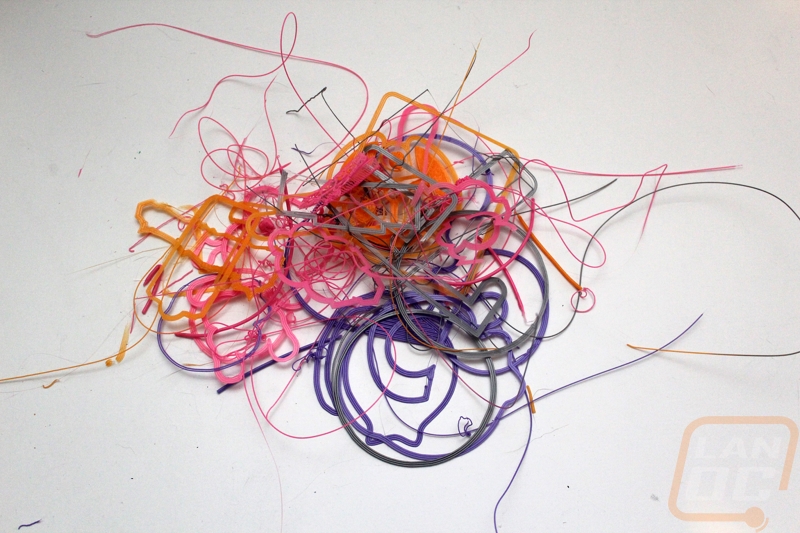
By the way, just as a heads-up. Plan to have a lot of excess filament and prints that you will be throwing away. Every spool change, print, or mess-up is going to add to a nice pile of trash so keep a box or trashcan around. I only mention it because I know my cats LOVE to chew on things like this and I imagine that the same goes for small children as well.
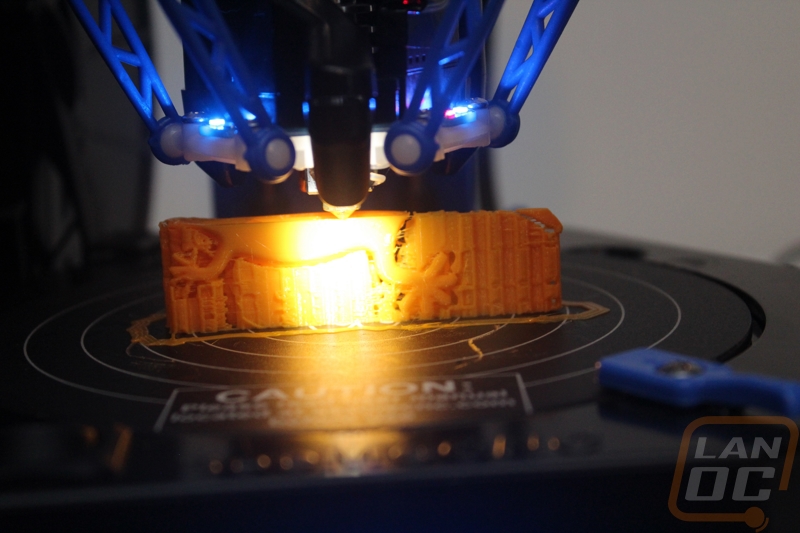
So I have obviously talked a lot about how I have used the Eris but I wanted to dive into how it actually performed during all of that as well. I touched on it a little but the default settings that were sent to me may end up changing depending on how things work out for the beta testers. I know in my experience the prints were good, but not perfect. Turning the heat up made for a good finish but ended up giving me small bumps in areas. I used the Simplify 3D print quality guide to help learn to read the prints and to make adjustments as I went. The fact is 3d printing does require tuning here and there, even between similar filament spools, to get the best settings. But the Eris did a great job of giving a good base to start from. As you can see in the pictures below, I did have to work out issues with lines. Lowering my temps helped. Im still working on getting the stringing fixed though.
I also touched on Matter Control in the setup section, but I wanted to revisit it and talk about how much I have actually enjoyed using it. Beyond being easy to setup, I really like that you can view and edit your prints right in the software. Being an open source program I was expecting it to be a little rawer but it’s clear the community has really kicked butt on it. I would love to see them add the ability to view supports before printing though and on that same note being able to add in your own supports would be nice as well. I know that you can do that in Simplify 3D, but it isn’t free. At first I ignored the cloud functionality, but after setting it up I’m surprised how much I use it. I’ve used it to log in and check the status of a print and once I even used it to remotely stop a print after seeing an issue. But on top of that I now use it to add new print files from my main PC. Before I was transferring them over the network then adding them into Matter Control, using the cloud is much quicker.
The only other thing I wanted to touch on was the overall noise output of the Eris. With it being portable it is very possible you might use it in a lot of different places. But I was curious if I would be able to live with it in my office. Honestly at first it wasn’t an issue at all, the print noise is still a lot less than the AC in my office, but even beyond that it was more than livable. After a few days of use I did notice that the main fan in the base has gone from a mild hum to a high pitched noise. It’s clear that the fan is going bad and I can’t blame SeeMeCNC for that, but I think if I don’t fix it soon I might end up going crazy.
For those of you curious to see the Eris in action, I have actually been streaming live to our Youtube account for days now. You can find some of the prints I spoke about in here on our Video Page and just maybe you might catch me printing Live as well.
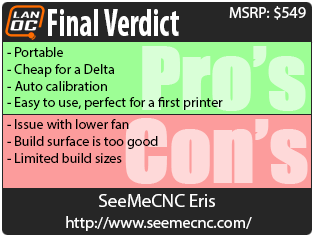
Overall and Final Verdict
So at the end of the day I’m in an interesting predicament. Normally I can get an idea of how a device works by comparing it to similar devices that I have tested. In this case though I can really only use my overall experience. Lucky for us, the Eris is designed to be a perfect printer for new users and that I most certainly was. So with that in mind I was extremely impressed with just how quickly I was able to pick up the Eris and be printing. Setup really only took about 5 minutes and I didn’t have to build anything with the exception of locking the spool hanger in place. The new auto calibration in the he280 hot end really added to this as well. While I have no personal experience with it, I’ve heard nothing but horror stories about getting delta printers and 3d printers in general leveled and ready to go. The Eris on the other hand took about a minute to do it for me.
I’m really excited about being able to use the Eris at events as well. The built in handle and small footprint make it perfect for transporting to wherever the printer is needed. So if I need a part out in the garage and I think I might be making one or two prototypes grabbing the Eris and my laptop and just taking it out to the garage is a better option than running back and forth to my office.
Now my experience with the Eris wasn’t perfect. The fan in the base was fine when I first started printing but it now makes a lot of noise. I also found the build surface that they provide with the Eris to actually be a little too good. I ended up damaging the surface early on multiple times when trying to remove prints that were stuck to it. I plan on using it for thin prints in the future that need the extra grip and using the glass side for prints with a large base. Speaking of that, being a delta the Eris does have a great overall production size but sadly most of it is vertical. This means you can print a lot of things that a similarly sized Cartesian printer isn’t going to be able to fit, but only if you can figure out how to take advantage of the z axis space. In my situation I have a whole list of projects that I want to jump into that the Eris just won’t work with.
So what about the price, is it priced to compete in the market? Well for starters there really isn’t a direct competitor, no one else is making a small delta like the Eris. Because of that it is actually a good entry level delta printer. But let’s also compare it to a few of the other small bed printers.
SeeMeCNC Eris $549 (currently, might be sale)
Lulzbot Mini $1250
Ultimaker 2 Go $1199
MakerBot Replicator Mini $799
Now for starters there are just too many small 3d printers to list them all. I tried to list out a few of the main brands. Frankly when compared to them the Eris is a steal. There are a few other small build area printers like the Monoprice Maker Select v2 but I don’t think it’s a fair comparison as well. The Maker Select does have a headed build plate but it lacks the auto leveling and most importantly it is nowhere near portable. Not to mention you still have to put it together when you get it. The Eris on the other hand is ready to print right out of the box.
So is the Eris the printer for you? Well if you are completely new to 3d printing and you are looking to get rolling right out of the box it is a good buy. I also think it will be a great option for people who have a 3d printer but want to toy with a delta. There are limitations of course, especially with the build size but also with materials that you can print with. If you are looking to do ABS you should check out SeeMeCNCs larger printers as well as the other options on the market, or wait around it looks like SeeMeCNC set everything up ahead of time to have the option to add a heated bed and a smart controller. I wouldn’t be surprised if they bring out an upgraded option in the future to handle more filaments.


Live Pricing: Amazon and SeeMeCNC


")
