When it comes to picking out a video card for your PC, I think we would all go with the top end cards if it was possible. But the truth is when we are picking out our components it is all a balance. We have to make sure that no one component gets the biggest portion of the budget, the card has to fit the budget, and it also has to fit with your other components. In other words, you wouldn’t go with a Fury if you could only afford a power supply that would power an R7 370. Because of that it is nice to have options and for the most part AMD has done a good job filling in the gaps. The one glaring omission though has been the lack of a 380X to match the 370X and 390X’s in their product line. Well today they have filled that gap. So today I’m going to dig into the Asus R9 380X Strix and find out what sets the 380X apart from the competition as well as the 380 and 390 that it sits between.
Product Name: Asus R9 380X Strix OC
Review Sample Provided by: Asus
Written by: Wes
Pictures by: Wes
Amazon Link: HERE
| Specifications | |
| Model name | STRIX-R9380X-OC4G-GAMING |
| Graphics Engine | AMD Radeon™ R9 380X |
| Bus Standard | PCI Express® 3.0 |
| OpenGL | OpenGL® 4.4 |
| Video Memory | 4GB GDDR5 |
| Engine Clock | 1030 MHz (OC mode: 1050 MHz ) |
| Memory Clock | 5700 MHz |
| Memory Interface | 256 bit |
| Stream Processor | 2048 |
| DVI Max. Resolution | 2560 x 1600 |
| DVI Output |
1x Native DVI-I 1x Native DVI-D |
| HDMI Output | 1x Native HDMI |
| HDCP compliant | Yes |
| DisplayPort | 1x Native DisplayPort 1.2 |
| Accessory Bundled |
1x STRIX Laser Sticker 1x Power Cable |
| Software Bundled | ASUS GPU Tweak 2 & Driver |
| Dimension |
273 x 140 x 43 mm 10.64 x 5.46 x 1.67 inches |
AMD 380X
Before I dive into our normal review I did want to take a look at the R9 380X and find out where it fits in AMDs product lineup as well as take a closer look at its specifications. For starters the R9 380X is based on the same Tonga GPU as the R9 380. To expand the performance, they opened things up by going from 112 texture units to 128 texture units. This raised the number of stream processors from 1792 to 2048. This puts it directly in between the R9 380 and the R9 390 with its 2560 stream processors. In fact I think the most interesting thing is that this is the same number of stream processors as the R9 280X had only it was Tahiti based not Tonga. The R9 380 and R9 380X also share the same clock speed and power usage as well. The 380X has the same 256 bit memory interface but they did double the memory capacity moving it up to 4 gigs as bump up the memory clock speed slightly as well.
| Specifications | R9 380 | R9 380X | R9 390 |
| Process | 28nm | 28nm | 28nm |
| Stream Processors | 1792 | 2048 | 2560 |
| Boost Clock | 970 MHz | 970 MHz | 1000MHz |
| GPU | Tonga | Tonga | Hawaii |
| Texture Units | 112 | 128 | 160 |
| ROPs | 32 | 32 | 64 |
| Memory Configuration | 2GB GDDR5 | 4GB GDDR5 | 8GB GDDR5 |
| Memory Interface | 256-bit | 256-bit | 512-bit |
| Memory Speed / Data Rate | 5.5GBps | 5.7Gbps | 6Gbps |
| Typical Board Power | 190W | 190W | 275W |
| CI-E Standard | PCI-E 3.0 | PCI-E 3.0 | PCI-E 3.0 |
| API Support | DirectX® 12, Vulkan™, Mantle | DirectX® 12, Vulkan™, Mantle | DirectX® 12, Vulkan™, Mantle |
| FreeSync Support | Yes | Yes | Yes |
| Virtual Super Resolution | Yes | Yes | Yes |
| Frame Rate Targeting Control | Yes | Yes | Yes |
| Launch Price | $199 | $259 | $329 |
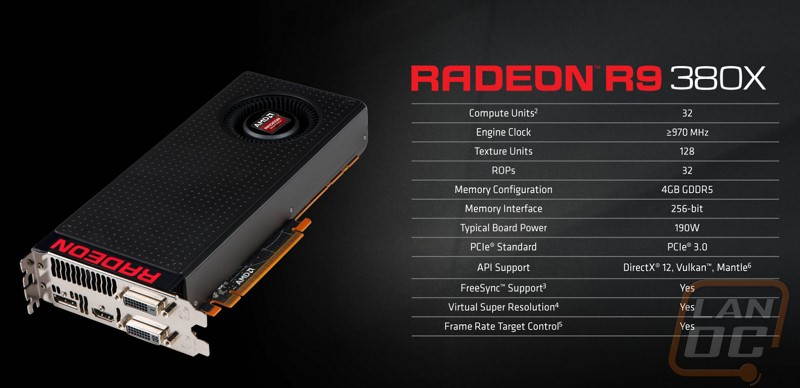
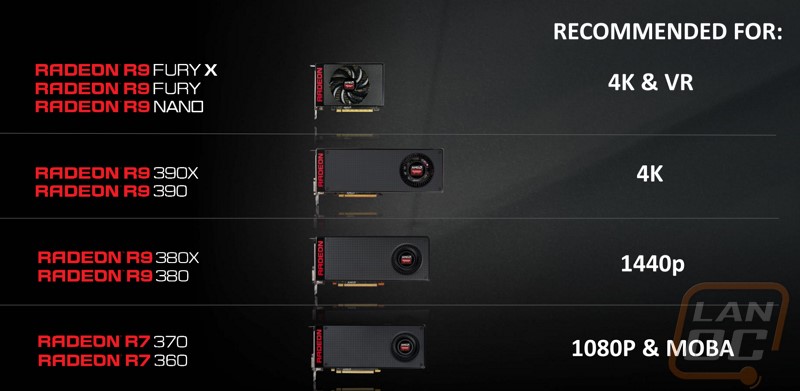
So now that we know the difference between the 380X and the 380 and 390 above and below it lets take a look at where it fits in the product lineup. First I was curious what the overall focus of the card was. While on our call with AMD they broke down each of their cards focus in an easy to read slide so I’m including it below. Basically the 370 and 360 are 1080p and Moba focused, the 380X and 380 are 1440p, the 390 and 390X are 4K focused, and the Fury line is for 4K and VR. When I get into my testing I will be curious to see if holds up, previous testing would have me inclined to say that the 380 only worked well with lower settings on 1440p.
To get an idea of the R9 380X’s direct competition I put together a chart showing the lowest prices available currently on Newegg for each card from AMD and Nvidia. Here we can see right away that AMD has spent more time having a bigger mix that covers every price range where Nvidia has a bit of a hole above the GTX 970. That said the R9 380X doesn’t really have a direct competitor, the GTX 970 is $60 more and the GTX 960 is $50 less. When I get into testing I’m going to be focused on seeing if the 380X falls closer to the GTX 970 or the GTX 960.
| AMD | Price | Nvidia |
| $999.99 | GeForce Titan X | |
| Radeon R9 Fury X | $639.99 | |
| Radeon R9 Fury Nano | $629.99 | |
| $599.99 | GeForce GTX 980 Ti | |
| Radeon R9 Fury | $499.99 | |
| $479.99 | GeForce GTX 980 | |
| Radeon R9 390X | $379.99 | |
| Radeon R9 390 | $294.99 | |
| $289.99 | GeForce GTX 970 | |
| Radeon R9 380X | $229.99 | |
| Radeon R9 380 | $179.99 | GeForce GTX 960 |
| $139.99 | GeForce GTX 950 | |
| Radeon R7 370 | $129.99 | |
| Radeon R7 360 | $99.99 |
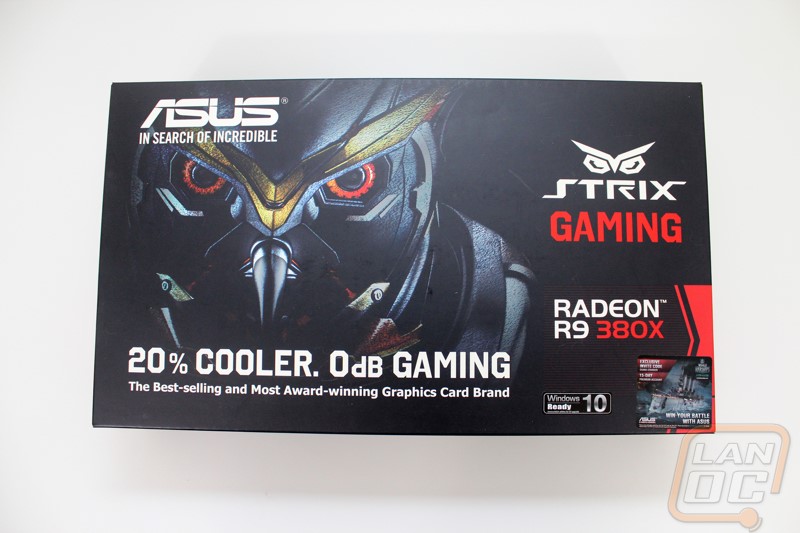
Packaging
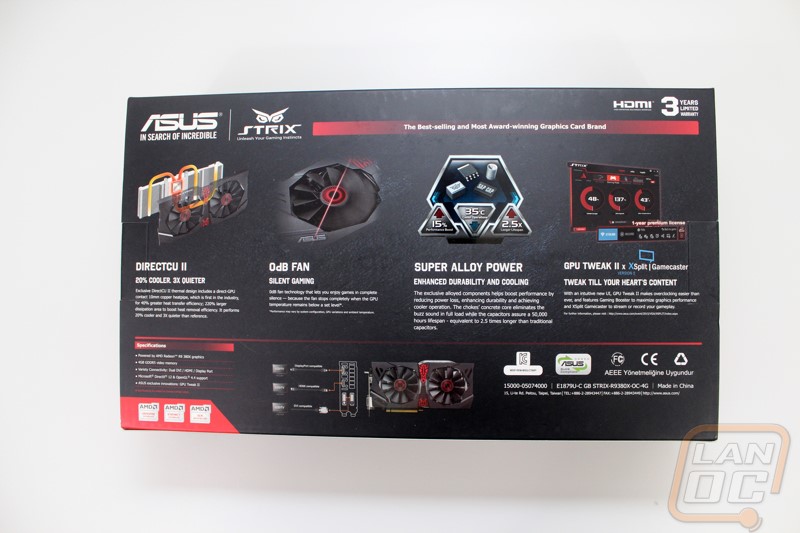
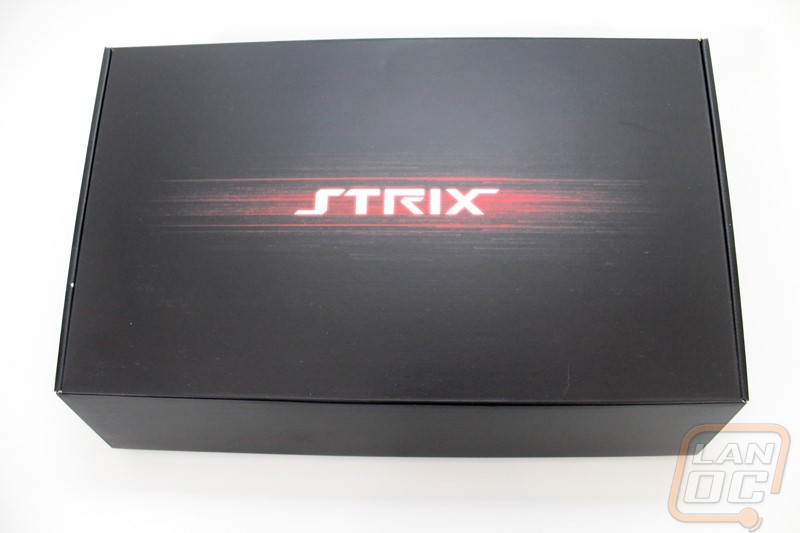
Being a Strix card it’s no surprise that the packaging on the 380X Strix has a large owl right on the front of the box. Beyond that Asus was right to the point with the model name over on the right side, their logo up in the top left, and the Strix branding in the top right. Really the only information about the card on the front of the box is the “20% Cooler, 0dB Gaming” quote in bold. It isn’t until we get around to the back of the box that we start to see a little more information. On the back Asus has broken down four of the card main features with a photo and more information. That is where they talk about the DirectCU II cooling, the 0dB Fan, Super Alloy Power, and the new GPU Tweak II with Xsplit. Down along the bottom we actually see a small photo of the full card and next to it a line drawing of the rear connection options. There is a specification listing but it is extremely small and doesn’t tell us to much about the card.
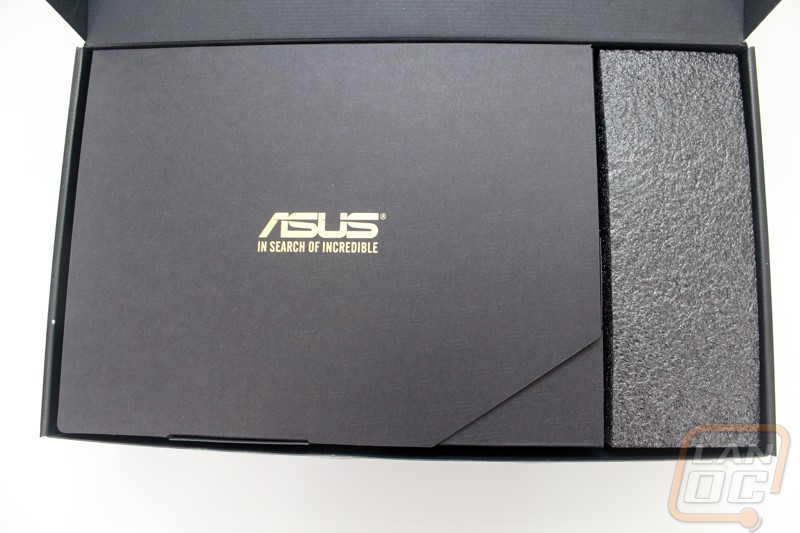
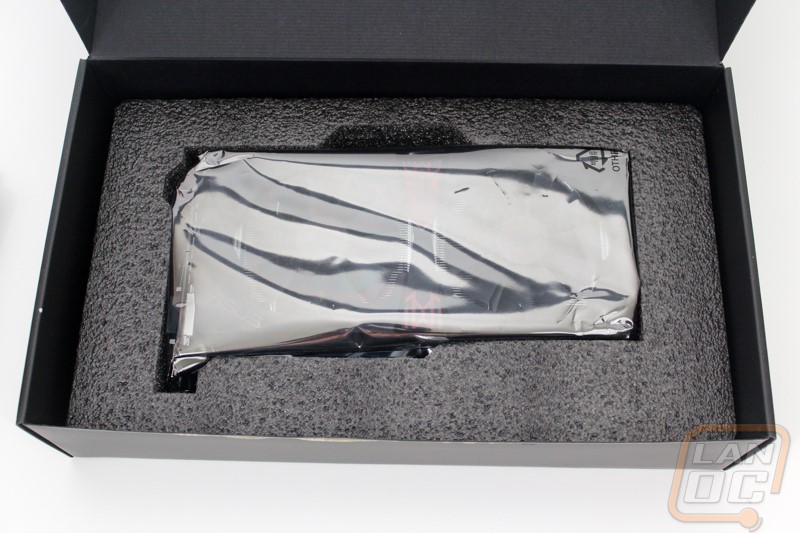
Inside the packaging is another box, this time it just has the Strix logo up top and a few Strix quotes on the ends. Inside THAT box we find foam and a small accessory box with the Asus logo on it. Under the accessory box and a layer of foam we find the card wrapped up in its static protective bag and sitting in a cutout section in foam.
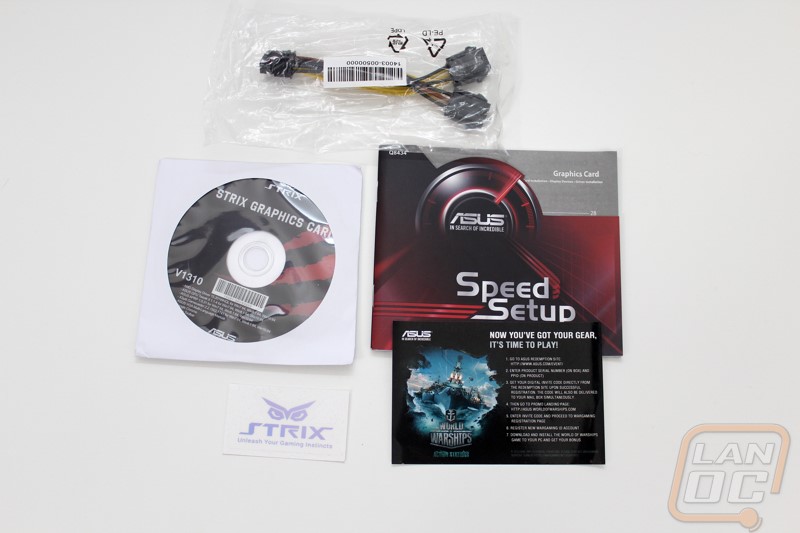
In the accessory box we have a software/drive disc. Along with it a speed setup guide and a world of ships paper. You also get a small Strix sticker as well as a power adapter cable.
Once I got the card out I also noticed that Asus wrapped up the rear backplate on the card in plastic to keep it from getting scratched up and getting finger prints on it. Remember to remove it before hooking everything up if you get the card!
Card layout and Photos
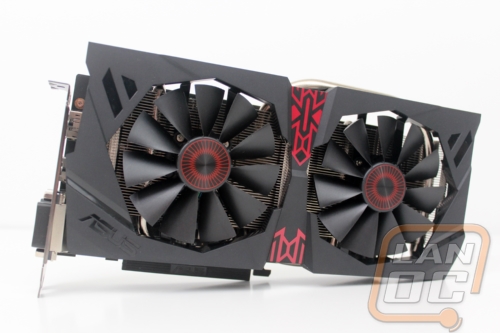
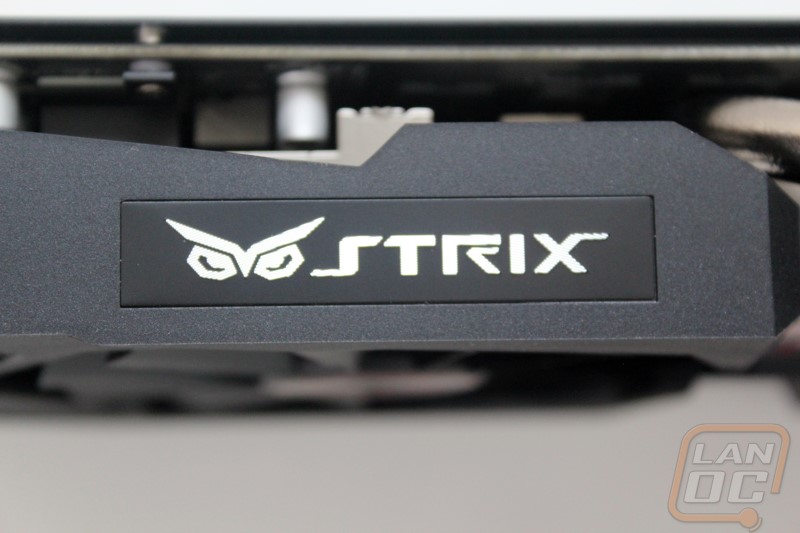
While the R9 380X is a little larger than the budget cards I have taken a look at recently, it does still have the same Strix styling. Basically this means that Asus included their standard DirectCU II cooling meaning their direct contact heatsink design with two fans. The fan shroud though is what gives the Strix all of its unique styling. You see, the Strix brand is built completely around the Strix mythology and Strix genus of owls. The Strix logo is designed into the shape of an owl face and all of the Strix products incorporate the owl design as well. For their video cards the fan shroud highlights the two fans as eyes with the angled areas on the left and right sides matching the Asus Strix logo. Seriously once you see the owl face in these cards you will never un-see it! The fan shroud is plastic and overall extends about an inch above the top of the PCI slot but not past the large heatpipe up top.
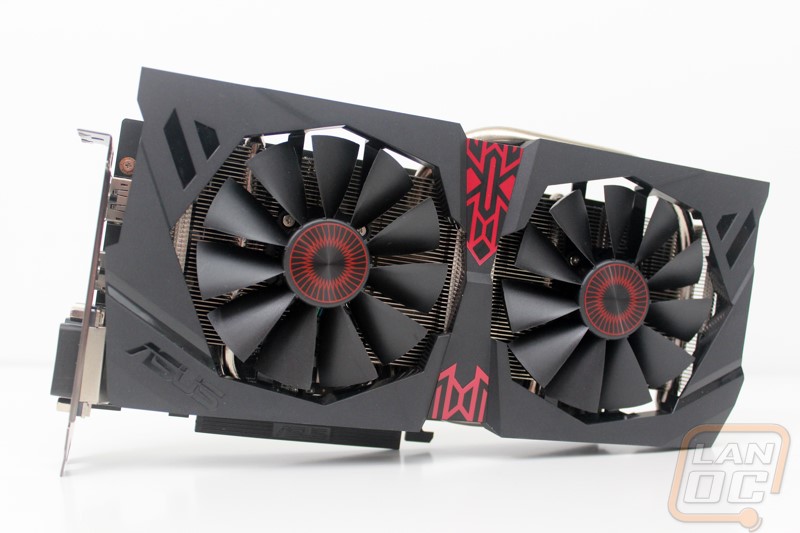
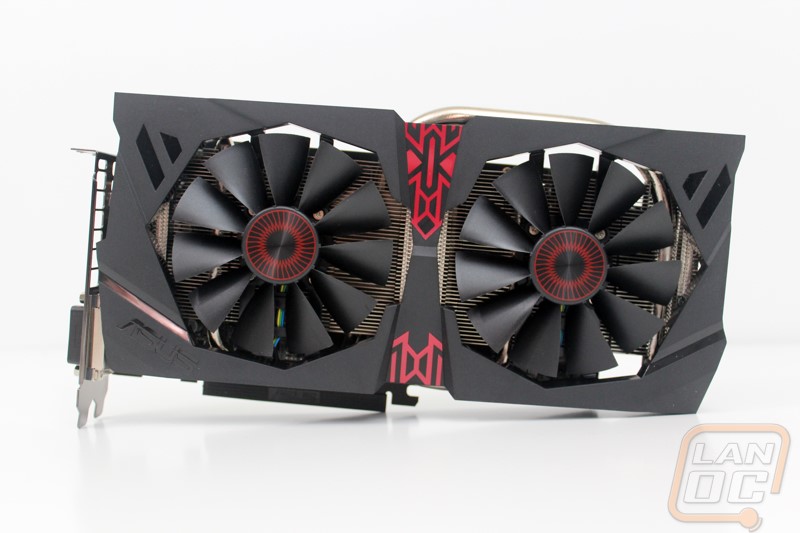
Asus kept the same styling with the two cooling fans. Both have a red and black sticker with a unique design on them that helps continue the owl theme, in this case the eyes. Then in the middle of the fan shroud they also slipped in two red and black stickers with a weird tribal design. Frankly every time I look at these on Strix cards I can’t think of anything but Darth Maul.


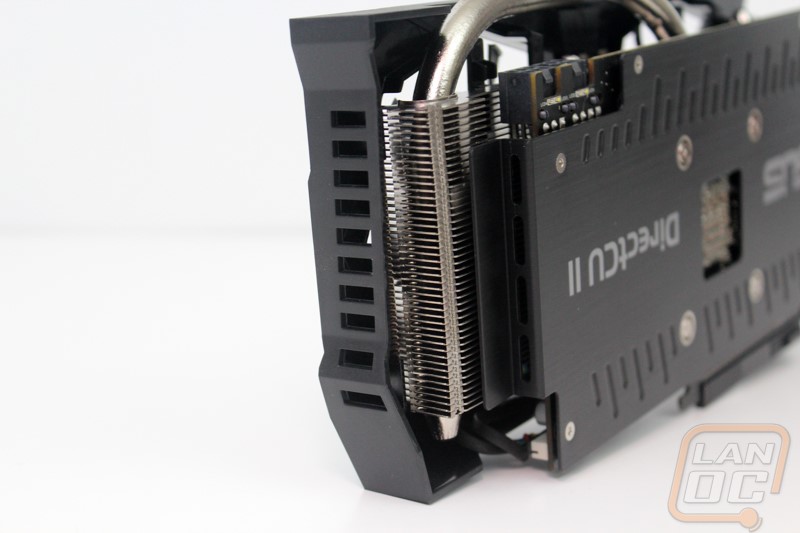
As usual though it’s the cooling that really sets Asus cards apart and the 380X Strix is no different. As I mentioned before it comes with the DIrectCU II cooling meaning the heatpipe has direct contact with the GPU and helps pull the heat out across the large heatsink. The heatpipes on the Strix though are huge. We have one up top that in centered on the GPU and pulls the heat out to the far end of the card and then two on the bottom that sit to the left and right of the top heatpipe on the GPU. These pull heat to the area about three inches to the left and to the right of the GPU. Then of course the thick heatsink has a large base that also transfers heat up into the heatsink. The two fans push air down across the heatsink then against the PCB. The design is efficient enough like most cards these days that it doesn’t actually have to turn the fans on until the card gets under load. This means the card runs dead silent most of the time. The design does mean that all of the hot air that the card generates will be pushed into your case, so keep that in mind when picking out your case.
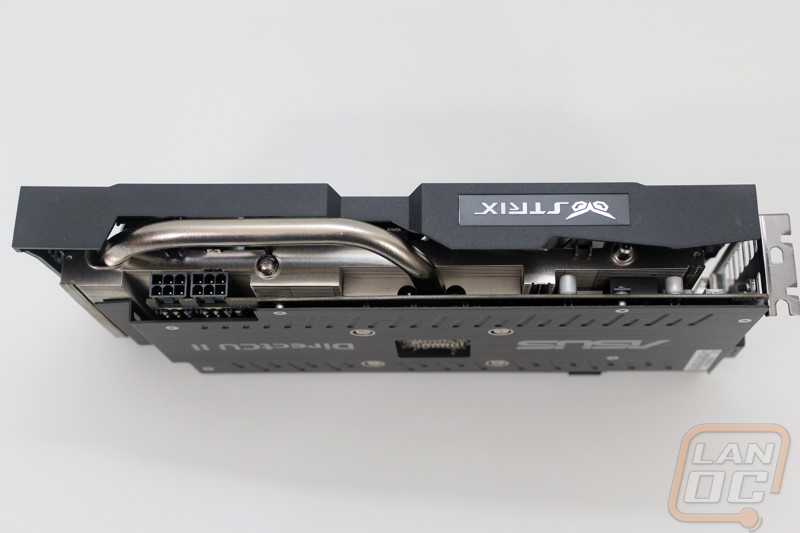

Up on the top edge Asus did include a small Strix logo. It’s not backlit and it isn’t fancy like a lot of cards but it does help show what you have inside.
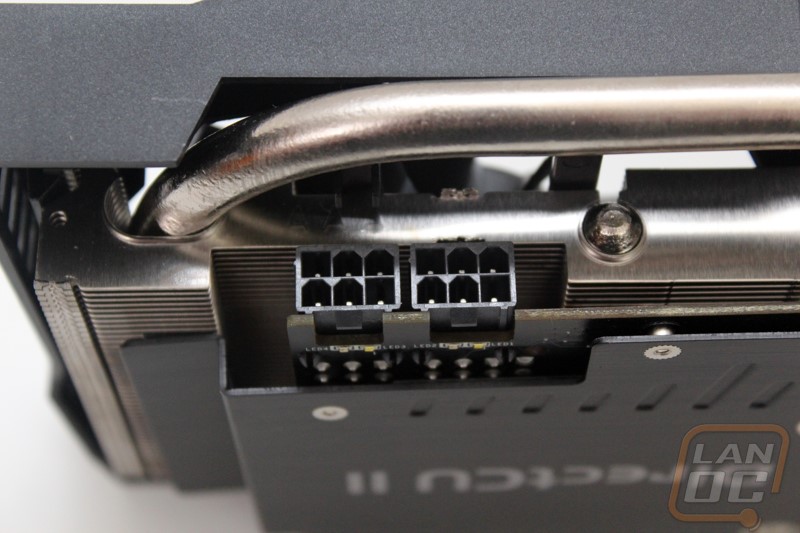
The 380X doesn’t have or need Crossfire bridge connections to run multiple cards so the only connections on the card are the two power connections. You need two 6-pin power cables to get things running. To help save room Asus has flipped the plugs around backwards and notched the PCB. This puts the clips on the back side of the card where they don’t need to leave room in the heatsink for fingers. Just under the plugs on the back Asus has also included red and white LEDs. When you put the 380X Strix in a PCI slot it will light both up red to show that you don’t have power hooked up yet and when you plug them in they switch to white. This makes diagnostics quicker and easier as well.
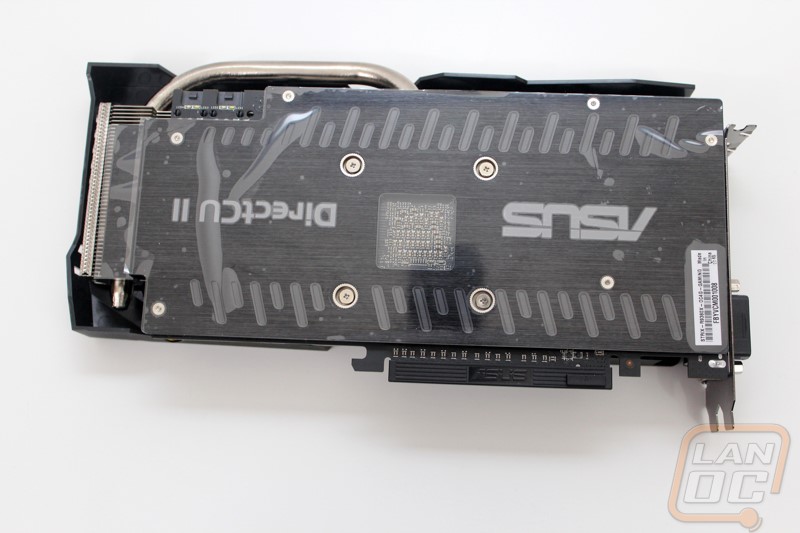
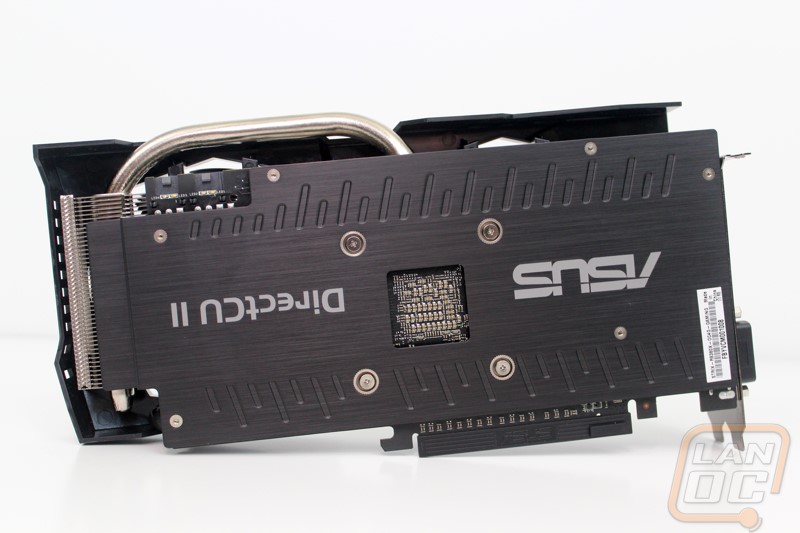
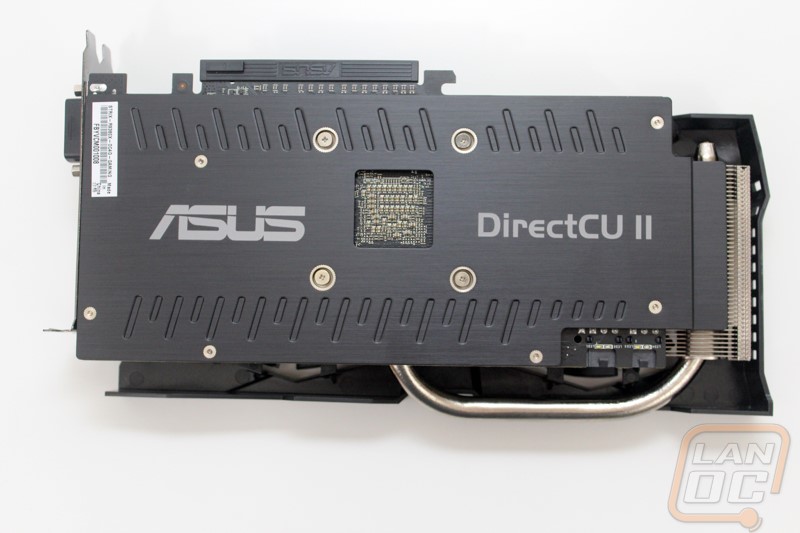
On the back of the card we can’t see much of the PCB because of the backplate but we can see that they went with a black PCB. In the center at the back of the GPU they have a hole in the backplate and we can see everything as well as give a little breathing room to keep things cool. The backplate is aluminum and is a little different. The top and bottom areas have angled lines carved for a little styling. Asus also included their logo and DirectCU II branding as well but upside down so that it can be read when the card is installed in a normal case.
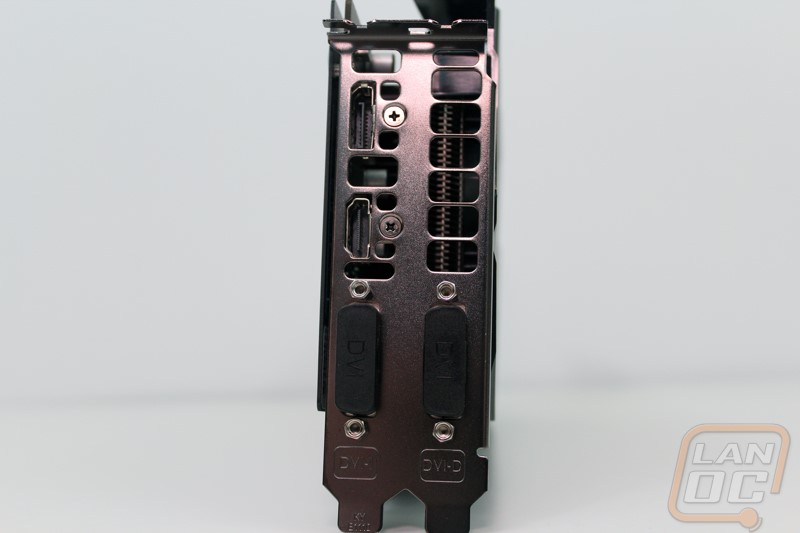
On the end of the 380X Strix Asus opened up the ventilation as much as possible with thin margins between holes, extra wide holes, and vents tucked in around all of the connection ports as well. Speaking of connections, the card comes with a full sized DisplayPort, a full sized HDMI, and two DVI’s. This is similar to the 380’s and below where the newer 390’s and above are all moving to a single DVI and more DisplayPorts.
Our Test Rig and Procedures
| Our Test Rig | ||
| CPU | Intel i7-3960X | Live Pricing |
| Memory | Corsair Vengeance 1600 MHz DDR3 RAM Quad Channel (4x4GB) | Live Pricing |
| Motherboard | Asus Rampage IV X79 Motherboard | Live Pricing |
| Cooling | Intel Active Thermal Solution RTS2011LC | Live Pricing |
| Power Supply | Cooler Master Gold Series 1200 Watt PSU | Live Pricing |
| Storage | Kingston Hyper X 3K 240GB SSD | Live Pricing |
| Case | High Speed PC Test Bench | Live Pricing |
| Our Testing Procedures | |
| 3DMark | The same goes for the most current version of 3DMark using the Fire Strike benchmark in normal, extreme, and ultra settings |
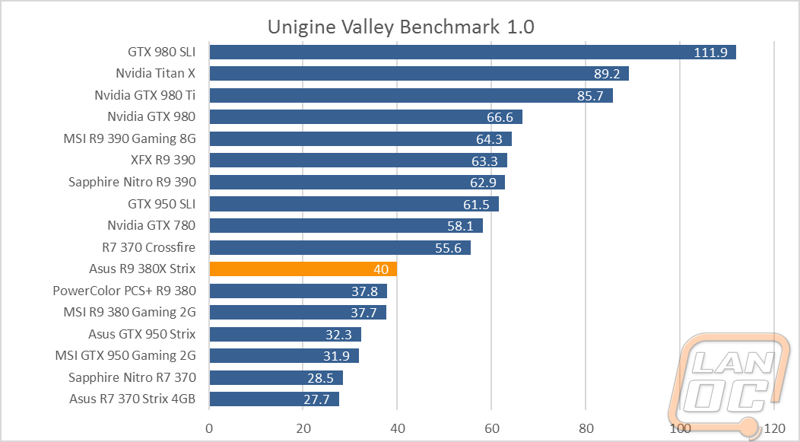
| Unigine Valley Benchmark 1.0 | Using the Extreme HD preset to get an average FPS |
| Bioshock Infinite | Using the Adrenaline Action Benchmark Tool we run Bioshock Infinite on the “Xtreme” quality setting. This has a resolution of 1920x1080, FXAA turned on, Ultra Texture detail, 16x Aniso Texture Filtering, Ultra Dynamic Shadows, Normal Postprocessing, Light Shafts on, Ambient Occlusion set to ultra, and the Level of Detail set to Ultra as well. We also run this same test at 2560x1440 using the same settings as mentioned above. |
| Tomb Raider | Using the Adrenaline Action Benchmark Tool we run Tomb Raider on the “Xtreme” quality setting. This has a resolution of 1920x1080, Exclusive Fullscreen turned on, Anti-Aliasing set to 2xSSAA, Texture Quality set to Ultra, Texture Aniso set to 16x Aniso, Hair Quality set to TressFX, Shadow set to Normal, Shadow Resolution on High, Ultra SSAO, Ultra Depth of Field, High Reflection quality, Ultra LOD scale, Post Processing On, High Precision RT turned on, and Tessellation is also turned on. We also run this same test at 2560x1440 using the same settings as mentioned above. |
| Hitman: Absolution | Using the Adrenaline Action Benchmark Tool we run Hitman: Absolution on the “Xtreme” quality setting other than the MSAA setting is turned down from 8x to 2x. That setting puts the resolution at 1920x1080, MSAA is set to 2x, Texture Quality is set to High, Texture Aniso is set to 16x, Shadows are on Ultra, SSA is set to high, Global Illumination is turned on, Reflections are set to High, FXAA is on, Level of Detail is set to Ultra, Depth of Field is high, Tessellation is turned on, and Bloom is set to normal. We also run this same test at 2560x1440 using the same settings as mentioned above, except on the “high” setting. |
| Sleeping Dogs | Using the Adrenaline Action Benchmark Tool we run Sleeping Dogs on the “Xtreme” quality setting. That means our resolution is set to 1920x1080, Anti-Aliasing is set to Extreme, Texture Quality is set to High-Res, Shadow Quality is High, Shadow Filter is set to high, SSAO is set to High, Motion Blur Level is set to High, and World Density is set to Extreme. We also run this same test at 2560x1440 using the same settings as mentioned above. |
| F1 2014 | We use the built in benchmark for F1 2014. We use the Ultra setting and then test at 2560x1440 and 1920x1080 |
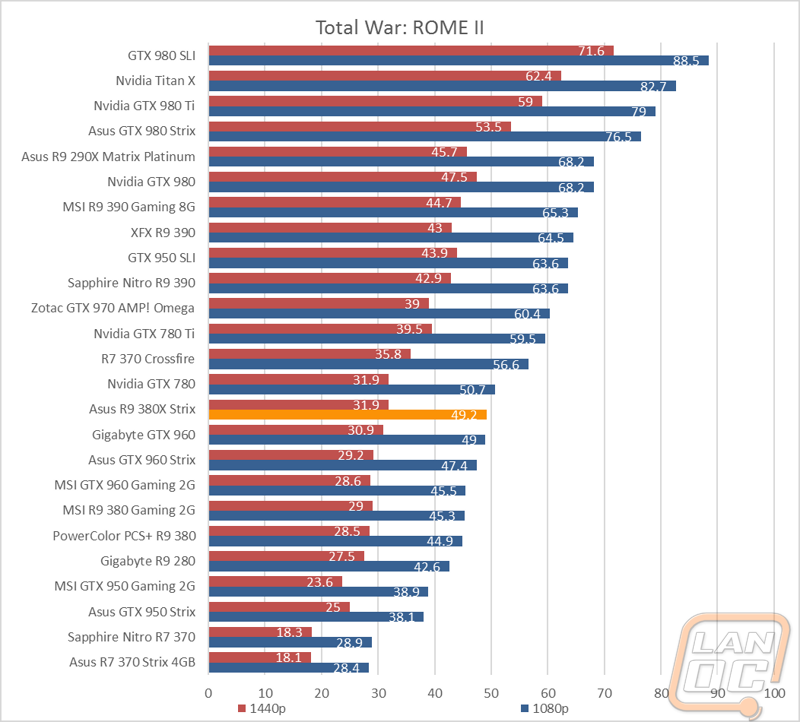
| Total War: ROME II | Ultra setting tested at 1920x1080 and 2560x1440, built in forest benchmark |
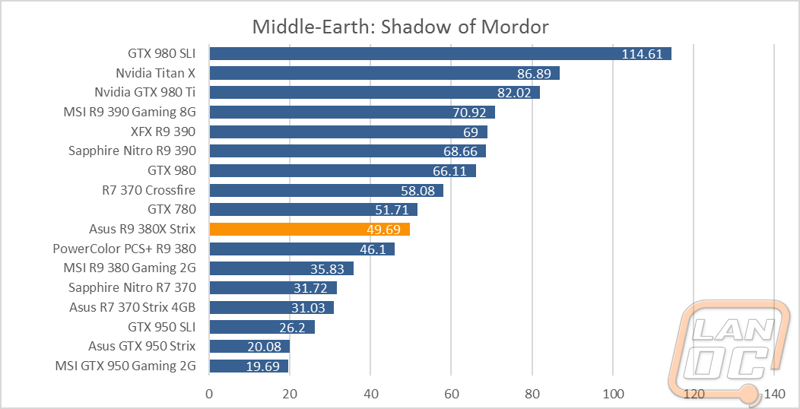
| Middle-earth: Shadow of Mordor | Using the built in benchmark we test with ultra settings at 1440p |
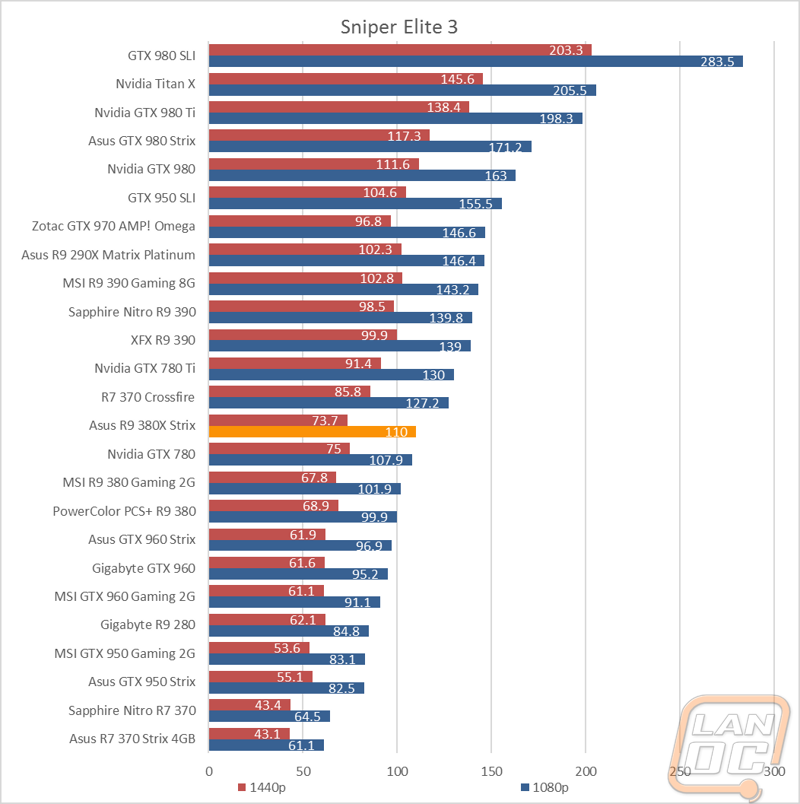
| Sniper Elite 3 | Ultra setting tested at 1920x1080 and 2560x1440, built in benchmark |
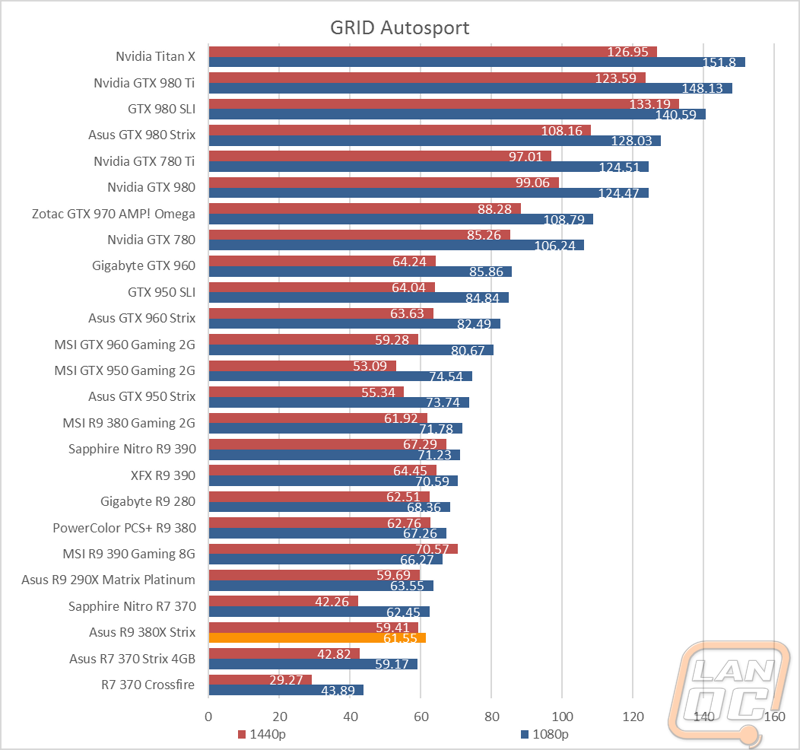
| GRID Autosport | Ultra setting tested at 1920x1080 and 2560x1440, built in benchmark |
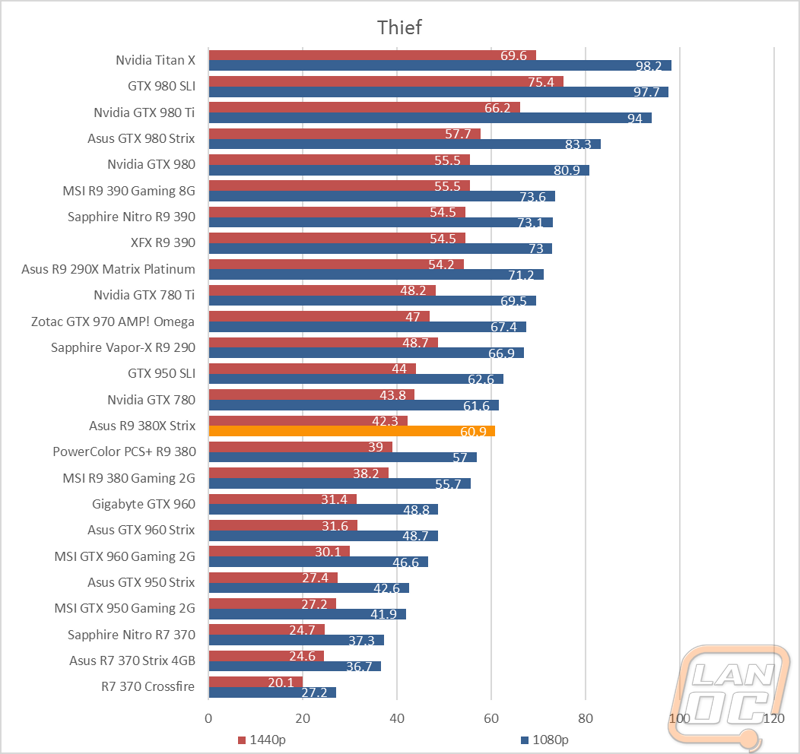
| Theif | Tested using the “Very High” setting at 1920x1080 and 2560x1440 |
| Folding @ Home | Using the Folding @ Home benchmark we test both single and double precision using the explicit result |
| Cinebench R15 | OpenGL benchmark |
| Unreal Valley Benchmark 1.0 heat testing | We run through Unreal Valley using the “Extreme” preset for 30 minutes to test in game cooling performance with the fan speed set to auto then again with the fan set to 100%. |
| Power Usage | Using Unreal Valley Benchmark 1.0, we get our “load” power usage number from the peak power usage during our test. We get our numbers from a Kill-A-Watt connected to the test benches power cord. |
| Noise Testing | Our Noise testing is done using a decibel meter 3 inches away from the video card on the bottom/fan side of the card. We test an idle noise level and then to get an idea of how loud the card will get if it warms all the way up we also turn the fan speed up to 50% and 100% and test both speeds as well. The 100% test isn’t a representation of typical in game noise levels, but it will show you how loud a card can be if you run it at its highest setting or if it gets very hot. |
Synthetic Benchmarks
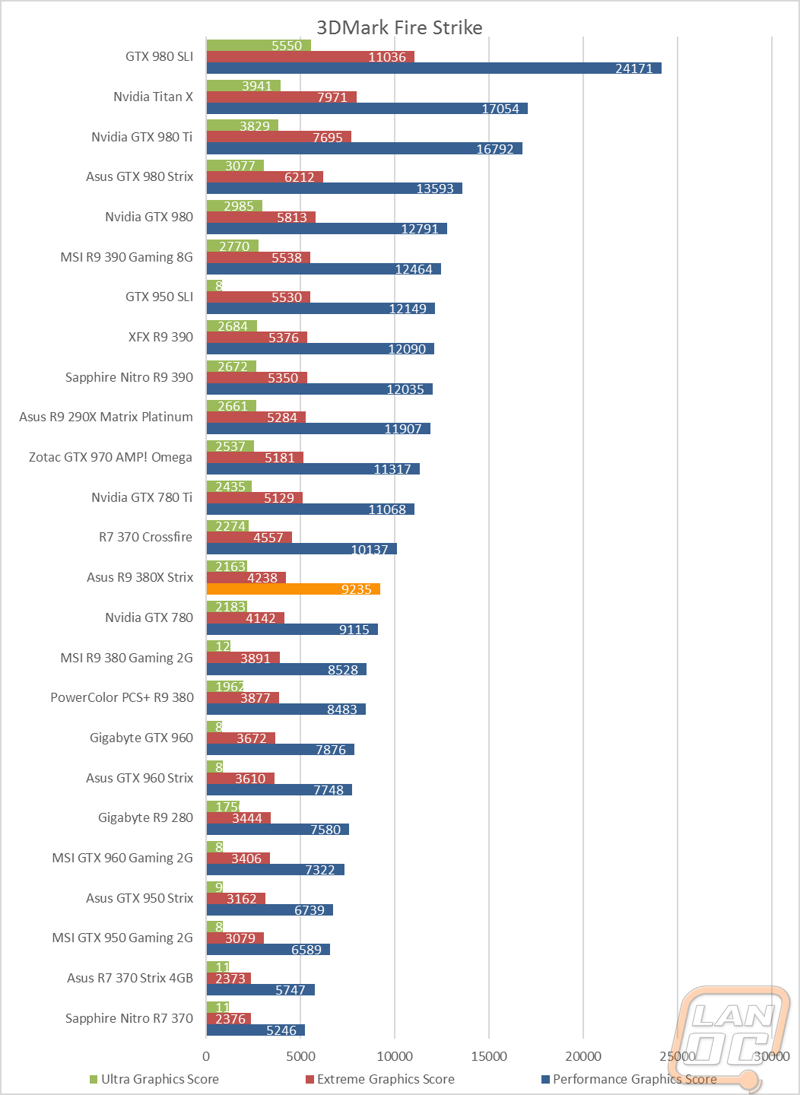
To start off my testing I ran the Asus 380X Strix through all three of the 3DMark Fire Strike benchmarks to test performance in 1080p, 1440p, and 4k situations. In addition to that I also slipped in Unigine valley 1.0 for an additional look. In 3DMark it wasn’t a surprise at all that the 380X performed above the R9 380, but the 700 point gap was much closer than the 2100 point gap between the 380X and the GTX 970. That said the bump in performance over the 380 did put the 380X up over a stock GTX 780 and up close to the R7 370’s in crossfire at 1080p. Having twice the memory really helped when it came to the Ultra benchmark that runs at 4K. The Unigine Valley results were again very similar to 3DMark. The 380X pulled an additional 3FPS over the R9 380 but there is still a big gap between it and the next level of cards.
In-Game Benchmarks
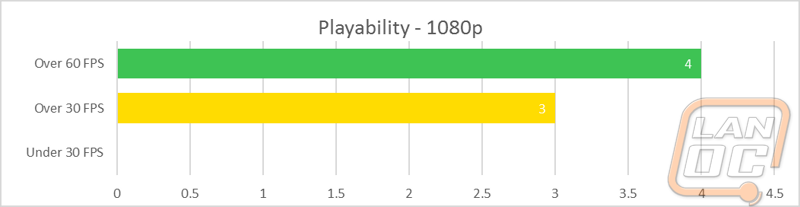
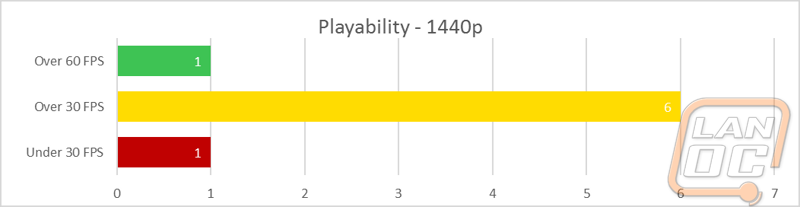
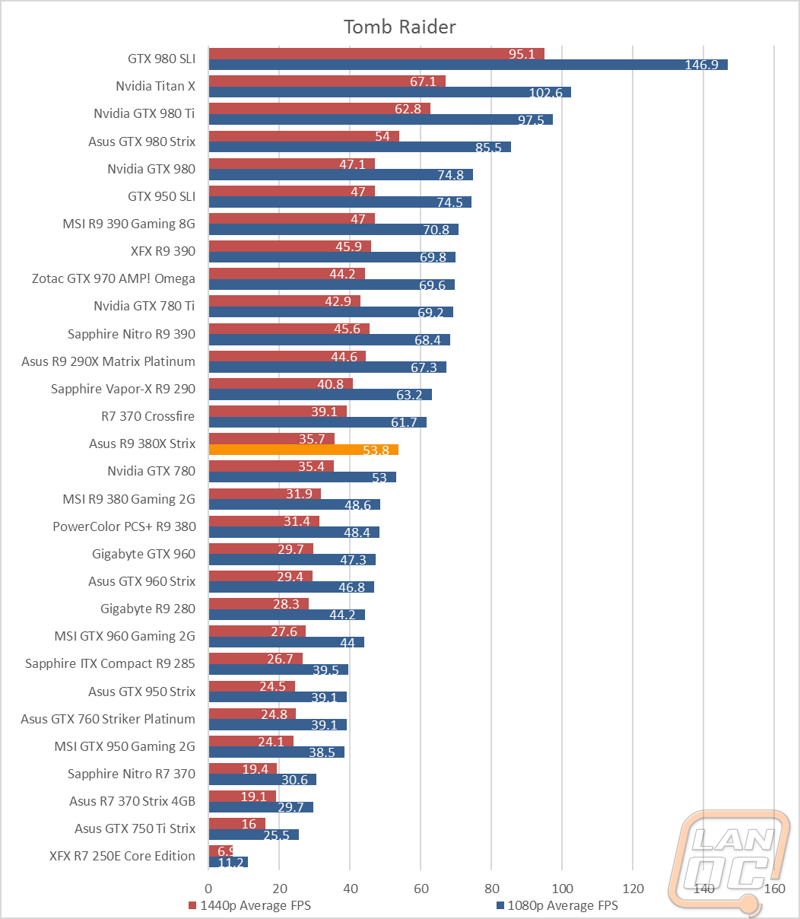
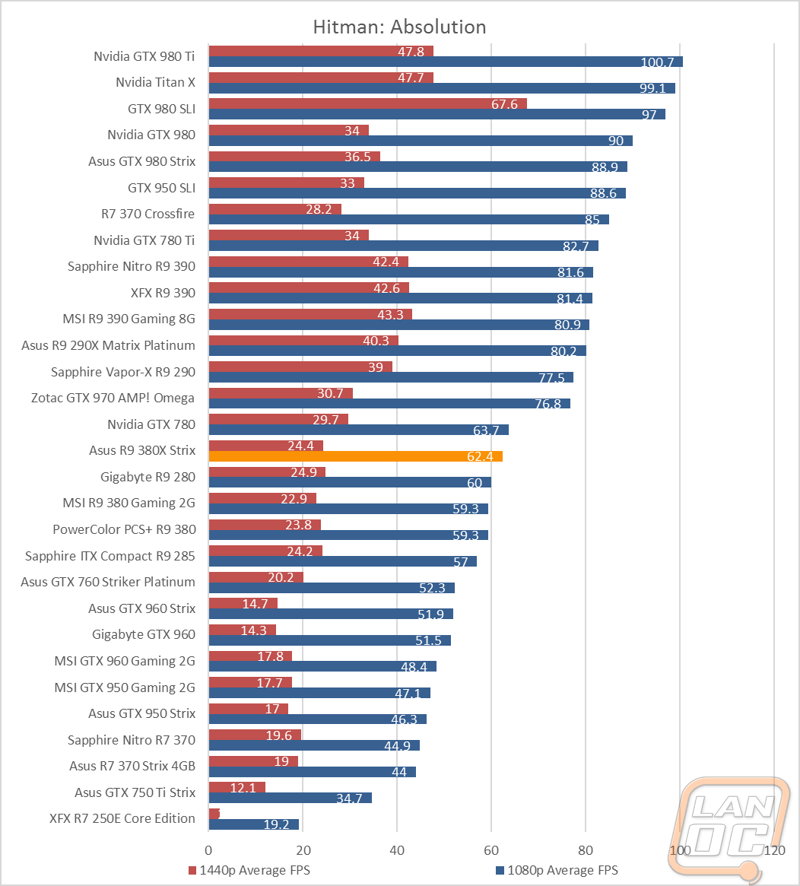
As always the synthetic benchmarks are great and all, but the real meat and potatoes is in the in gaming testing. The only reason most of us even get dedicated video cards is to play our games at the best possible settings. So to get an idea of how the 380X performs I ran it through our in game benchmark suite. I did run into issues with Bioshock Infinite not running on our test bench so our number of tests was cut down to 8 from our normal 9. I also test nearly all of those games at both 1080p and 1440p to see how the card handles both resolutions. To make things a little easier to consume, in addition to the full graphs I also break down the performance results from all of the tests into three categories, under 30 (unplayable), over 30 (playable), and over 60(ideal performance). This way we can quickly take a look at where the card stands at each resolution. So how did the 380X perform? Well at 1080p all of the games were playable at the highest possible settings with most of those falling into the 60+ FPS category. It was the 1440p testing that had my attention though, AMD suggested that the R9 380 and R9 380X were their 1440p focused cards. So how did the 380X do? Well with everything turned all the way up all but one game was playable but I would personally like to see more than just one game in the 60+ FPS category. That said the 380X would be a 1440p card, the only difference I would make in their chart would be to put the R9 390 and the 380X together as 1440p cards, dropping the R9 380 down into the higher 1080p category.
When looking at the results individually there were a few things that stood out. Specifically, in GRID Autosport the 380X pulled over 60FPS at 1080p and was just under at 1440p, but this is oddly slow compared to past testing. The 1440p results are spot on, but at 1080p it was on par with the R7 370. I will revisit this and find out if this is a driver or game issue. Beyond that everything was about normal with the 380X performing about on par with the GTX 780 in most tests, falling above the 960 but a big margin and below the GTX 970 by a good margin as well.

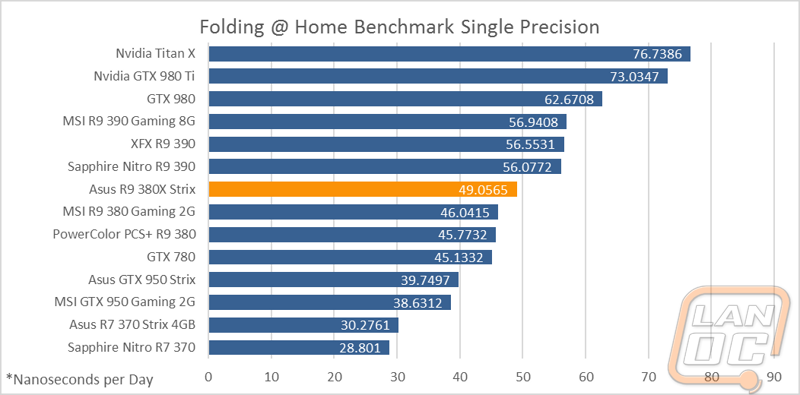
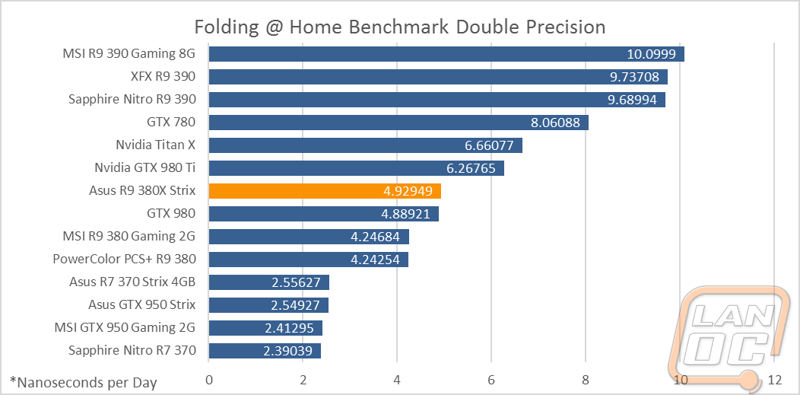
Compute Benchmarks
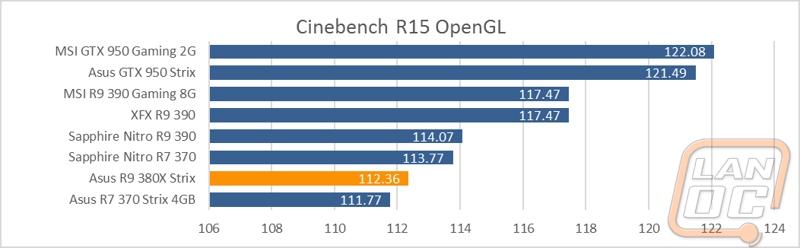
In addition to the normal in game and synthetic benchmark testing, I also wanted to see how well the R9 380X would perform in some compute benchmarks. To do that I ran it through our Fold @ Home testing as well as Cinebench. In Folding @ Home the single precision test reads almost exactly like all of the previous testing with the 380X pulling a 49 over the 46’s of the R9 380’s. The gap to the R9 390 is up there though with the 390’s pulling 56 and higher. In the double precision test, the R9 380X falls just above the GTX 980, a drastic change over the rest of our testing. This is because Nvidia has handicapped their cards in the double precision performance to keep their professional card market intact. In Cinebench though I think the 380X could use a little more refinement on its drivers, it falls in between two different R7 370’s that I have previously tested.
Cooling, Noise, and Power
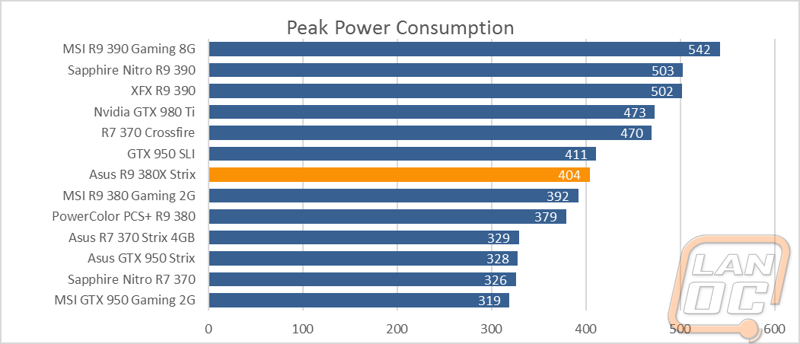
In game and compute performance is important, but it is all for nothing if you don’t have enough power to push the R9 380X or if the card overheats. Because of that I make sure to dig into the cooling, power, and noise performance of all cards that come into the office as well. This is also a great way to spot differences between cards that share the same base GPU. In this case this is the first R9 380X that I have tested so I will be focusing on how it compares to the 380 and 390 from AMD and the GTX 960 and GTX 970 from Nvidia. To start things off I ran the card through Valley Benchmark and noted the peak wattage draw of the R9 380X Strix. This isn’t the highest possible power draw, but it is a good idea of what you can expect in the average game. The 380X Strix pulled a peak 404 watts, this is of course including the hard drive, ssd, and 6 core CPU in our test bench. That is just slightly more than the R9 380 pulled and well below the 390 with its light dimming 502 watts. Sadly, with our new power test I haven’t had the chance to retest the 960 and 970. Our old test had the 970 at 389 and the 960 at 327, I would expect them to be a few watts higher in the new test but without a doubt the 960 would still be well below the 380X.
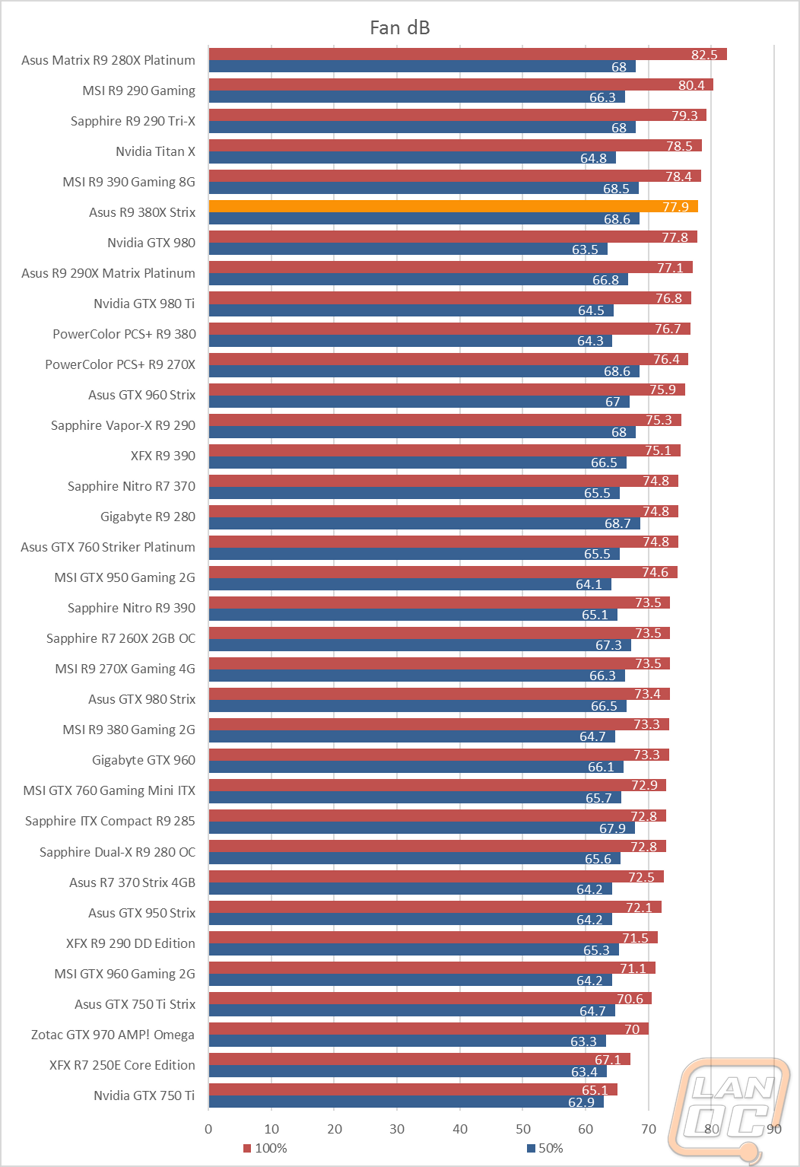
For noise testing I test at both 50% fan speed and 100% fan speed to get a range of what to expect. Typically, Strix cards are very quiet but this time around the 380X Strix was a little noisier than normal with the fan speed turned up. It is rare that I even notice fan noise when testing but I can say that our sample seemed to be louder than any other Strix card tested in the past. Thankfully most of the time the card runs with the fans turns completely off anyhow so this is only an issue when you are pushing things in game.
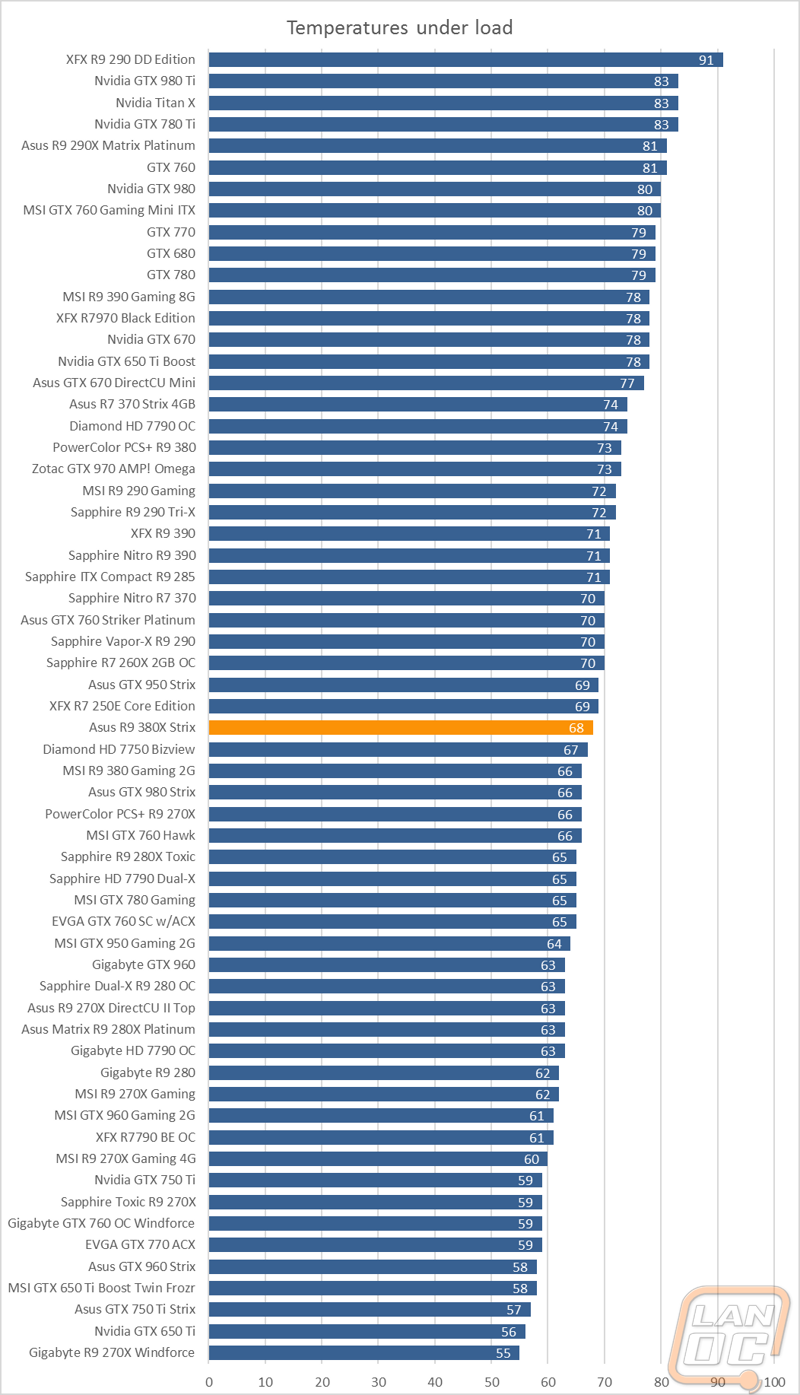
For temperature testing I ran our standard test where I run Valley Benchmark for up to 30 minutes or until the temperature levels completely off to get a real world in game temperature. The 380X Strix fell right in the middle of the pack with its 68-degree result. This is impressive given the higher power draw I saw in previous tests. The only problem with this test is that it doesn’t give us a true idea of the performance of the DirectCU II cooling as fan profiles to keep noise down have a large impact on the running temperature. So I have added a new benchmark where I run through the same test but with the cards fan turned to 100% the entire time. Here the 380X Strix dropped from 68 down to 53.

Overclocking
For my last bit of testing I wanted to see how much I could push the 380X Strix with its stock cooling. To do that I break the testing down into three sections. I overclock the GPU first and find the highest possible GPU overclock on a stock setup. Then I do the same with the memory clock speed. Then I put both together and see if they will run together. Starting on the GPU Clock I ran the stock clock then jumped immediately up to 1200 MHz to see if the card could handle it. I picked 1200MHz because that was about where I was able to overclock with the R9 380. This failed, but as I stepped back to 1100 MHz I got a passing result. From there I just had to work to pinpoint how far I could go. Sadly, I wasn’t able to get past 1110 MHz. I did see a 4 FPS jump in performance though.
Going off of the R9 380 that is based on the same Tenda GPU as the 380X I expected my memory testing to go very quickly as the 380 maxed out the software. I jumped through a few tests quickly but the 7000 MHz test failed. More testing found that the 6500 MHz test I ran was the highest memory clock I was able to reach. This only gave me about .4 of an FPS over the stock tests. The lack of a result and the high risk that memory overclocking has means this isn’t really worth it at all. I did still run my combined testing though and had no issues. Combining the overclocked memory into the overclocked GPU gave me a total of 66.74 FPS in the final test.
| GPU Clock Overclocking | |||
| GPU Clock Speed | Pass/Fail | FPS Result | Notes |
| 1030 MHz | Pass | 62.44 | Stock Clock |
| 1200 MHz | Fail | N/A | Driver Crash |
| 1100 MHz | Pass | 65.99 | |
| 1150 MHz | Fail | N/A | Driver Crash |
| 1130 MHz | Fail | N/A | Driver Crash |
| 1120 MHz | Fail | N/A | Driver Crash |
| 1110 MHz | Pass | 66.58 | |
| Memory Clock Overclocking | |||
| Memory Clock Speed | Pass/Fail | FPS Result | Notes |
| 5700 MHz | Pass | 62.44 | Stock Clock |
| 6000 MHz | Pass | 62.74 | |
| 6500 MHz | Pass | 62.82 | |
| 7000 MHz | Fail | N/A | Hard Crash, black screen |
| 6600 MHz | Fail | N/A | Hard Crash, black screen |
| GPU and Memory Overclocks Together | |||
| GPU Clock Speed | Memory Clock Speed | FPS Result | Notes |
| 1110 MHz | 6500 MHz | 66.74 | |
Software
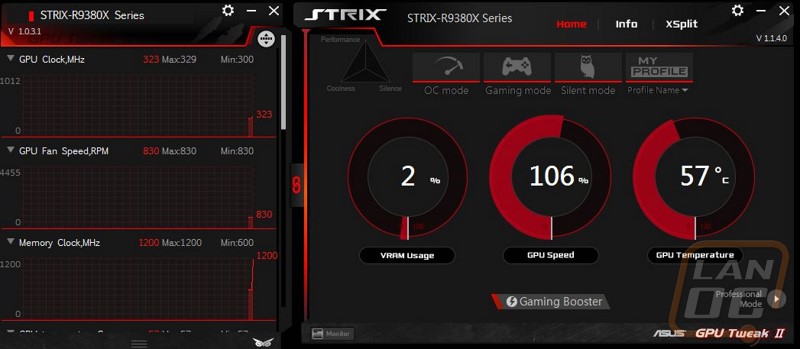
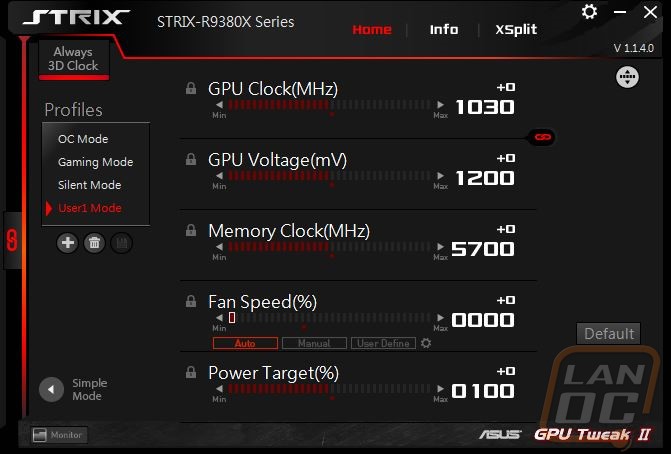
Typically, I don’t need to talk too much about any software on a video card. This is because the software available from a few manufactures hasn’t really changed in a few years. That said Asus did introduce a new version of their GPU Tweak software so I’m including a quick look here. I actually have been using their software when doing overclock testing for a long time because it consistently works with every card that comes into the office. The new software changes the styling a little and now includes the Strix logo up top. The opening page now includes a few profiles where we can tune the card for overclocking, gaming, or noise performance. Beyond that when we get to the advanced page we have the same sliders as the previous software where we can toy with the GPU and memory clock speeds as well as voltage, power, and fan speeds.
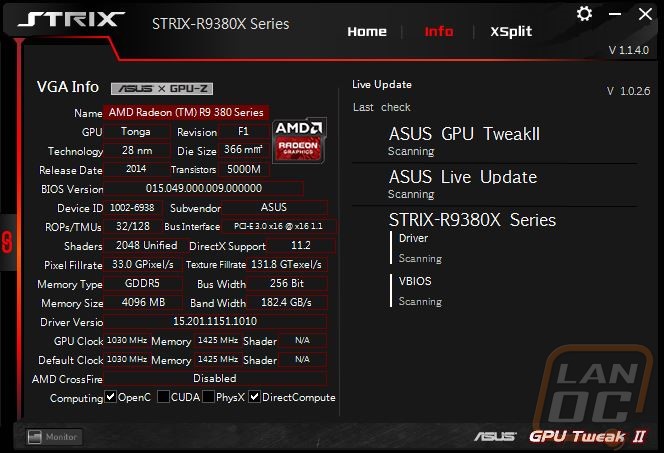
The info tab up top loads an integrated GPUZ page on the left. The right side is live update where it will scan and make sure the software is up to date. It also scans the drive and VBIOS as well. This should help keep cards a lot more up to date in the future for people who don’t check often.
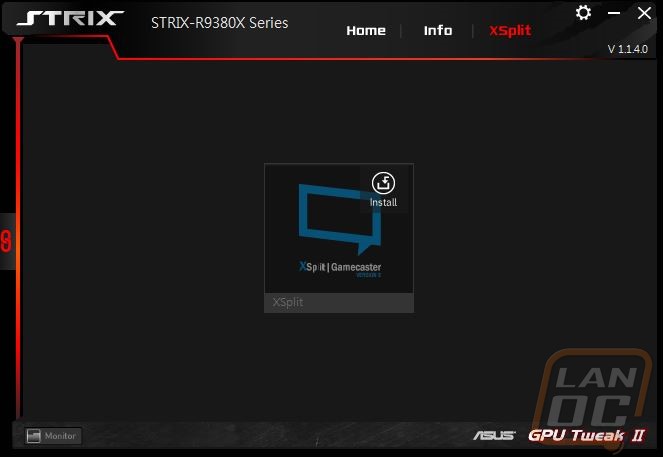
The software also integrates with XSplit. It doesn’t come preinstalled, you will have to click and head to the XSplit website to download their software. It’s great to see Asus recognize that streaming is a huge growing market.
Overall and Final Verdict
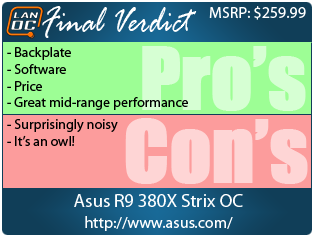
When going into testing on just about any Asus product I can expect a few things, namely their attention to detail and their software. In the case of the R9 380X Strix the attention to detail showed in the cooling performance and the nice backplate. The new GPU Tweak software isn’t overly complicated, but it does everything you might need and more. Integrating with XSplit shows that Asus knows that a lot of gamers are starting to stream as well. The 380X Strix impressed me with its performance, it gets the job done when playing at 1080p and 1440p without blowing up your budget like higher end cards. This seems to be a good sweet spot, going much past the 380X starts to really only benefit people running multiple monitor setups or running at 4k. Really the only downsides I ran into with the Strix was in the noise testing. Generally, all Strix cards have been nearly silent for me but this card seems to be a fluke. I’m also still on the fences with the owl styling but Asus seems to have gone all in at this point.
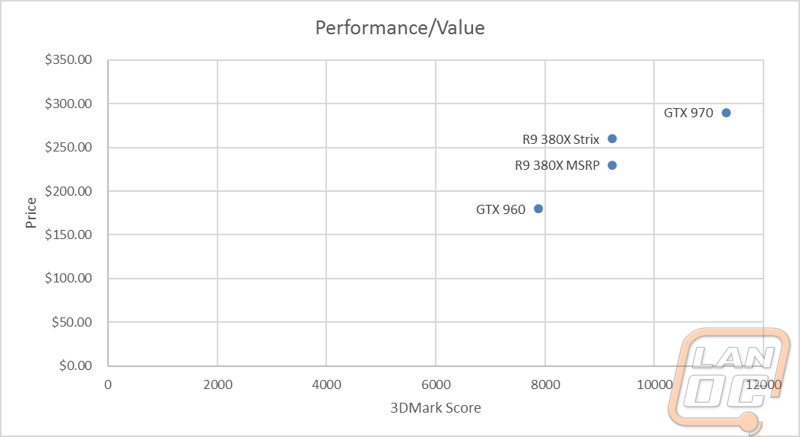
Before jumping into our performance testing when going over the new R9 380X specifications I noted that I was especially curious how it would perform in comparison to the GTX 970 and GTX 960. The reason was because the R9 380X falls into a weird price point that is right in the middle of the two cards. Because of that I don’t really feel the 380X has a direct competitor, but I was curious where it would end up falling in the performance testing. In the end the 380X Strix fell again near the middle in tests like 3DMark. To help visualize it all I put together a quick scatter graph that shows the cards 3DMark Performance in comparison to the MSRP. Because the 380X Strix has such a drastic price difference from the MSRP of the 380X I went ahead and graphed both, obviously a no-overclocked 380X’s 3DMark numbers will be slightly lower but I didn’t have those numbers to include. In the end I feel that the 380X is a good value that falls directly between Nvidia’s offerings. The Strix tested does have a bit of a high MSRP when compared to the R9 380X’s base MSRP though and that does push the card a little closer to the GTX 970, lowering the value slightly.

Live Pricing: HERE


