Earlier this week I had the chance to take a look at Asus’s Matrix R9 280X Platinum, today I’m going to come back down to earth a little and check out their R9 270X DirectCU II Top. With a price that fits better into budget builds I’m curious how many of the features I saw on the Matrix will carry over into this card. I have high hopes for the card, but after seeing a few R9 270X’s from other manufactures I can say without a doubt that Asus has their work cut out for them. Let’s dig into it and see what it’s all about.
Product Name: Asus R9 270X DirectCU II Top
Review Sample Provided by: Asus
Written by: Wes
Pictures by: Wes
|
Specifications |
|
|
GPU |
AMD Radeon R9 270X |
|
GPU Clock |
1120 MHz |
|
Memory Clock |
5600 MHz |
|
Memory Size |
GDDR5 2GB |
|
Bus Type |
PCI Express 3.0 |
|
Memory Bus |
256-bit |
|
Stream Processors |
2048 |
|
DirectX 11 |
Yes |
|
DVI Port |
DVI-I / DVI-D |
|
Power Connections |
2 x 6 pin |
|
DisplayPort |
Yes x1 |
|
HDMI |
Yes x1 |
|
HDCP |
Yes |
|
Cooling System |
DirectCU II SSU thermal design |
|
Backplate |
No |
|
Dimensions |
10.7 " x 5.24 " x 1.578 " Inch |
|
Features |
DirectCU II with SSU architecture DIGI+ VRM with Super Alloy Power TOP-Selected 1120 MHz core GPU Tweak |
|
Accessories included |
1 x DVI to D-Sub adaptor 1 x CrossFire cable |
Packaging
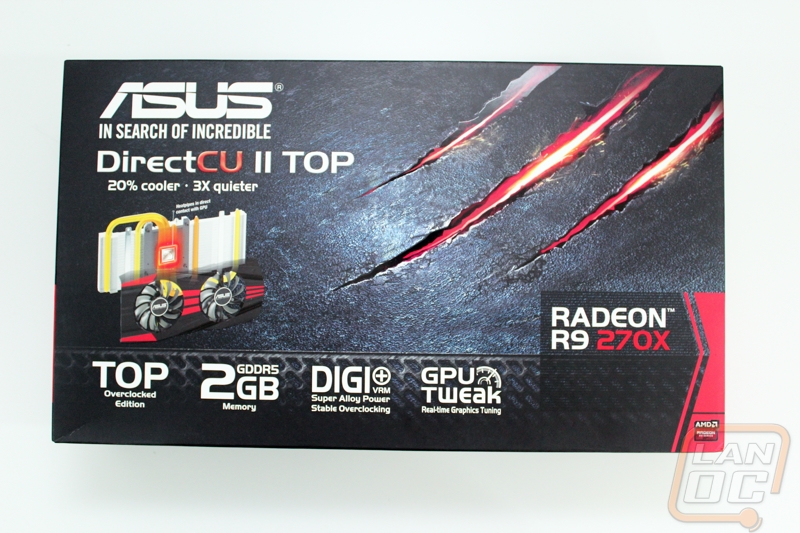
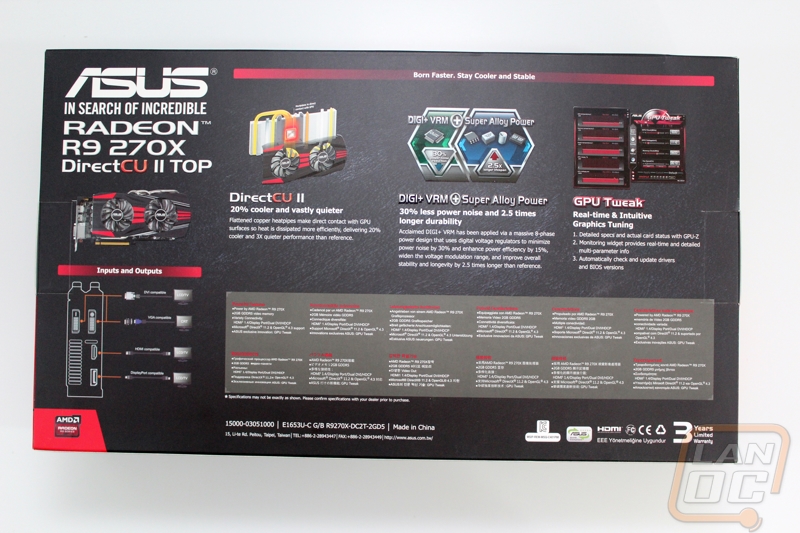
The Asus R9 270X Direct CU II Top came in a box that is a little more typical for a video card compared to the R9 280X that I took a look at earlier this week. The front design has metal look with three claw marks across it, I’m not all that sure how that relates to the card itself but this is the same design we have seen on other Asus non ROG cards in the past. The from does have a little information on it like the memory size, model name, DIGI+ VRM, GPU Tweak, and a note mentioning this is a “Top” card aka overclocked card. The back of the packaging has a little more information about the features mentioned on the front of the box. Here you will see a photo of the card itself as well as a diagram of all of the video connections it has available.
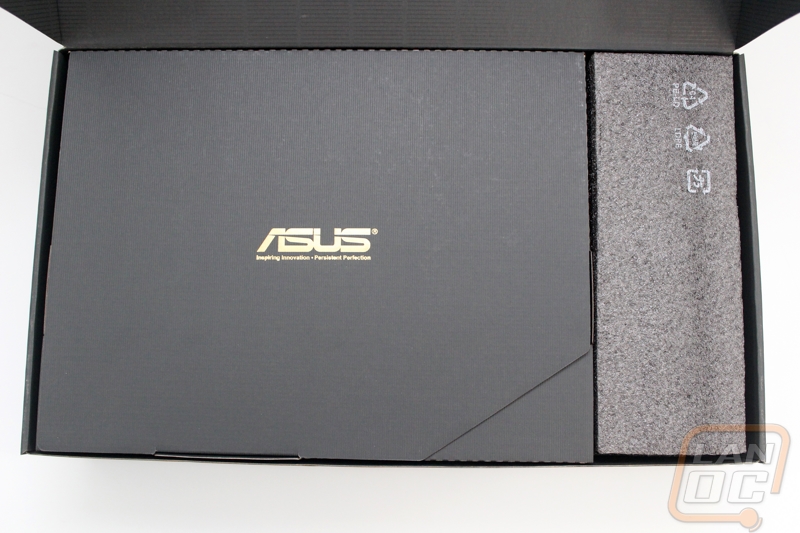
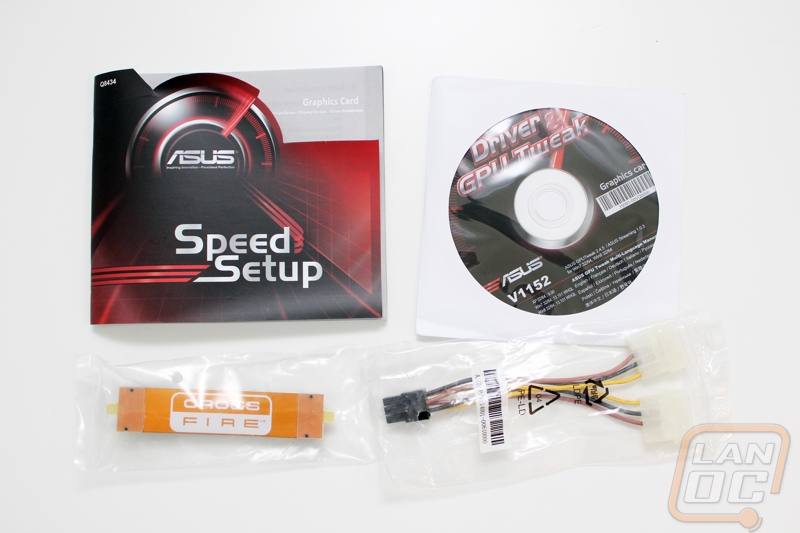
Inside the box there is a second box directly on top that houses all of the accessories. You get a Speed Setup guide, driver and software disc, a crossfire bridge, and a double Molex to 6 pin adapter for power.
Card layout and Photos
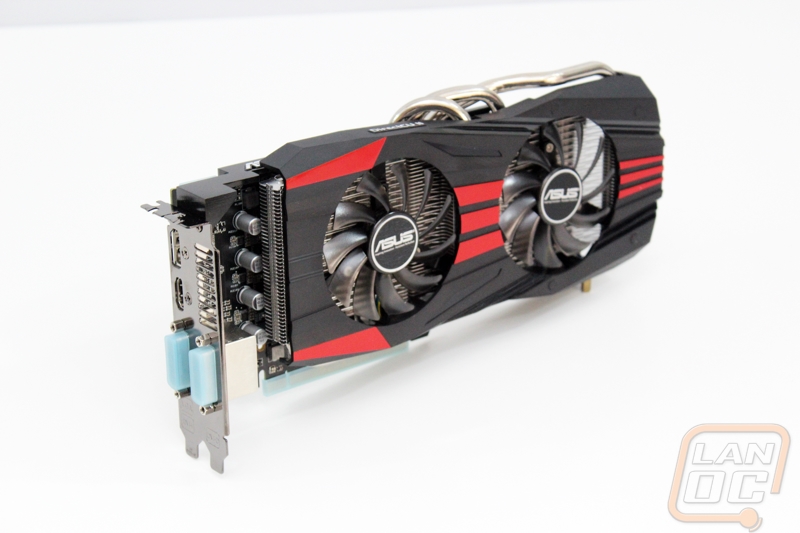
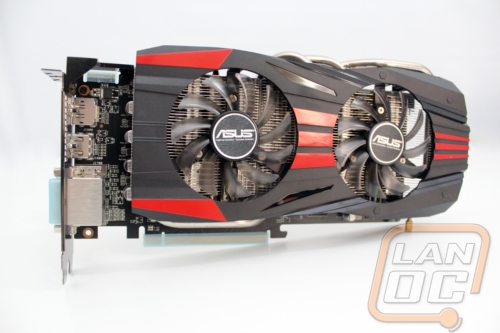
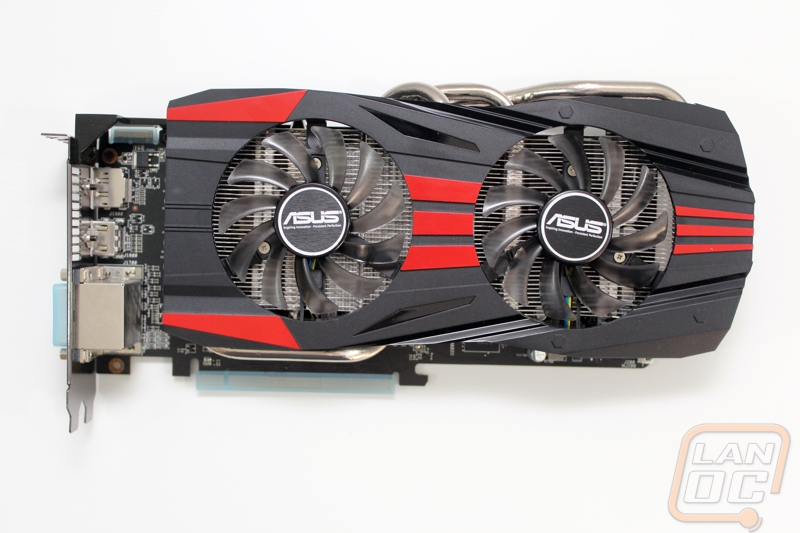
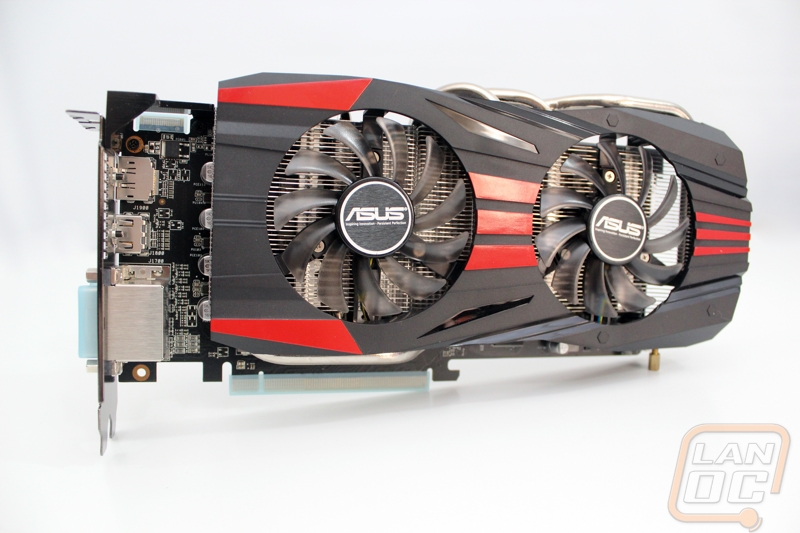
The R9 270X DirectCU II Top shares is design with a good portion of Asus’s VGA product line. This is because the card has Asus’s DirectCU II cooling that they use any chance they can get. For those of you who don’t know what DirectCU II is, this is their Direct Contact design and the II means two fans. They use 5 heatpipes that have direct contact on the GPU, similar to how most modern CPU coolers work, and pull the heat away from the GPU out onto the heatsink where the two fans can blow over the heatsink and dissipate the heat. This design is considerably different than a reference cooler for example that blows air over a heatsink from the front of the card to the back, blowing out of the back. In order to get more airflow, this design pushes air down through the heatsink and against the PCB. This means, like any other aftermarket cooler, that the card vents its air into the case not out the back. Asus uses a plastic fan shroud to help shape the airflow as well. This fan shroud also gives the card its Asus styling with its black and red theme.

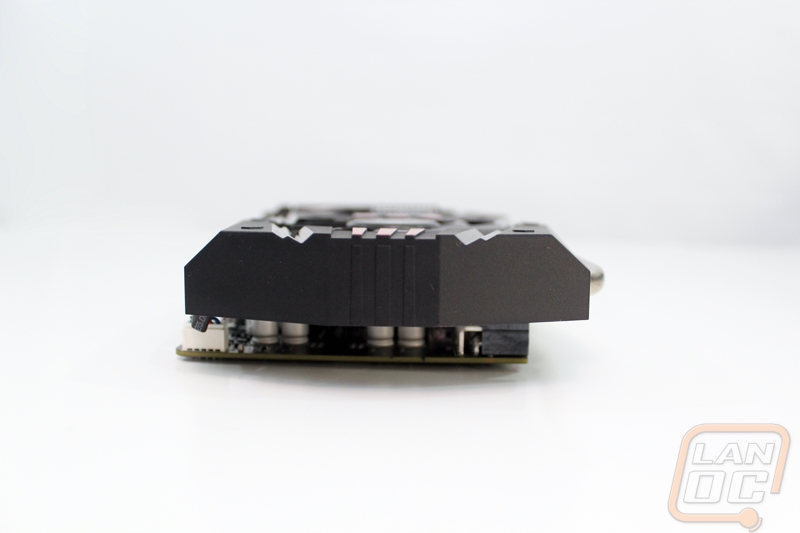
The end of the R9 270X DirectCU II Top is half opened and extended out beyond the PCB to give it additional airflow from the second fan.
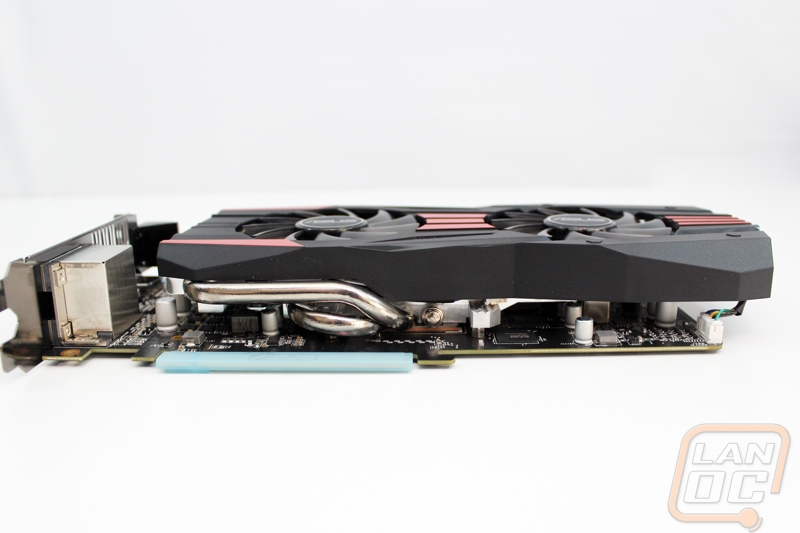
The underside of the R9 270X DirectCU II Top has two of the cards five direct contact heatpipes that help pull the heat from the GPU out over the rest of the heatsink so that the cards two fans can cool things down. In this photo you can see some of the heatsink itself as well, you can see that there is a gap of about a half inch between the heatsink and the PCB to give room for a little airflow. You can also see in this photo that there isn’t any way for air to push out the back of the card with that large of a gap from the end of the fan shroud to the rear PCI slot vents.
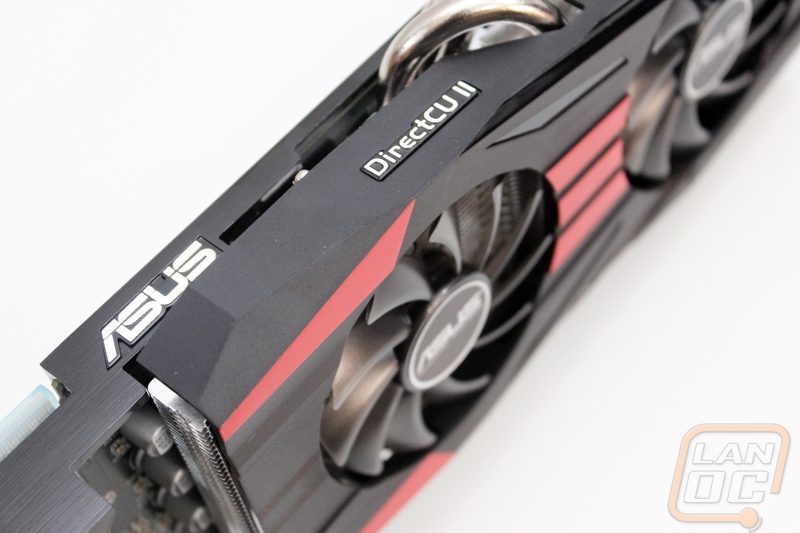
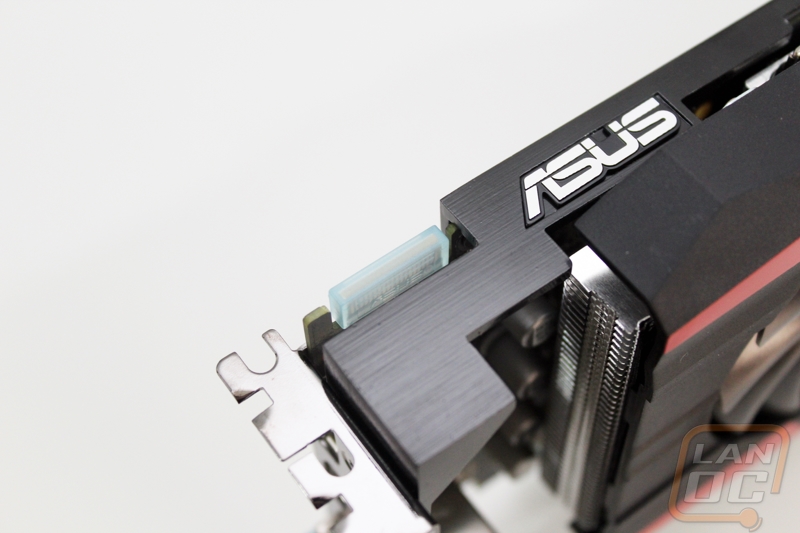
So when you have the card installed, what are you going to see? Well the top of the R9 270X DirectCU II Top has both the Asus badge as well as the DirectCU II logo on the fan shroud. Each of the heatpipes coming directly from the GPU and run across the top of the card before going back into the heatsink. They have been nickel plated for an eye catching finish as well.
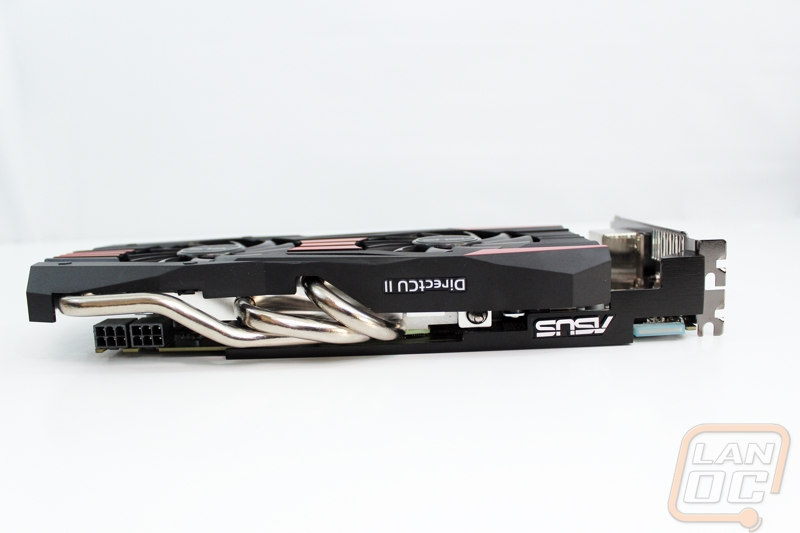
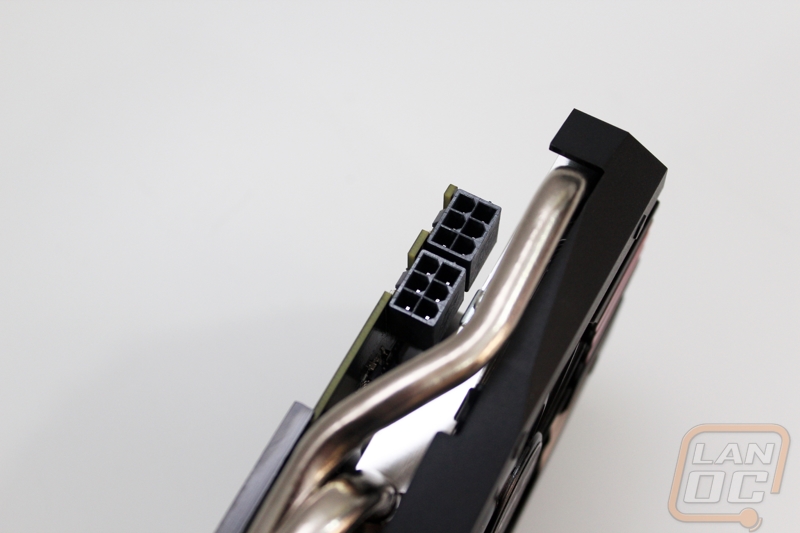
For power, the R9 270X DirectCU II Top has the same double 6-pin power requirement as most other R9 270X’s. Asus did flip the connections around backwards in comparison though to give a little more room for the cards extremely large heatpipes. You can see that the PCB is notched for each of the retention clips. Another feature I noticed that I am a big fan of is the small LED on the back of the PCB by each power connection. When you have the card plugged into the PCI slot, they will light up red if there isn’t power to the 6 pin connection. Once each plug gets power that light turns to green. This is a great way to confirm if you are having issues and you think maybe a plug has come undone.
Much like most R9 270X’s this card comes a single Crossfire connector and from the looks of it, it is the same height as reference PCB cards so there is a better chance that the DirectCU II Top will crossfire with other models than some of the other cards I have tested.
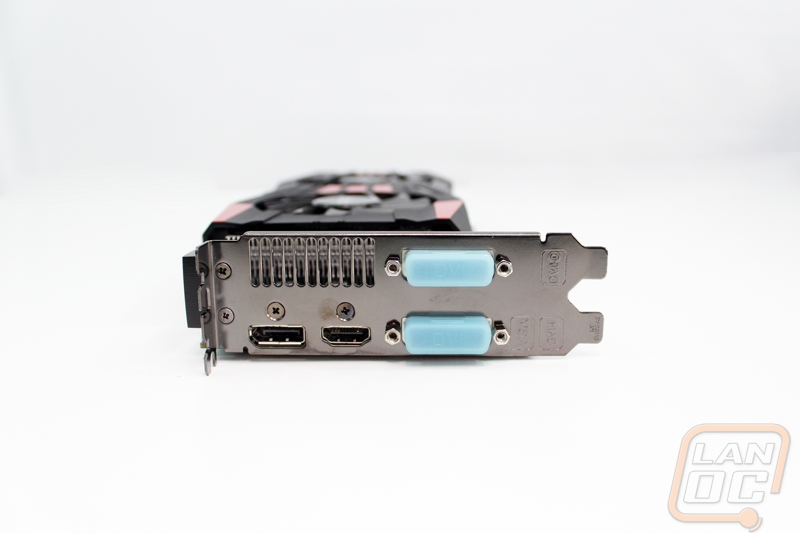
The R9 270X DirectCU II Top comes with a fairly standard assortment of video connections. You have full size DisplayPort and HDMI connections along with two DVI connections as well. Aside from those there is a half slot vent for a little additional ventilation.
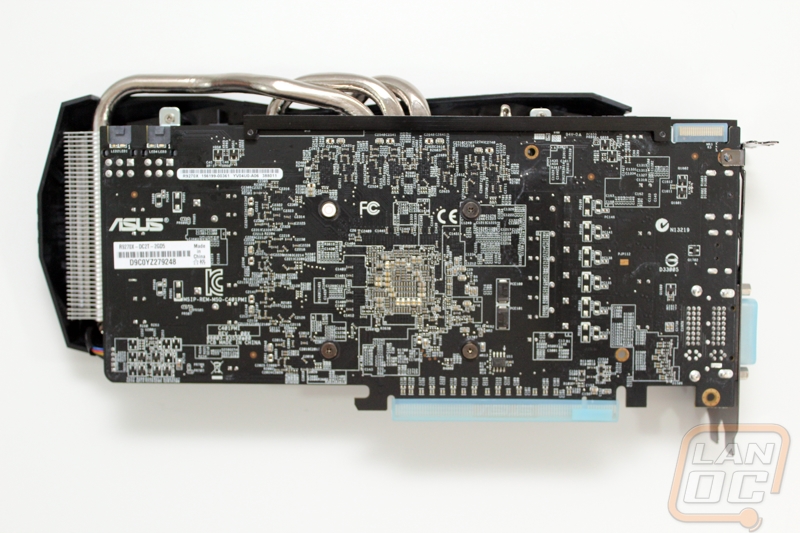
With the card flipped over, we can see the black PCB of the R9 270X DirectCU II Top as well as the notches I previously mentioned for both of the power plugs. Here you can also see the support bracket along the top of the card that helps support the weight that the DirectCU II cooler adds to the card.
Our Test Rig and Procedures
|
Our Test Rig |
|
|
CPU |
|
|
Memory |
|
|
Motherboard |
|
|
Cooling |
|
|
Power Supply |
|
|
Storage |
|
|
Case |
|
|
Our Testing Procedures |
|
|
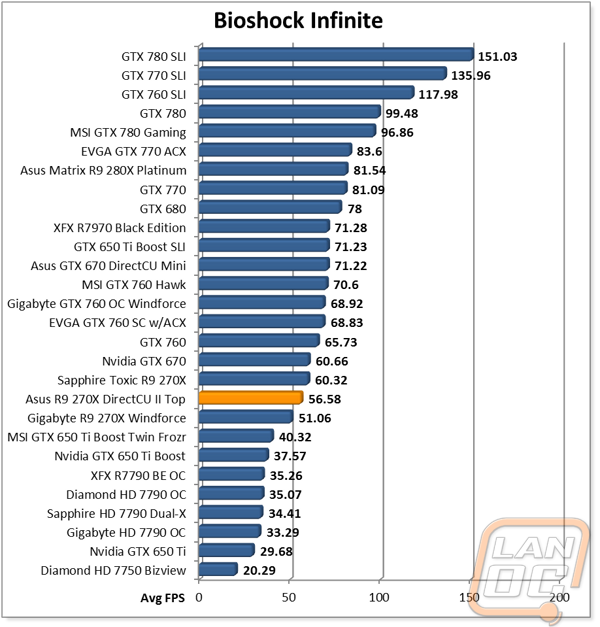
Bioshock Infinite |
Using the Adrenaline Action Benchmark Tool we run Bioshock Infinite on the “Xtreme” quality setting. This has a resolution of 1920x1080, FXAA turned on, Ultra Texture detail, 16x Aniso Texture Filtering, Ultra Dynamic Shadows, Normal Postprocessing, Light Shafts on, Ambient Occlusion set to ultra, and the Level of Detail set to Ultra as well. |
|
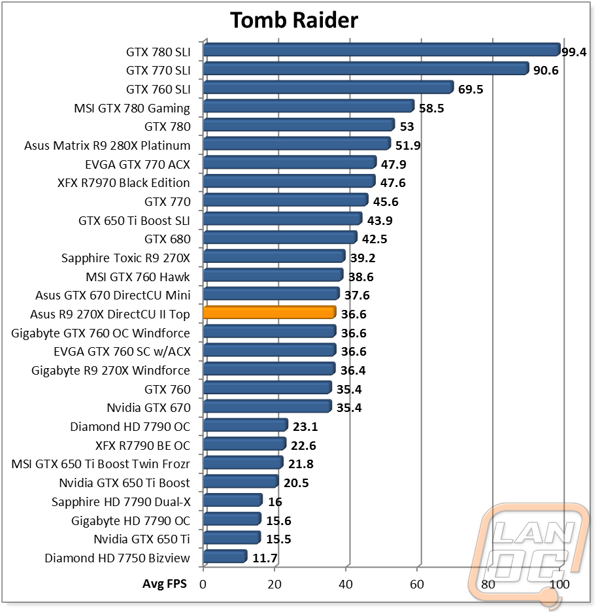
Tomb Raider |
Using the Adrenaline Action Benchmark Tool we run Tomb Raider on the “Xtreme” quality setting. This has a resolution of 1920x1080, Exclusive Fullscreen turned on, Anti-Aliasing set to 2xSSAA, Texture Quality set to Ultra, Texture Aniso set to 16x Aniso, Hair Quality set to TressFX, Shadow set to Normal, Shadow Resolution on High, Ultra SSAO, Ultra Depth of Field, High Reflection quality, Ultra LOD scale, Post Processing On, High Precision RT turned on, and Tessellation is also turned on. |
|
Hitman: Absolution |
Using the Adrenaline Action Benchmark Tool we run Hitman: Absolution on the “Xtreme” quality setting other than the MSAA setting is turned down from 8x to 2x. That setting puts the resolution at 1920x1080, MSAA is set to 2x, Texture Quality is set to High, Texture Aniso is set to 16x, Shadows are on Ultra, SSA is set to high, Global Illumination is turned on, Reflections are set to High, FXAA is on, Level of Detail is set to Ultra, Depth of Field is high, Tessellation is turned on, and Bloom is set to normal. |
|
Sleeping Dogs |
Using the Adrenaline Action Benchmark Tool we run Sleeping Dogs on the “Xtreme” quality setting. That means our resolution is set to 1920x1080, Anti-Aliasing is set to Extreme, Texture Quality is set to High-Res, Shadow Quality is High, Shadow Filter is set to high, SSAO is set to High, Motion Blur Level is set to High, and World Density is set to Extreme. |
|
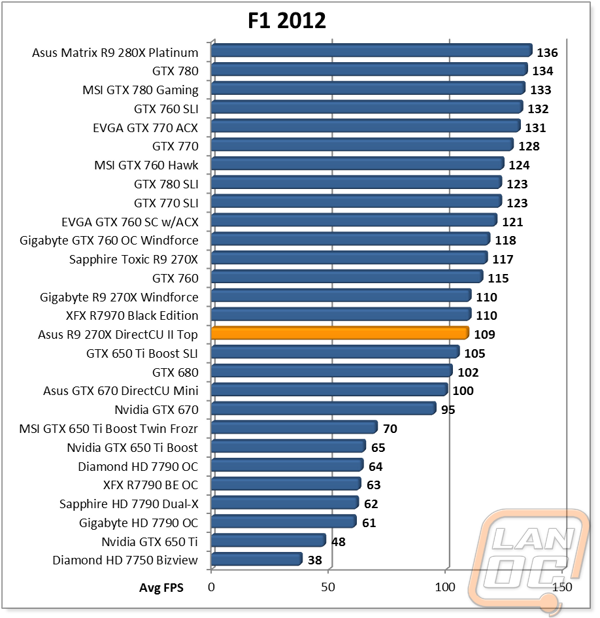
F1 2012 |
We use the built in benchmark for F1 2012. We set our resolution to 1920x1080 and then use the “Ultra” setting. |
|
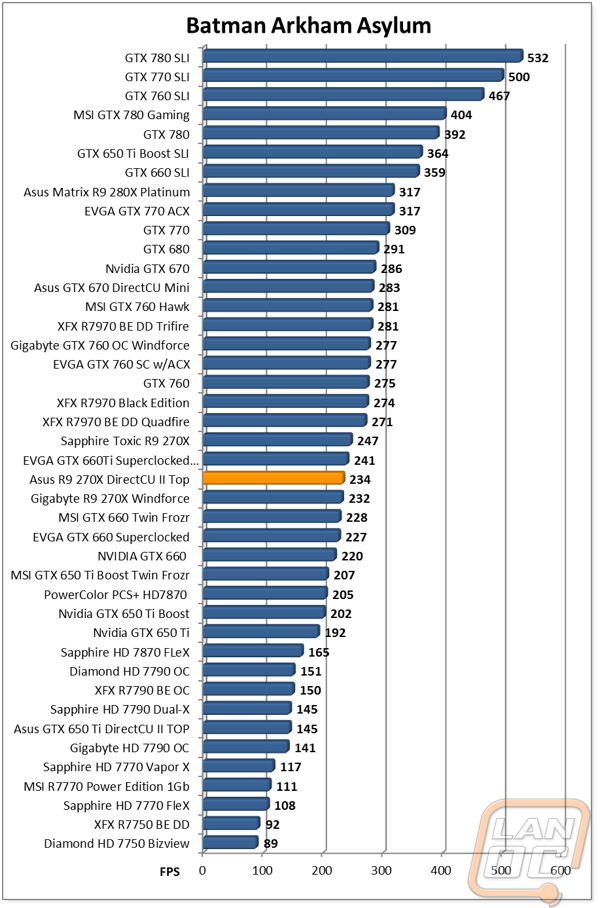
Batman Arkham Asylum |
We used the built-in benchmark set to 1920 x 1080, Multi Sample AA 16XQ, Detail Level, Very High, Bloom: Yes, Dynamic Shadows: Yes, Motion Blur: Yes, Distortion: Yes, Fog Volumes: Yes, Spherical Harmonic Lighting: Yes, Ambient Occlusion: Yes, PhysX: Off |
|
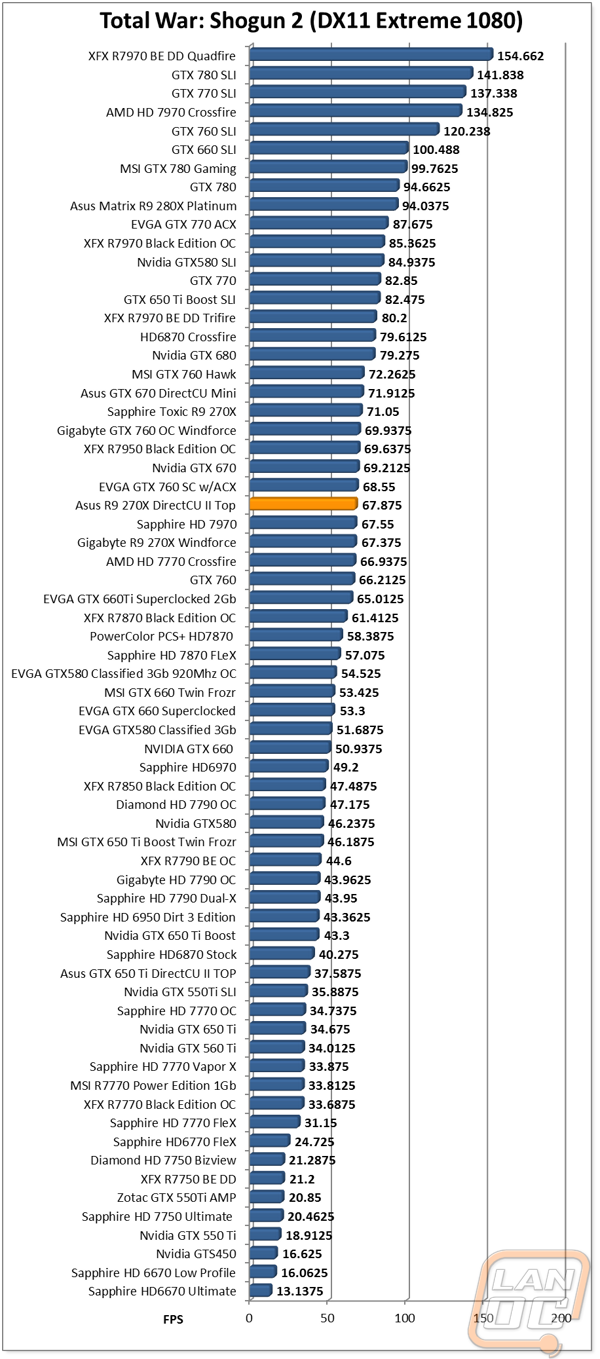
Total War: Shogun 2 |
Direct X11 Benchmark High setting |
|
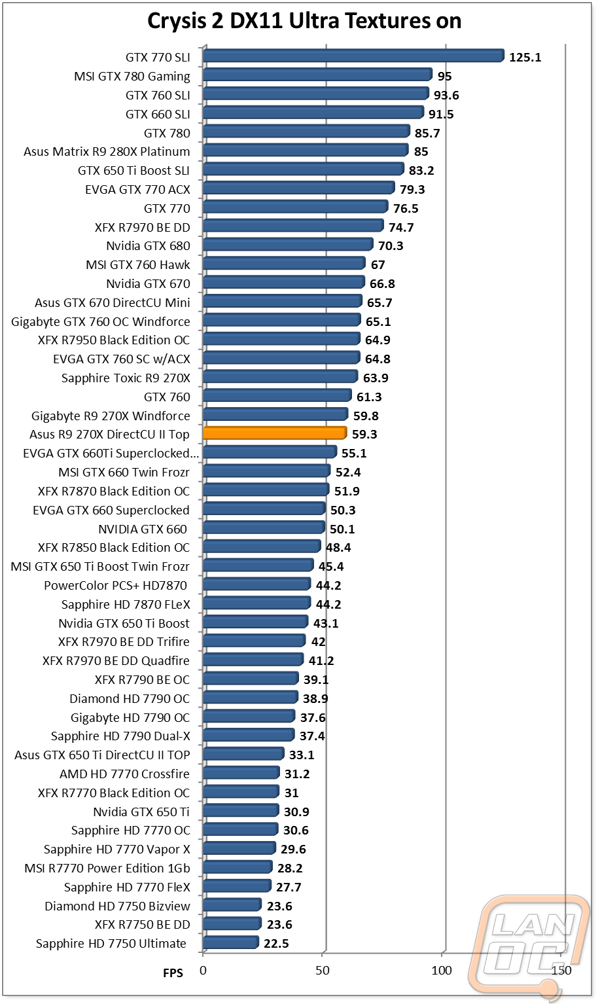
Crysis 2 |
Using Adrenaline Crysis 2 benchmark. 1080p, 4x Anti-Aliasing, DX11, Laplace Edge Detection Edge AA, on the Times Square map, with hi res textures turned on. |
|
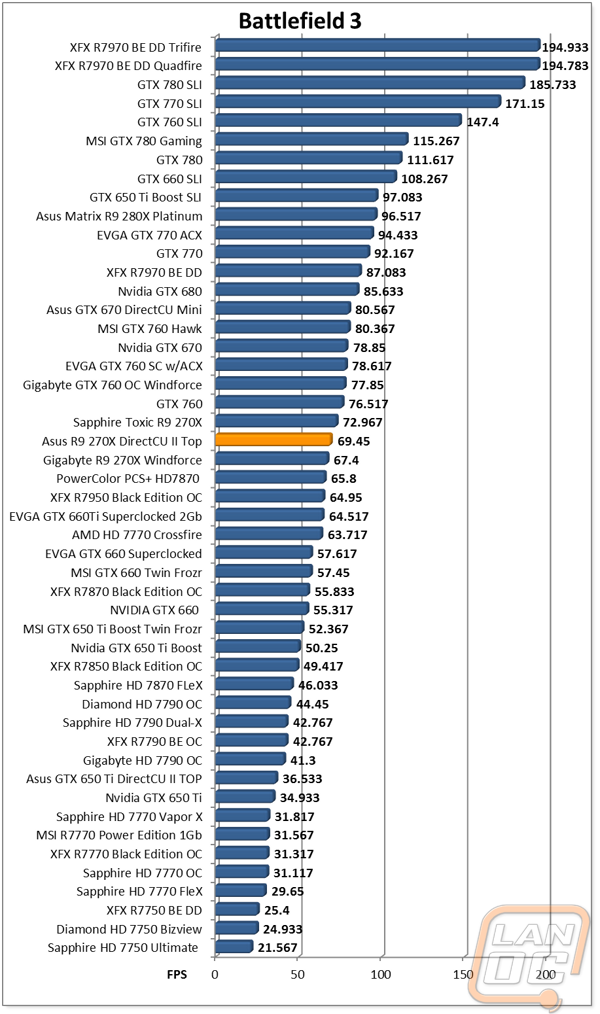
Battlefield 3 |
Using Fraps with the game set to Ultra settings with 4x MSAA Antialiasing Deferred, 16X Anisotropic Filter, at 1920x1080. |
|
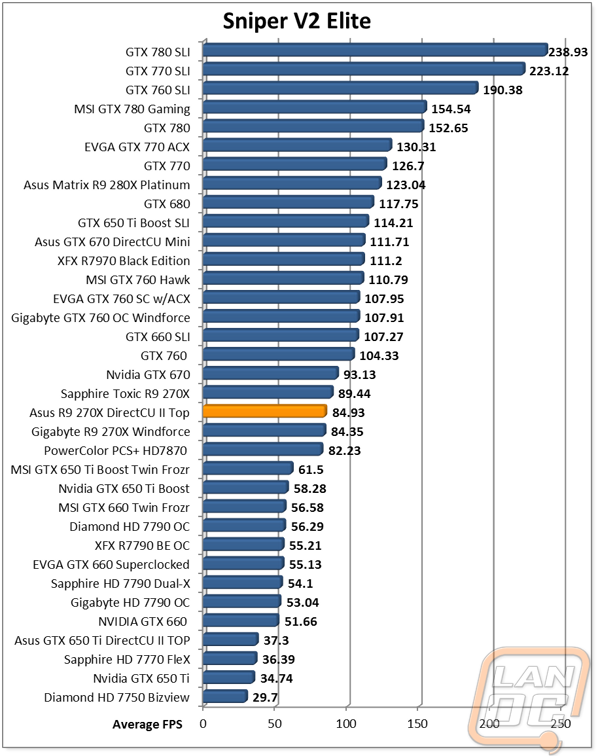
Sniper V2 Elite |
1920 x 1080 resolution, graphics detail set to ultra |
|
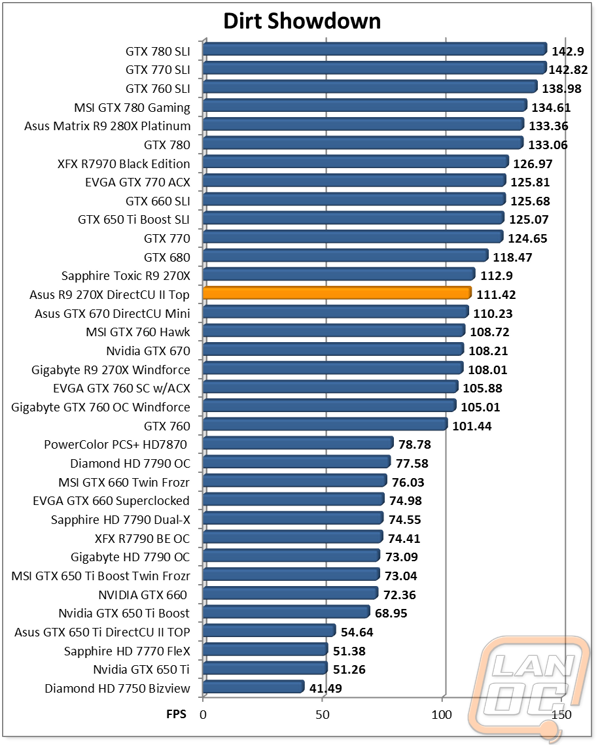
Dirt Showdown |
1920 x 1080 resolution, 4x MSAA multisampling, Vsync off, Shadows: ultra; Post Process: High; Night Lighting: High; Vehicle Reflections: Ultra; Ambient Occlusion: Ultra; Water: high; Objects: Ultra; Trees: Ultra; Crowd: Ultra; Ground Cover: High. |
|
Metro Last Light |
Using the included benchmark tool. The settings are set to 1920x1080, DirectX 11, quality is set to very high, Texture filtering is untouched at 4x, and motion blue is set to normal. SSAA is unselected, PhysX is unselected, Tessellation is off. We run through scene D6 three times to get an average score. |
|
Synthetic Benchmarks |
For video cards our synthetic benchmarks are limited to 3DMark Vantage 2011, and 3DMark 2013 (AKA 3DMark). In 3DMark Vantage 2011 we run both performance and extreme benchmarks. The same goes for the most current version of 3DMark, we run through Fire Strike on standard and extreme settings. |
|
Unreal Heaven Benchmark 4.0 |
Using the “Extreme” preset |
|
Unreal Heaven Benchmark 4.0 heat testing |
We run through Unreal Heaven at 1080p for 30 minutes to test in game heat performance and noise output of the card while under load. |
|
Power Usage |
Using Unreal Heaven Benchmark 4.0, we get our “load” power usage number from the peak power usage during our test. We get our numbers from a Kill-A-Watt connected to the test benches power cord. |
|
Noise Testing |
Our Noise testing is done using a decibel meter 3 inches away from the video card on the bottom/fan side of the card. We test an idle noise level and then to get an idea of how loud the card will get if it warms all the way up we also turn the fan speed up to 100% and test again. The 100% test isn’t a representation of typical in game noise levels, but it will show you how loud a card can be if you run it at its highest setting or if it gets very hot. |
Cooling, Noise, and Power
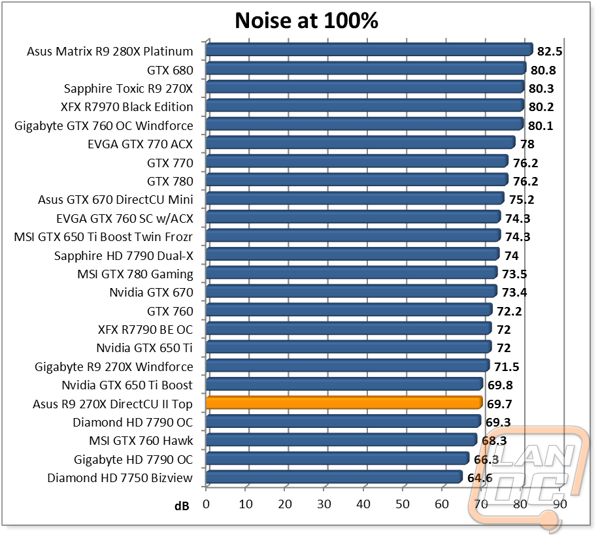
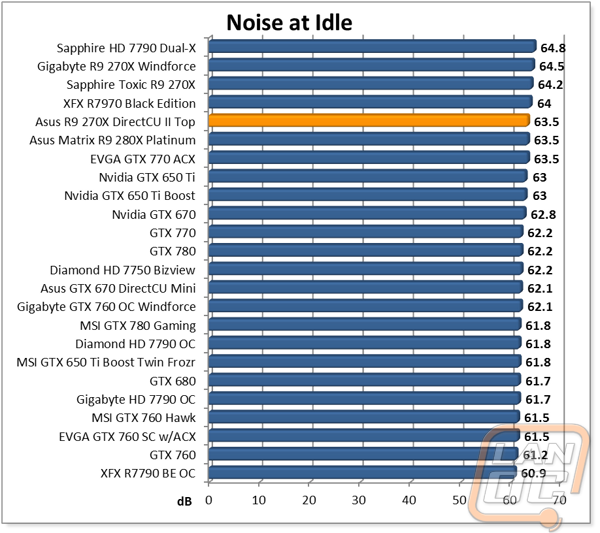
There is a little more to just pure performance when picking out your next video card. Its important to know what kind of power it will draw at both idle and in game and cooling performance and noise are important, especially in cases that don’t insolate noise or have great cooling performance. To test the R9 270X DirectCU II Top I ran through our normal power, cooling, and noise tests. To start things off I tested the noise output at idle and at 100% fan speed. At idle the R9 270X DirectCU II Top was in line with most of the other cards, but it was a little louder than average. At 100% fan speed though; it actually performed better than expected, putting it down close to the bottom at 69.7 decibels.
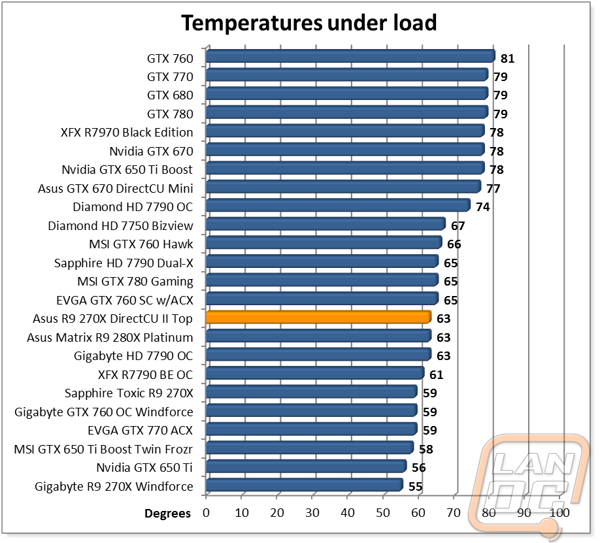
For cooling performance and power load I use Unreal Heaven Benchmark 4.0. This gives a good idea of in game results while still being repeatable. The R9 270X DirectCU II Top’s cooling performance was in the middle of the pack for all of the cards I have tested but sadly it was higher than the other R9 270S’s that I have tested recently. The difference is only a few degrees, but they did run a slightly lower temperature. That isn’t to say that the R9 270X DirectCU II Top does a bad job of cooling, because it is going to do considerably better than a reference card. But the more aggressive triple fan designs out performed for obvious reasons.
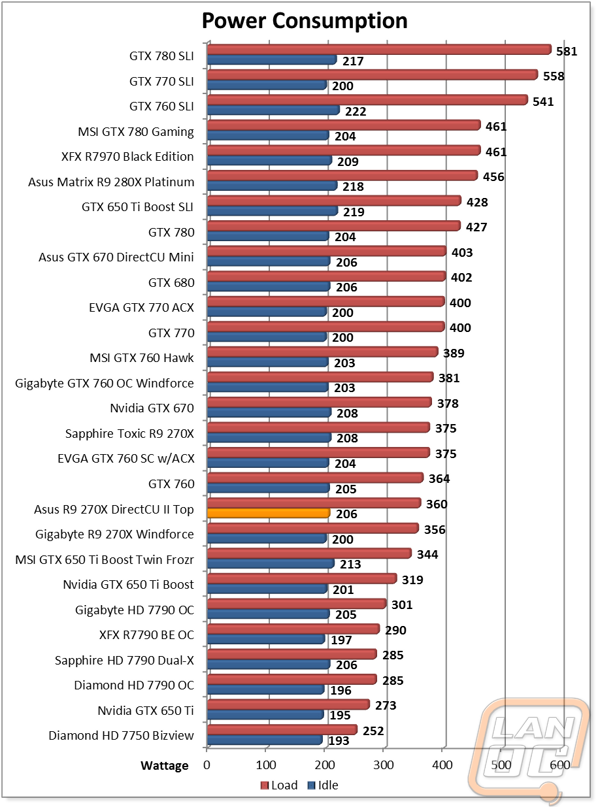
What about its power usage? Well idle power usage was right in the middle of the two other R9 270X’s tested at 206 watts. The important number is the load number and that result was also in between the other two cards at 360 watts at peak. This was only 4 watts higher than the Gigabyte card and considerably less than the Sapphire card that had a higher overclock.
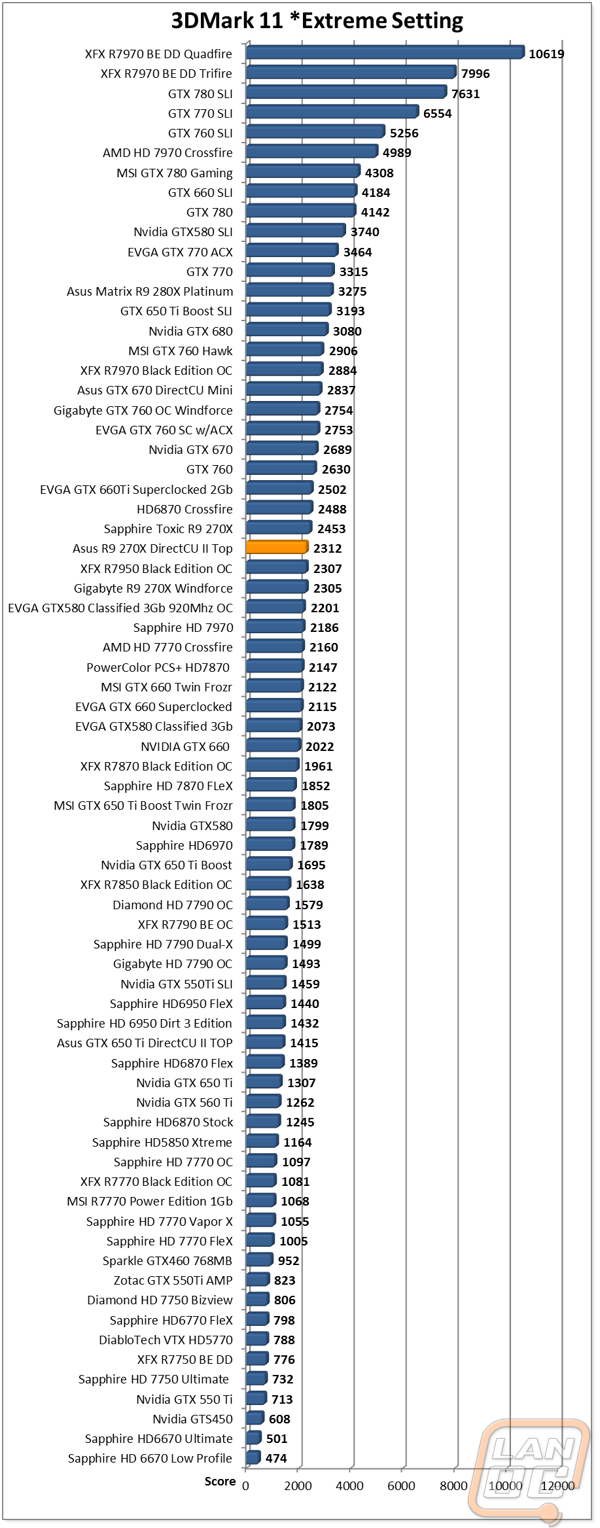
Synthetic benchmarks
Having tested a couple other R9 270X’s before Asus’s DirectCU II Top version I had a good idea of what to expect. With this being an overclocked model like the others tested, it really came down to the overclock clock speed as sold by Asus. Here is a breakdown of the three R9 270X’s before we get into their results
|
Model |
GPU Clock |
Memory Clock |
|
Asus R9 270X DirectCU II Top |
1120MHz |
5600MHz |
|
Gigabyte R9 270X Windforce OC |
1100MHz |
5600MHz |
|
Sapphire Toxic R9 270X |
1150MHz |
6000MHz |
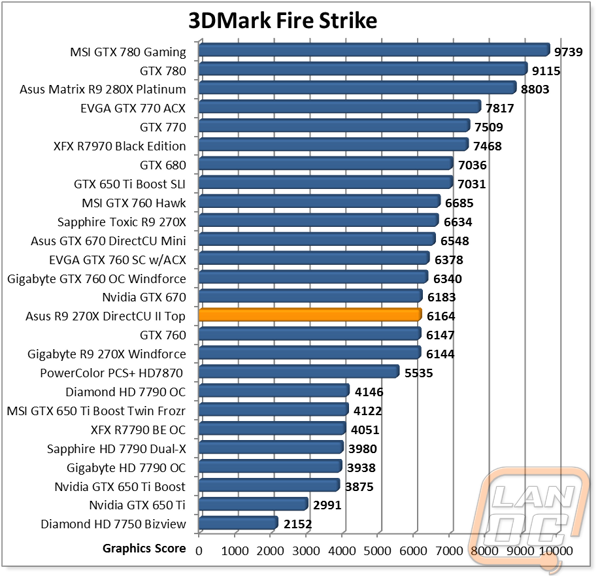
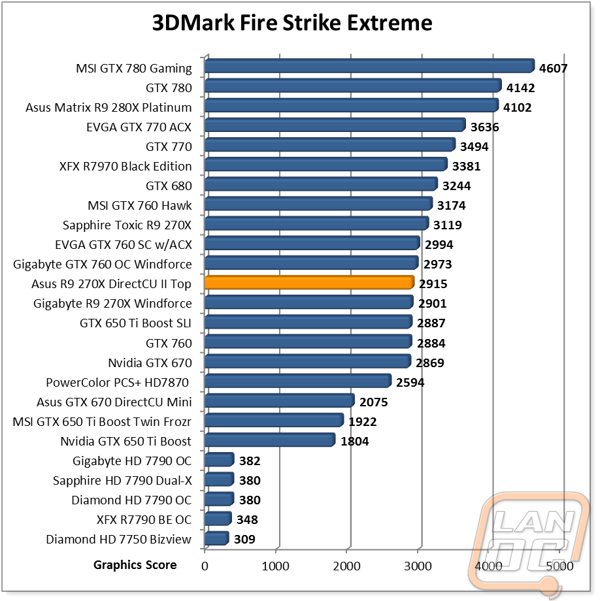
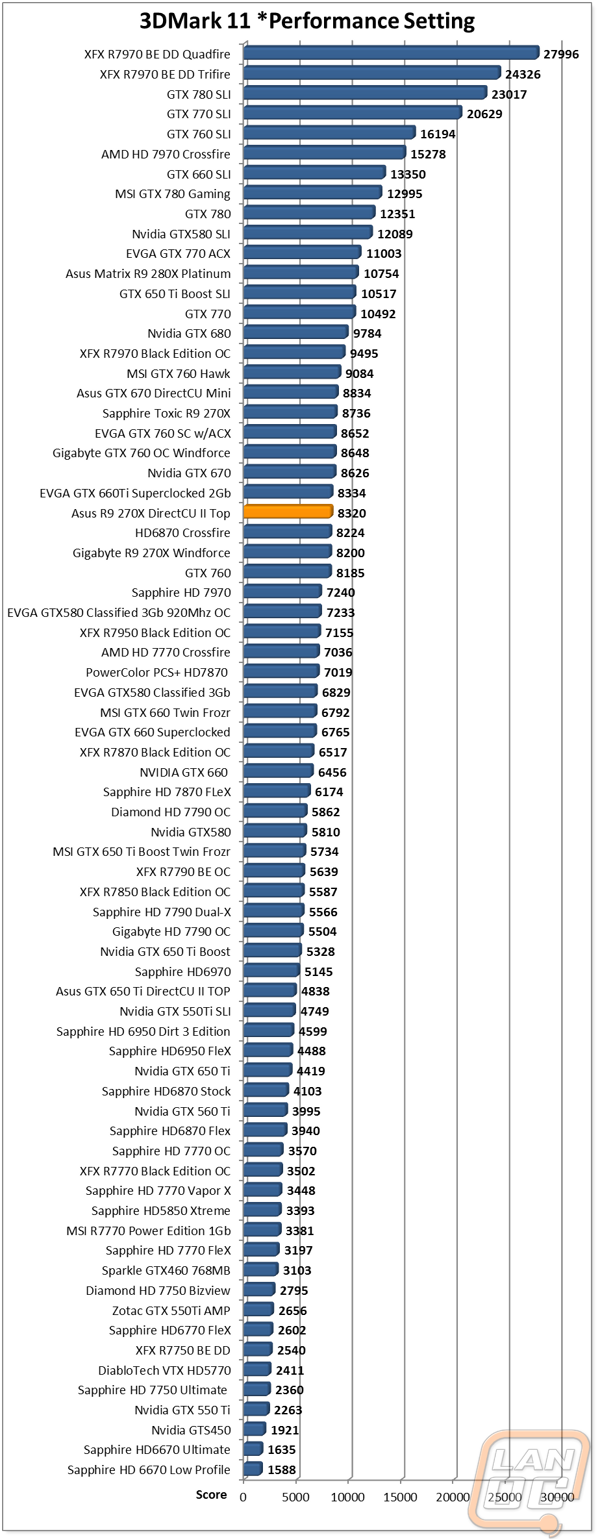
As you can see above, the Asus card comes in just above the Gigabyte in its GPU clock but Sapphire pushed the limits farther on their card. So it wasn’t a shock when I dug into the synthetic benchmark results and the Sapphire was up ahead of the DirectCU II Top with the Windforce slightly lower than the Asus. Just like with the other cards though, the R9 270’s still impress me with them coming in around the same performance as the GTX 760 when AMD suggested that the GTX 660 was its competition.

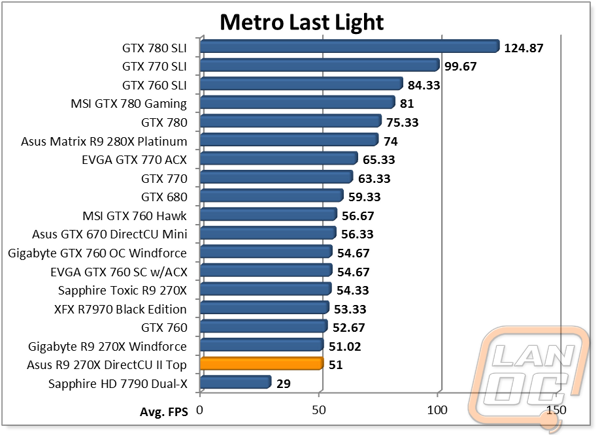
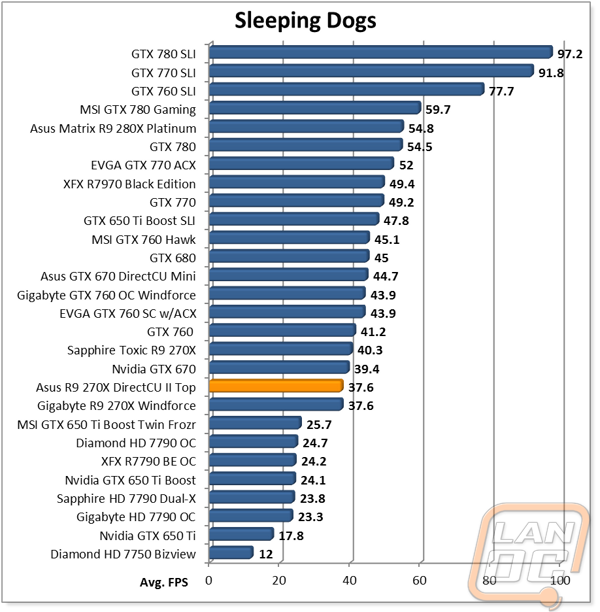
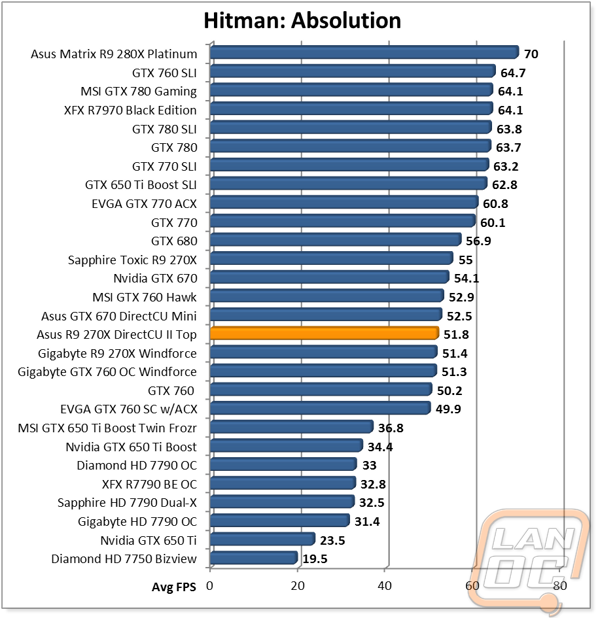
In Game Benchmarks
As always, all of the other benchmarks are great, but when it comes down to why we buy video cards it is for the best possible in game performance. Because of that I put every card I test through 12 different games that cover a variety of game engines and game genre’s to give you an idea of what to expect. The R9 270X DirectCU II Top completed all of our tests in line with what I expected, just like with the synthetic benchmarks. Out of the 12 games tested, the R9 270X DirectCU II Top performed at or above 60 FPS in 6 games. Of the games that it didn’t reach 60 FPS in, four were 50 FPS or higher with Crysis 2 coming in at less than 1 FPS less than 60. This is of course with every test turned up to its highest possible settings, including AA in almost every situation. That means that the R9 270X DirectCU II Top should play every game you want at 1080p with high settings, but in a few cases you will need to turn AA down or off to reach 60FPS. Most people are fine with 30 FPS though and for those people, you can keep all of the goodies turned all the way up.
Overclocking
When it came time to overclock the R9 270X DirectCU II Top over and above its “Top” overclock from the factory I went about it the same way I do with every card. I break my testing down between GPU, Memory, and then both together. This way I can get the highest possible clocks on each and then see how they work out together. To confirm my overclocks I run through a 3DMark 11 test to push the card and heat things up. Starting with the GPU clock speed, I jumped up to 1200MHz right from the start without any trouble. My next attempt was at 130MHz and this resulted in what I call a soft crash, meaning windows didn’t crash, only the driver. I turned things down to 1275MHz with good results so I attempted to bump it up from there (suspecting I could get close to my 1300MHz because I only had a soft crash before). Sadly my small bump resulted in a hard crash meaning the highest I could reach was 1275MHz using standard methods. This is spot on in line with my previous best on another 270X.
Memory testing was very uneventful, I was able to quickly bump things up to the maximum setting that AMD allows in their software without any issues, just like I have done on all of the other R9 270X’s tested. I know there is more room to be found here when you go around the software overclocking, but for our testing this should do. Next I combined both of my max overclocks and ran through everything again to see if it passed, and it did. In the end I went from an FPS in the 41’s to a high 46FPS with the overclock, showing there is still room above what Asus provided, although your results will very.
|
GPU Clock Speed Overclocking |
|||
|
GPU Clock Speed |
Pass/Fail |
FPS Result |
Notes |
|
1200MHz |
Pass |
43.79 |
|
|
1300MHz |
Fail |
N/A |
Driver Crash |
|
1275MHz |
Pass |
46.14 |
|
|
1285MHz |
Fail |
N/A |
Blue Screen |
|
Memory Clock Offset Overclocking |
|||
|
Memory Clock Speed |
Pass/Fail |
FPS Result |
Notes |
|
1500MHz |
Pass |
41.93 |
|
|
1600MHz |
Pass |
41.88 |
|
|
1625MHz |
Pass |
41.96 |
|
|
Combined GPU and Memory overclocks together |
|||
|
GPU Clock Speed |
Memory Clock Speed |
FPS Result |
Notes |
|
1275MHz |
1625MHz |
46.81 |
|
Overall and Final Verdict
Having owned a few of Asus’s DirecCU II cards in the past I came into this really excited to see how the R9 270X DirectCU II Top compared to the two other R9 270X’s that I have taken a look at over the past week and a half. In the end I was really happy with its performance both in game and cooling. For being up against cards with three fans it held its own in our cooling tests and even stayed quiet in the noise testing. For performance it did pull out ahead of the Gigabyte card across the board but the Sapphire card with an even higher overclock did show that there is still more room to be had with a higher overclock on both the GPU and Memory. Of course the Sapphire card is priced considerably higher as well, making this a good buy in comparison. I also think that the R9 270X DirectCU II Top has its styling going for it. The black and red styling that Asus is known for is extremely popular and this card sticks to it. If you are looking for a card that can play just about anything without breaking the bank that will go with your new Asus motherboard, this is the card!