 If you are an avid reader, you have most likely seen countless Asus motherboard reviews and even a few audio products as well recently. Something that is a little rarer is having an Asus video card come through our office. When Asus contacted me asking if we wanted to take a look at their upcoming GTX 650 Ti DirectCU II TOP, there wasn’t even a hesitation. We have already taken a look at the reference GTX 650 Ti; this card on the other hand is nothing like it. Sure you have the same architecture, as you would expect. But the DirectCU II TOP is almost twice as long, has twice the cooling, and has a considerably different PCB even. It’s no off the shelf reference design, today we are going to dig in and see what all of that means for you when looking to buy a GTX 650 Ti.
Product Name: Asus GTX 650 Ti DirectCU II TOP
Review Sample Provided by: Asus
Written by: Wes
Pictures by: Wes
Specifications
|
Processing Units |
|
|
Graphics Processing Clusters |
2 or 3 |
|
SMXs |
4 |
|
CUDA Cores |
768 |
|
Texture Units |
64 |
|
ROP Units |
16 |
|
Clock Speeds |
|
|
Base Clock |
1033 MHz |
|
Boost Clock |
N/A |
|
Memory Clock (Data rate) |
5400 MHz |
|
L2 Cache Size |
256KB |
|
Memory |
|
|
Total Video Memory |
1024MB GDDR5 |
|
Memory Interface |
128-bit |
|
Total Memory Bandwidth |
86.4 GB/s |
|
Texture Filtering Rate (Bilinear) |
59.2 GigaTexels/sec |
|
Physical & Thermal |
|
|
Fabrication Process |
28 nm |
|
Transistor Count |
2.54 Billion |
|
Connectors |
2 x Dual-Link DVI 1 x mini-HDMI |
|
Form Factor |
Dual Slot |
|
Power Connectors |
1 x 6-pin |
|
Recommended Power Supply |
400 Watts |
|
Thermal Design Power (TDP) |
110 Watts |
|
Thermal Threshold |
98° C |
Packaging
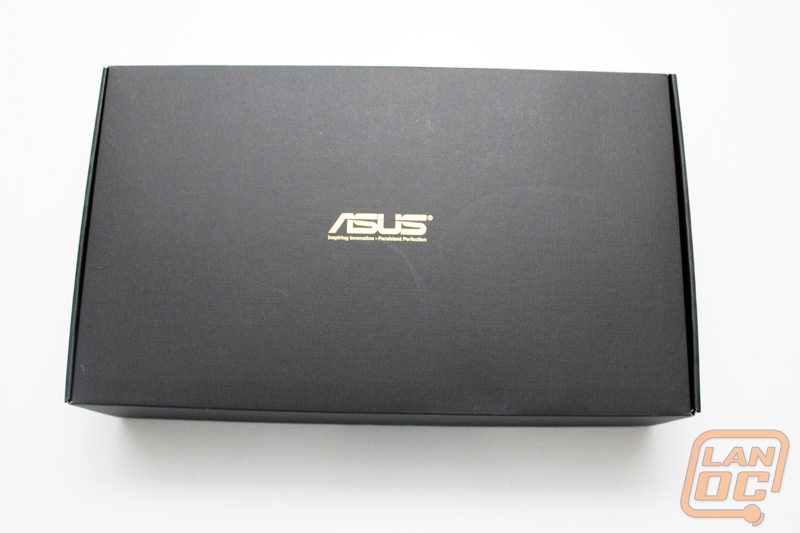
When the Asus GTX 650 Ti DirectCU II TOP came in I had just finished working on our testing of the reference card from Nvidia. I was immediately curious about the size of the card after seeing its packaging. The box for this video card is about the same size as the GTX 580 Classifieds box to give you an example and that isn’t a small card.
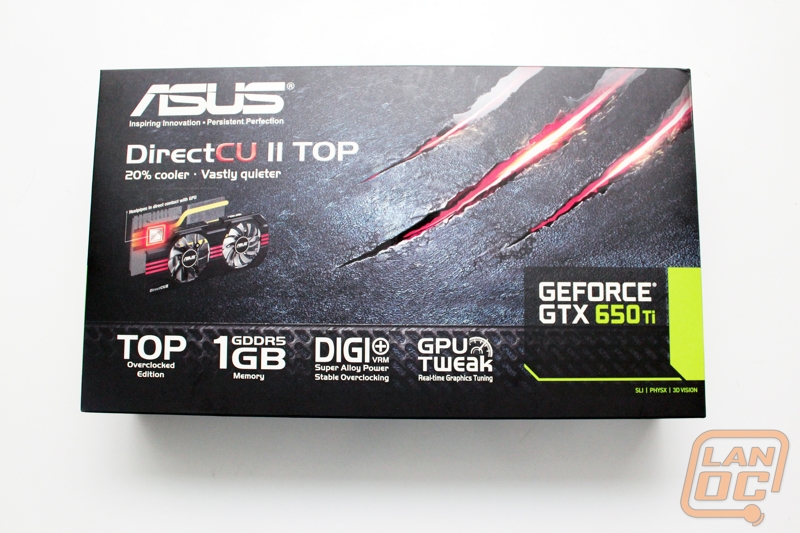
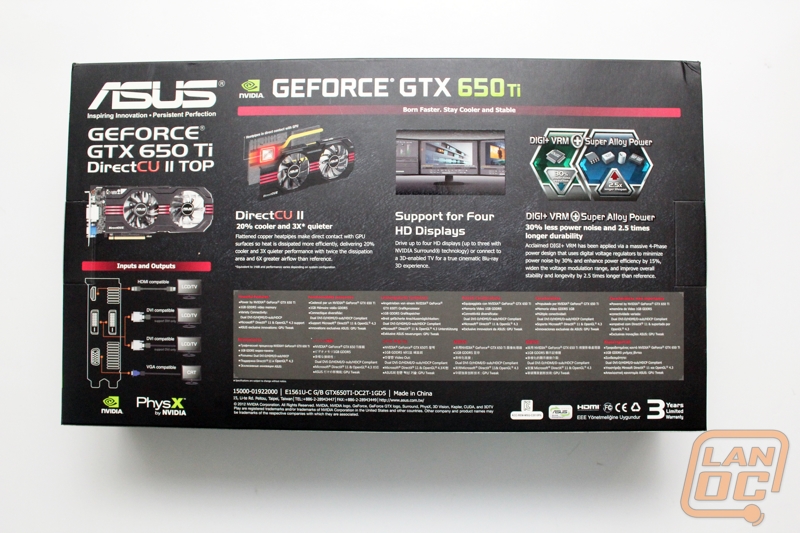
I was impressed with the packaging’s art work as well. In the background you have a textured look with three hardcore claw marks across the box. You have the standard Geforce GTX 650 Ti branding as well as a few key features, most notably the word TOP overclocked edition printed on the box. This caught my eye because normally at best we would see a package with an overclocked sticker on most boxes to save money on packaging. Around back they have more details on the DirectCU II cooler, the cards ability to support four monitors, and the DIGI+ VRM. I like that they also have a diagram of the cards outputs and a list of examples of what will hook up to it, this is a small touch but helpful for someone who isn’t as knowledgeable checking it out in a store.
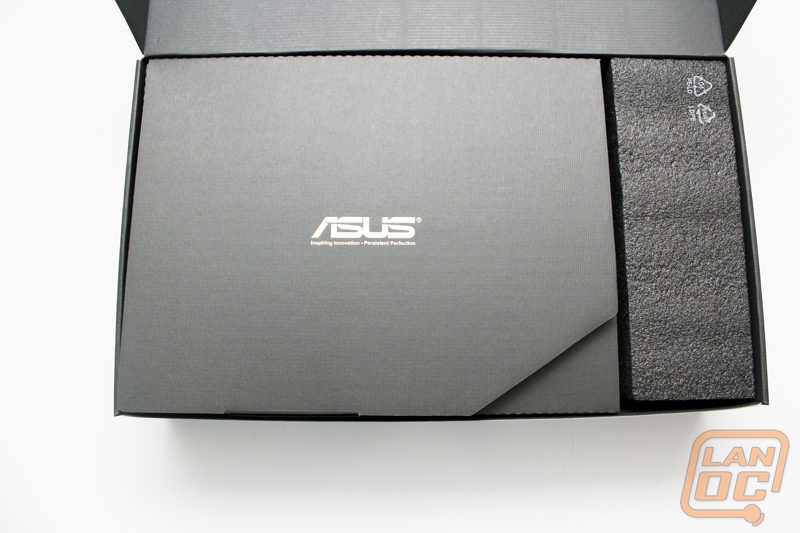
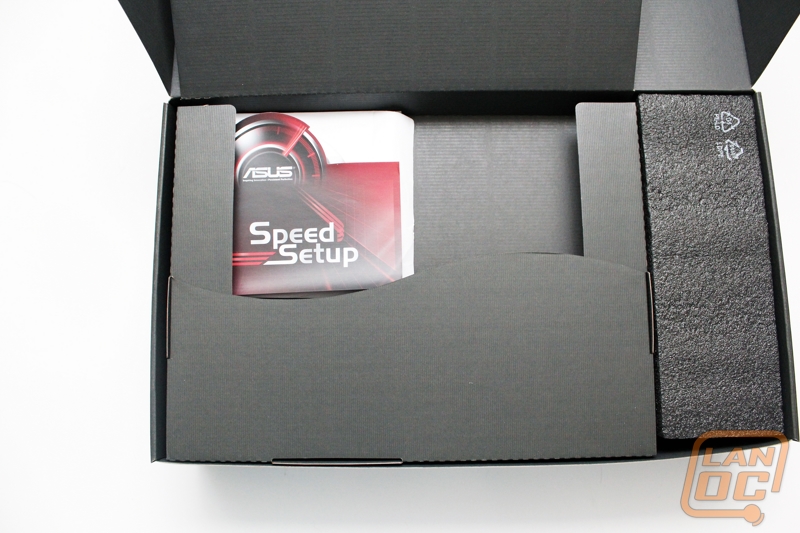
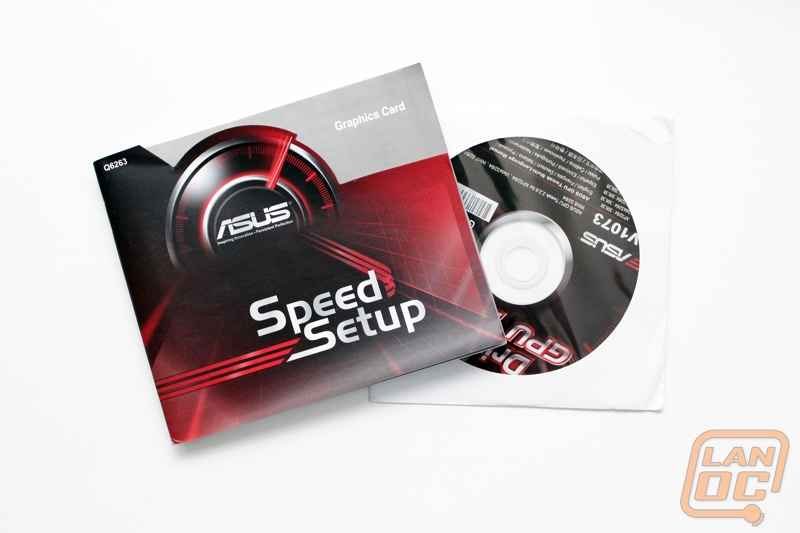
Inside the outside packaging there was a very classy box with a gold Asus logo in the middle. When you open it up you have yet another box. That box contains your software disc, manual, and all of the card's accessories. Below this box you have a layer of protective foam and then you finally have dug down to the card itself. It sits in a foam tray with a cutout in the shape of the card. Of course it comes in a static protective bag as well. All in all I don’t think there is any way this card can get damaged in shipping; it is well protected.
Card Layout and Pictures
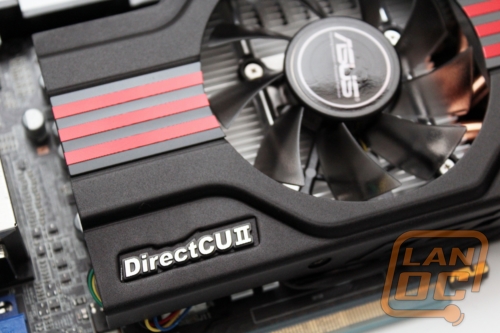
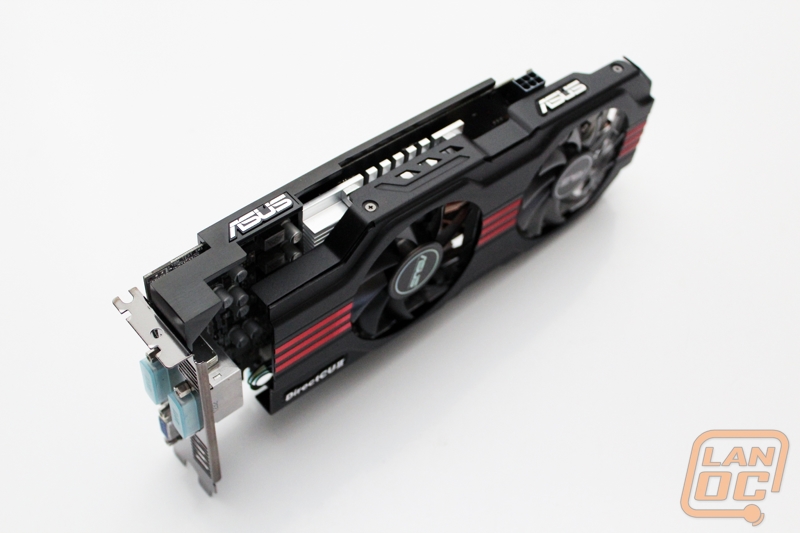
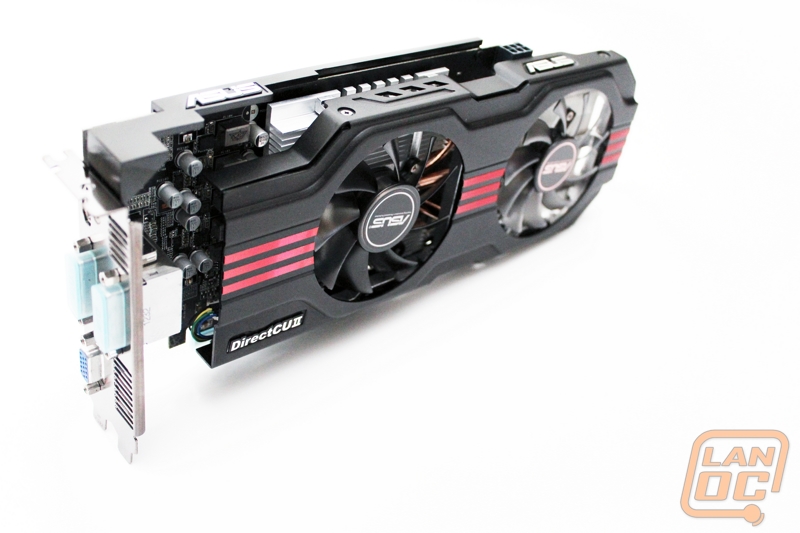
I love that Asus doesn’t try to pack graphics all over the GTX 650 Ti DirectCU II TOP. The card also lacks any bright colors that might affect it matching the styling on your builds. They went with a black and red design with the black having a heavy duty texture that looks great. The black fan shroud surrounds two 9 fin cooling fans. Each fan is smoke in color to match the shroud while still letting you peak past to the heatpipes and heatsinks underneath.
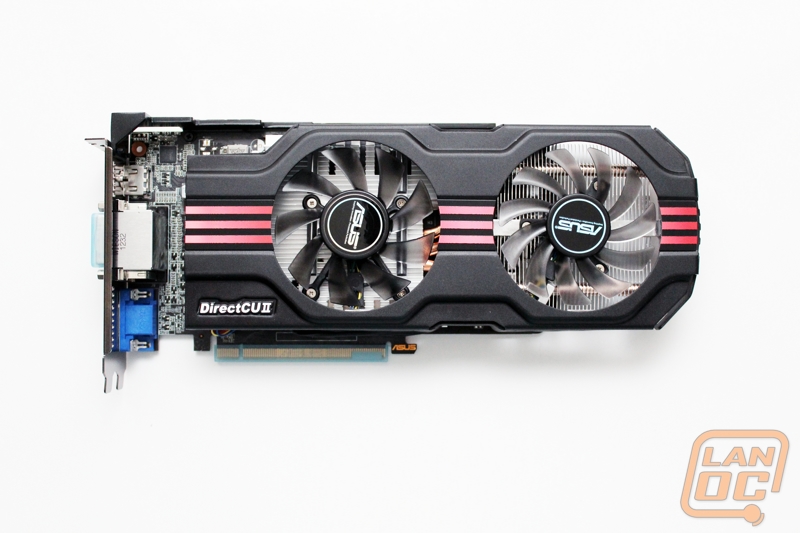
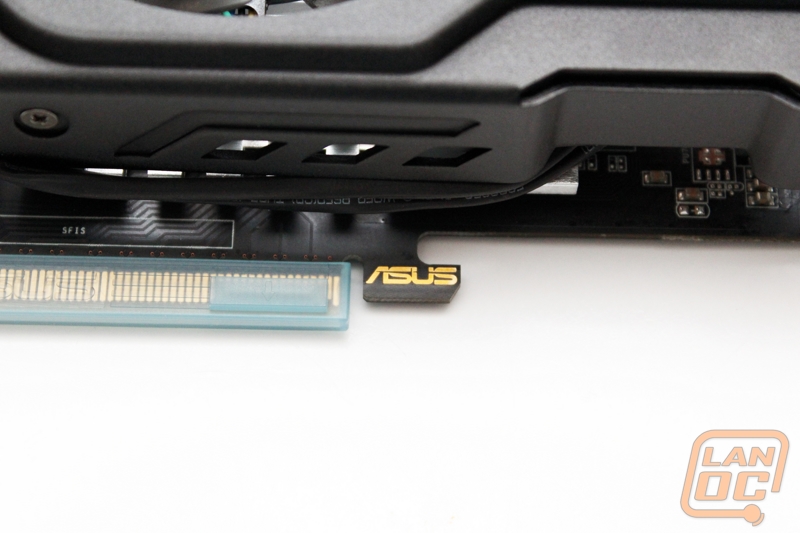
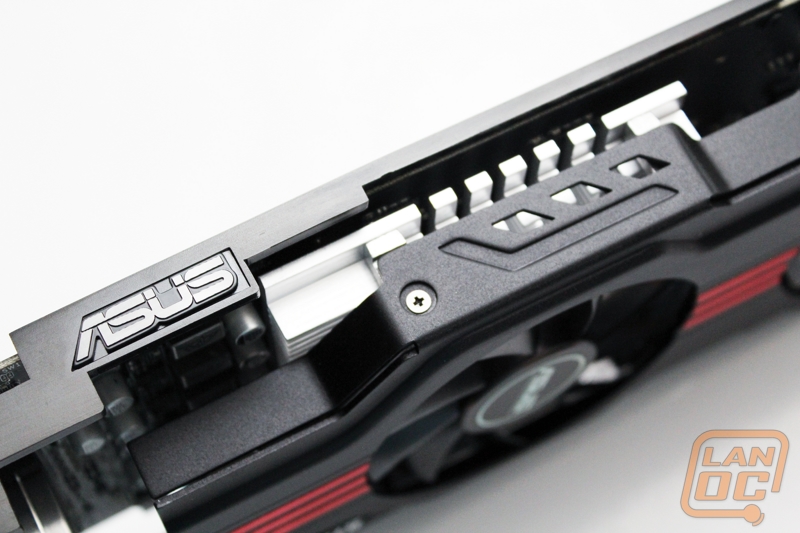
It’s a very small touch, but I love the gold Asus logo right on the PCI Express slot lock.
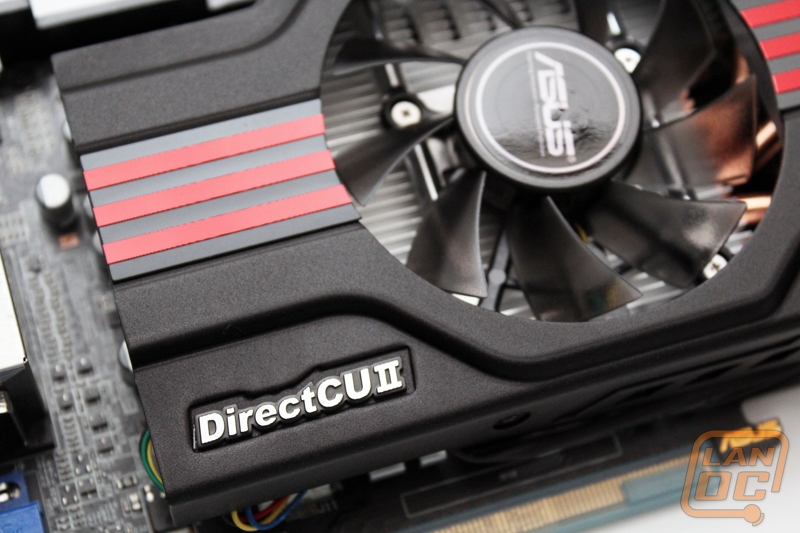
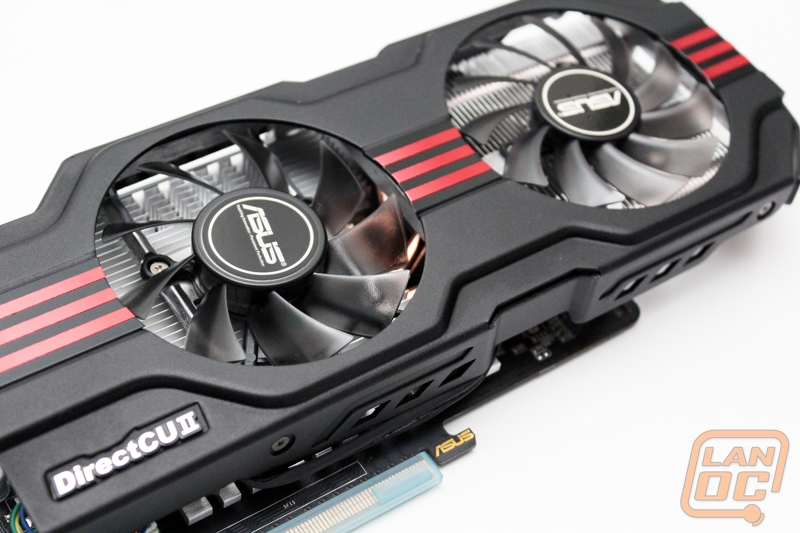
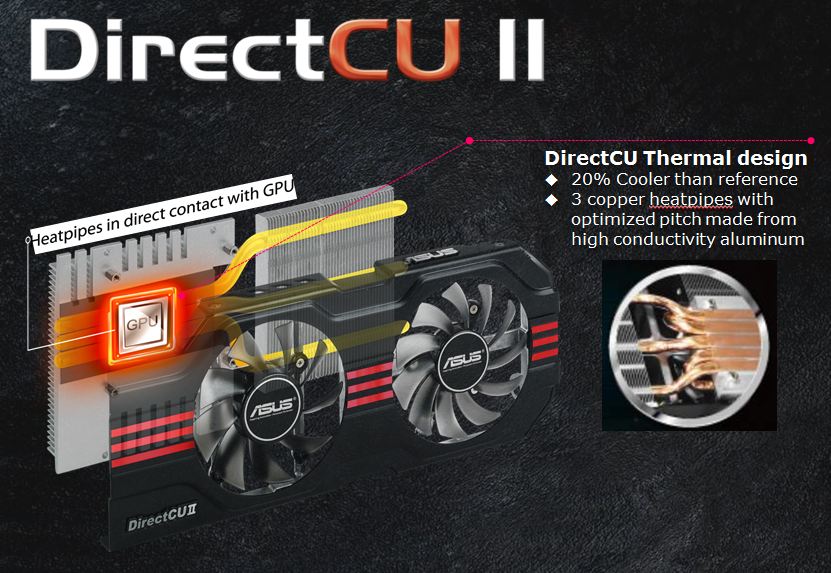
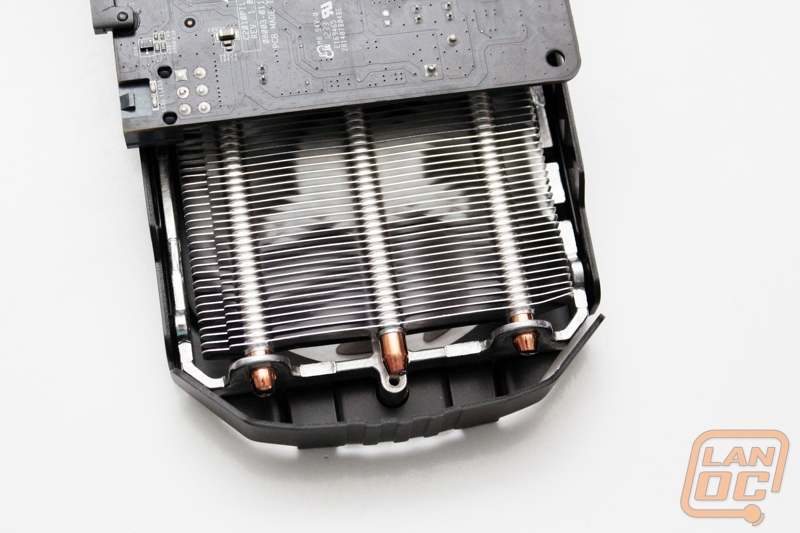
Asus’s fan shroud is a unique design that when combined with the support bracket looks great on top. It is a little weird that there are two Asus logos; personally I would have preferred that one have the card’s model name or maybe the DirectCU II logo. From the top you can also see that Asus didn’t go with anything like the reference cards cooler that looked a lot like an Intel CPU heatsink. The Asus card has a large machined aluminum block with heat fins cut out of it on top. Internally Asus has flattened the copper heatpipes and put them directly on top of the GPU as well, pulling the heat right out to the second half of the heatsink. This is their DirectCU II design.
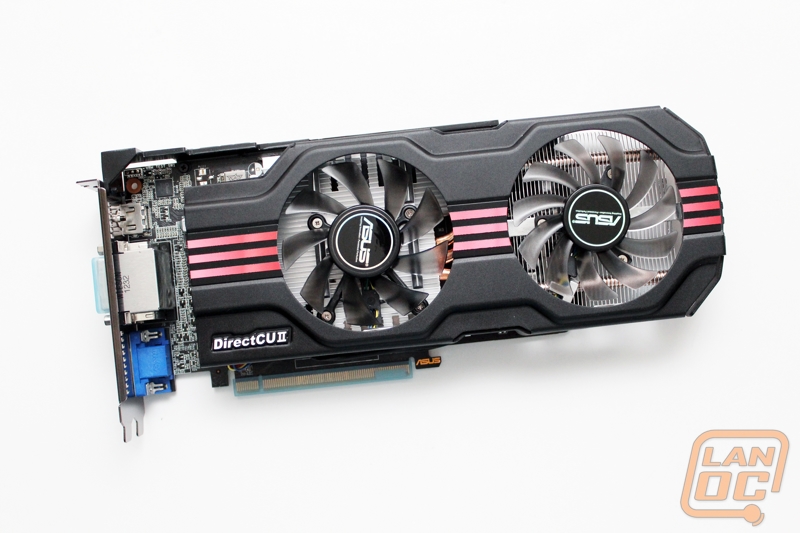
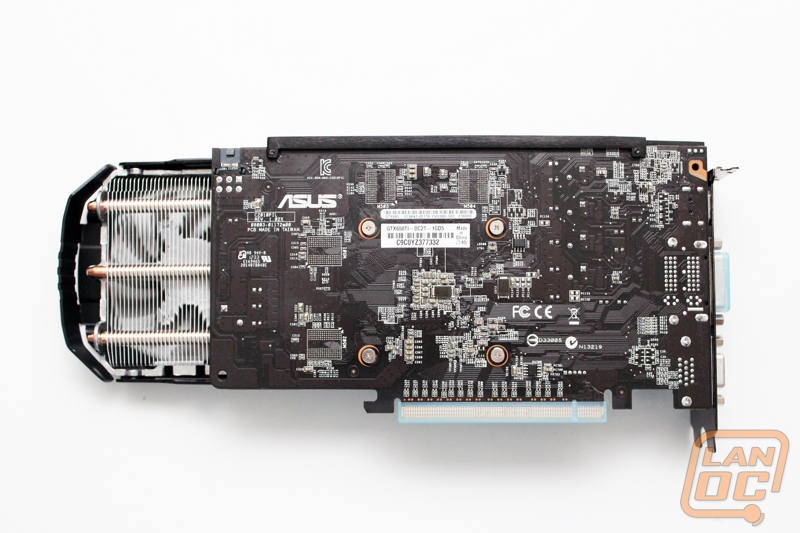
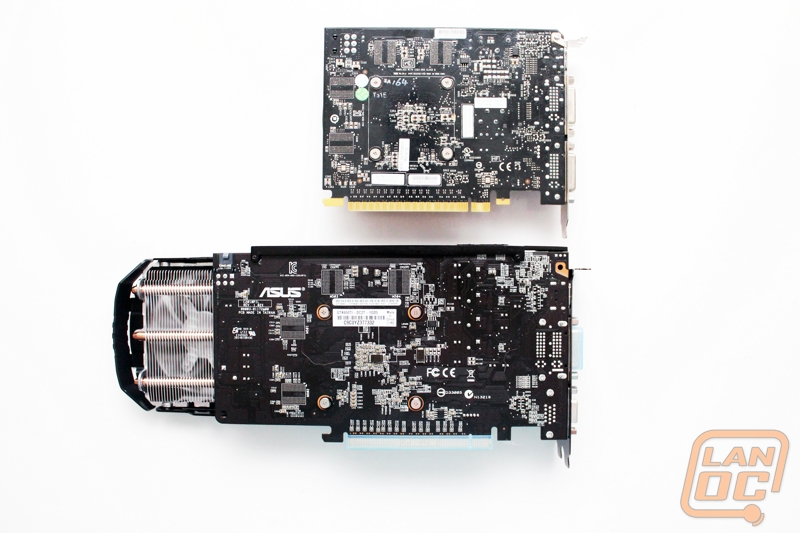
Flipping the card over is where it gets really interesting. Much like the GTX 660 and above, this card has a heatsink that hangs past the PCB considerably. In this case you can see through the heatsink to the fan from the back. This means the second fan is actually blowing the heat up and away from the card. From the back here you can also see that Asus went with a nice black PCB to keep the style of the card consistent. You can see that the heatsink is attached in six spots total. There are the four key mounts around the GPU and then a support beam across the top as well. Something else very interesting to me is the cards power connection. If you look closely you can see that the 6 pin connection is completely flipped from how we would normally see it. There is a cutout in the PCB for the hold down clip that would normally face the other direction. This keeps the connection flat against the PCB, giving more clearance for the heatsink.
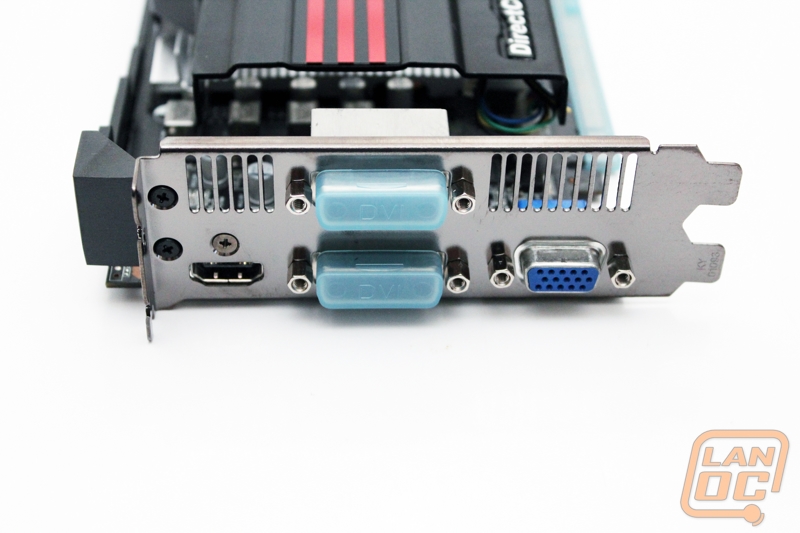
Unlike our reference card, the DirectCU II TOP is officially a dual slot card. This allows a little more room for connections that the reference card didn’t have. Interestingly enough, being a lower budget card, Asus decided to include a VGA port on this card. I think this is a good choice, a lot of people with lower budgets are still running VGA. If this was a GTX 670 or GTX 680 I might look down on including VGA, but this was a good call at this price point. You are still getting the came two DVI ports as the reference card and even an HDMI port. Unlike the reference card though, the HDMI port is full sized on the Asus card. I think everyone can appreciate that!
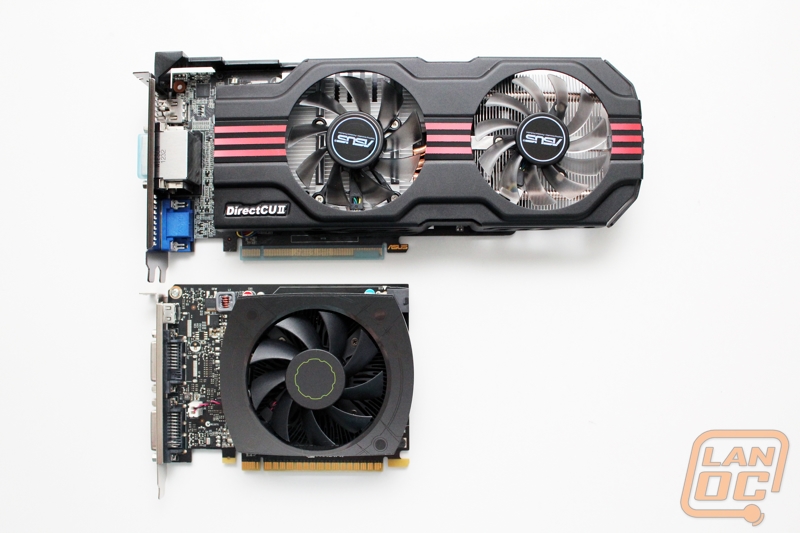
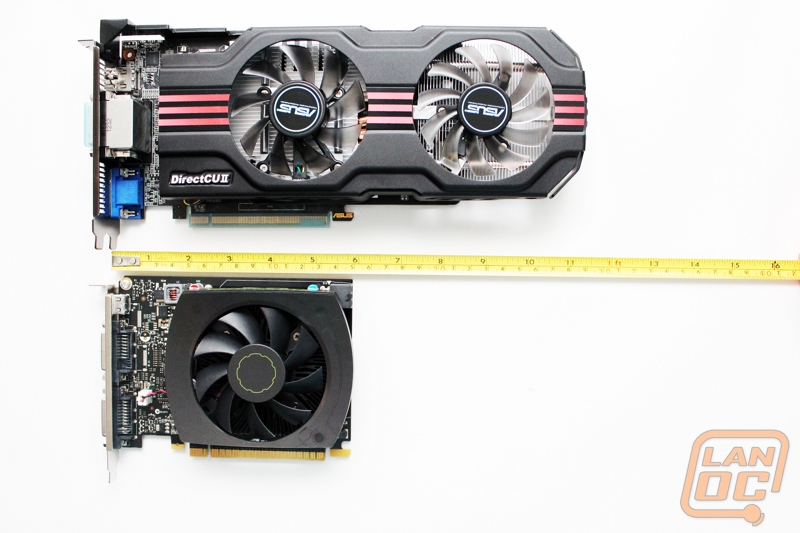
It is painfully obvious when you put the card up next to the reference card that it is huge. Even more importantly, it’s not just the heatsink that is making it so large. As you can see when the cards are flipped over, the PCB is much longer as well. Poking around on the card I see nothing noticeably different between the two PCB designs other than the obvious length. The trace routes showing on the outside layer of the PCB show a very clean and organized layout when compared to the reference card. The additional room gave them a chance to clean things up; this is a nice little touch. Everything important is in the same spot other than stretching them out slightly for additional length. This added length plays a role in making sure they can fit the largest heatsink on the GPU itself but moving the 6 pin power connection farther out and out of the way.
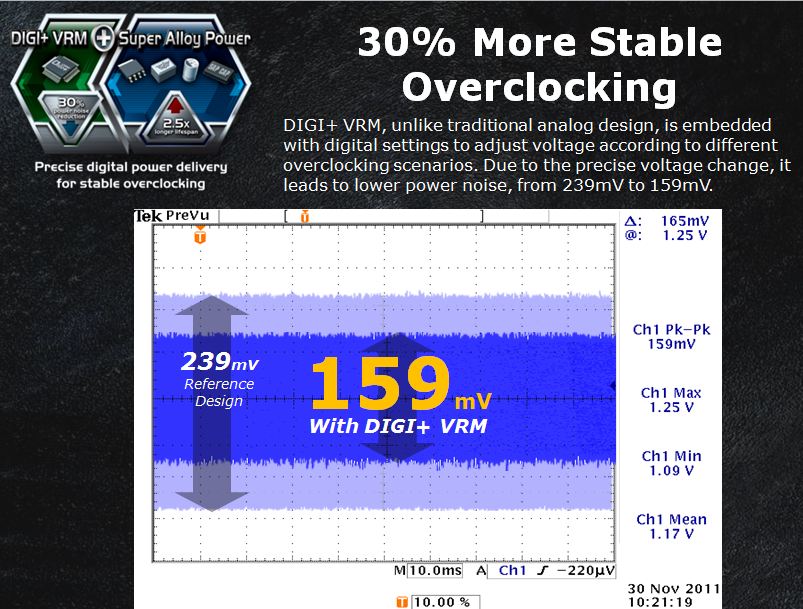
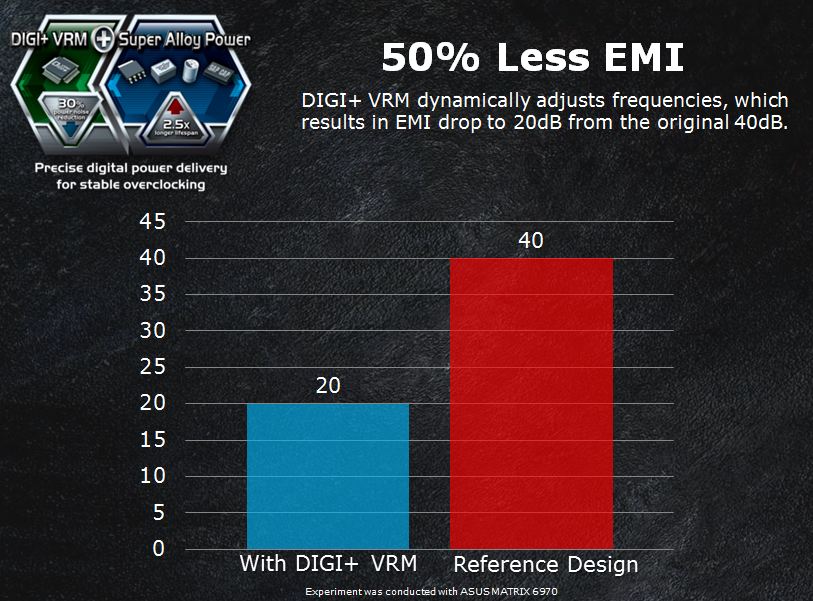
What you can’t really see in our photos, and what really makes the Asus card special is their inclusion of a DIGI+ VRM as well as 4-phase Super Alloy Power. Their improvements here will help with overclocking, overall temperatures, and lower EMI. In Asus’s testing they were able to lower the power noise on their test card from 239mV’s to 159mV’s when switching from a traditional VRM to their DIGI+ VRM.
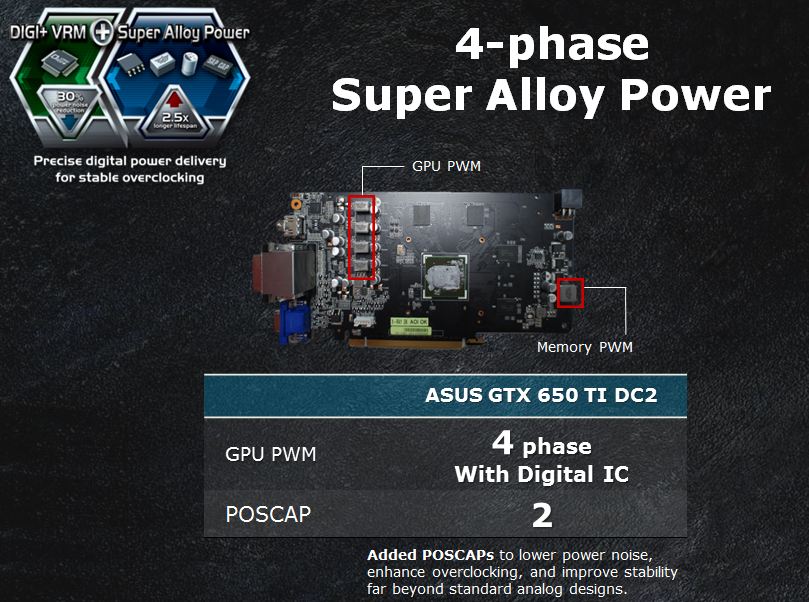
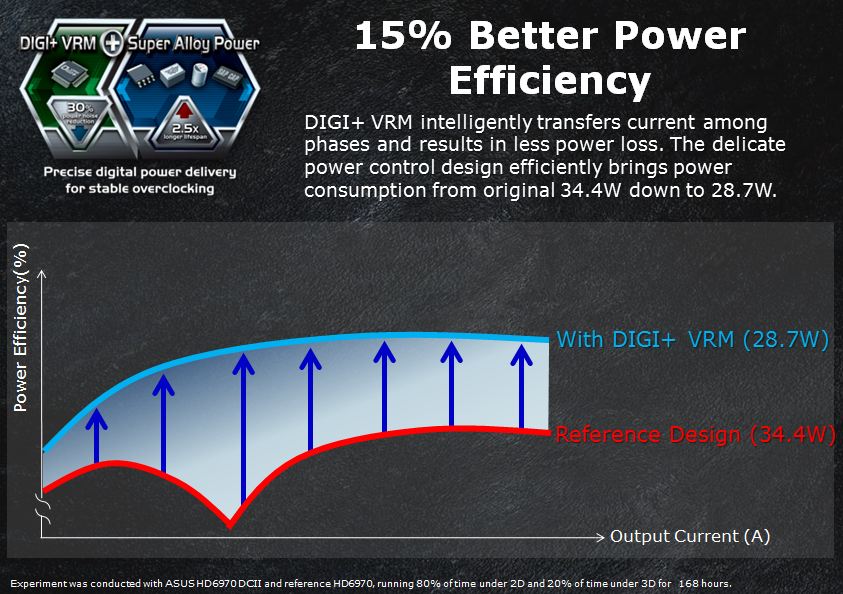
Where the DIGI+ VRM really helps is improving the power control. This is how they are able to keep temperatures down more. When you can cut out 6 watts of power usage you are making the card more efficient and lowering the overall heat output.
Our Test Rig
Asus Rampage IV X79 Motherboard
Seagate Constellation 2tb Hard drive
Cooler Master Gold Series 1200 Watt PSU
http://www.highspeedpc.com/ Test Bench
Kingston 1600Mhz DDR3 Quad Channel Ram
Kingston Hyper X 120 SSD
Our Testing Procedures
Batman Arkham Asylum (built-in benchmark; 1920 x 1080; Multi Sample AA 16XQ; Detail Level: Very High; Bloom: Yes; Dynamic Shadows: Yes; Motion Blur: Yes; Distortion: Yes; Fog Volumes: Yes; Spherical Harmonic Lighting: Yes; Ambient Occlusion: Yes; PhysX: Off)
F1 2011 (built-in benchmark; 1920 x 1080; Multi Sample AA 4x; Vsync: Off; DirectX: 11; Shadows: Ultra; Particles: High; Crowd: High; Drivers: Ultra; Distant Vehicles: Ultra; Objects: Ultra; Trees: Ultra; Vehicle Reflections: Ultra; Post Process: Ultra; Skidmarks: On; Cloth: High)
Super Street Fighter Arcade Edition (built-in benchmark; 1920 x 1080; Multi Sample AA: C16xQ; Vsync: Off;Filtering: 16x; Model Quality: High; Stage Quality: High; Soft Shadow: Extreme; Self Shadow: High; Motion Blur: High; Particles: High; Extra Effect: Off)
Dirt 3 (192x1080 - 4xMSAA - high settings, in-game benchmark)
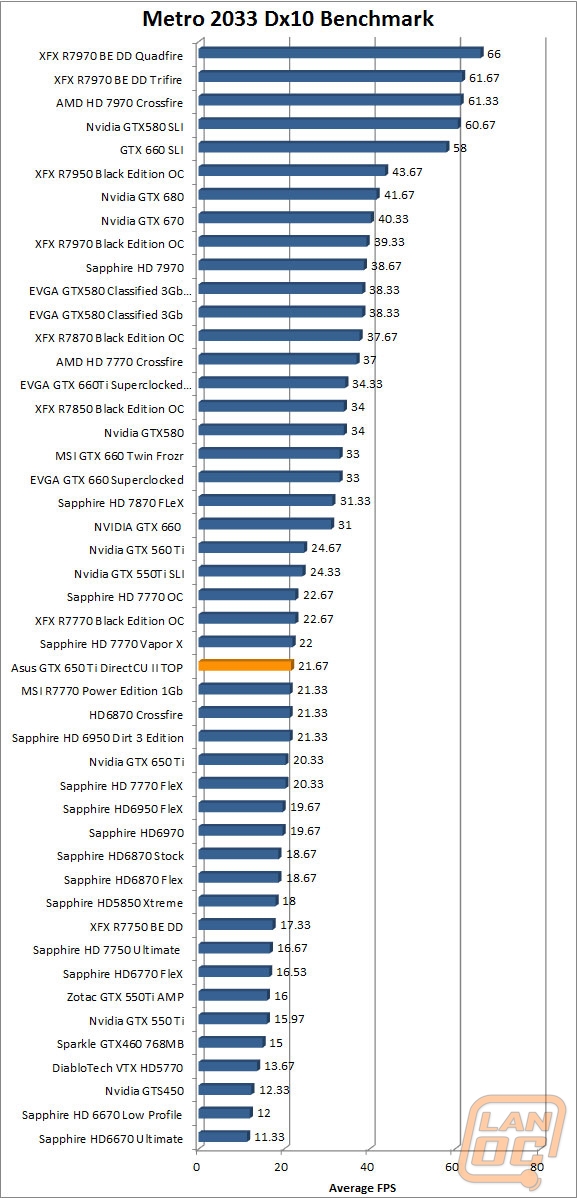
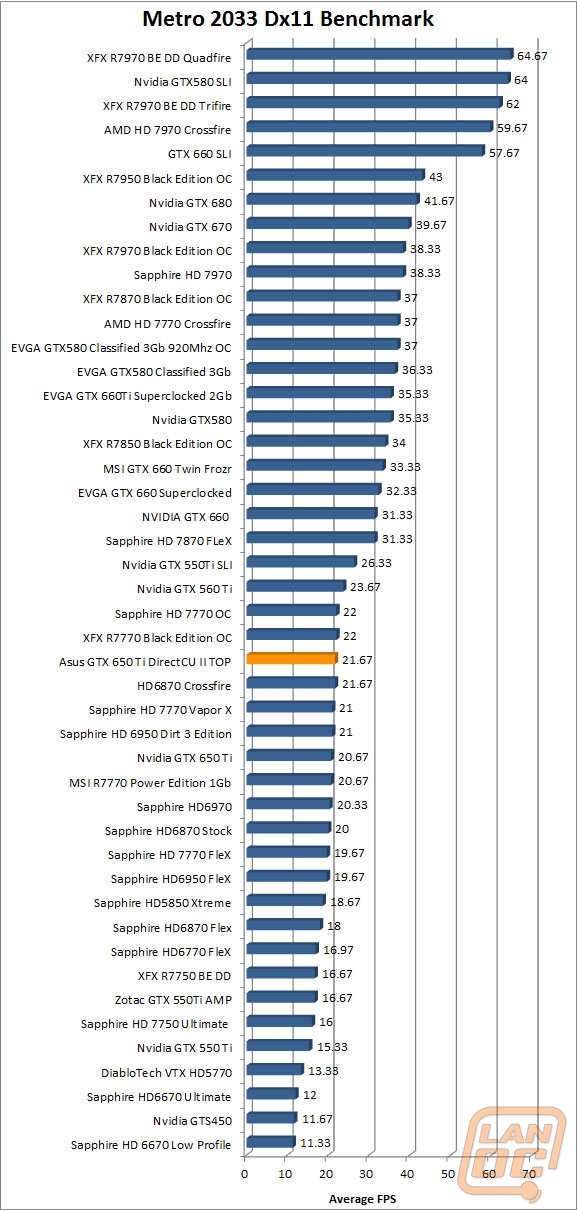
Metro 2033 DX11 (built-in benchmark, 1920 x 1080; DirectX: DirectX 11; Quality: Very High; Antialiasing: MSAA 4X; Texture filtering: AF 4X; Advanced PhysX: Enabled; Tessellation: Enabled; DOF: Disabled)
Metro 2033 DX10 (built-in benchmark, 1920 x 1080; DirectX: DirectX 10; Quality: Very High; Antialiasing: MSAA 4X; Texture filtering: AF 4X; Advanced PhysX: Enabled; Tessellation: Enabled; DOF: Disabled)
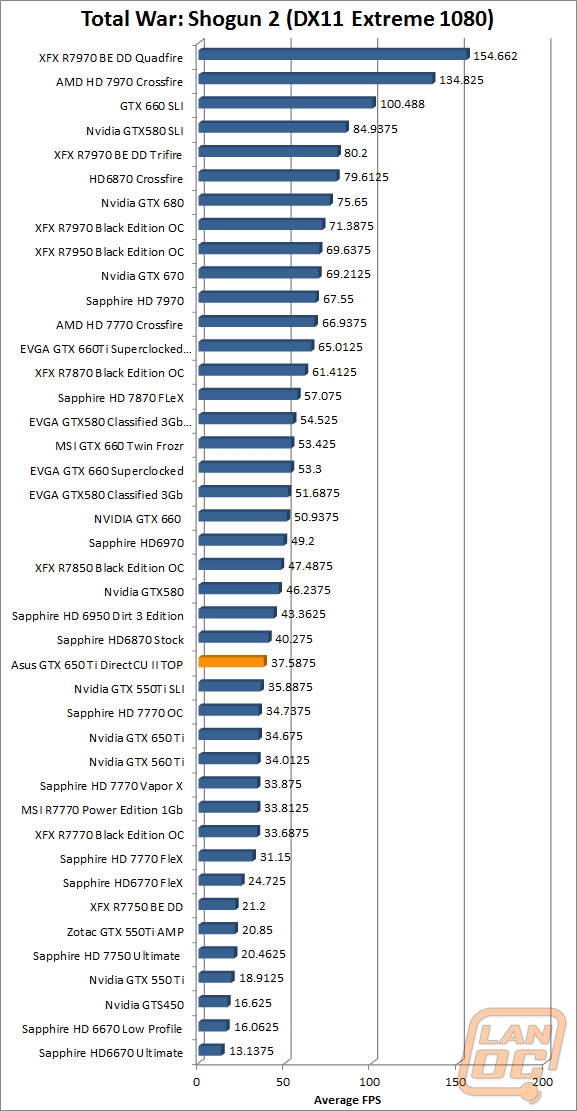
Total War: Shogun 2 Direct X11 Benchmark High setting
Crysis 2 Using Adrenaline Crysis 2 benchmark two runs. The first set of runs set to ultra-settings, 1080p, 4x Anti-Aliasing, DX11, Laplace Edge Detection Edge AA, on the Times Square map, with hi res textures turned on. The second benchmark set to Xtreme at 1080p, no AA, DX9, Edge Blur, Hi-Res Textures turned off on the Times Square Map.
Battlefield 3 Using Fraps with the game set to Ultra settings with 4x MSAA Antialiasing Deferred, 16X Anisotropic Filter, at 1920x1080.
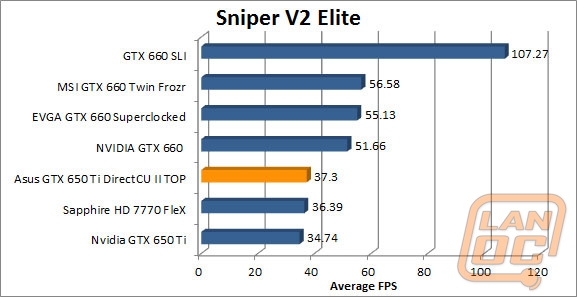
Sniper V2 Elite 1920 x 1080 resolution, graphics detail set to ultra
Dirt Showdown 1920 x 1080 resolution, 4x MSAA multisampling, vsync off, Shadows: ultra; Post Process: High; Night Lighting: High; Vehicle Reflections: Ultra; Ambient Occlusion: Ultra; Water: high; Objects: Ultra; Trees: Ultra; Crowd: Ultra; Ground Cover: High.
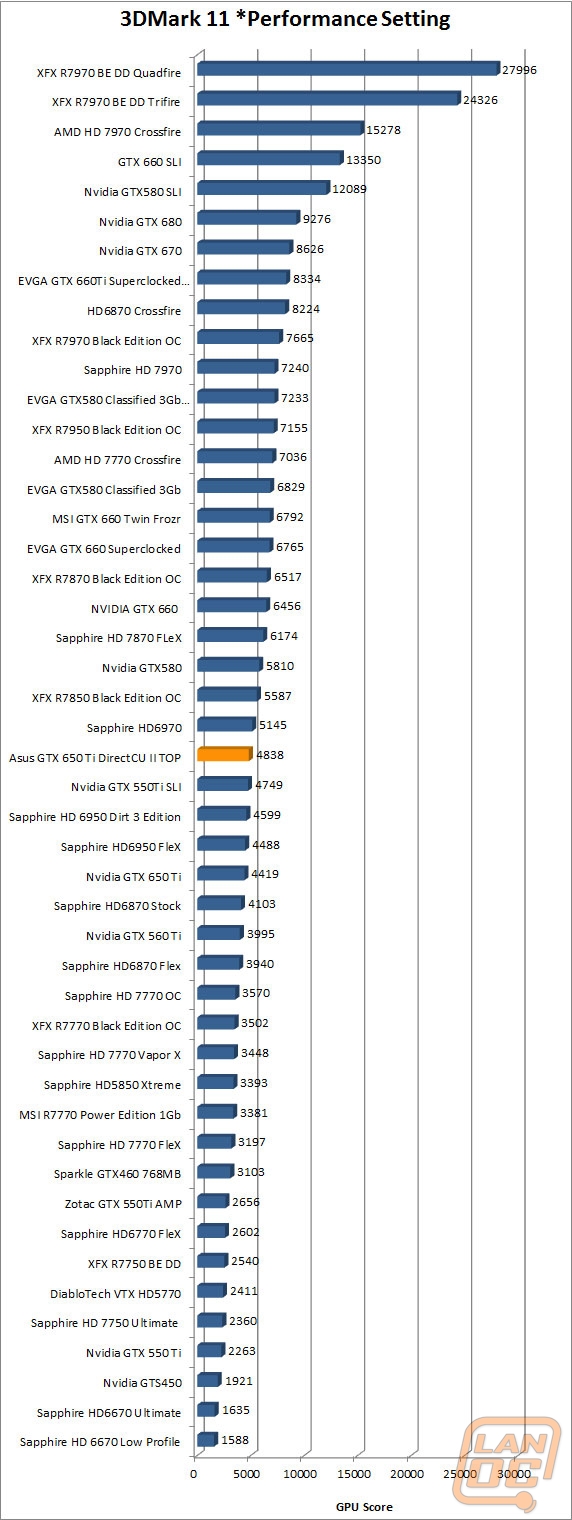
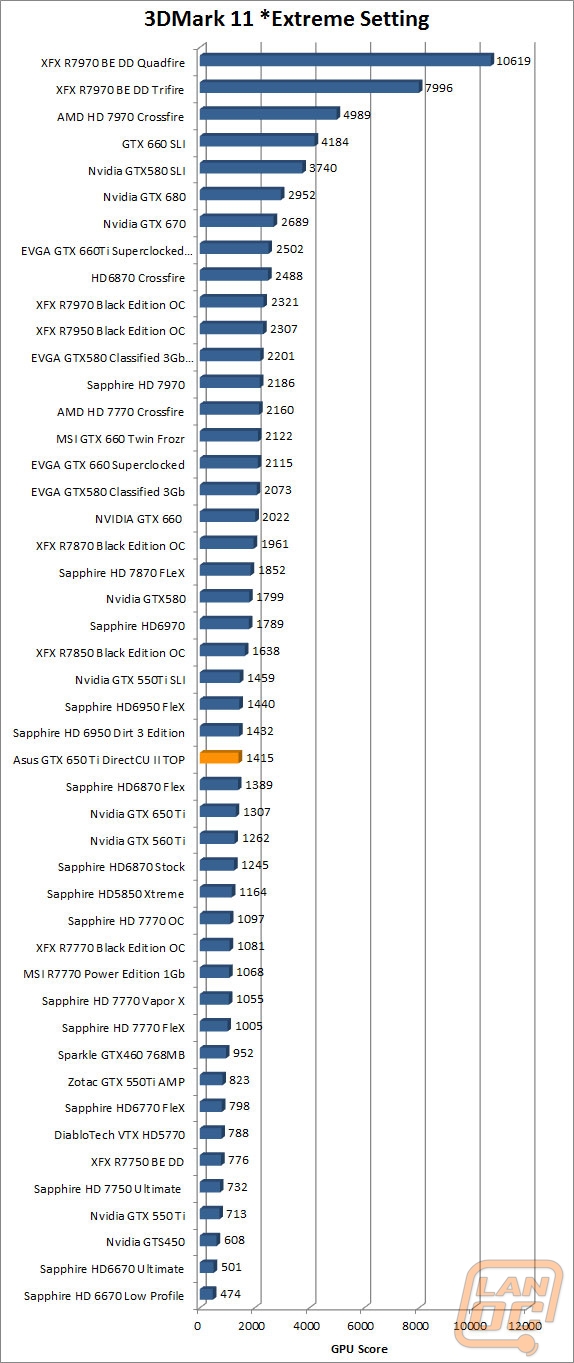
Synthetic Benchmarks For video cards our synthetic benchmarks are limited to 3DMark Vantage and 3DMark Vantage 2011. 3DMark Vantage is run with PPU turned off with results from both the performance and high settings. In 3DMark Vantage 2011 we run both performance and extreme benchmarks
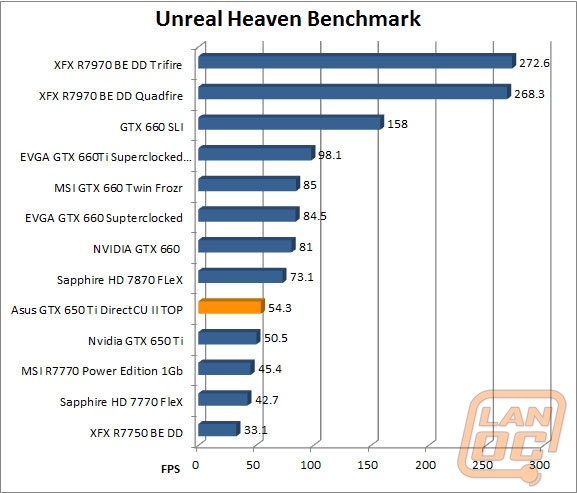
Unreal Heaven Benchmark DX11 (API: DirectX11; Tessellation: Disabled; Shaders: High; Anisotropy: Off; Stereo 3D: Disabled; Multi Monitor: Unchecked; Anti-aliasing: 8x; Full Screen: Checked; Resolution: 1920 x 1080)
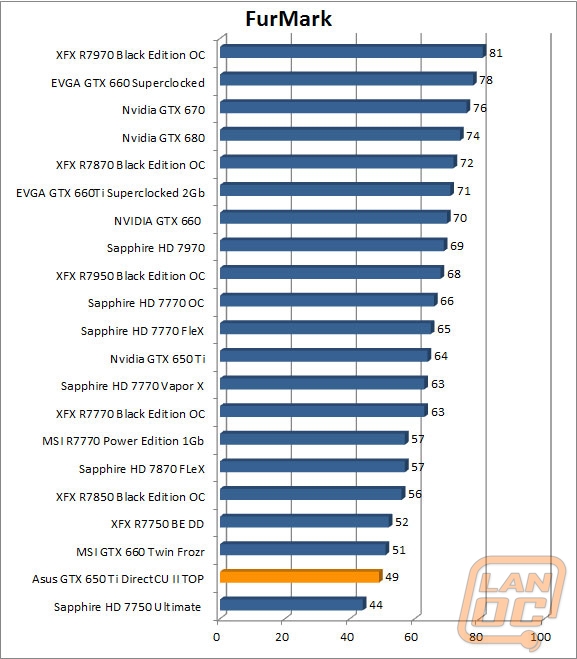
FurMark We use Furmark to push the video card to the limit and test its cooling performance. Keep in mind that FurMark pushes cards well beyond what they would ever do in game. Our tests are done using the built in 1080p benchmark. All testing is done with a room temperature of 70 degrees.
Cooling and Noise
Our experience with the reference GTX 650 Ti put the cards temperatures, after running through Furmark, right in the middle of all of our HD 7770’s. With the Asus card having what can only be described as extreme cooling with their DirectCU II being almost twice the length of the reference card, I was expecting good performance and I wasn’t disappointed. With a tempature of 49 degree’s, this is the second coolest card we have tested, only to the much lower TDP of the HD 7750. Asus focused on the cooling and it shows in its performance.
As for noise, two fans do make more noise than one fan. Idle noise was a bit higher than the reference card, but still what most would consider silent when placed in an enclosed case. During testing, the noise level never went up, the DirectCU II cooling kept things so cool that turning up the fan speed was never needed.
3DMark
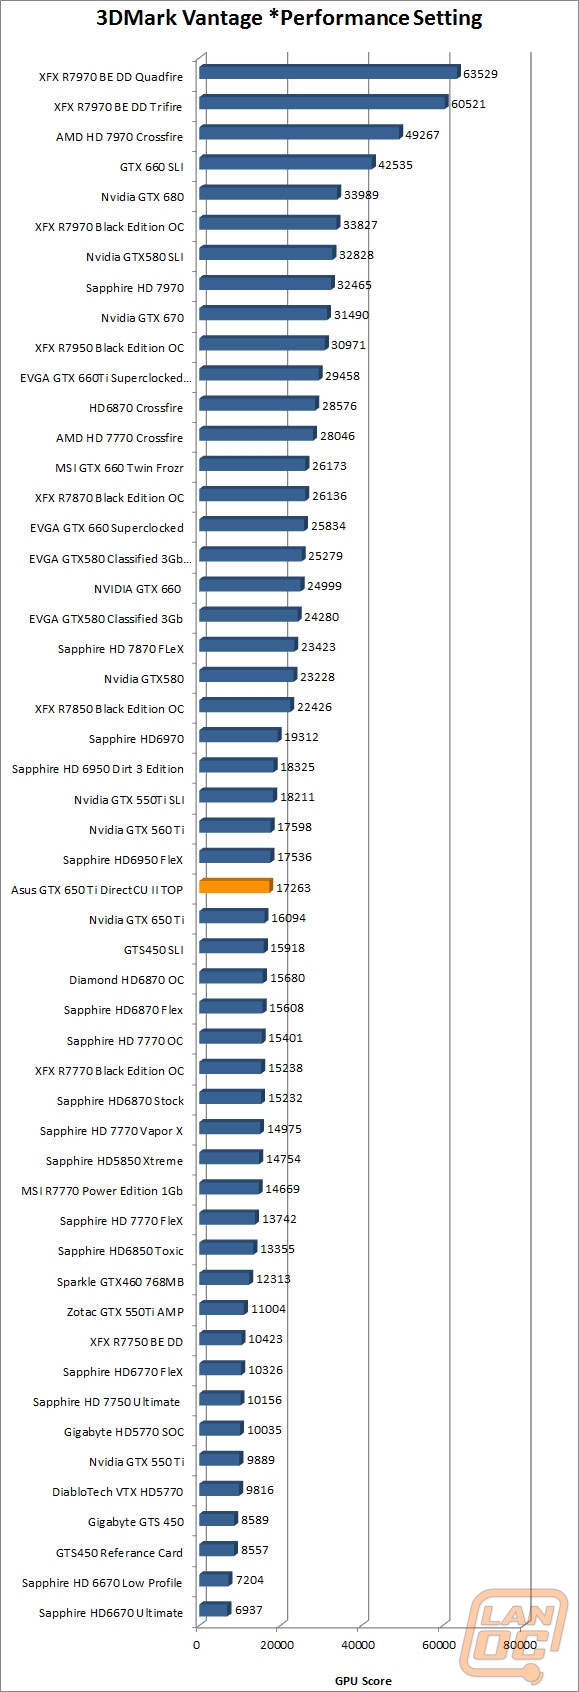
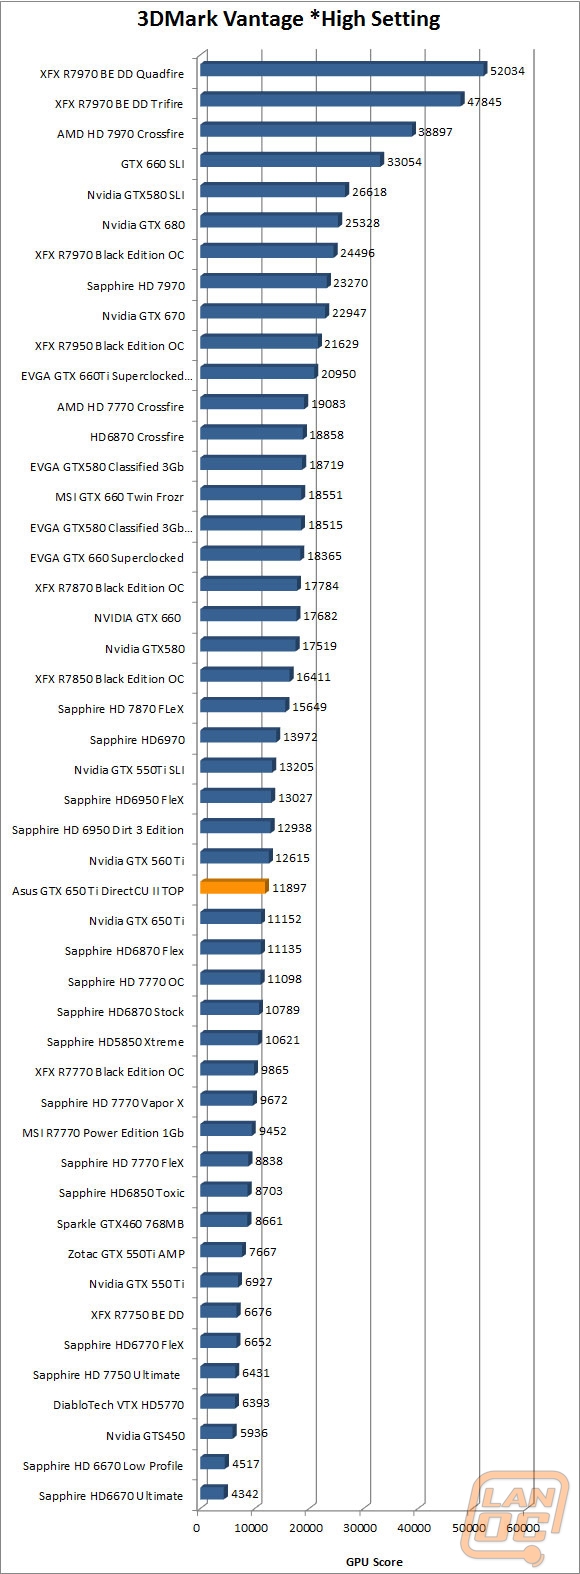
With the Asus GTX 650 Ti DirectCU II TOP having a nice overclock over the reference card, we were excited to see what kind of improvement over the reference card we would see. When it comes to 3DMark Vantage and 3DMark 11 tests we were surprised at the bump in numbers considering how small the difference between stock and overclocked models can sometimes be. For example in 3DMark Vantage Performance test we saw 17263 over the reference cards 16094, that’s a nice improvement! The extra performance bumped the card up even closer to the HD 6950 results for example.
In Game Performance
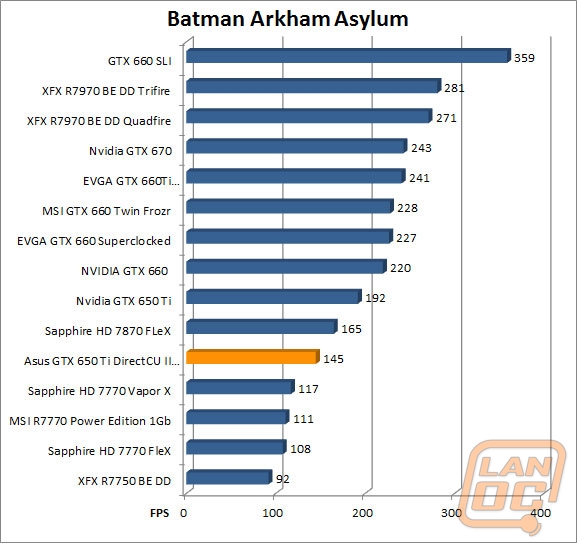
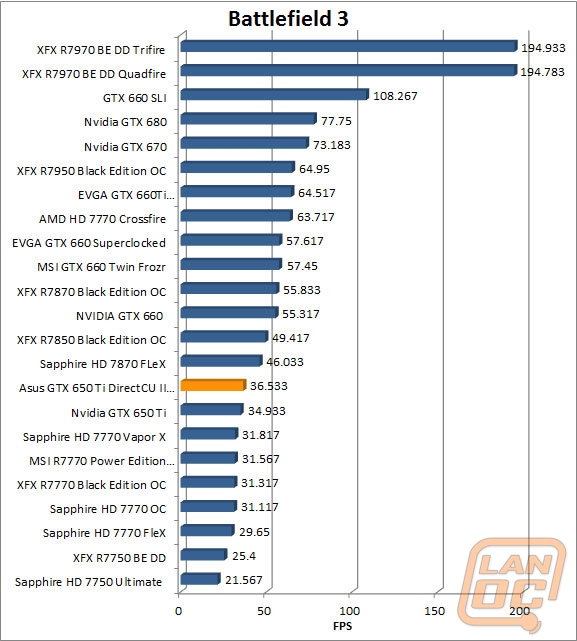
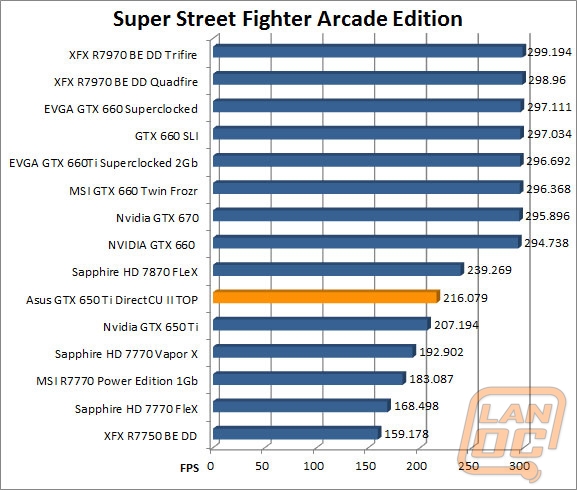
For in game performance we have broken down the FPS that we have gotten from each game testing into a list showing over 60 FPS, over 30 FPS, and under 30 FPS. This will give you an idea of how well you can expect the games to play on the Asus GTX 650 Ti DirectCU II Top. For most, anything over 30 FPS will be perfectly fine, some people do find anything less than 60 FPS to be a little off. For those people you will have to adjust the settings down slightly from high settings for anything in the Over 30 FPS section. To see exactly how they tested look further down, you can compare between cards there.
Smooth (over 60 FPS)
Batman Arkham Asylum
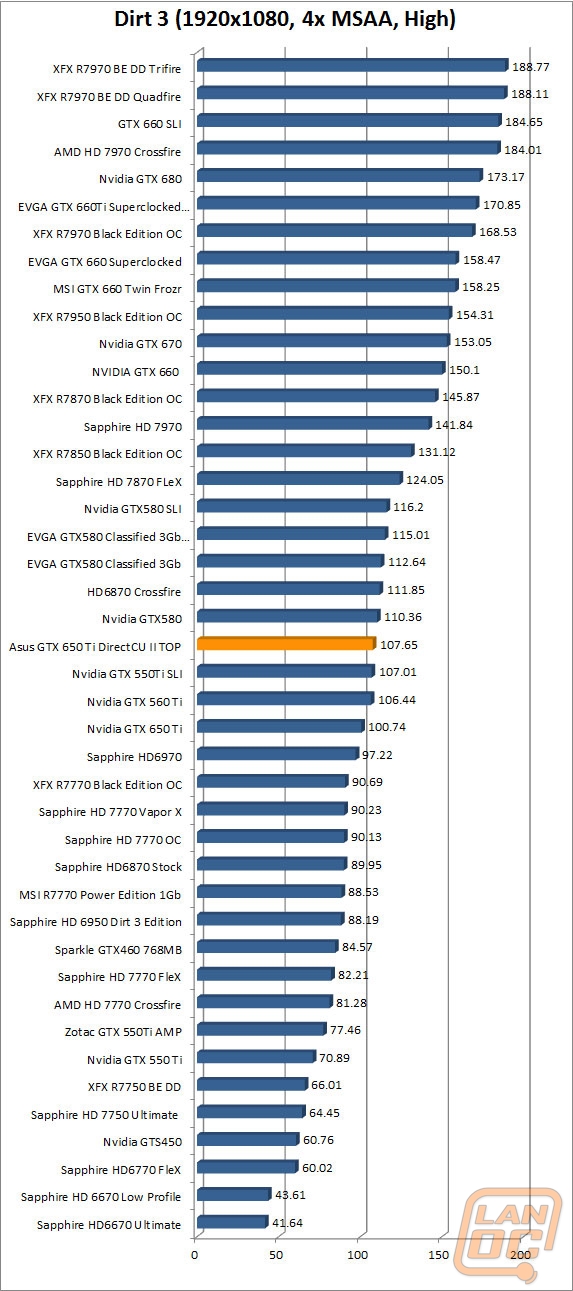
Dirt 3
Super Street Fighter Arcade Edition
Playable (over 30 FPS)
Battlefield 3
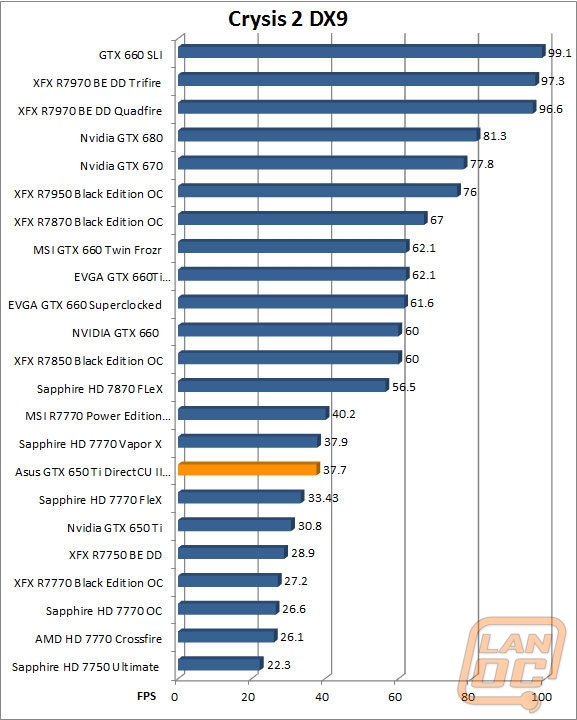
Crysis 2 DX9
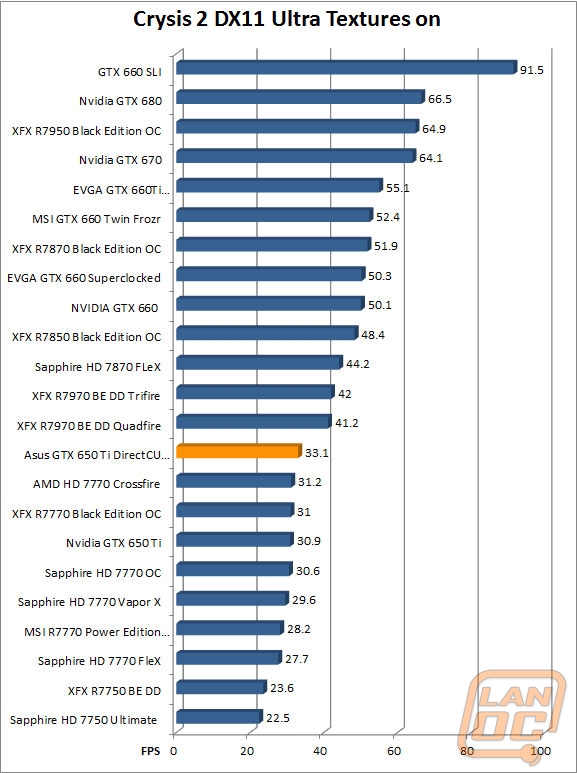
Crysis 2 DX11
Dirt Showdown
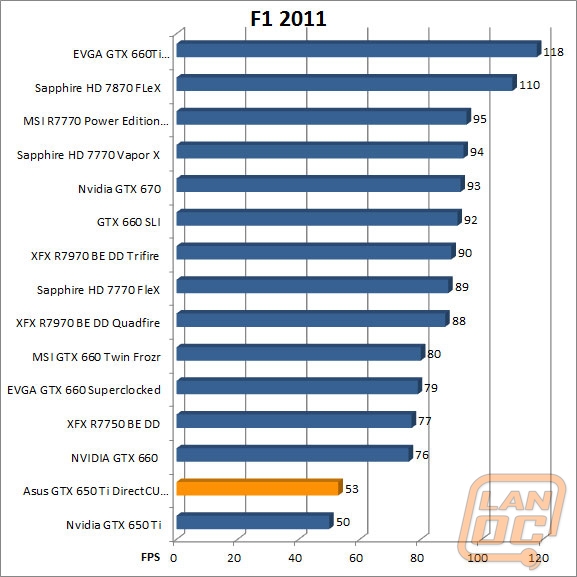
F1 2011
Total War: Shogun 2
Sniper V2 Elite
Unreal Heaven Benchmark
Rough (under 30 FPS)
Metro 2033 DX10
Metro 2033 DX11
As you can see above, the overclocked card doesn’t change the rankings in our playable scale from the reference card. What they did manage to do is inch some of the results even closer. For example Dirt Showdown and F1 2011 both moved up three FPS from 50 and 51 FPS putting them at 53 and 54 FPS, very close to the ideal 60 FPS that we shoot for.

Overclocking/Software
Our past experiences with Asus software have been great. Their software on motherboard specifically are well thought out and packed full of useful features. When I saw that Asus bundled software with the GTX 650 Ti, I was excited to see what they had to offer.
Starting with the installation, the software had an interesting look as well as the black and red Asus style.
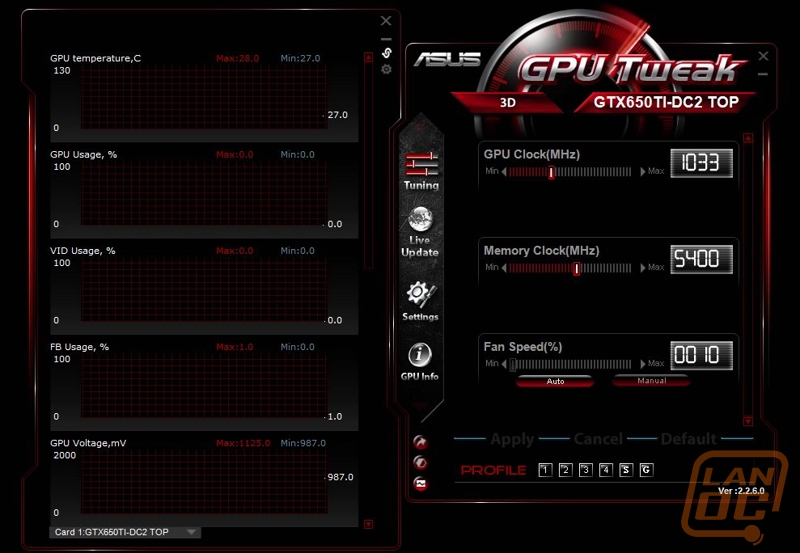
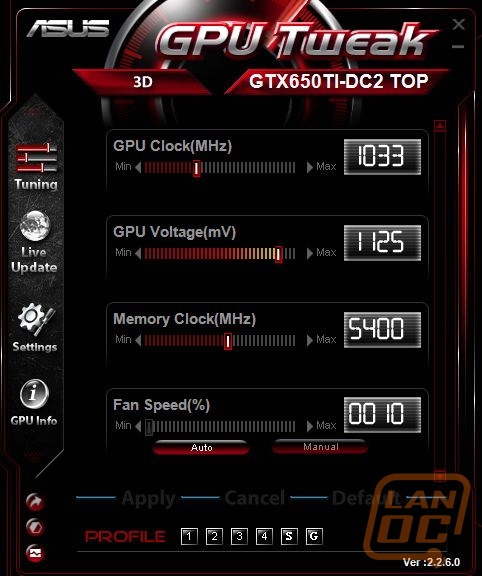
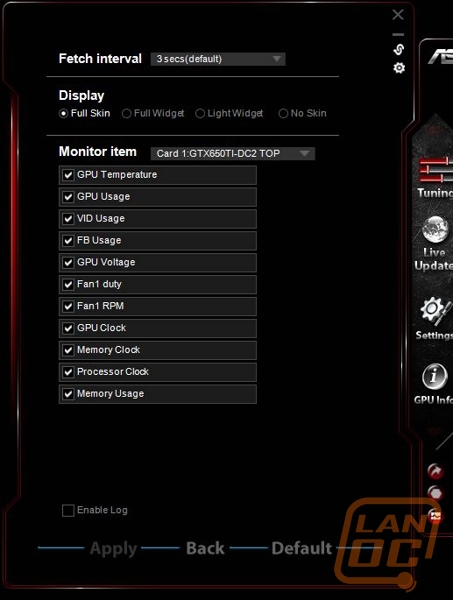
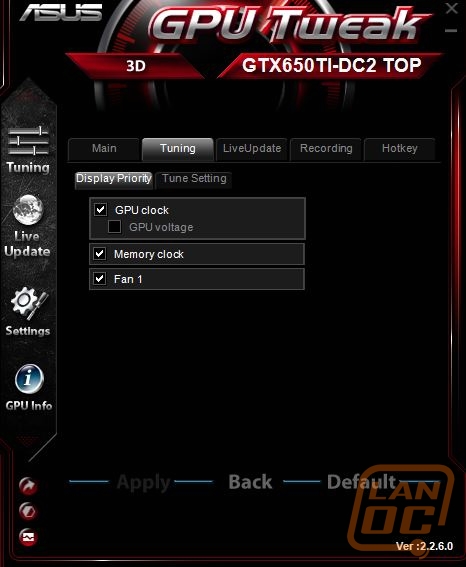
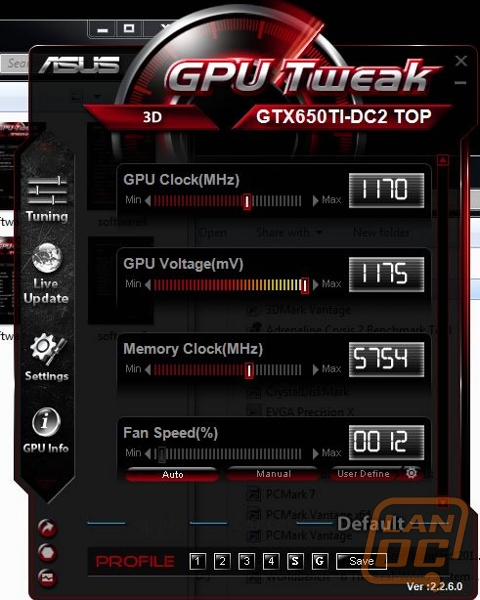
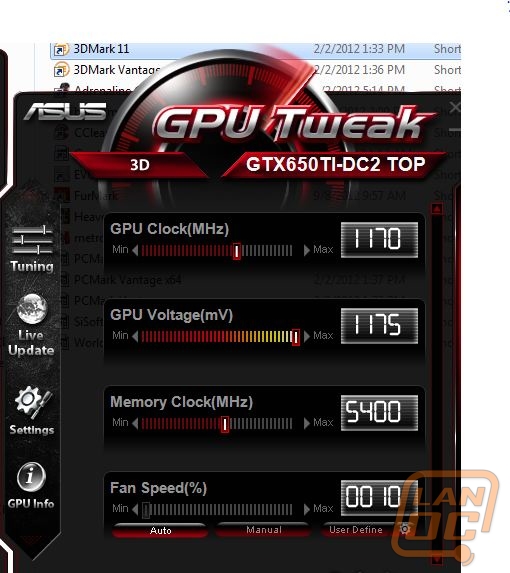
Asus’s GPU Tweak software is compact and has everything you need right out in the open. You have GPU Clock, Memory Cloc, and Fan speed adjustments right on the home page in the normal mode. After poking in the settings I was also able to turn on a fourth adjustment slider for voltage as well. On the left side you have five on the fly graphs that track the GPU temperatures, Usage, VIDO Usage, FB, Usage, and GPU Voltage and more. You can adjust the fetch interval in the settings as well as turn off options you don’t want to monitor.
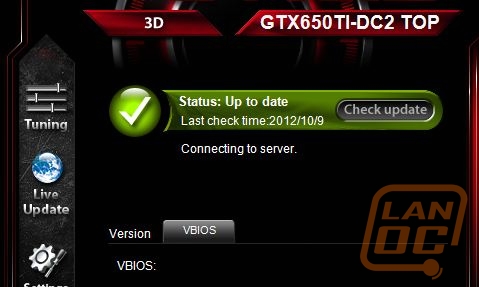
Asus packed in a live update option that you can check to make sure the software and your VBios are up to date.
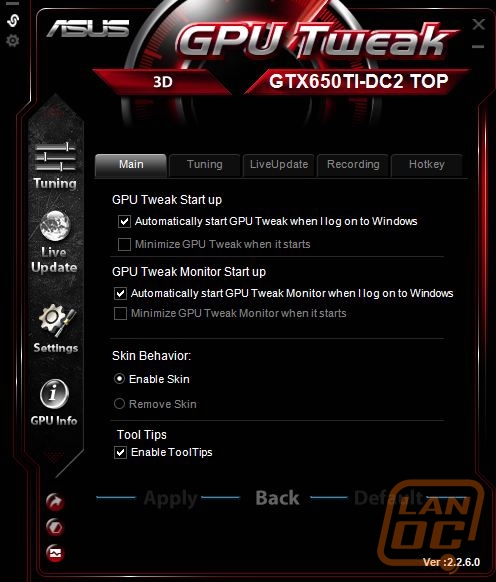
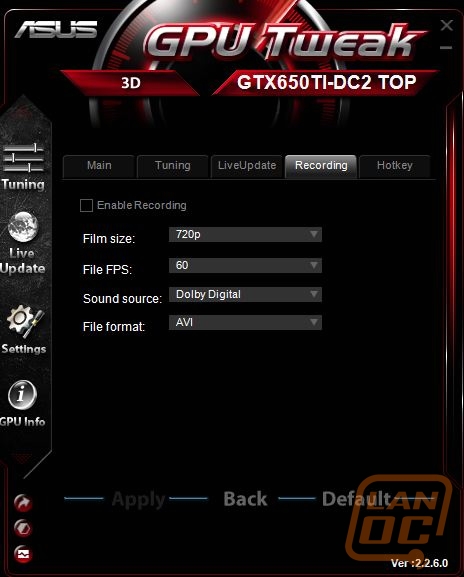
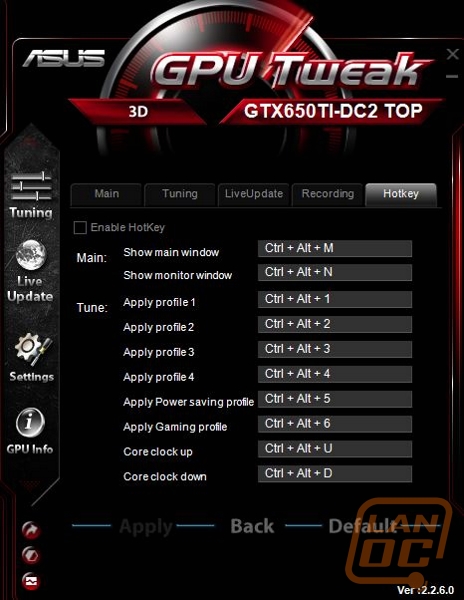
The Settings tab has 5 tabs of its own to let you adjust the GPU Tweak software to your liking. I love that Asus lets you adjust your hotkeys as needed. This is especially important when paired with the recording tab. The GPU Tweak software has bundled in the ability to record while gaming. In the options you can check the resolution, FPS, sound options, and file format.
The last part of the software is the built in GPUz. Most of you have seen GPUz or at least CPUz. This variation loads with the GPU Tweak and has a theme matching the software.
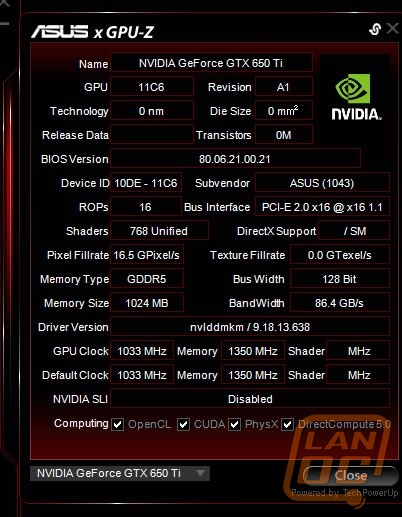
After getting acquainted with the software, I jumped into overclocking the already factory overclocked Asus GX 650 Ti DirectCU TOP. Starting with the GPU clock, we cranked the GPU Voltage up just a small amount to the highest setting that Asus will let you go. From there we bumped the GPU clock up over and over again until it wouldn’t make a pass through 3DMark 11. The end result was 1170MHz, up over the 1033MHz the card came with. Next I went through the same process with the Memory clock to push it to its limit. I was able to move it from 5400 to 5754 total. At the end of the day, it was a nice overclock for a factory overclocked card.
Overall and Final Verdict
With the Asus GTX 650 Ti DirectCU II TOP, Asus went over the top to make sure that our experience was nothing like the factory reference card. Starting with its DirectCU II cooling, not only did it look amazing, but it ended up being one of the coolest running cards we have ever tested. Of course, the downside to that was the size of the heatsink. We went from the cute 5 inch long GTX 650 Ti reference card to over 11 inches with this card. It should still fit in just about any case, but it’s still crazy to see the two cards next to each other.
Much like the reference card, there isn’t support for SLI. But you are getting Asus’s amazing software. With the software we were able to inch out a nice overclock over the already overclocked card, something we can’t always do on other factory overclocked cards.
When you put it all together, we have an amazing package. Asus pushes the GTX 650 Ti over the edge with their software and DirectCU II technology. Being a factory overclocked card and a no- reference design you do pay a premium for it, the card as tested runs $179 and is a little pricy. When considering everything Asus went through to improve on the reference design, the additional cost is understandable. This does mean that this isn’t as good of a value as a reference card, but if I had to pick between the cute reference card and the Asus DirectCU II TOP model with their great software, I would go with the Asus card every time.


