 A longtime proponent of e-sports, I’m thrilled to see the mass number of viewers live streamed tournaments are bringing in. Even more promising are the views individual gamers are managing to attract, streaming their favorite games, charities, or scrimmages with professional teams. We’ve have a handful of LanOC members that stream their gameplay, and if you’d like to join them, here’s how.
Written by: Adam
The options available to you as a streamer are intimidatingly numerous. Not only do you have several services to choose from, but you also have just as many broadcast applications. For this article, we will focus on streaming to Twitch.tv, as the majority of LanOC members currently use this service. I’m not going to open a debate between the stream providers, but there is plenty out there to read. Do your research, consider your ambition, and choose whichever service is right for you. Even if you decide to switch in the future, the majority of the configuration we’ll do will remain the same within the application.
The broadcast software we’ll be using for this guide is Open Broadcaster Software. It’s a good piece of software that is fairly easy to set-up and understand, plus it is free.
1. Click here to download the Open Broadcaster Software.

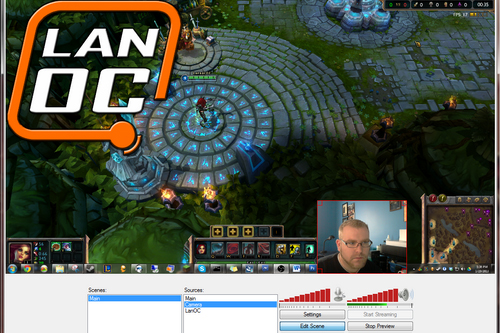
Once installed, run the program and take a moment to check out what’s on this main window. Scenes, sources, stream start and stop, preview, etc. will all be configured and controlled from here.
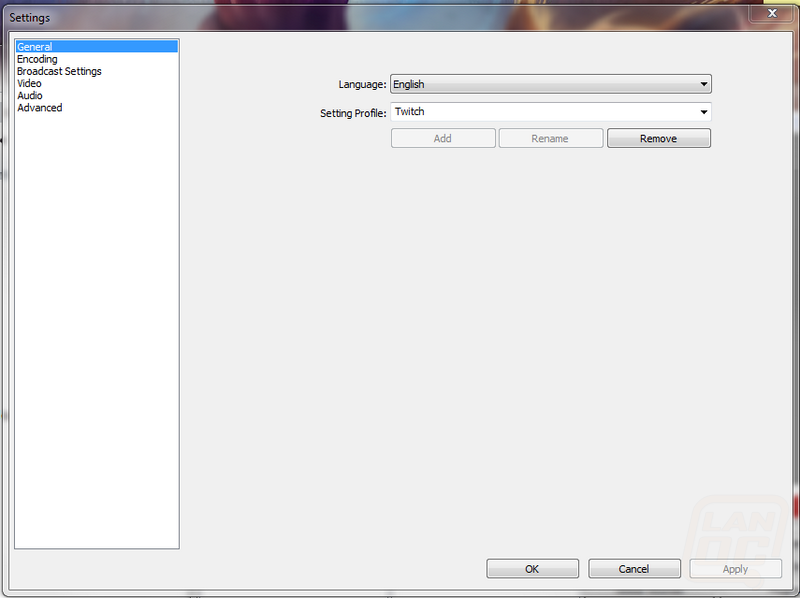
Click on the Settings button. In the Settings window, we’ll setup a profile, set our audio and video encoding, tell OBS where to stream, and set our resolutions and audio source. These categories are selected from the pool to the left. Starting with General, you’ll choose your language and create a Profile. Changes that you make from this point forward will save to that profile, so you can create several and switch between them.
2. Set desired language and create an appropriate Profile.
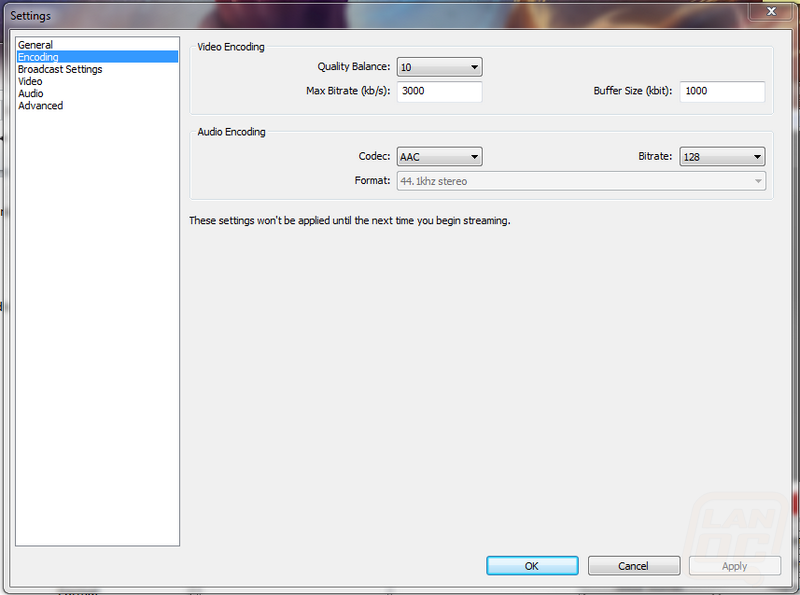
Let’s move on to Encoding, which is split between Video and Audio. Here you can customize bitrates and buffer size, so you need to decide what resolution you plan on streaming at. You can use a calculator, such as this one, to calculate the suggested maximum bitrate. Just plug in your resolution and frame rate and hit Go. Now, keep in mind that your Internet bandwidth is going to be a major player in what resolution you can stream at. You may need to scale back if you just don’t have the speed necessary. This is easy to change if you get to the end and test to find it too laggy.
3. Set Bitrate and Buffer Size depending on your computer and bandwidth available.
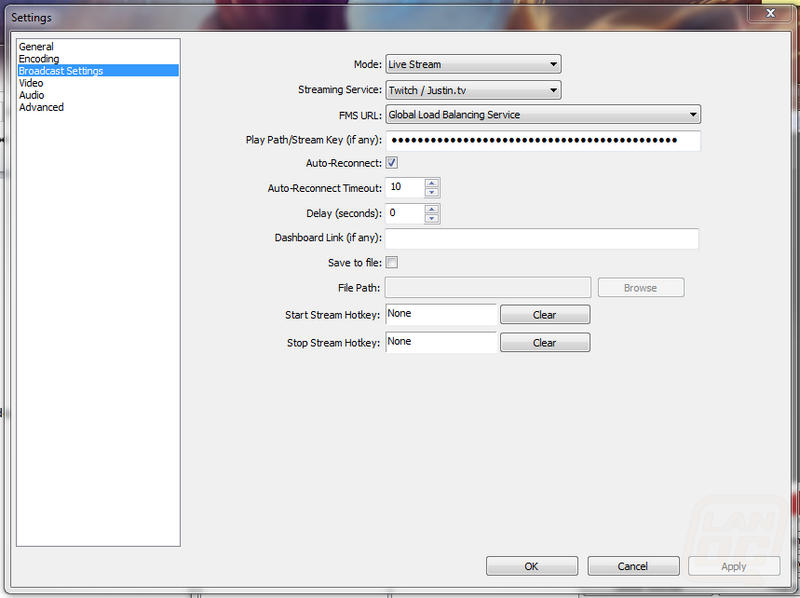
The next section, Broadcast Settings, tells OBS where to stream. You also have the option of an offline, local recording instead of a live stream. Use the Mode drop down to switch between these. If you don’t already have a Twitch account, create one now. You’ll need your unique Stream Key to enter into OBS, and beware: this key should be kept private! Anyone who has it can stream to your account, so keep it safe.
4. Click here to obtain your Stream Key from Twitch.
Now we’re ready to enter the information into OBS. Choose Twitch / Justin.tv as the Streaming Service, and enter the Stream Key you obtained in step four. You can also check the box to keep a local recording, and bind a hotkey to start and stop the stream if desired.
5. Choose Twitch as Steaming Service and enter Stream Key.
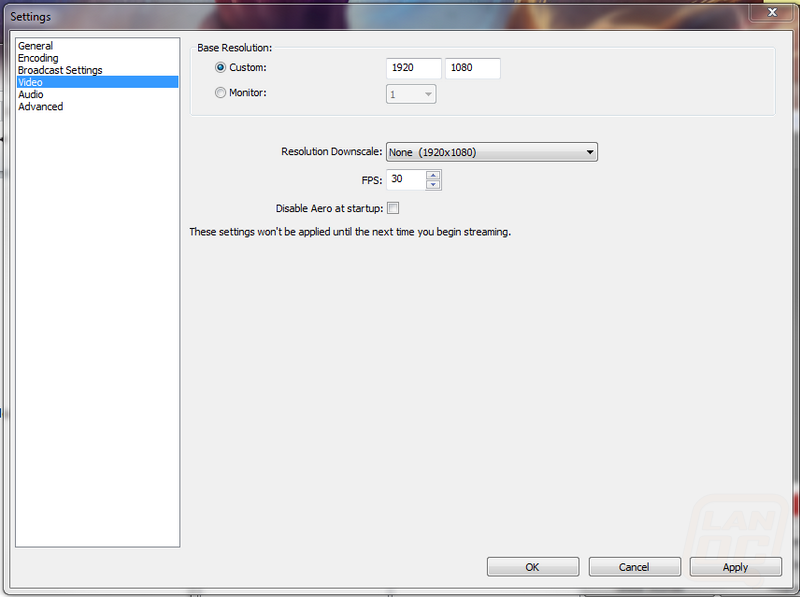
The Video setting will allow you to choose the resolution you want to stream at. Remember, the resolution you stream with will depend heavily on your Max Bitrate and Buffer Size you set in step four, and therefore on your Internet bandwidth.
6. Set the desired streaming resolution.
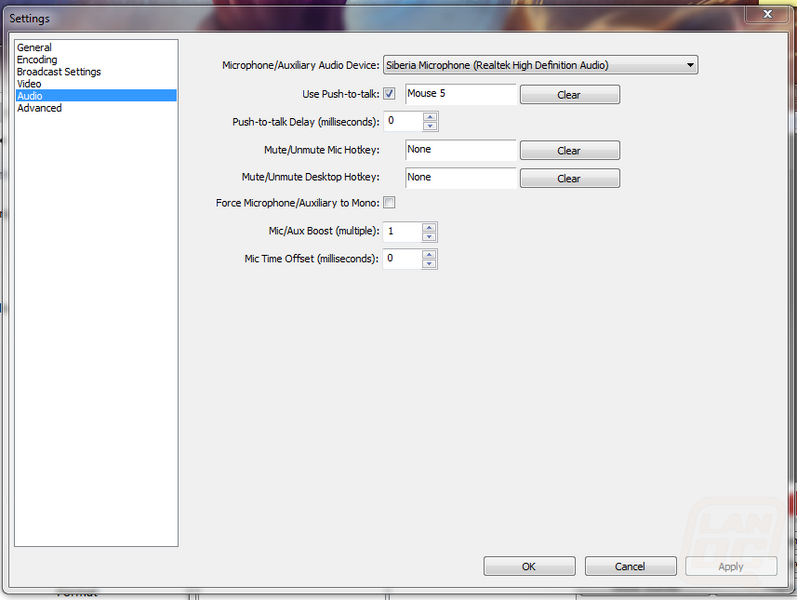
Audio will let you configure your input device. There are quite a few features here including some you don’t see even in paid broadcasting software. A nice option is the push-to-talk, allowing you to assign a key press for voice transmission over the stream.
7. Choose a connect microphone and set up push-to-talk/delays/boosts as desired.
Advanced provides in depth option that are beyond the scope of this article. It’s safe to leave them defaulted but take a look to see what is available if you need them in the future.
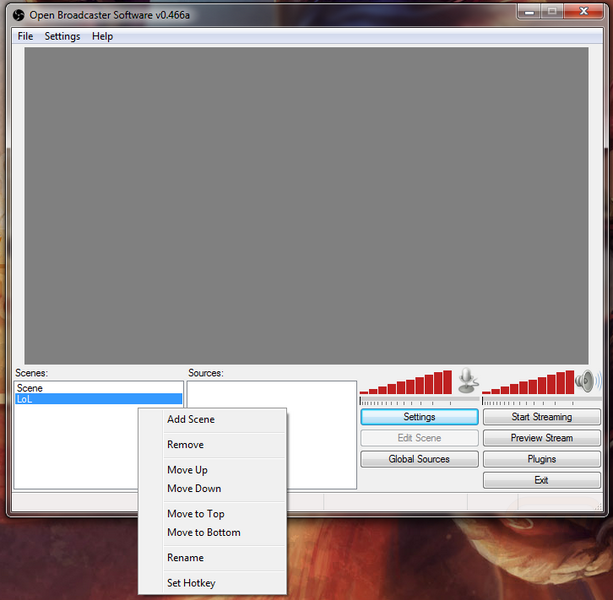
Now we’re ready to Stream, and if you hit the Start Streaming button you’d be live, though we’re yet to tell OBS what we want to stream. Notice the Scenes and Sources box on the left half of the OBS main screen. You may already have a default scene setup, you can either adjust it or delete and make a new one. Essentially, you’ll create a scene for a general purpose (like live streaming a certain game) and then assign sources to that scene (the actual gameplay, a webcam feed, music display, and so on).
8. Right click in the Scenes box and choose Add Scene. Name the scene something appropriate.

Again, we’ll use the Sources box to populate our ‘scene’. A preview of that scene represented by the grey box in the OBS software; indeed, if you pressed the Preview Stream button, it will still be empty, since we haven’t added any sources into our scene yet. Right click the Sources box, and take a observe the different options available.
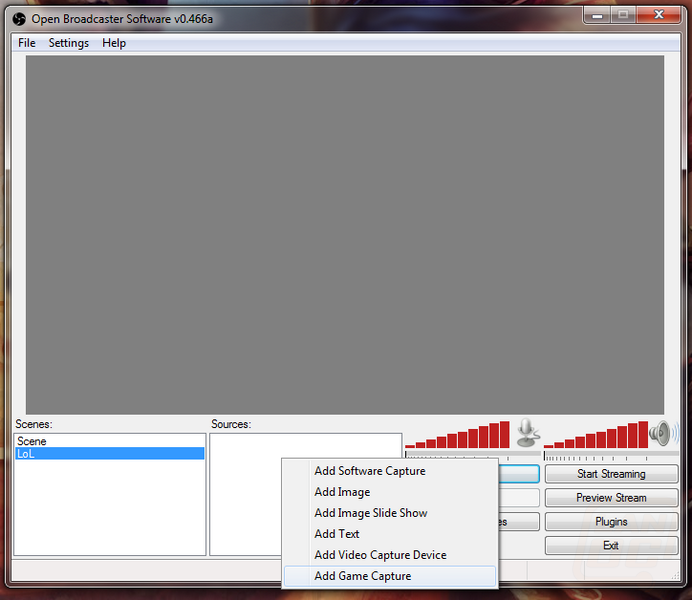
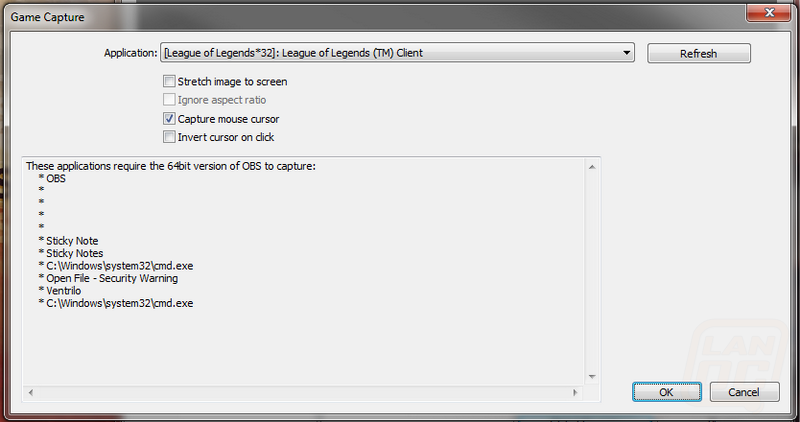
The main source, your game, can be added two ways. You’ll notice both an Add Software Capture and an Add Game Capture option. Using the latter, you can actually choose a running process to Stream independently. If you had Black Ops running, for example, it would be listed in the drop down and only the process Black Ops would be broadcast.
This is a nice feature to prevent broadcasting anything else accidently, but doesn’t work very well for some games. A popular example is League of Legends. Technically, it’s a pain to set the Add Game Capture option for League because the ‘launcher’ and the game itself are two different processes. In practice, you would need to switch between the two so your viewers could see things like pick and bans instead of potentially looking at a blank screen waiting for your next match to assemble and launch.
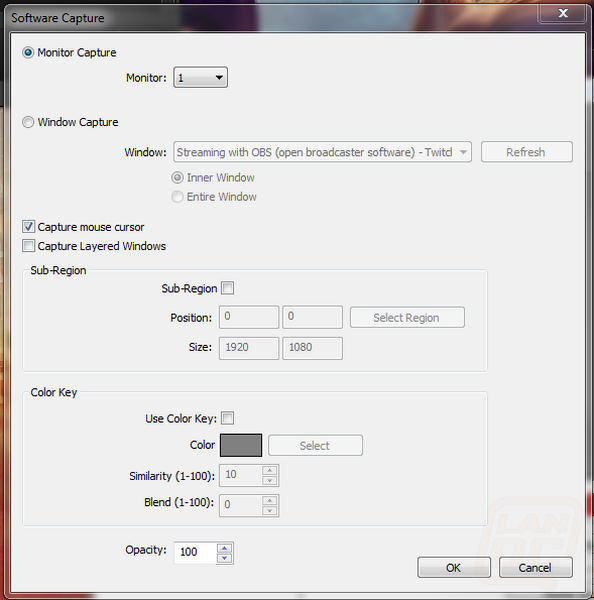
Instead, you can choose an entire monitor as the stream source, so whatever is on displayed on the selected monitor will be streamed. This can be found using the Add Software Capture option. This is generally what you see on professional streams, especially League of Legends. Keep in mind that some games, such a League, stream better when in Windowed mode. Fortunately this is recognized in League of Legends and a “borderless” mode is available that is windowed by appears full screen. Though it’s beyond the scope of this article, you can use a third party application like ShiftWindow to play windowed games at your native resolution.
9. Choose a method for your game source. I recommend Add Software Capture, then selecting the monitor you’ll be playing the game on. This will broadcast everything display on that monitor.
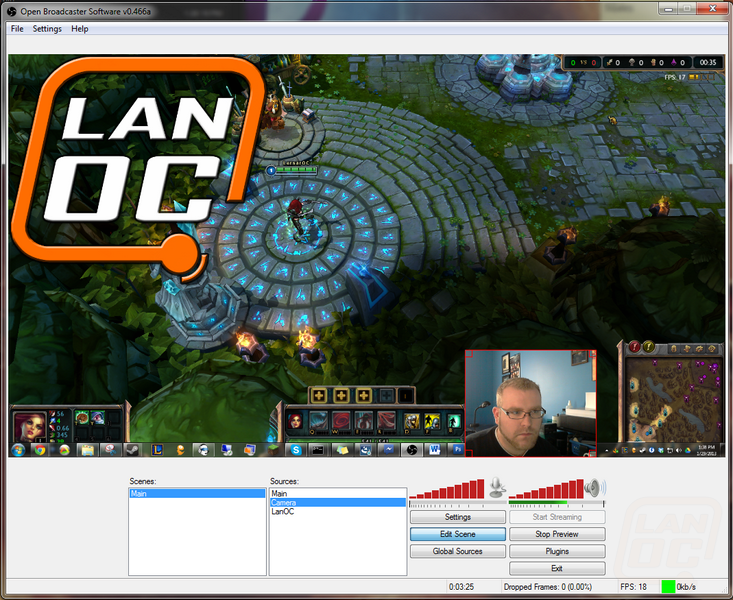
In addition to the game source, you can add other media, such as a webcam of you playing or perhaps a LanOC logo. Right click again in the Sources box and note options like Add Image, Add Text, and Add Video Capture Device. Adding an image, for example, will probably input it in a default location and size; click Preview Stream, and you should see your main monitor (if you chose this method in step nine) and potentially a very large image/text/video of yourself. To the left of the Preview Stream button there is an Edit Scene button. Give that a click, and then highlight the source you want to move/resize. You should a red border appear around it; drag the corners to resize and position as desired. If the main monitor source you selected in step nine is bigger than the preview screen, right click on that source and select Fit to Screen.
Also note that the order the sources are listed in is important. Each source will act as a layer, and the source nearest the bottom is considered ‘on top’, while the first scene listed will be ‘on bottom’, or your ‘background’. In most cases this will be your game/monitor source. Sources will overlap one another depending on their position. For example, if your sources are listed as ‘Main’ and ‘Camera’, the camera will overlap whatever position you drag it to on the main screen. If they were listed as ‘Camera’ and ‘Main’, though your camera feed would be there, if wouldn’t be visible because it would be underneath the main monitor feed. To adjust these positions, right click on the source item to find options to Move Up, Move Down, Move to Top, or Move to Bottom.
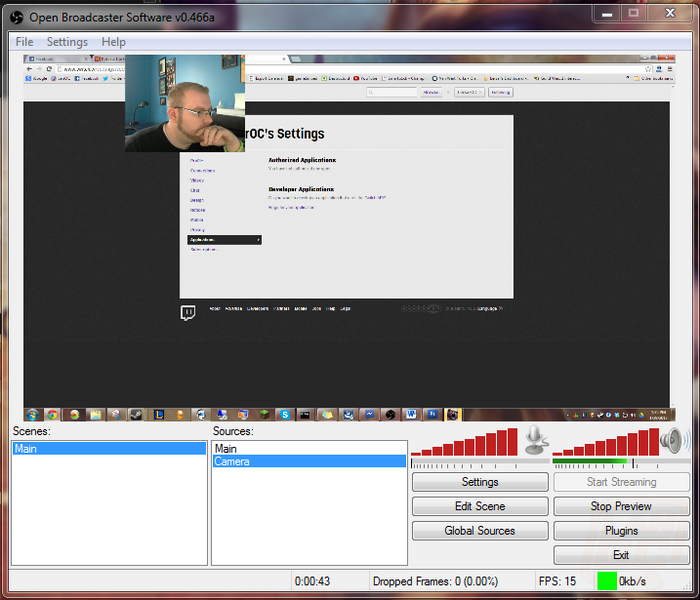
10. Add any desired additional Sources and resize/position them as desired by clicking Edit Scene. Click Edit Scene again to lock the sources into position.
Once your Stream Preview looks like what you want to stream, you’re ready to go live. Stop Preview and then Start Streaming, and you should be online. It may be a good idea to visit your Twitch channel and make sure everything looks good. If you have any questions, please feel free to visit our forums. Likewise, post your channel here so we can follow you!