It seems nearly every motherboard manufacturer took the chance to change things up slightly when it came time for the Haswell launch. I didn’t have a chance to check out a board from Gigabyte at the launch but I did get one in recently, specifically their Z87X-UD4H. It’s not their highest end board, nor is it entry level. It should give us a good idea of what to expect from Gigabyte on the Z87 platform without breaking the bank. With its red styling, you can’t say it’s not a little eye catching, that’s for sure!
Product Name: Gigabyte Z87X-UD4H
Review Sample Provided by: Gigabyte
Written by: Wes
Pictures by: Wes
|
Specifications |
|
|
CPU |
Support for Intel® Core™ i7 processors/Intel® Core™ i5 processors/Intel® Core™ i3 processors/Intel® Pentium® processors/Intel® Celeron® processors in the LGA1150 package L3 cache varies with CPU |
|
Chipset |
Intel® Z87 Express Chipset |
|
Memory |
4 x 1.5V DDR3 DIMM sockets supporting up to 32 GB of system memory * Due to a Windows 32-bit operating system limitation, when more than 4 GB of physical memory is installed, the actual memory size displayed will be less than the size of the physical memory installed. Dual channel memory architecture Support for DDR3 3000(O.C.) / 2933(O.C.) / 2800(O.C.) / 2666(O.C.) / 2600(O.C.) / 2500(O.C.) / 2400(O.C.) / 2200(O.C.) / 2133(O.C.) / 2000(O.C.) / 1866(O.C.) / 1800(O.C.) / 1600 / 1333 MHz memory modules Support for non-ECC memory modules Support for Extreme Memory Profile (XMP) memory modules |
|
Onboard Graphics |
Integrated Graphics Processor: 1 x D-Sub port, supporting a maximum resolution of 1920x1200 1 x DVI-D port, supporting a maximum resolution of 1920x1200 * The DVI-D port does not support D-Sub connection by adapter. 1 x HDMI port, supporting a maximum resolution of 4096x2160 * Support for HDMI 1.4a version. 1 x DisplayPort, supporting a maximum resolution of 3840x2160 * Support for DisplayPort 1.2 version. Maximum shared memory of 1 GB |
|
Audio |
Realtek® ALC898 codec High Definition Audio 2/4/5.1/7.1-channel Support for S/PDIF In/Out |
|
LAN |
Intel® GbE LAN chip (10/100/1000 Mbit) |
|
Expansion Slots |
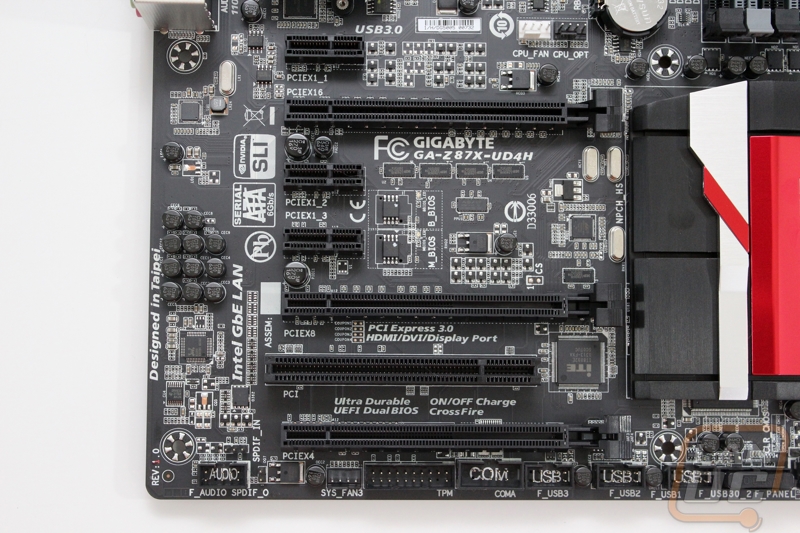
1 x PCI Express x16 slot, running at x16 (PCIEX16) * For optimum performance, if only one PCI Express graphics card is to be installed, be sure to install it in the PCIEX16 slot. 1 x PCI Express x16 slot, running at x8 (PCIEX8) (The PCIEX16 and PCIEX8 slots conform to PCI Express 3.0 standard.) * The PCIEX8 slot shares bandwidth with the PCIEX16 slot. When the PCIEX8 slot is populated, the PCIEX16 slot will operate at up to x8 mode. 1 x PCI Express x16 slot, running at x4 (PCIEX4) * The PCIEX4 slot shares bandwidth with the PCIEX1_2/3 slots. The PCIEX1_2/3 slots will become unavailable when a PCIe x4 expansion card is installed. * When installing a x8 or above card in the PCIEX4 slot, make sure to set PCIE Slot Configuration in BIOS Setup to x4. (Refer to Chapter 2, "BIOS Setup," "Peripherals," for more information.) 3 x PCI Express x1 slots (The PCIEX4 and PCI Express x1 slots conform to PCI Express 2.0 standard.) 1 x PCI slot |
|
Multi-Graphics Technology |
Support for 2-Way AMD CrossFire™/2-Way NVIDIA® SLI™ technology (PCIEX16 and PCIEX8) |
|
Storage Interface |
Chipset: 6 x SATA 6Gb/s connectors (SATA3 0~5) supporting up to 6 SATA 6Gb/s devices Support for RAID 0, RAID 1, RAID 5, and RAID 10 Marvell® 88SE9172 chip: 2 x SATA 6Gb/s connectors (GSATA3 6/7) or 2 eSATA 6Gb/s connectors on the back panel, supporting up to 2 SATA 6Gb/s devices * Use either the GSATA3 6, 7 connectors or the eSATA connectors at a time. Support for RAID 0 and RAID 1 |
|
USB |
Chipset: Up to 2 USB 3.0/2.0 ports (available through the internal USB header) Up to 6 USB 2.0/1.1 ports (available through the internal USB headers) Chipset + 2 Renesas® uPD720210 USB 3.0 Hubs: Up to 8 USB 3.0/2.0 ports (6 ports on the back panel, 2 ports available through the internal USB header) |
|
Internal I/O Connectors |
1 x 24-pin ATX main power connector 1 x 8-pin ATX 12V power connector 1 x PCIe power connector 8 x SATA 6Gb/s connectors 1 x CPU fan header 1 x water cooling fan header (CPU_OPT) 4 x system fan headers 1 x front panel header 1 x front panel audio header 1 x S/PDIF In header 1 x S/PDIF Out header 2 x USB 3.0/2.0 headers 3 x USB 2.0/1.1 headers 1 x serial port header 1 x Clear CMOS jumper 1 x Trusted Platform Module (TPM) header 1 x power button 1 x reset button 1 x Clear CMOS button Voltage measurement points 2 x BIOS switches |
|
Back Panel Connectors |
1 x PS/2 keyboard/mouse port 1 x D-Sub port 1 x DVI-D port 1 x HDMI port 1 x DisplayPort 1 x optical S/PDIF Out connector 6 x USB 3.0/2.0 ports 2 x eSATA 6Gb/s connectors 1 x RJ-45 port 6 x audio jacks (Center/Subwoofer Speaker Out/Rear Speaker Out/Side Speaker Out/Line In/Line Out/Microphone) |
|
I/O Controller |
iTE® I/O Controller Chip |
|
H/W Monitoring |
System voltage detection CPU/Chipset/System temperature detection CPU/CPU OPT/System fan speed detection CPU/System overheating warning CPU/CPU OPT/System fan fail warning CPU/CPU OPT/System fan speed control * Whether the fan speed control function is supported will depend on the cooler you install. |
|
BIOS |
2 x 128 Mbit flash Use of licensed AMI EFI BIOS Support for DualBIOS™ PnP 1.0a, DMI 2.0, SM BIOS 2.6, ACPI 2.0a |
|
Unique Features |
Support for Q-Flash Support for Xpress Install Support for APP Center @BIOS EasyTune EZ Setup ON/OFF Charge2 USB Blocker |
|
Bundle Software |
Norton® Internet Security (OEM version) Intel® Rapid Start Technology Intel® Smart Connect Technology Intel® Smart Response Technology cFosSpeed |
|
Operating System |
Support for Windows 8/7 |
|
Form Factor |
ATX Form Factor; 30.5cm x 24.4cm |
Packaging
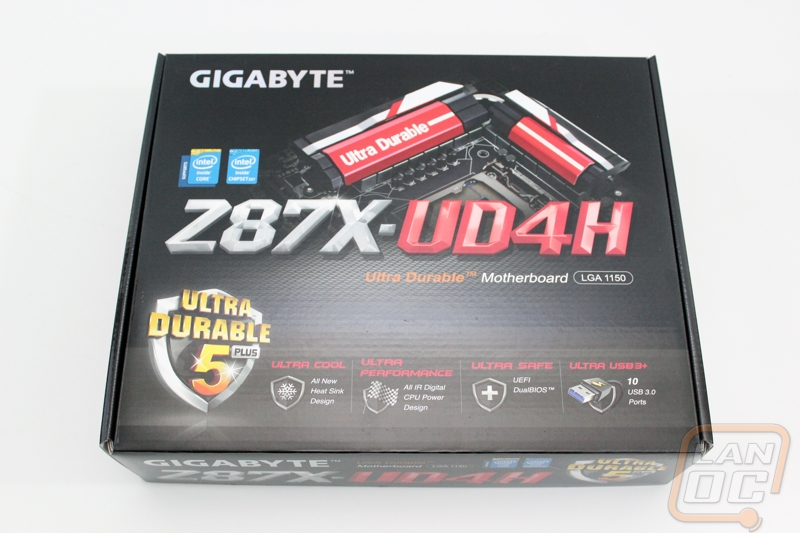
The packaging for the UD4H is a little cleaner than previous Gigabyte boards that we have had in. There is a large photo of the boards cooling across the top and Gigabyte color matched the board’s model number on the top to match the red on the board as well. Along the bottom there are 5 of the board’s key features with the Ultra Durable 5 plus logo taking precedence.
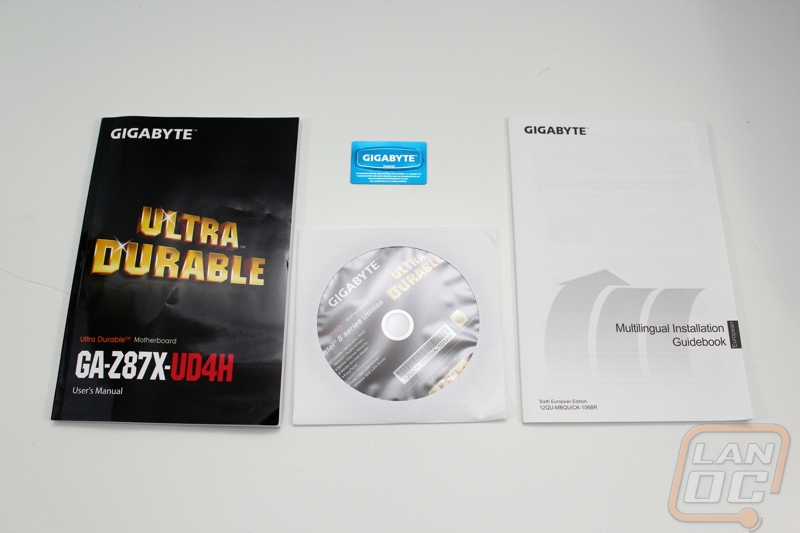
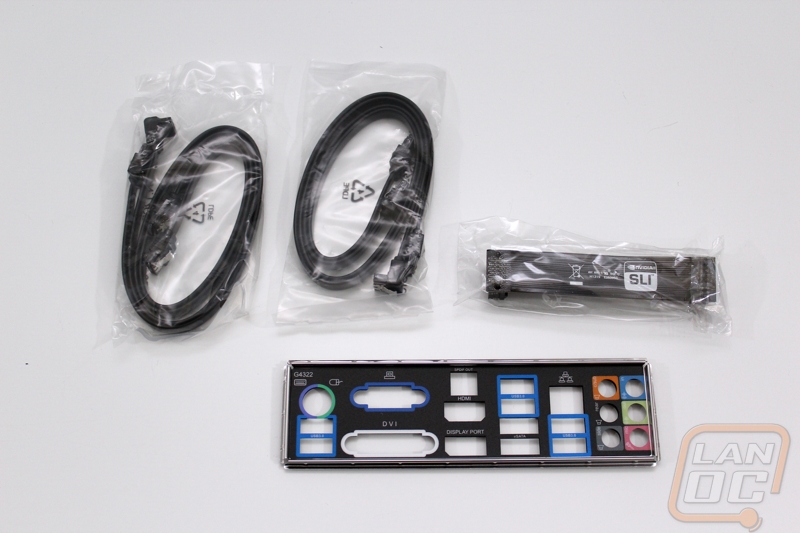
Inside the box, along with the motherboard itself, you have all of the documentation and accessories tucked in up under the board. For documentation you will get an installation guidebook and a larger user manual as well. They also include a Gigabyte case badge along with the driver and software disc. For accessories, you get what you would normally find with a mid-range motherboard. That includes four black SATA cables and a black SLI bridge. You of course also have the rear I/O panel; this is also black with each connection being color coded as well. I love that Gigabyte went with all black for their accessories; it’s a small touch but makes a big difference in putting together a clean build.
Board Layout and Pictures
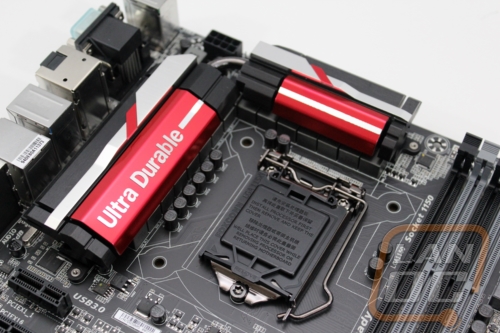
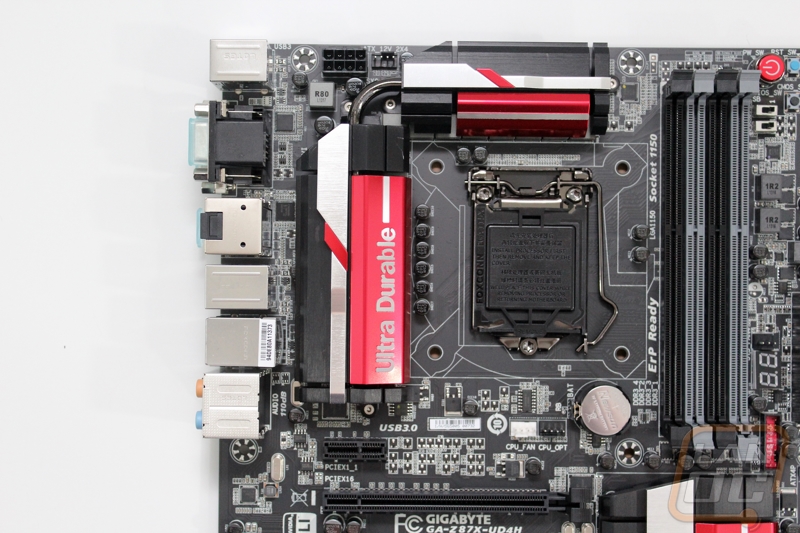
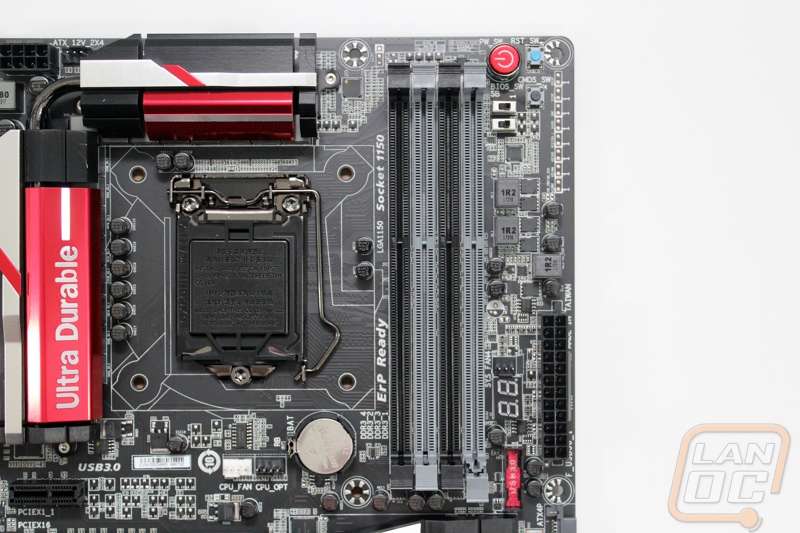
Jumping right into the UD4H, starting in the top left corner behind the rear I/O panel you have an 8-pin power connection for the CPU. Next to it is one of three four pin fan headers around the CPU socket, the other two are below the CPU socket and the main fan header is white in color to help it stand out. Considering I have had issues in the past where I hooked up my CPU fan to the wrong header, color coding that one specifically was a nice touch.
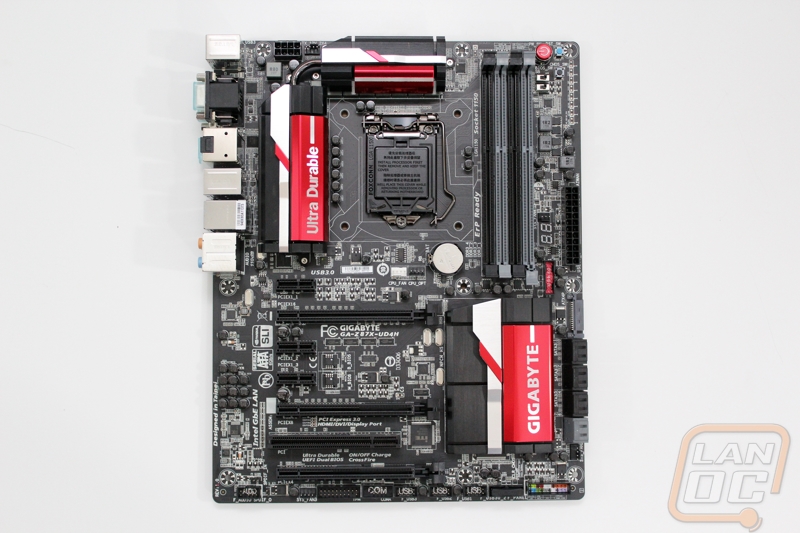
Over on the top right corner, the first thing you are going to see is the bright red power button that is directly next to the four DIMM slots. Around that power button you also have a smaller blue reset button, two BIOS switches and a clear CMOS button. Next to all of the buttons are 16 pads where you can check the voltage on 8 different motherboard voltages with a multi-meter, this is important because onboard voltage readouts can be a little less accurate compared to a dedicated multi-meter. Down farther, but still next to the DIMM slots you have a 3 pin fan header as well as the 24 pin power header. In with those headers you have the LED diagnostic readout as well as a bright red USB 3.0 header for hooking up your front panel USB 3.0 connections. It’s a small detail but I would have liked to of seen the fan header here be a 4 pin as well, most of the competition is going to this now.
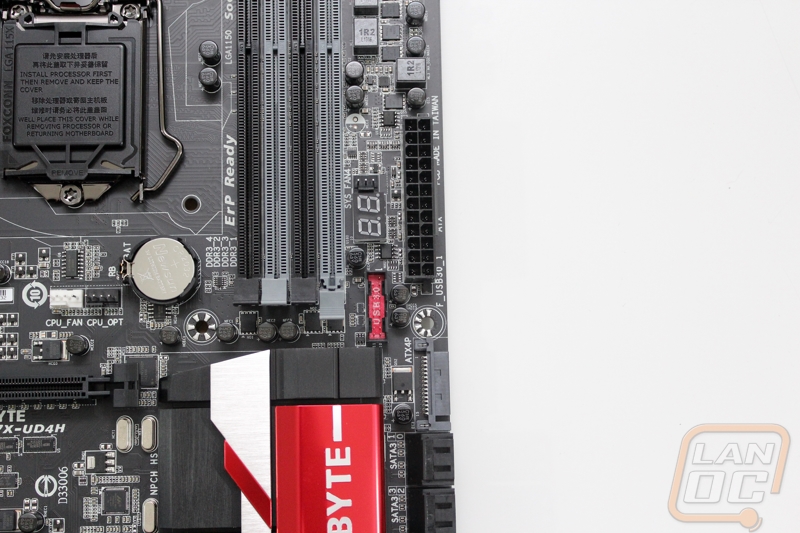
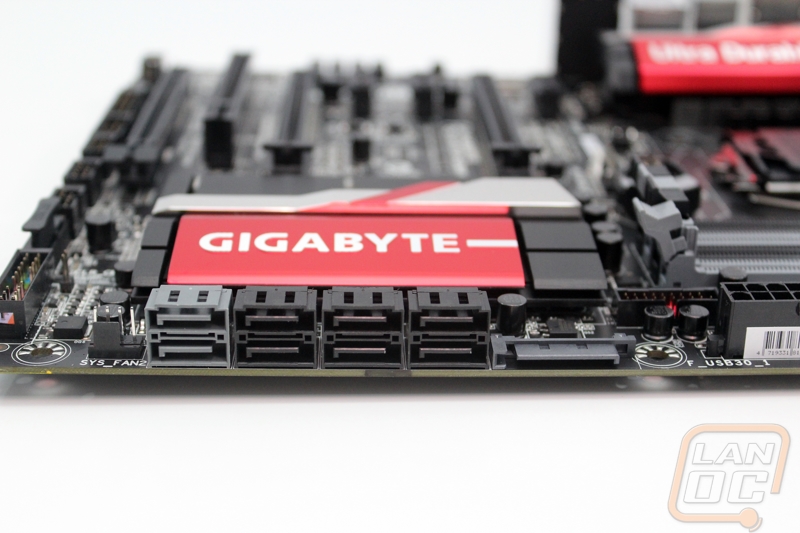
Down in the bottom right corner of the UD4H, next to the chipset cooler you have eight SATA connections. Six of those ports (the black ones) are SATA 3’s ran on the Intel controller while the other two (grey) are run on the Marvell 88SE9172 chipset. There is also an optional power connection here that uses a SATA power cable, something I rarely see but welcome. From its location I can’t tell if it provides additional power to the DIMM slots or the PCI slots or maybe both. Below the SATA ports you have another four pin fan header (our 3th 4-pin and 5th total). On the bottom corner you have a color coded front panel header for hooking up your LEDs, power, and reset buttons. Next to that you have a second internal USB 3.0 header, something I don’t see often as well as three USB 2.0 internal headers.
In the last corner, continuing from before on the right, we have the COM and TPM headers as well as our sixth fan header. The last header in the bottom left corner is the front panel audio connection, this is in a much better location that older Gigabyte motherboards, no have to run the cable over or under a video card this time around!
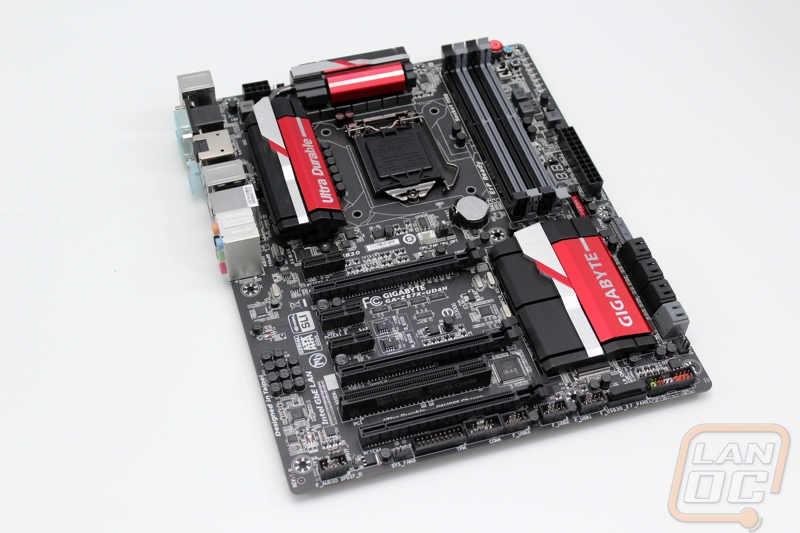
The rear I/O panel on the UD4H is completely packed full. You end up with four different display connections alone with its DVI, VGA, DisplayPort, and HDMI ports. To go with them you have an optical audio connection as well as the fairly standard 6 port audio connections. You get one 10/100/1000 Ethernet connection to keep yourself connected that runs on an Intel NIC. It’s great to see more companies using the Intel NICs. Beyond that you get two eSATA headers (in red) and six USB 3.0 ports (in blue). They also included a legacy PS/2 connection as well for those who want to run their older keyboard or mice.

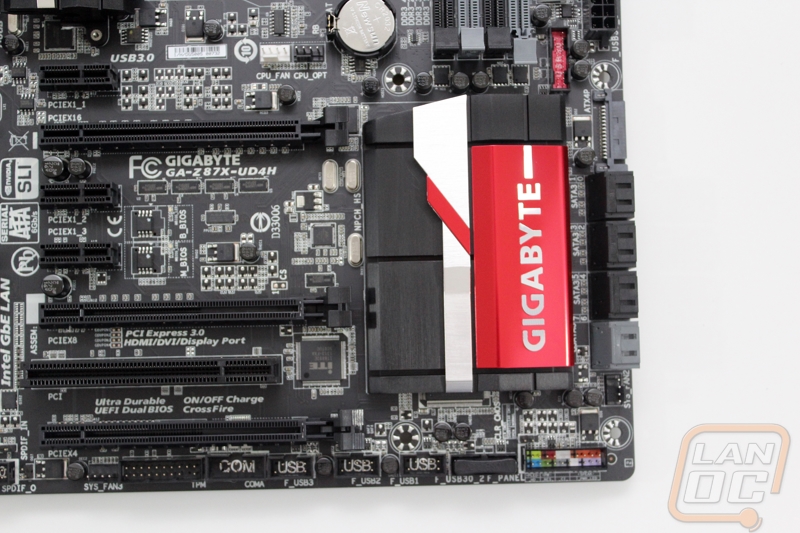
To match the red trim on the cooling of the UD4H, Gigabyte also went completely flat black on the entire PCB. I think the only thing I might like better than a black PCB is a white one, or orange… ANYHOW including a black PCB shows that they are listing to what people want. Now for that white and orange model!
Cooling
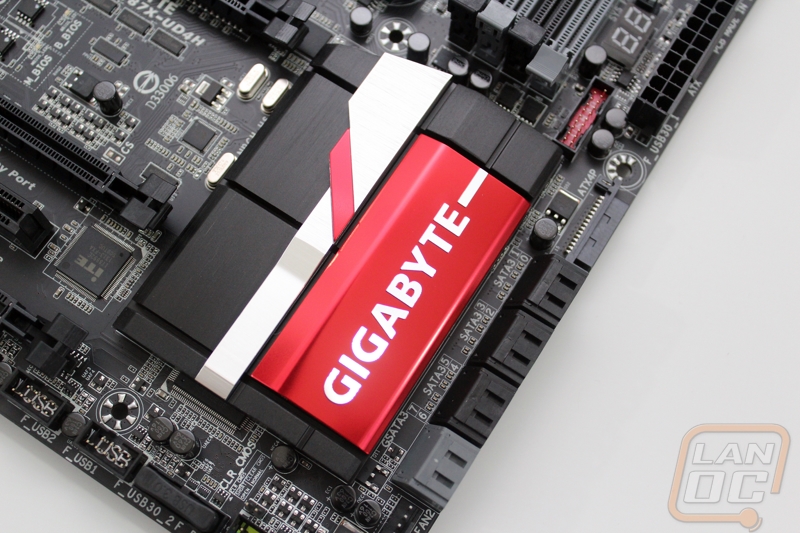
The chipset cooling for all of Gigabyte’s Z87 motherboards changed the design of their heatsinks. The new design is aesthetically much better and they look to be comparable in cooling performance over previous models as well. The power circuitry is cooled by two heatsinks next too and above the CPU socket. They are joined together by a heatpipe that helps spread the heat around for the most effective cooling. Their base color is black but they are trimmed out in red. Gigabyte also trimmed them out in silver by machining off the red in key areas like the Ultra Durable branding.

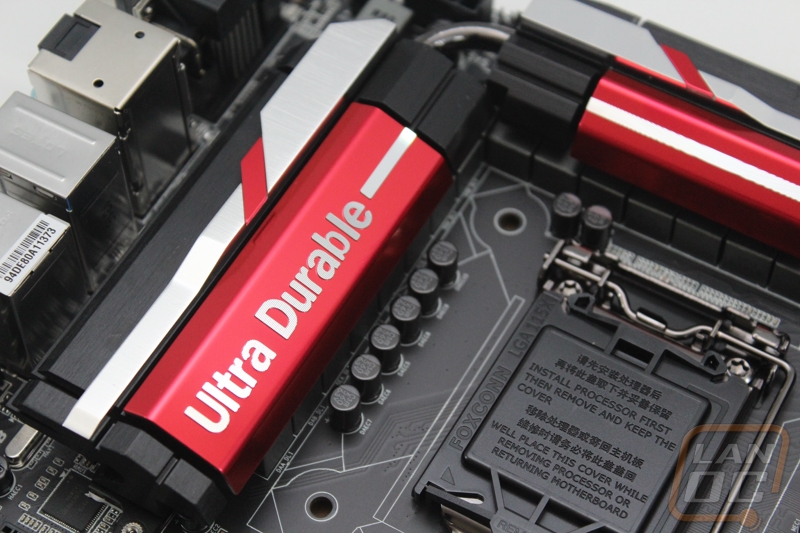
The chipset cooler is low profile to provide clearance for long video cards and it follows the same black, red, and silver color scheme that I saw on the rest of the cooling. Overall I really like the new design, its clean but still eye catching,
Test Rig and Procedures
Our Test Rig
|
Intel LGA1150 Test System |
|
|
CPU |
Intel i7-4770K CPU |
|
Cooling |
|
|
Memory |
|
|
Storage |
Kingston HyperX 120Gb SSD (OS) Seagate 2TB Hard drive (Steam games) Corsair Force GT 60Gb (USB 3.0 and SATA 3 testing) |
|
Video Card |
|
|
Power Supply |
|
|
Case |
|
|
OS |
Windows is kept up to date while only having the benchmark programs and games needed for our testing installed. |
Our Testing Procedures
|
CPU Testing |
|
|
CINEBENCH is a real-world cross platform test suite that evaluates your computer's performance capabilities. CINEBENCH is based on MAXON's award-winning animation software CINEMA 4D, which is used extensively by studios and production houses worldwide for 3D content creation. The test procedure consists of two main components - the graphics card performance test and the CPU performance test. We only use the total CPU score for our motherboard testing. |
|
|
We now just use the overall CPU mark score that takes into account all of the CPU oriented results |
|
|
Designed by the guys behind PCWorld, Worldbench is a benchmark designed to use applications and utility’s that everyone uses day to day and benchmark their performance. This gives the most accurate REAL world results, something that no other benchmark does. Being fully automated, WorldBench 6's application tests are scripted to run consecutively, and those results are automatically combined and compared against a baseline system. We use their Photoshop and Office tests. |
|
|
Perfect for testing the multithreading of multiple core CPU’s. “wPrime uses a recursive call of Newton's method for estimating functions, with f(x)=x2-k, where k is the number we're sorting, until Sgn(f(x)/f'(x)) does not equal that of the previous iteration, starting with an estimation of k/2. It then uses an iterative calling of the estimation method a set amount of times to increase the accuracy of the results. It then confirms that n(k)2=k to ensure the calculation was correct. It repeats this for all numbers from 1 to the requested maximum.” |
|
|
X264 HD is a CPU encoding benchmark. Using the x264 codec this test encodes a video file and times its performance. |
|
|
Overall Synthetic Benchmarks |
|
|
We run the basic PCMark test suite and use the overall score to get a general idea of system performance. |
|
|
We run the 2013 Fire Strike test using both the normal setting and extreme settings to get an overall system performance number that takes into account gaming focused systems like bandwidth to our test bench’s video card. |
|
|
In Game Tests |
|
|
Using the Adrenaline Action Benchmark Tool we run Bioshock Infinite on the “Xtreme” quality setting. This has a resolution of 1920x1080, FXAA turned on, Ultra Texture detail, 16x Aniso Texture Filtering, Ultra Dynamic Shadows, Normal Postprocessing, Light Shafts on, Ambient Occlusion set to ultra, and the Level of Detail set to Ultra as well. |
|
|
Using the Adrenaline Action Benchmark Tool we run Tomb Raider on the “Xtreme” quality setting. This has a resolution of 1920x1080, Exclusive Fullscreen turned on, Anti-Aliasing set to 2xSSAA, Texture Quality set to Ultra, Texture Aniso set to 16x Aniso, Hair Quality set to TressFX, Shadow set to Normal, Shadow Resolution on High, Ultra SSAO, Ultra Depth of Field, High Reflection quality, Ultra LOD scale, Post Processing On, High Precision RT turned on, and Tessellation is also turned on. |
|
|
Using the Adrenaline Action Benchmark Tool we run Hitman: Absolution on the “Xtreme” quality setting other than the MSAA setting is turned down from 8x to 2x. That setting puts the resolution at 1920x1080, MSAA is set to 2x, Texture Quality is set to High, Texture Aniso is set to 16x, Shadows are on Ultra, SSA is set to high, Global Illumination is turned on, Reflections are set to High, FXAA is on, Level of Detail is set to Ultra, Depth of Field is high, Tessellation is turned on, and Bloom is set to normal. |
|
|
Using the Adrenaline Action Benchmark Tool we run Sleeping Dogs on the “Xtreme” quality setting. That means our resolution is set to 1920x1080, Anti-Aliasing is set to Extreme, Texture Quality is set to High-Res, Shadow Quality is High, Shadow Filter is set to high, SSAO is set to High, Motion Blur Level is set to High, and World Density is set to Extreme. |
|
|
Subsystem Testing |
|
|
We use this to test the on board audio on all motherboard that come in, this gives us an idea of their audio performance beyond subjective testing. When testing we always have our audio set to 24 bit. |
|
|
We use this benchmark for USB 3.0 and SATA speed tests. Testing is done with Crystal Disc Mark with a Corsair Force GT 60 Gb. USB 3.0 testing is hooked up through a Thermaltake BlackX with USB 3.0 support |
|
Performance
I’ve spoken about it in the past, but it is worth mentioning again here. Performance testing of motherboards isn’t as cut and dry as testing on a video card for example. Generally, considering they all use the same chipset, performance numbers rarely vary by much more than a margin of error. That doesn’t stop me from running the UD4H through our test suite though just to make sure their aren’t any glaring issues. As you can see in the results below, the UD4H performed in line with the other Z87 motherboards we have tested in the past. Keep an eye out on the USB/SATA testing and audio testing as those are more likely to use different controllers and show larger variances.
|
PCMark 7 |
Overall Score |
|
|
MSI Z87-G45 Gaming |
6107 |
|
|
Asus Z87 Pro |
6287 |
|
|
Asus Z87 Plus |
6332 |
|
|
MSI Z87 MPower |
6465 |
|
|
Asus Z87 Gryphon |
6304 |
|
|
Gigabyte Z87X-UD4H |
6292 |
|
|
3DMark |
Fire Strike |
Fire Strike Extreme |
|
MSI Z87-G45 Gaming |
4340 |
1955 |
|
Asus Z87 Pro |
4353 |
2086 |
|
Asus Z87 Plus |
4346 |
2018 |
|
MSI Z87 MPower |
4344 |
1961 |
|
Asus Z87 Gryphon |
4345 |
2071 |
|
Gigabyte Z87X-UD4H |
4345 |
2002 |
|
Worldbench (low score is better) |
Photoshop |
Office |
|
MSI Z87-G45 Gaming |
222 |
302 |
|
Asus Z87 Pro |
222 |
291 |
|
Asus Z87 Plus |
210 |
290 |
|
MSI Z87 MPower |
206 |
289 |
|
Asus Z87 Gryphon |
213 |
293 |
|
Gigabyte Z87X-UD4H |
217 |
298 |
|
wPrime (low score is better) |
32M |
1024M |
|
MSI Z87-G45 Gaming |
10.658 |
325.787 |
|
Asus Z87 Pro |
10.437 |
325.981 |
|
Asus Z87 Plus |
10.584 |
328.48 |
|
MSI Z87 MPower |
10.657 |
331.992 |
|
Asus Z87 Gryphon |
10.562 |
324.228 |
|
Gigabyte Z87X-UD4H |
10.658 |
325.947 |
|
Passmark |
CPU Mark |
|
|
MSI Z87-G45 Gaming |
10295 |
|
|
Asus Z87 Pro |
10437 |
|
|
Asus Z87 Plus |
10425 |
|
|
MSI Z87 MPower |
10297 |
|
|
Asus Z87 Gryphon |
10470 |
|
|
Gigabyte Z87X-UD4H |
10354 |
|
|
X264 |
Pass 1 |
Pass 2 |
|
MSI Z87-G45 Gaming |
166.9525 |
43.83 |
|
Asus Z87 Pro |
168.2825 |
45.9675 |
|
Asus Z87 Plus |
171.8175 |
45.8775 |
|
MSI Z87 MPower |
170.1025 |
45.9075 |
|
Asus Z87 Gryphon |
169.2225 |
45.7725 |
|
Gigabyte Z87X-UD4H |
168.3642 |
45.6975 |
|
Cinebench |
CPU Score |
|
|
MSI Z87-G45 Gaming |
7.73 |
|
|
Asus Z87 Pro |
8.02 |
|
|
Asus Z87 Plus |
7.94 |
|
|
MSI Z87 MPower |
8.1 |
|
|
Asus Z87 Gryphon |
8.18 |
|
|
Gigabyte Z87X-UD4H |
8.04 |
|
|
Unreal Heaven Benchmark 4.0 |
Average FPS |
|
|
MSI Z87-G45 Gaming |
35.5 |
|
|
Asus Z87 Pro |
34.7 |
|
|
Asus Z87 Plus |
34.7 |
|
|
MSI Z87 MPower |
34.5 |
|
|
Asus Z87 Gryphon |
34.7 |
|
|
Gigabyte Z87X-UD4H |
34.9 |
|
|
Bioshock Infinite |
Average FPS |
|
|
MSI Z87-G45 Gaming |
50.08 |
|
|
Asus Z87 Pro |
48.76 |
|
|
Asus Z87 Plus |
48.76 |
|
|
MSI Z87 MPower |
48.94 |
|
|
Asus Z87 Gryphon |
47.56 |
|
|
Gigabyte Z87X-UD4H |
48.91 |
|
|
Tomb Raider |
Average FPS |
|
|
MSI Z87-G45 Gaming |
30.7 |
|
|
Asus Z87 Pro |
30.6 |
|
|
Asus Z87 Plus |
30.6 |
|
|
MSI Z87 MPower |
30.5 |
|
|
Asus Z87 Gryphon |
30.3 |
|
|
Gigabyte Z87X-UD4H |
30.3 |
|
|
Hitman Absolution |
Average FPS |
|
|
MSI Z87-G45 Gaming |
29.4 |
|
|
Asus Z87 Pro |
30 |
|
|
Asus Z87 Plus |
30 |
|
|
MSI Z87 MPower |
30 |
|
|
Asus Z87 Gryphon |
30 |
|
|
Gigabyte Z87X-UD4H |
29.7 |
|
|
Sleeping Dogs |
Average FPS |
|
|
MSI Z87-G45 Gaming |
31.8 |
|
|
Asus Z87 Pro |
31.5 |
|
|
Asus Z87 Plus |
31.2 |
|
|
MSI Z87 MPower |
31.4 |
|
|
Asus Z87 Gryphon |
31.5 |
|
|
Gigabyte Z87X-UD4H |
31.5 |
|
USB 3.0 and SATA 3
One aspect of motherboards that a lot of people don’t even consider is their data transfer performance on the SATA and USB interfaces. This can change the way your PC performs day to day in booting, file transfers, and load times of games and programs. To put the UD4H to the test I ran it though a benchmark on CrystalDiscMark. To keep things fair every board is tested using the same 60Gb Corsair SSD both on the USB 3.0 and SATA testing. For USB 3.0 testing I use a Thermaltake BlackX dock to hook the drive up to the PC. As you can see on the SATA testing we had no surprises, the UD4H uses the same Intel SATA controller as the other boards. On the USB 3.0 side the UD4H again uses the Intel controller but it had a hard time competing against the numbers the Asus boards put up due to their USB3 turbo mode. The UD4H still performed up to regular USB 3.0 specifications and that is really all you can expect. Anything beyond that is just a bonus.
|
SATA3 |
Read Speed |
|
MSI Z87-G45 Gaming |
473.4 |
|
Asus Z87 Pro |
471.2 |
|
Asus Z87 Plus |
467.1 |
|
MSI Z87 MPower |
468.7 |
|
Asus Z87 Gryphon |
472.0 |
|
Gigabyte Z87X-UD4H |
470.2 |
|
USB 3 |
Read Speed |
|
MSI Z87-G45 Gaming |
278.2 |
|
Asus Z87 Pro |
429.8 |
|
Asus Z87 Plus |
431.1 |
|
MSI Z87 MPower |
268.5 |
|
Asus Z87 Gryphon |
430.1 |
|
Gigabyte Z87X-UD4H |
276.4 |
Audio
For audio testing I run all of the motherboards through Rightmark’s Audio Tester. This benchmark outputs audio out and then right back into the microphone input to test an audio cards overall performance. This is the benchmark that we see the most variance between motherboards because Intel doesn’t include a sound card in their chipset (other than HDMI audio). Generally the more high end a board is the more than can afford to invest into better audio cards as well as focus on isolating the onboard sound card from the rest of the motherboard. In the case of the UD4H I didn’t really have high expectations simply because this is a mid-range to budget board. Even so I was able to compare it to the general market motherboards from Asus. The UD4H performed very well against the other boards in its price range. If you are heavy into audio quality you should plan on adding a sound card later, but I think that most people will be happy with the UD4H otherwise.
|
Frequency Response |
Noise Level |
Dynamic range |
Total harmonic distortion |
Intermodulation distortion |
Stereo crosstalk |
Intermodulation distortion + noise |
Frequency Response |
|||
|
MSI Z87-G45 Gaming |
0.11 |
-.1 |
-83.1 |
83.1 |
0.13 |
0.258 |
-82.8 |
0.324 |
0.1 |
-0.1 |
|
Asus Z87 Pro |
0.2 |
-.06 |
-88.3 |
88.5 |
0.132 |
0.067 |
-80.1 |
0.052 |
0.1 |
0 |
|
Asus Z87 Plus |
0.17 |
-.21 |
-90.2 |
90.2 |
0.253 |
0.21 |
-85 |
0.149 |
0.1 |
-0.2 |
|
MSI Z87 MPower |
0.12 |
-2 |
-90.1 |
89.9 |
0.0069 |
0.013 |
-86.6 |
0.02 |
0.1 |
-0.2 |
|
Asus Z87 Gryphon |
0.02 |
-.07 |
-87.3 |
87.4 |
0.147 |
0.081 |
-79.8 |
0.06 |
0.1 |
-0.1 |
|
Gigabyte Z87X-UD4H |
0.18 |
-0.18 |
-83.6 |
83.5 |
0.215 |
.225 |
-83.2 |
0.323 |
0.1 |
-0.1 |
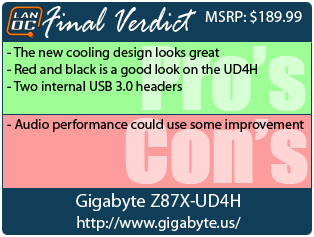
Overall and Final Verdict
After spending time with the Z87X-UD4H I have to say that I came out more impressed than I expected. My last few Gigabyte motherboard experiences have been less refined than I would like. The UD4H has made major improvements in nearly every area. I really like the new cooling design as well as the red, black, and silver design. Gigabyte continues to go overboard with the number of USB and SATA connections including having two USB 3.0 front panel headers available. This is much better than finding out in the future that you don’t have enough room to hook up everything you might need. Really the only downside to the UD4H that I ran across was its audio performance and considering how picky I can sometimes get its impressive that this is the only con I could come up with. The audio performance wasn’t bad, but I wouldn’t call it great as well, although to be fair to Gigabyte they don't advertise this as being an audio focused board. Beyond that I feel that Gigabyte has improved considerably. I do feel the overall refinement and user experience with a few other boards is still better, but if Gigabyte keeps this up they might just pass them up.