 I was there… I heard the loud noises and saw the grenades being thrown. My partner and I went to war and back that night. Some of the things we saw that night can and will never be un-seen. The night that Gigabyte invited us out for the launch of their new military themed gaming motherboards will be a night that will not be forgotten. I may be shell shocked from that night but we must go on. Today I have Gigabytes flagship G-1 Assassin here to review. With every part of the board designed specifically for the gamer I am very excited to see how it performs. Will there be a g-1 in your next build? Let’s find out
Product Name: Gigabyte G-1 Assassin
Review Sample Provided by: Gigabyte
Review by: Wes
Pictures by: Wes
Specifications
|
CPU |
|
|
QPI |
4.8GT/s, 6.4GT/s |
|
Chipset |
|
|
Memory |
(Go to GIGABYTE's website for the latest supported memory speeds and memory modules.) |
|
Audio |
|
|
LAN |
1 x Bigfoot Killer E2100 chip (10/100/1000 Mbit) |
|
Expansion Slots |
|
|
Multi-Graphics Technology |
Support for 3-Way/2-Way NVIDIA SLI technology and 4-Way/3-Way/2-Way ATI CrossFireX™ technology |
|
Storage Interface |
South Bridge:
Marvell 88SE9182:
|
|
USB |
South Bridge:
1 x Renesas D720200 chip and 2 x VLI VL810 hubs:
|
|
Internal I/O Connectors |
|
|
Back Panel Connectors |
|
|
I/O Controller |
iTE IT8720 chip |
|
H/W Monitoring |
|
|
BIOS |
|
|
Unique Features |
|
|
Bundle Software |
Norton Internet Security (OEM version) |
|
Operating System |
Support for Microsoft® Windows® 7/Vista/XP |
|
Form Factor |
XL-ATX Form Factor; 34.5cm x 26.3cm |
Features (from Gigabytes Website)
4-way CrossFireX™ and 3-way SLI™ Support
The ability to see clearly through the fog of war can often tip the balance between the winning or losing force. That is why GIGABYTE has equipped the G1.Assassin motherboard to offer utmost graphics flexibility and upgradeability. With multiple GPU support, GIGABYTE G1.Assassin motherboard delivers maximum FPS (Frames Per Second), allowing gamers to see more clearly, aim faster, and move more quickly.
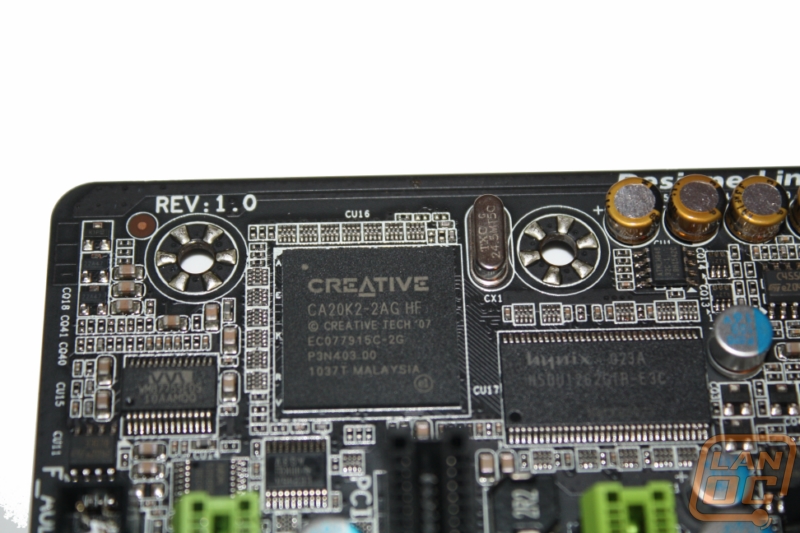
Onboard Creative Soundblaster X-Fi Digital Audio Processor (20K2) with X-Fi Xtreme Fidelity™ and EAX® AHD 5.0™ Technologies
Being able to hear where your enemy is located before you see them can put you at a distinct advantage in most gaming situations. That is why GIGABYTE has rigged the G1.Assassin motherboard with the industry’s most advanced audio solutions all onboard; giving you the highest caliber audio experience. GIGABYTE G1.Assassin is the world's only gaming motherboard to feature Creative's top-of-the-line Soundblaster Digital Audio Processor (20K2) onboard with X-Fi Xtreme Fidelity® and EAX® Advanced HD™ 5.0 technologies, allowing you to experience sound in your gaming world exactly as you would in real life.
Dolby® Digital Live
Enjoy audio from your PC through your home theater with Dolby® Digital Live. A real-time encoding technology, Dolby Digital Live converts any audio signal into a Dolby Digital bitstream for transport and playback through a home theater system. With it, your PC can be hooked up to your Dolby Digital-equipped audio/video receiver or digital speaker system via a single digital connection, eliminating the confusion of multiple cables and ensuring the integrity of the audio signal.
DTS™ Connect
DTS Connect is the perfect solution to enhance your entertainment experience using your home theater's Audio/Video Receiver. DTS Connect is comprised of two DTS technologies including DTS Neo: PC™ which takes 2-channel (stereo) audio and transforms it into a full-bandwidth matrix of your speaker layout (up to 7.1 channels) and DTS Interactive™ which encodes digital audio sources into DTS Digital Surround, which can then stream out to your Audio/Video Receiver using a S/PDIF connection.
Built-in Front Audio Headphone Amplifier
Specially designed for gamers, GIGABYTE G1.Assassin utilize a high capacity amplifier which is able to drive 150? loads, allowing gamers to enjoy a fuller range of dynamic sound with crisper details and less distortion when using high quality professional headphones. The amplifier also features wide band-width, low noise, high slew rate and low distortion, making it ideal for professional audio usage. In addition, GIGABYTE has equipped G1.Assassin motherboard with 4 additional amplifiers onboard for the center/subwoofer, rear speaker, side surround and line out.
Nichicon High-end Audio Capacitors
GIGABYTE G1.Assassin motherboard utilizes the highest quality Nichicon MUSE ES series and MW series Bi-Polarized audio capacitors at each channel layout. These professional audio capacitors deliver the highest quality sound resolution and sound expansion to create the most realistic sound effects for professional gamers.
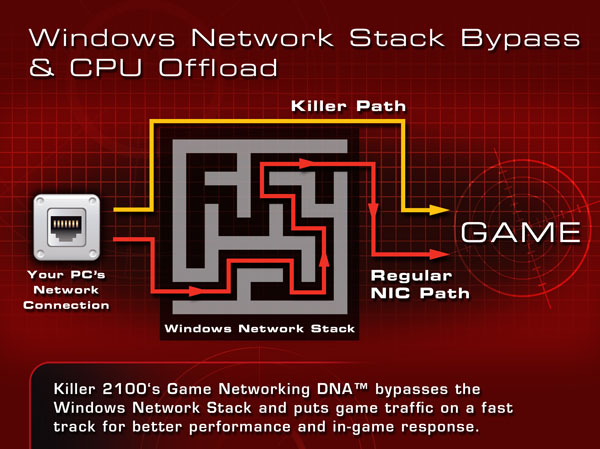
Onboard Bigfoot Networks Killer™ E2100 Game Networking Platform
GIGABYTE is the first motherboard manufacturer to seriously address online gaming network lag issues by implementing the Bigfoot Networks Killer™ E2100 Game Networking Platform directly onboard the G1-Killer series motherboards. Utilizing a unique combination of dedicated Network Processing Unit (NPU) and exclusive Game Networking DNA™ technology, the Bigfoot Networks Killer™ E2100 Game Networking Platform was designed to give the best online gaming experience possible.
Killer™ E2100 Dedicated NPU
Dedicated Network Processing Unit (NPU) with 128MB of dedicated DDR2 memory helps offload network traffic from the CPU, freeing it up to do other important computing tasks.
Game Networking DNA™
Bigfoot Network's exclusive Game Networking DNA™ software offloads gaming data directly to the NPU by bypassing the Windows Network Stack, delivering tremendous speed benefits which allow you to move quicker, shoot faster and win bigger.
Up to 10X Faster
Whether you're playing MMOs or first-person shooters, the Bigfoot Networks Killer™ E2100 game networking platform delivers up to 10X faster networking performance for a whole new level of online gaming performance.
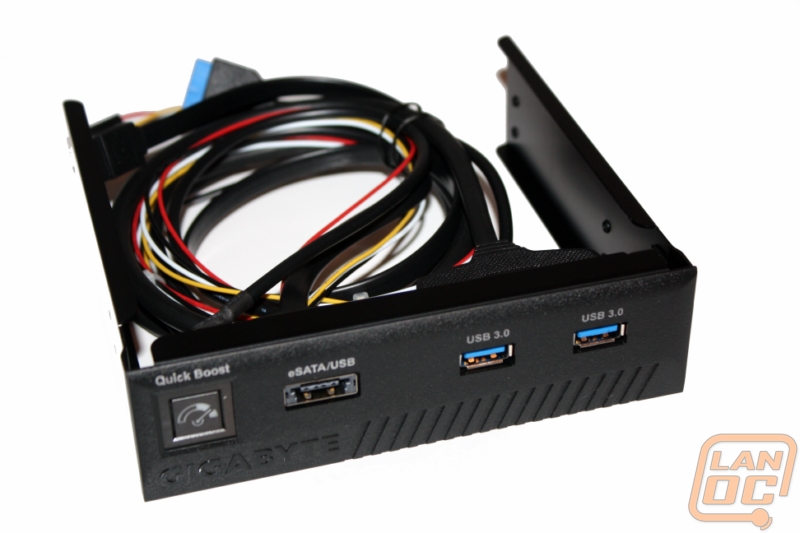
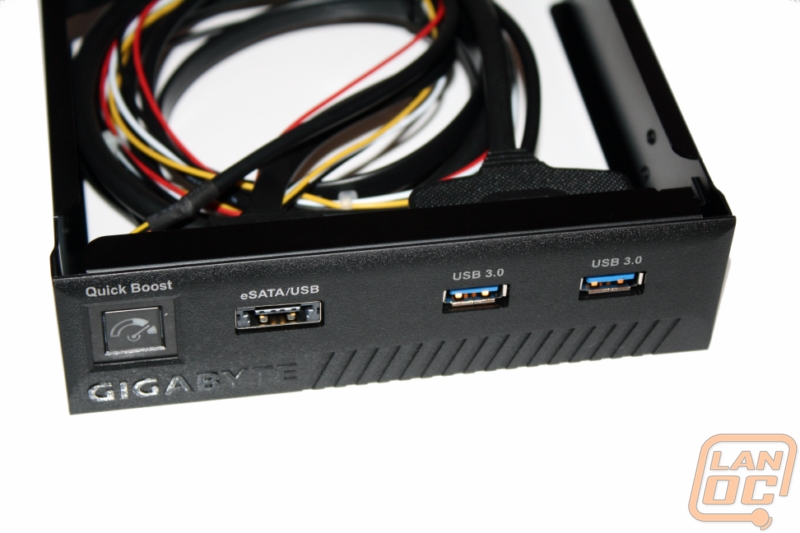
Front Access Control Panel
As part of its box kit, the G1.Assissin motherboard features a convenient Front Access Control Panel that allows quick and easy access to 2 USB 3.0 ports and Power eSATA. The Front Access Control Panel also features a Quick Boost button that allows gamers to instantaneously overclock their system with a single press of a button. Imagine being in the thick of battle and being able to get a super charged on-the-fly performance boost without the need for a system reboot.
SATA 3.0 (6Gbps) and USB 3.0
When you're behind enemy lines, intelligence data latency can get you killed. That is why GIGABYTE G1.Assassin motherboard provides ultra fast data transfer performance with onboard integration of the latest SuperSpeed USB 3.0 for up to 8 ports (4 front panel, 4 back panel), SATA Revision 3.0 (6Gbps) technologies from Marvell, and an unprecedented 3x USB power boost on all USB ports for the most power hungry USB devices.
Locked and Loaded Heatpipe Design
The GIGABYTE G1.Assassin features a brand new heatpipe that was designed to be as deadly to heat as it looks. By effectively spreading the heat from the critical areas of the motherboard such as the CPU VRM zone and quickly dissipating it, GIGABYTE G1.Assassin motherboard remain cool, even when the battle heats up.
Modeled after the common firearms issued to soldiers deployed to a warzone including pistol, rifle and ammo clip, the Locked and Loaded heatpipe design utilizes a unique fluting technology similar to a rifle barrel fluting, which allows for maximum heat dispersion.
5 Smart Fan Connectors
Further helping to eliminate heat are the 5 strategically placed Smart Fan pin headers which allow for more precise control of system and CPU fans. Equipped with their own individual thermal sensors, the Smart Fans can be easily controlled via GIGABYTE’s EasyTune™ 6 utility as well as in the BIOS.
Ultra Durable 3
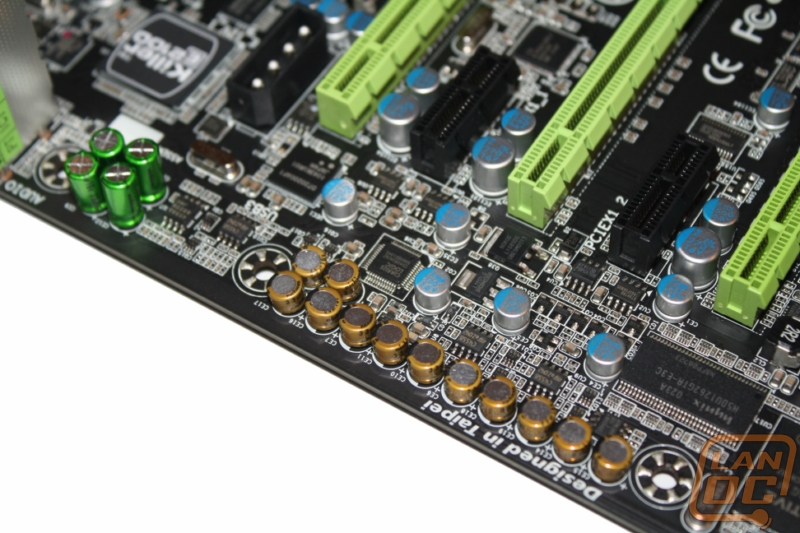
The GIGABYTE Ultra Durable™ 3 design features twice the copper for both the power and ground layers of the PCB, dramatically lowering system temperature by efficiently spreading heat from critical areas of the motherboard (such as the CPU power zone) throughout the entire PCB. GIGABYTE's Ultra Durable™ 3 also lowers the PCB impedance by 50%, which helps to reduce electrical waste and further lowers component temperatures. A 2x Copper layer design also provides improved signal quality and lower EMI (Electromagnetic Interference), providing better system stability and allowing for greater margins for overclocking...more
Maximum CPU Power Delivery
Like the pistons and cylinders of a car engine, the design of the motherboard Voltage Regulator Module (VRM), component quality and number of power phases greatly affects motherboard performance. GIGABYTE engineers were first to realize not only the importance of using the best quality components for this critical area, but also that with more power phases, there can be more power available to your CPU. With 16 phase power design, Dual CPU Power and Driver MOSFETs, GIGABYTE G1.Assassin motherboard delivers the best-in-class system performance and power stability required for elite gaming systems.
Dual CPU Power
GIGABYTE's proprietary Dual CPU Power Technology allows CPU VRM power phases to split evenly into 2 sets of power engines that operate in tandem. This allows 1 set of power phases to rest while the other is active as opposed to a traditional power design where all the power phases are always active. As such, GIGABYTE Dual CPU Power effectively halves the amount of work done by each set of power phases to significantly increase motherboard durability and reliability.
Driver MOSFETs
By incorporating the MOSFETs and driver IC in accordance with the Intel® Driver MOSFET specification, GIGABYTE G1-Killer series motherboards allows higher power transfer and increased efficiency at higher switching frequencies to satisfy the power requirements of modern processors. Driver MOSFETs also help to reduce VRM real estate requirements for a cleaner, less cluttered CPU zone.
DualBIOS™ 3TB+ HDD Support (Hybrid EFI Technology)
Hybrid EFI Technology combines the benefits of GIGABYTE's mature BIOS platform including stability and compatibility with 3rd party products with 3TB+ HDD support from EFI technology, allowing GIGABYTE to offer the best of both worlds through a quick and easy BIOS update using GIGABYTE's @BIOS utility that is freely available from the GIGABYTE website.
Packaging
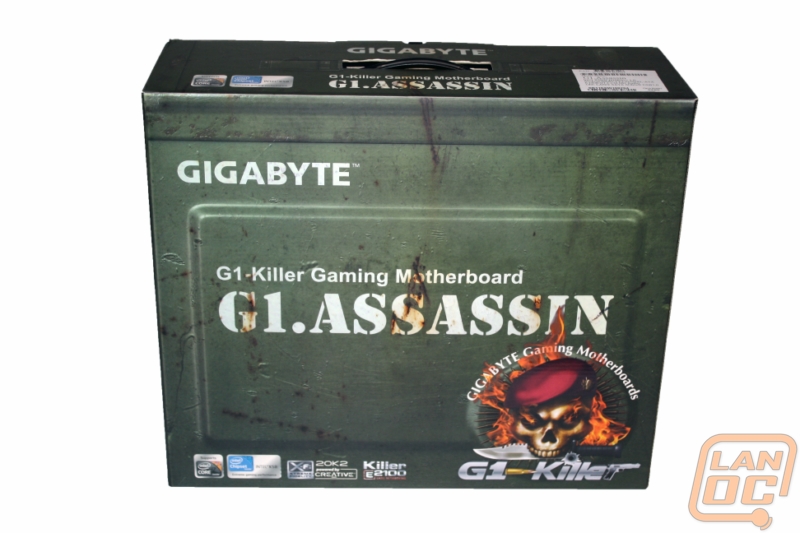
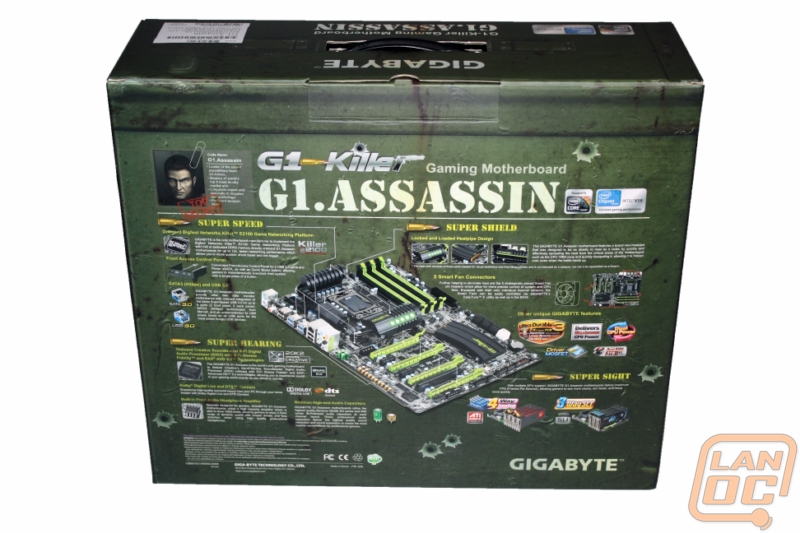
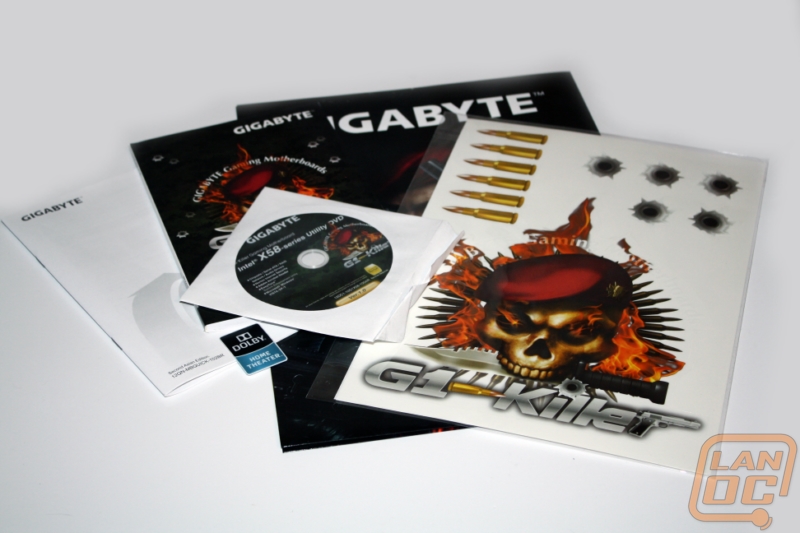
Gigabyte wanted to make sure you remembered that you were picking up the ammunition you’re going to need to get an edge in your next game. They did that by designing the box to look like an aged ammo box. Of course it does have the G1 logo on the front along with G1.ASSASSIN right in the middle with rust running over top of it. The back of the box has a large photo of the board itself while breaking things down to Gigabytes focus points (Super Speed, Super Shield, and Super Hearing). Each of the three focus points having multiple items under it with full descriptions on how they will help you perform better while gaming.

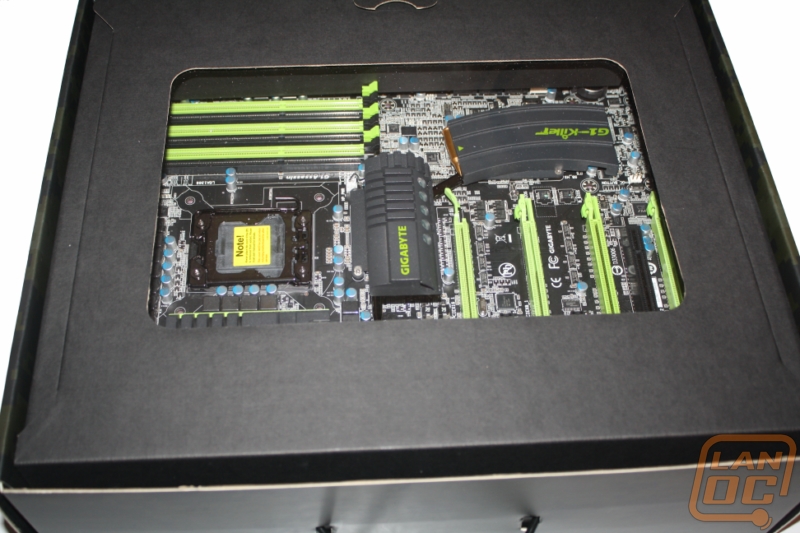
Inside is a second box with a full digital camo design covering it. Inside you are greeted with a glimpse of the Assassin through a window in yet another box. Under that box they have a compartment with all of the boards accessory’s and cables. Of those accessories the front access control panel really stands out. A device like this wouldn’t be cheap if sold separately; it’s great to see things like this being included on today’s high end (expensive) motherboards. I was also impressed with the G1-Killer image on the rear I/O panel. It’s a small detail but does add a little style. To top it all off, along with the manual and software Gigabyte even provided a sticker sheet and a poster to go with the G1 Killer lineup.

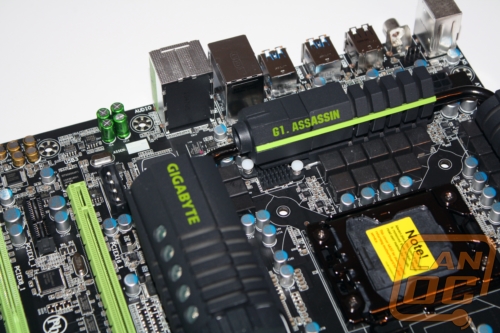
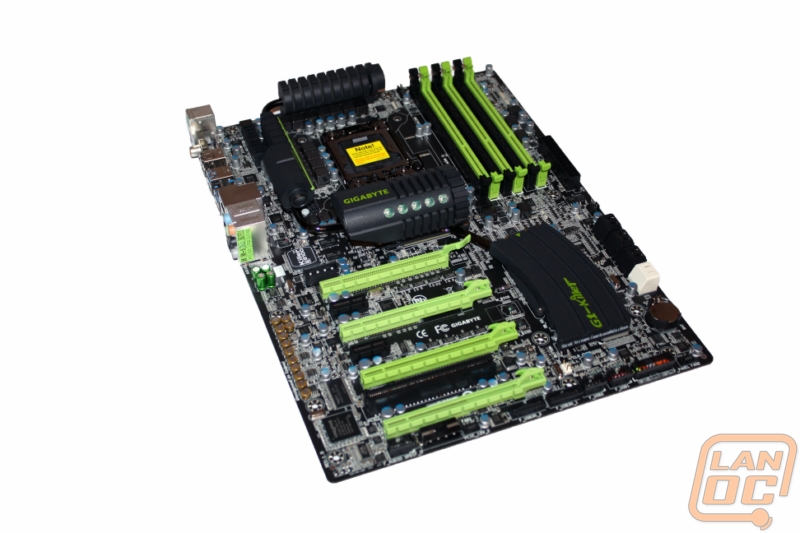
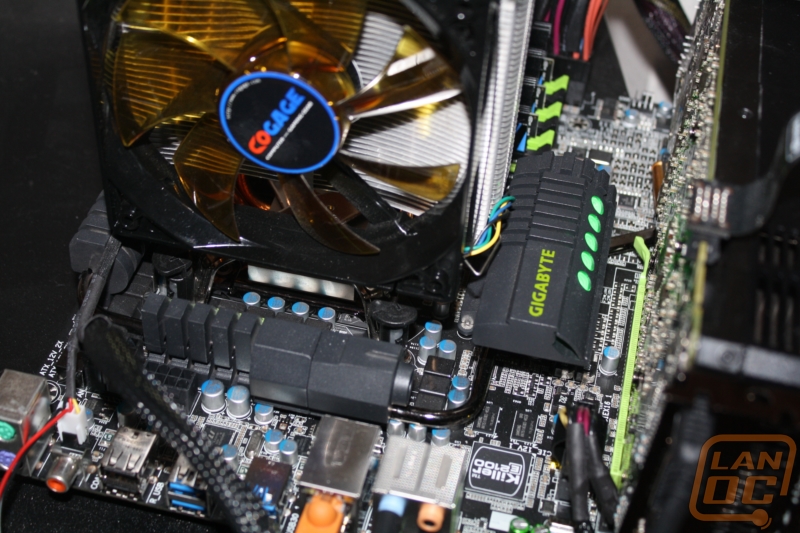
Board Layout
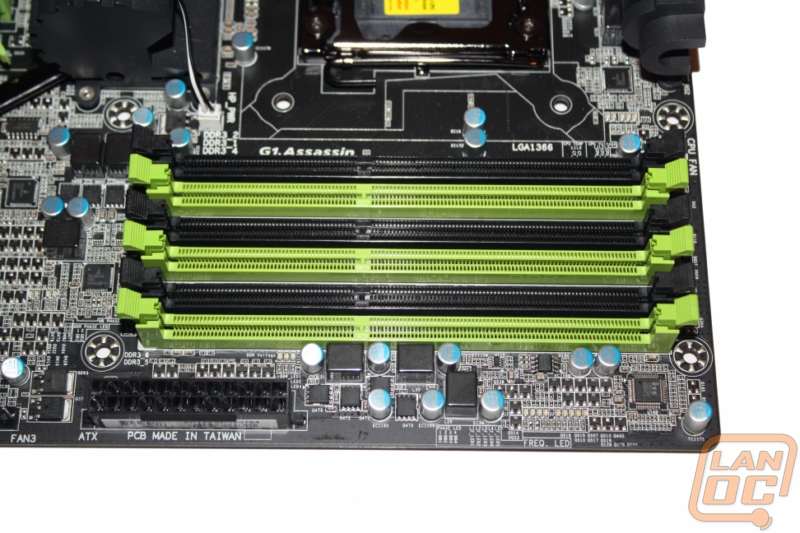
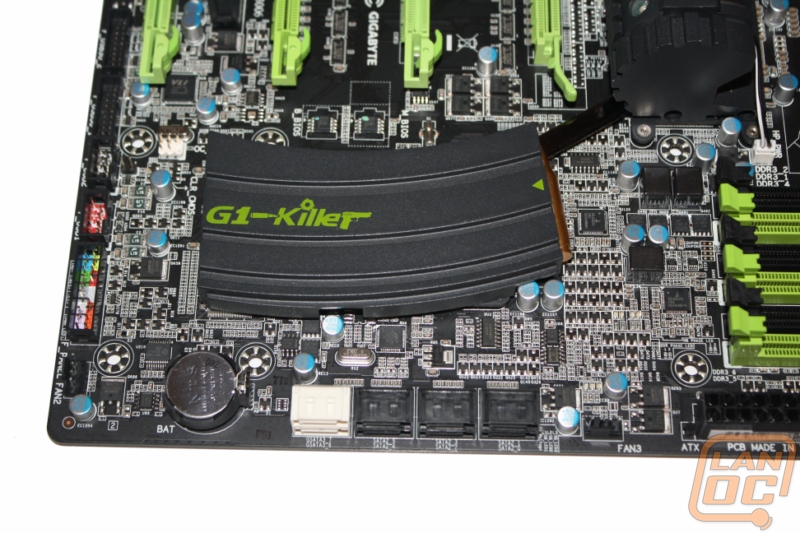
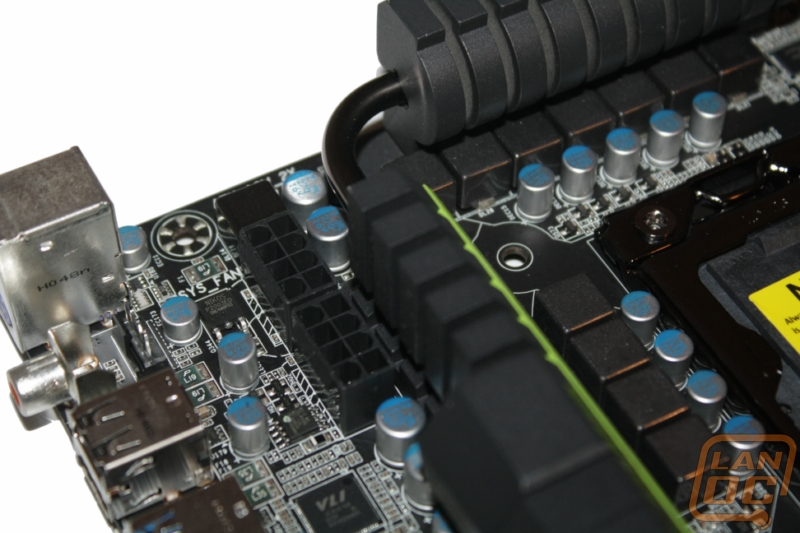
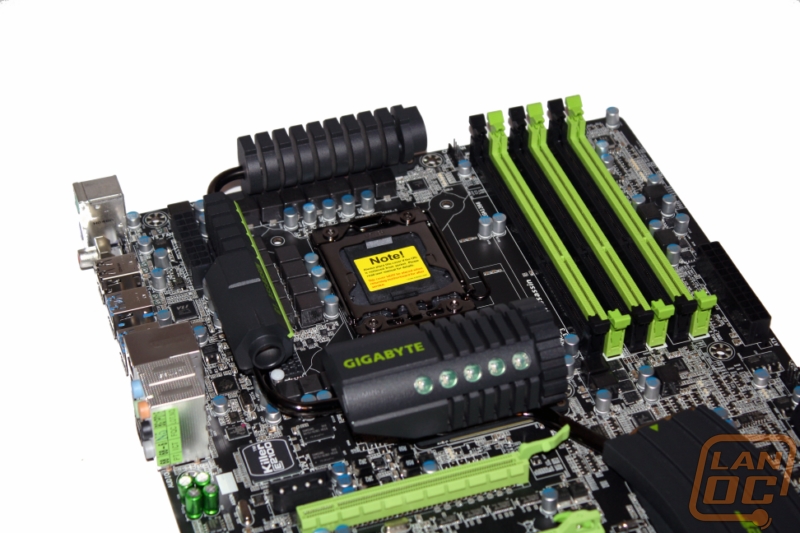
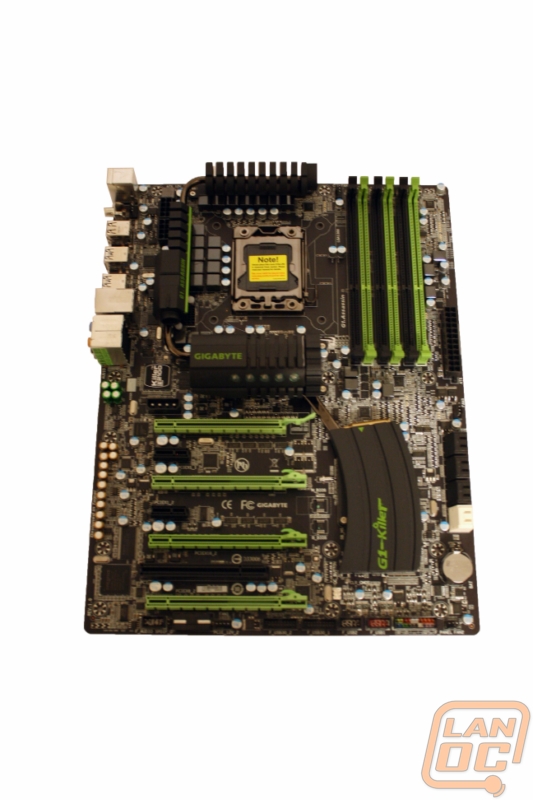
Starting in the top right corner of the board, Gigabyte colored the six 240 pin DDR 3 slots in black and green to match the cooling system. Between the closest ram slot and the heatsink you have about a half inch clearance. This should be enough to keep tall ram sinks away from large heatsinks unless the heatsink overhangs over like the V10 from Cooler Master. You will also find the 24 pin main power connector in this area close to the edge of the board for easy wire management.
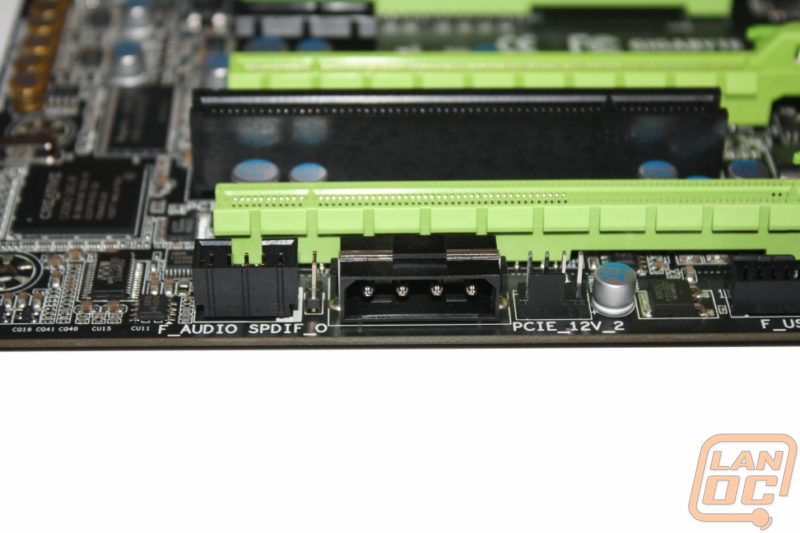
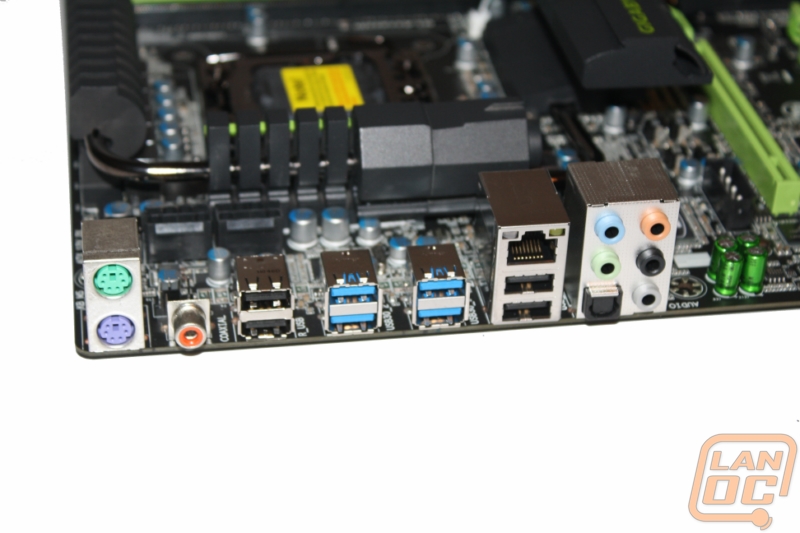
The bottom right corner, you have the front panel connections in a color coded box near the bottom right corner, a perfect place to put them and keep your wire management in line. You will also find a four pin fan header tucked between the front panel header and the corner. With two USB 3.0 and two USB 2.0 headers you shouldn’t have any trouble with USB connections. It’s also great that they included two USB 3.0 connections, this way if you use the front panel device they include with the board you still have a connection for your case’s front panel USB 3.0 ports. Also in this area is the connection for the front panel devices overclock button (the white 5 pin header), and also the Clear CMOS header (above the black USB 2.0 header). It’s nice to see the clear CMOS header in an easy to reach location.
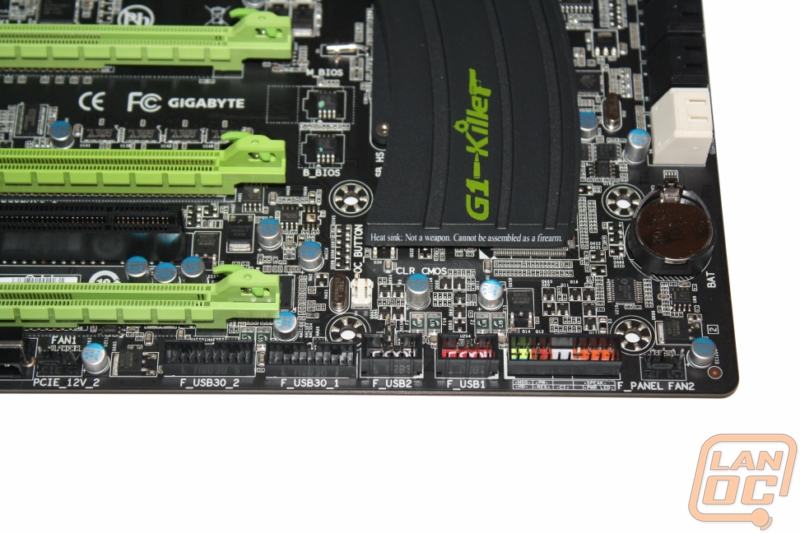
I also wanted to point out, look at how close everything is packed together on the PCB. Even with this being an XL-ATX board they still needed every inch of space to pack everything in.
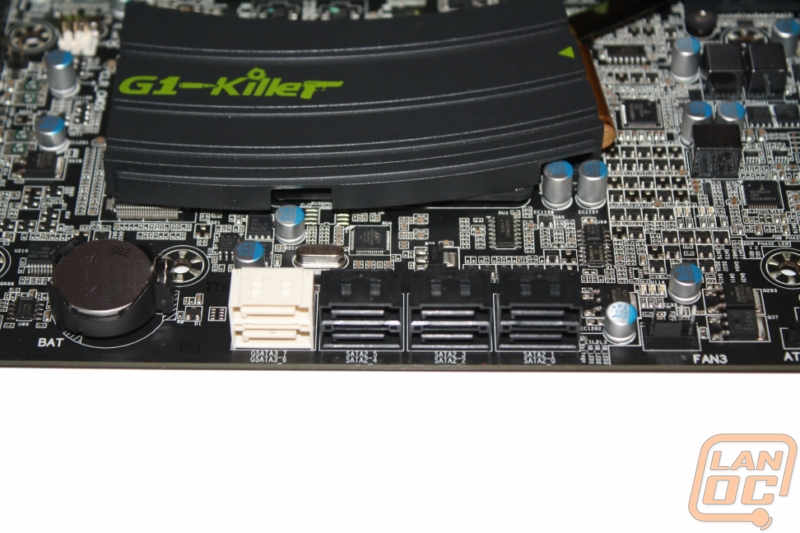
Also in the bottom right corner are 8 SATA connections (2 SATA 6) and a four pin fan connection
The Assassin can run four video cards in crossfire or three in SLI using its four PCI Express slots. Of course when filled only two will run at a full 16x, the other two are limited to x8 each when running four video cards. The top and third down are full x16, the second down and bottom slots share a x16 connection between the two of them. You also have two PCI Express x1 slots and one legacy PCI slot. Also of note are the two Molex connections needed to power everything. I found that it was very hard to use one cable to reach both of those connections, although it could be done. It would be nice if they were closer together.
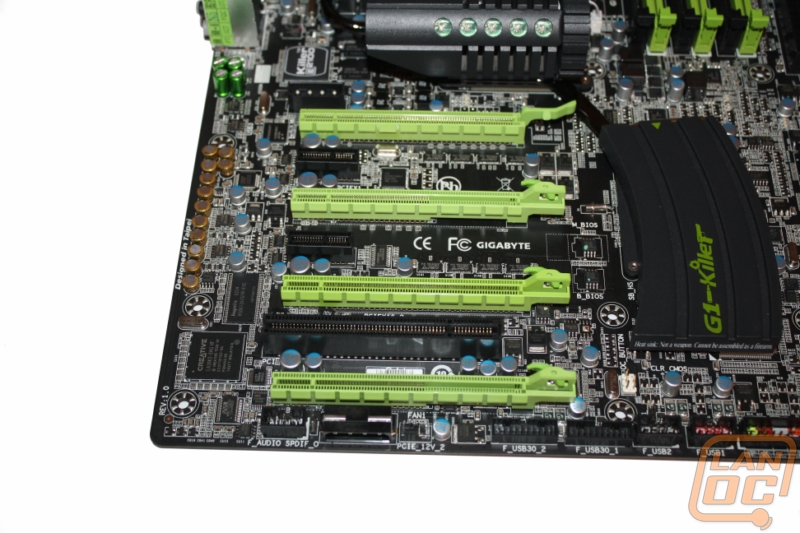
I do like that they used a right angle connection for this Molex connector. Details like this make wire management easier. Although I think they only reason this is right angled is for clearance if you use a dual width card in that last slot.
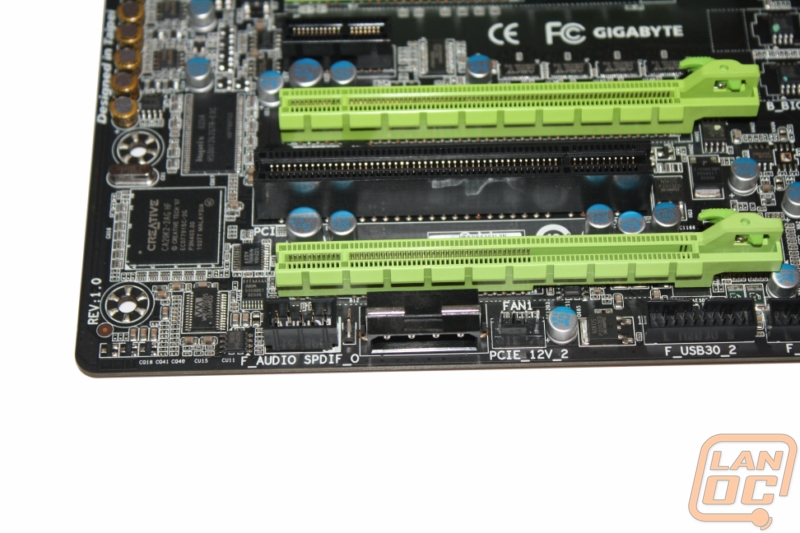
On the bottom left you can spot the Creative Soundblaster X-Fi Digital Audio Processor
Just above the Creative onboard chipset you can see the Nichicon capacitors used for the 5 different amplifiers uses on the Assassin. The 5 amplifiers are used for the following. Front panel headphone plug, center/subwoofer, rear speaker, side surround and line out. This is a drastic change from what you would find on any other motherboard!
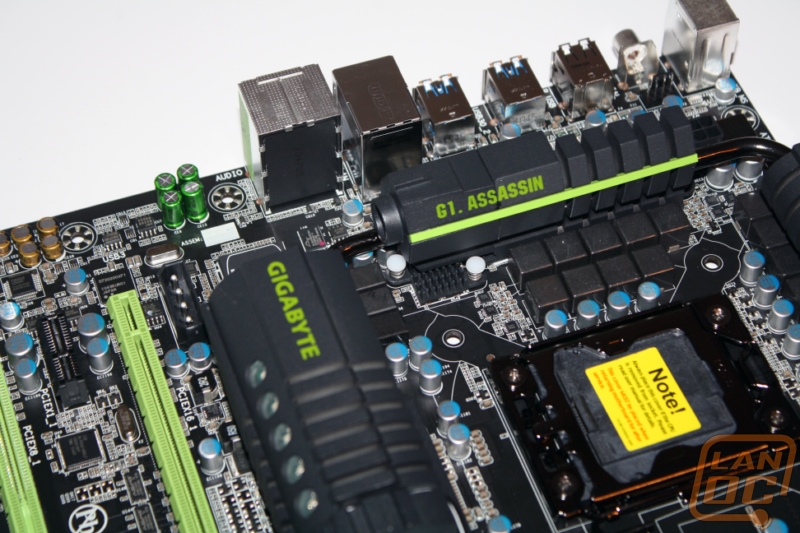
Tucked away just under and behind the read I/O panel is Bigfoots Killer E2100 Dedicated Network Processing Unit along with 128MB of dedicated DDR2 memory. How many motherboards can say they have a gigabit of ram built into it, not many ;)

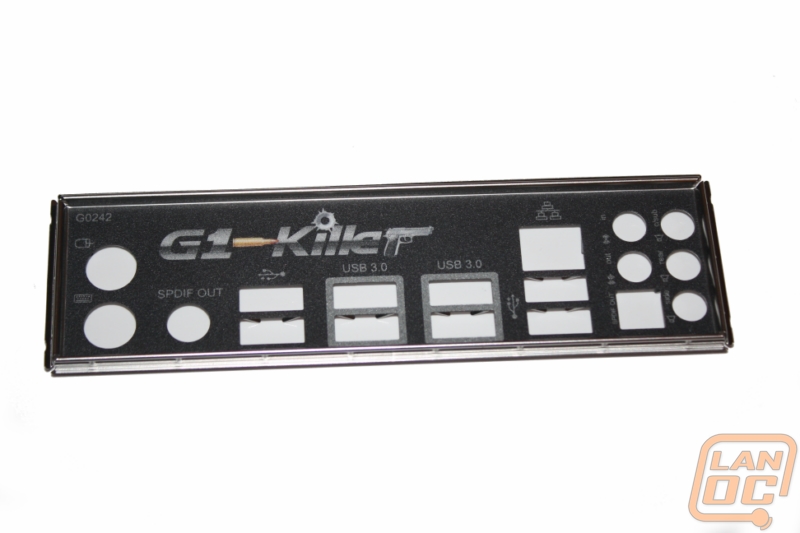
And last but not least you have the Rear I/O panel. With a feature set as long as the Assassin’s its surprising to see how bare its I/O panel is. But they designed everything about the G1 Killer series specifically for gaming, and gamers don’t need multiple NIC’s onboard video, firewire, and all of the other connections we have seen on other motherboards.
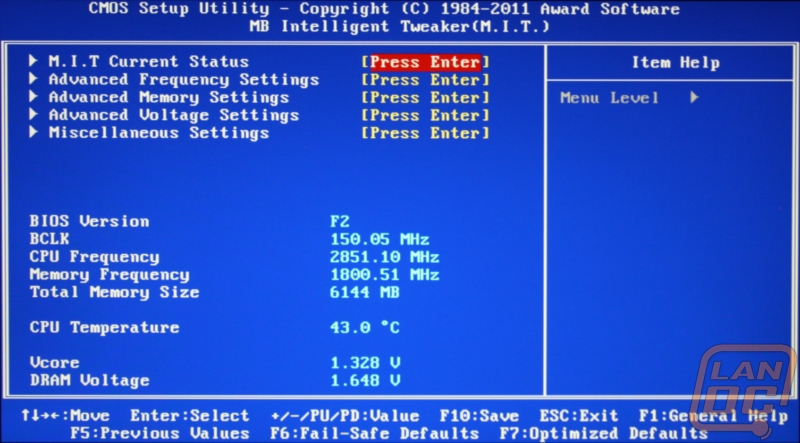
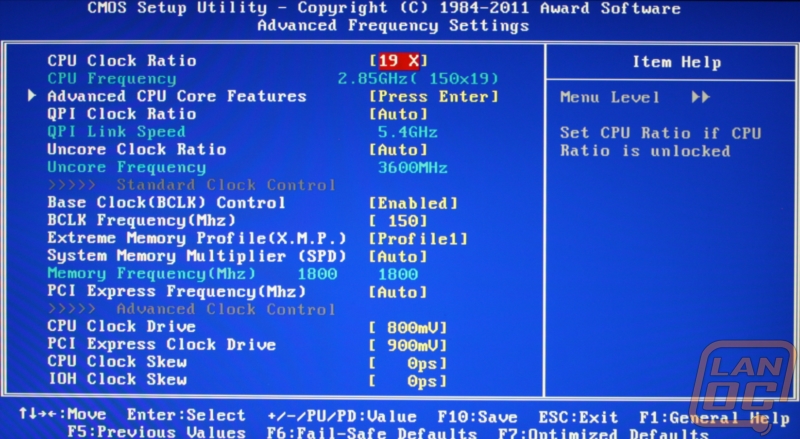
BIOS
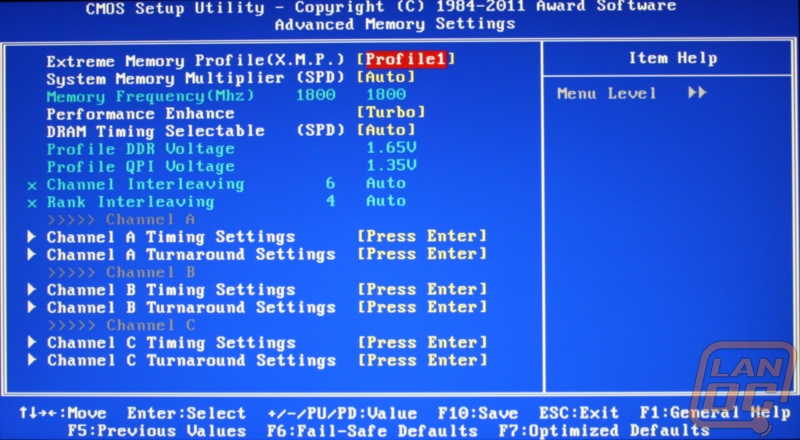
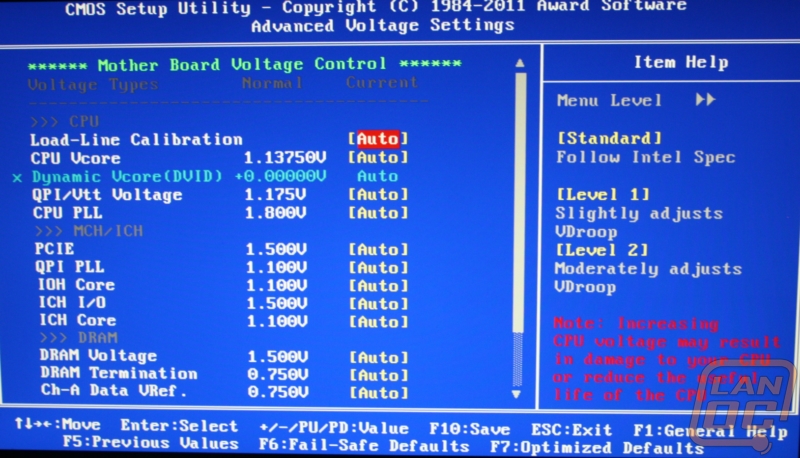
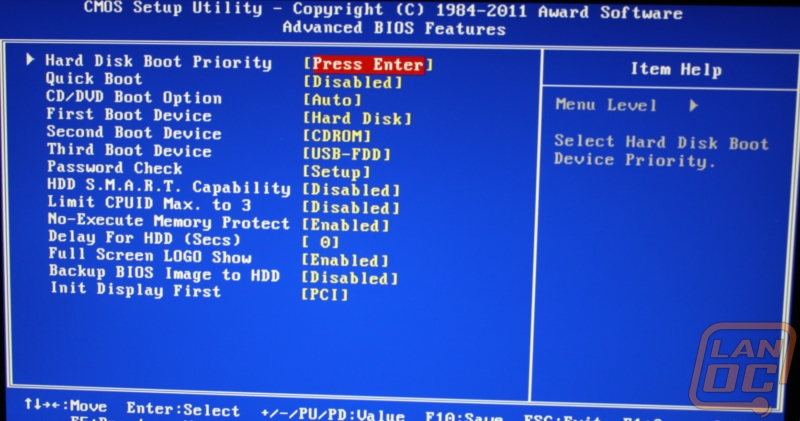
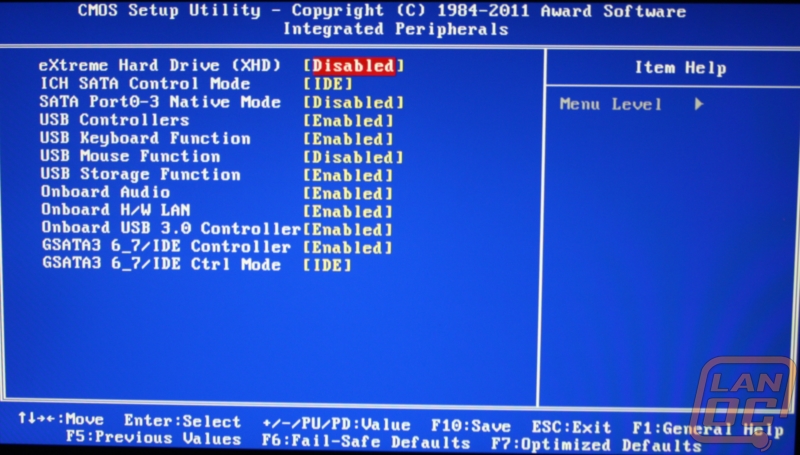
The Assassin has Gigabytes Dual BIOS with support for 3tb hard drives. It’s a little odd that we still don’t see UEFI from Gigabyte but they have done a great job at perfecting their BIOS and I’m sure they don’t want to move to UEFI until its perfect. The Dual BIOS on the Assassin has the exact same setup that we have seen on past Gigabyte motherboards including great overclocking options, even if that wasn’t the focus.

Cooling
For cooling Gigabyte really wanted the G-1 Assassin to stand out, and stand out it does. With each heatsink being modeled after a different firearm each of them has a distinctive but familiar look. Around the LGA 1366 socket each of the heatsinks are connected by a heatpipe, Gigabyte is calling this their Locked and Loaded Heatpipe design. The Northbridge heatsink just below the CPU includes five green LED’s built into its design.
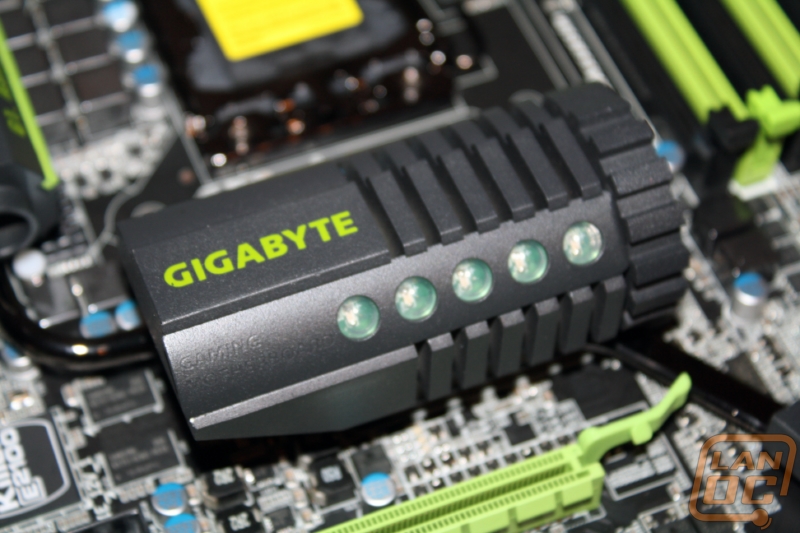
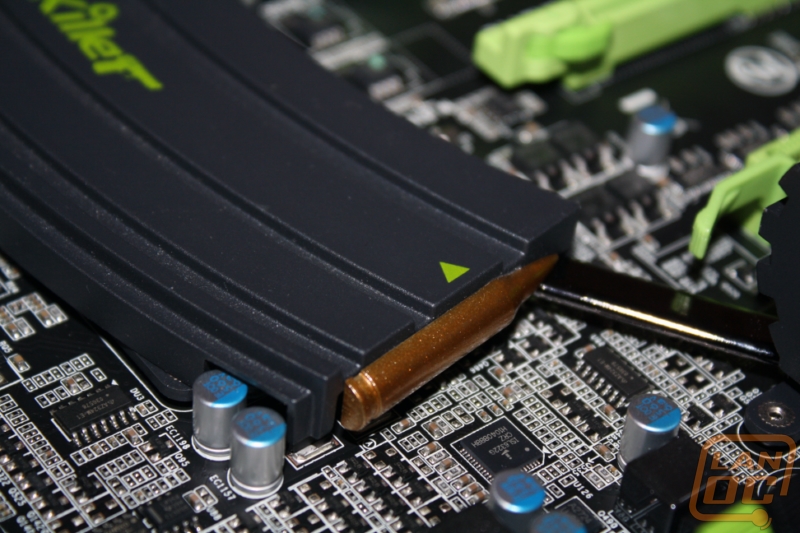
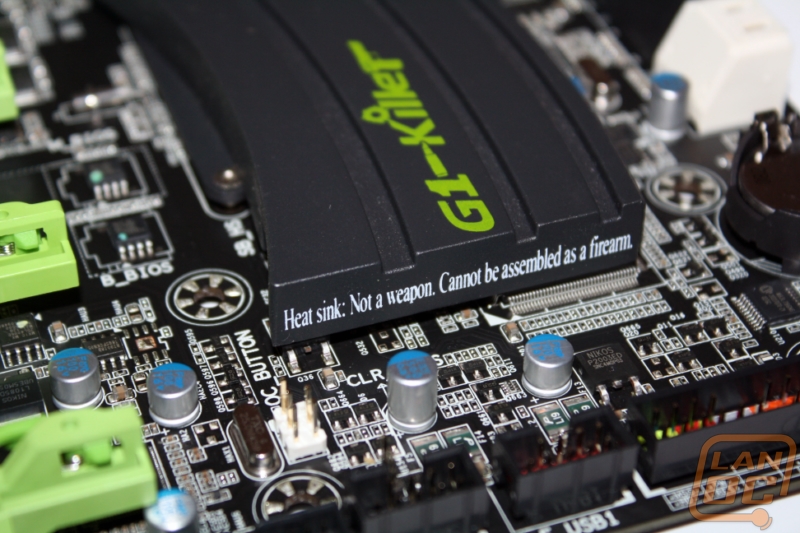
Even though each of the heatsinks is designed after the barrel of a gun, the real jewel is the southbridge heatsink. Keeping with the low profile design that it requires, they designed it into the shape of a ammo clip. The icing on the cake is the round showing on the top. They did such a good job with the design that they felt the need to include “heatsink: not a weapon, cannot be assembles as a firearm” on the bottom of the clip. There goes my dream of piecing together an AK out of my running PC.
It’s obvious they spent a lot of time on this particular part of the motherboard design. For a lot of gamers, performance is important but esthetics rank up there also. Who doesn’t love showing off their rig on the forums and at LAN party’s. The cooling system of the G1 Assassin does a great job of keeping things cool, and keeping your system looking cool also.
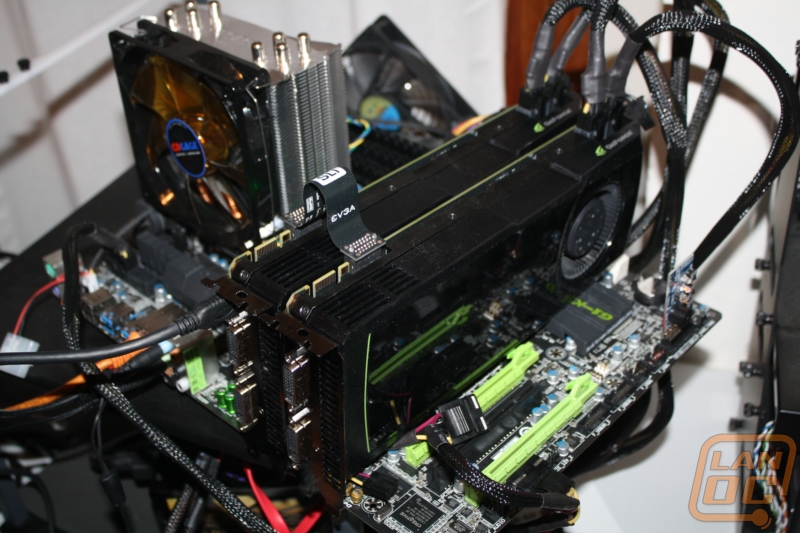
Our Test Rig
Intel i7 930 CPU
Patriot Sector 7 Ram Triple Channel
Seagate Constellation 2tb Hard drive
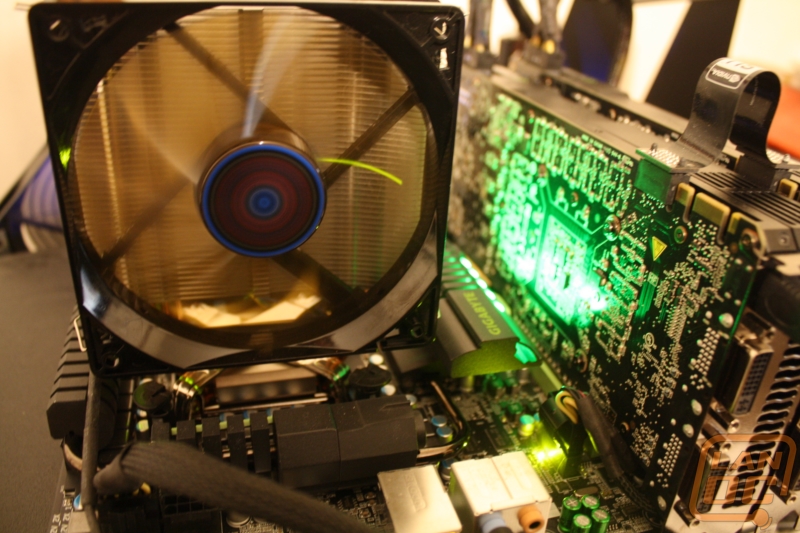
Corsair H50 Water Cooling
Sparkle Gold Class 750 Watt PSU
Sapphire HD6970 BF:BC2 Edition
http://www.highspeedpc.com/ Test Bench
Software
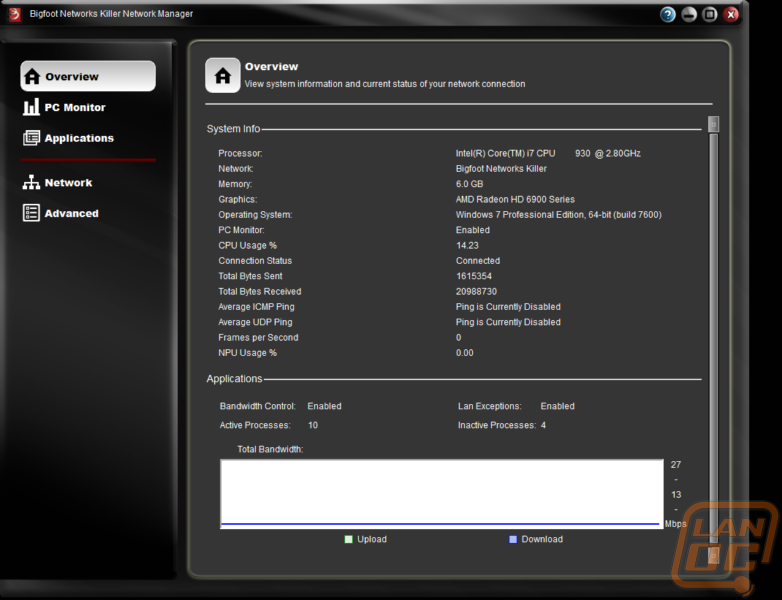
The Assassin came with gigabytes typical collection of software; we have talked about it countless times. This time around I am going to focus on two things, the Killer NIC software, and ZYNGA. Having tested the Killer NIC in our review of the Killer 2100 I knew their software was the most impressive part. Because of that I was excited to see that the software was included in the software pack for the G1 Assassin. As with before, Bigfoot gives you the ability to prioritize each program you are running to give it more or less importance in network traffic. Where this can really come in handy is with torrents and other downloads. You can give your games the highest priority and your downloads a lower priority and your game packets will get first choice when you’re in the middle of that epic battle.
The software also tracks and graphs your internet and network traffic along with ping, FPS, and CPU. You can even see how much of a load that you are putting the network card processor under load. The graph updates in real time and will also let you save a log if you want to show off your FPS, ping, or network traffic.
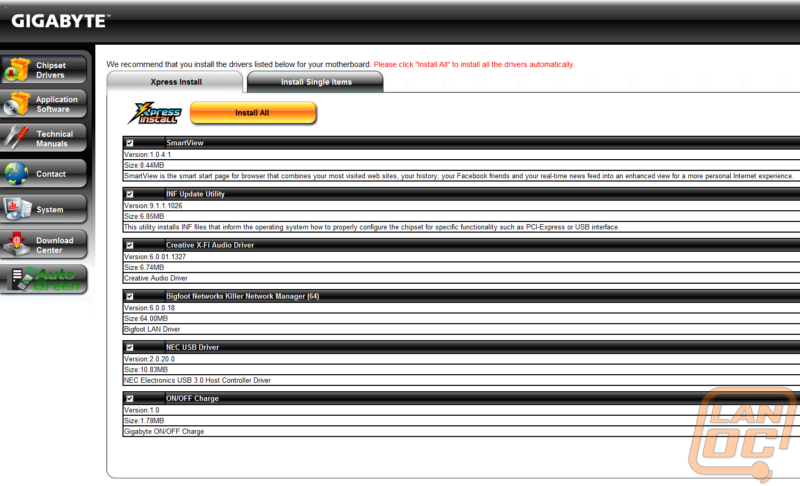
Now with all of that you may be wondering why the other thing I wanted to talk about was ZYNGA… Well I found that if you do the bulk install using Gigabytes software it will installed a link to ZYNGA on both your desktop and also pinned to your taskbar. This wouldn’t be a problem if they both did come back every time you restart the pc. By the end of my testing I had a whole collection of them in my recycle bin. This is amazingly frustrating and shocking that they would include software like that. You can avoid installing it if you don’t do a bulk install, but the average user may not know that. Leaving them stuck with the reappearing links for what could be the life of their PC. As cool as that PC is, that would be very frustrating. If you want to avoid this, you have to manually install each piece of software and ether skip over smartview, or be careful with the options while installing it.
Onboard Bigfoot Networks Killer™ E2100 Game Networking Platform
I have already discussed Bigfoot’s Killer NIC software and how much of a help it can be to prioritize your different programs to optimize your gaming experience. That is only part of the solution, if it was just software anyone would be able to do what Bigfoot is doing. Every Bigfoot product whether it’s integrated like the E2100 on the Assassin or their 2100 PCI card comes with what they call a Network Processing Unit or NPU. The NPU along with the 128MB of ram integrated on the Assassin offloads the network processing off of your CPU onto the NPU. This frees up your CPU to work on more important things, like helping you get that frag.
The other way that Bigfoot sets themselves apart is with the way they treat the Windows network Stack. Rather than going through the typical network stack Bigfoot bypasses it all together to give them full control of every aspect of your network traffic and to see things up by avoiding multiple windows operations to classify, sort, and prepare the data. The best part about all of this being packed onto the Assassin and other G1 Killer motherboards is this keeps all of the PCI Express slots open for you to run as many video cards as you can pack onto the board, all while having Bigfoots gaming optimized network performance. Not a bad deal if you ask me!
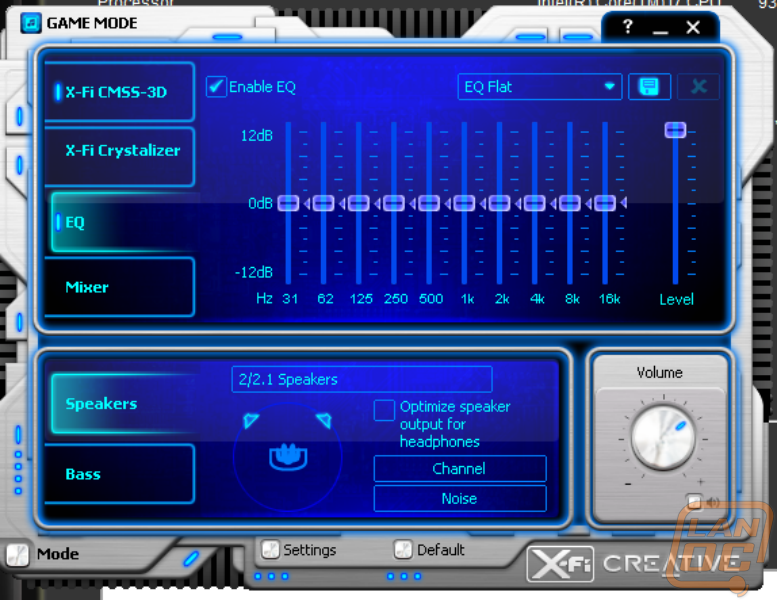
Onboard Creative Sound Blaster X-Fi Digital Audio Processor (20K2)
I spoke about it before when going over the board layout but It’s important that I go over what Gigabytes “Super Hearing” is all about. Like the Bigfoot NIC that I just covered the X-Fi Digital Audio Processor was designed specifically to both outperform any of its competitors, but also designed with gaming as its top priority. That is why Gigabyte chose to integrated it onto the G1 Killer line of motherboards. The other benefit of integrating the X-Fi is keeping the PCI slots open for multiple video cards, just like their use of the Bigfoot Killer NIC.
Although in my opinion Creative’s EAX audio technology is dead, the X-Fi does include it, giving you the ability to put it to use on EAX compatible games. It’s really disappointing that EAX isn’t included on more games, the technology makes for a more realistic gaming experience pulling you into the game with 3D audio and the ability to have up to 128 different sounds at the same time.
When you’re not in game X-Fi CMSS gives you Virtual 3D Surround on your MP3’s and digital movies. The inclusion of the front audio headphone amplifier is also a great feature for both games and anyone who enjoys high quality audio on a set of headphones. The amplifier itself is a high capacity amplifier that is able to drive 150 ohm loads to give you a full range of crisp high end audio. Along with the headphone amplifier they included four others for your rear audio connections. To support the Creative audio and the amplifiers they used the highest quality Nichicon MUSE ES series and MW series Bi-Polarized audio capacitors for each channel. Although they look like the low quality capacitors we have seen on low end motherboards in the past, they really are some of the best that you can buy for top quality audio use.
Our Testing Procedures
All of our in game performance testing was run at 1920x1080, you can see the exact settings below. Here are the details for each of our tests.
Call Of Duty Black Ops (1920x1080 – high settings, first scene starting after the cut scene, recorded using fraps)
Battlefield Bad Company 2 (1920x1080 – high settings, first scene starting after the cut scene, recorded using fraps)
Dirt 2 (1920x1080 – 4x MSAA – high settings, in-game benchmark)
Metro 2033 DX11 test (built-in benchmark, 1920 x 1080; DirectX: DirectX 11; Quality: Very High; Antialiasing: MSAA 4X; Texture filtering: AF 4X; Advanced PhysX: Enabled; Tessellation: Enabled; DOF: Disabled)
Metro 2033 DX10 test (built-in benchmark, 1920 x 1080; DirectX: DirectX 10; Quality: Very High; Antialiasing: MSAA 4X; Texture filtering: AF 4X; Advanced PhysX: Enabled; Tessellation: Enabled; DOF: Disabled)
Mafia 2 (built-in benchmark, 1920x1080, PhysX on, high settings)
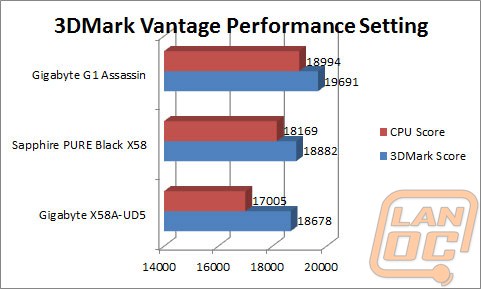
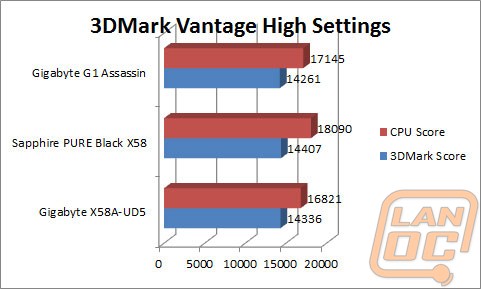
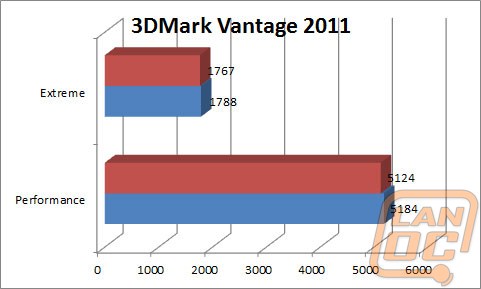
Synthetic Benchmarks For motherboards our synthetic benchmarks are limited to 3DMark Vantage, 3DMark Vantage 2011,and PC Mark Vantage. 3DMark Vantage is run with PPU turned off with results from both the performance and high settings. In 3DMark Vantage 2011 we run both performance and extreme benchmarks. PC Mark Vantage is set to its default setting.
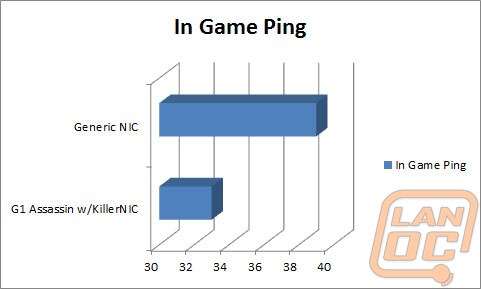
In game Ping testing was done using TF2 on two similarly configured PC’s on the same network at the same time connecting to the same server.
Performance
There are a few perks to my job and one of them is getting to benchmark and test a gaming motherboard in game while still getting to tell myself that I am being productive. I started my testing on the Gigabyte Assassin with all of the synthetic benchmarks knowing that if I did the in game testing first I may never finish. I tested using the procedures listed above, you are welcome to double check my “work”, lol.
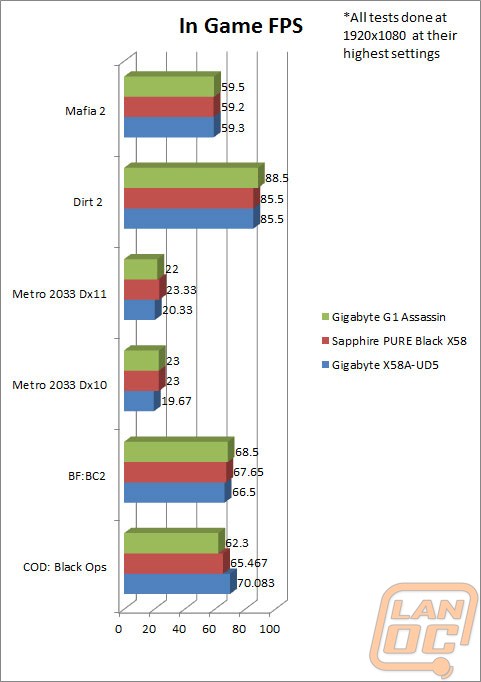
Our standard set of in game benchmark’s showed performance very close to other X58 boards. The same could be said for PCMark’s tests with one exception, gaming. The standard 3DMark Vantage results using the performance setting showed a similar jump but other tests showed the opposite. That just goes to show you what we have said before in the past that you really won’t see a jump in performance when switching motherboards. It’s all about the boards features and layout. We do still do all of our testing just to make sure there isn’t a glaring issue, and as you can see the G1 Assassin had none.
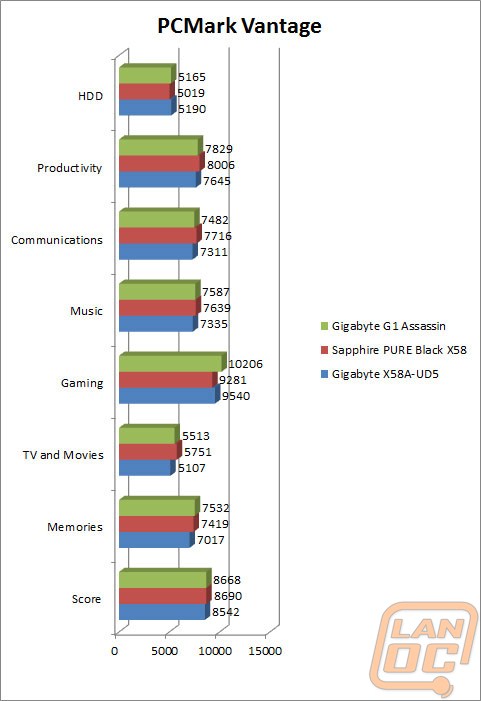
Where Gigabyte made the G1 Assassin shine was with the built in Killer NIC and Creative sound card. Our testing of the Killer NIC showed similar results to what we have seen before. You will see a small drop in pings but it’s nothing that will affect the average user. That six ping drop could be the difference between getting the kill or getting killed in a competitive match though. More importantly I was able to take advantage of the Killer NIC’s software and give my games priority over other internet traffic like torrents and game downloads. This was very obvious when I was able to download a large file and still enjoy a nice game of Black Ops without any issues with lag. THIS is where the Killer NIC earns its price; something that I don’t think is pointed out enough when people are quick to put it down. When I did offline testing I saw a more noticeable difference between the bigfoot NIC and a standard NIC. Although my Ping improvement was similar to what I saw online, this time it was clear that the Killer NIC’s ping was more stable. I’m sure this is a testament to the network processing being offloaded off of the CPU.
My testing of the Creative Soundblaster X-Fi Digital Audio Processor and the five amplifiers that Gigabyte packed onto the Assassin consisted of both in game testing along with music and Blu-Ray testing. In game, using my LanOC orange Steel Series Siberia v2 I found the amplifier helped immensely in listening to the details. Small sounds like footsteps and the location of faraway gun fire were much easier to hear when compared to the same headset on our other test rigs. The audio quality overall was worlds better than other on board solutions, I found it difficult to stop listening to music once I started. The inclusion of the X-Fi audio onboard was a considerable improvement over what you would normally expect from onboard audio putting the G-1 Killer line ahead of almost every motherboard on the market for audio quality without the need to take up a PCI slot with an aftermarket sound card.
I mentioned it earlier but during testing I hooked up the drive bay device that Gigabyte includes with the G1 Assassin and put it through its paces. I found this to be extremely helpful as most of our cases around the office do not include USB 3.0. The two front ports it adds makes hooking up a USB 3.0 flash drive or hard drive a lot easier. In the past we have had to plug into the back, something that can be a pain when the PC is on the floor. For those of you who don’t have many or any USB 3.0 devices the eSATA/USB plug may also come in handy. The overclock button included on the front panel is also very cool and reminded me of the old turbo buttons you would find on early PC’s but this time around the button gives you a performance boost that may help you get the edge in the middle of a fire fight.
Overall
In a market where almost every X58 motherboard is the same Gigabyte was able to make the G1 Assassin stand out in a crowd. Their attention to detail with the cooling system puts the entire G1 Killer series of motherboards into a class of their own. With a list price of over $500 it is a hard sell on a platform that is over ¾ through its life cycle, but the Creative audio and Killer NIC integration really do give you more value. A lot of people will question why Gigabyte decided to launch this on the X58 platform over the never Sandy Bridge, Gigabyte explained to us that they felt the gamers would need the extra bandwidth on the PCI Express slots that X58 can afford, for more video cards. While that may be true, it’s still going to be a hard sell for a lot of people to go with an LGA1366 CPU over a cheaper and sometimes faster LGA 1155. Because of that, I hope we see AMD and Sandy Bridge variations of the G1 Killer lineup soon. Gigabytes first attempt at a full gaming focused board hits the nail on the head in almost every way, I can’t wait to see what they do next.