 One of the best parts about CES is that we get the chance to catch up with companies like Cooler Master and take a peek at what they are toying around with behind the scenes. This year they had an interesting case that at the time they called a LAN case. This struck a tone for me because of a fundamental issue I had with the case being for LAN use, its size, and I let them know it. Over 10 months later the HAF XB is sitting here in the office, with an improved design and a more appropriate focus. The HAF XB is considered a case / test bench. Those of you who like to tweak and play with your builds may have just perked up. The HAF XB is a completely new form factor for Cooler Master; considering their past win’s this should be interesting. Maybe even game changing?
Product Name: Cooler Master HAF XB
Review Sample Provided by: Cooler Master
Written by: Wes
Pictures by: Wes
Specifications
|
Materials |
Steel Body, Front Mesh / Polymer Bezel |
|
Dimensions (W / H / D) |
456 x 330 x 423 mm / 18” x 13” x 16.7” |
|
Net Weight |
8.2 kg / 18.1 lb |
|
M/B Type |
Mini-ITX, Micro-ATX, ATX |
|
5.25” Drive Bays |
2 |
|
3.5” Drive Bays |
2 (2 from X-Dock) |
|
2.5” Drive Bays |
6 (2 from X-Dock) |
|
I/O Panel |
USB 3.0 x 2 (internal), Audio in and Out (supports HD Audio) |
|
Expansion Slots |
7 |
|
Cooling System |
Front: 120 mm black fan x 2 |
|
Power Supply Type |
ATX PS2 / EPS 12V |
|
Maximum Compatibility |
CPU cooler height: 168 mm / 6.6” |
Packaging
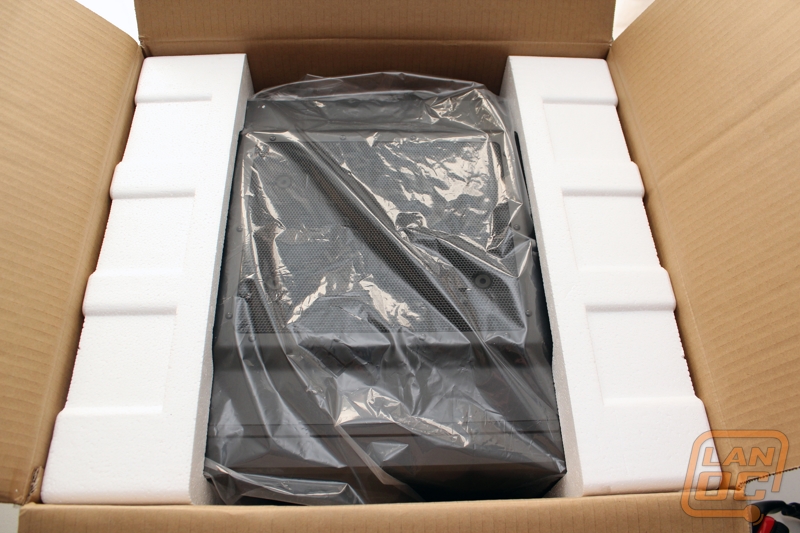
Unlike what we normally see, the HAF XB came in without its normal packaging. Due to this we only have the packaging photos from Cooler Master to go off of for the exterior. Inside our box is what you will see in the production packaging. The case is wrapped up in a plastic bag to keep it clear and free of finger prints and then you have foam on each side keeping it secure while protecting it during shipping, just like any other case really.
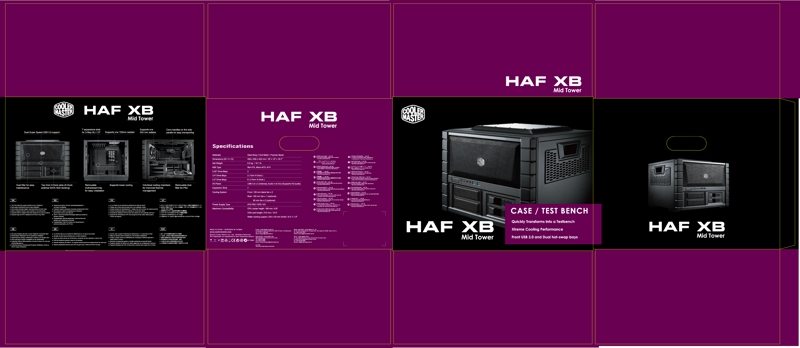
A quick look at the packaging you will see, being a normal Cooler Master product you get the purple themed packaging. The front of the box has a large photo of the XB on it showing off bot its front panel with hot swap bays and the carry handle on the side. They put a handy specification listing on the side that even includes maximum compatibility for CPU heatsinks, video cards, and even water cooling. The back of the box has a few more details pictures of the case including with the top and side panels off to give you a better idea of what is going on inside.
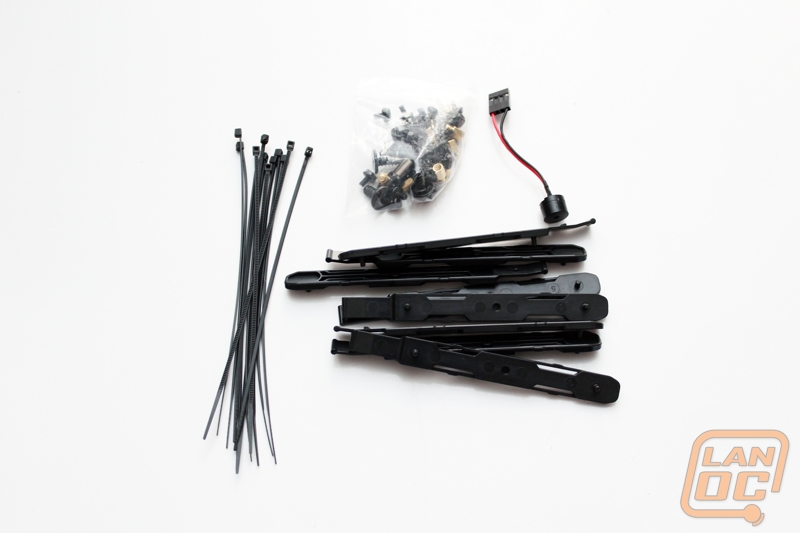
As for accessories included with the case, you are getting a small box secured inside of the case itself. Inside you have a small baggy of screws, a motherboard speaker, hard drive/ssd slider mounts, and very small black zip ties.
Outside
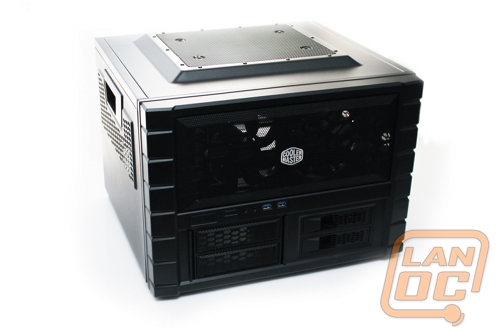
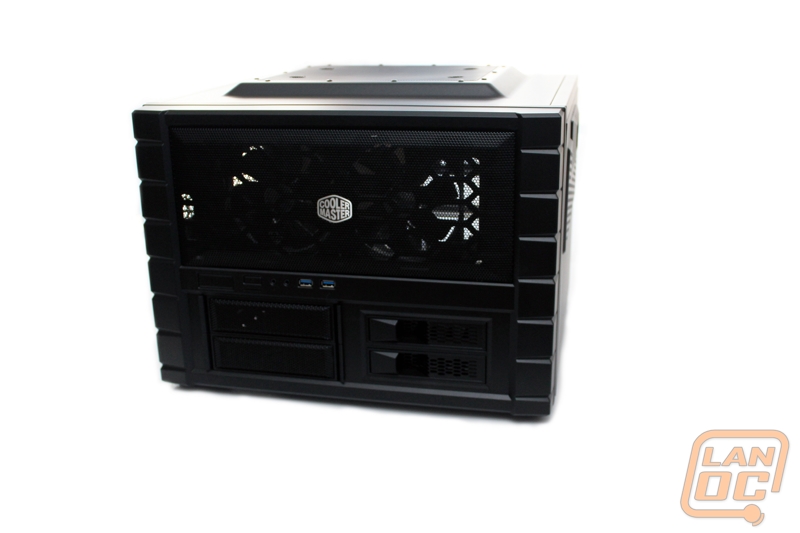
What makes the HAF XB stand out from everything else that we have had come into the office is its unique shape. With dimensions of 18 inches wide 13 inches tall and 16.7 inches deep its actually considerably wider than tall or deep. There are only a few cases with a similar size, almost all of them are actually open air test benches, and Danger Den also makes their water box in all acrylic. That is where the HAF XM is a little different. Cooler Master calls it a test bench / case. It has the layout of a test bench but gives you a full shell and case features like power buttons and front USB 3.0 ports.
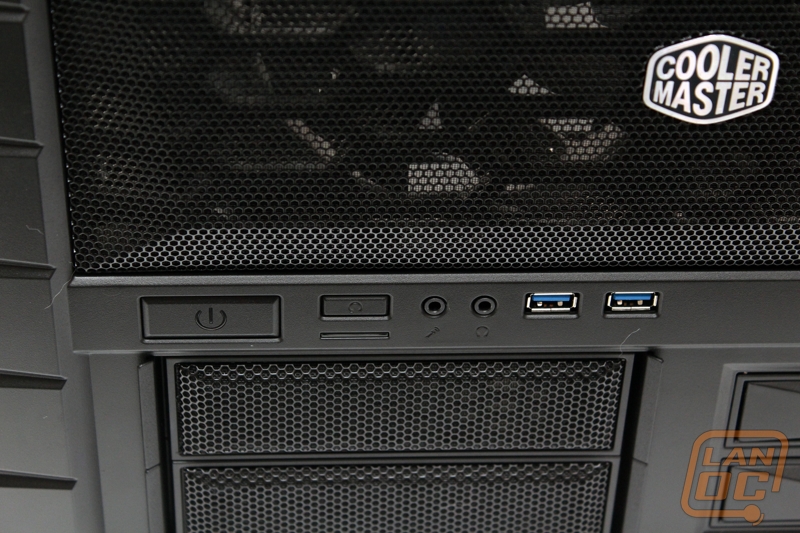
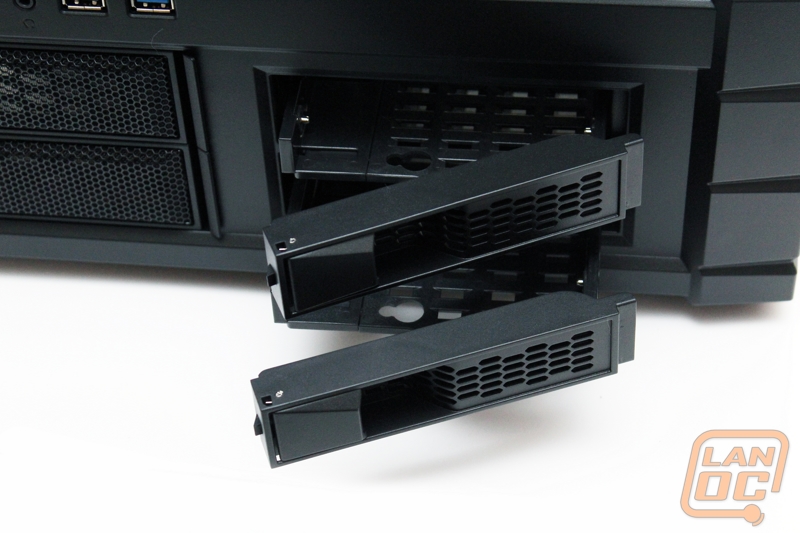
Around front you have the full HAF treatment with its industrial look. You can see the case’s two front mounted 120mm fans through the large mesh area on the top half of the front. Below that you have the front I/O panel with two USB 3.0 ports, audio connections, and then large power and reset buttons. Unlike other cooler master cases, the power and reset buttons have a very short throw, previous cases normally require being pushed in farther for them to turn the computer on. The bottom half of the front houses two 5.25 inch drive bays and two hard drive hot swaps. They all have mesh covering them, so when they aren’t in use they provide extra ventilation.
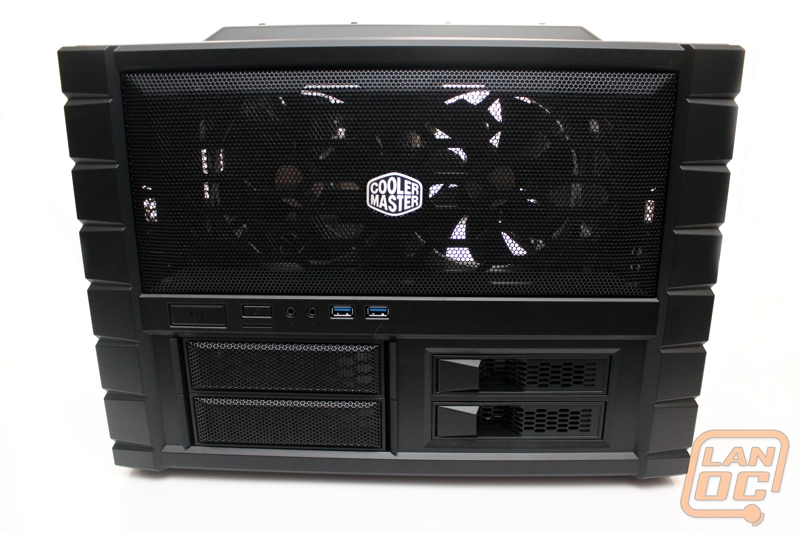
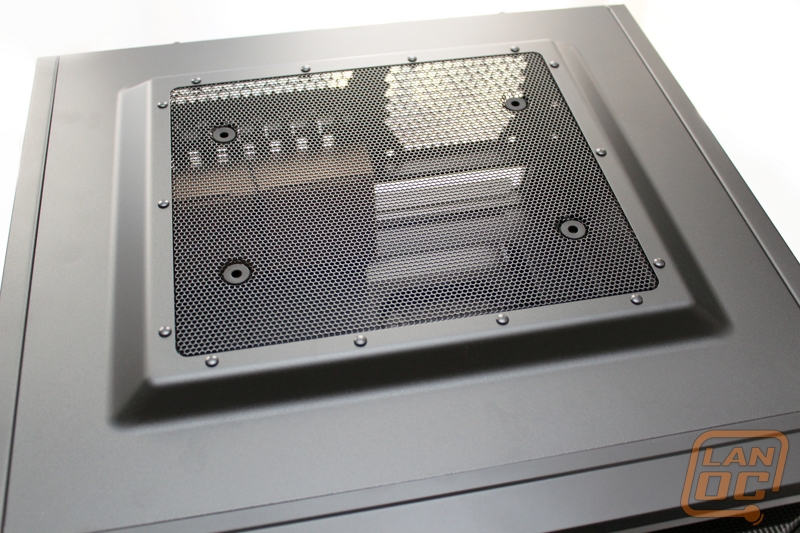
Up top I am reminded of the side panel on the Storm Sniper with a raised section and mesh. You can see a few extra fan mount holes on the panel as well.
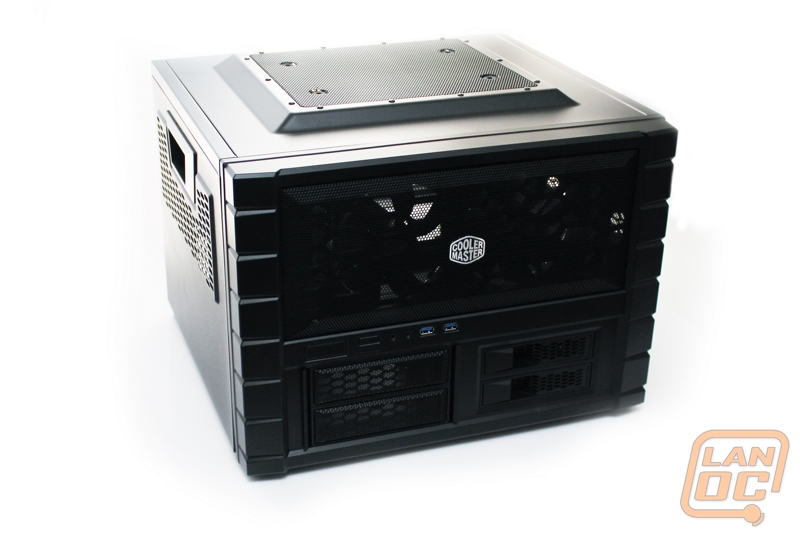
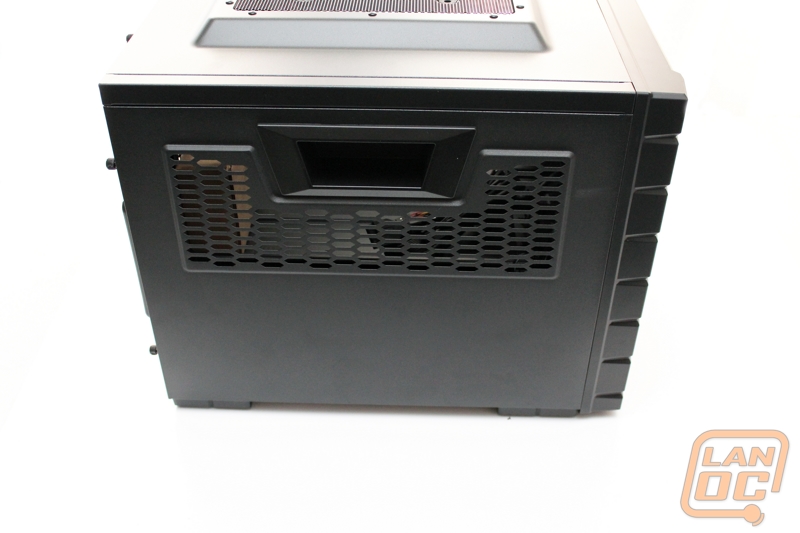
Both sides of the case are mirrored and share the same ventilation covering half of the side panel. Both side panels also have carrying handles built into them to make the XB easier to move around as needed.
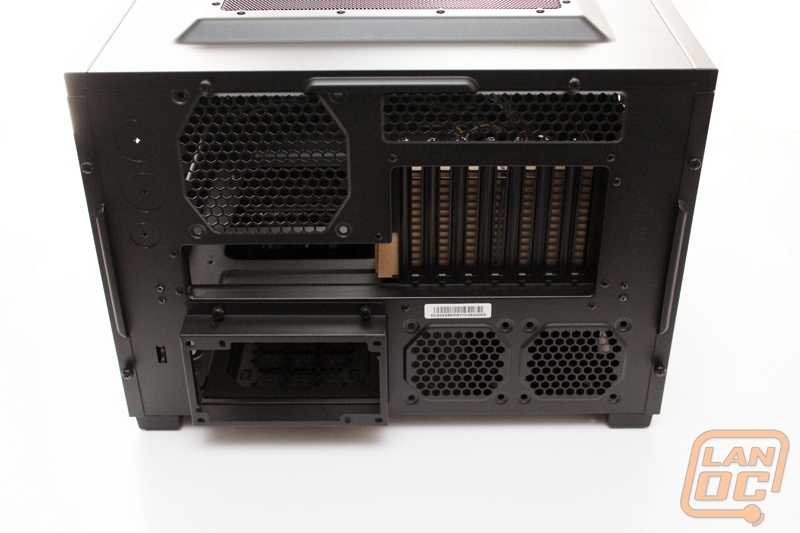
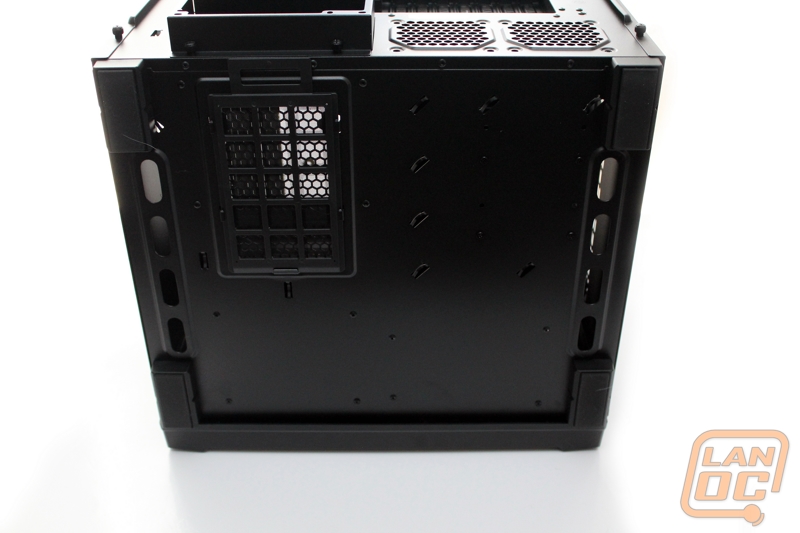
Around back we can finally start to see the XB’s layout. The power supply uses a bracket that sticks out of the back of the case a little under an inch. We have seen this before; it’s great that you can install the power supply from outside of the case. But I always feel like it was a little bit of an after thought with it sticking out like that. There are three fan vents, one 120mm and two 80mm as well as a vent over top of the PCI slots as well. Speaking of the PCI Slots you have 7 total, with each being vented as well for the maximum airflow. If you need water cooling or if you have a motherboard that doesn’t support internal USB, Cooler Master did leave holes for those as well. But unlike the past they have left the knock outs in for now, giving the case a cleaner look, unless you actually need them.
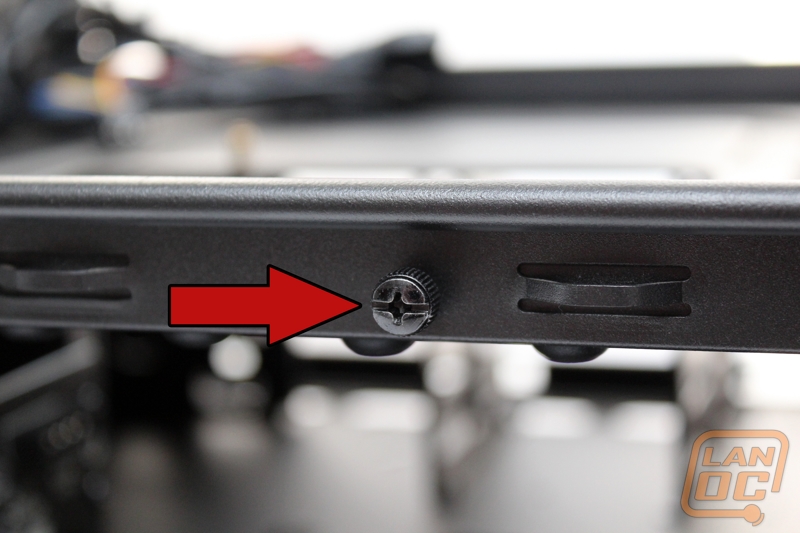
You can also see from here how the top and two side panels all slide off after removing their thumbscrews.
The bottom of the XB is much like any other case on the market, just considerably wider. Each corner has large rubber feet to keep the case firmly planted no matter what. You can also see the removable filter that slides in under the power supply as well. Ironically because of the power supply bracket, the handle is hard to reach without lifting the case up. It’s a good thing you shouldn’t have to get to it often.
Inside
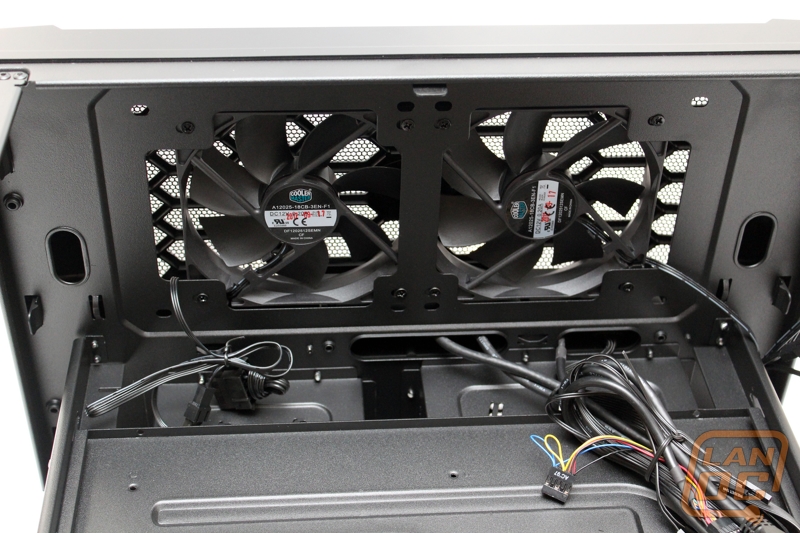
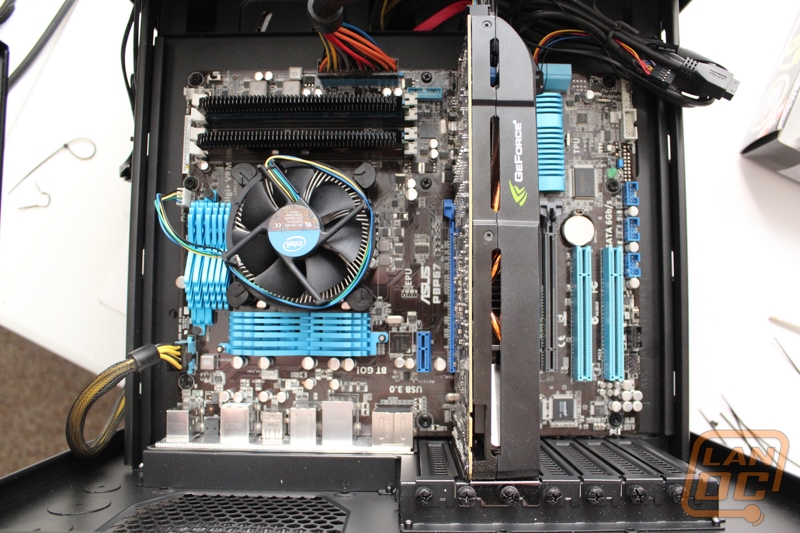
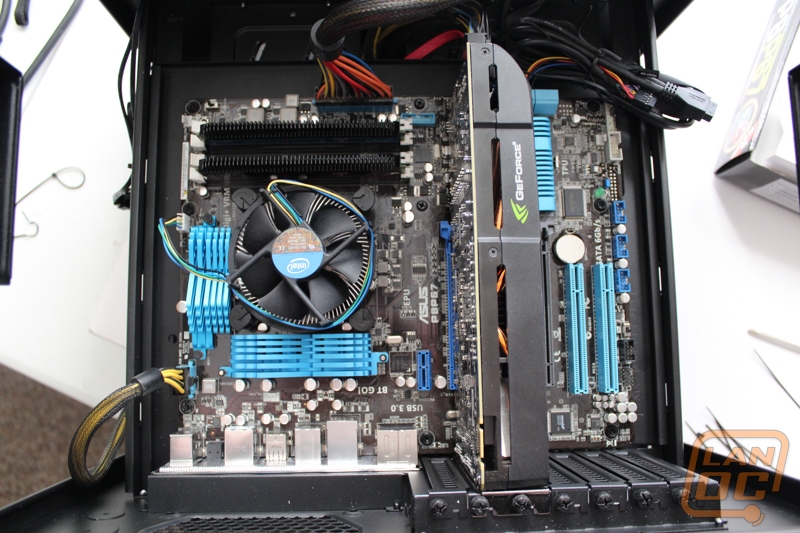
The HAF XB, as I mentioned earlier, is a case/test bench. This is much clearer after we started taking the side panels off. First unlike most cases you have three side panels rather than two. This leaves the case more open and accessible like a test bench. Starting from the front, on the top half of the case you have two 120mm fans that do all of the cooling and low air over the motherboard. If you look close there are mounts for 140mm fans if you would like and there is just enough room to run a 240mm radiator here if you would like as well.
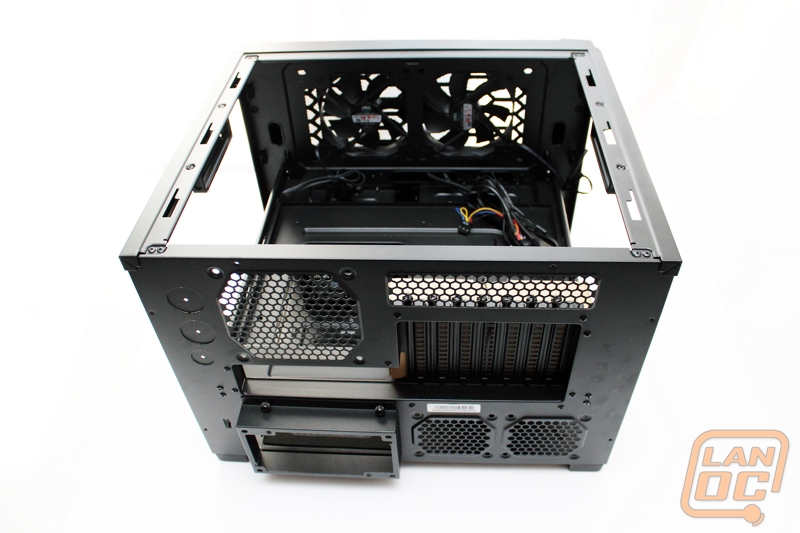
This angle shows the two different levels very well. As you can see here half way up the case there is a second level where the motherboard tray is located. The motherboard tray also has a very large motherboard cutout, so large incase that is actually bigger than a mini ITX motherboard. This means you shouldn’t have any trouble getting to the back of any CPU to install a heatsink backplate.
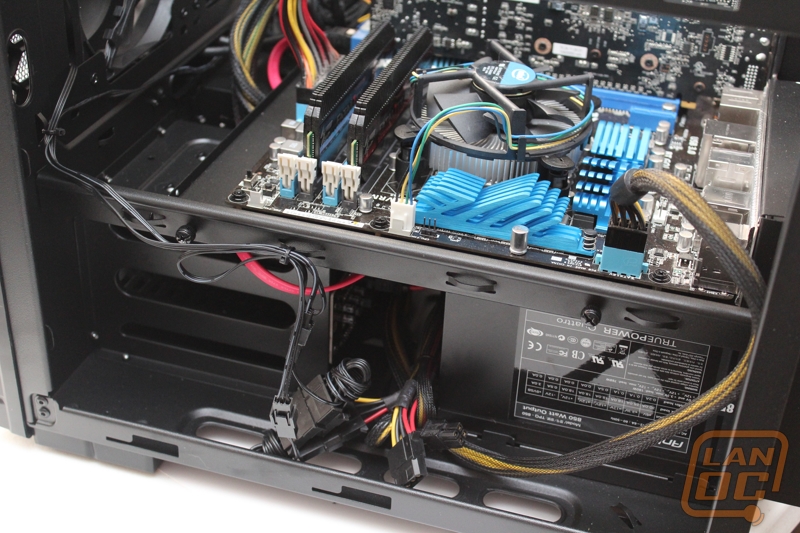
Under the motherboard tray they have tucked away all of the other goodies like the PSU and drive and disk mounts. The first thing that will catch your eye is the built in hot swap. You can see that this is a little tight up against the PSU in our photo here, we will find out in testing if this is really an issue.
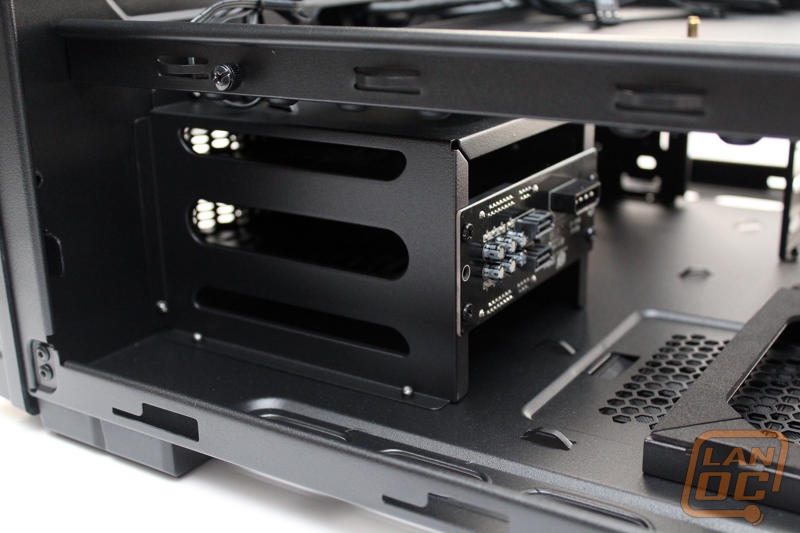
The PSU mounting location includes a padded base that both prevent vibration and helps pull air from under the case rather than inside of the case.

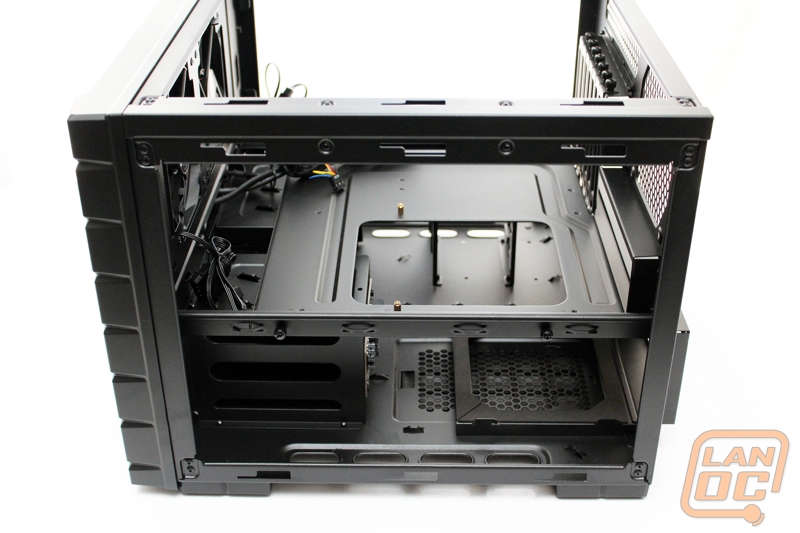
Over on the other side of the case you can see the two 5.25 inch drive bay mounts. Cooler Master did include their typical tool-less mounts to make swapping these in and out easy. I also love that there are a couple well placed zip tie tabs just behind the drive bays to help you keep your wiring very clean as well.
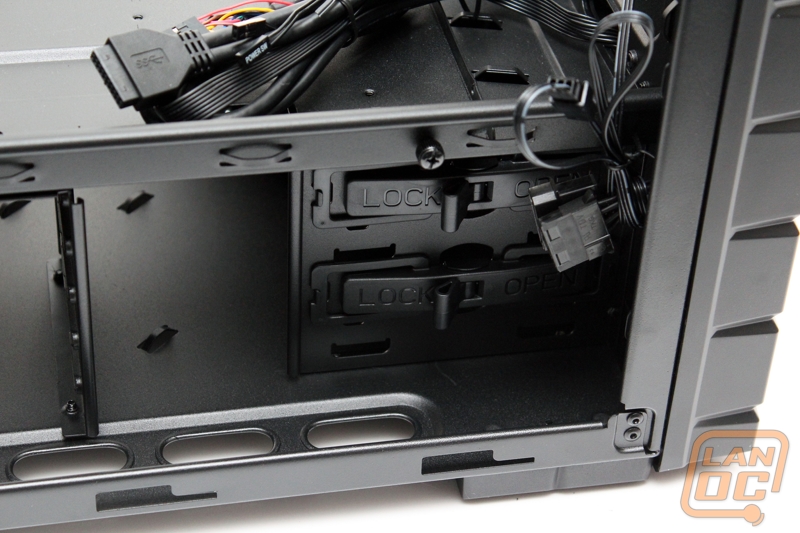
Behind the 5.25 inch base there is a second hard drive rack, this time specifically for 2.5 inch drives. This puts our total drive capacity’s at two 5.25, two 3.5, and 4 2.5. Cooler Master lists the 2.5 inch drive capacity at 6, but this is counting if you use the two 3.5 bays. This rack isn’t a hot swap but is still easy to use. It uses sliders placed on each side of the drive, it then just slides right in and snaps into place. Getting to the back to plug the drives in could be an issue though, we will see during our installation.

I mentioned before the motherboard tray. Something I didn’t point out is that it is actually removable. Cooler Master used four thumbscrews around the tray to keep it secure but once removed the tray picks right up and makes motherboard installation much easier. They also put the small zip tie tabs along the motherboard tray mount for better wire management as well.
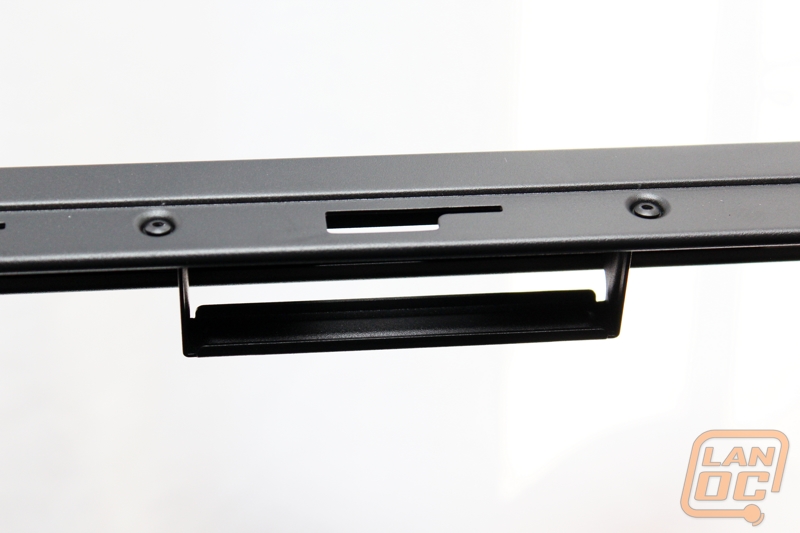
I mentioned before that there are the carrying handles on the outside. At first I was a little concerned with picking the case up by its side panels. But after seeing inside, I found this on each side. They have given those handles full support with a small bracket to push the weight onto the frame itself. Nice job Cooler Master!
Installation/Performance
Test Rig
Asus P8P67
Intel heatsink
Seagate 1TB hard drive
OCZ Fatality 1600MHz DDR3 RAM
Antec 850 Watt Power Supply
When putting all of our build together in the HAF XB, I wasn’t sure what to expect really. I spend almost every day working with our test benches and the reason for going with test benches over normal cases is the ease of access and quick swapping that they provide. With Cooler Master advertising this as a test bench case, I was hoping installation would be as easy as in a test bench. To Start things off, I pulled off the side panels and removed the motherboard tray to open everything up. I went ahead and mounted our motherboard onto the tray while it was out. I noticed a few things while doing that. First, Cooler Master used nice black screws that don’t use the same thread type that some other cases use. They also didn’t preinstall most of the standoffs meaning I had to spend a little extra time installing them all. I don’t expect them to install them all, but the standoffs that match on both micro ATX and ATX would have been nice.
With the motherboard tray out I had full access to the bottom half of the case, something I was a little worried about when I first took a look at the case. I went ahead and installed our hard drive in one of the hot swap bays and put in the power supply as well. From here, because we didn’t need a DVD drive, I started wiring. The space between the power supply and the hard drive hot swap was tight as I expected. Because of this I did most of the wiring before I mounted the PSU. The zip tie tabs all over the case made a very big difference on keeping the wiring clean in a case that doesn’t have anywhere to hide extra wiring. Because of the lack of hiding places, I would still recommend going with a modular power supply. I routed all of the cables we would need up to the top, there is actually a lot of room in most cases, like with the 8 pin CPU power connection. There was room between the side panel and the motherboard tray mounts.
With all of our wiring ready dropping in the already mounted motherboard, cpu, and ram combo was as simple as the four thumb screws. This just left installing the video card and hooking up our wires to the motherboard itself. The video card installation was just as easy as you would expect, I am still a little unsure about the decision to have the motherboard tray not include the PCI slots, just for easy removal. Because of that when you want to remove the motherboard you will need to uninstall the video card first. Because we are actually planning on using this as a test bench for one of our writers in the future, I verified the length of each of the front panel connections, but I tied them all back up other than the power button. This is simply just to keep it simple when removing the motherboard tray, less to unhook and hookup. I can say that each cable has enough length and I love that they went with the black colored USB 3.o connection as well; the bright blue cables tend to stand out a little too much IMO.
With everything installed I had a little time to play around with everything. I was impressed with the cooling on the top half of the case with the two 120mm fans; this is actually a lot of cooling considering this is only for half of the case. I do think the case could benefit from a fan down on the bottom half if you end up installing a lot of hard drives. Because I would expect there to be only a few considering the XB’s two 3.5 drive bays, there shouldn’t be an issue. Noise wasn’t bad as well, at least when it comes to the case. Our PSU was especially noisy, but the rest of the build was extremely quiet. I think that as a test bench the HAF XB is going to make life easy for a lot of people. Accessing the back of the motherboard for CPU installation is still a little tough; a standard case actually gives a little easier access because you don’t need to remove the motherboard tray at all.
As a case, I really love its functionality. The carrying handles come in handy for moving the case around. I also found that the size is great for home use. I still think that because of the amount of space it takes up that you are going to have a hard time at LAN parties though. We set it up with a 23 inch monitor, keyboard, and mouse on half of a 6 foot table and couldn’t get it all to fit correctly, specifically the monitor. To me that is by far the cases biggest flaw. I did think of a solution to this. Imagine if you could set this case on its side when needed, it would fit just fine then.
Overall and FV
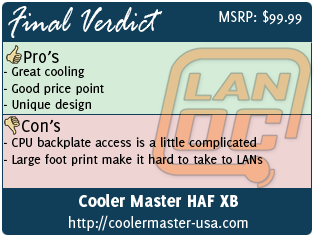
I really think Cooler Master is onto something here with this design. The layout isn’t really anything new when you considering last test bench designs. What makes it unique is that it is a real case. This means you have easy access to swapping out products as needed but when not swapping things out you can just toss the top and side panels back on and enjoy the perks of a normal case like quietness and better protection for your components. The case isn’t without its flaws, I really think they should have considered making the motherboard tray and PCI slots one piece to prevent you from having to remove the video card each time you need to swap something out. There is also the issue with the case’s size as LAN ‘s with a table size of 3 foot. My solution of turning the case on its side actually had me very interested in just seeing a HAF XC with this exact layout, but turned on its side. This would be a wide but short case design that might be the best of both worlds. Working with the HAF XB otherwise was great. Cooling and noise was great and the side panel handles were a great idea!
What really impressed me the most about the HAF XB was its price. At Under $100 MSRP, this is a good case with a large list of features. Things like the front panel USB 3.0 ports costs money and drive up the costs normally. I expected a slightly higher price point because of that, but I think Cooler Master priced this in a way that should bring in a lot of interest to this unique case design.


")
